Use TrueCrypt to protect your data.
“Encrypt Your Temp Folder” [Hack #33] showed how to encrypt files using the Windows EFS, but it also touched on some problems with EFS, such as lack of support for the same algorithms across all versions of Windows on which it’s available. One other big caveat is that the keys used by EFS are attached to your user account, so it leaves you unable to access the files on another system unless you decrypt them before moving them there.
Another good solution for seamless file encryption under Windows is TrueCrypt (http://www.truecrypt.org). With TrueCrypt, you can choose either to create an encrypted disk volume (a container file) or to actually encrypt a whole disk device (USB memory drives are especially good for this). In addition, TrueCrypt supports a wide variety of encryption and hashing algorithms. What’s more, it runs under Linux and it’s free.
To set up TrueCrypt, download the .zip file from the project’s download page, unzip the archive, and launch the installer: TrueCrypt Setup.exe. The installer features all of the options that you’d expect. You can choose whether to install it for your own account or for all users on the system, whether to create Start menu and desktop icons for it, where to install it, and a variety of other options.
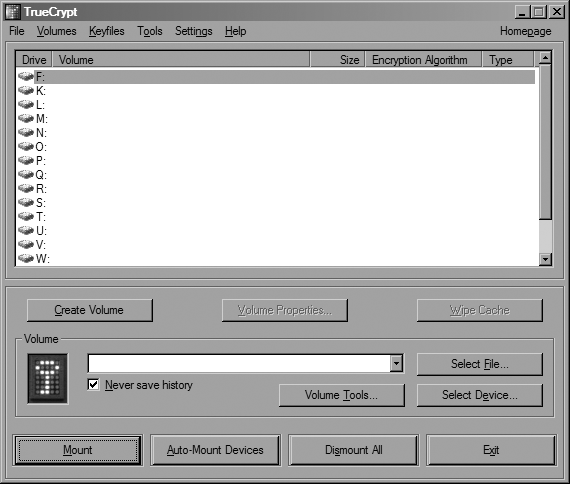
After you’ve installed it, launching TrueCrypt brings up the window shown in Figure 3-2.
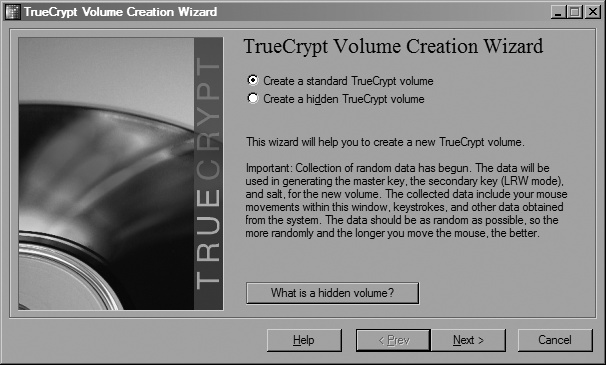
This window lists all currently mounted TrueCrypt volumes. Since you’ve just installed it, you won’t have any, so now it’s time to create one. Click the Create Volume button to launch the Volume Creation Wizard. You should see the window shown in Figure 3-3.
The first option you’ll be presented with is whether to create a hidden volume—one of the coolest features TrueCrypt has to offer. A hidden volume allows you to create an encrypted disk volume (the outer volume) with one password and hide another volume (with a different password) within the free space of the outer volume. This allows you to disclose the key to the outer volume if you’re compelled to do so, but still leave the hidden volume undetected. The only major drawback to doing this is that the outer volume must be formatted using the FAT filesystem. However, the hidden volume can be formatted as either FAT or NTFS.
If you choose to create a hidden volume, you can either do so within a FAT-formatted volume that already exists, or choose to create a new outer volume and hidden volume. Whatever you decide, you’ll still be going through the same volume-creation process used for standard volumes (you’ll just do it twice in the latter case), so we’ll cover creating a standard volume here.
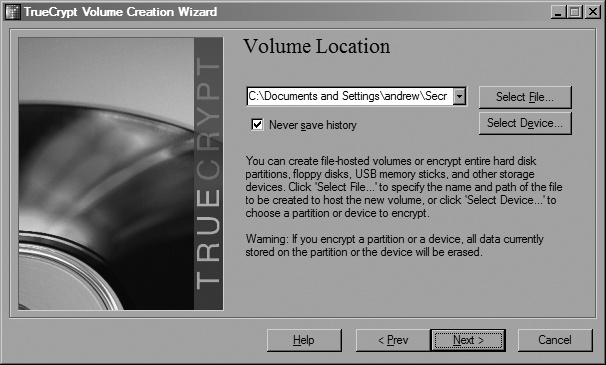
Select the “Create a standard TrueCrypt volume” radio button and click Next. You should now see the dialog shown in Figure 3-4.
Here is where you can select the location of the container file where you want to store the encrypted disk image or which partition you want to encrypt. For now, try out a container file. Enter a name for your container file, and click Next.
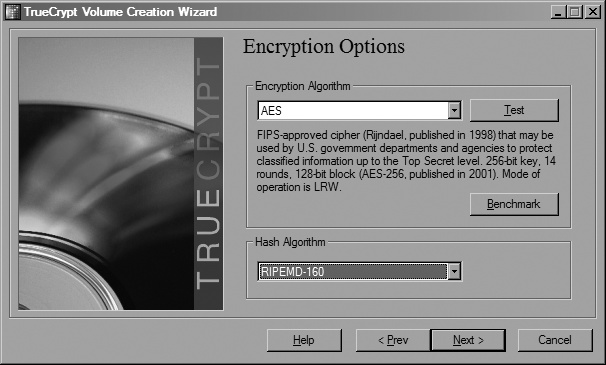
You’ll be presented with options for what algorithm to use for encryption and which hashing algorithm to use for generating the encryption key. In this example, Figure 3-5 shows that AES will be used for encryption and RIPEMD-160 will be used to generate the key.
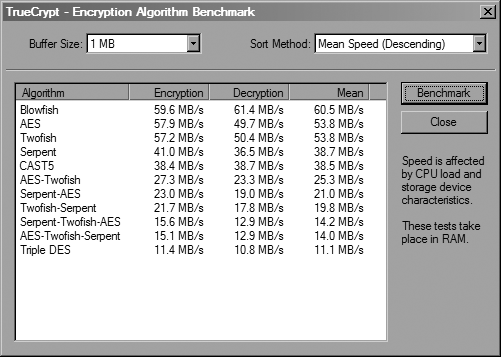
If you want to see what encryption algorithm will likely yield the highest performance, click the Benchmark button. After the benchmarking window pops up, click the Benchmark button to display the screen shown in Figure 3-6.
On the system used here, it might be worthwhile to choose Blowfish instead of AES, because Blowfish is significantly faster at decryption. Once you’ve chosen which algorithms to use, click Next. You’ll then be able to specify the size of the encrypted volume. Of course, if you’re creating a hidden volume, you won’t be able to make it any larger than the outer volume in which it’s located.
After specifying the size, you’ll be prompted to set a password. Then it’s time to format the volume. Choose either NTFS or FAT and specify the cluster size to use, and then click Format. After TrueCrypt finishes formatting the volume, follow the prompts to exit the wizard.
You can now go back to the main TrueCrypt window and select the encrypted container file or the device that you encrypted. Once you do that, click the Mount button. You’ll be prompted for your password. If your password is accepted, you should see the details of the volume listed in the topmost pane of the window. Just double-click the drive letter to open it in the Explorer shell.
