Windows XP SP2 turns on the Windows Firewall by default, so you’re automatically protected from incoming attacks. Here’s how to configure the Windows Firewall for maximum protection and flexibility and use it to log potential attacks and send information about the intruders to your ISP.
The moment you connect to the Internet, you’re in some danger of intrusion, especially if you have a broadband connection. PCs with broadband connections are tempting targets, because their high-speed connections are ideal springboards for attacking other networks or web sites.
Whenever you’re connected, your system is among many constantly being scanned for weaknesses by crackers (malicious hackers) and wannabes (often called script kiddies) sending out automated probes looking for vulnerable PCs. In fact, these kinds of probes are so common and incessant, you can think of them as the background radiation of the Internet.
One of the best ways to protect yourself against these probes and more targeted attacks is to use a firewall. Firewall software sits between you and the Internet and acts as a gatekeeper of sorts, allowing only nonmalicious traffic through.
In this hack, we’ll look at how to get the most out of the Windows Firewall, the firewall built into XP SP2, which is turned on by default when you install SP2.
Tip
Before SP2, the firewall was called the Internet Connection Firewall (ICF). It was much the same as the Windows Firewall, with some notable differences in how the firewall and its features were accessed.
The Windows Firewall offers basic Internet security by stopping all unsolicited inbound traffic and connections to your PC and network, unless your PC or another PC on the network initially makes the request for the connection. However, it will not block outgoing requests and connections, so you can continue to use the Internet as you normally would for browsing the Web, getting email, using FTP, or similar services.
The Windows Firewall has one serious drawback: it won’t protect you against Trojans, such as the Back Orifice Trojan. Trojans let other users take complete control of your PC and its resources. For example, someone could use your PC as a launchpad for attacking web sites, making it appear as though you were the culprit, or could copy all your files and find out personal information about you, such as your credit card numbers if you store them on your PC. The Windows Firewall won’t stop Trojans because it blocks only incoming traffic, and Trojans work by making outbound connections from your PC.
Tip
To stop Trojans, get a third-party firewall, such as CORE FORCE [Hack #48].
When you install XP SP2, you’re automatically protected because it turns on the Windows Firewall. However, it is possible to turn off the firewall. To make sure it’s turned on, click Security Center from the Control Panel. When the Security Center appears, there should be a green light next to the Firewall button and it should say ON, as shown in Figure 4-1.
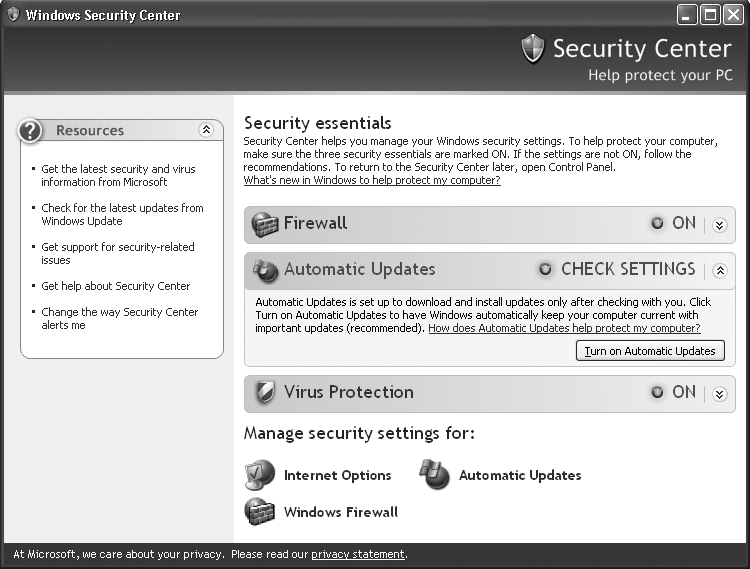
If it’s not on, click the Windows Firewall icon at the bottom of the screen, click ON, and then click OK.
The Windows Firewall offers protection from inbound threats, but it can also cause problems. A variety of software needs to be able to accept inbound connections, and the firewall will initially prevent these programs from working. Instant messaging programs and FTP programs, for example, both need to be able to accept these kinds of connections, and the Windows Firewall blocks them.
Usually, but not always, the first time you run one of these programs, you’ll get the warning from the Windows Firewall shown in Figure 4-2.
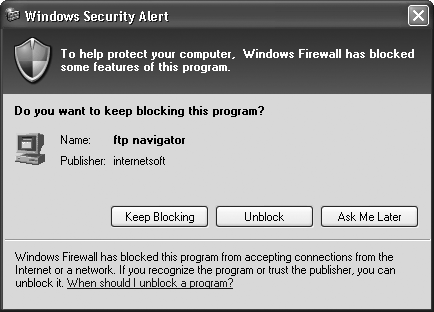
The warning will show you the name of the program and the publisher and will ask if you want to keep blocking the program. If you’d like the Windows Firewall to let the program function, click Unblock. To keep blocking the program, click Keep Blocking. The Ask Me Later choice lets the program accept incoming connections for just this one time; after you exit, the next time you run the program, you’ll get the same warning.
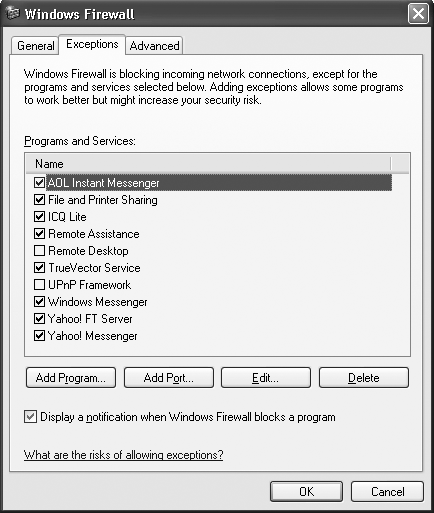
That’s well and good, but the Windows Firewall won’t always pop up this alert. So, you might find that some programs don’t work with the firewall on, but you won’t get a warning about them. Once you figure that out, you can manually tell the Windows Firewall to let those programs through by adding them to its exceptions list.
To do so, choose Control Panel→Security Center→Windows Firewall. Then click the Exceptions tab, shown in Figure 4-3.
Tip
When you get a warning from the Windows Firewall and click Ask Me Later, the temporarily allowed program will be listed on the Exceptions tab, with no check next to it.
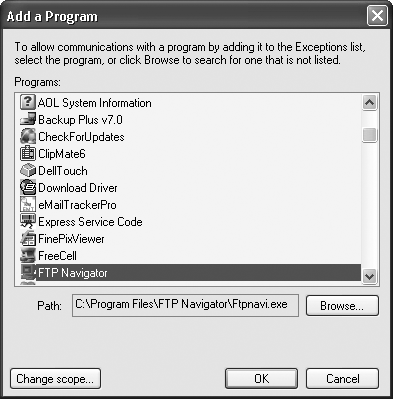
To add a program to the exceptions list, click Add Program to bring up the window shown in Figure 4-4.
This tab lists all the programs for which the firewall will accept inbound connections. If a program is listed here but doesn’t have a check next to it, it means the firewall will block it. To tell the firewall to stop blocking inbound connections for the program, check the box next to it and click OK.
Choose a program from the list and click OK, and then click OK again to add it to your list. If the program you want to add isn’t listed in the Add a Program dialog box, click the Browse button to find it and then add it.
There might be some programs for which you want to grant access to only certain people and not others. Maybe, for example, you want to allow an instant messaging program to work only with people on your own network. There’s a way to do that.
First, add the program to the exceptions list. Then, highlight the program and choose Edit→Change Scope. The Change Scope dialog box appears, as shown in Figure 4-5.
Choose “My Network (subnet) only,” click OK, and then click OK again, and the firewall will allow only inbound connections originating from your network. To allow inbound connections for the program for only specific IP addresses, choose “Custom list,” type in the IP addresses you want to allow, and then click OK and OK again.

The Windows Firewall can do more than just protect you from intruders; it can also keep track of all intrusion attempts so that you know whether your PC has been targeted and what kinds of attacks the Windows Firewall has turned back. Then you can send that information to your ISP so they can track down the intruders.
First, create a Windows Firewall log. From the Security Center, choose Windows Firewall→Advanced, and click the Settings button in the Security Logging section. The dialog box shown in Figure 4-6 appears.
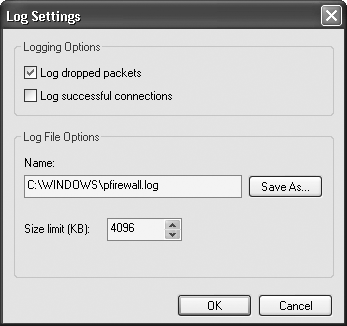
Choose whether to log dropped packets, successful connections, or both. A dropped packet is a packet that the Windows Firewall has blocked. A successful connection refers to any connection you have made over the Internet, such as to a web site; it doesn’t mean an intruder has successfully connected to your PC. Because of this, there’s usually no reason for you to log successful connections. If you do log them, your log will become large quickly, and it will be more difficult to track only potentially dangerous activity. So, your best bet is to log only dropped packets.
After you’ve made your choices, choose a location for the log, set its maximum size, and click OK. I don’t let my log get larger than 1 MB, but depending on how much you care about disk space and how much you plan to use the log, you might want yours to be larger or smaller.
The log will be created in a
W3C Extended Log (.log) format that you can examine with Notepad or another text editor or by using a log analysis program such as the free
AWStats (http://awstats.sourceforge.net). Figure 4-7 shows a log generated by the Windows Firewall, examined in Notepad.
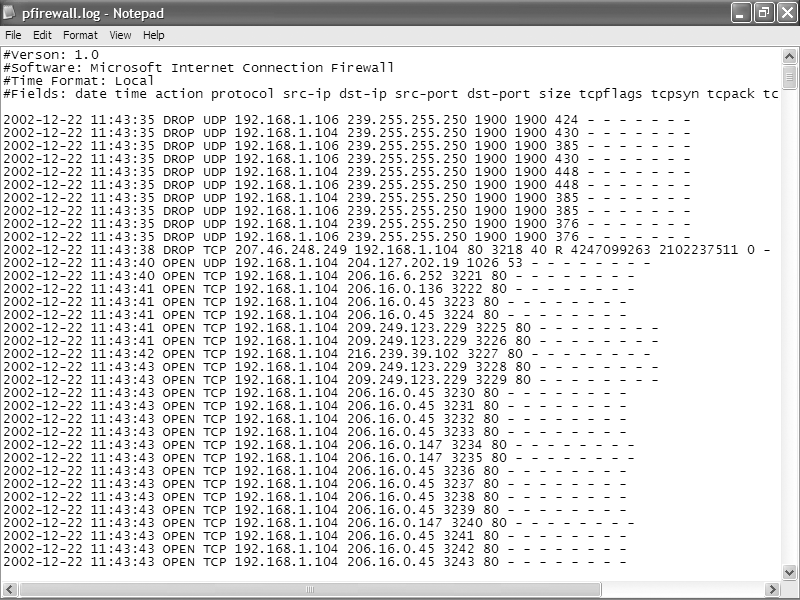
Each log entry has a total of up to 16 pieces of information associated with each event, but the most important columns for each entry are the first 8. (In a text editor, the names of the columns don’t align over the data, but they will align in a log analyzer.)
Table 4-1 describes the most important columns.
Table 4-1. The columns in the Windows Firewall log
| Name | Description |
|---|---|
| Date | Date of occurrence, in year-month-date format |
| Time | Time of occurrence, in hour:minute:second format |
| Action | The operation that was logged by the firewall, such as DROP for dropping a connection, OPEN for opening a connection, or CLOSE for closing a connection |
| Protocol | The protocol used, such as TCP, UDP, or ICMP
|
| Source IP (src-ip) | The IP address of the computer that started the connection |
| Destination IP (dst-ip) | The IP address of the computer to which the connection was attempted |
| Source Port (src-port) | The port number on the sending computer from which the connection was attempted |
| Destination Port (dst-port) | The port to which the sending computer was trying to make a connection |
| size | The packet size |
| tcpflags | Information about TCP control flags in TCP headers |
| tcpsyn | The TCP sequence of a packet |
| tcpack | The TCP acknowledgment number in the packet |
| tcpwin | The TCP window size of the packet |
| icmtype | Information about the ICMP messages |
| icmcode | Information about the ICMP messages |
| info | Information about an entry in the log |
The source IP address is the source of the attack. If you notice the same source IP address continually cropping up, an intruder might be targeting you. It’s also possible that the intruder is sending out automated probes to thousands of PCs across the Internet and your PC is not under direct attack. In either case, you can send the log information to your ISP and ask them to follow up by tracking down the source of the connection attempts. Either forward the entire log or cut and paste the relevant sections to a new file.
Depending on the email program you use and how it gets notification of new messages, the Windows Firewall could interfere with the way you retrieve your email. It won’t stop you from getting your mail, but it could disable your email program’s notification feature.
The Windows Firewall won’t interfere with the normal notification feature of Outlook Express, because the initial request asking for notification of new email comes from Outlook Express, which is inside the firewall. When the server responds to the request, the firewall recognizes that the server is responding to the request from Outlook Express, so it lets the communication pass through.
However, if you use Outlook and connect to a Microsoft Exchange server using a remote procedure call (RPC) to send email notifications (which is usually the case with Exchange), you’ll run into problems. Because the RPC initially comes from the server, not from Outlook, the firewall won’t allow the notification to pass to you. In this case, you can still retrieve your email, but you’ll have to check for new messages manually; you won’t be able to get automatic notifications from the server. So, if you find that you stop getting new mail notifications after you install the Windows Firewall, it’s not that coworkers, friends, and spammers are suddenly ignoring you; you’ll just have to check for new mail manually.
The Windows Firewall Exceptions tab is especially useful for anyone who uses file sharing on a home or corporate network but wants to turn it off when on a public network connection, such as a WiFi hotspot. When you get to a hotspot, before connecting, go to the Exceptions tab, uncheck the box next to File and Printer Sharing, and click OK. File sharing will be turned off. Then, when you get back to your home or business network, turn it back on again.