
TSUMAMI
TREVISO WITH PECAN MISO AND SANSHO LEAVES
ZUCCHINI COINS WITH ROASTED SESAME
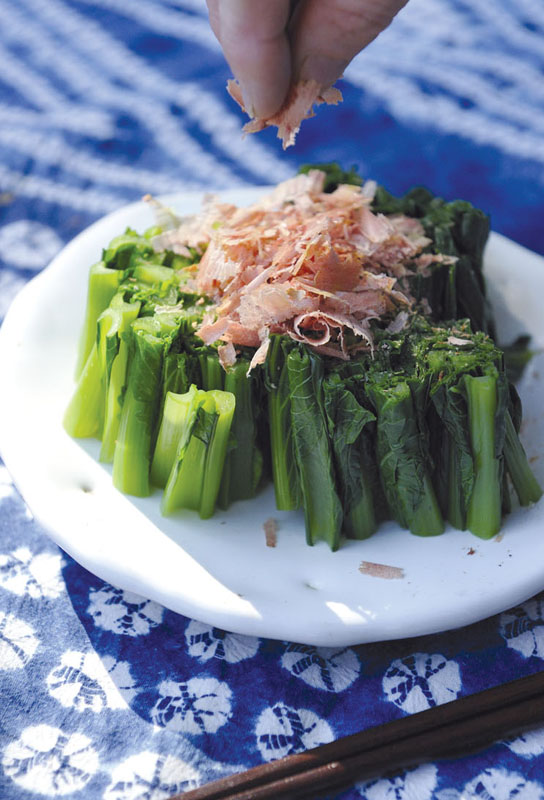
THINLY SLICED OKRA WITH DRIED BONITO SHAVINGS
SALT-MASSAGED RAW EGGPLANT WITH GINGER AND SHISO
GRILLED TOFU POUCHES WITH GINGER AND SCALLIONS
STIR-FRIED KONNYAKU WITH SHAVED BONITO
BITTER MELON STIR-FRIED WITH EGG AND RED PEPPER
TSUMAMI: SMALL BITES
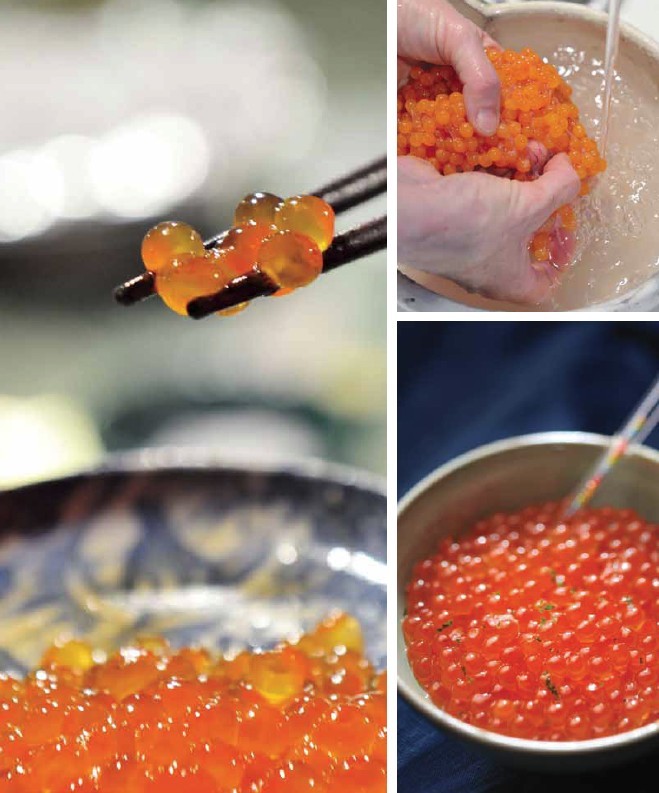
salmon roe SERVES 6
IKURA
1 sac salmon or salmon trout roe (about 7 ounces/200 g)
1 teaspoon sea salt
1 teaspoon sake
Grated zest of ½ yuzu or Meyer lemon
Set a medium-sized bowl in the kitchen sink and fill with tepid water. Submerge the egg sac in the water and gently pry the roe from the outer membrane by scraping your fingertip along the membrane. Remove the membrane tendrils from among the eggs. Drain the eggs as you go in a wire mesh strainer set over a bowl.
Season with salt, sake, and grated yuzu (or Meyer lemon) zest. Taste and add more salt if necessary. The eggs should remain naturally sweet with a slight background taste of salt. They should not be too salty.
Serve as an appetizer in a small colorful bowl with soy sauce dishes and chopsticks alongside.
VARIATION: Use 1 teaspoon soy sauce in place of the salt.
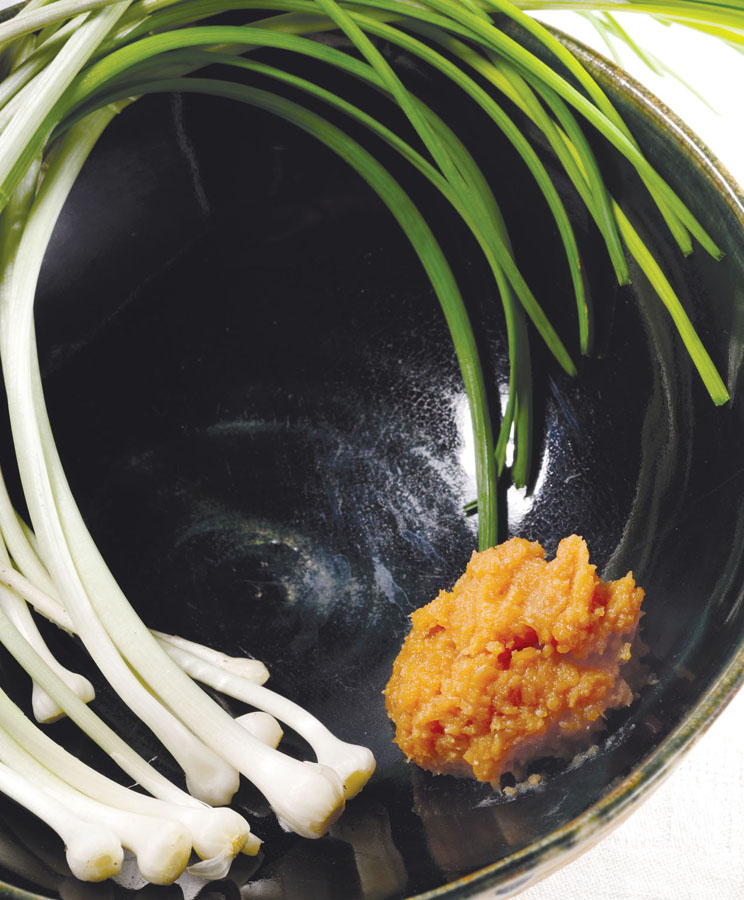
My favorite miso is made in Kamiizumi-mura, a mountain town bordering ours. Yamaki Jozo is family owned and part of our Slow Food community. The brown rice miso has enough depth of flavor to hold up to the wild scallion, with no distraction from the underlying wheat grains that you get with barley miso. I couldn’t have told you that a month ago, but recently I’ve been yanking off stalks of wheat to taste wheat kernels in the field with my preschool kids, and they share similar characteristics with barley. I use wild scallions that grow by a riverbank. They are almost a cross between garlic and green onion, but have very thin green stalks and small curved pinky white bottoms. This simple dish makes a fresh before-dinner appetizer and is especially good with mixed drinks such as mojitos or gin and tonics . . . or beer.
young scallions and miso
NOBIRU TO NAMA MISO
Very thin, young scallions
Organic brown rice miso
Clean the scallions. Cut off the root bottoms and any brown or tapering tops. Peel off the tough or discolored outside layers.
Spoon out a dollop of miso onto a medium-sized plate. Curl the scallions attractively on the plate with the miso. To eat, dip the scallion in the miso, scooping up about the same volume of miso to scallion.
VARIATION: Fantastic with Japanese cucumber sticks (cut in half across the middle, then quarters lengthwise), green pepper wedges, whole mild chiles, radishes (washed and tailed, but leave the greens on if fresh picked) or heavenly with very young garlic cloves or green garlic.

Once, on the way back home to Japan from California, my friend Sam White and artist girlfriend Jessica Niello were on the same plane. We had planned on rendezvousing in the Tokyo Narita Airport before heading out to our area by limousine bus, but by a lucky stroke, their flight was canceled, so Sam and Jessica were rerouted on my plane. When we finally arrived at our farmhouse (about fifteen hours later), Tadaaki had laid the table with a feast. I can’t remember all he prepared that night, but the one dish that stood out was the koshi abura, a hauntingly bitter, yet earthy mountain vegetable gathered in the Japanese spring, which he served with homegrown pecans ground up with miso and sansho leaves from our shrub. The pecans stunned me. Treviso would make a good substitute for the koshi abura, since it is slightly bitter and has a touch of juicy crunch. Sansho leaves, from a similar bush to the one that produces Sichuan pepper, leave a peppery-tingling sensation that cannot be duplicated, though shiso leaves can be used instead.
treviso with pecan miso and sansho leaves SERVES 6
TOREVISO TO PEKAN-MISO
4 small sansho sprigs (about 2 inches/5 cm)
¾ cup fresh pecans (3.5 ounces/100 g)
4 tablespoons organic brown rice or barley miso
12 treviso leaves
Pluck the leaves from the sansho sprigs and finely chop. Smash the pecans and chopped leaves in a suribachi or mortar. Grind by hand until smooth, then mash in the miso with a surikogi or pestle. Mound the pecan miso onto a medium-sized plate. Stack the treviso leaves attractively in a fan formation on the same plate. Pick up a leaf, scoop up some of the pecan miso, and eat.
VARIATION: Substitute garden chives, young celery, or just about any other juicy vegetables that go well with miso. Also fantastic rolled in a fresh shiso leaf.
PECANS: FROM NUT TO TREE

EDAMAME


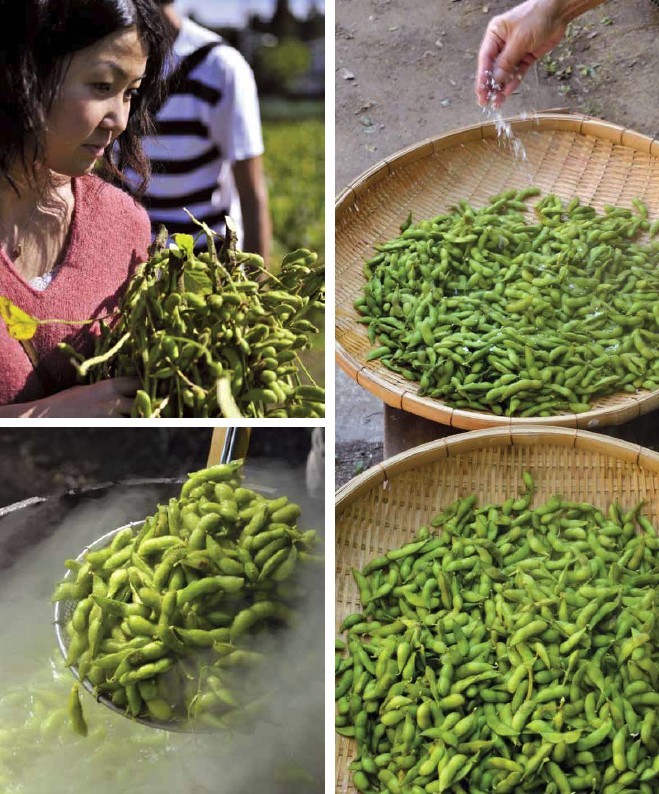
I don’t think it’s possible to get tired of fresh-picked, freshly boiled edamame, but I did fall in love with another method I read about on Hiroko Shimbo’s blog. Hiroko is the author of The Japanese Kitchen, what I would call the “bible” of Japanese food (next to Shizuo Tsuji’s Japanese Cooking: A Simple Art). Hiroko shared the roasting method in a dry wok that I describe in the variation. She credits her friend Jiro Iida, the chef at Aburiya Kinnosuke in New York City. You can only roast a small amount at a time, so the method is not good for crowds. Also it does take longer than the boiling method. But for just yourself or a couple of people, pan roasting yields remarkable pods that are smoky, intensely flavored, and crystallized with salt. Frozen pods are not too bad if you’ve never tried fresh edamame right off the branch (eda). But once you eat the real thing, you will be unable to go back to frozen pods. Guaranteed.
edamame and sea salt SERVES 4
1⅓ pounds (600 g) edamame (young soybeans)
1½ teaspoons best-quality sea salt
Fill a large stockpot with water and bring to a boil over high heat. Boil the edamame about 3 to 4 minutes, depending on the size of the beans. Scoop out with a strainer into a medium-sized crockery bowl and toss with sea salt. Serve immediately. The edamame should be so hot you can barely touch them.
Grab a handful and eat quickly because they cool quickly (and are particularly good burning hot). Don’t forget to prepare the cold beer (if you like) and a bowl for the empty pods. Boil in batches for a big crowd so you can keep serving them hot.
If you have any left over, save the pods in a resealable plastic bag, then pop the beans out the next day and fold into a vegetable salad, potato salad, or any curry or stewlike dish.
VARIATION: Heat an iron wok over high heat and throw in a couple of handfuls of raw edamame pods. You want to make sure that each pod is in direct contact with the surface of the pan. Toss with two flat-edged wooden spoons to ensure even heat distribution. Cook until the skins are blistered and a little juice runs out. Taste to check for doneness. Sprinkle with sea salt, toss once or twice, and serve hot.
When developing the recipe list for this book, I originally intended to make this with sesame oil. In the meantime, I steadily began to dislike the overpowering heaviness of dark sesame oil, especially when compared to the beautifully elegant Japanese rapeseed oil I had recently begun using. To compensate for the lack of sesame flavor, I used toasted sesame seeds. As a result the dish became instantly less oily and also more pleasing to the eye—a win-win decision.
zucchini coins with roasted sesame SERVES 6
ZUKKINI NO KARUPACCHO
1 tablespoon unhulled sesame seeds
2 medium yellow zucchini (about 1 pound/450 g)
½ teaspoon salt
1½ teaspoons organic rapeseed oil
Measure the sesame seeds into a small frying pan and roast over medium-high heat while lifting and shaking the pan to avoid burning the seeds (be careful—they burn easily!). When the seeds start to pop, remove from the heat, dump into a Japanese grinding bowl (suribachi) or mortar, and grind roughly.
Slice the zucchini into very thin (but not paper-thin) rounds with a razor-sharp knife. Starting with the coins of the largest diameter, fan the zucchini around the perimeter of a nice-looking large dinner plate (or small serving platter). Working down in size, make concentric, overlapping circles of zucchini coins. You may need to squish up the zucchini in places to fit all the coins in. You want to make sure that at least some of the surface of each coin is peeking out. You don’t want to completely cover any of the zucchini as you are laying out the coins.
Sprinkle with the salt, and with gentle fingertips try to distribute the salt evenly over the surface of the zucchini. Drizzle with the oil, sprinkle with the ground sesame, and serve immediately but carefully. Invariably, the zucchini pieces will be unevenly seasoned, so be sure to give each person all of the layers from any given spot on the serving plate (and they should eat accordingly to get the full effect: less seasoned pieces layered with more seasoned pieces).
VARIATION: Substitute green zucchini, or mix the colors.
KATSUOBUSHI


I almost can’t squeeze enough vegetables into a meal, and am particularly addicted to raw ones. Okra has that slime thing going, so many people don’t care for it, but I’ve found that some people who can’t eat cooked okra can eat it raw. And slicing the okra into very fine rounds makes it all that more palatable, since it hinders telltale okra “threads” from forming. This is, hands down, my favorite way to eat okra.
thinly sliced okra with dried bonito shavings SERVES 6
OKURA NO OHITASHI
30 small or 15 medium okra (about 7 ounces/200 g)
2 tablespoons freshly shaved katsuobushi, or 3 tablespoons wide flakes (hanakatsuo)
2 tablespoons organic soy sauce
Cut off the tops of the okra and slice into fine rounds. Heap into a small serving bowl. Pinch up a small handful of katsuobushi and drop on top of the okra. Drizzle with soy sauce right before serving.
VARIATION: Substitute finely sliced tender asparagus spears for the okra.

There always comes a point during the summer when I start feeling like I don’t want to cook another eggplant, Western style or Japanese. But I never get tired of eating eggplant raw, fatigued in salt—so very refreshing, and of course unusually low in calories, since most other eggplant recipes require oil (and eggplants soak up oil like sponges).
salt-massaged raw eggplant with ginger and shiso SERVES 4
NASU NO SHIOMOMI
2 (4½-ounce/125-g) Japanese eggplants
2½ tablespoons sea salt
1 teaspoon slivered ginger
½ tablespoon shiso leaves, cut in chiffonade
Slice the eggplants into very thin rounds with a razor-sharp knife or mandoline. Toss in a medium-sized bowl with salt and a handful of ice cubes. Let sit 15 minutes. Squeeze out the water, discard the salty water, and return the squeezed eggplant to the (wiped) bowl. Drop in the ginger slivers and shiso chiffonade and distribute gently with chopsticks. Mound in a small bowl and serve.
VARIATION: Replace the shiso and ginger with a small red pepper, cut into fine rounds.

Tadaaki loves to make huge bags of these eggs for workers’ snacks or when he goes on the occasional road trip. There is something about the gently salty soy sauce enveloping the creamy egg that is irresistible.
eggs pickled in soy sauce SERVES 6 OR MORE
TAMAGO NO SHOYUZUKE
8 farm-fresh eggs, at room temperature
¾ cup (175 cc) soy sauce
Fill a medium-sized saucepan three-quarters full with water and bring to a boil. Place the eggs in a small strainer and lower into the boiling water. Boil for 8 to 9 minutes, depending on size. Set a large bowl in the kitchen sink and fill with cold water. Scoop the eggs from the boiling water with the strainer and immediately plunge into the water. Run more cold water if the water temperature feels warm. When the eggs are cool, gently crack by rapping and rolling on a cutting board. Put the eggs back in cold water for a few more minutes, then peel. Try to get to the inner membrane and peel by running your thumb under the membrane to free the shiny white egg.
Lay the peeled eggs on a dry dish towel. Pat dry, then place the eggs in a freezer-style gallon resealable plastic bag. Pour in the soy sauce, tip the bag to distribute, press out all the air, and roll up any unused portion of bag to create a tight cylinder. Refrigerate overnight. Serve before dinner with drinks or as a side dish for a barbecue or picnic. Best the first day.


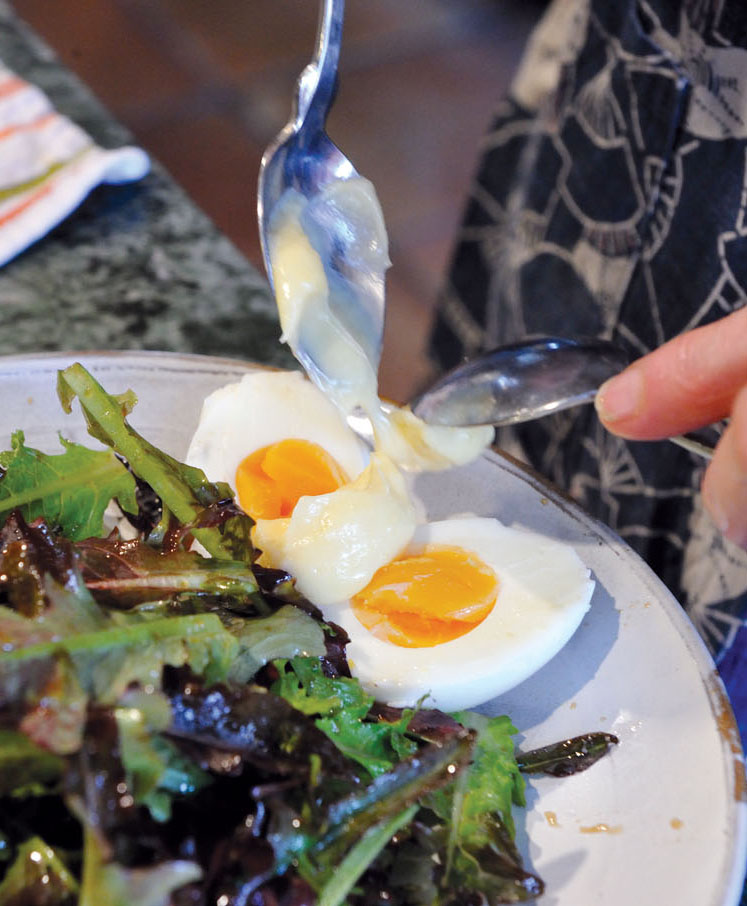
I like to serve our guests what we produce, so with a free-range egg farmer husband, eggs are always high on the list. Whacking the eggs in half and scooping them out of the shells is a great chore to palm off on guests eager to help. These eggs are wonderful served nestled in a small pile of tender lettuce leaves filmed with soy sauce dressing, finished with a dollop of homemade mayonnaise and a sprinkling of chopped chives. Half-boiled eggs also add a creamy note to a bowl of homemade ramen. Use eggs of any shell color but white.
half-boiled eggs SERVES 6
HANJUKU TAMAGO
6 medium-sized farm-fresh eggs, at room temperature
Best-quality white sea salt
Fill a medium-sized saucepan three-quarters full with water and bring to a boil. Place the eggs in a small strainer and lower into the boiling water. Boil for 7 to 8 minutes, depending on size. Set a large bowl in the kitchen sink and fill with cold water. Use a strainer to scoop the eggs from the boiling water and immediately plunge the hot eggs into the cold water. Run more cold water until the water temperature remains cool.
When the eggs are completely cool, remove from the water and set on a kitchen towel to air dry (or hand dry individually).
Within an hour or so of serving, slice the boiled eggs in half vertically with a razor-sharp knife. Carefully scoop the eggs out from the shells with a soupspoon. Place the eggs on a pretty dinner plate and make a small mound of sea salt alongside for dipping. Serve as an hors d’oeuvre before dinner.
VARIATION: Serve with Japanese Mayonnaise, or substitute a small saucer of soy sauce for the salt.
It is worth tracking down good-quality usuage for this simple and immensely satisfying little before-dinner snack. Or you might try making the pouches yourself if you have access to local tofu. Slice the cotton tofu (momendofu) horizontally into ½- to ¾-inch (12- to 18-mm) thin slabs; lay out on a bamboo sushi rolling mat placed on a chopping block. Place another rolling mat on top of the tofu slices and another chopping board on top as a weight. Angle the boards into the sink (prop up one end with another board or plate). Let sit for 30 minutes, then deep-fry one by one until light brown on each side. Drain on paper towels set on top of a folded-up newspaper.
grilled tofu pouches with ginger and scallions SERVES 6
YAKI USUAGE NO SHOGA-ZOE
2 (4-ounce/112-g) packages usuage (deep-fried tofu pouches)
1 tablespoon rapeseed oil (if frying instead of grilling)
1 tablespoon grated ginger
1 tablespoon finely chopped scallions or chives
2 tablespoons wide bonito shavings (optional)
2 tablespoons organic soy sauce
Cut the usuage in half horizontally, then again diagonally into triangles. Cook over low embers on a charcoal grill, turning frequently, until gently sizzling but not tough. Alternatively, heat the oil in a wide frying pan over high heat and cook quickly by tossing and flipping the skins frequently.
Fan out the crisped tofu pouches in a circular fashion on an attractive dinner plate. Dab with ginger, strew with chopped scallions and bonito shavings, if using, and drizzle with soy sauce.
VARIATION: Do the same with thicker deep-fried tofu pieces such as atsuage or ganmodoki but heat slowly over a low flame or coals, covered. Again, getting top-quality fried tofu products is essential.
Konnyaku is pure fiber and contains virtually no calories. But konnyaku loves oil, so it makes a great stir-fry to eat with beer or drinks before dinner. Some people may be put off by the rubbery consistency of konnyaku, but I find the texture of the konnyaku works well against the scratchy katsuobushi. And soy sauce gives this dish a deep flavor that tends to be addicting. Konnyaku keeps for weeks in the refrigerator, so it’s easy to have on hand at any time. And once the konnyaku is parboiled, this stir-fry is ready in a flash, making it convenient as well as tasty.
stir-fried konnyaku with shaved bonito SERVES 6 TO 8
KAMINARI KONNYAKU
2 blocks konnyaku (1 pound/500 g each)
2 tablespoons rapeseed oil
3 small dried red peppers, broken in half
3 tablespoons soy sauce
A couple of handfuls of large katsuobushi flakes (hanakatsuo)
Tear the konnyaku into bite-sized pieces. Boil in salted water for 15 minutes to firm up and dispel any packaging taste. Drain in a strainer.
Heat the oil in a wide skillet or wok over a medium-high flame. Drop in the red peppers and fry for a few seconds until bright red and well roasted. Slide the drained konnyaku pieces into the hot oil and toss for several minutes until heated through. Splash in the soy sauce, stirring once. Throw in the handfuls of katsuobushi, toss one more time, and serve hot.
KONNYAKU
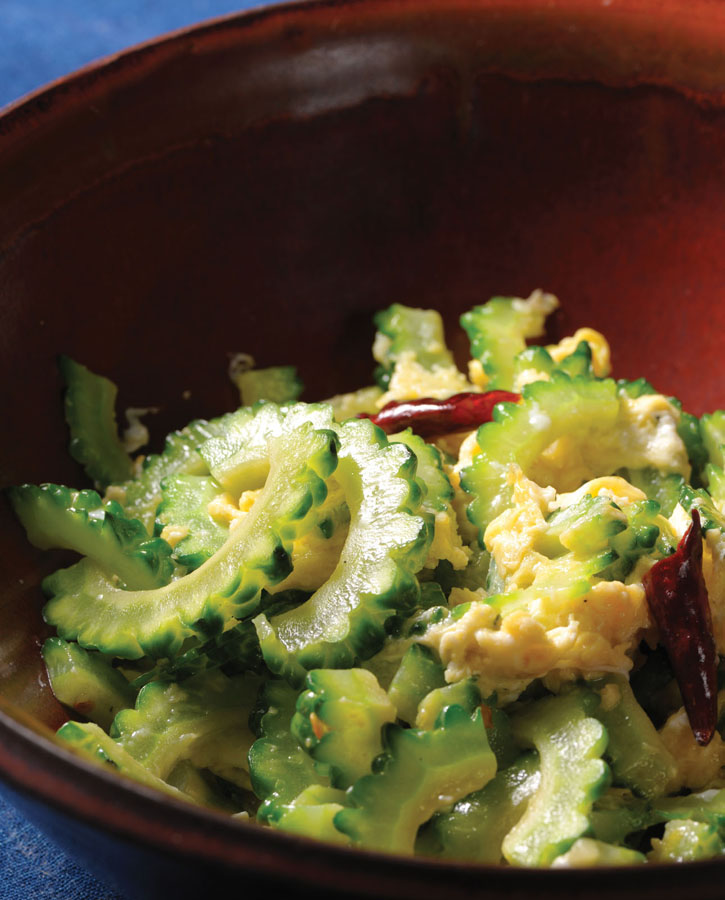
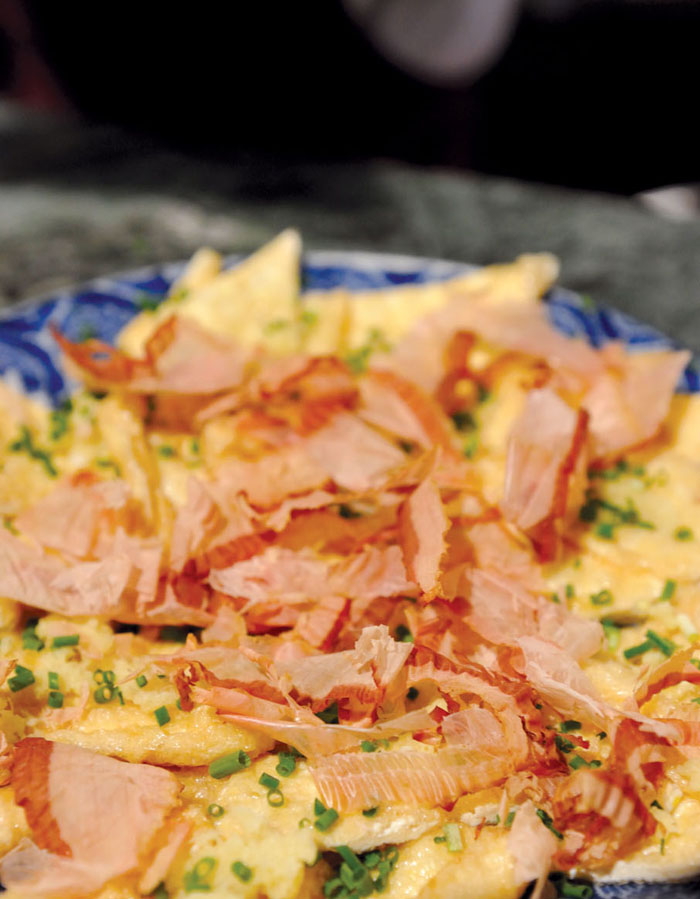
Goya Champuru is one of my favorite Japanese dishes. Goya is the Okinawan word for “bitter melon” and champuru is Okinawan for “stir-fry.” Goya looks more like a cucumber than a melon and has the texture of a hard zucchini. This champuru combines four tastes into an explosive finale: bitter (goya), sweet (egg), hot (red pepper), and salt. My husband often whips up champuru for a bite to eat with drinks before dinner in summer. We review the day while standing around the counter, pinching up bright green and yellow mounds of champuru with our chopsticks as soon as Tadaaki turns it into a waiting pottery bowl.
bitter melon stir-fried with egg and red pepper SERVES 6
GOYA CHAMPURU
3 small to medium bitter melons (goya), about 1 pound/500 g
2 small dried chile peppers (japones or árbol)
6 eggs, at room temperature
2 tablespoons rapeseed oil
¾ teaspooon sea salt
Slice the bitter melons in half lengthwise and scoop out the seeds with a spoon. Cut off the ends and slice crosswise into ⅛-inch (3-mm) half-rounds.
Tear the chile peppers in half or thirds and reserve in a small bowl.
Break the eggs into another bowl and whisk with a fork or chopsticks.
Heat the oil in a large frying pan or wok over medium-high heat and drop the chile peppers into the hot oil. Immediately decrease the flame to low and fry the peppers to infuse the oil. Throw in the bitter melon slices and toss over high heat until no longer raw (about 4 minutes or so). Add the salt as you are cooking the bitter melon.
Mix in the beaten egg and toss quickly as the egg curds form. Remove from the heat when the eggs are still not quite set. Stir until just set and turn into a medium-sized serving bowl. Eat hot.

Tadaaki loves this dish beyond reason, since eating it propels him back to his childhood. He makes it countless times over the course of the long, hot summer months. The backs of the eggplant halves are scored in crosshatch slits, and when fried resemble the feathers of a bird, hence the name. Shigi is the Japanese word for “sandpiper,” one of the many water birds in a country surrounded by water and dotted with water-flooded rice fields.
fried eggplant halves with sweet miso SERVES 4
NASU NO SHIGIYAKI
About 1⅓ cups (150 cc) Sweet Miso Sauce
1 pound (450 g) Japanese eggplants (4 or 5 small)
2 cups (500 cc) organic rapeseed or cold-pressed sesame oil
top, in photo: salt-massaged raw eggplant with ginger and shiso.
Make the sweet miso sauce, but reserve the finely sliced shiso leaves and ginger slivers separately until the eggplant has been cooked.
Slice the eggplants in half lengthwise and score the backs with a crosshatch pattern at ⅛-inch (3-mm) intervals and about the same depth.
Line a cookie sheet with several sheets of folded newspaper topped with paper towels and set next to the stove.
Heat the oil in a deep-frying pan (such as a wok) over medium- high heat until hot but not smoking. There should be enough oil so that the eggplant pieces are submerged; otherwise they will become overly brown. Slip the eggplant halves in, skin side down, and fry gently for several minutes, until the cut surface of the eggplant has a golden sheen. Turn the eggplants, cook a couple of minutes more, and remove to drain on the prepared paper-lined cookie sheet.
Stack attractively (cut side down) on a large dinner plate or small serving platter. Warm the sauce briefly, stir in the shiso threads, and pour over the fried eggplant. Sprinkle with the slivered ginger and serve immediately.
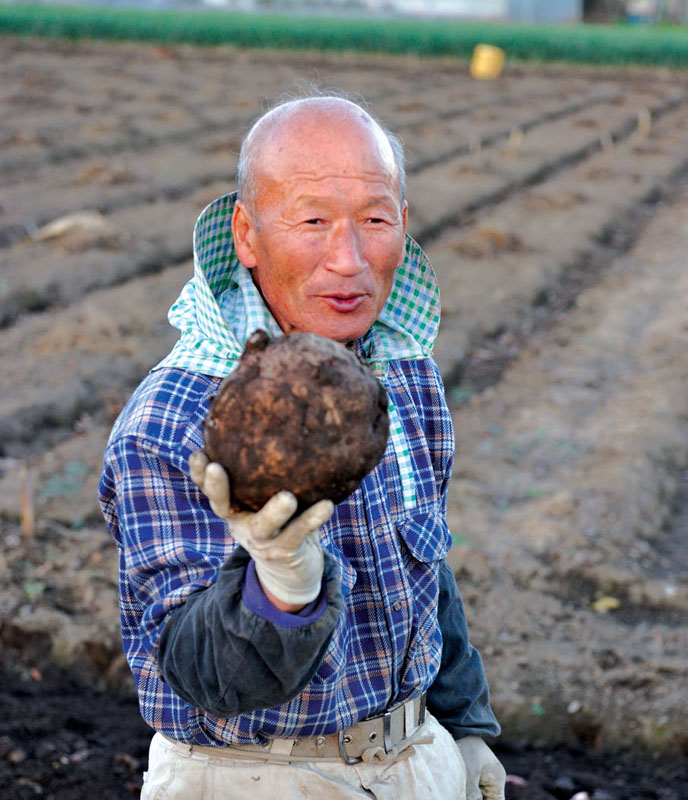
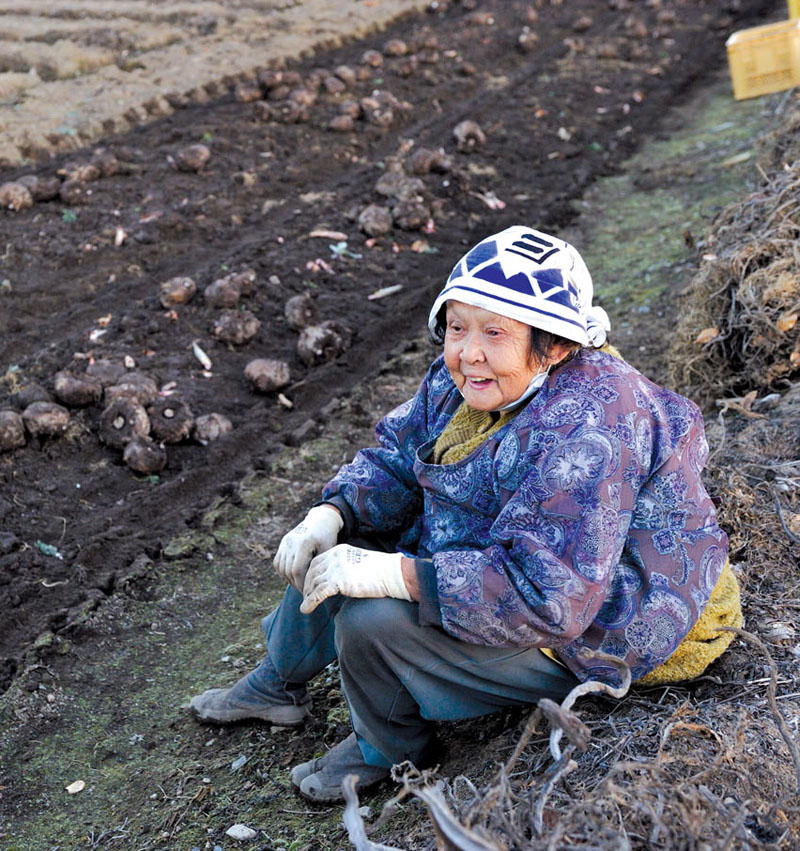
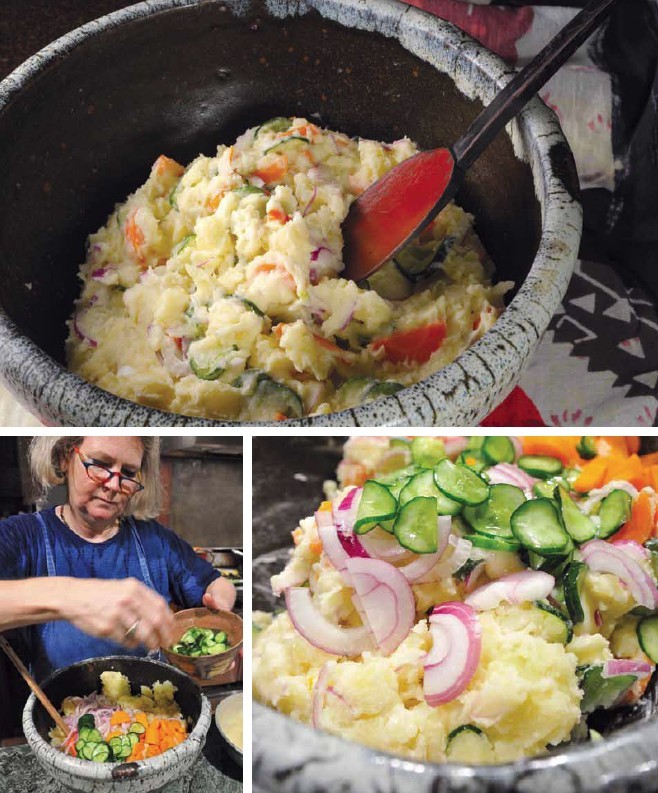
Potatoes aren’t very sexy. Not like a slender stalk of spring asparagus or those first delicate snap peas. They don’t have the natural beauty of a gorgeous leafy red speckled head of heirloom lettuce. But fresh-dug potatoes are beyond memorable. We crop potatoes in late June or early July, though sometimes Tadaaki is busy and we end up cropping them later. And some years, Tadaaki is able to get a second crop planted for late fall or early winter eating.
The big difference between Japanese and Western potato salad is that you mash the potatoes before adding vegetables and mayonnaise. It took some getting used to at first, but now I prefer the Japanese style. The only thing I object to is adding the mayonnaise when the potatoes are still warm. It’s worth tracking down a clear-tasting neutral oil for the mayonnaise since oil is the main ingredient. I use rapeseed, but a good-quality peanut or safflower oil would also work.
japanese-style potato salad SERVES 6
POTETO SARADA
8 large yellow-skinned potatoes
2 medium carrots, peeled
3 small Japanese cucumbers, thinly sliced
1 teaspoon salt, plus more to taste
2 very small red onions (or 1 medium)
2½ to 3 cups (600 to 700 cc) Japanese Mayonnaise
Rice vinegar to taste (1 to 2 tablespoons)
Peel the potatoes and cut into large (2½-inch/6-cm) chunks. Boil the potato pieces in salted water with the carrots. Cook the carrots halfway (around 7 minutes—they should not be soft) and remove to a cutting board. Continue cooking the potatoes until the centers have no resistance (about 15 minutes or more, depending on the heat of your flame and the variety of the potato).
Sprinkle the cucumber slices with 1 teaspoon salt, toss, and let sit for 5 to 10 minutes before squeezing out the excess cucumber water. Slice the cooled carrots into thin half-moons. Mash the hot potato pieces until fluffy, cool, then add the sliced cucumbers and carrots. Cut the ends off the onions and slice in half vertically. Peel, cut into thin half-rounds, and mix into the smashed potatoes with the other vegetables. Fold in the mayonnaise to taste; add salt and vinegar as needed.
VARIATION: In the summer, skip the carrots and use any combination of the following instead: cooked edamame beans, finely sliced raw okra, raw corn kernels shaved from the cob, or chopped peppers (green, red, or yellow). Substitute chopped scallions for the sliced onions.

There is something about fried food that is madly appealing, but it does create a bit of a mess in the kitchen. Nonetheless, for a casual before-dinner snack, little fried fishes are worth the effort of having to stand over a hot pot of boiling oil. The trick here is to pour yourself a small glass of crisp wine and prepare a little plate of fish for yourself to munch as you cook. These really need to be served hot as they come out of the oil and don’t hold up too well. Also, using the best-quality oil you can find is essential, as is skimming off flour particles between batches. When frying with excellent organic oil, the oil remains crystal clear and almost sparkles. The difference is visually palpable, and the taste is incomparable.
deep-fried little fishes SERVES 6
MAMEAJI NO FURAI
Best-quality rapeseed or peanut oil
⅔ cup (100 g) low-gluten good-tasting flour
1 teaspoon fine white sea salt, plus more for sprinkling
½ pound (225 g) small fish, such as anchovy, smelt, or whitebait
2 or 3 lemon wedges
If the fish are larger than a child’s pinky, remove the guts by poking your finger into the tummy area and smooshing them out toward the head. Wash and dry the fish, making sure to remove any lingering sand, silt, or guts.
Line a cookie sheet with a thick piece of newspaper, then top with a layer of paper towels. Set next to the stove. Over low heat, heat 4 inches (10 cm) of oil in a medium-sized heavy saucepan.
Measure the flour into a small- to medium-sized bowl and whisk in 1 teaspoon salt. Have a pair of long cooking chopsticks or tongs ready.
Increase the heat on the oil to about medium-high. The oil should not be smoking. Test the oil with a drop of flour. It should sizzle and immediately form a small ball as it hits the oil but should not brown. Adjust the oil temperature as needed.
Working with 6 or 8 fish at a time, toss the fish in the flour. Pick them up in your palm, spread your fingers, shake off the excess flour with a couple of vigorous shakes, and drop into the hot oil. Turn gently as the fish become a light golden color. When both sides are cooked and the oil bubbles around the fish have quieted down a little (about 3 to 4 minutes, depending on the size of the fish), remove to the prepared cookie sheet. Serve immediately on a dinner plate lined with attractive blotting paper, sprinkled with fine white sea salt and a few squeezes of lemon.

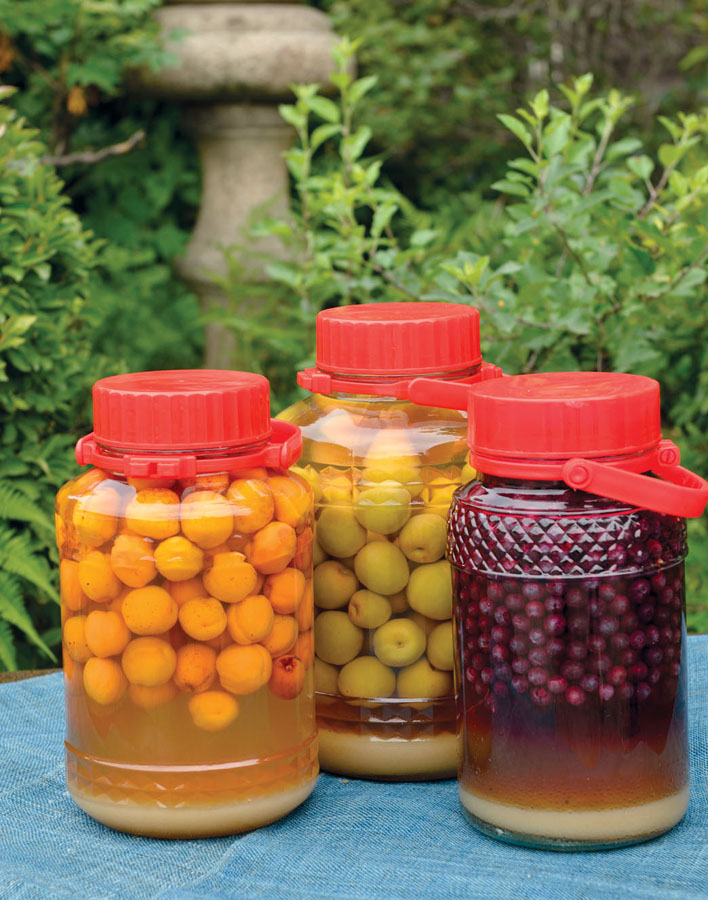
Come early summer, every home center in our area brings out the fixings for making umeshu, the traditional cordial fashioned from rock-hard sour “plums.” The sugar commonly used is a rock sugar called korizato (“ice sugar”), though I prefer organic sugar for the floral notes it adds to the cordial, especially since the shochu (sold here as “white liquor”) is fairly generic. My friend Amy Dencler, a longtime downstairs cook at Chez Panisse, sometimes gives me a jar of her strawberry gin made from artisanal gin and organic strawberries ripened under the sun. In this case, she uses a tasteless (easy-to-dissolve) sugar. That makes sense because the organic sugar would muscle out the beautiful gin and strawberries. It’s all about balancing your flavors. If you use organic sugar, it will take a bit longer to dissolve and you’ll need to shake the jars a tad more often. Producing your own homemade cordial is simple, but I suspect this custom is no longer followed as much in urban areas because the majority of city people are fairly removed from the land and country customs. Also the jars are large and hard to store for apartment dwellers, and we live in an impatient world. Perhaps the minimum of three months it takes for umeshu to mature is too long to wait to taste the “fruits” of your labor. But do not be deterred. The wait is more than worth it.
apricot cordial
MAKES ABOUT 2 QUARTS/2 LITERS
ANZUSHU
2 pounds (1 kg) apricots
1 pound (500 g) organic sugar or white rock sugar
2 quarts (1.8 to 2 liters) white liquor (or plain vodka)
Wipe the apricots and place them in a large clean jar or sealable crock. Add the sugar and liquor, and cap securely. Shake to distribute and help dissolve the sugar.
Let the fruit and liquor macerate for at least 3 months in a cool, dark place. Shake occasionally. Taste after 3 months, and if the liquor is sufficiently infused with apricot, it is ready to serve. This cordial keeps practically indefinitely, though the taste will intensify over time.
Serve cold over ice as a before-dinner drink in the summer.
RATIO: fruit : sugar : liquor—2 : 1 : 2 quarts (1.8 liters—a large bottle of shochu)
VARIATION: Raspberries, blackberries, boysenberries, and blueberries make lovely cordials as well. When the liquor is fully infused, strain and discard the berries because they will discolor the cordial.