MANY OF THE STUDENTS RECOMMENDED FOR JUMP DO NOT know any times tables when they start the program. It might seem pointless, therefore, to teach these students fractions right away. After all, they have a very poor sense of numbers and cannot be expected to find the lowest common denominator of a pair of fractions. I have found, however, that fractions are an ideal place to start. With fractions, complex operations can be reduced to steps any student can reproduce. In mastering these operations, even the most delayed students in JUMP have shown remarkable improvements in memory, concentration, and numerical and conceptual ability.
To teach this unit effectively you should bear in mind that its purpose is as much psychological as mathematical: the material is designed to train a student’s attention and build confidence. Students who learn how to multiply and divide in the course of performing more difficult operations are motivated to remember their times tables. As well, a great deal of conceptual work is learned while performing the apparently mechanical procedures of this unit. Students learn to recognize patterns, select appropriate algorithms, and carry out complex sequences of operations. The goal of even the most mechanical exercise in the unit is to prepare children for more advanced conceptual mathematics.
Sections F-16 to F-20 contain conceptual exercises, which teach the notion of fractional equivalence. You may introduce these sections at any point in the unit, as long as your student knows how to divide (division is taught in F-5). In teaching a more delayed student, you might cover sections F-1 to F-15 and give your student the Advanced Fraction Test before you cover sections F-16 to F-20. After your student has done well on the fractions test, they will be more motivated to learn and remember the concepts underlying sections F-1 to F-15. (If you feel your student needs a break from fractions when they finish the fractions test, you might teach sections F-16 to F-20 after you have completed one or two other units.)
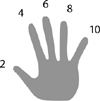
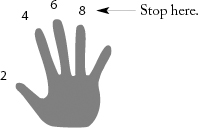
First check whether your student can count on one hand by twos, threes, and fives. If they can’t, you will have to teach them. I’ve found the best way to do this is to draw a hand like this:
Have your student practise for a minute or two with the diagram, then without. When your student can count by twos, threes, and fives, teach them to multiply using their fingers, as follows:
The number you reach is the answer.
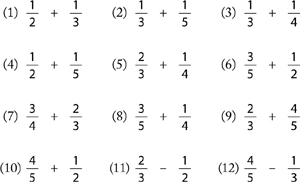
Give your student practice with questions like:

Point out that 2 x 3 means: add three, two times (that’s what you are doing as you count up on your fingers). Don’t belabour this point, though — you can explain it in more depth when your student is further into the units.
Your student should be able to count and multiply with ease by twos, threes, and fives on one hand before you teach the next section. As it is important to create a sense of momentum in your lessons (while still teaching by steps and allowing lots of repetition), you shouldn’t expect a more delayed student to learn any table other than the fours (on one hand) as you progress through the rest of the unit. After your student has written the Fractions Test, you can introduce higher tables. (You can demand more of a more motivated or knowledgeable student: you might draw a new hand on their homework every few weeks and ask them to memorize it. You might also assign questions where they are required to use higher tables.)
Explain how to represent a fraction.
Remember, each step should be taught separately (allowing for repetition), unless your student is very quick.
Here are some questions your student can try:
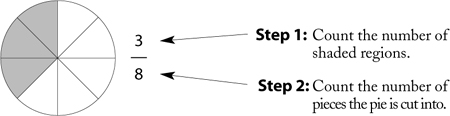
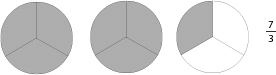
What fraction of each figure is shaded?

Make sure your student can name the numerator (top) and denominator (bottom). And that they know that the bigger the denominator, the more pieces the pie is cut into, and hence the smaller the piece size; that is, given two fractions, each with the number one in the numerator, the fraction with the larger denominator represents a smaller piece of the pie (because the pie is cut into more pieces). For instance, ¼ is smaller than  . (Draw this for your student.)
Teach your student how to draw ½ and ¼ with circles.
Teach them how to draw as follows:

Ask your student how they would draw ½ and ¼ in a square box. Make sure they know that in drawing a fraction, you have to make all the pieces the same size. For instance, this is not a good example of ¼:

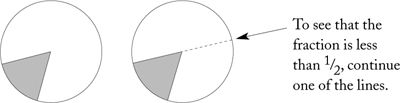
Your student should be able to recognize when a shaded piece of pie is less than ½ of a pie.
Rule: Add the numerator and leave the denominator the same.
Example:
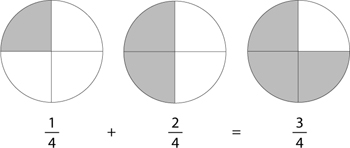
1 piece plus 2 pieces gives 3 pieces
Make sure your student knows why the denominator does not change: the pie is still cut into 4 pieces — you are still adding up ¼ size pieces.
Allow for lots of practice. Introduce one step at a time.
Whenever possible, you should allow the student to figure out how to extend a concept to a case they haven’t seen. This is easy to do with the addition of fractions. Ask your student what they might do if:
• There were three fractions with the same denominator.

(If your student guesses what to do in this case, point out that they are smart enough to figure out mathematical rules by themselves. It is essential that you make your student feel intelligent and capable right from the first lesson.)
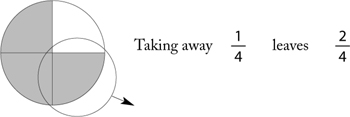
• They had subtraction.
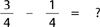
Demonstrate this with a picture:
• They had mixed addition and subtraction.

Here are some sample questions you can use during this lesson (don’t ask your student to reduce answers — this comes later, in section F-8):

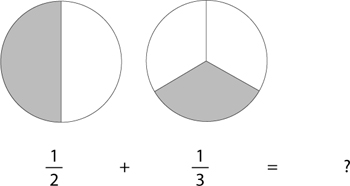
If the denominators are different, then you can’t compare piece sizes — it’s not clear how to add fractions with different denominators.
Example:
Tell your student that after you have shown them how the operation works with pictures you will show them a much easier method they cannot fail to perform. (You should, however, return to this sort of pictorial explanation when your student fully masters the operation.)
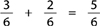
Solution: Cut each of the two pieces in the first pie into three, and cut each of the three pieces in the second pie into two. This will give the same number of pieces in each because 2 x 3 = 3 x 2 = 6
Draw the above picture and ask your student to write the new fractions corresponding to the way pies are now cut. Make sure they notice that ½ is the same as  of the pie, and that is the same as
  (and one out of three pieces is the same as two out of six). Once you have discussed this, your student can perform the addition. Here is the one thing the student should take away from this explanation: to produce pieces of the same size in both pies (which is necessary for adding fractions), one has to cut each pie into smaller pieces. (For more advanced students: the number of pieces you need to cut both pies into is equal to the lowest common multiple of the denominators — see section F-9.)
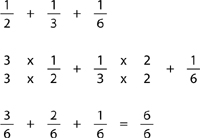
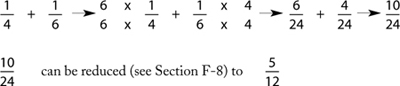
Tell your student you will now teach them a very easy way of changing the number of pieces the pie is cut into without having to draw the picture.
Step 1: Multiply each denominator by the other one. The numerator also has to be multiplied, because now you are getting more pieces:

Have your student practise this step before you go on. The student should just practise setting the right numbers in the right places. Remember you can make this step easier if necessary by having the student move one denominator at a time (see Chapter 3, pages 28–30).
Step 2: Perform the multiplication.

Practise step 1, then step 1 and step 2 together, before you go on.
Step 3: Perform the addition.
Now have the student practise all three steps.
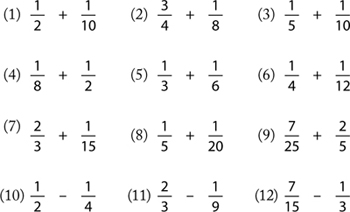
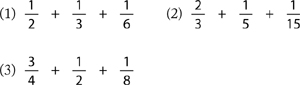
Here are some sample questions you can use during this lesson:
For students who know higher times tables, gradually mix in higher denominators like 6 and 7 (make sure the smaller denominator does not divide the larger).
Note: Two numbers are relatively prime if their least-common multiple (the lowest number they both divide into evenly) is their product. For instance, 2 and 3 are relatively prime, but 4 and 6 are not (since the product of 4 and 6 is 24, while their least common multiple is 12). The method of adding fractions taught in this section is really efficient only for fractions whose denominators are relatively prime (as is the case for all of the examples on page 72). For other cases — for instance when one denominator divides into the other or when both denominators divide into a number that is smaller than their product — more efficient methods can be found in sections F-5 and F-9.
Tell your student that sometimes you don’t have to change both denominators when you add fractions. How can you tell when you can do less work?
Step 1: Check to see if the smaller denominator divides into the larger. Count up on your fingers by the smaller denominator and see if you hit the larger denominator — if you do, the number of fingers you have up is what you multiply the smaller denominator by:
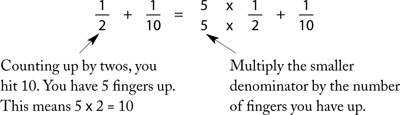
Give lots of time for practice at this step before you move on.
Step 2: Perform the multiplication.

Step 3: Perform the addition.
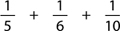
Extra: Ask your student how they would do

Here are some sample questions you can use during this lesson:
Note: If you think your student might have trouble with this section, you should start with the following exercise: tell your student that the number 2 “goes into” or “divides” the numbers they say when they are counting up by twos (2 divides 2, 4, 6, 8,10, etc). Write several numbers between 2 and 10 in a column and ask your student to write “yes” beside the numbers that 2 goes into, and “no” beside the others. When your student has mastered this step, repeat the exercise with numbers between 3 and 15 (for counting by threes) and with numbers between 5 and 25 divisible by 5 (for counting by fives). Tell your student that when they are adding fractions, they should always check to see if the smaller denominator divides into the larger; when this is the case, they only have to change the smaller denominator.
This is an important section. For many students, it may be the first time they are taught how to decide which of several algorithms they should use to perform an operation.
Tell your student always to follow these steps when given a pair of fractions to add:
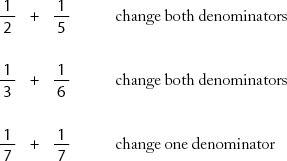
Step 1: Check to see if the two denominators are the same. If yes, write “same.” If no, go to step 2.
Step 2: Identify the smaller denominator. Count up by that number and see if you hit the larger denominator (i.e., see if the smaller divides or goes into the larger evenly). If yes, write “change one.” If not, write “change both.” (In other words, the student is identifying whether or not they will have to change one or both fractions before adding.)
Practise these steps on a variety of different pairs of fractions before going on.
Step 3: If the student has written “same,” add the fractions using the procedure in F-3. If they have written “change both,” follow the procedure in F-4, and if they have written “change one,” follow the procedure in F-5.
Typical exercise:

Give the student a number of pages on which you have mixed up the types of questions in sections F-3, F-4, and F-5. If you think your student might have trouble with this section, make sure they can recognize when one number divides into another (see the method described in the note of section F-5). Then try the following exercise:
Write a pair of fractions in which the denominator of the first fraction divides the denominator of the second fraction, and then write another pair of fractions in which the denominators are relatively prime. For, instance, you might write:

Ask your student to find the pair where the smaller denominator divides into the larger and write “yes” beside it (and “no” beside the other pair). Have them repeat this step with other pairs, without adding the fractions, until they can tell when one denominator divides another. When your student masters this step, write down more than two pairs at a time and have them identify all the yeses and all the noes (without adding the fractions).
Let your student know that this is an enriched unit. Adding triple fractions is normally not covered until Grade 6 or 7.
Give questions where two smaller denominators go into the larger, for example:
Note: When you first teach this section, place the fractions with the two lowest denominators first. After your student has mastered this, you can change the order and ask them to identify which denominators have to be changed.
Here are some sample questions you can use during this lesson:
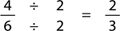
First check to see if your student knows how to divide by a single-digit number. If not, teach them as follows:

Count up by the number that comes after the division sign until you reach the number in front of the sign; the number of fingers you have up is the answer; e.g., 3 divides 15 five times, because it takes five 3s to add up to 15. Give lots of practice. Then explain to your student that the same fraction can have different representations:

For instance, with ½ of a pie and  of a pie you get the same amount of pie.
Each fraction has a representation in the smallest possible whole numbers. Finding this representation is called reducing the fraction.
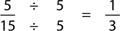
To check whether a fraction can be represented with smaller numbers, your student should check first whether the numerator divides into the denominator.
Step 1:

Step 2: If yes, divide both the numerator and the denominator of the fraction by the numerator:
Some students will need a good deal of practice with step 1. You might give your student a sheet of questions on which they simply have to count up by the numerator, checking to see if they say the denominator as they count.
Once your student has mastered the steps above, let them know that if the numerator of a fraction does not divide the denominator, they should still check to see if any smaller number divides both. If they find a number that goes into the numerator and the denominator, they should reduce the fraction as follows:
You might start by giving your student hints. You might say, for instance, “The numerator and denominator of this fraction divide by either 2 or by 3. Check which one works.”
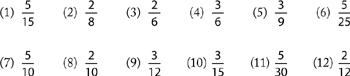
Here are some sample questions you can use during this lesson:
Division
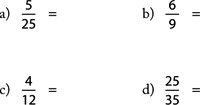
Reducing fractions (harder)
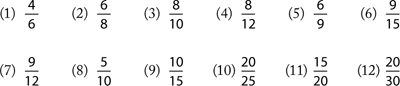
Note: If your student has just learned to multiply, ask them only to reduce fractions where the numerator and denominator divide by 2, 3, or 5. You should give them the same questions repeatedly for homework as it may take them some time to get used to reducing.
This section should only be taught to second-year JUMP students or to very advanced first years.
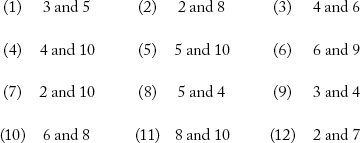
The lowest common multiple (LCM) of two numbers is the lowest number that both divide into evenly. For instance, the lowest common multiple of 4 and 6 is 12. Notice that the lowest common multiple of 4 and 6 is lower than their product (4 x 6 = 24). But with other numbers, say 2 and 3, the lowest common multiple is the product. To find the lowest common multiple of a pair of numbers, simply count up by the larger number and keep checking whether the smaller divides into the result.
Example: 4 and 6
Count up by sixes.
6: 4 does not go into 6. Keep counting up. 12: 4 goes into 12.
Therefore, LCM = 12
Example: 2 and 3
Count up by threes.
3: 2 does not go into 3. Keep counting up.
6: 2 goes into 6.
Therefore, LCM = 6
Example: 2 and 10
Count up by tens
10: 2 goes into 10.
Therefore, LCM = 10
By counting up, have your student find the LCM of the following pairs. Also have them say whether the LCM is equal to the product or less than the product.
The method of adding fractions that we taught in sections F-4 to F-6 doesn’t always yield a final denominator that is the LCM of the two denominators; by our method the student would add ¼ and  by changing both fractions as follows:
If the student thinks that the LCM of a pair of denominators may be lower than the product, then (to avoid having to reduce the answer) they should proceed as follows:
To find the LCM, count up by the larger denominator (in this case 6) until you reach a number that the smaller denominator divides into. Counting by sixes you get 12, and you can stop counting there because 4 divides into 12, so the student can use 12 as the denominator:

Make sure your student knows the LCM is also called the lowest common denominator.
Your student should try these questions:

This method will also work for triple fractions.
Tell the student to count up by the largest denominator, and at each stage to check whether the smaller denominators divide the number they have reached. For instance: two 10s are 20, but 6 does not divide 20, so the student should keep counting by tens. Three 10s are 30, and 5 and 6 both divide 30, so the student should use 30 as the denominator.
Here are some sample (Grade 8 level) questions you can use during this lesson:

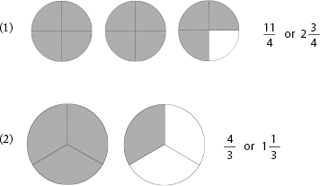
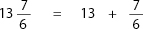
If the numerator of a fraction is bigger than the denominator, the fraction is called an improper fraction. Any improper fraction can also be written as a mixed fraction, that is, as a combination of a whole number and a fraction. For instance:

You can explain these two ways of writing a fraction with a picture.

Three half-size pieces of a pie are the same as one whole pie, plus an extra half.
How to write a fraction as an improper fraction:
Example:
Step 1: How many pieces are shaded? Answer: 7. Put this number in the numerator.
Step 2: How many pieces is each pie cut into? Answer: 3. Put this number in the denominator. (Even though you have more than one pie, the piece size doesn’t change — you still have third-size pieces in each pie — 7 all together.)
How to write a fraction as a mixed fraction:
Example:
Step 1: How many whole pies are there? Answer: 2. Write this down as a whole number.
Step 2: Write down what fraction of a pie you have in the last pie.
Give your student lots of practice in the two ways of writing a fraction. Here are some examples you might use:
Your student should be able to draw simple mixed fractions like

Your student should also be able to decide, in simple cases, which of two mixed fractions is larger. For instance,

Your student should be able to explain how they can tell when a fraction represents more than a whole pie: they should be able to say “when the top (or numerator) is larger than the bottom (or denominator) you have more than one pie.”
As a test, write out several fractions and ask your student to identify the fractions that represent more than one whole pie. For instance,

Example:
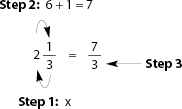
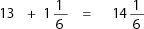
Step 1: Multiply the whole number by the denominator, i.e., 2 x 3 = 6. (To explain this step, point out that in two whole pies [each cut into three pieces], there are six pieces.)
Step 2: Add the number you got in the last step to the numerator. Put the sum in the numerator of your improper fraction. (To explain this step, point out that in the one-third pie you have one piece which has to be added to the six pieces in the two whole pies, giving seven pieces all together.)
Step 3: Write the denominator of the mixed fraction in the denominator of the improper fraction. (The two fractions have the same denominator because the piece size is still one-third.)
Here are some sample questions you can use during this lesson:
First, you may have to teach your student how to divide when the divisor doesn’t go evenly into the number being divided.
Example:

Step 1: Count up on your fingers by the divisor (e.g., 2) until you reach a number just below the number being divided (9).
If the student has trouble knowing when they should stop counting up, practise this step with various examples:

If your student is really struggling with this step, write the numbers from 1 to 10 and circle the numbers divisible by 2. This will help your student see when to stop counting. Repeat this with the numbers between 1 and 15 (for counting by threes) and 1 and 25 (for counting by fives).
Step 2: Write the number of fingers you have up on top of the division sign:

Step 3: Write the number you reached on your fingers below the number being divided:

Step 4: Subtract to find the remainder:
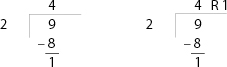
Explain that the answer on top means that 2 fits into 9 four times with 1 left over. You might draw a picture to illustrate this:

How to convert an improper fraction into a mixed fraction:
Step 1: Rewrite the fraction as a division statement:

Have the student practise putting the right number in the right place.
Step 2: Do the long division. Your student should know how to do this from the previous section:

Step 3: Use the answer to the division problem to write the mixed fraction:
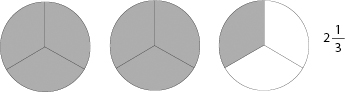
After your student has learned to convert improper fractions to mixed fractions, teach them to estimate how many whole pies an improper fraction represents. For instance,  is at least two whole pies because 3 divides into 7 two times (the remainder, 1, is the number of fractional pieces in the last pie plate).
Your student should be able to say, in simple cases, which of two improper fractions is larger. For instance,  is larger than
  because in the first case you have three whole pies, and in the latter, two.
They should also be able to say when an improper fraction is bigger than a whole number. For instance, is bigger than 2.
Finally, your student should know that an improper fraction is always bigger than a proper fraction. You might write out several pairs and have them identify the larger; for instance,  and
and  .
.
Here are some sample questions you can use during this lesson:

Note: Maggie Licata, the former executive director of JUMP, suggests a method for converting improper fractions to mixed fractions that I think is easier than the one I give above (her method also enables students to do the conversions in their heads). If you use the following method, you should still, at some point, teach your student how to do long division by the method above.
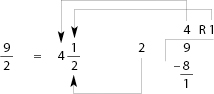
Change  to a mixed fraction:
Step 1: Count by the denominator until you reach a number just below the number being divided. (This is just step 1, as outlined above.)
Step 2: Write the number of fingers you have raised (four fingers) as a whole number:

Step 3: Write the denominator of the original fraction beside the whole number:

Step 4: Multiply the whole number by the denominator:

Step 5: Subtract the result of step 4 from the numerator of the improper fraction:

Step 6: The answer from step 5 is the numerator of the mixed fraction:

If your student has trouble with step 5, teach them to subtract as follows:

Step 1: Say the second number (“15”) with your fist closed.
Step 2: Raising one finger at a time, count until you reach the first number (the student raises one finger when they say “16” and another when they say “17”). The number of fingers you have up is the answer.
Give your student lots of practice at this. (Eventually you can give questions involving fairly large numbers such as 178 - 173 to boost your student’s confidence. Make sure the numbers you pick aren’t too widely separated: for numbers that have a difference greater than 10, it is better to subtract by lining the numbers up in the traditional way.)
Converting fractions to improper fractions, then adding them.
Example:

First, convert the fractions to improper fractions (see F-10):

Now add the fractions (as taught in F-4 to F-6):

Here are some sample questions you can use during this lesson:

Note: There is a method of adding fractions that is more efficient than the one taught above when the whole numbers or the denominators of the fractions are large. If your student finds fractions easy, you might teach them the following method. (Otherwise wait until your student has completed several other units of the manual.)
Example:

Step 1: Make the denominators of the fractions the same (as you would if you were simply adding the fractions):

Step 2: Add the whole numbers (8 and 5) and the fractions ( and ) separately, but write your answer as a single mixed fraction:

In some cases, the fractional part of the answer may be an improper fraction. For instance:

In this case, your student should change their answer as follows:
Step 1: Rewrite your answer as the sum of a whole number and a fraction:
Step 2: Rewrite the improper fraction as a mixed fraction (as taught in F-12):

Step 3: Add:
First, teach your student the meaning of the “greater than” (>) and “less than” (<) signs. Tell them the arrow should always point from the larger number to the smaller number.
Example:

Give the student practice filling in the sign with whole numbers.
Example:

Now, tell your student that to compare the size of two fractions they simply have to convert the fractions to the same denominator. The fraction with the larger numerator is the larger fraction.
Example:

Note: If you would prefer not to teach your student about inequalities at this stage, simply ask them to circle the bigger fraction.
Here are some word problems your student could try:
1. Samir ate of a pizza and Nola ate ¼ What fraction of the pizza was eaten?
2. On Monday, Mike ran for ¼ hour in the morning and ½ hour in the afternoon. What fraction of an hour did Mike run on Monday?
3. Over one supper hour, Yen used ½ of a container of tomatoes, and of a container of olives. How many containers of toppings did he use?
Give your students other questions of this sort.
Sections F-16 to F-20, below, may be taught before or after you give your student the Advanced Fractions Test on page 113.
As your students master the operations in this unit, teach them to articulate the general principles underlying the operations.
You might, for instance, eventually write out simple phrases on their homework that they should be able to repeat and explain.
For example:
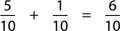
• To add two fractions with the same denominator, you just add the numerators (you are adding up the number of pieces).
• The denominator stays the same because it tells you how many pieces the pies are cut into (the piece size).
• The bigger the denominator, the more pieces in the pie, so the smaller the piece.
• When the denominators are different, you must change one or both before you can add the fractions.
To help your student remember an operation and articulate how it works, the following exercise is very effective:
Write down several examples of the operation in which you have made some errors. For instance, if you have covered section F-6 of the manual you might write,
Ask your student to find your mistakes, and explain what you did wrong. Students enjoy this: they work very hard to find your mistakes (and usually keep reminding you that you made them).
The parts of a fraction are equal shares of a whole thing or set. These shares are most commonly represented by regions of a figure (such as a line, circle, or square), or parts of a set.
The exercises below introduce the notion of equal parts, and present an assortment of models of fractions.
1. Circle the pictures that are not good models of one-third.

2. Circle the pictures that are not good models of one-fourth. Why are the pictures you circled not good models?

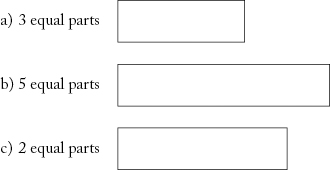
3. Use a ruler to divide each line into equal parts.
a) 6 equal parts ______________________________________________
b) 5 equal parts ____________________________________
c) 2 equal parts ______________
4. Use a ruler to divide each box into equal parts.
5. Use a ruler to divide each box into square boxes.
6. What fraction of the following figures are: a) circles? b) squares?

7. What fraction of the following figures are: a) circles? b) squares? c) triangles?

8. What fraction of the following figures are: a) grey? b) black? c) triangles? d) black circles? e) grey circles? f) black squares?

9. There are five children:  are boys and
  are girls. Draw a picture showing the girls and boys.
10. What fraction of the edges in the triangle are the same length? (Use a ruler to find the lengths.)

11. What fraction of the edges are on the outside of the figure?

12. What fraction of the squares are on the outside of the figure?

13. A hockey team wins 3 games and loses 2 games.
a) How many games did the team play?
b) What fraction of the games did the team win?
c) Did the team win more than half its games?
14. A hockey team wins 6 games, loses 4 games, and ties 1 game. What fractions of the games did the team...
a) win?
b) lose?
c) tie?
15. The chart below shows the number of children in a class with each given hair colour.

What fraction of the children have hair that is
a) red?
b) black?
c) blond?
d) brown?
16. A box contains 3 red marbles, 2 blue marbles, and 6 yellow marbles. What fraction of the marbles are not red?
The denominator of a fraction indicates the number of pieces in the whole, and the numerator the number of pieces being considered. Given a pair of fractions with the same numerator, the fraction with the larger denominator is smaller. Conversely, given a pair of fractions with the same denominator, the fraction with the biggest numerator, is bigger (as it contains more parts). The size of the part of a fraction depends on the size of the whole. The exercises below illustrate several ways of introducing these ideas. You might use concrete materials, such as pattern blocks, to reinforce the idea of fractional size: for instance, your student could use hexagonal and triangular blocks to answer question 11 below.
1. Which fraction has a larger numerator, ¼ or ¾? Which fraction is larger? Explain your answer with a picture.
2. Circle the larger fraction in each pair:

3. Fraction A and fraction B have the same denominators (bottoms) but different numerators (tops). How can you tell which fraction is larger?
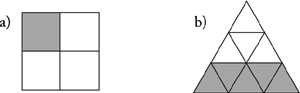
4. Cut the square in half. What fraction of the square is each part? Cut each of the parts in half. What fraction of the square is each new part? As the denominator of the fraction increases, what happens to the size of the piece?

5. Circle the larger fraction in each pair:

6. Fraction A and fraction B have the same numerators (tops), but different denominators (bottoms). How can you tell which fraction is larger?
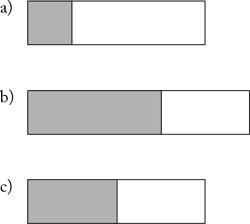
7. Using a ruler, find what fraction of the box is shaded.
8. Each of the lines below is one-third of a line. Use a ruler to draw the whole line.
a) _______
b) _______________
9. Using a ruler, complete the figures to make a whole.
10. Draw lines from the point in the centre of the hexagon to the vertices of the hexagon. How many triangles cover the hexagon?

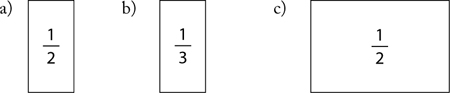
11. What fraction of each figure is the shaded part?

12. What fraction of the figure is the shaded piece?

13. The shaded pieces have different shapes. But are they different sizes? Explain your thinking.

14. Is it possible for of a pie to be bigger than ½ of another pie? Show your thinking with a picture.
Your student should know how to represent a fraction of a set when the denominator of the fraction divides into (but doesn’t match) the number of objects in the set.
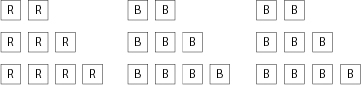
For this exercise you will need objects of two different sorts, for instance, red and blue blocks (which are represented below by squares with the letters R and B in them). Have your student carry out the following exercises:
1. Using 2 blocks, make a model of ½. Answer: 
2. Using 3 blocks, make a model of . Answer: 
3. Using 5 blocks, make a model of . Answer: 
(In all of these questions, the denominator of the fraction matches the number of blocks in the model: make sure your student knows how to build any such model before you go on.)
Now have your student build a model of ½ using 6 blocks as follows:
First, make a model of ½ using the number of blocks given by the denominator of the fraction (in this case, 2). Make sure there is some space between the blocks:

Think of the red and blue blocks as position markers: you are allowed to add 1 block at a time, to each position, until you have 6 blocks all together (the blocks added must match the colour of the position).
Add 1 block to each position:

Add another block to each position:

The procedure stops at this point, as the model contains 6 blocks.
Here is another example: Build a model of using 12 blocks.
First, build a model of using 3 blocks (that is, using the number of blocks given by the denominator):

Now continue adding blocks to the positions until you have 12 blocks:
Push the blocks in each position together to show that 12 has been divided into three equal parts, or thirds:

Your student should see that is equal to  . Also, point out that the number of blocks in each position (4) is equal to the total number of blocks (12) divided by the denominator of the fraction (3). One-third of 12 is 4.
Allow your student enough practice building models that they can answer questions of the following sort without the model:
Suppose you were to build a model of using 20 blocks.
• How many positions would you start with? Answer: 5 positions. (This is just the denominator of the fraction.)
• How many of the starting positions would be red? Answer: 2 positions. (This is just the numerator of the fraction.)
• How many blocks would you place in each position? Answer: 4. (Divide the total number of blocks in the model by the number of positions.)
• How many blocks in your model would be red? Answer: 8. (There are 2 red positions, with 4 blocks in each position.)
This exercise gives another way of visualising cases where the denominator of the fraction divides the total number of objects.
Start with the following questions:
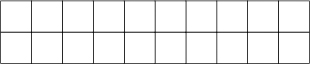
1. Shade of the boxes. 
2. Shade of the boxes. 
3. Shade  of the boxes.
Make sure your student understands that these questions are easy because the denominator matches the number of boxes; the number of boxes you shade is simply the numerator of the fraction.
Now show your student how to shade of 10 boxes as follows:
Step 1. Divide the number of boxes by the denominator of the fraction:

Step 2. Multiply the top and bottom of the fraction by the answer from the previous step:
The idea in this step is to make the denominator of the fraction match the number of boxes. Once you have changed the fraction, you can see immediately how many boxes you should shade — it’s just the numerator of the new fraction: i.e., you shade 6 boxes:

Give your student practice with questions of the following sort: Shade  of 9 boxes; shade ¼ of 12 boxes; etc. You might also draw arrays of dots and have them circle fractions of the arrays, for instance:

You might also give your student questions where they have to deal with more than one fraction, for instance:
Colour ¼ of the boxes red, blue,  green, and
  yellow. (In this case, they must change all the denominators to 20.)
Here are some more questions your student could try:
1. Draw 12 boxes. Colour red, ¼ blue and  yellow.
2. Draw 8 boxes. Colour ½ red, ¼ blue and ¼ yellow.
Teach your student how to find fractions of whole numbers in their head.
Example: Find of 15.
Step 1. Divide the whole number by the denominator of the fraction:

Step 2. Multiply the top and bottom of the fraction by your answer from the last step:
Step 3. The numerator of the new fraction is the answer to the question:
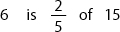
If your student wants to take a shortcut, they can simply multiply the numerator by the result of dividing the whole number by the denominator:

Here are some questions your student could try:
1. Find of 10.
2. Find ¾ of 12.
3. Find  of 25
of 25
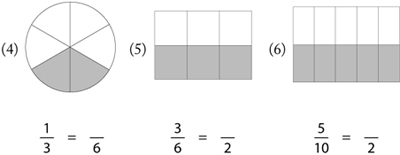
Your student should also be able to solve the following equivalence problems by looking at the pictures:
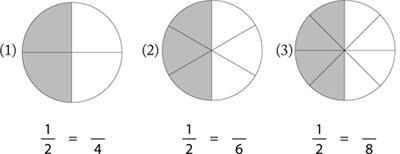
Your student should also be able to answer these questions:
1. Name a fraction equivalent to a whole pie.
2. Draw and shade ½ a pie. By cutting the shaded and unshaded pieces into smaller pieces, find a fraction equivalent to ½. (Repeat this question with .)
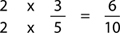
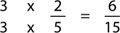
Tell your student that when they multiply the numerator and denominator of a fraction by a given number, say 2, they should simply imagine cutting each piece of a pie representing the fraction into two pieces.
For instance,
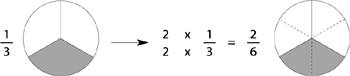
To add a pair of fractions with different denominators, you must cut both pies into the same number of pieces (see the picture of ½ + in section F-4). For instance,

Here, you are cutting each piece in the first pie into two pieces, to give four pieces all together.
Show this with a picture:

JUMP students who complete sections F-1 to F-15 of the fractions unit must score 80% or higher on the Advanced Fractions Test before they move on to new units. The Advanced Fractions Test does not completely test a student’s understanding of fractions. The point of the test is largely psychological: students who learn to perform complex calculations with fractions, and who do well on the test, show remarkable improvements in confidence, concentration, and numerical ability. This has been demonstrated in 50 elementary classrooms, with more than 1000 students.
The concepts underlying fractions are introduced more fully in sections F-16 to F-20 of the fractions unit (and also in the Fractions II unit of The JUMP Teaching Manual ).
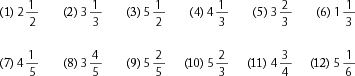
1. Name these fractions:
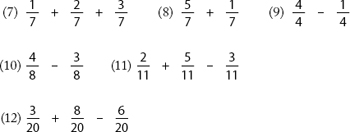
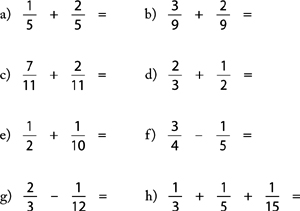
2. Add or subtract:
3. Reduce:
4. Convert to an improper fraction:

5. Convert to a mixed fraction:

6. Add:

7. Circle the larger fraction in each pair:

8. Samira ate ¼ of a pizza and Tom ate  . What fraction of a pizza did they eat?