Figure 3.1
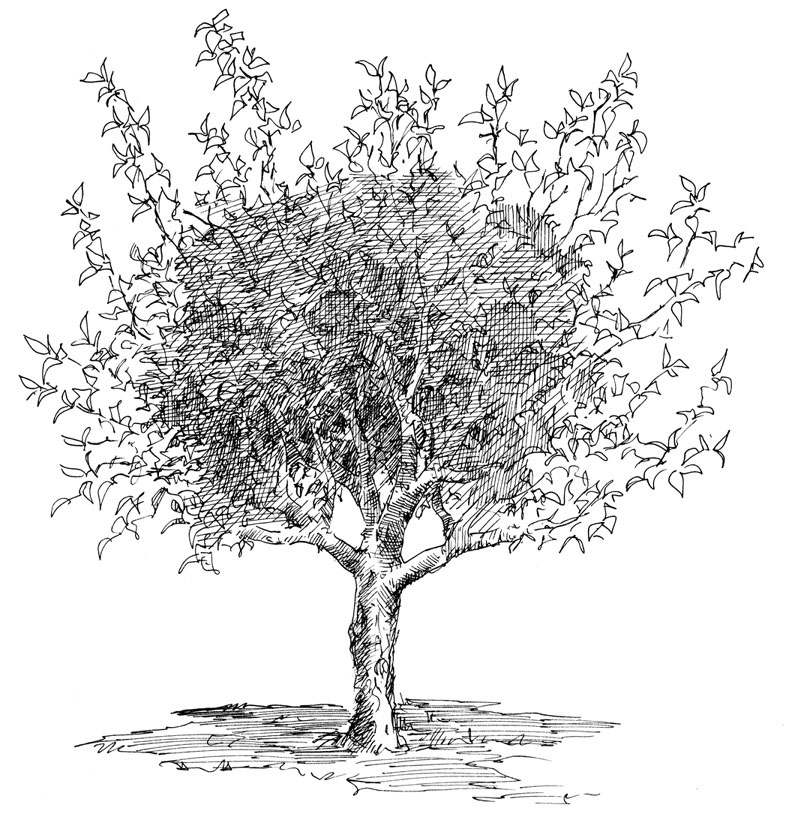
A) Much of the volume of large trees is shaded and unproductive.
B) Small, open trees are productive throughout the entire canopy.
Here is where the fun starts. Whether you are planting one tree or 10,000, the same principles apply. For those of you with established orchards, this will be a good opportunity to evaluate your orchard and, perhaps, update your orchard layout and training systems. Take the time to get your design right before buying trees and equipment or changing management practices. Investing in trees and trellises, laying out fields and roads, and installing irrigation systems and fences are long-term decisions that can be expensive and difficult to change. For organic growers, it is very important to create a design that minimizes pest and disease problems and lends itself to organic management practices. And again, you also want to think about how you will market your crops, as discussed in chapter 14.
Creating and fine-tuning your orchard on paper is much easier and less expensive than correcting mistakes later on. Our goal is not to create a good orchard, but to create a great orchard!
One of the first decisions you need to make is the size of trees that you will grow. When I first started working in fruit culture, dwarf apples were just becoming commercially popular and dwarf sweet cherries were still a dream. Many orchards consisted of huge trees spaced far apart. Speaking from experience, pruning or harvesting a 20- to 30-foot-tall apple, pear, or sweet cherry tree is a highly overrated pastime. Worse still, yields and fruit quality are often poor, pest and disease management are difficult, and labor costs are high for large trees. If you are growing fruit in a home landscape, one or two large fruit trees can dominate your yard. By planting smaller trees, you not only enjoy greater diversity in your fruit production but are usually rewarded with better-quality fruit, higher usable yields, and less work.
The case for small trees. Modern orchards typically consist of relatively small trees that are sometimes supported on wires or poles. While an individual small tree produces less fruit than a large one, you make up the difference in yield by planting many more small trees in a given space. Although your initial establishment costs are greater because you need to buy more trees and may have to build supports for them, smaller trees offer many advantages.
First, large trees are less efficient fruit producers than small trees. If you examine a large, healthy fruit tree, you will find that most of the leaves and fruit are borne on a thin shell on the outside of the tree, rather like the skin of a balloon. According to research, few fruits form more than 18 to 24 inches from the outer surface of a dense canopy. The interior portion of a large tree is mostly branches and empty space that produce little fruit. The interior is also highly shaded. What few fruits are found there are usually small and poorly colored and may be misshapen. Much depends on the pruning and training, of course. Trees that are pruned to open shapes are more fruitful in the interior than are denser trees. Figure 3.1 shows the productive areas of large and small trees.
Labor needs are greater with large trees due to the need to use ladders for pruning and harvesting. Pruning also involves removing larger wood than is necessary with smaller trees and pruning as many as three times per year, instead of once during the dormant season. If you are operating a U-pick orchard, large trees greatly reduce the amount of fruit that is harvested because it is harder to pick and customers will not necessarily be willing to climb to the treetops to harvest fruit there. The risk of injury and potential liability also increase whenever your customers’ feet leave the ground.
Large trees usually have more pest and disease problems than smaller trees. Large, dense trees trap humid air, restrict drying winds, and screen out sunlight. All of these factors favor bacterial and fungal infections. Dense trees can also tip the balance from beneficial insects and mites to pest species. Tall, dense trees make scouting for pests and diseases and spraying pesticides (organic, of course!) more difficult, and unharvested fruits in the tops of tall trees serve as nurseries for next year’s pests and diseases. Large trees also require more pesticides and reduce the percentage of leaf and fruit surfaces that are effectively covered by the pesticides, compared with smaller trees.
A) Much of the volume of large trees is shaded and unproductive.
B) Small, open trees are productive throughout the entire canopy.
Large trees also tend to begin bearing fruit crops slowly. Grafting a fruit variety onto a precocious, dwarfing rootstock can cut the time to production tremendously. In the Pacific Northwest, fruit specialists report that sweet cherry trees on Gisela dwarfing rootstocks begin bearing in the third leaf (third growing season from planting), are up to 50 percent smaller than trees on the older Mazzard rootstock, and begin turning profits in 8 years, as opposed to 15 years on Mazzard rootstock. The time needed to prune and harvest the smaller cherry trees is half that for larger trees. Depending on the training system and scion, sweet cherries can be maintained 8 to 10 feet tall, compared with 20-foot-tall trees in a traditional orchard.
While I advocate small trees, if you have a large, old fruit tree, do not feel the need to cut it down. The principles of organic fruit production still apply, although they will be rather more challenging and less effective with standard-sized apple, pear, and sweet cherry trees.
The right small size and number. It is possible to go too small. Extremely dwarfing rootstocks for apples create weak, unfruitful trees. Some nurseries promote genetic dwarf peaches, but these trees produce few or very small fruits. In cooler climates and on poor soils, a fruit tree’s growth is naturally less than it would be in ideal climates; in such environments, it is best to plant moderately vigorous to vigorous trees.
Growing small trees can create financial advantages in the long run and financial disadvantages in the short run. High-density systems made up of many small trees often produce high early yields, but they cost more to establish than low-density orchards made up of fewer, larger trees. If you need to support the trees on trellises, the cost rises substantially. The advantage is that high-density plantings increase profitability by increasing yields. This concept became popular during the 1970s and 1980s. The extreme example was the “meadow orchard” system for peaches that contained 7,500 or more trees per acre.
Today’s marketplace, in which new, high-value fruit varieties are being released frequently, has made commercial growers push to get as many trees as possible into bearing quickly while demand for a particular variety remains high. Early returns on investment, high yields, and premium prices for popular varieties can offset high establishment costs and make the strategy feasible. This strategy requires high-density plantings of small trees.
These designs often include support systems for the trees. The expected productive life of high-density, high-value orchards can be short — the strategy being to replace the trees with another hot new variety in 15 years or less. From a strictly economic perspective, quick-turn-around orchards make sense. From a long-term sustainability perspective, the answer is less clear and depends on your personal values and needs.
For many growers, particularly those new to fruit growing, small- to moderate-sized trees in the 6- to 14-foot height range work very well. For apples, pears, and occasionally other fruits, support systems are viable and can be economically rewarding. The trade-off is increased establishment costs for trees and trellises. Freestanding trees reduce establishment and maintenance costs, but you will probably have lower early yields, and it may take longer to achieve full production and earn a positive return on your investment.
Some organic orchardists remain leery of growing trees that are too small and prefer medium-sized trees. The rationale is usually that more vigorous trees are better able to cope with competition from alley cover crops, in-row cover crops, and/or weeds. This approach can be important to organic fruit growers, due to the lack of effective herbicides to manage the orchard floor. The larger trees also tend to fill the canopies more quickly than very dwarfing rootstocks. The trade-off here is that the more vigorous rootstocks can increase pruning labor and make maintaining abundant, small-diameter fruiting wood more difficult.
There is no perfect tree size and no perfect training system. Whether for a large commercial orchard, a small market orchard, or home fruit production, select trees and a growing system that fit your lifestyle and needs. Many options are available, from thousands of trees per acre hanging on wires, to a moderate number of freestanding trees, to one or a few gentle giants in your yard.
Fruit trees are propagated in four ways: growing from seed, layering root suckers, budding or grafting pieces of a variety onto a rootstock, and inserting a short interstem between the rootstock and scion of a grafted tree. Depending on the crop and training system, trees that are 6 to 14 feet tall work well in modern orchards and home fruit plantings.
Trees that are grown from seed are produced from their own rootstocks. This method works well only for a handful of minor crops, such as Damson plum and Nanking cherries, as discussed in chapters 5 and 6. Alternatively, if you have found a seedling that you like, you can propagate it vegetatively by layering root suckers (creating roots on young shoots that grow from the roots or collar). As with seedling trees, you are growing the variety on its own roots. If you want to layer a fruit tree using suckers arising from the ground or base of the tree, be sure that the tree is not grafted. Otherwise, you will likely be propagating the rootstock (the bottom part of the tree), not the scion (the top part), and you will not get the type of fruit that you want. (See figure 3.2.)

A) Layering using a root sucker
B) Rootstock production in a stool bed
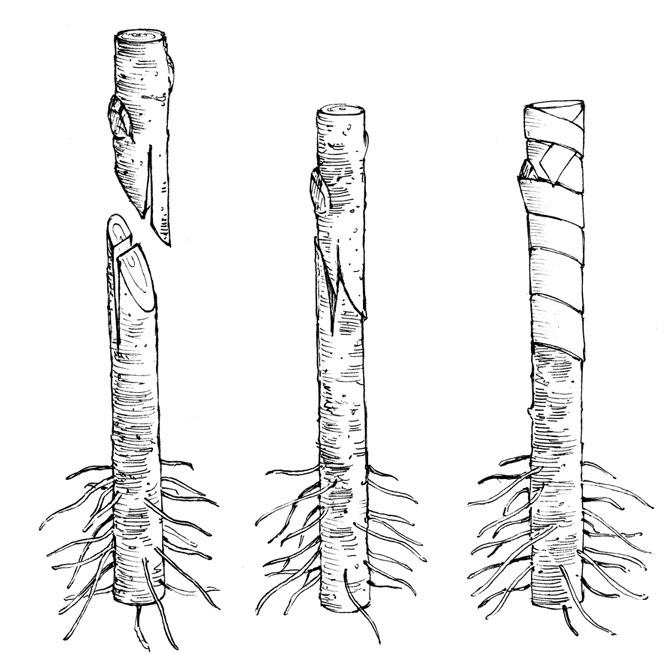
C) Whip-and-tongue grafting (not for stone fruits!) onto a rootstock
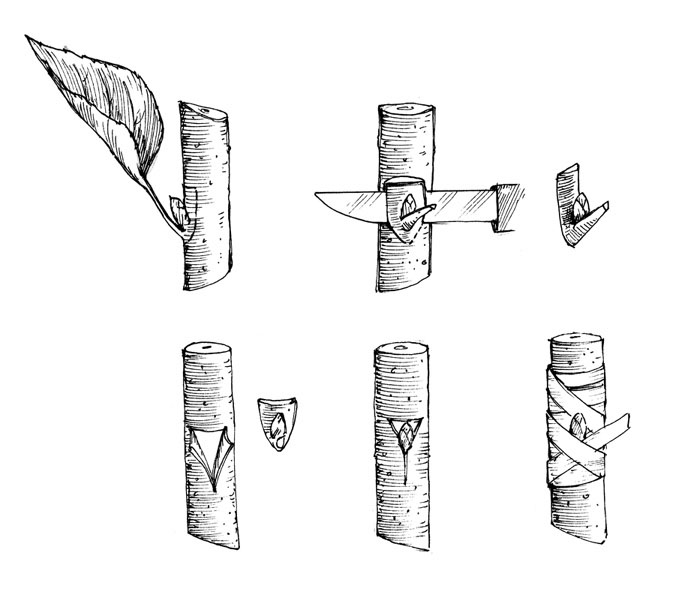
D) T-budding onto a rootstock
Rather than layering fruit trees, we usually bud or graft pieces of a desirable variety onto a suitable rootstock. In a fourth method, we sometimes insert a short interstem between the rootstock and scion, usually to control the size of the tree when using a vigorous rootstock. The bottom part of the rootstock provides adaptability to the soil while the interstem controls the tree’s size. The rootstock provides the foundation for the tree. The scion produces the variety of fruit that we want.
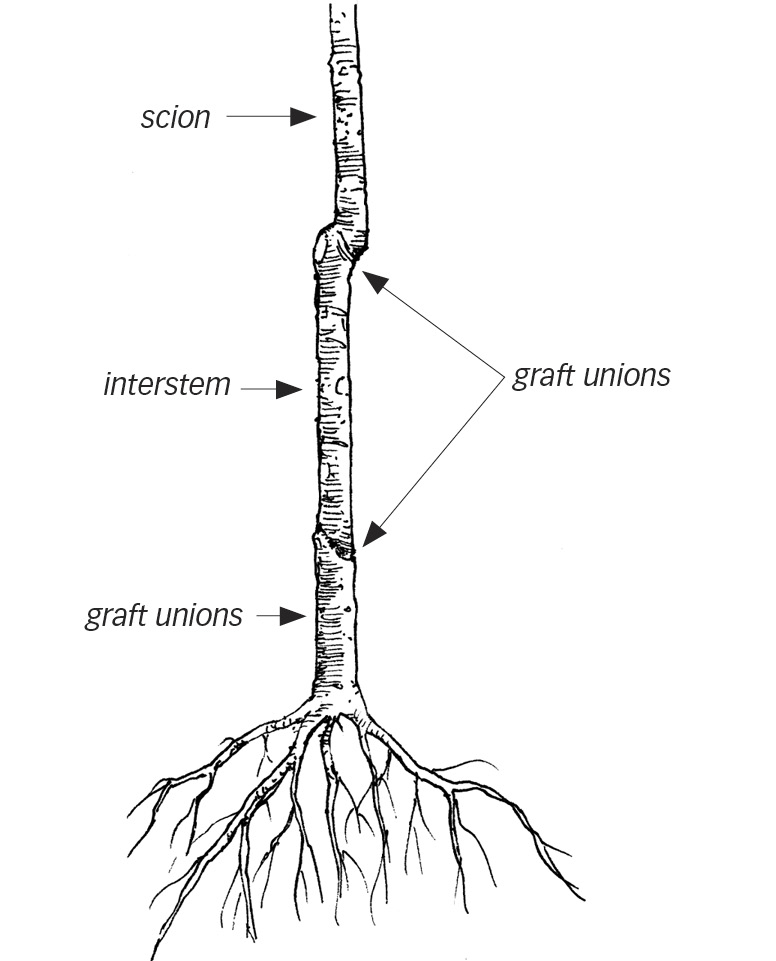
A grafted tree using a root stock for soil adaptability, an interstem for size control, and a scion for fruit variety
When selecting a rootstock, we consider its compatibility with the scion variety, its precocity (time to fruit bearing), its adaptability to different soil and climate conditions, and its resistance to pests and diseases. When choosing pear, apple, and sweet cherry rootstocks, size is often an important criterion.
Seedlings and trees grafted to seedling rootstocks generally grow to be about the same size as the seed tree. For apples, this might be 40 feet tall; for sweet cherries, 60 feet. For grafted or budded trees, the size of the tree varies according to the vigor of the rootstock, scion, and interstem (if used).
Fortunately, there are many good size-controlling and standard-sized rootstocks for apples, pears, and sweet cherries. These rootstocks allow you to grow small, medium-sized, or large trees. Many popular rootstock/variety combinations today produce apple and cherry trees that are 40 to 70 percent of the height of standard-sized trees. Some rootstocks produce even smaller trees. The scion variety also influences the final size of the tree, particularly with sweet cherries — more vigorous varieties produce somewhat taller trees than less vigorous varieties. Apricot, peach, nectarine, plum, and tart cherry trees can be produced efficiently on non-dwarfing rootstocks, although dwarfing rootstocks are sometimes available for these crops. (See chapters 5 and 6 for specific rootstocks.)
You can further reduce the size of trees by planting trees closer together, cropping the trees heavily, and pruning to remove excessively vigorous growth. The illustrations at left show typical sizes of apple and sweet cherry trees that develop on selected commercially available rootstocks.
Before you buy any trees, ask the salesperson what rootstocks the trees are grown on. If the response is a glazed look or gibberish about dwarfs and semidwarfs, find a nursery where the people know what they are doing. Again, select tree sizes that fit your needs. Don’t be pressured into buying trees that will grow smaller or taller than you are comfortable with.
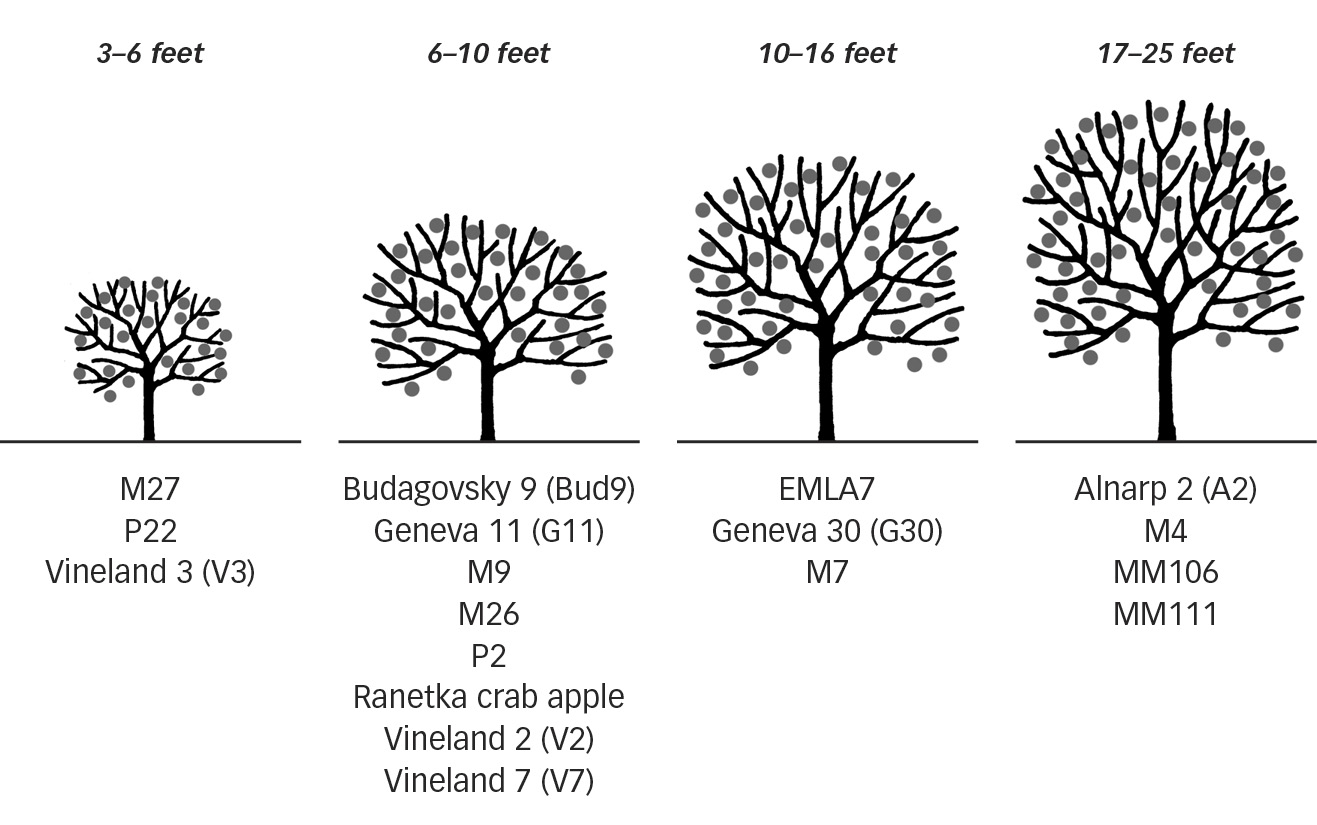
Note that a particular rootstock/scion variety combination can vary substantially in height in different growing regions and is strongly affected by training and pruning practices.
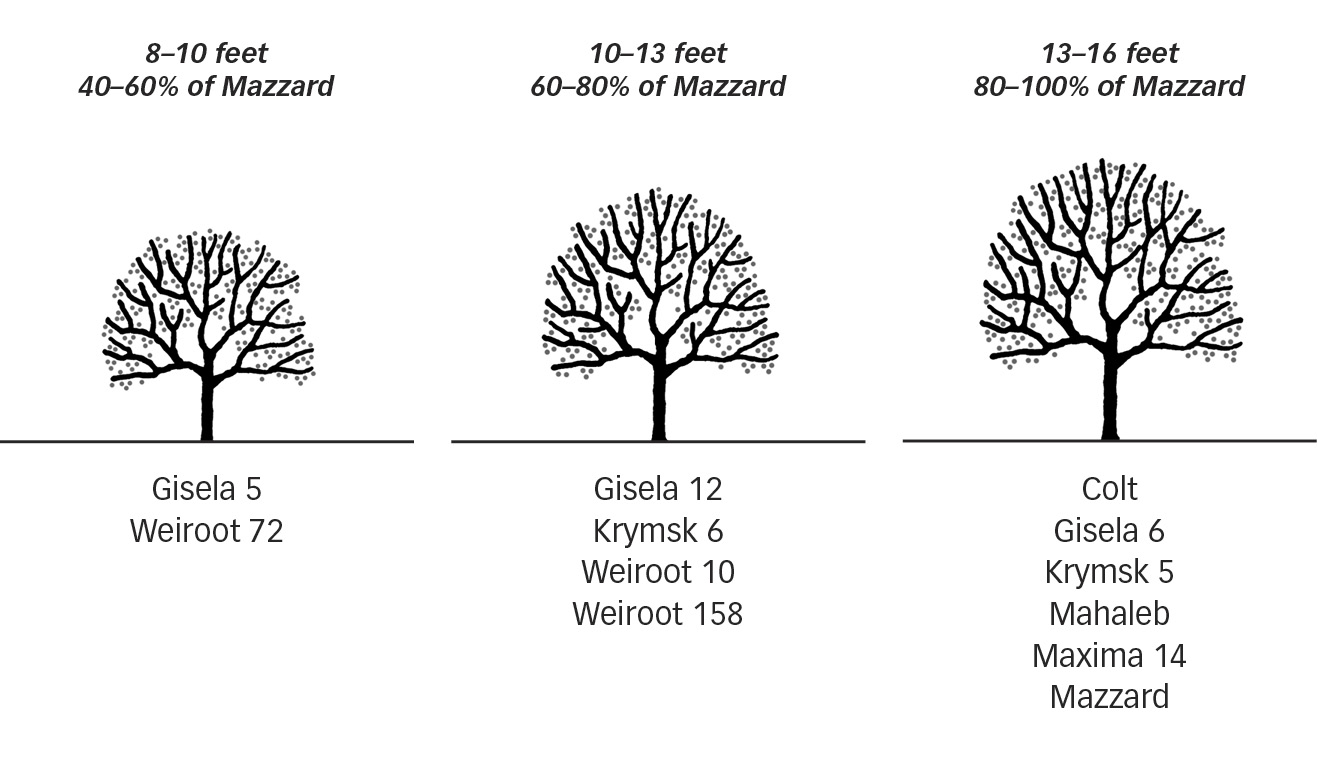
Standard-sized cherry trees (Mazzard rootstock) can grow 40 feet tall if left unpruned but are normally kept about 16 feet tall in orchards. The relative heights in this figure are based on a 16-foot height for a full-sized tree. Note that rootstock/scion variety heights vary substantially in different regions and with different training and pruning practices.
You often hear the terms “dwarf” and “semidwarf” used to describe fruit trees on size-controlling rootstocks, particularly when talking about apples and sweet cherries. To be blunt, the terms are meaningless. A “standard” apple is about 25 feet tall or somewhat taller. You can reasonably argue that 20-foot-tall trees on a particular rootstock are dwarfs. Technically, that is correct. From a practical perspective, that amount of dwarfing is insignificant.
Regardless of the size of your trees, it is important to select a suitable training system to create an efficient and productive orchard. Choose a system that will optimize the fruit-bearing surface of the trees and the number of trees for your orchard. Note that I use the word optimize, not maximize. We want the system to be sustainable for the long term. We also want a system that works well for organic production and that fits the site and your lifestyle. Which training system you select determines the amount of labor needed to manage and harvest your trees, and it has a huge influence on pest and disease management strategies and effectiveness.
Training systems and rootstocks are introduced here to help readers begin planning the orchard layout. Detailed descriptions for various training systems and instructions for creating and maintaining them are found in chapter 12.
Pome and stone fruit trees can be grown freestanding or supported on trellis wires and/or poles. Until roughly the 1970s, freestanding trees were the rule, with the occasional exception of ornamental trellising of apples and pears in landscape designs. Since then, wire and pole systems have been developed for the high-density production of tree fruits. The goals of these systems are to produce fruit, rather than wood; bring the trees into production quickly; increase yields; and increase profits.
A word of caution: One of the most common mistakes new growers make is to plant their trees too closely together, which soon creates crowding and tree health problems. Rows that are too narrow and trees that are planted too closely together make orchard work difficult and reduce labor efficiency. Trees that are planted too far apart yield less fruit. The following sections provide suggested within- and between-row spacings for tree fruits.
Of all the tree fruits, apples are the most complex crop because of the large numbers of varieties, rootstocks, and training systems. That being said, apples are among the easiest tree fruits to grow and adapt to many different growing areas. Don’t allow yourself to become overwhelmed by the sheer numbers of combinations and options available. Stay focused on basic fruit-growing principles and your needs. Table 3.1 reduces the many variations into seven basic systems and gives recommended planting distances within and between tree rows. Chapter 12 provides details on the training systems described below.
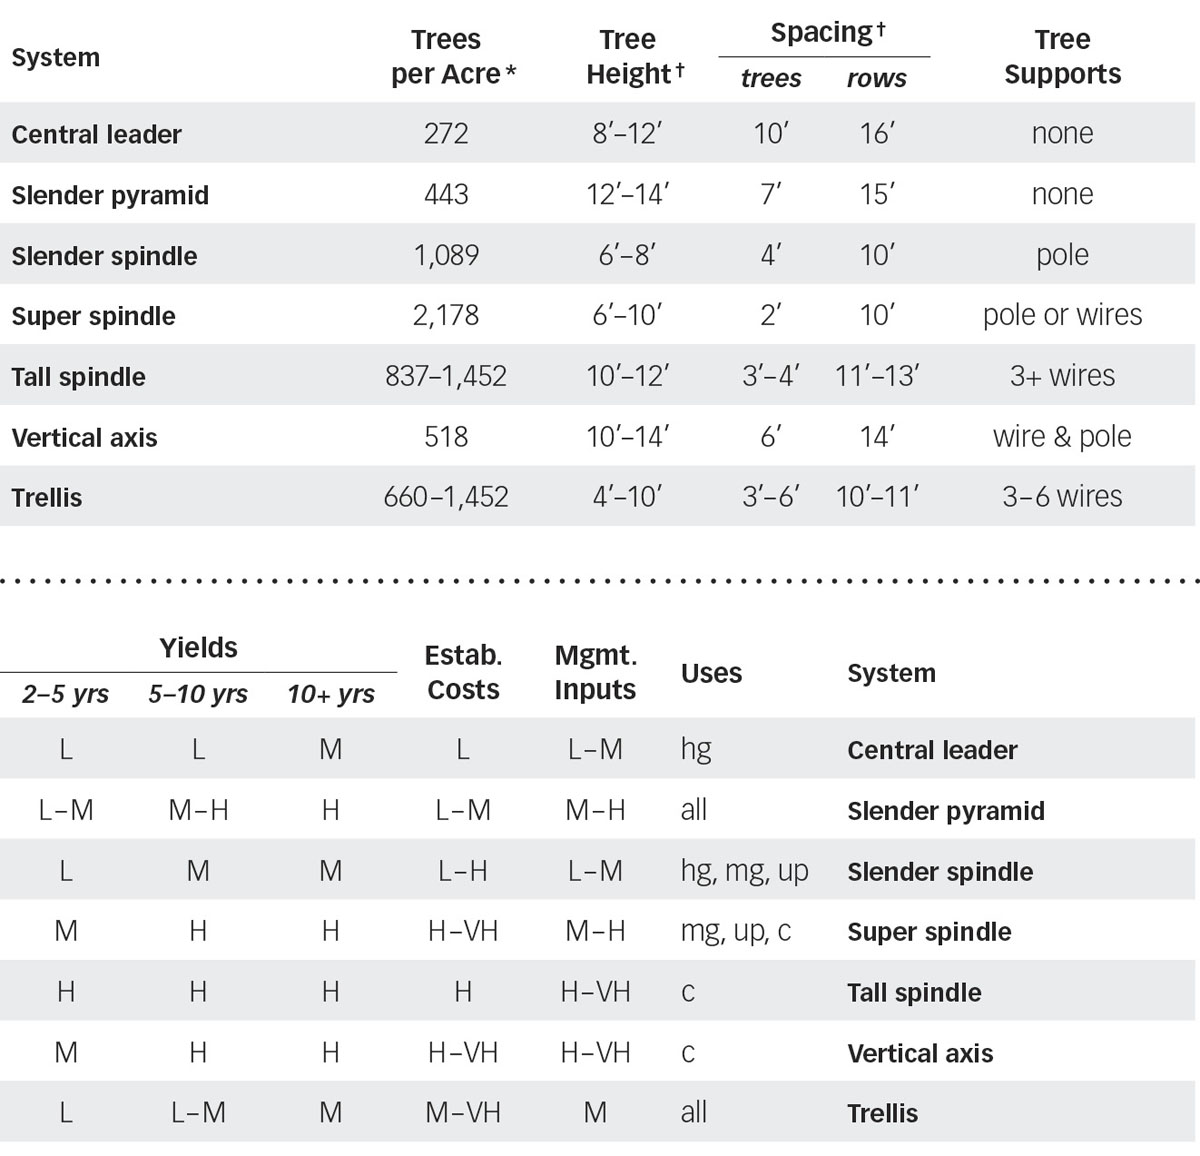
In the not-distant past, large apple trees were often planted 20 feet or more apart, allowing around 100 trees per acre. Plantings of 200 to 300 trees per acre were considered high-density. Today, apple orchards of 500 to 1,000 trees per acre are common, and some systems have more than 2,000 trees per acre.
In trials conducted at Cornell University, researchers evaluated various apple training systems. The lowest yields for the first 4 years of the trials came from freestanding trees trained to central leaders (218 trees/acre). For trees on supports, slender pyramid training (444 trees/acre) produced the lowest yields, followed by slender axis training (726 trees/acre). The tall spindle system (1,307 trees/acre) produced the earliest and heaviest yields. Figure 3.6 shows how tree planting density affects apple yields.
In related apple training system trials in New York, researchers estimated the earliest financial breakeven points for new orchards using each system (shown on the next page). Growing apples is not a get-rich-quick enterprise!
Trials have been conducted in British Columbia, Pennsylvania, and other locations around the world with generally similar results. For new commercial apple orchards, most North American experts now generally recommend some variation of a vertical axis or tall spindle design.
Pear orchards, particularly in North America, have traditionally been low- to medium-density plantings of freestanding trees or trees trained to palmette shapes and sometimes supported on trellis wires. Even today, that approach remains common in the United States. Internationally, research on high-density pear plantings has paralleled, but lagged behind, that on apples. Because the methods used to produce apples and pears are very similar, modern pear systems are largely adapted from apple systems. As with apples, the move toward higher densities is largely driven by the desire to increase early yields and profitability. Unlike for apples, there are relatively few new pear varieties entering the market, so there is little need to establish short-term plantings to capture the market for hot new varieties. There are also far fewer pear rootstocks available than are available for apples.

Most existing commercial pear orchards in North America use either freestanding central leader trees or trees trained on wire trellises. Freestanding trees for home and commercial production are best trained to conic or pyramidal shapes, as for apples. High-density training systems that are being tested and used commercially worldwide include variations on the spindle, vertical axis, double leader, and split canopy designs (V, Y, and Tatura). Other than the double leader and split canopy systems, these designs are very similar to those we discussed for apples. Table 3.2 below lists basic pear training systems. In international and U.S. trials, split-canopy systems, particularly the Tatura, have often proven highly productive but increase the difficulty of managing pests and diseases. Perhaps the best choice for organic, high-density pears is the double leader system (see chapter 12 for more details).
In addition to apples and pears, loquat, mayhaw, medlar, quince, and saskatoon are pome fruits that are grown for personal and commercial use in North America. Being minor commercial crops, their production systems are usually very simple and involve freestanding trees or bushes (we’ll cover these crops in more detail in chapter 5).
Loquats are a Chinese fruit long domesticated and grown in southern California, Florida, coastal Georgia, and Hawaii. These large evergreen shrubs or small trees can reach 30 feet tall but are generally kept about 10 feet tall, and quince rootstocks can be used to produce smaller plants. Loquats are generally grown freestanding and are planted 20 to 25 feet apart within and between rows.
Quince and medlar are very similar to pears in many respects. Table 3.3 shows typical spacings for freestanding trees. Medlar trees are spaced 7 to 20 feet apart in rows 15 to 20 feet apart, and quince trees are spaced about 15 feet apart in rows 20 to 25 feet apart. The newer training systems that work for apple and pear may be effective for quince and medlar (tables 3.1 and 3.2) and are worth experimenting with.
Spacings are given for plants grown as freestanding trees or bushes.
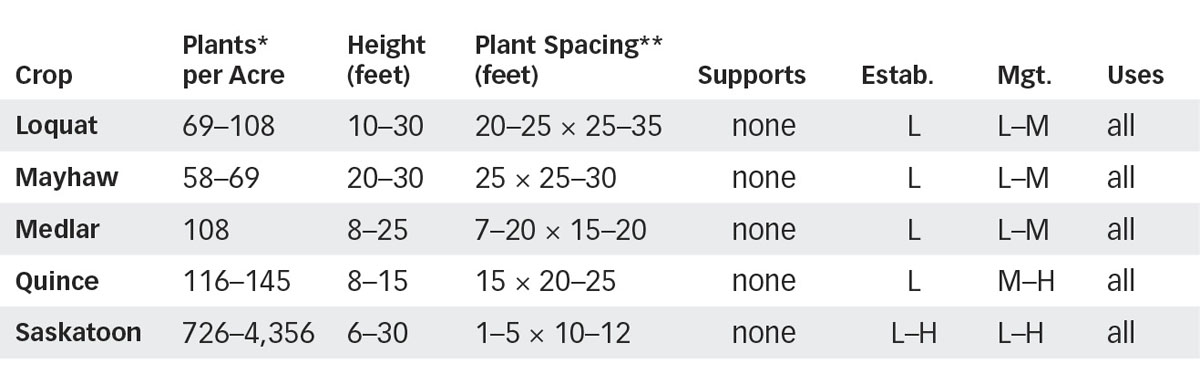
*Plants per acre refers to solid blocks and does not take roads into account. These are typical densities for the respective crops.
**Plant spacing refers to distance between plants × distance between rows.
Key: Estab. = establishment costs; Mgt. = management inputs
L = low, M = moderate, H = high, VH = very high
Uses: hg = home orchards, mg = market orchards, up = U-pick, c = commercial grower pick
Mayhaws are hawthorns adapted to the southern and southeastern United States and have recently been domesticated. Although early recommendations were to plant mayhaws 15 to 18 feet apart, experience has shown that a spacing of about 25 feet apart within and between rows works better.
Saskatoons are bush fruits that resemble blueberries in size, shape, color, and flavor. Wild bushes can reach 30 feet, but the plants are usually kept to about 10 feet tall or less in cultivation. Very dense hedgerows designed for mechanical harvest can be created by planting the saskatoons 12 inches apart in rows 10 feet apart. A more typical spacing would be 3 to 5 feet apart in rows 10 to 12 feet apart.
As with apples, fruit growers around the world have made tremendous advances recently in developing new cherry varieties, rootstocks, and training systems. While the drive has primarily been due to the desire for increased yields and profits, market and noncommercial fruit growers are also benefiting. Not so long ago, cherry trees were planted on standard rootstocks and developed into large trees. Without intensive management, the trees often grew 25 to 40 feet tall, with little fruit within 8 to 10 feet of the ground.
With today’s dwarfing rootstocks and improved training methods, we can keep cherry trees 8 to 16 feet tall. With some trees, 80 to 100 percent of the fruit can be harvested from the ground. Two genetic dwarf tart cherries grow only 6 to 8 feet tall and are ideal for home orchards.
That is the good news. On the downside, we are at the beginning of a very steep learning curve when it comes to dwarfing cherry rootstocks and high-density training systems. What we do not know is much greater than what we do, and growers must exercise caution when investing heavily in new varieties, rootstocks, and training methods. Further, combinations that work well in the Pacific Northwest may perform poorly in eastern North America and systems that are successful in Europe and Australia do not necessarily work well here.
Generally speaking, North American commercial cherry growers have been slow to adopt high-density cherry training systems. Research by growers and fruit specialists at universities and government agencies in the United States and Canada is underway and promising, but the present trend in North America is to continue with medium-density cherry orchards and rather simple training systems. One of the most serious problems with precocious, highly productive rootstocks is that, as the trees mature, they bear too many fruits and fruit size becomes too small to market. We are also finding that different cherry varieties respond quite differently to the same rootstocks (see chapter 6 for recommended rootstocks). Modern cherry training systems are generally similar to the spindle, axis, V-system, and Tatura systems described for apples and pears and are described in chapter 12.
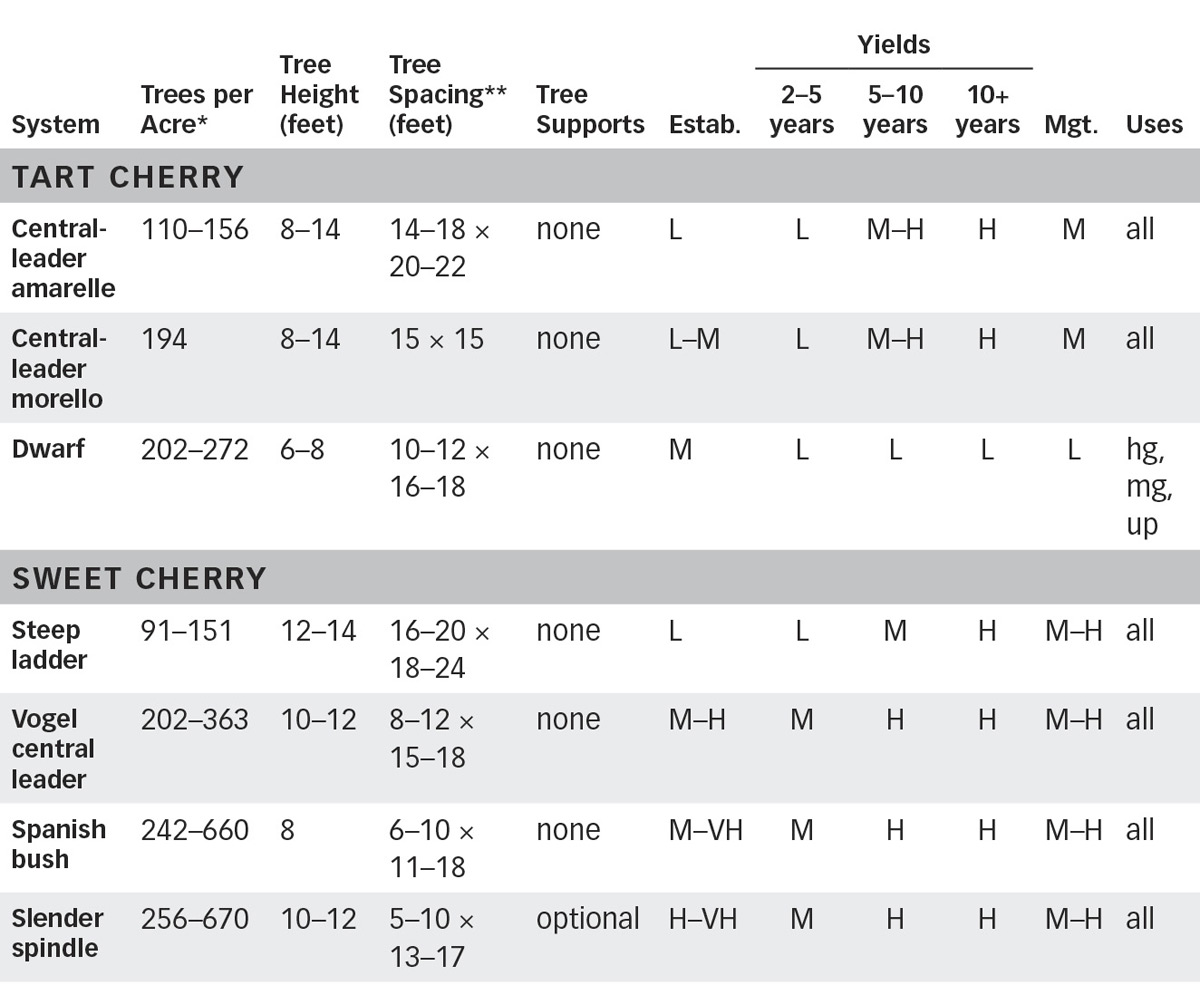
*Trees per acre refers to solid blocks and does not take roads into account. These are typical densities for the respective training systems and crops.
**Tree spacing refers to distance between trees × distance between rows.
Key: Estab. = establishment costs; Mgt. = management inputs
L = low, M = moderate, H = high, VH = very high
Uses: hg = home orchards, mg = market orchards, up = U-pick, c = commercial grower pick
Peaches, nectarines, and apricots have traditionally been grown as freestanding trees trained to open centers. Despite efforts to develop high-density planting systems using the designs we discussed for apples, pears, and cherries, low- to medium-density orchards built on open center designs remain popular in leading peach and apricot growing regions. This is mainly due to three reasons:
The few genetic dwarf peach and nectarine varieties available are really novelty trees best suited for pots, patios, and ornamental gardens. The dwarfing is due to very short spaces between leaves (internodes) which create dense foliage and closely spaced fruits. Yields are very low, and you must thin excessively to avoid what has been described as “thumbnail-sized” fruits. The management of pests and diseases is complicated by the densely clustered foliage and fruits. Dwarfing in apple, pear, and cherry is accomplished by grafting vigorous varieties onto low-vigor rootstocks. The dwarfing is due to the genetics of the rootstock and does not result in the very short internodes found in genetic dwarf peaches.
Another problem with high-density, central leader training for peaches and nectarines is that the trees bear fruit on 1-year-old wood and must create a lot of new fruiting wood each year to bear the following year’s crop. Fairly large, long-lived scaffold branches bear this abundant fruiting wood. Additionally, peach and nectarine trees have very upright growth habits that best lend themselves to open center training. Peaches trained to central leaders require extensive maintenance and are really going against their natural form.
Depending on where you live, however, high-density peach systems might be viable. In cold areas, where stem cankers and other diseases make for short-lived peach trees, high early yields can be important for profitability. In Ontario, peach growers have largely adopted central leader and spindle (Fusetto) training systems, despite difficulties with maintaining the tree shapes and increased stem canker diseases. Trials in New York, Georgia, and Arkansas support the use of high-density plantings using variations on open center training, including the perpendicular-V and quad-V designs (described in chapter 12). Research done in New York suggests that 500 to 600 peach trees per acre is the most profitable density for the northeastern United States and eastern Canada.

*Trees per acre refers to solid blocks and does not take roads into account. These are typical densities for the respective training systems.
**Tree spacing refers to distance between trees × distance between rows.
Key: Estab. = establishment costs; Mgt. = management inputs
L = low, M = moderate, H = high, VH = very high, n/a = data not available
Uses: hg = home orchards, mg = market orchards, up = U-pick, c = commercial grower pick
For warm, dry climates, such as in California and Texas, fruit specialists caution peach and nectarine growers against high-density systems. In these areas, trees have productive lives of more than 15 years and low- to moderate-density orchards work well.
Peach and nectarine orchardists have successfully used Tatura and other divided canopy systems to increase early yields. Trellises and other supports increase establishment costs and maintenance labor and the hard-to-reach crop row centers can complicate pest and disease control. I believe the perpendicular-V and quad-V systems are better alternatives for organic orchards.
Apricots can be trained to any of the open center designs, or to a modified central leader system, as for apples. In commercial orchards, they are usually trained the same way as peaches are trained, but somewhat less pruning is required.
You can train plums and prunes similarly to peaches — with an open center or modified central leader — but the trees are more upright. As with peaches, no proven dwarfing rootstocks are yet available.
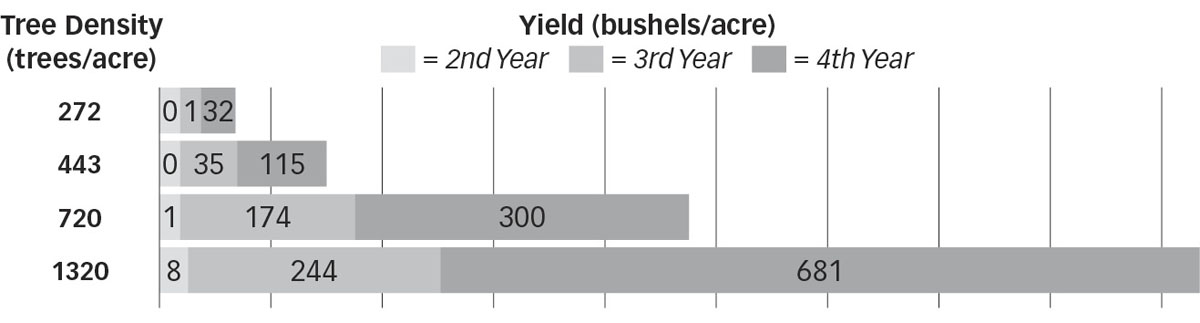
As the numbers of trees per acre increase, yields, especially early yields, increase dramatically. Note that, even with trees at the same densities, yields differ substantially between rootstocks, varieties, training systems, management practices, and regions.
Across North America, plums and prune trees are typically spaced 10 to 20 feet apart in rows 16 to 20 feet apart. Only a very few high-density plum trials have been reported around the world, including experiments with tree densities greater than 2,000 trees per acre and spindle, axis, and V-shaped training systems. Although these high-density orchards had very high yields, the longest trials only lasted a few years, and we have little information on how plums respond to high-density training over a long period of time. In northeastern Europe, plum trees are planted around 6 to 7 feet apart in rows 13 to 14 feet apart. This closer spacing might work in particularly cold, short-season areas of the United States and Canada, but it will create a crowded orchard on good soils in favorable climates.
Once you have decided what crops you will grow and how they will be spaced and trained, you can begin designing the orchard. When laying out your orchard, avoid the temptation to crowd as many trees as possible into the space available. For commercial orchards, make sure there is quick, easy, and efficient access into and out of the orchard for workers and equipment. Crowding seldom results in higher marketable yields in the long run and it increases your labor and management costs by reducing efficiency. Narrow alleyways and headlands can lead to damage to trees from large equipment, and crowding greatly increases pest and disease problems.
Lay out your orchard on a piece of paper, and begin by mapping out the general crop and non-crop areas. Start with a fairly accurate outline of your property. If you do not have a property map, you might be able to find one at your local tax office. If you are purchasing a piece of property, be sure to have it accurately surveyed. The surveyor can provide you with a detailed map of the boundaries. Some online search engines now provide satellite maps of much of North America and enable you to identify and print off an aerial photo of your property. The great advantage of aerial maps is that they also show streams, bogs, rock outcrops, and other features of your site. Using these sources, create an outline map of your property, including features such as wetlands and low areas. Try to get the dimensions as accurate as you reasonably can.
The next step is to start designing your dream orchard. At this stage, do not worry about getting everything to scale. The important point is to develop a general idea of what you want to grow and how you want it laid out. Later on, you can refine the plan and drawing.
Non-crop areas. Begin by marking out crop and non-crop areas. Wetlands, low-lying frost pockets, and rocky outcroppings are best used for equipment, employee, and customer parking; equipment and supply storage buildings; refrigerated storage; sales stands; and any other structures your operation may need. Identify these non-crop areas, leaving the best parts of the site for your crops.
Other non-crop areas are buffer strips around the inside perimeter of your orchard. Certified organic orchard growers generally need to leave buffer strips between certified land and adjacent uncertified fields, rows, hedgerows, and roads. The width of the buffer strips will be determined by your certifying agency and the needs of your individual operation. As a general guideline, 30-foot-wide strips should meet most growers’ needs. Exceptions to this would be if your orchard adjoins a nonorganic orchard where airblast sprayers or similar equipment are used to apply pesticides, or if it sits along roadways where nonorganic herbicides and other pesticides are sprayed. In these cases, you may need wider buffer strips and you should probably include a dense windbreak to reduce the amount of pesticide spray that drifts into your orchard. Even if you are not planning to become certified, creating a buffer strip to protect your fruit trees from pesticide drift is a good practice. The buffer strips typically serve as roads around the orchard and provide headlands for turning tractors and other equipment. Make the headlands wide enough to allow you to easily turn around the largest piece of equipment you will be using in the orchard.
Planting blocks. Once you have mapped out the non-crop areas, define the orchard blocks where each crop will be grown. Draw these blocks in relation to your already defined orchard boundaries and non-crop areas. These planting blocks will largely create themselves when you plot out buffer strips from boundary roads and fences. Every grower’s site differs in topography and shape, and you will need to evaluate your own site to determine how best to lay out the orchard. For home orchards the trees may simply be spread out, more or less randomly, through the orchard space.
Lay out the entire planting area first, then divide that area into sections for different crops or varieties. Add crossroads to the plan to provide access to the different planting blocks. The road widths will depend on orchard size and the equipment you will be using. Twenty-foot-wide roads are about the minimum for small pickup trucks, with 30- to 40-foot-wide interblock roads being common in large orchards. For large orchards, include enough main and crossroads to allow bins of harvested fruit to be moved quickly from the fields with minimal rough handling.
Once you have the planting blocks drawn, lay out the tree rows. In general, run planting rows across slopes, not up and down the slopes. Determine the number of tree rows in each block. For each crop that you plan to grow, identify what training system you will use. The tables that appear earlier in chapter 3 give the distances between tree rows. These between-row spaces are called alleys.
Be sure to provide plenty of spacing between the trees within the rows in order to meet the needs of the individual crops. Again, use the tables that appear earlier in this chapter to determine tree spacing. Be cautious not to crowd the trees.

For freestanding trees, particularly medium-sized to large trees, offsetting them in adjacent rows to form a triangular pattern maximizes the space for each tree. Given adequate spacing, offset plantings can be mown or cultivated along the alleys and on diagonals.
In laying out planting rows with freestanding trees, try to offset the trees in adjacent rows, forming a triangular pattern that maximizes the distance between trees. Figure 3.7 shows an offset or staggered planting.
While some of the spacings in the tables may seem too large, especially when trees are young and small, they are based on vast experience by growers around the world. Crowding does not increase long-term yields and greatly complicates orchard management.
As orchard size and mechanization increase, you will find straight rows desirable, although curved rows are often necessary due to curving property lines or slopes. Where planting rows must be laid out in curves, keep the curves gentle and uniform to allow easy access with orchard equipment, and easy installation and maintenance of trellises.
Many orchard irrigation systems exist, from flooding to overhead sprinklers to high-efficiency drip systems. Which you choose will be influenced by the availability and cost of water, the cost of electricity for pumps and controller systems, the complexity and cost of the irrigation system (including installation, operation, and maintenance), and your personal preferences. A good irrigation system will do the following:
Although irrigation systems may seem simple, you need expertise and experience to design an effective system. For all but the smallest orchards, it is best to have a professional assist you with the design. Firms that sell irrigation equipment can often help you design a system that meets your needs.
Personal safety is a concern in every orchard. When you have customers for U-pick or roadside stand orchards, safety becomes even more challenging. Design your operation to keep customers and visitors away from equipment, storage buildings, and potentially hazardous orchard operations. You want the orchard to be attractive and welcoming without exposing people to unnecessary hazards.
Consider installing fences and railings to keep people away from hazardous areas. Design planting blocks and access roads to confine U-pick customers to particular blocks while harvesting, rather than allowing them to roam throughout the orchard and “cherry pick” only perfect fruit. Figure 3.8 shows a sample orchard design.
Flooding. Years ago, orchards in regions where water was abundant were commonly flooded. Using a series of ditches and dams, the entire orchard floor would be flooded for up to several hours at a time before the dams were opened and the water allowed to flow out. While the trees received plenty of water, root diseases and micronutrient disorders were also common, as was soil erosion. The system required vast amounts of water and a perfectly level orchard. In most areas today, flood irrigation for orchard crops is rare.
Sprinklers. Sprinkler systems are an improvement over flood irrigation and can be good choices for home orchards, as well as for commercial orchards in areas where water is abundant and inexpensive. Sprinklers can be used in orchards on sloping ground, they work well when you have alley and in-row cover crops, and they are relatively simple to use. They can be set up to automatically turn on at regular intervals or when soil moisture drops to a specific level. Another plus is that you can easily spot a clogged sprinkler at a distance.
Overhead sprinklers are sometimes used in home and commercial orchards to provide frost control for a short period of time. If temperatures drop to around 34°F (1°C) and a damaging frost is expected, sprinklers are turned on and are run continuously during subfreezing temperatures until the temperature returns to above freezing. Although ice will form on the trees, as long as there is a film of liquid water on the ice, the temperature of the ice and tissues below it will remain at about 32°F (0°C), which will protect against frost damage. This approach to frost protection is based on the nature of water to release heat as it changes from liquid to solid.
If you use sprinklers for frost control, you will need to cover the trees completely with water and apply at least 1⁄4 inch of water per hour for as long as there is a risk of frost. These systems work best for short-term frosts that last a few hours. They are not effective against masses of freezing air that settle into orchards for several days.
Most commercial orchards now use large fans mounted on towers to stir up the air in the orchard and help offset inversion layers during radiation frost events. Inversion layers commonly develop when cold air is trapped near the ground. You can see inversions when smoke from chimneys rises 100 feet or so in the air and then spreads out in a horizontal layer as if it has hit a glass ceiling. That ceiling is the boundary between cold and warm air layers. Mixing the cold layer with warmer air layers above it can help prevent frost damage in orchards.
Propane- or kerosene-fired heaters are sometimes used alone or in combination with fans to keep orchard temperatures above freezing during bloom. Specially designed orchard heaters called “salamanders” are available. On a small scale, one of my friends who has a home orchard places a portable barbecue grill under each blooming tree during frosty periods. The idea is to add just enough heat to the canopy area to keep temperatures at about 32 to 34°F (0 to 1°C) or above.
When sprinkler systems are not intended to provide protection against frosts, it is usually best to use sprinkler designs that keep the water close to the ground. This practice keeps the foliage and fruit dry and greatly reduces disease problems. When you use sprinkler irrigation, apply water early in the morning to allow the understory of the tree to dry before nightfall. This practice keeps the humidity level lower and helps reduce disease problems. Keeping the sprinkler pattern low also protects the kaolin clay film that is applied to the foliage, fruit, and branches as part of some pest and disease control programs. Sprinklers quickly wash the clay film off, leaving the crops susceptible to pests and diseases. We’ll discuss kaolin use in chapters 10 and 11.
In addition to the potential for increasing disease problems, sprinkler systems have several major drawbacks, particularly for larger orchards. The first drawback is increased operation costs. A large commercial orchard requires large amounts of water and powerful pumps to lift the water from a well or other source and push it through the system, which can be quite expensive.
There are also several serious drawbacks with using sprinklers for frost protection: You need large amounts of water during and shortly after spring bloom, you need a system that will cover all parts of every tree, and, finally, the weight of the ice can break branches. As an alternative to sprinklers, you could use large fans or heaters to protect against frost (see box on page 67).
Drip irrigation and microsprinklers. Many orchards today are irrigated using drip systems that apply water directly to the soil at the base of the trees. These designs can be used on flat or sloping ground, use water very efficiently, and eliminate erosion problems associated with sprinkler and flood irrigation. One disadvantage is that it is harder to spot clogged emitters in a drip system.
Microsprinklers set in the crop rows to irrigate the fruit crops, alley crops, and in-row living mulches provide a compromise between a drip and a sprinkler system. It is easy to spot clogged microsprinklers, and this design uses much less water than older large-volume sprinklers. Microsprinklers have several advantages over drip systems. Microsprinklers cover relatively large areas. The wider distribution of irrigation water across the orchard floor can help encourage the development of larger, better-anchored root systems for fruit trees than is common with drip irrigation alone. The larger root systems can provide better drought tolerance for the trees than the limited root systems that sometimes develop under drip irrigation.
Microsprinklers and drip systems require either city water or a series of filters to trap sand and organic matter that would clog the emitters. They also require pressure regulators to ensure that each irrigation line receives about the same amount of water and at the correct pressure for the emitters you are using.
If you are using alley and in-row living mulch crops, microsprinklers are often the best choice. Set high-quality irrigation lines deeply in the tree rows before planting. Locate the risers and sprinkler heads in the centers of the rows and midway between adjacent trees.
For orchards that contain closely spaced trees and bushes and for those that are located in arid locations where water efficiency is very important, drip irrigation may be the best choice.
Orchards often need fencing to protect crops from wildlife or livestock. Regardless of its size, if your orchard is located in an area inhabited by deer or moose, a well-designed and constructed orchard fence is a good investment.
When designing your fence system, keep convenience and efficiency in mind. While you can put a fence around each individual tree in a small orchard, caring for the trees becomes extremely inconvenient and inefficient. You will probably find that a fence enclosing a complete planting area will work better for you. For large orchards, enclose the entire orchard, rather than separate planting blocks. See pages 370–372 for several fencing options.
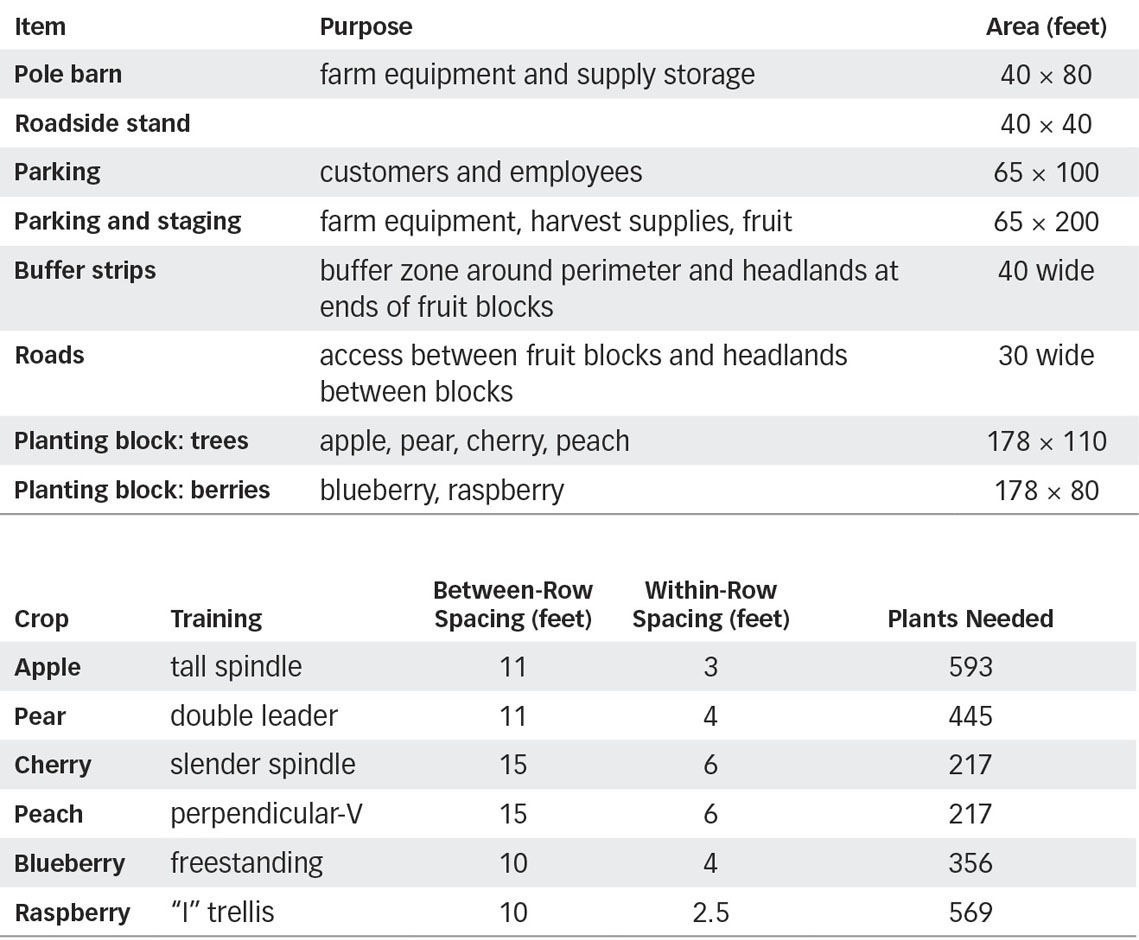
For our example, we will begin with a 5-acre property laid out in a square. Approximately 4.3 acres are devoted to fruit production, with 0.7 acre reserved for equipment, buildings, composting areas, and parking. Each fruit block is 178 feet long by 80 to 110 feet wide. This grower plans to sell fruit from an on-farm roadside stand, at a farmers’ market, and through U-pick sales.
To reduce the risks associated with a single crop and to expand the market season, the design includes different tree fruits and berries. The berries mature quickly, with raspberries and blueberries bearing crops within 2 to 4 years. The berry crops also ripen early in the season, providing cash flow to help finance the tree fruit orchard. While multiple crops have marketing advantages, growing many different crops is much more challenging than focusing on a single crop. If you are new to fruit farming, start small and focus on one or a few fruit crops. As you gain experience, you can expand and diversify.
Our first step will be to complete an orchard planning worksheet. Much of this information you will develop while evaluating your site.
The following worksheet provides an example of how you might plan a new orchard or orchard upgrade. Filling in the different sections of the worksheet provides you with the information you need to use the site effectively and prepare a diagram or blueprint for your orchard.
Total orchard size: 5 acres
Site description: A square parcel consisting of 5 acres lying 4 miles outside of a town of 6,000 people. The site is adjacent to the main highway leading into town. Four other towns with 500 to 2,000 people are within 10 miles of the orchard and a city of 50,000 people is 45 miles away. (This information is critical for evaluating your marketing plan.)
Slopes: Approximately 2 acres next to the highway are mostly level, with a few low-lying areas. The remaining 3 acres slope upward and away from the highway. Slopes average 6 to 10 degrees, and the surface is generally flat.
Surface water drainage: The slopes are grass-covered pasture and show no signs of erosion. Drainage appears good; there is no standing water on the slopes, but several areas near the highway retain standing water for 1 to 2 days after a rain.
Soil type and drainage: The site is covered with 24 to 30 inches of loam overlying 48 inches of sandy clay loam lying over gravel. Percolation tests show adequate drainage on the 4 acres away from the road. Several clay lenses near the highway are causing poor drainage and some standing water.
Cold air drainage: Cold air drainage (the ability of cold, heavy air to flow out of your orchard) on the 3 acres away from the highway is good. Next to the highway, the land is more or less level for several miles around. Late spring frosts are common on the lower 2 acres.
Wind protection needed: The area experiences occasional summer and winter winds with steady speeds of 20 to 30 miles per hour and gusts of 50 to 60 mph. The winds are usually from the north and east. Windbreaks will be used on the north, east, and west sides, leaving the highway side of the orchard open. The windbreak will consist of the Penn State University clone of hybrid poplar with trees spaced 10 feet apart.
Low spots or other problem areas: There are several low spots with occasional standing water next to the highway. A few areas between the base of the slope and the highway need leveling before fruit crops are planted.
Fencing required: Whitetail deer are abundant in the area. To exclude deer and reduce vandalism to farm equipment, an 8-foot-tall fence will be constructed around the entire property, with the exception of the roadside stand area. The fence will be 4-inch-square wire orchard mesh to a height of 60 inches, and above that individual high-tensile wires will be spaced every 10 inches to the tops of the posts. Two 10-foot-wide rolling gates will be installed to allow for a 20-foot-wide entrance. The fence will go on the outside of the windbreak.
Access to county road or highway: A gravel driveway and parking area will connect directly to the highway.
Utilities available and needed: Electricity and telephone will be needed. Both are available at the property edge along the highway.
Irrigation system: Microsprinklers will be used in all tree fruit blocks. Risers are spaced 5 feet apart, with enough spread to cover the crop rows and alleys at the rate of 10 gallons per hour per emitter. For the blueberries and raspberries, rigid polyethylene tubing will run the length of the rows with 1-gallon-per-hour emitters. The tubing will be supported on a trellis wire 18 inches above the ground for raspberries. Schedule 40 PVC pipes 6 inches in diameter will be used for main lines; for secondary lines, 4-inch pipe will be used with the tree fruits and 3-inch pipe will be used in the berry field. Pipes will be buried 48 inches below the soil surface with suitable drainage outlets to remove all water from the system for winterizing. A hybrid sand and cartridge filter system will be used to clean the water before distributing it to the microsprinklers or drip lines.
Source of water: One or more wells will be needed to produce at least 60 gallons per minute.
Pump requirements: An electrical pump capable of sustained rates of up to 75 gallons per minute.
Holding or irrigation pond needed: None.
Source of potable water and water for pesticide mixing: Well.
Slope management. The site slopes upward from south to north. Cherries and peaches bloom earlier than apples and are more susceptible to spring frost damage. By locating them as high as possible on the slope, heavy cold air drains away from the trees, reducing the danger of frost damage to the blossoms and developing fruit.
Crop row orientation. Crop rows are oriented east–west. The orientation of fruit tree rows is relatively unimportant for most growers. For rows of very large trees, a north–south orientation allows somewhat more light to reach the orchard floor than an east–west orientation, but not much from a practical standpoint. With smaller trees, you should obtain adequate sunlight penetration regardless of the planting direction. In this example, the greater consideration is preventing soil erosion. Running the tree rows north–south on this site would create serious erosion problems. If the slope is too steep to allow vehicles and tractors to move safely across it, one possibility is to create a pattern of narrow, level terraces along the tree rows that would be wide enough to handle farm equipment, although terraces will probably not be needed for this orchard. The alleys are maintained in permanent vegetation, which will help reduce erosion and improve access in wet weather while supporting beneficial organisms.
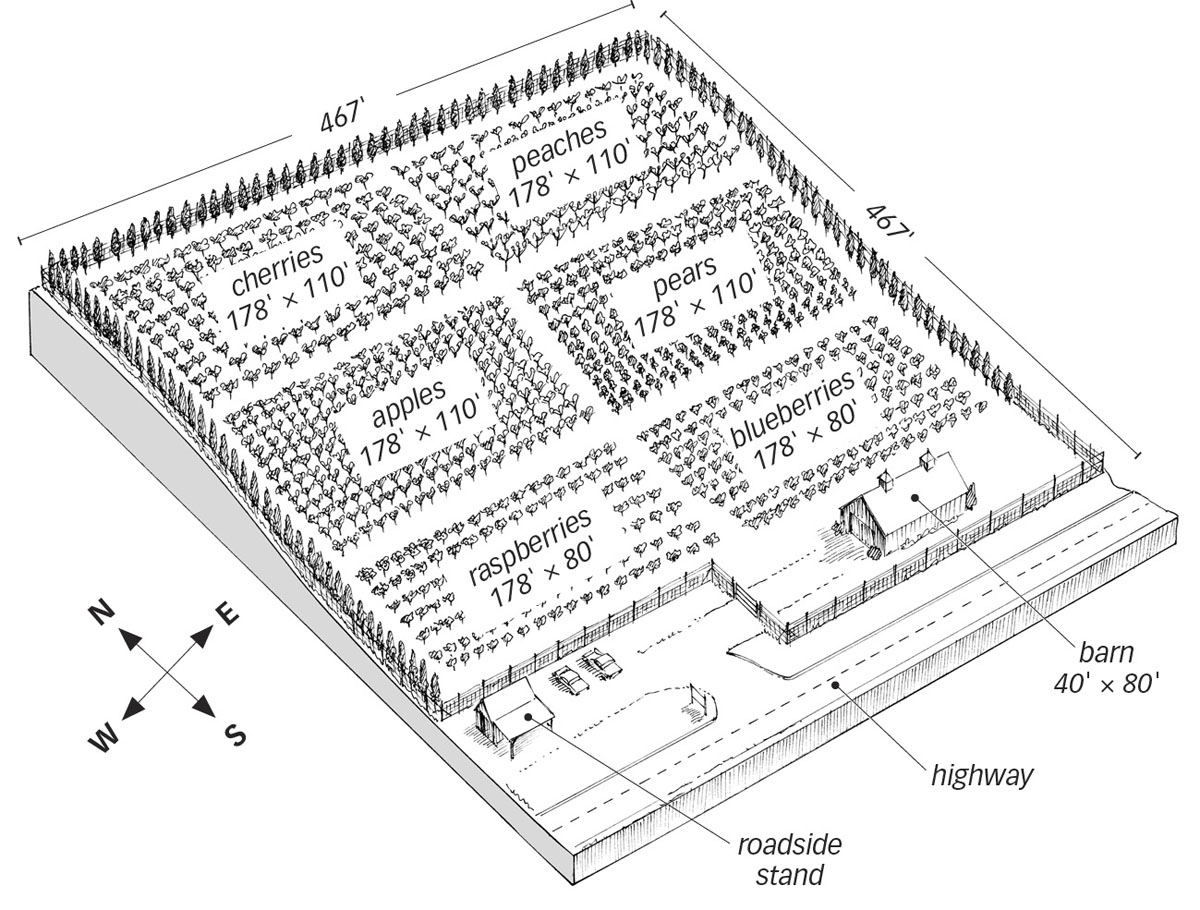
Sample orchard design for a square 5-acre orchard. The design allows for U-pick, a roadside stand, and farmers’ market sales.
Crop spacing. The space between crop rows varies from 10 feet for berries to 11 feet for apples trained to slender wire-trained spindles to 15 feet for freestanding, perpendicular-V-trained peaches. Keeping the row spacing the same and the alleys aligned with adjacent blocks makes it easy to move equipment between the blocks and reduces the need for additional headlands. Spacing between trees is 3 feet for apples, 4 feet for pears, 6 feet for peaches, and 6 feet for sweet cherries. The height of the trees will be limited to 10 feet. Remember that these dimensions will vary from one orchard to another, depending on crops, varieties, rootstocks, and management practices.
Windbreaks. Hybrid poplar trees are placed just inside the fence, with the trees spaced 10 feet apart. Hybrid poplar trees grow rapidly, have straight trunks, and can easily be trained to single trunks. The Penn State University clone is shorter than many other hybrid poplar clones and produces a denser canopy, which improves its ability to block wind. Further, the poplars are not hosts for most serious fruit crop pests and diseases. No trees are planted on the southern perimeter, so that cold air is allowed to drain out of the orchard.
Fencing. The 8-foot-tall fence, with 5 feet of 4-inch mesh and high-tensile wires, will keep out deer and other browsers. This will work well for this orchard, although there are many fence designs, some of which were developed specifically for orchards, as we discuss in chapter 11. While electrified fences can be used for orchards, they are not well-suited to populated areas and U-pick farms, where visitors and customers could be hurt.
Buffer strips. The buffer strips around the orchard’s perimeter serve as roads and headlands. In this example, they are kept in permanent sod, which helps lower dust contamination on the fruit, reduces erosion, and provides improved access during wet weather. On the downside, the sod roads require mowing. Twenty- or thirty-foot-wide roads between orchard blocks provide room for equipment operations, as well as staging and transport of fruit bins during harvest.
Access roads. A 30-foot-wide road running north–south between the blocks facilitates harvesting by U-pick customers. In a strictly grower-pick orchard, eliminating the central road would increase the amount of space available for crops, but it would also make moving equipment and fruit bins through the orchard more difficult. In this design, the grower has chosen to emphasize labor efficiency, high fruit quality, and open canopies, rather than maximum yields. For your design, you will need to find a balance between yields and efficiency that works for you.
Irrigation. These trees will be irrigated using microsprinklers set into the tree rows. The microsprinklers will irrigate the trees, alley crops, and living mulches within tree rows, while still keeping the tree foliage and fruit dry. The grower will use the Swiss sandwich system for in-row living mulches (see chapter 9). The Swiss sandwich system uses perennial crops in the alleys, typically grass or alfalfa. Underneath the trees and centered on the tree row is a 2- to 3-foot-wide strip of herbaceous perennials, such as sweet woodruff or grass. Between the in-row and alley cover crops are narrow strips of bare earth along each side of the tree row.
Running irrigation lines up and down a slope would make uniform irrigation difficult. Water pressure would be greatest at the lowest emitters, causing them to apply more water to the trees at the bottom of the slope than to those higher up. When the irrigation pump is turned off, water from the irrigation lines would drain out of the emitters near the bottom of the slope, adding to the water already applied to those trees. Since cherry and peach trees are quite susceptible to root diseases encouraged by wet soils, trees at the lower edges of the planting blocks would likely suffer more disease problems than those higher up. Additionally, cherries and peaches are particularly susceptible to iron chlorosis on alkaline soils (pH above 7.0), which is aggravated by wet soils. Running the tree rows and irrigation lines across the slope should reduce or eliminate these problems.
Non-crop areas. The roadside stand is next to the highway, making it highly visible and easy for customers to approach. It also provides a large, graveled parking and turnoff area. The barn and equipment parking areas are inside the orchard fence and away from customers. The design provides a safe, efficient traffic flow for farm operations, employees, and customers. Whenever possible, keep customers and visitors away from equipment and storage areas to reduce the risk of injury and liability.