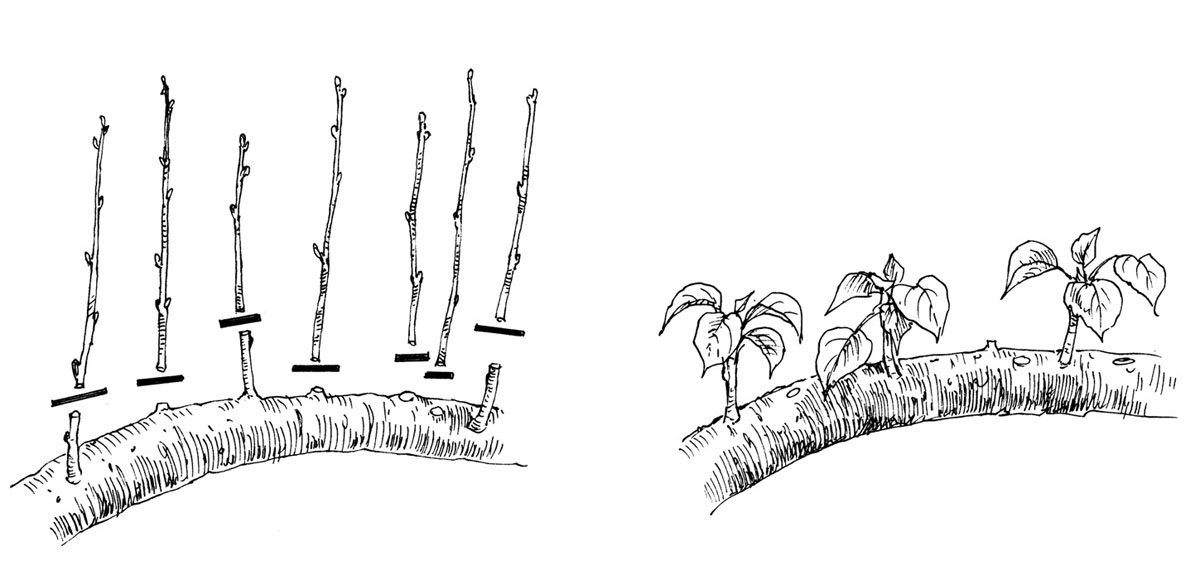
Figure 12.1
Types of Cuts

Heading cut
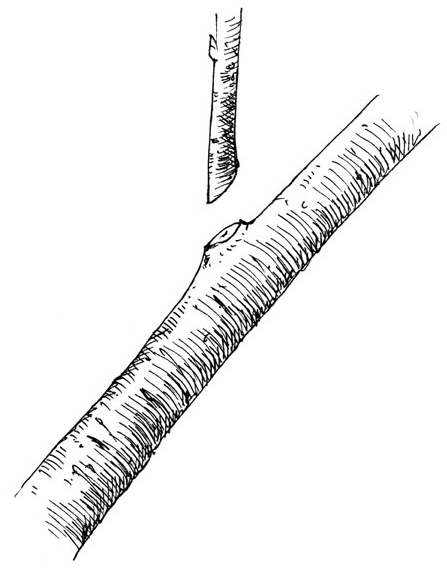
Thinning cut
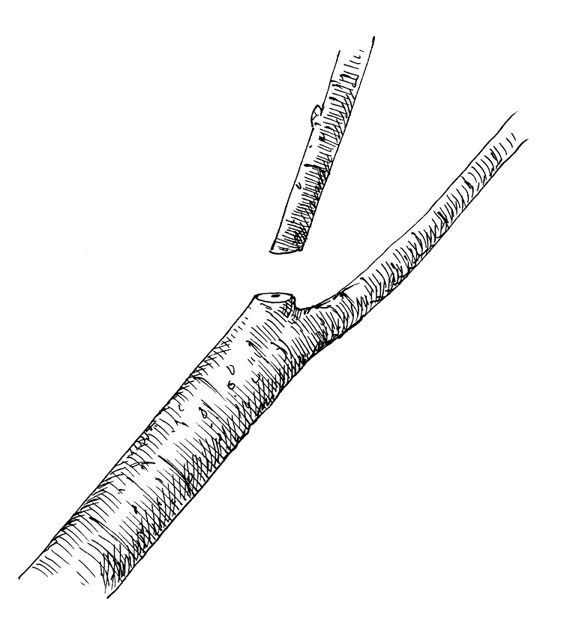
Bench cut
To maintain healthy and productive orchards, it is critically important to prune and train fruit trees and bushes. Although people have pruned and trained plants for thousands of years, there are many approaches, and it is easy to obtain conflicting advice. The reality is that many of the different approaches work well, as long as they are based on a few simple concepts.
Pruning involves removing parts of a plant. Regardless of when and how it is done, it has a dwarfing effect; pruned trees are always smaller than equivalent trees that have not been pruned. We prune our orchards to:
Dormant pruning is carried out in late fall, winter, or early spring, when all plant growth has stopped. This makes up most of the pruning in orchards. Dormant pruning invigorates and stimulates new growth at and slightly below the cuts. When no leaves are present, it is easy to see where cuts must be made and to make them. It is easier to prune at this time when there are few other orchard tasks. On the downside, dormant pruning in larger orchards sometimes means working in cold, wet conditions. Dormant pruning can stimulate too much growth, and pruning in fall or winter can create open wounds that are exposed to pathogens for extended periods of time.
Summer pruning can be carried out at any time during the growing season and includes everything from rubbing off new shoots with your fingers to cutting deeply into 2-year-old or older wood. The plant’s response depends on the timing and the amount and age of the wood that is removed. Summer pruning usually has more of a dwarfing effect than dormant pruning. Pruning before the terminal bud sets or before active growth ceases can stimulate new growth, while summer pruning after active growth stops causes little growth. Cutting into 2-year-old or older wood produces less growth than cutting into current-season or 1-year-old wood.
During the late 1900s, when large fruit trees were still common in orchards, summer pruning was sometimes used to open up apple tree canopies and to allow more light to reach the fruit and color them up. During July and August, workers would cut back into 2-year-old wood. The work was difficult and extremely labor intensive. With today’s smaller trees and open training systems, this practice has largely fallen out of favor. Summer pruning remains important, however, especially for removing unwanted shoots before they are more than a few inches long.
The advantages of summer pruning are that you generally have good working conditions and, when it is properly done, the trees regrow relatively little. The disadvantages are that there are many other tasks that must be done during the growing season, and the leaves can make it difficult to see the overall tree or shrub shape.
Despite the many different orchard crops and training systems, there are only two types of pruning cuts: heading and thinning.
Heading. This involves cutting a stem between branching points and is often done on 1-year-old wood just above a strong bud. Heading shortens and stiffens the limbs. It eliminates apical dominance for a time and usually causes a strong growth response at buds several inches below the cut. Apical dominance is caused by hormone-like chemicals produced in the tip of a trunk leader or shoot and results in straight, unbranched growth. The more wood that is cut off, the greater is the growth response. You normally see less regrowth when horizontal limbs are cut than when upright branches or shoots are headed. Stiff branches are desirable for many training systems, especially for freestanding trees. If the branches become too stiff, however, they can become more susceptible to breaking due to heavy crop and snow loads.
Hedging is a type of heading cut that is sometimes used for fruit trees, grapes, and berries. Beginning in the late 1900s, hedging became a popular means of reducing labor costs in commercial orchards and vineyards. Tractor-mounted, sickle bar–type implements were used to cut the sides and tops of trees and vines to remove unwanted vegetative growth and maintain desired shapes. Hedging cuts are indiscriminate, however, and typically produce a thin layer of densely branched, twiggy growth immediately below the cuts, leaving a barren, woody interior. This dense outer layer can reduce the amount of light that penetrates to the center of an individual plant or canopy, and orchard hedging should be followed up with more detailed hand pruning. Hedging can be used with newer, high-density training systems, but it requires a substantial amount of skill and careful follow-up corrective pruning.
Thinning. In this type of pruning, cuts are made at the junctions of branches. These cuts result in less growth than with heading, and in a stronger, more natural structure. Thinning is important for selecting scaffold limbs and keeping a plant open, which allows light to penetrate throughout the canopy and ensures healthy and fruitful growth on the lower and internal parts of a plant.
In thinning, you should generally avoid making “bench” cuts (figure 12.1). Bench cuts happen when an upright branch is removed and an outer secondary branch is left. These cuts usually occur in training trees to open centers and can occur on any fruit tree. They are especially common on peaches and nectarines. The problem is that the benches are structurally weak and can leave the tree open to breaking due to crop load, snow load, and wind. A better strategy is to carefully select scaffold limbs and use spreaders and weights throughout the spring and summer to develop desirable shapes, rather than simply relying on dormant pruning.

Heading cut

Thinning cut

Bench cut
Diseased and damaged wood can, and should, be removed whenever you find it, regardless of the time of year. Where diseased wood is present, wait for dry weather to make the cuts and disinfect your pruner and saw blades between cuts with a 70 percent alcohol solution or a solution containing 9 parts water and 1 part household bleach. Thinning cuts are usually best for these situations.
When removing branches at the trunk, cut outside of the bark swelling or collar at the base of the branch (figure 12.2). Flush cuts callus over more slowly than those where the collar is left, and they leave the tree open to infection by wood rot organisms and cankers. Do not apply tree wound dressing to cuts. Such materials can actually slow the development of new bark across wounds. When you are removing large branches, use the three-cut method illustrated in figure 12.3 to prevent tearing the bark below the cut.
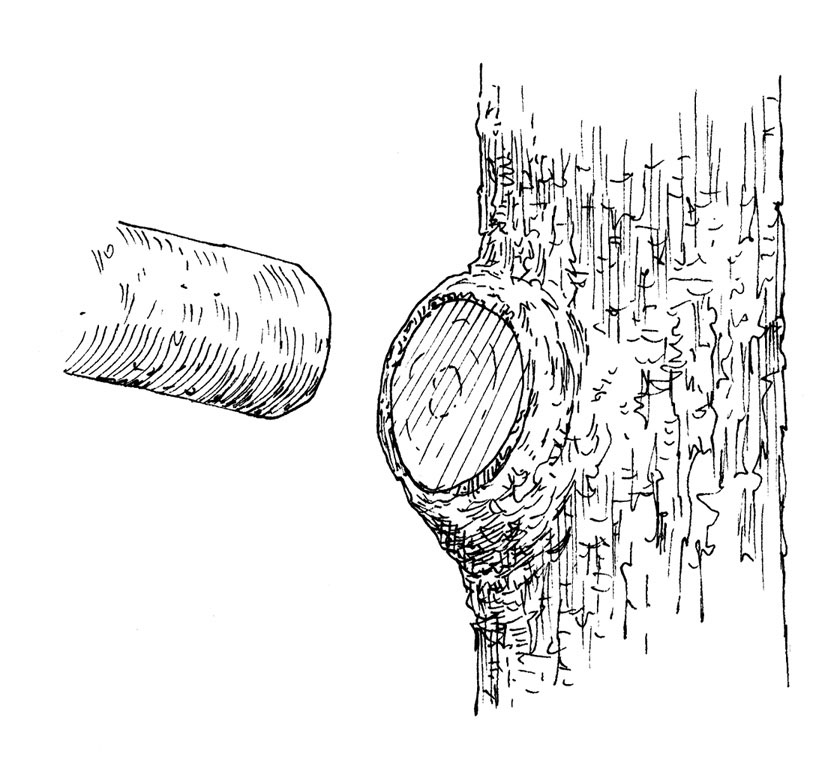
Cut to the outside of the swelling at the base of the branch. Cutting flush with the trunk increases the risk of infection and tree death. Avoid leaving a stub, with the exceptions of certain pruning cuts on sweet cherry and plum and when heading back water sprouts to leave some shade on exposed limbs. Exceptions are described in the text.
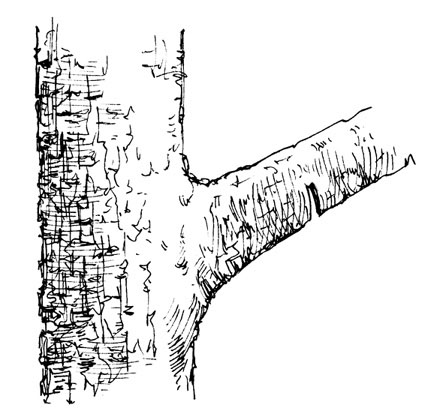
When two branches or a branch and trunk develop with a very narrow angle between them, problems result. Bark will continue to form between the two pieces and can form a bark inclusion, as shown in figure 12.4. Water and microorganisms become trapped in the inclusion and contribute to the development of wood rot. Insects also find narrow crotch angles to be a good entry site, and trapped water can freeze, causing branches to split apart. If you can see a ridge of bark between the branch and trunk, there is no bark inclusion, but you may still want to spread the branch to increase the branch angle.
1) Make your first cut on the underside of the branch about 6 to 12 inches away from the trunk.
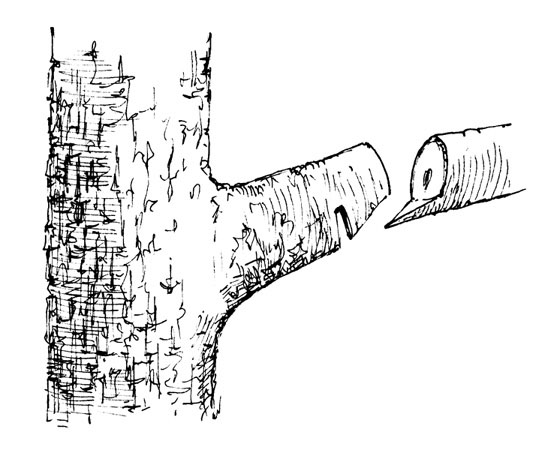
2) Cut the branch off outside of the first cut.
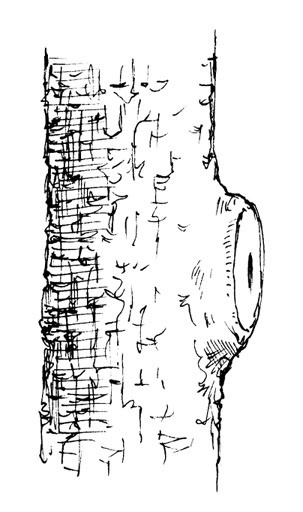
3) Cut off the branch stub just outside of the swelling at the base of the branch.
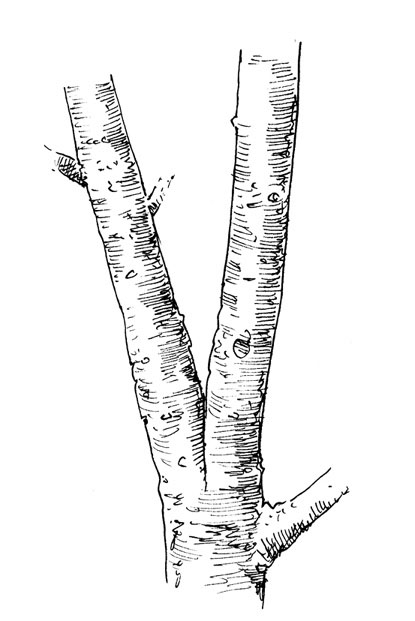
A bark inclusion resulting from a narrow branch angle
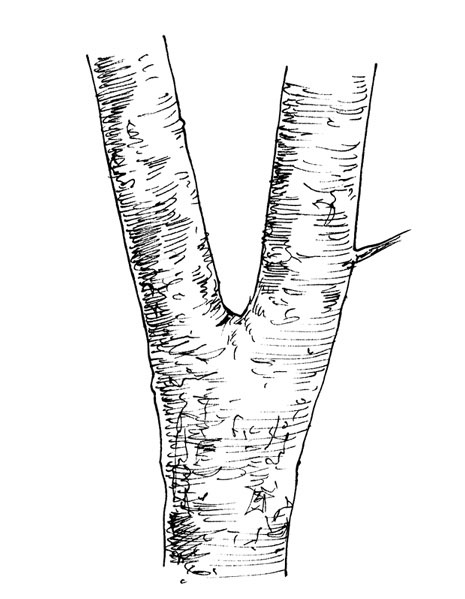
A ridge of bark between the branch and trunk shows no inclusion is present.
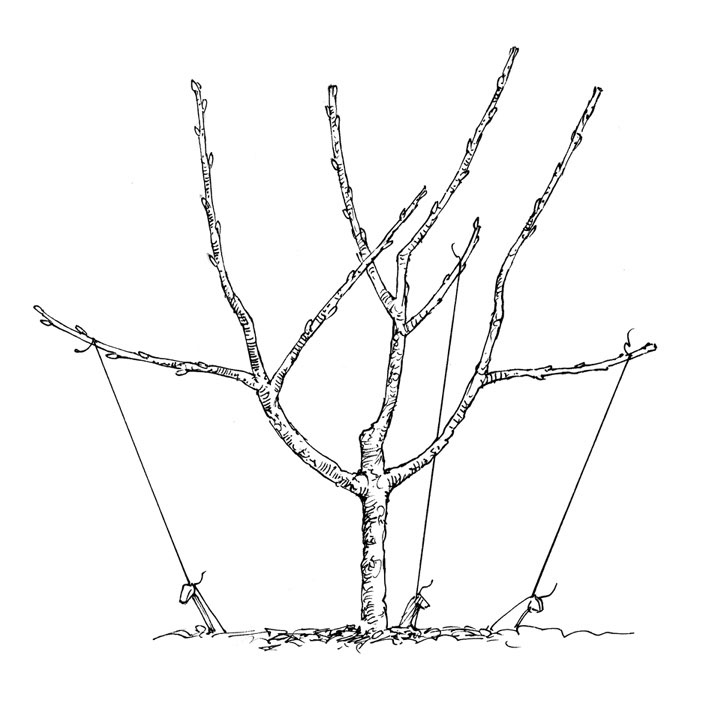
With narrow branches, take action as early as possible, preferably when the branches are no more than green shoots a few inches long. Remove poorly located branches using thinning cuts. Use weights, ties, and spreaders to develop strong, wide branching angles. Figure 12.5 illustrates these techniques.
Water sprouts (vigorous, vertical shoots) should be removed, except where they are needed to replace leaders. Water sprouts are unfruitful, create shading problems, and interfere with the development of strong scaffolds. Completely cut off sprouts on interior parts of a tree. In apples and pears, some sprouts can be headed back to be several inches long for 2 or 3 years in a row to develop fruitful spurs.
Water sprouts often develop at the site of a pruning wound. Bending limbs down, such as during trellising, will also cause more water sprouts to form. Horizontal and down-pointing limbs produce more water sprouts than limbs that angle upwards. It is extremely important to manage water sprouts in all orchards.
When sprouts arise from exposed limbs in the top of a tree, removing them entirely can cause the main limbs to become sunburned. For such exposed limbs, remove about half of the sprouts entirely and head the others back to be 1 foot or less. The headed sprouts will need to be headed several years in a row, but the shade that they produce will help prevent sunburn (figure 12.6).
It is best to do summer pruning or pinching when the unwanted growth is just a few inches long. When done correctly, this may involve pinching off new shoots with your fingers or rubbing them off with your thumb (leather gloves are an asset here). Except when removing diseased or damaged older branches, you should not need more than a pair of hand pruners.
Several methods can be used to position branches to prevent narrow branch angles and bark inclusions or for positioning branches to desired angles for various training systems.
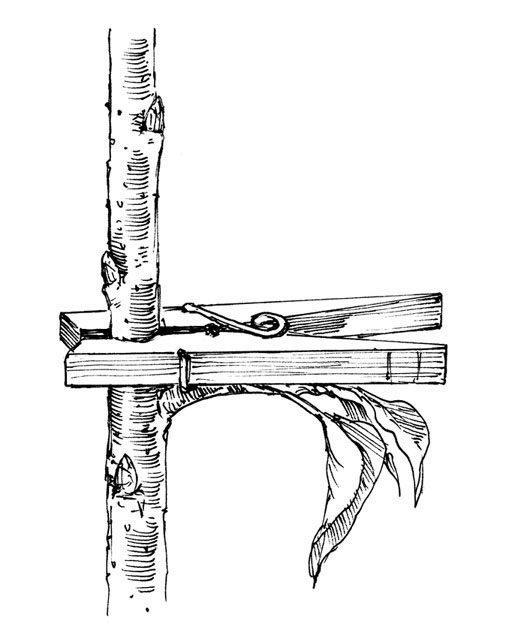
A spring-type clothespin is clamped around the trunk, and the tail of the clothespin holds the new shoot horizontally.
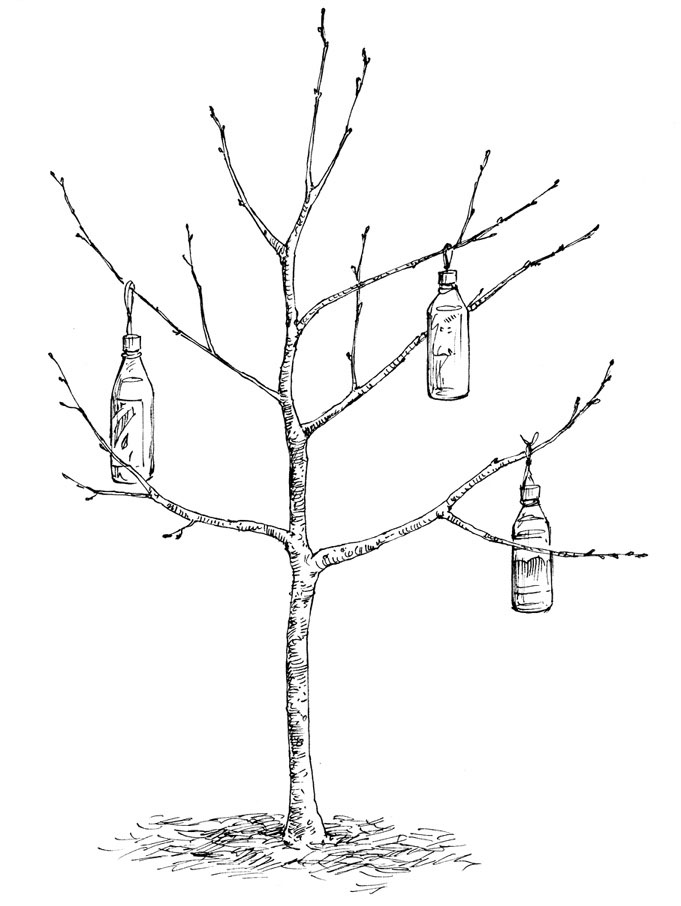
A weight tied to a branch. Plastic water bottles and milk jugs work well and allow you to adjust the weight by adding or removing water.
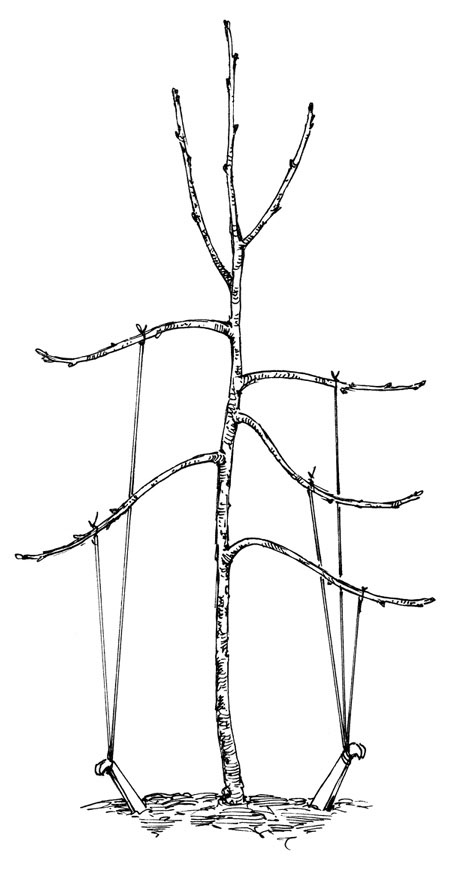
Tie-downs attached to stakes in the ground
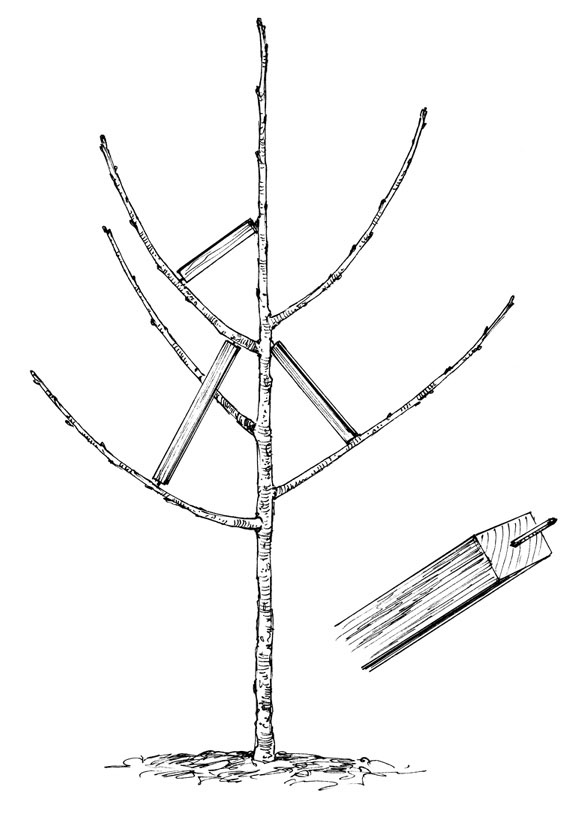
Wooden spreader bars with finishing nails inserted in the ends
Branches with and without Water Sprouts
Before. The tops of shaded branches can sunburn if all water sprouts are removed (left). Leaving some of the sprouts but heading them back repeatedly over several years (right) can provide partial shading to protect the main branch.
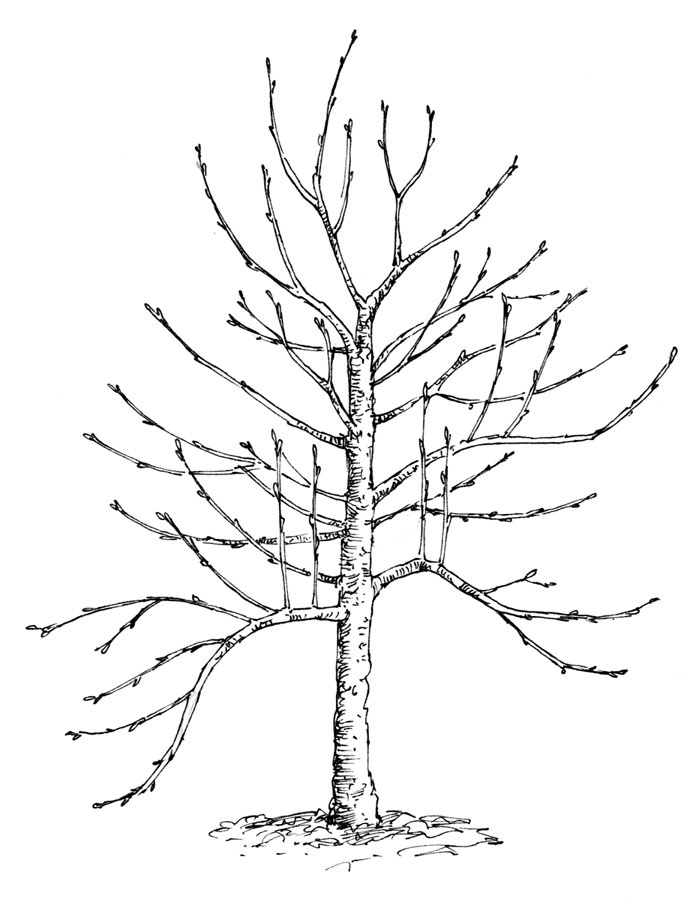
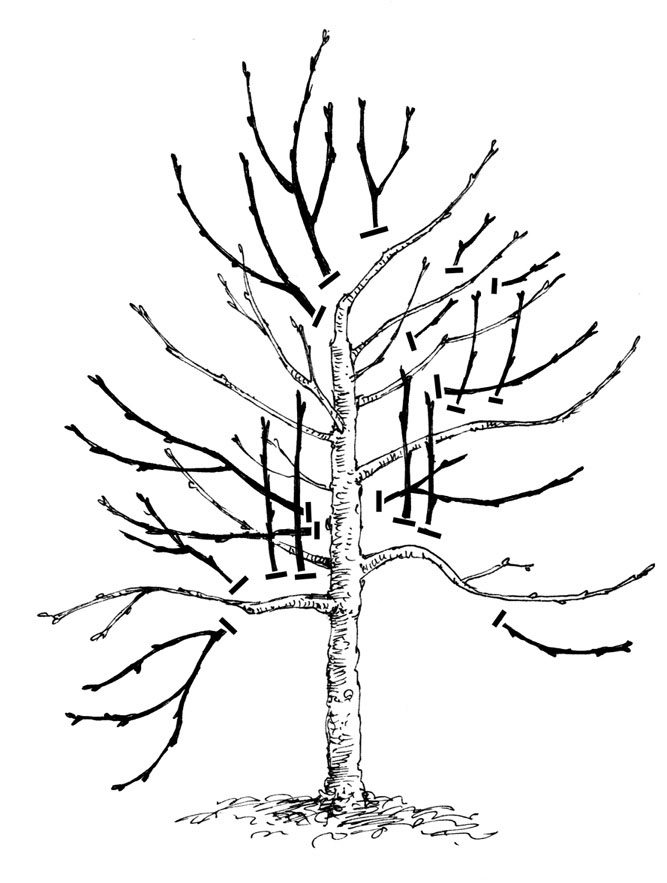
After. Note the removal of the large scaffold limb on the lower left. The shoot retained just above the removed limb will provide renewal fruiting wood.
Whether you have one tree or 10,000, pruning is an essential task. The right tools make the job go faster and produce the best results. Avoid the temptation to buy cheap pruners and saws; they often produce inferior results and make pruning more difficult. Tools that are well designed and constructed will last for many years.
Hand shears. Anvil-type pruners are suited for stems that are up to about 1⁄2 inch in diameter, but they tend to crush stems if they are not very sharp, and they require more force than do bypass or scissor types.
Bypass or scissor-type pruners are less likely to crush stems and usually make cleaner cuts than do anvil shears. These pruners allow you to make clean cuts very close to the trunk, speeding the healing process. They may or may not have a ratchet device to provide a mechanical advantage during especially thick or difficult cuts (up to 3⁄4 inch in diameter), but they generally require less effort than anvil shears to make the same cut. Better-quality pruners often have replaceable blades and other parts. Given equal-quality construction, bypass designs are generally better for orchard work than anvil styles.
Loppers. These are long-handled pruners used for large cuts (up to 11⁄2 inches in diameter). They come with either anvil or bypass cutting edges, and the blades are sometimes replaceable. Handles can be hollow metal, wood, or fiberglass. Wood and fiberglass handles are generally quite durable, and high-quality aluminum- and steel-handled pruners can be very durable. The handles on cheap pruners, however, often bend easily. Loppers come in lengths of about 12 to 48 inches, and short loppers can often be used in place of hand pruners. Their longer handles and two-handed grip reduce hand fatigue and allow you to make cuts with less effort.
Pruning saws. These saws have narrow blades with coarse teeth that are designed to cut on the “pull” stroke. Both straight and curved blades are available. Saws may be fixed into one piece or can fold, which makes them very convenient to carry when you are pruning many trees. Wooden-handled folding saws are generally more durable than those with plastic handles. Saws may also be fixed onto long poles for taller trees, often with a hook and pruner head that is operated by pulling a rope. It can be difficult to make clean, accurate cuts with pole saws and rope-operated pruners, so take great care.
Chain saws. Chain saws are used to remove trees entirely and to make large cuts. They are often used to head back large limbs in preparation for cleft or bark grafting in a process called topworking. Use topworking to replace the scions without replanting. While chain saws are used in orchards, particularly commercial orchards, they increase the risk of personal injury and damage to trees. Unless you are rehabilitating older trees, topworking, or removing trees entirely, chain saws are most often used only in larger commercial orchards. Chain saws may be gasoline, electric, pneumatic, or hydraulic.
Pneumatic, hydraulic, and electric pruning tools. These pruners use air pressure, hydraulic liquid pressure, or electrical solenoids to operate. They have two great advantages in that they require less hand pressure to make the cuts and they provide greater reach. Pruners range from about 8 inches to 12 feet in length and often consist of a cutting head mounted on interchangeable or adjustable extension rods. Chain saws, likewise, have handheld units that can be mounted on extension rods up to nearly 12 feet long. These powered tools are extremely valuable for commercial orchards because they increase speed and efficiency while reducing fatigue. Most cuts can be made from the ground, reducing the need for hauling and setting up ladders. On the downside, they are much more expensive than handheld pruning tools and require dragging hoses or cables about the orchard. They also require separate air compressors, hydraulic motors, or electrical generators.
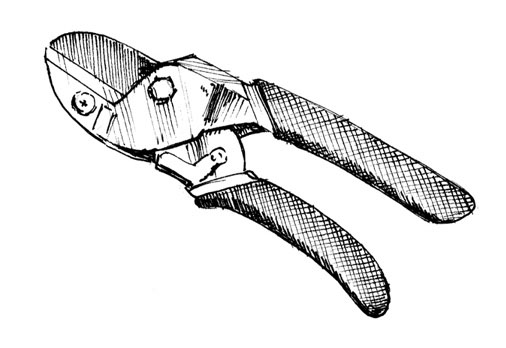
Anvil hand pruner
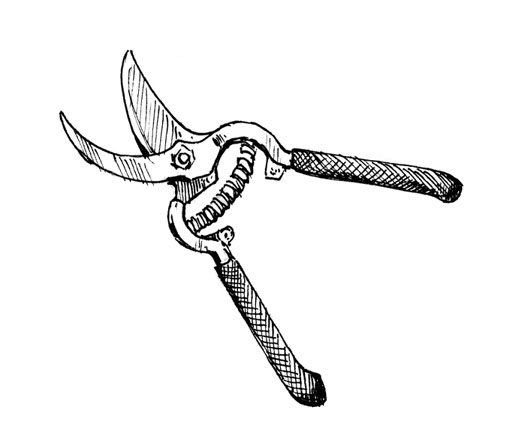
Bypass hand pruner
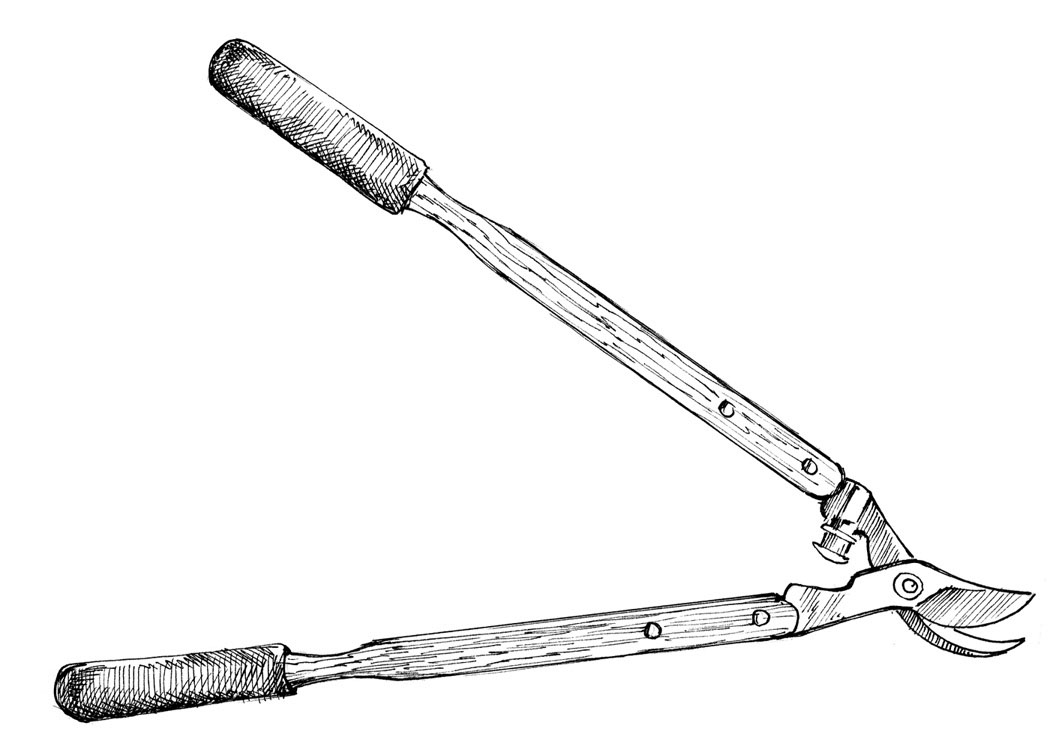
Loppers

Folding pruning saw
Training is used to shape a tree to a desired architecture, and many variations on training are available to fruit growers. The basic concepts, however, are quite simple. For freestanding trees, we use training to create strong structures that produce and bear large fruit crops well while maintaining good light penetration and air movement through the canopy. Some training systems support the trees on wires or poles, reducing the need for a strong structure and emphasizing fruit production. Other training systems are used for decorative effects in landscapes.
For thousands of years, domestic fruits have been grown as freestanding trees. Freestanding trees are the least expensive to establish because there are fewer trees per acre than in high-density systems and no supports are needed. Depending on the crop and rootstocks, trees are allowed to grow to about 7 to 20 feet tall and are generally trained to a central leader, modified central leader, or vase shape. For most training systems, early training involves developing strong trunks and branches, rather than fruiting. Some of the newer freestanding systems place greater emphasis on early yields and frequent branch replacement. Apricot, bush cherry and plum, European and Japanese plum, tart cherry, loquat, medlar, quince, and saskatoon are most often grown commercially as freestanding trees or bushes.
Growing freestanding apple, pear, peach, nectarine, and sweet cherry trees is less technically challenging and requires less-intensive management practices than some of the modern higher-density systems. The trade-offs are that your early yields are lower, it can be more difficult to control pests and diseases, and the labor costs for pruning and harvesting are typically greater than for smaller trees on supports. Freestanding trees take longer to come into bearing and generate less early and overall profit per acre than higher-density systems.
For home and market fruit growers who do not need the highest yields nor want to pay the high establishment costs or perform the intensive management practices that go with high-density plantings, freestanding trees remain a good option.
Whether to use freestanding trees for a commercial orchard depends on your goals and philosophies. If economic returns over a 10- to 15-year period are your driving concern, you probably should not go with freestanding apple, pear, and sweet cherry trees. If you are planning to keep your orchard longer than 15 years, freestanding trees can provide sustainable yields and eliminate the need to install and maintain support systems. Economically, they are never likely to produce the profits available from early-producing orchards using the latest, high-value varieties. On the other hand, they will not require the same level of intensive management.
During the 1980s, trellis systems became popular, and many different designs emerged. Some were tremendously complex and expensive or difficult to work with, and they did not remain popular for long. Since the 1990s, several training and support systems have emerged that meet growers’ needs more cost-effectively. The primary systems in commercial apple production today use high-density plantings, tree supports, and intensive management practices to produce marketable fruit within 2 or 3 years of planting. Pears can also be grown on temporary or permanent supports in high-density plantings. Quince and medlar can be adapted to these training systems, although they are more commonly grown as freestanding trees or large shrubs. High-density support systems are sometimes used for commercial peaches, nectarines, and sweet cherries, and they can be adapted to be used for apricots.
Tree support systems include vertical and split canopy designs that support the trees on poles and/or horizontal wires. Trees usually range from 6 to 14 feet tall, depending on the crop and system.
Support systems have the primary advantages of producing marketable yields quickly while reducing labor costs and better managing pests and diseases, compared with low-density, freestanding trees. High-density apple trees that use precocious rootstocks, for example, come into bearing as early as their second growing season (second leaf). Some designs create narrow, wall-like crop rows as little as 2 feet wide, although rows that are 3 to 4 feet wide are more common. Fruits on most support systems receive abundant light and usually color up well. Trees on supports can be spaced closer together than those in freestanding systems, which increases yields. You can also use relatively small tractors and other equipment, compared to those used with standard-sized, freestanding trees.
Fruit trees can be trained to either vertical shapes or split canopy V or Y shapes. Split canopies in low and moderate tree densities increase yields and intercept more light. They are most often used for apricot, peach, nectarine, and pear and are sometimes used for sweet cherries. From a practical standpoint, split canopies can be more expensive and difficult to establish than vertical systems, and they can make it more difficult to scout for pests and diseases and apply spray materials. Older split canopy systems made getting tractors and other equipment through an orchard problematic and were generally miserable to work around. Some of the newer designs are more practical.
On the downside, support systems make it more costly to establish and maintain an orchard. Systems that use horizontal wires make it difficult for workers to move between rows. Depending on the system, supported trees can also require greater skill and time to manage than non-supported trees.
Trellis systems have traditionally used two to five horizontal wires to support trees that are up to about 6 feet tall. Trellises are used almost exclusively for apples and pears, and many variations exist, with trees trained vertically, diagonally, or as palmettes. The idea is to create a narrow wall or hedge of fruit, with the branches tied to and supported by the trellis wires. Trellised trees are easy to prune and harvest, and they make it easy to control pests and diseases. For an organic home landscape or orchard, trellising apple and pear trees can work very well. Taller trellises may also be suitable for new commercial orchards, and they are particularly valuable where space is limited. Trellises lend themselves well to U-pick orchards.
Because traditional trellises produce lower yields than spindle-trained trees, they have largely fallen out of favor for new commercial orchards, even though they are generally less expensive to install than the taller spindle systems. The lower yields are due to the fact that the trees are kept short and the crop rows are narrow. Researchers at Pennsylvania State University determined that, in terms of canopy height and density, trellis systems are about as productive as the taller vertical axis designs for the first 10 years after planting. They are now testing tall trellises (about 10 feet in height) for commercial orchards.
It’s important to select a rootstock that will create enough vigor to fill the canopy but not so much as to require excessive pruning. Trellised trees are usually spaced about 3 to 6 feet apart in rows that are 10 to 12 feet apart, and they require 660 to 1,452 trees per acre. The more closely spaced the trees, the more expensive it is to establish the system and the more intensive the management becomes.
These became very popular for high-density apple orchards during the 1980s and 1990s. The slender spindle was one of the first designs and is simply a post supporting a tree, usually to a height of about 6 feet. Newer designs can be up to 10 feet tall. No horizontal wires are used and the trees are typically trained to be the shape of a Christmas tree or pyramid. Vigorous, upright leaders are cut off, and weak shoots are tied up in their places to form slow-growing leaders as part of an orchard-size control program.
Due to their relatively high cost and low yields, slender spindle systems have become less popular than newer training systems. The newer super spindle system is a viable design for commercial apple orchards. While it resembles the earlier slender spindle, the trees are supported on wires without the use of posts, and the trees are planted about 2 feet apart to quickly form a dense canopy. They are costly to establish due to the large numbers of trees needed: up to 2,178 per acre. Space rows about 10 feet apart.
There are many vertical axis designs, and they are often used in new commercial apple orchards and are adaptable to pears and sweet cherries. Other names you may hear include the “axe,” “V-axe,” “French axe,” and “slender axis.” All are similar and differ mainly in pruning techniques and how the trees are managed. The V-axe uses more trees per acre and splits the canopy into a V shape.
Axis systems are typically 10 to 14 feet tall. Some designs use a metal electrical conduit, bamboo pole, or wooden stake placed next to each newly planted tree for support. Wires run the length of the tree row, supporting the tops of the poles and keeping them in line, either horizontally or at an angle for V systems. Additional horizontal support wires can be used, depending on the design. In some systems, no poles are used and the trees are supported entirely by the wires. The trees are tied loosely to the poles or wires so that as they grow they form straight trunks. Depending on the crop and design you choose, trees are spaced about 3 to 7 feet apart in rows that are 10 to 16 feet apart. About 389 to 1,452 trees are planted per acre. In cooler climates where trees are less vigorous, it is best to space trees closer together within rows.
Apples are remarkably adaptable trees that can be trained to large pots for patios or as freestanding giants. For organic fruit growers, freestanding or supported trees 6 to 12 feet tall work well.
If you have an established orchard of freestanding trees, do not rush to remove them and replant. What you have may already be suitable, and replanting costs can be high. Begin using the pruning and training practices described in this chapter to improve fruit quality and pest and disease management. In particular, open up the trees to ensure good light penetration and air movement.
Freestanding, central leader design. To train an apple tree to a freestanding central leader design, you may start with either an unbranched whip or feathered tree (figure 7.1). Provided that the branches on the feathered trees are in suitable locations, you can save a year in training and come into production sooner. Poorly located branches, however, are no bargain.
Traditionally, whips were headed back to several inches above where you wanted the first scaffold branches to start. By heading back the leader, you eliminate apical dominance and stimulate the first three or four buds below the cut to grow. These new shoots form the scaffolds, and one shoot is trained up to form the modified central leader.
If you can avoid heading back the leader, your trees will develop faster. If you have a well-feathered tree, simply prune off the branches that you do not want. Central leader trees are traditionally started with a cluster of three or four branches about 3 feet above the ground. Space the branches in the whorl 3 to 6 inches apart vertically so that no two or more branches arise at the same height on the trunk, and evenly distribute the scaffold branches around the tree. Leave the trunk bare for about 18 inches above the topmost branch of the first whorl, and repeat the process to form a second whorl. Some central leader or modified central leader trees have three or four whorls.
An alternative to heading back the leader to stimulate branching is to remove some of the buds from the whips. Rub off all of the buds up to about 3 feet above the ground and rub off the first six buds directly below the terminal bud. Leave roughly every second or third bud for now, choosing those that point in the direction you want the branches to grow. This approach produces branches that are distributed evenly along the trunk, rather than in distinct whorls. Figure 12.9 shows the stages involved in developing a central leader or modified central leader tree. The main difference between the two approaches is that in a central leader tree, the leader is not headed to stimulate branching.
The final tree shape should be conic-shaped or pyramidal, with a relatively wide base and narrow top to allow light to penetrate to the lowest branches and the interior of the trees. In some orchards, the trees are allowed to become rounded with a wide top. The shading from the upper limbs, however, reduces the fruit quality and production on lower branches. Distribute your branches around the trunk so that one branch does not lie directly above another. Leave enough scaffold branches to fill in the canopy, but not so many as to create excessive shading.
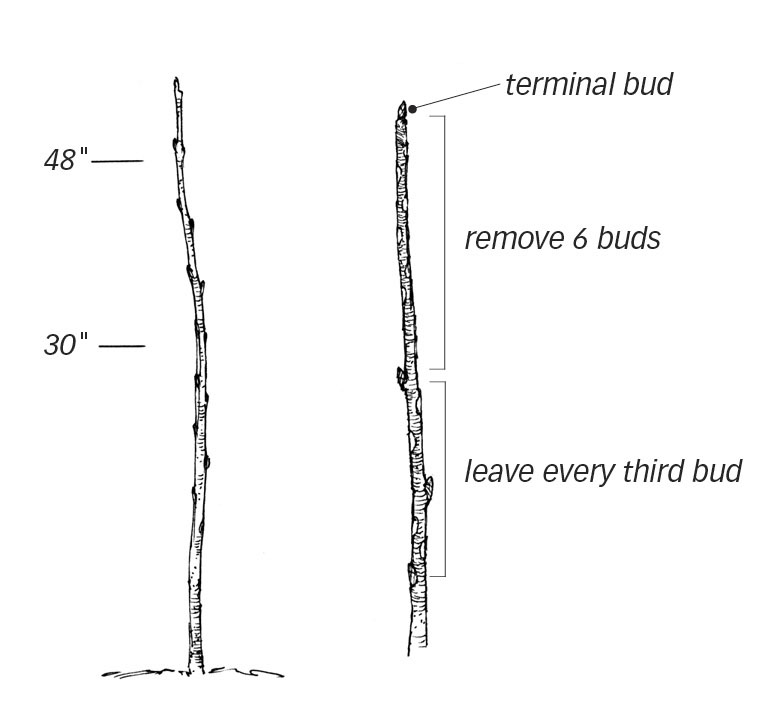
1) If starting with a whip, rub off the first six buds below the terminal and leave about every second or third bud after that between 30 and 48 inches above the ground. Keep three or four branches well distributed around and along the trunk on this section of the trunk.
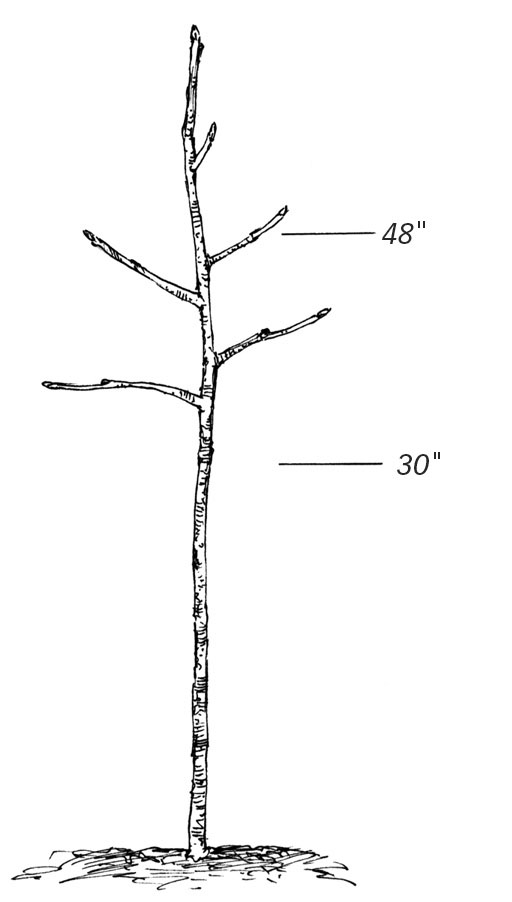
2) With a feathered tree, select three or four branches 30 to 48 inches above the ground.
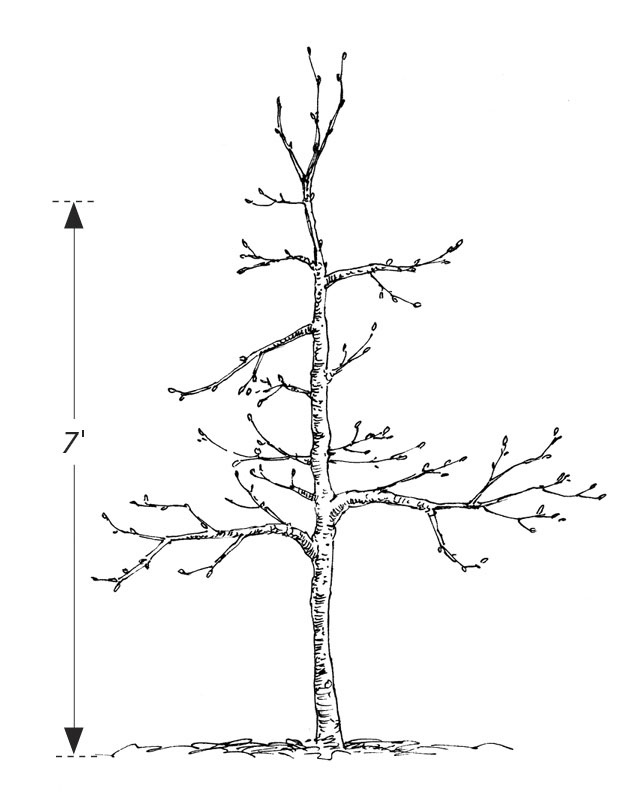
3) Try to avoid heading the leader. Remove buds and select branches as for steps 1 and 2 to establish three or four more branches to about 7 feet above the ground.
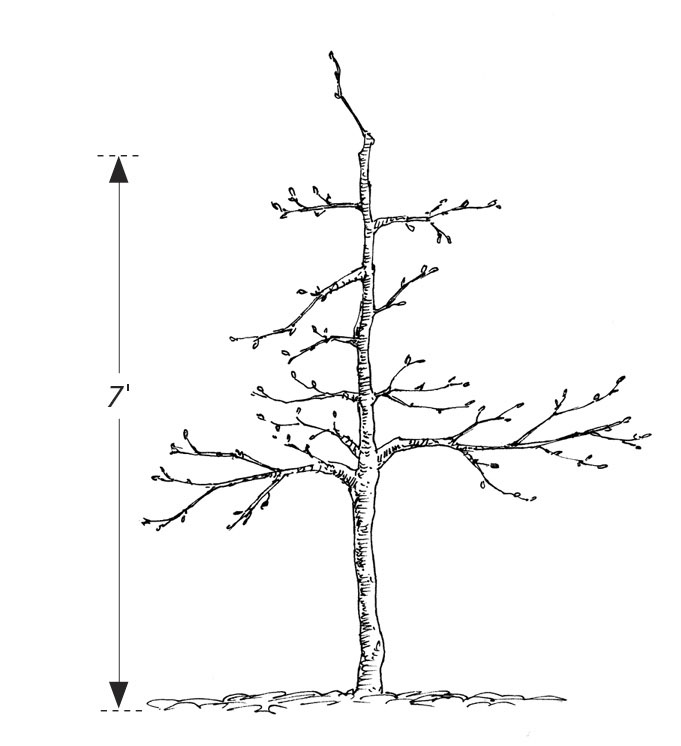
4) Thin out the leader to a weak lateral.
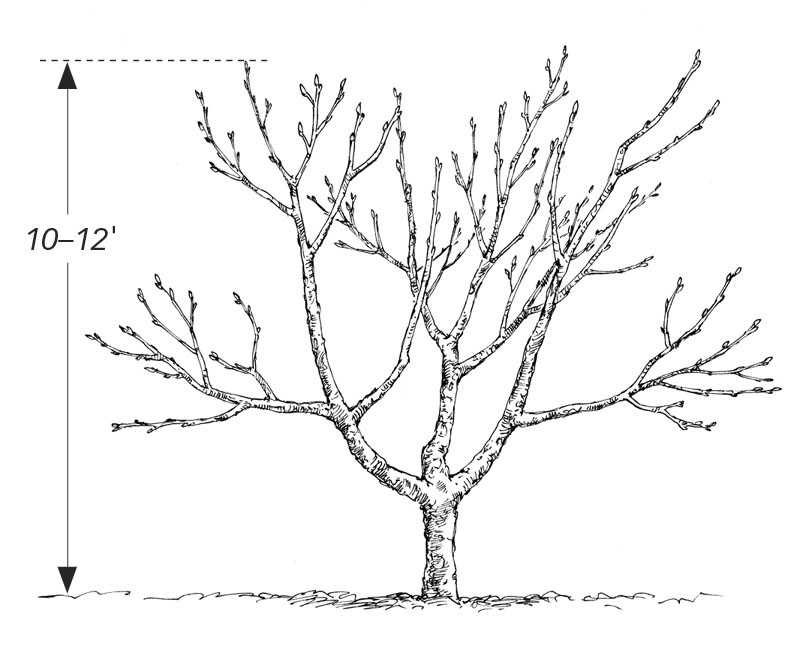
Freestanding, open center design. To develop a freestanding, open center tree, you also begin with either whips or feathered trees. Develop a whorl of branches as you would for modified central leader trees, described above. The difference between mature open center and central leader trees is that the open center trees have only a single whorl of scaffold branches set atop a short trunk. How high you should develop your scaffold depends on your preferences and your orchard equipment. Scaffolds are typically developed at a height of 18 to 36 inches above the ground.
Open center trees usually have three to five scaffold branches. It’s easier to scout for pests and diseases and to spray trees with three or four main branches. Distribute the branches evenly around the trunk and space them vertically 3 to 6 inches apart on the leader. For now, leave the central leader in place.
As the scaffold branches grow, use spring-type clothespins, weights, tie-downs, and spreader bars to position them so that they form a uniform vase shape with wide branch angles at the trunk. When the main scaffold branches are 12 to 18 inches long, head them back or select vigorous side branches to form V-shaped pairs of branches. Remove the central leader. Depending on the desired height of the tree, each of these secondary scaffold branches may also be headed back or thinned to form more V shapes. If you can avoid heading the leaders, your tree will come into production sooner. Figure 12.10 shows the stages in training an open center tree.
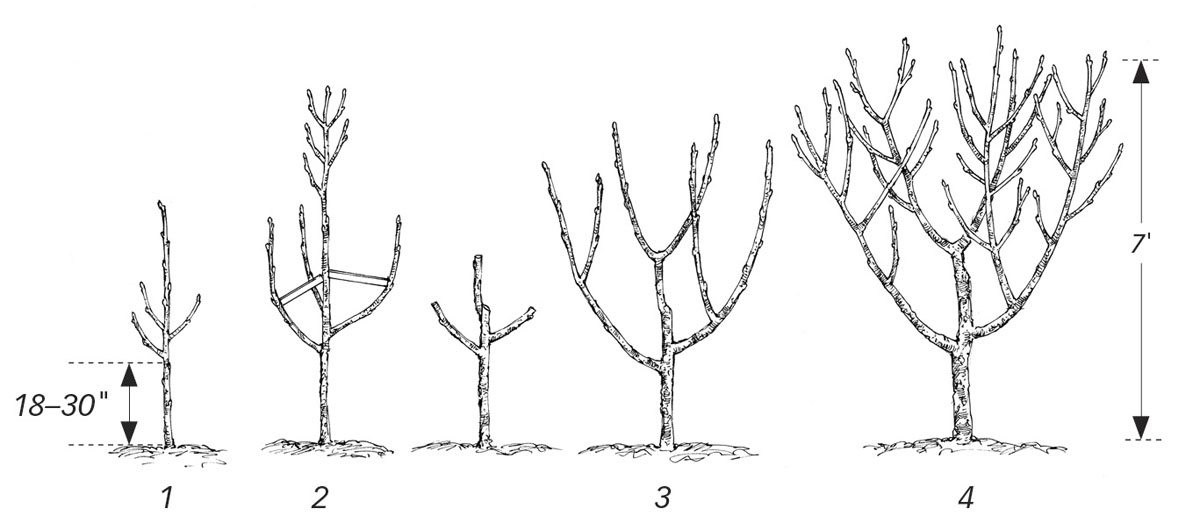
1) Start with a whip or feathered tree, as described for figure 12.9. Select three to four branches that are well distributed around the trunk and spaced 3 to 6 inches apart vertically, starting 18 to 30 inches above the ground. Keep the central leader for now, but remove all the branches above those you have selected. Spread the branches with clothespins, weights, spreader bars, or tie-downs.
2) Allow the main scaffolds to develop, keeping them spread to a uniform bowl or vase shape.
3) Remove the central leader, and head the main scaffold branches about 18 inches above their bases.
4) Prune to keep an open canopy. Head and thin as necessary to maintain the desired tree height.
Apples and pears have long been trained on posts and wires. One such supported design is the slender pyramid, which was mentioned in chapter 3. Although trees in this design produce greater yields than freestanding central leader and open center apple trees, they are slow to come into production and produce lower yields than trees trained with the other high-density designs discussed later in this chapter. For those reasons, I do not recommend it.
Trellises are well suited to apples and pears. While they were probably originally intended for ornamental landscaping, the designs are also useful in high-density orchards. Because they are more costly to establish and produce lower yields than axis and tall spindle systems, trellises are not widely used in commercial apple production. (Taller trellises that produce yields comparable to other high-density systems are being tested in Pennsylvania at the time of publication.) Trellises can still be excellent choices for home and market apple orchards, however, and they make attractive fences for landscapes.
The objective is to develop more-or-less permanent scaffold limbs. The scaffold limbs are tied to horizontal trellis wires and can be horizontal or angled upward. The trunks can be vertical or slanted. The high-density double leader pear system is a modification of the trellis design.
For trellis systems, it’s best to use the more-dwarfing rootstocks to prevent unwanted vigor, but avoid the extreme-dwarfing M27, P22, and V3 rootstocks. Apple rootstocks Bud9, M9, M26, Geneva G11, P22, Vineland V2 and V7, and Ranetka crab apple work well. Pears are more easily trained to trellises than are apples, and OHxF 40, 69, and 217 rootstocks are adequate. In warm, dry climates where fire blight and cold injury are not problems, quince rootstocks provide greater dwarfing for pears.
Installing trellises. Install the trellis posts before planting your trees; you can install the wires after the trees are planted. Use strong end posts, and space posts every 25 feet within rows. Brace the end posts to prevent them from tipping inward. For trellises longer than 50 feet, it is best to use high-tensile wire. Adjustable ratchets can be used to keep the wires tight. Remember that most of the weight of the fruit crop will be borne by the wires and posts. The same techniques are used for wire-supported axis and spindle systems. The heights of the wires can be adjusted to meet your needs, but it is common to have three to five wire designs that are 5 to 7 feet tall. Use taller trellises for higher yields. Trees are typically spaced 3 to 6 feet apart, and rows are typically spaced 10 to 11 feet apart.
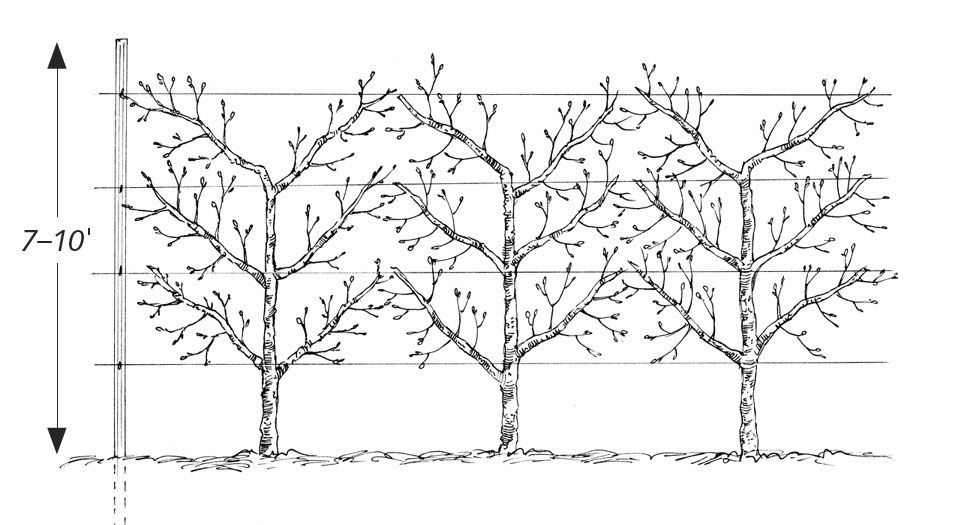
Trees are trained to a trellis using one of the following designs. Trellises range from about 3 to 10 feet tall.
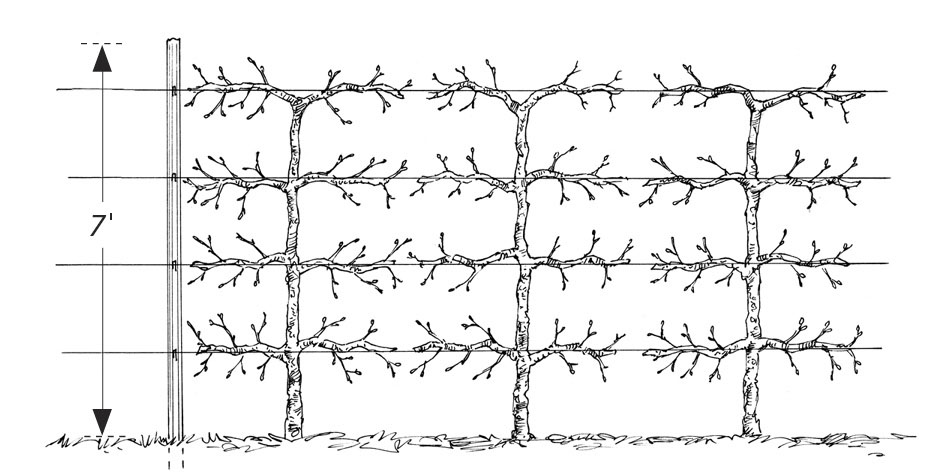
A) Horizontal
B) Palmette
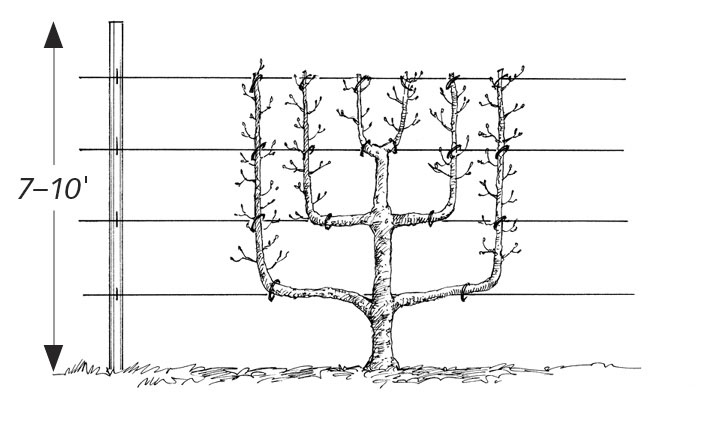
C) Espalier
Training trees to trellises. You can use either whip or feathered trees, although feathered trees can save you training time and you will produce your first crop sooner than you would with whip trees. For feathered trees, simply select the branches you want and remove the others. Tie the selected branches loosely to the trellis wires. Check the ties frequently during the growing season, and replace them before the ties cut into or girdle the branches.
For whips, you can head the leader back to the first wire to develop lateral branches and repeat as needed for each additional wire or scaffold. This is a slow method and delays time to fruiting. A better method is to leave the terminal bud and rub off the next six buds. Leave several buds on the leader at each wire or desired branch location and rub off all of the other buds just as they are swelling in spring. As the new shoots form, keep those that fit the trellis well and remove the others.
You can train the branches horizontally, at about 45 degrees, or vertically. Horizontal branches typically produce the most undesirable water sprouts, while palmette designs can be easier to manage. Pruning established trellises mostly involves removing water sprouts, keeping the rows narrow, and occasionally renewing the fruiting wood beginning about 6 years after planting. Figure 12.11 illustrates different trellis designs.
Slender spindle design. One of the earlier innovations in high-density apple plantings was the slender spindle design. Apples grown on M9, Bud9, M26, and similarly vigorous rootstocks are planted next to strong, rigid posts, and the trunks are tied loosely to the posts. Allow the trees to grow about 6 to 8 feet tall, and train them to conic shapes. The trees are typically planted about 4 feet apart in rows that are spaced 10 feet apart, with 1,089 trees per acre.
Slender spindles work well when space is limited, but they do not provide the high yields needed for today’s commercial orchards. It’s also very expensive to install the many trees and posts that are needed. For these reasons, slender spindles are no longer popular commercially, but they still have their place in home and market orchards. A higher-density version called the super spindle uses horizontal wires to support the trees, rather than solid posts. In the super spindle system, trees are planted 2 to 3 feet apart.
An ideal method is to plant stock that has four to eight feathers that begin about 18 inches above the ground. The feathered trees save training time by eliminating the need to head the leader to force lateral branches. Distribute the branches around the trunk, several inches apart vertically. Use clothespins and weights, if necessary, to form angles that are nearly, but still above, horizontal.
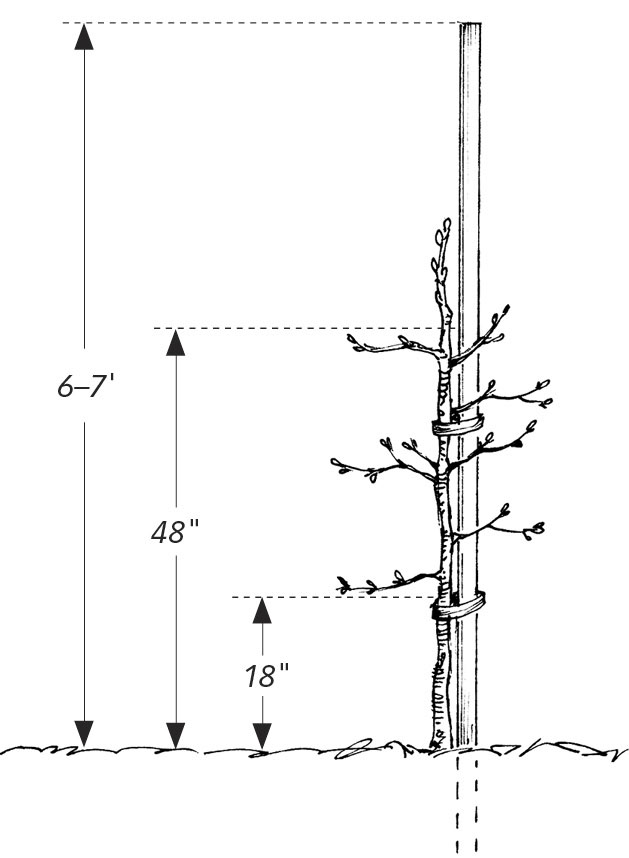
1) Use a whip or feathered tree as for figure 12.9 to establish four to eight branches between 18 and 48 inches above the ground.
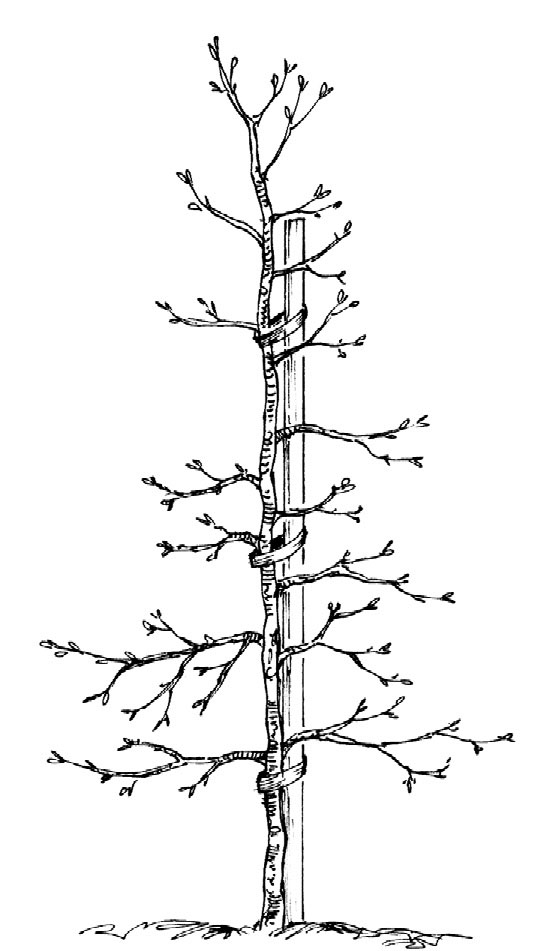
2) Use weights or ties to train the branches nearly horizontal.
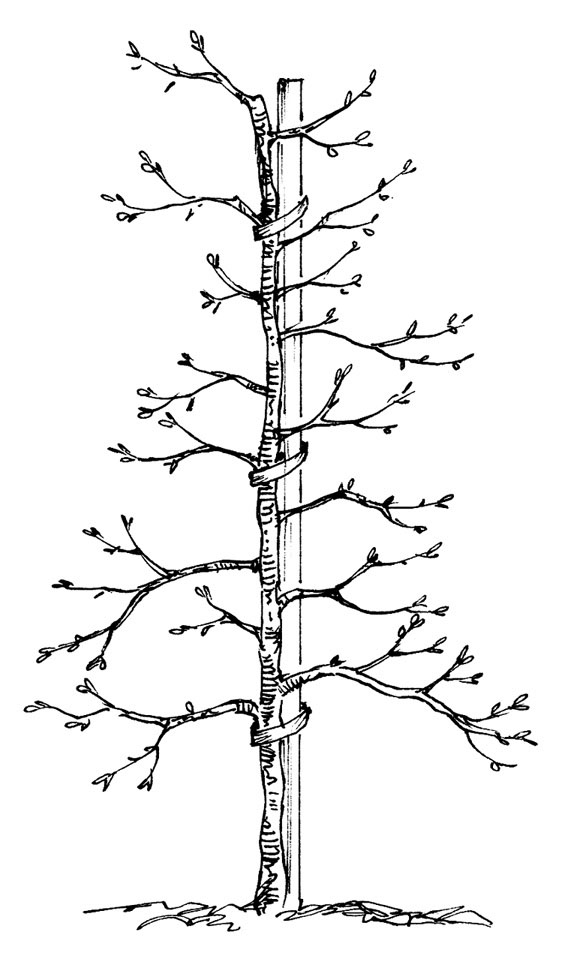
3) If possible, avoid heading the leader. Use the bud-thinning steps described in figure 12.9 to form more branches to a height of about 6 to 7 feet. Thin back the leader to a weak lateral, and tie up the lateral as a new leader.
As the trees mature, you will need to remove some of the scaffold limbs to prevent crowding and shading. By removing older branches, you also promote the formation of new fruiting wood and spurs. One strategy for maintaining mature trees is to thin out some of the largest branches each year so that all branches are replaced about once every 5 years. To keep the trees short, cut off vigorous leaders using thinning cuts, and tie up weak lateral branches near the tops of the trees. This leader renewal method produces a zigzag top and is a critical part of controlling tree vigor. Prune to maintain a conic shape with a narrow top and a wide bottom. Figure 12.12 shows the steps in training a tree to a slender spindle design.
Tall spindle design. The tall spindle appears to be one of the best high-density axis designs today for commercial apple plantings and comes largely from work done at Cornell University. This design is quite similar to the axis and other spindle training systems described earlier in this chapter. According to Michigan State University’s Crop Advisory Team, the tall spindle system is excellent for eastern apple growers and has the following advantages:
In tall spindle designs, each tree may be supported on an individual pole or the trunks may be supported only on horizontal wires, with three to five wires forming the trellis. The bottom wire is usually about 2 feet above the ground and can support a drip irrigation line. The top wire is usually 9 to 12 feet above the ground, and you will need stout support poles and bracing at the ends of the tree rows. When poles are used, they are done so mostly to keep the trunks straight, not to support the weight of the crop. Wooden poles, metal electrical conduit, or 1-inch-diameter PVC pipe will all serve this purpose. Training without poles can be very successful and is less expensive than training with poles.
Space the trees 3 to 4 feet apart in rows that are 10 to 12 feet apart on level ground, and 12 to 13 feet apart on slopes. This will allow for between 837 and 1,452 trees per acre. Rootstocks that have performed especially well are M9 and Bud9; Geneva G41, G11, and G16 also work well. Tall spindles can be used for any apple variety.
The system begins with feathered trees with trunks about 1⁄2 to 5⁄8 inch in diameter. The first side branches should be about 3 to 4 feet above the ground, with at least four to eight branches between 3 and 4.5 feet above the ground. If you do not use support posts, you can place commercially available U-shaped wire clips around each trunk to hold it in place against the horizontal wires. The clips install quickly and last for the life of the orchard. Figure 12.13 shows a tree trained to a tall spindle.
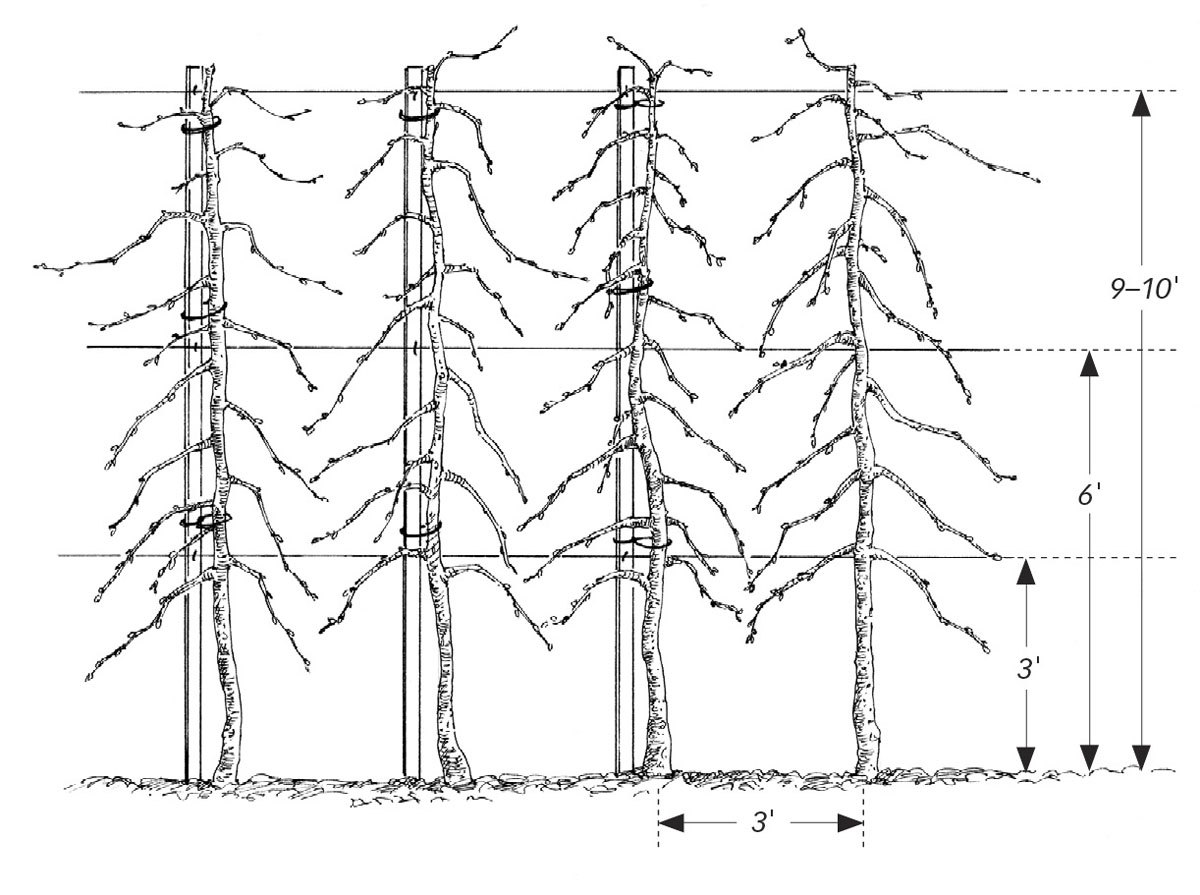
At this stage, the poles used to train and support the trunks remain in place. With support poles, the 3-foot and 6-foot wires are optional. The tree at right is shown without a support pole. The trunks can also be trained without poles, using only the three to five support wires and U-shaped wire clips to hold the tree trunks in position.
You need to do little or no pruning during the planting year or the second year. During the planting year, or no later than the second year, tie the laterals down to below horizontal. Wires that are about 12 inches long and have open hooks at both ends work well for this procedure and are available commercially. Simply hook one end of the wire to the outer portion of the branch, pull it down, and hook the other end of the wire to the trunk. Weights also work well, but they take more time to fasten to the trees. Some growers prefer to tie the branches down to stakes set into the ground. By bending down the branches, you prevent them from developing into competing leaders and induce early fruiting, which is critical for maintaining desirable tree vigor. The goal is to produce fruit by the second year and production should become substantial in years 3 and 4. Do not, however, sacrifice early leader growth at the expense of fruit production. The trunk should reach the top wire by the third growing season. Filling in the side branches may take a year or two more. Continue developing new fruiting branches as the trees grow taller.
Pruning established trees involves three steps for most apple varieties, plus a fourth step for ‘Gala’.
Commercial pear production differs from apples in several ways. First, very few pear varieties make up the bulk of world production, and we do not see the rapid introduction of hot, new varieties as we do with apples. ‘Bartlett’, as it has for decades, still makes up the majority of pear production domestically and worldwide. There is much less need to force early production to capitalize on the short market life of new pear varieties, as is now done with apples. In addition to pear varieties being limited in number, so are pear rootstocks. Some of the dwarfing rootstocks needed for the high-density and very-high-density pear orchards are not adapted to many growing regions, and others have yet to be tested across North America.
This is not to say that new commercial pear orchards should not be designed using high-density systems. We do, however, have much to learn about high-density pear production systems, and there is an extremely limited amount of technical support for growers using them in North America. Growers in Australia, Italy, the Netherlands, and Japan are further ahead in developing high-density pear production. In short, do your research and exercise caution before investing heavily in a high-density pear orchard. In colder climates, you may find that medium-density orchards and moderately vigorous rootstocks will be more reliable than higher density systems using dwarfing rootstocks.
Especially for organic growers, be careful to design your orchard to allow sustainable yields of high-quality fruit to be produced at reasonable costs for the life of the orchard. Avoid the temptation to chase early, high yields with a design that may make long-term production difficult.
Freestanding and palmette-trained trees on simple trellises are still well suited to home and market orchard pear production. For a new commercial orchard, where the climate allows, several high-density systems will likely prove to be better investments than low-density plantings. Some high-density systems make it easy to pick without the need for ladders and they work well for home and market orchards, U-pick, and more intensive, grower-pick orchards.
Both central leader and open vase training systems have long been used and generally work well.
One difference between pears and apples is that pears have a greater tendency to produce very upright growth, multiple leaders, and narrow branch angles with their associated bark inclusions. It is especially critical to train pear trees early, and you must pay careful attention to removing unwanted leaders and removing or spreading upright branches.
Pears are among the easiest trees to train and they can be given almost any shape you want. Trellises have long been used to support and train pears, two of the most popular systems being the palmette and espalier designs described earlier for apples and shown in figure 12.11. These designs use from three to five or more horizontal wires. Newly formed leaders and branches are tied to the wires to hold the desired shapes until enough wood and stiffness develop to hold the shapes. Depending on the size of the tree and the training system, the supporting wires may or may not be left in place permanently.
In 2008, California researchers reported on 13 years of trials comparing freestanding pear trees to those in high-density Tatura and parallel hedgerow systems. They found that the Tatura system was the highest-yielding. The high-density systems came into bearing sooner than the freestanding trees and would have become profitable in the sixth growing season, compared with the ninth growing season for the standard planting. At full production, the high-density plantings produced about 50,000 pounds of fruit per acre, compared with 40,000 pounds for the freestanding trees. The researchers estimated that a grower would recover establishment costs in year 10 if using the high-density systems and year 21 if using the freestanding trees. These results are similar to those found in pear trials conducted in other countries.
Several divided canopy designs are available for pear growers. These systems train four leaders per tree, or train alternate trees to lean one way or the other in a V-shaped row. The four-leader systems are used because they reduce the number of trees needed per acre compared with single-trunk, single-leader trees.
This design (figure 12.14) uses single rows of well-feathered trees spaced 4 feet apart in rows that are spaced 11 to 12 feet apart. Four leaders are developed at the top of a short trunk, about 18 inches above the ground. Wooden stakes or bamboo poles position the leaders and are supported by horizontal wires about 6 to 7 feet above the ground, creating a double V shape about 4 feet wide at the top. Four poles are used for each tree, with one leader being trained per pole. Keep the fruiting laterals short on each leader to maintain an open canopy.
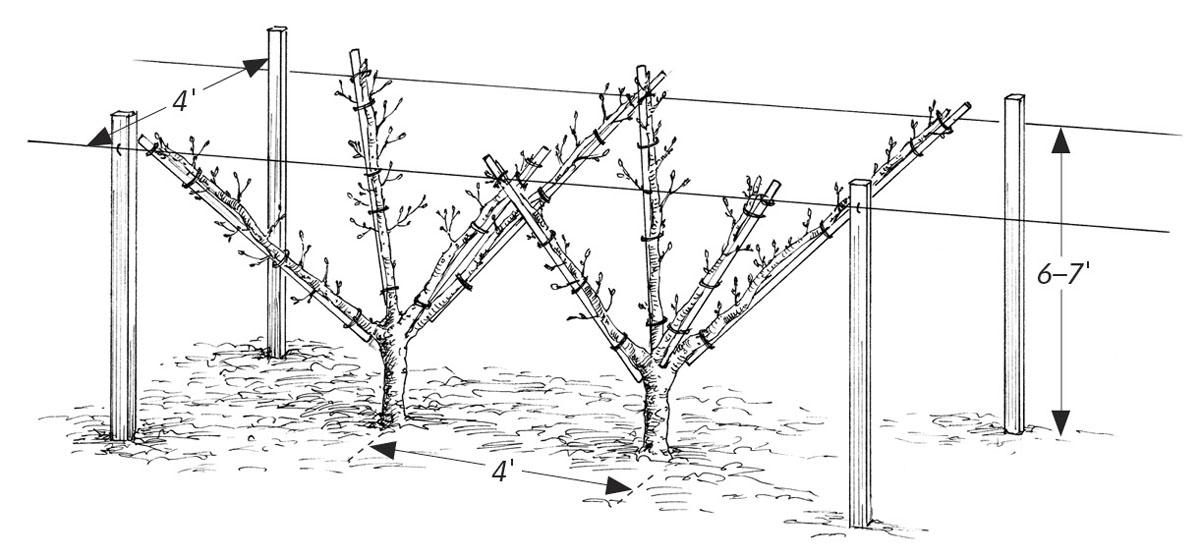
A) Pear trees trained to a V-hedge. A bamboo or other similar pole is used to support and train each of the four leaders on each tree. These poles attach to the support wires.
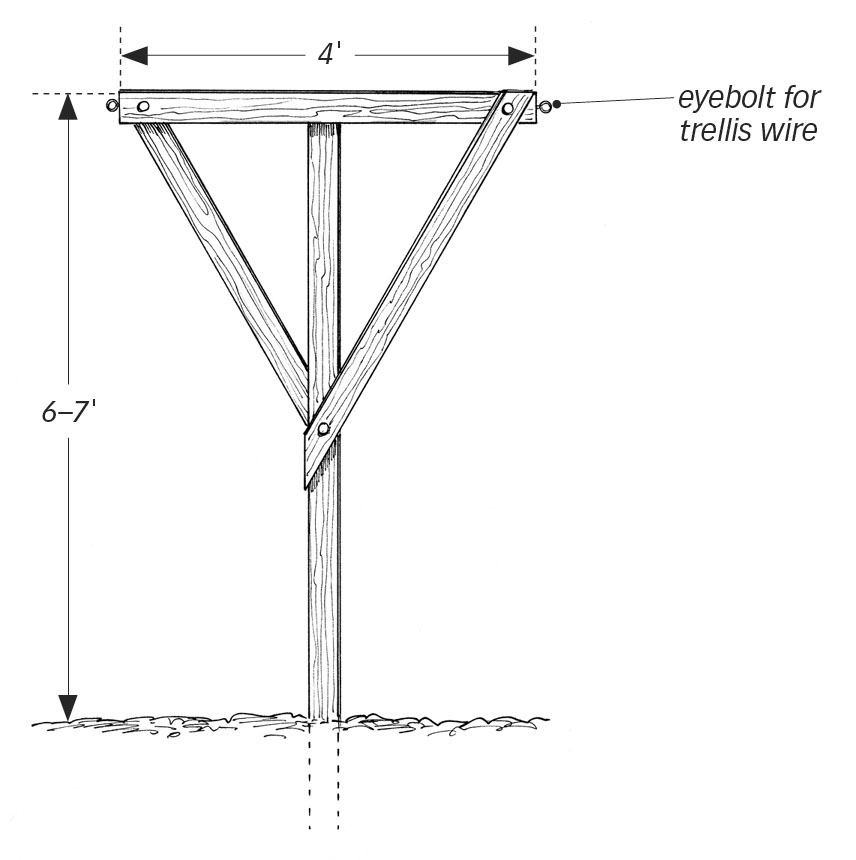
B) Row end and mid-row wire support posts
This high-density pear system is used in Europe. Early Tatura systems developed double leaders on short trunks, forming a Y shape perpendicular to the crop rows. This design resulted in tall trees that stuck out into the alleys and interfered with the movement of equipment and other orchard operations. Newer Tatura designs use shorter trees, more vertical trunks, and rows more closely spaced than did early designs.
The open Tatura design uses double rows of trees, with each member of a tree pair leaning in an opposite direction toward the alleys and creating V-shaped rows of trunks supported on poles and horizontal wires. The two rows of trees in each crop row are separated by a strip of open ground about 20 inches wide running along the center of the crop row. The row centers are 11 to 12 feet apart. The trees are planted in an offset pattern between rows to maximize the distance between the trees. Within each row, the trees are planted 3 to 6 feet apart (there is 1.5 to 3 feet between trees in the paired rows). The support posts for the trellis wires are similar to the one shown in figure 12.14b.
The open Tatura design (figure 12.15) improves on early Tatura systems by lowering the canopy and reducing the trees’ intrusion into the alleys. Trees are maintained about 6 to 9 feet tall. The advantage over freestanding trees is that there is more fruiting surface per acre. The disadvantages are that the trees need trellis wires and poles, and there need to be many more trees per acre. From a pest and disease control perspective, the V-shaped rows can make it difficult to scout and apply pesticides to the interiors of the crop rows, particularly as the orchard matures. It can also be challenging to manage weeds within the double rows of trees without using conventional herbicides.
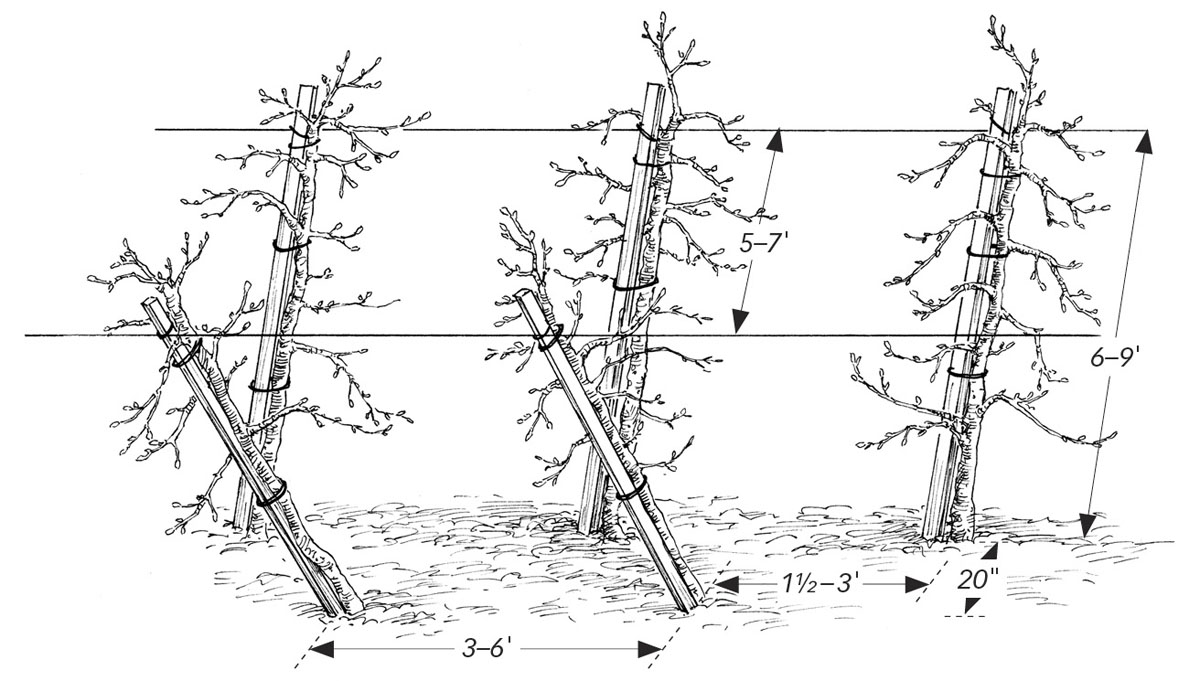
The trees are planted in double rows spaced about 20 inches apart and are offset between rows to maximize the distance between trees. Poles and wires are used to train and support the trunks.
This training system is especially good for commercial and home organic pear production (figure 12.16). While several variations exist, they all develop two leaders from each tree and train the leaders vertically, forming two trunks. Essentially, this is a high-density version of the old palmette training system, which uses greater numbers of smaller trees and spaces the leaders closer together. The two leaders are formed about 10 inches above the ground in a U shape and are trained vertically using horizontal wires at a density of about 2,400 leaders per acre. Unlike the V-hedge and Tatura designs, the U-shaped trees are oriented parallel to the crop rows in the double leader system and create narrow walls.
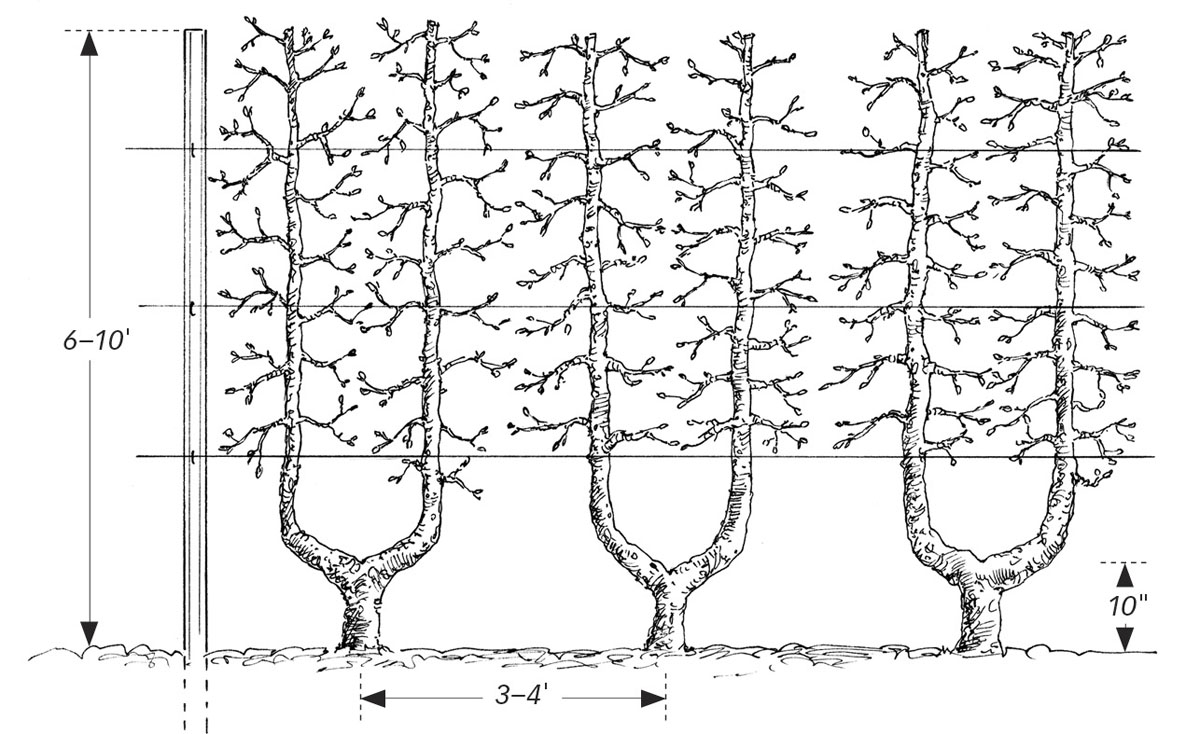
Developing two trunks for each tree reduces establishment costs. The flat, narrow canopy provides for excellent pest and disease control and easy harvest.
By doubling the leaders, you use half the number of trees per acre to produce the same number of leaders as with single-trunk axis or spindle systems. This saves you a huge amount of money in establishment costs. Growers that double the number of leaders also have an advantage in areas where fire blight is a problem — you can lose one of the two leaders and still remain in production. Organic growers that use this system have the advantage of easier pest and disease management, due to the flat, narrow fruiting surface, than with freestanding or V-trained trees.
Harvesting the fruit is also very easy and is ideally suited to U-pick orchards, where the trees are maintained to a height of about 8 feet. Grower-picked trees can be trained to around 10 to 12 feet tall to increase yields. The taller trees lend themselves well to mechanization, where pruning the tops of the trees is done from tractor-drawn platforms, from which workers prune or harvest two rows simultaneously. This mechanization approach applies to all of the spindle and axis systems described in this chapter and can provide big savings in labor in commercial orchards.
Before planting, install your support wire posts the same way you would install a tall spindle system for apples (see page 433). There should be roughly five wires between 18 inches and 9 to 11 feet above the ground. You can install the wires after planting. Begin with feathered trees or whips. For yellow European varieties, use OHxF 40, 69, or 217 rootstocks or similarly vigorous pear rootstocks. Use OHxF clones 277 or 97 for Asian pears and for red European pear varieties. Plant the trees 3 to 4 feet apart in rows that are about 11 feet apart.
You will need to develop two leaders about 10 inches above the ground. If lateral branches are not available, head back the leader to a height of 12 to 14 inches above the ground in order to force new lateral shoots. When forming the double leaders, create a rather gentle U shape at the top of the single shared trunk. Take great care to avoid bark inclusions (see pages 414–415). For a spacing of 3 feet between trees, the paired leaders for each tree should be 18 inches apart. For a spacing of 4 feet between trees, the leaders should be 24 inches apart. Although not absolutely necessary, temporary posts are very helpful during training to ensure straight, evenly distributed leaders. Loosely tie the leaders to the horizontal wires or clip them into place using the U-shaped wire clips described for the tall spindle system for apples. When the leaders develop enough strength to support the crop load, you can remove the support wires.
Pruning established trees mostly involves removing crowding branches and heading back vigorous laterals to form fruiting spurs. Pear spurs live for 8 to 10 years, and it is a good practice to occasionally remove or head back older spurs to form new fruiting wood.
For high-density, organic pear production, the double leader design appears to offer more advantages and fewer disadvantages than the V-hedge or Tatura systems. The V-hedge does allow you to produce four leaders per trunk, reducing the numbers of trees needed per acre as compared to single and double leader designs. The spindle and axis systems described for apples are worth experimenting with for pears.
Loquats are tropical to subtropical evergreen trees or shrubs that can grow to be 30 feet tall, although in orchards we keep the trees about 10 feet tall. The trees naturally spread, and you can train them to central leaders, open centers, or multiple-stemmed shrubs. Loquat trees are typically spaced 20 to 25 feet apart in rows that are also spaced 20 to 25 feet apart.
Loquats bear their fruits in clusters at the ends of short side branches. After harvest, some growers head back the fruiting laterals by about 2 inches to stimulate new fruiting wood. The naturally dense evergreen canopy remains in place year-round and can create challenges with pest and disease control. Use the training and pruning practices we discussed for apples to shape and maintain the trees. All cuts will essentially be summer pruning. Use thinning cuts to keep the canopy open, and maintain the plants at a height of about 10 feet. Head back fruiting laterals several inches after harvest.
Mayhaw trees naturally develop open canopies and are among the easiest pome fruits to train. Once they are trained, pruning is generally limited to occasionally thinning out the top to maintain the desired tree height and an open canopy. You also need to prune suckers from the base of the tree and water sprouts in the canopy.
The trees can be trained to either modified central leaders or open centers. In either case, you use similar training and pruning methods as those used for apple and pear (see page 425). In commercial settings, the trees are typically trained to wide, flat-topped shapes (figure 12.17) and resemble flowering crab apples. The small fruits are harvested using mechanical shakers and are collected on tarps under the trees. In training young trees, select your first branch at least 18 inches above the ground and 36 to 48 inches above the ground if you plan to harvest mechanically. In new mayhaw orchards, trees are usually planted about 25 feet apart in rows that are spaced 25 to 30 feet apart. Early recommendations were for closer spacing, but the higher density caused crowding.
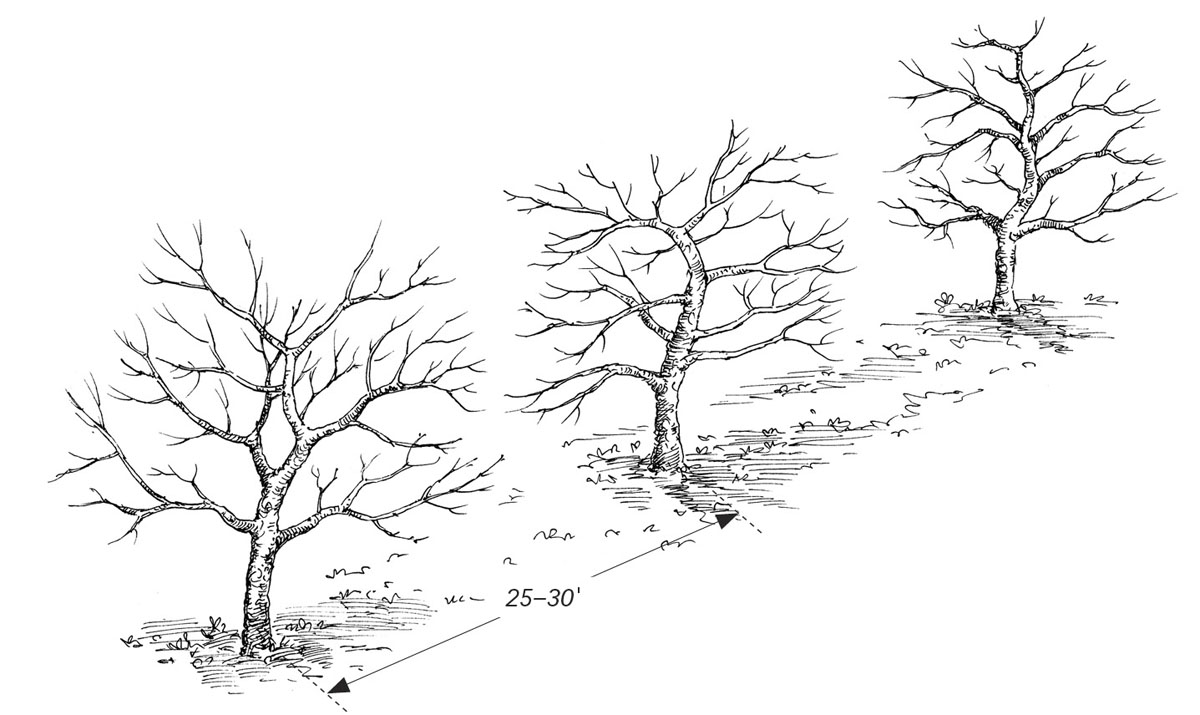
Trees are freestanding and can attain 30-foot height and spread. They can be trained to modified central leaders or open centers.
Medlars require very similar methods of pruning and training to apple and pear trees. They are naturally spreading and are traditionally grown as freestanding, single-trunk trees. They are planted 15 to 20 feet apart in rows that are spaced 15 to 20 feet apart. In landscapes, the trees typically grow to be 13 to 20 feet tall and broad. In an orchard setting, keep them no more than 12 to 14 feet high. Medlars can be trained to modified central leaders or open centers, and you can stake freestanding trees for 3 to 4 years after planting to produce straight trunks.
The low-density designs described above for apple and pear work well for medlar. Medlars can be trained to trellises, although they are most often grown freestanding. By using the training methods described for apples and pears, the trees might be planted at higher densities, perhaps as close as 7 feet apart in rows that are spaced 15 feet apart. Medlars’ ability to adapt to high-density spindle and axis systems remains to be determined.
Early training is important because mature medlars do not tolerate heavy pruning well. For pruning, follow the recommendations for apple and pear.
Quince trees generally resemble apple and pear trees and can be trained to either central leader or open center designs. Although quince trees have a strong apical dominance that makes them well suited to central leaders, their susceptibility to fire blight means that open center training is best in areas where fire blight is a problem. If one of three to five scaffold limbs in an open center tree is lost to blight, the tree can still produce fruit. Losing the main trunk of a central leader tree is more serious.
The biggest difference between quince trees and apple and pear trees is that apples and pears develop fruiting spurs that can remain productive for 8 to 10 years. Quinces bear their fruits at the tips of current-season shoots. The goal is to produce new fruiting shoots each year.
Quinces are usually grown as freestanding trees or tall bushes and are planted in low densities, about 15 feet apart in rows that are 20 to 25 feet apart. Trees are typically 8 to 15 feet tall. While there may be promise in growing quinces in high-density axis and spindle systems, similar to apples and pears, very little research has been published on the subject. For now, high-density quince plantings should be considered experimental.
Saskatoons are grown as freestanding bushes, although some growers place two trellis wires, one on either side of the row and about 4 feet above the ground, to keep the bushes from leaning out into the alleys. Freestanding bushes that are spaced 20 feet or more apart make excellent specimens in an edible landscape. For fruit production, the bushes are usually grown in fairly dense hedgerows with the plants spaced 1 to 5 feet apart in rows that are 10 to 12 feet apart. Plants are spaced very closely together in commercial orchards to obtain early yields using mechanical harvesting. This close spacing can create crowding and may necessitate thinning out bushes several years after planting. An in-row spacing of 4 to 5 feet is more common and is recommended for home and market orchard production.
It’s important to prune saskatoons because it rejuvenates the bushes and helps ensure high and consistent yields and healthy plants (see box on page 446). We usually prune saskatoons in early spring, before new growth starts. For the first 3 years after planting, prune only to remove dead, damaged, or diseased stems. At the same time, remove stems that droop close to the ground. Cut these off at ground level using sharp pruning shears or long-handled loppers. Saskatoon stems are normally not headed or thinned. Instead, remove the stems at ground level.
Depending on the plants’ growth, regular pruning begins about 3 to 6 years after planting. Remove one-third to one-fourth of the stems, targeting those that are more than about 4 years old and those that show declining fruit production. Also, remove weak new stems and any stems that lie close to the ground. The next year, remove one-third to one-fourth of the oldest stems and repeat this practice yearly. Eventually, you develop a system where the oldest stems are 3 to 4 years old. For saskatoons, the best fruit production usually occurs on vigorous 2- to 4-year-old stems.
For ornamental landscape plantings, modify these steps to meet your needs. In general, you will prune to remove dead and damaged stems and to thin out the stems to create an attractive specimen shrub. The mature heights of selected cultivars are given in chapter 5, although in commercial cultivation the bushes are kept about 7 to 10 feet tall, depending on whether they will be hand or mechanically harvested. Strive for an open, spreading, vase-shaped shrub with a spread that is about equal to its height. Occasionally remove old stems to maintain a healthy and vigorous shrub.
Until recently, sweet cherries were most often trained to vase shapes and allowed to develop into tall trees, with most fruit produced far above the ground. Improved training systems and dwarfing rootstocks now allow us to grow smaller trees with 80 percent or more of the fruit harvested without ladders. The smaller trees and more open designs allow for improved pest and disease management.
Sweet cherries bear their fruits at the base of 1-year-old wood and on short spurs located on 2-year-old and older wood. Unlike the short-lived spurs on tart cherries, the fruiting spurs on sweet cherries live for 10 to 12 years, but the best-quality fruit comes from young to middle-aged spurs.
The type and amount of pruning needed for sweet cherry trees depend on the rootstock and the training system. With trees that grow on vigorous rootstocks, like Mazzard and Mahaleb, you are faced with the challenges of bringing the trees into production quickly, reducing growth, and maintaining heavy crop loads. With dwarfing and highly productive rootstocks, such as Gisela 5 or Gisela 6, the trees come into production quickly and tend to overbear, leading to loss of vigor and small fruits. With these highly productive rootstocks, the challenges are to increase vigor and reduce crop load.
The pruning practices we discussed at the beginning of this chapter work well for vigorous sweet cherry rootstocks. For trees on highly productive rootstocks, we need to prune differently. Oregon State University has developed an approach to pruning highly productive cherry rootstocks using thinning, stub, and heading cuts to maintain high vigor and reduce crop loads (figure 12.18).
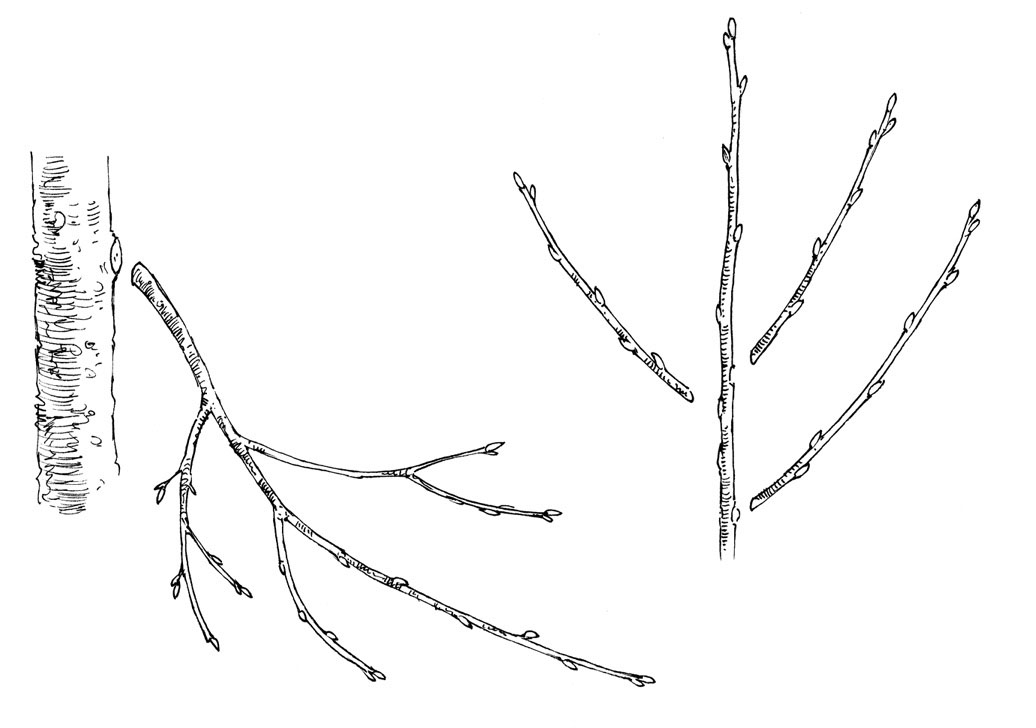
A) Thinning cuts are used to remove drooping branches, small diameter fruiting wood, and branches near the tops of leaders.
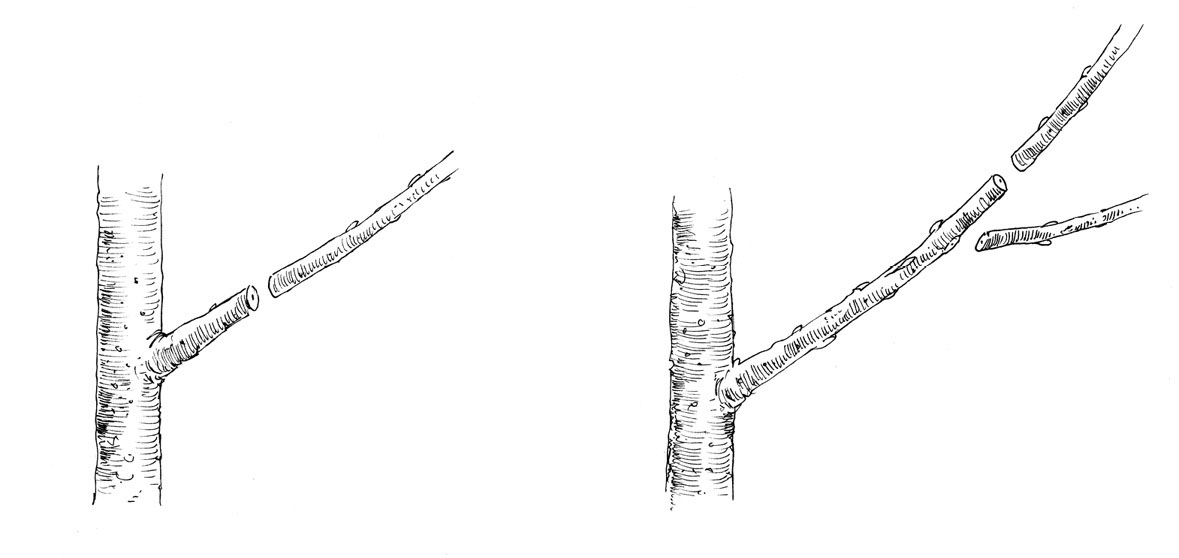
B) Stub cuts produce new fruiting wood. Renewal stubs near the tops of trees can be as short as 3 inches. For lower, more shaded branches, stubs can be up to 24 inches long.
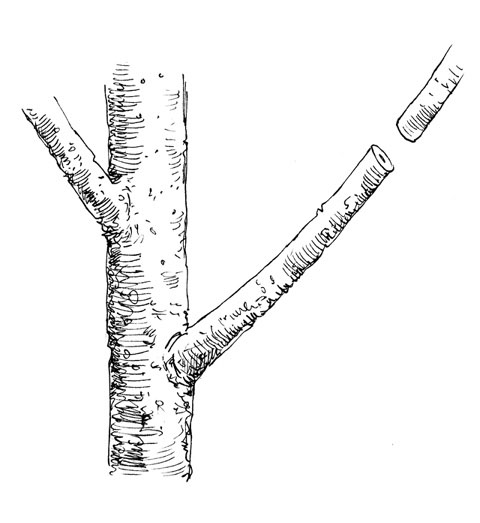
C) Heading cuts are made during the dormant season and involve removing one-third to one-half of each new fruiting shoot.
Use thinning cuts to remove weak and drooping wood. This practice is common to all of the pruning systems described in this book and is essential in maintaining open canopies that allow good air movement and light penetration. Maintaining high light penetration is important with the vigorous rootstocks to encourage new shoot development low in the tree as part of regular fruiting branch replacement. Also thin out leaders and lateral branches in the tops of the trees to allow light penetration. For vigorous cherry rootstocks, thinning also removes wood that is most likely to produce small fruits. Follow the practices described earlier in this chapter.
Stub cuts are a form of heading cut used on fruiting branches. According to the Oregon State University system, about 20 percent of all fruiting branches are cut back each year in order to renew the branches and spurs and increase tree vigor. Over a 5-year period, you will renew all of the fruiting branches and most of the spurs. The length of the renewal stub depends on the amount of light it receives. Well-exposed fruiting branches near the top of a tree can be stub-cut to be 3 to 5 inches long. Stubs for less-exposed branches lower in the tree may be left as long as 2 feet if the canopy is dense.
Make heading cuts during the dormant season by removing the outer third to half of each fruiting shoot that formed during the previous growing season. This practice increases branching, causes the fruiting spurs to develop farther apart, reduces crop load, and increases leaf size and photosynthetic capacity. The number and size of leaves are important factors in the fruit’s size and quality. To produce large, high-quality cherries, you need about five leaves for each fruit. Leaves that develop at the base of new shoots are generally larger and have greater photosynthetic capacity than those near the shoot tips.
For organic orchardists, a serious drawback with this system is that the heading cuts produce very dense canopies that can increase humidity and shading in the canopy, limit spray coverage on the inside of the canopy, and increase disease and pest problems. If you use this approach to prune highly productive sweet cherry trees, also increase thinning cuts to limit the number of branches in the canopy. You will have smaller yields but fewer pest and disease problems.
While sweet cherries can be trained to simple open centers or, with more difficulty, central leaders, the trees’ vigorous growth complicates management. Newer designs help maintain shorter trees, greater yields, and improved pest and disease management.
In the steep ladder system (figure 12.19), a freestanding tree is grown on either standard or dwarfing rootstocks. This is the system of choice for many sweet cherry growers in the Pacific Northwest and is an adaptation of the open center or vase training system design that has long been popular. Trees are planted 16 to 20 feet apart in rows that are 18 to 24 feet apart, producing low- to moderate-density orchards on vigorous rootstocks, usually Mazzard. Production does not begin until the fifth or sixth year after planting.
By using dwarfing rootstocks such as Gisela 5 or Gisela 6, you can increase early yields while reducing tree size. These trees are spaced closer together than trees on vigorous rootstocks. California growers have found, however, that it can be difficult to maintain vigor on the dwarfing rootstocks, and small fruit size has been a problem as orchards mature. The pruning methods we discussed above should help maintain vigor and fruit size on productive rootstocks.
The steep ladder design has many advantages, particularly for larger-scale commercial growers. It is suited to good or poor soils and frosty sites, adapts to a range of vigorous and dwarfing rootstocks, and works with different cherry varieties. The system does require relatively high management skills and is slow to come into bearing (at least on vigorous rootstocks), and harvest costs are higher than with smaller trees.
If you have a large, freestanding sweet cherry tree and want to keep it, pruning and training mostly involve thinning out excessive growth. Sweet cherries are notorious for producing multiple upright leaders and lateral shoots with narrow branch angles. Use thinning cuts to keep the canopy open. Spreaders and weights can be used to position branches and shoots to ensure branch angles wide enough to prevent bark inclusions and later limb breakage. Over several years, gradually thin out large branches. The goal is to lower the tree height and reduce its spread while developing new scaffold limbs that are more manageable and easier to reach. Train sweet cherry trees to an open center as in figure 12.10.
Using the steep ladder system. When developing a steep ladder sweet cherry tree, you will create a temporary modified central leader that has four permanent scaffold limbs. You will treat each of these limbs as a separate spindle or trunk. Start with either feathered trees or whips and select four primary scaffold branches that are distributed evenly around the tree about 30 to 36 inches above the ground. Remember to keep the central leader for now. Head the scaffolds so that each develops two permanent secondary scaffold branches. After two to four growing seasons, remove the central leader to form an open center tree. Use heading and thinning cuts to maintain a conic shape. Figure 12.19 shows the steps in developing a steep ladder sweet cherry tree.
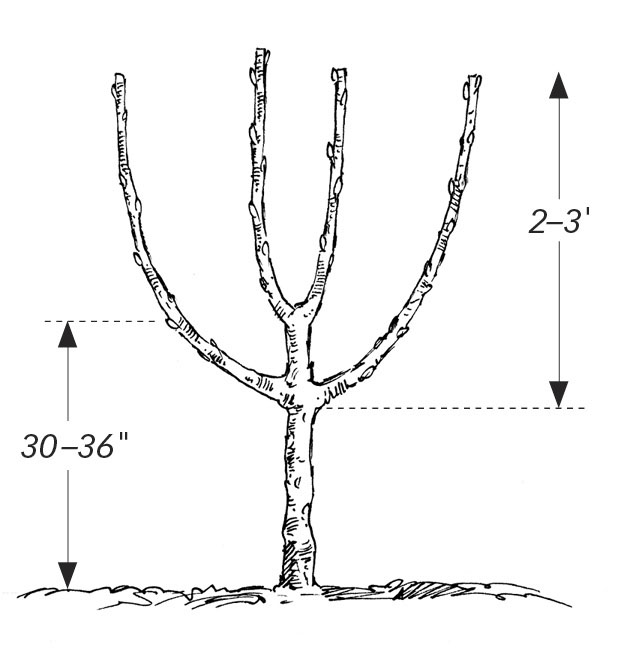
1) Develop three or four primary scaffold branches that are distributed evenly around the tree and 30 to 36 inches above the ground. Keep the central leader for now.
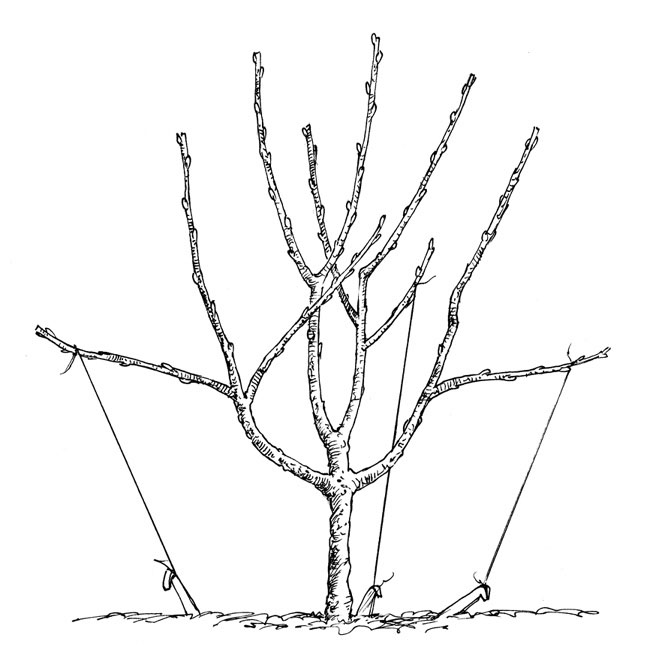
2) Head each primary scaffold branch to develop two secondary scaffold branches. For each primary scaffold, tie down the lowest of the two secondary scaffold branches, as shown.
3) After two to four growing seasons, remove the central leader to form an open center tree.
4) Use heading and thinning cuts to maintain a conic shape.
The Vogel central leader system uses dwarfing rootstocks, such as Gisela 5 or Gisela 6, to produce moderately high-density orchards that contain trees spaced 8 to 12 feet apart in rows that are 15 to 18 feet apart. Trees in this system are easy to develop and maintain, produce high early yields when used with highly productive varieties, and are easy to harvest. Because the trees are taller, the Vogel central leader design is better suited to frosty sites than the Spanish bush. This design tends to produce lower yields than do the other sweet cherry systems we are covering here. For home and market fruit growers, however, the Vogel central leader can be a good fit and is a replacement for the old open center training systems for cherries.
Because the trees grow 10 to 12 feet tall, the design is not ideal for U-pick orchards. By heading the leaders back to weak lateral branches, however, you can keep the trees shorter. Use the pruning practices described above for highly productive rootstocks in order to maintain commercially acceptable fruit size.
Using the Vogel central leader system. Start with whips and head them back to 30 to 36 inches above the ground. If you want your primary fruiting branches to be higher or lower than this, adjust the height at which you head the leaders. Instead of heading the leader, you can leave the two uppermost buds on the leader and rub off the next five or six buds below them to reduce competition for the leader. Then leave every second or third bud. The goal is to develop about four fruiting branches 18 to 24 inches above the ground. Use clothespins and weights to train the branches horizontally, as we discussed earlier. If both top buds produce shoots, prune off the stronger shoot and keep the weaker shoot.
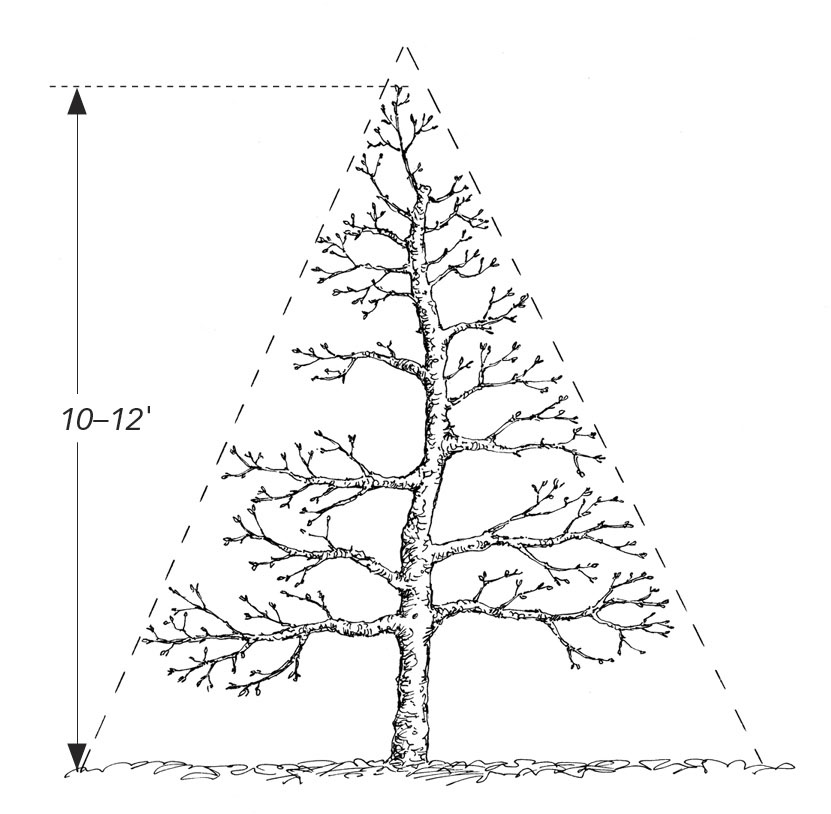
Use thinning cuts to keep the canopy open and develop new fruiting wood. Head back branches that become too long or are half the trunk diameter or more at that height. Keep branches horizontal. Maintain tree height by thinning to a weak lateral.
Repeat these procedures for the new leader during the first and subsequent dormant prunings. You will not need to head back the leader again unless it grows to be more than about 32 inches long. Your goal is to develop a series of fruiting branches that are distributed more-or-less evenly around and along the leader, rather than to form distinct whorls of branches every 18 to 24 inches.
As the trees mature, thin out drooping and crowding branches. Head back laterals that start to turn upwards, crowd neighboring trees, or intrude into the alleys. For each fruiting lateral, in summer pinch off the tips of new shoots when they are about 6 inches long. Thin out or head back branches that are more than one-half the diameter of the section of trunk where the branch is located. Based on Oregon State University recommendations, you may need to renew as many as 10 to 15 fruiting branches each year in mature trees. Figure 12.20 shows a Vogel central leader sweet cherry tree.
The Spanish bush system see (figure 12.21) uses dwarfing rootstocks to produce high-density orchards that provide high early yields with low labor costs. Most of the fruit can be harvested without ladders. In colder climates and on poorer soils, which limit cherry tree growth, use more vigorous rootstocks.
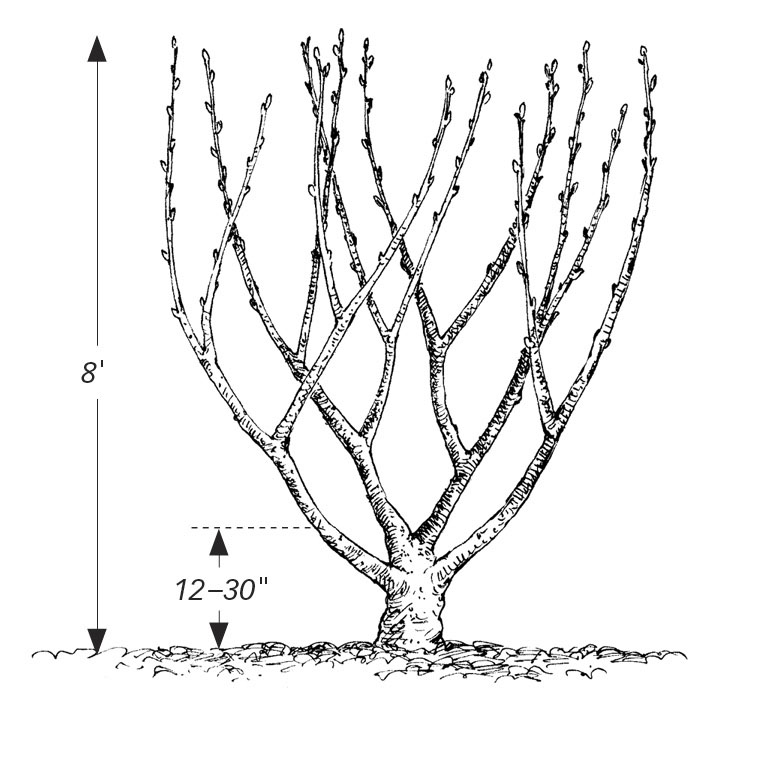
Develop four primary scaffold branches. Head these to produce two secondary laterals each. Head each secondary lateral to produce two tertiary laterals each. Use weights, ties, or spreader bars to train the scaffolds to a wide, uniform bowl shape. Use thinning and stub cuts to keep the canopy open and develop new fruiting wood.
While this particular design was developed in Spain, other variations exist. Essentially, they are high-density variations of open center trees. You need more skill to manage the Spanish bush than you do to manage the Vogel central leader, and the Spanish bush is riskier on frosty sites because the trees are shorter. On sites where spring frosts are not serious problems and for growers who are willing to learn the system and put in the required management effort, the Spanish bush can be well suited to home, market, and U-pick orchards. The system is also worth testing in larger commercial orchards. Plant the trees 6 feet apart in rows that are 15 to 18 feet apart.
As with other systems that use highly productive rootstocks to produce early yields, small fruit size can be a problem as orchards mature. In trials in the northeastern United States, Spanish bush–trained trees produced relatively low yields, and the dense canopy created problems with shading and low-quality fruit. Use the pruning practices described above for trees on highly productive sweet cherry rootstocks. Also make extra thinning cuts to remove excessive numbers of fruiting branches and keep the canopies open.
In an Australian modification to the Spanish bush, called the Kym Green’s bush (KGB), sweet cherry trees are grown on vigorous rootstocks and are spaced roughly 6.5 to 9 feet apart in rows that are 13 to 15 feet apart. The trees are roughly 11 to 12 feet tall. When newly planted, they are headed back to develop scaffold limbs. Over the next 2 years, each scaffold limb is headed back four times to produce 25 to 30 limbs. When the trees are mature, two to four large limbs are removed each year during dormant pruning, and renewal limbs are trained up. In both the Spanish bush and KGB systems, you need to frequently head back laterals during the first four years after planting.
While Spanish bush and KGB training systems produce much fruiting wood, they create dense canopies that make it very difficult to scout and treat pests and diseases under all but the poorest cherry-growing conditions.
Many different spindle and axe training systems are being used and tested with sweet cherries around the world. These are generally similar to the Vogel central leader design, but the trees are spaced more closely — at densities of more than 1,000 trees per acre. In this book, we recommend wider spacings and a maximum of about 670 sweet cherry trees per acre.
A long-term orchard trial in New York produced the highest yields on a vertical axis system, with lower yields on slender spindle and V-systems. Spanish bush-trained trees produced less than half the yields of those trained to the vertical axis, and central leader trees produced the lowest yields.
Using the spindle and axe systems. Precocious, dwarfing rootstocks are generally used for vertical axis and spindle cherry systems, although more vigorous rootstocks are used where soils and climate limit cherry tree vigor. As with other high-density systems, establishment costs and management input are high. The trees are well suited for producing hand-picked fresh fruit, and around 80 percent of the fruit is harvestable without ladders. The narrow rows also make it relatively easy to control pests and diseases.
For trees on Gisela 5, Michigan State University recommends planting the trees 8 feet apart in rows that are 15 feet apart. For trees on Gisela 6, plant the trees 9 to 10 feet apart in rows that are 16 to 17 feet apart. Where soils and climate produce vigorous sweet cherry trees, the wider spacings can provide less crowding over the long term.
While vertical axis and spindle training for sweet cherries show promise, adoption by commercial growers in North America has been slow. Widespread use of these techniques in North America may depend on rootstock breeders developing improved dwarfing rootstocks that maintain acceptable fruit size. Consider testing these designs in experimental plantings at this time. The following guidelines for slender spindle sweet cherry training are based, in part, on work done at Cornell University and recommendations by Michigan State University.
The vertical axis and slender spindle systems develop conic-shaped trees that are very narrow at the tops and provide good light penetration to the bottoms of the trees. Vertical axis trees are generally taller than those trained to slender spindles, which accounts for their greater yields. The increased height of the trees, however, complicates pest and disease management and increases harvest costs. Except for height, the two systems are very similar for cherries. For organic orchards, the lower tree height is better for most growers.
Managing growth. Cherry trees can be grown without support posts or wires, but because they need straight, uniform trunks and fruit crops develop early, it is advisable to use supports. Wooden stakes or metal conduit stand alongside each tree and support the young trunks, keeping them straight. The support posts can be driven into the ground or they may be supported by one overhead wire 10 to 14 feet above the ground.
Growers often divide the canopy of spindle- and axis-trained trees into two management zones: the lower fruiting zone and the upper fruiting zone. The lower fruiting zone includes seven or eight branches between about 2 feet and 4.5 to 6 feet above the ground. Begin with a well-feathered tree that has abundant lateral branches. Select the branches you intend to leave, distributing them evenly around the trunk and spacing them evenly along the trunk within the lower fruiting zone. Prune off the unwanted branches, and rub off unwanted shoots as they begin developing in the spring.
Horizontal branches are the key to the axis and spindle systems, but we do not use trellis wires to tie the branches. Train the lower zone branches horizontally or just above horizontal. You can tie larger branches down to stakes that are driven into the ground between the trees, or tie weights to the branches. For new shoots, use spring-type clothespins clamped around the leader with the tails of the clothespins pressing the lateral shoots down beginning when they are about 4 inches long. Leave the clothespins in place for about 2 weeks.
As the shoots grow longer, they naturally turn up at the tips. To prevent this, clip the clothespins to the ends of the developing branches and keep moving the clothespins further out about every 10 days as the branches grow. Add more weight, if necessary, to keep the branches flat in the lower fruiting zone. The upper fruiting zone is formed similarly to the lower, but the branches are trained to an angle below horizontal using weights and tie-downs.
Tatura and other divided canopy training systems are sometimes used for cherry production and can be very productive. The move today, however, is toward central leader trees and narrower rows. Divided canopies with cherry trees tend to become very dense and are likely to increase pest and disease problems. For that reason, I do not recommend them for organic growers.
Sweet cherries have strong apical dominance and often develop long sections of “blind wood” without fruiting laterals. To form the laterals in the lower and upper fruit zones, some growers head back the leaders to 50 percent of their length during the first three dormant prunings to force lateral buds to develop into fruiting branches. This practice, however, slows tree development and reduces yields during establishment. Rather than heading the leader to force laterals, leave the terminal bud but rub off about six buds below it with your thumb just as the buds are swelling in spring. Then leave about every third bud along the leader to develop lateral branches, as we discussed earlier. Use this spacing as a guide, but make sure you develop branches that are evenly distributed around and along the trunk. Mature trees appear similar to those shown in figure 12.13.
Managing mature trees. Once the cherry trees mature, pruning mostly involves thinning out excess wood to keep the canopy open and develop renewal fruiting wood. To accomplish this, thin out several of the larger branches each year in both the upper and lower zones. When cutting back large branches, leave branch stubs about 6 inches long. This practice helps limit the incidence of bacterial canker in the stubs and protects the main trunk from infection. It is especially important to use stub pruning in humid regions, where bacterial canker is a serious problem. Also use heading cuts to keep branches from intruding into the alleys or crowding adjacent trees. If you are growing the trees on Gisela 5, Gisela 6, or other highly productive rootstock, use the pruning practices described on pages 447–449.
Tart cherry trees are naturally smaller than sweet cherry trees and are trained somewhat differently. Tart cherry trees bear their fruit mostly on 1-year-old wood and on spurs that are concentrated on 2- to 3-year-old wood. Due to these characteristics, the fruiting wood needs to be renewed relatively frequently compared with sweet cherries.
Because the fruit is generally used for processing, rather than sold fresh in markets, growers often use mechanical harvesting techniques to reduce labor costs. Many common training systems are designed around mechanical harvesting, in which machines grasp the trunks and shake the trees. Researchers are testing designs that use smaller trees trained to bushes and harvested with over-the-row blueberry harvesters. They generally do not use dwarfing rootstocks, and the trees are typically trained to modified central leaders for both hand and machine harvesting.
In Michigan, which is the leading producer of tart cherries in North America, fruit specialists recommend spacing trees 14 to 18 feet apart in rows that are 20 to 22 feet apart for standard-sized trees bearing amarelle-type (yellow flesh) fruits. Amarelle cherries make up nearly all commercial tart cherry production in North America. Morello cherries (red flesh) are sold in niche markets and produce somewhat smaller trees that can be spaced 15 feet apart within and between rows.
‘Meteor’ and ‘North Star’ are cold-hardy genetic dwarfs that can be kept 6 to 8 feet tall and 8 to 12 feet wide. Plant these varieties 10 to 12 feet apart in rows that are 16 to 18 feet apart. Dwarf tart cherries are ideal for home orchards and may be useful for market orchards and to diversify U-pick orchards. It is unlikely the trees will produce enough fruit to meet the needs of grower-picked commercial orchards.
For hand and mechanical harvesting, a modified central leader design works well (figure 12.9). Although you can use whips, if you start with well-feathered planting stock your trees will produce more quickly. If you use whips, rub off unwanted buds as described above for sweet cherry (see page 452), rather than heading back the leaders. Heading back the leaders of tart cherry trees tends to stunt the trees.
The mature trees will have four or five scaffold branches that attach to the trunks between 2.5 and 7 feet above the ground. Some growers prefer to have the lowermost branch face southwest. This practice helps shade the lower trunk and offers some protection against sunburn, to which tart cherry trees are susceptible. As with other central leader training systems, avoid developing two or more branches at the same height on the trunk. When the leader grows to the desired height, cut it back to a weak lateral.
The pruning techniques used for tart cherry trees are similar to those used for sweet cherry trees, but the buds of tart cherry trees are shorter-lived, and fruiting wood should be renewed about once every 5 years. Once trained, tart cherries require less pruning than most other stone fruits; you only need to renew fruiting branches and thin to prevent shading and crowding. If you harvest your fruit mechanically, head back willowy branches to stiffen them. Long, thin fruiting wood is too limber to release fruits easily when shaken.
Peaches and nectarines can be grown both freestanding and supported on trellises in divided canopies. The Tatura trellis has proven especially popular with some peach growers and produces high yields. The dense canopies and difficult-to-reach interiors of the trees greatly complicate pest and disease management, especially for organic orchardists. For the purposes of this book, we will focus on using freestanding peach and nectarine trees.
Open center training remains the standard for home orchard and commercial peaches and nectarines throughout North America. This design is standard in commercial California and Texas orchards and works well in warmer climates, where cold injury and stem cankers are not serious problems. In some cases, the steep ladder design we discussed for cherries (see page 448) is also used for peaches and nectarines to enhance color and fruit size.
For open center training, plant peach and nectarine trees 18 to 24 feet apart in rows that are 18 to 24 feet apart. In dry areas where trees are not irrigated, space the trees 24 feet apart within and between rows.
It is easy to adapt the training and pruning practices described for apple, pear, and sweet cherry trees to peaches and nectarines. The most popular open center design uses three or four main scaffold branches that are evenly distributed around the trunk to form a symmetrical bowl. Develop the lowest branch about 18 to 30 inches above the ground, and space other branches about 4 to 6 inches apart vertically along the trunk. Choose shoots with wide branch angles and/or use clothespins and weights to ensure wide branch angles. Leave the central trunk in place for now, and use it as an anchor point for spreader bars to train the scaffolds.
As the scaffold limbs grow, select two or three strong secondary branches on each of them, with the lowest at least 15 inches above the base of the scaffold. Try not to use heading cuts during this stage of training. Once you have established your secondary scaffolds, remove the central leader where it joins with the uppermost main scaffold branch. Trees that are trained to open centers usually mature in 5 to 6 years.
Use light to moderate annual pruning to maintain a strong, open framework. Because peaches and nectarines bear their fruit on 1-year-old wood, you need to renew the fruiting wood annually. Otherwise, fruit production moves upward and outward, producing an overly wide, top-heavy tree that has little fruit close to the ground. Thin out secondary scaffolds as needed to keep the trees within a desirable height range and to maintain fruit production throughout the trees. When pruning to develop outward-pointing branches, avoid making bench cuts (figure 12.1), if possible, because they tend to weaken the scaffold limbs. Use spreaders, weights, and ties, rather than pruning, to position branches. Figure 12.10 is similar to an open center peach tree.
The perpendicular-V training system is adapted from the open center, vase-shaped designs, but it uses only two scaffold limbs. The scaffold limbs are oriented perpendicular to the crop rows. The design creates an open canopy with good light penetration and air movement. It is relatively simple to control pests and diseases in this system. Although perpendicular-V trees yield somewhat fewer fruits than trees trained in the quad-V, the perpendicular-V system appears to be a better choice for high-density organic peach and nectarine orchards because it maintains a more open canopy.
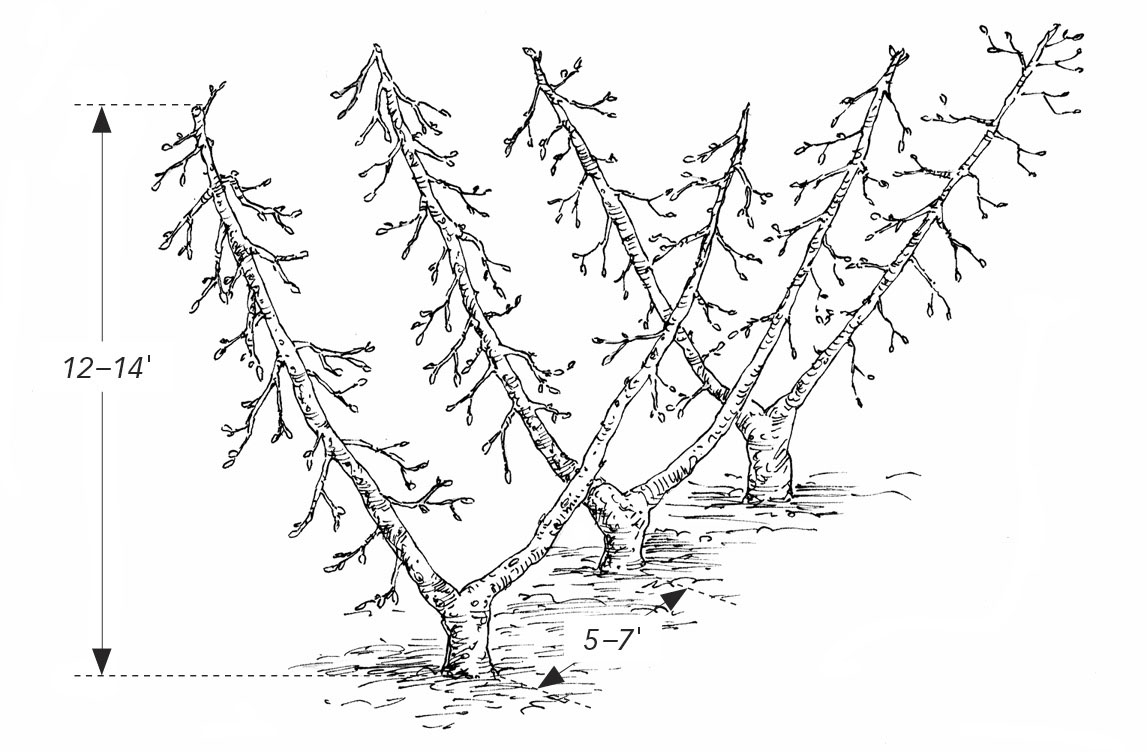
Each tree has two scaffold branches perpendicular to the row. Note how the scaffold branches are headed back occasionally during establishment to develop the shape. Use thinning cuts to develop renewal fruiting wood along each scaffold branch.
Perpendicular-V peach orchards typically have 375 to 580 trees per acre, and trees are spaced 5 to 7 feet apart in rows that are 16 to 20 feet apart. In areas with vigorous tree growth, unless space in your orchard is limited and you are experienced in growing peaches and nectarines, I recommend a spacing of 6 feet apart in rows 18 feet apart. In areas with cold winters and where tree vigor is limited, you can space peach and nectarine trees as closely as 5 feet apart in rows that are 16 feet apart. Whenever possible, orient the tree rows north–south to reduce sunburn on the scaffolds.
Develop two strong scaffold limbs, opposite to each other and that are perpendicular to the tree row. Together, these branches form a vase shape with a 50-degree angle. The limbs should arise from the trunk about 18 inches above the ground. Secondary scaffold branches are not used in the perpendicular-V system; only fruiting wood is allowed to develop on the main scaffolds. Figure 12.22 shows peach trees trained to a perpendicular-V design.
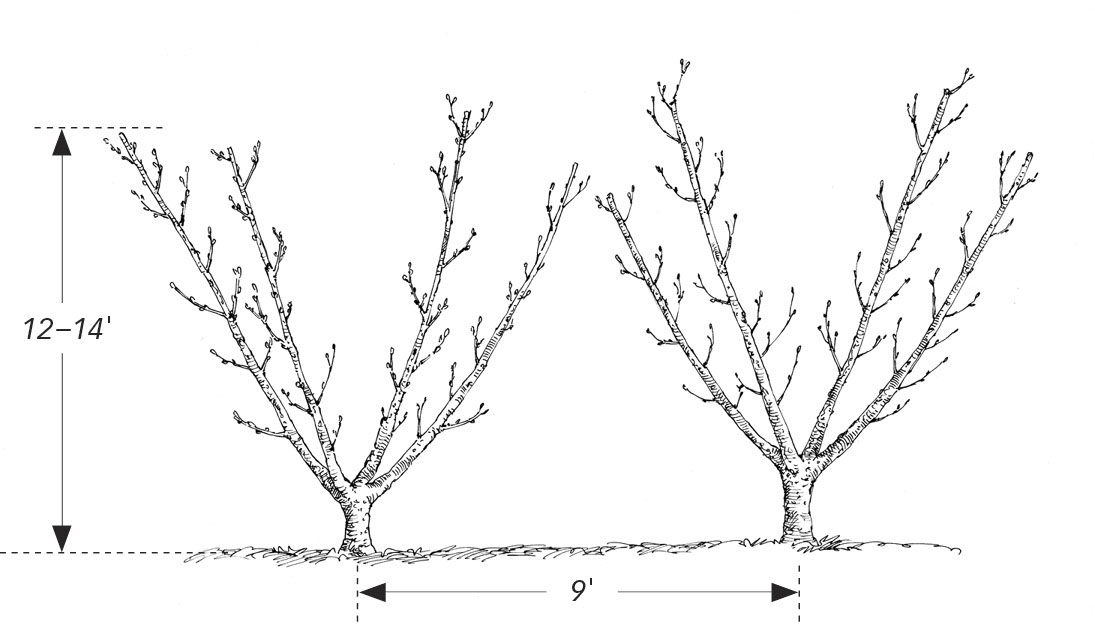
A) Elevated view
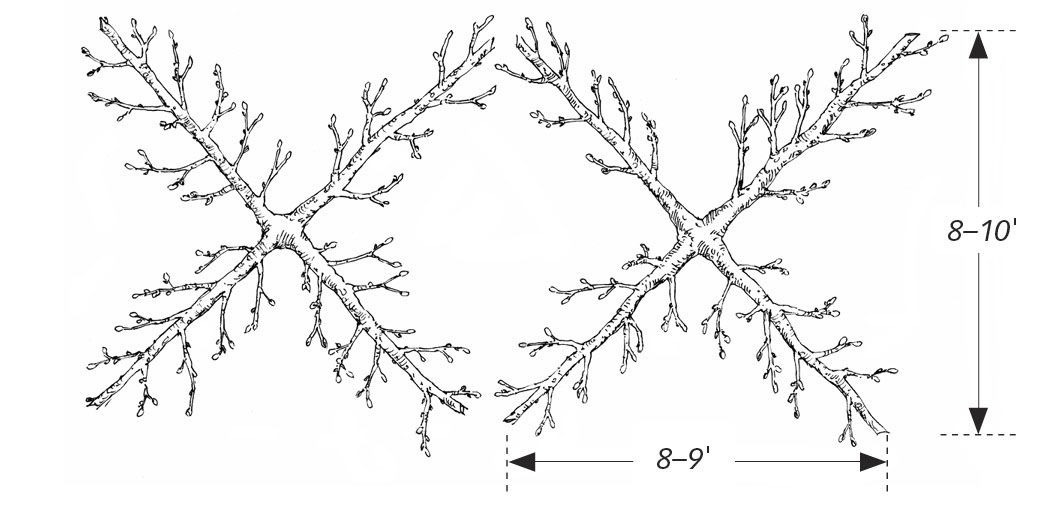
B) Top view. Use thinning cuts to produce renewal fruiting wood on each scaffold branch.
The quad-V system is another adaptation of open center training. It uses four permanent scaffold limbs that are spaced approximately 90 degrees apart, perpendicular to and parallel to the crop rows. The design is somewhat more difficult and labor intensive to establish than the system for perpendicular-V trees. Quad-V orchards use fewer trees per acre than perpendicular-V orchards, and they create greater early yields by doubling the number of fruit-bearing scaffolds per tree. Plant the trees 9 feet apart in rows that are 18 feet apart, for a density of 269 trees per acre. This design can be used for home and commercial high-density peach and nectarine production, but it requires greater management skill and labor than the open center or perpendicular-V systems. See figure 12.23 for how peach trees are trained to a quad-V design.
Apricots develop fruit both on 1-year-old limbs and on spurs found on older wood. In general, apricot trees require similar pruning and training practices as peach trees, and the amount of pruning they need lies somewhere between that needed for apples and that needed for peaches. Apricots are usually grown as freestanding trees. These trees tend to spread, so relatively wide spacing is the rule.
When you are training apricot trees to open centers, follow the recommendations for peaches. Space the trees about 18 to 24 feet apart in rows that are 18 to 24 feet apart. In the southeastern United States, fruit specialists recommend spacing apricots 20 to 24 feet apart within and between rows.
Apricots can also be trained to modified central leaders. Follow the recommendations for training apples, but use more thinning and heading cuts to ensure an open canopy. A tree spacing of 18 to 24 feet apart in rows that are 18 to 24 feet apart works well.
For higher-density plantings, you might consider experimenting with the perpendicular-V or quad-V training systems, as described above for peaches.
Plums are among the easiest stone fruits to train, and they adapt well to both central leader and open center designs. For higher-density orchards, plums (especially European varieties) can be trained to palmettes parallel to the crop rows. Plums have a tendency to develop erect shoots with narrow branch angles and bark inclusions. Early pruning and branch spreading take care of this problem.
Like peaches, plums bear their fruit laterally on 1-year-old shoots. They also set fruit on relatively long-lived spurs, like apples and sweet cherries. Japanese plums tend to bear fruit more heavily along shoots than their European cousins and are more often trained like peaches.
As a general rule, encourage about 10 to 24 inches of new shoot growth for young trees and at least 10 inches of new shoot growth for mature trees. If shoots exceed those lengths, you may need to prune less, spread the branches more, and/or reduce the amount of nitrogen fertilizer you use. If shoot growth falls below these levels, prune more heavily and have your foliage tested to determine nitrogen status.
A modified central leader system and the pruning practices that work for apples also work well for upright European plum varieties such as ‘Stanley’ (figure 12.9). With upright varieties, pay careful attention when removing unwanted new shoots that form narrow branch angles. Select new shoots that point outward. Use branch spreaders, when necessary, to ensure suitable branch angles. European plums that have been trained early and well to a modified central leader design require relatively little pruning throughout their lives.
Bush cherries and plums are typically planted about 5 feet apart in rows that are 10 to 12 feet apart, depending on the mature size of the bushes. These crops are usually grown as freestanding bushes. The training and pruning techniques described for saskatoons generally produce satisfactory results (see page 445). The goal is to maintain productive, open canopies and to occasionally renew the canes.
European and Japanese plums adapt well to open centers (figure 12.10). For most European varieties, follow the recommendations for open center apples and pears described at the beginning of this chapter.
Japanese and European French plum varieties are trained more like peaches. When training new trees, select three to five laterals for your scaffold, with the branches starting about 18 to 36 inches above the ground and equally spaced around the trunk. The system is very similar to that described earlier for open center peaches (see page 459), but you may want to leave a few more secondary branches.
With Japanese plums, pay particular attention to thinning out water sprouts and unwanted lateral branches. Japanese varieties tend to produce too much fruit, leading to small size fruit and more disease problems. For these reasons, you must prune Japanese plums more heavily than you would European varieties. Use thinning cuts to open up the canopy. Use stub cuttings (described for sweet cherry, page 447) to renew fruiting branches that are more than about 5 years old. By renewing fruiting branches, you can help reduce shading and maintain large fruits without using excessive hand thinning. You can also renew branches of European plums by removing older branches heavily set with fruiting spurs.