PLUMBING
FAUCETS: SINK: REPAIRING
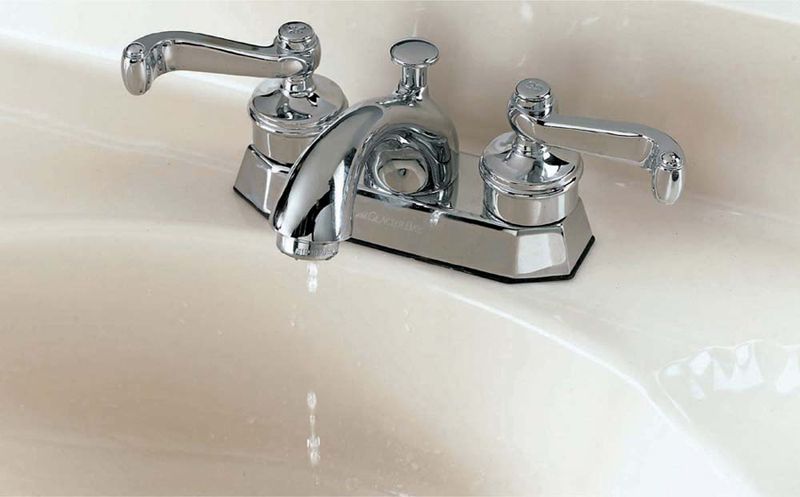
It’s not surprising that sink faucets leak and drip. Any fitting that contains moving mechanical parts is susceptible to failure. But add to the equation the persistent force of water pressure working against the parts, and the real surprise is that faucets don’t fail more quickly or often. It would be a bit unfair to say that the inner workings of a faucet are regarded as disposable by manufacturers, but it is safe to say that these parts have become more easy to remove and replace.
The older your faucet, the more likely you can repair it by replacing small parts like washers and O-rings. Many newer faucets can be repaired only by replacing the major inner components, like a ceramic disk or a cartridge that encapsulates all the washers and O-rings that could possibly wear out.
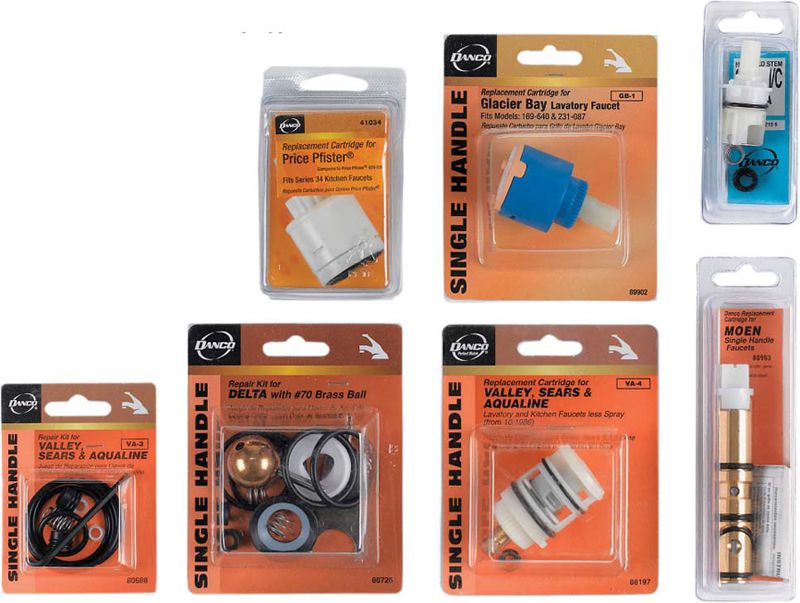
The most important aspect of sink faucet repair is identifying which type of faucet you own. In this chapter we show all of the common types and provide instructions on repairing them. In every case, the easiest and most reliable repair method is to purchase a replacement kit with brand-new internal working parts for the model and brand of faucet you own.
Eventually, just about every faucet develops leaks and drips. Repairs can usually be accomplished simply by replacing the mechanical parts inside the faucet body (the main trick is figuring out which kind of parts your faucet has).
All faucets, no matter the type, have valves that move many thousands of times to open and close hot- and cold-water ports. These valves—or the rubber or plastic parts that rub against other parts when the faucet is being adjusted—wear out in time. Depending on the faucet, you may be able to fix the leak by cleaning or replacing small parts, such as washers or O-rings; or you may need to buy a repair kit and replace a number of parts; or the only solution may be to replace a self-enclosed “cartridge” that contains all the moving parts.
 IDENTIFYING YOUR FAUCET AND THE PARTS YOU NEED
A leaky faucet is the most common home plumbing problem. Fortunately, repair parts are available for almost every type of faucet, from the oldest to the newest, and installing these parts is usually easy. But if you don’t know your make and model, the hardest part of fixing a leak may be identifying your faucet and finding the right parts. Don’t make the common mistake of thinking that any similar-looking parts will do the job; you’ve got to get exact replacements.
There are so many faucet types that even experts have trouble classifying them into neat categories. Two-handle faucets are either compression (stem) or washerless two-handle. Single-handle faucets are classified as mixing cartridge; ball; disc; or disc/cartridge.
A single-handle faucet with a rounded, dome-shaped cap is often a ball type. If a single-handle faucet has a flat top, it is likely a cartridge or a ceramic disc type. An older two-handle faucet is likely of the compression type; newer two-handle models use washerless cartridges. Shut off the water, and test to verify that the water is off. Dismantle the faucet carefully. Look for a brand name: it may be clearly visible on the baseplate, or may be printed on an inner part, or it may not be printed anywhere. Put all the parts into a reliable plastic bag and take them to your home center or plumbing supply store. A knowledgeable salesperson can help you identify the parts you need.
If you cannot find what you are looking for at a local store, check online faucet sites or the manufacturers’ sites; they often have step-by-step instruction for identifying what you need. Note that manufacturers’ terminology may not match the terms we use here. For example, the word “cartridge” may refer to a ceramic-disc unit.
Most faucets have repair kits, which include all the parts you need, and sometimes a small tool as well. Even if some of the parts in your faucet look fine, it’s a good idea to install the parts provided by the kit, to ensure against future wear.
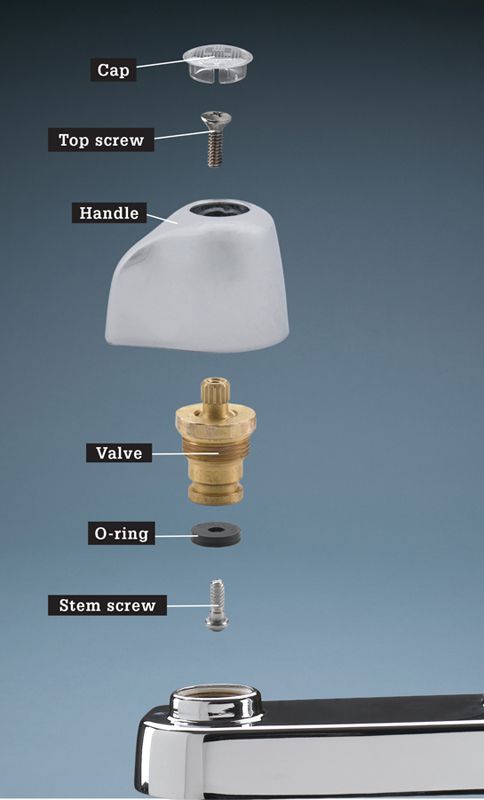
COMPRESSION FAUCETS
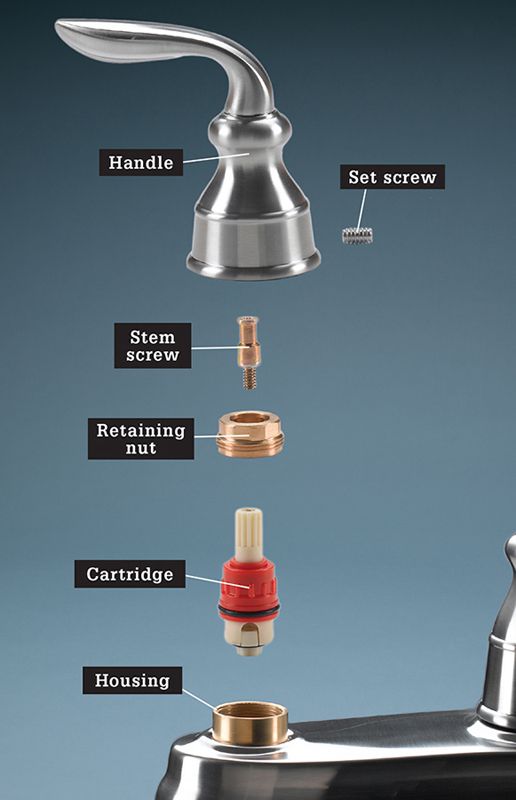
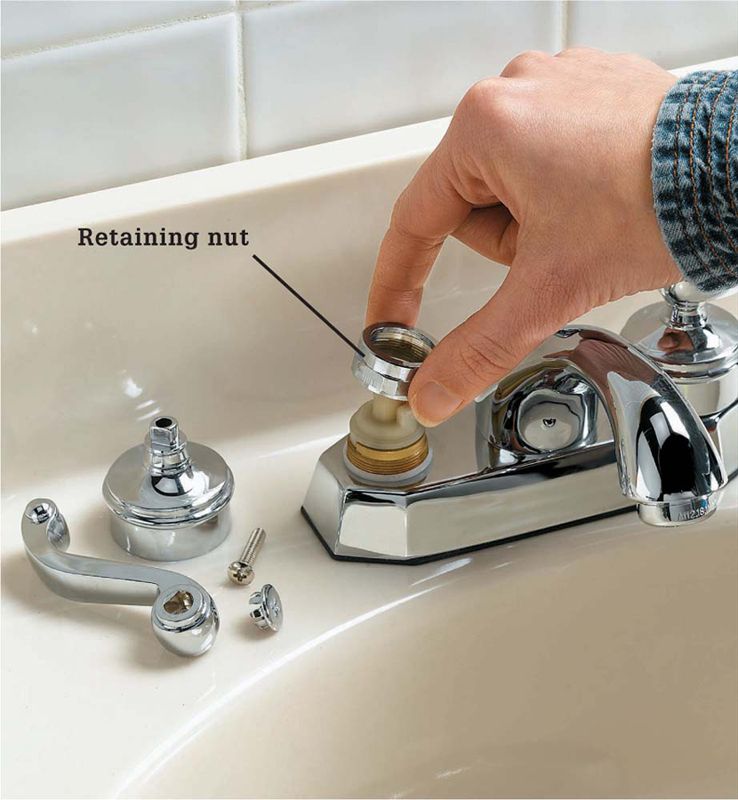
A compression faucet has a stem assembly that includes a retaining nut, threaded spindle, O-ring, stem washer, and stem screw. Dripping at the spout occurs when the washer becomes worn. Leaks around the handle are caused by a worn O-ring.
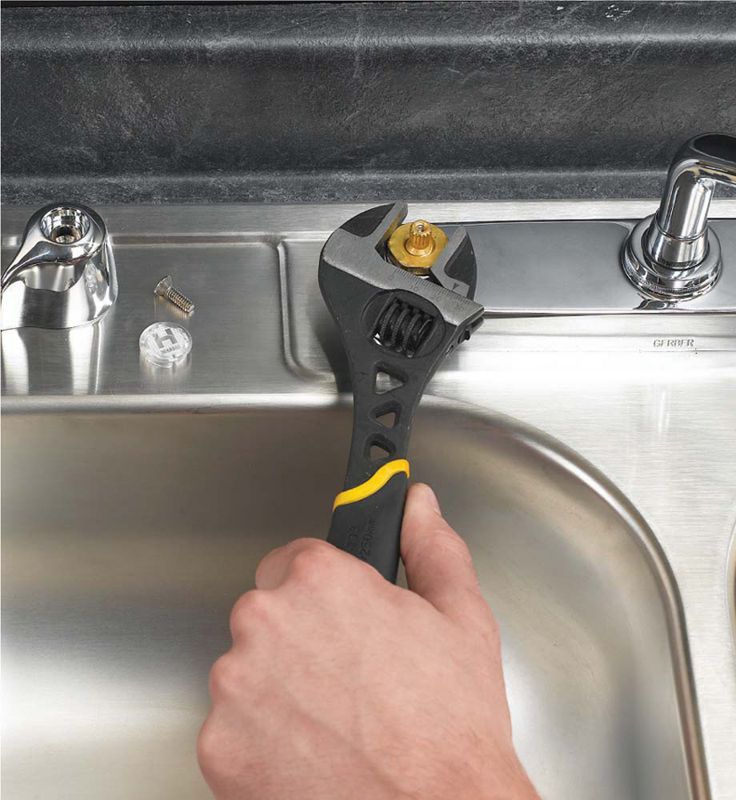
Pry off the cap on top of the handle and remove the screw that holds the cap onto the stem. Pull the handle up and out. Use an adjustable wrench or pliers to unscrew the stem and pull it out.
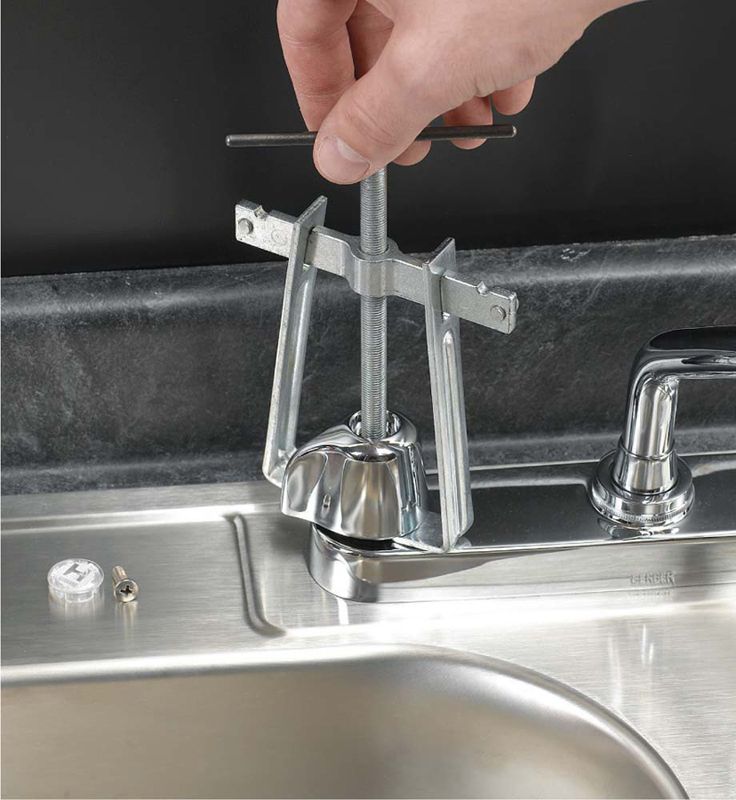
If the handle is stuck, try applying mineral cleaner from above. If that doesn’t work, you may need to buy a handle puller. With the cap and the hold-down screw removed, position the wings of the puller under the handle and tighten the puller to slowly pull the handle up.
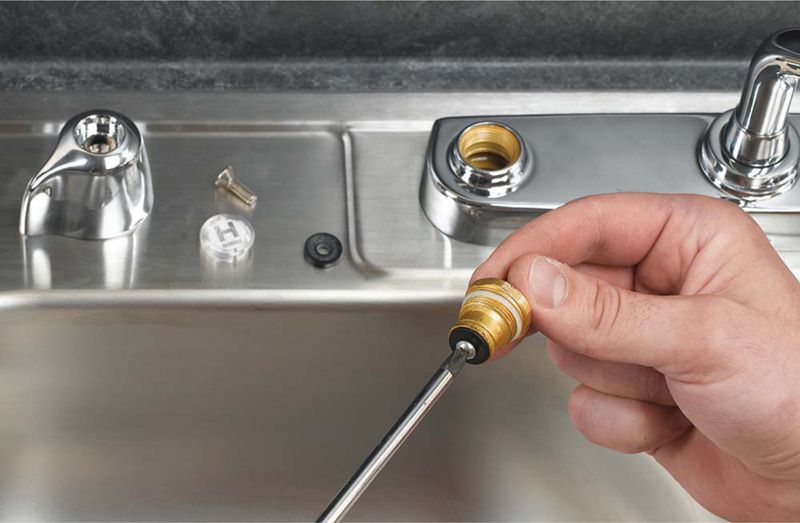
Remove the screw that holds the rubber washer in place, and pry out the washer. Replace a worn washer with an exact replacement—one that is the same diameter, thickness, and shape.
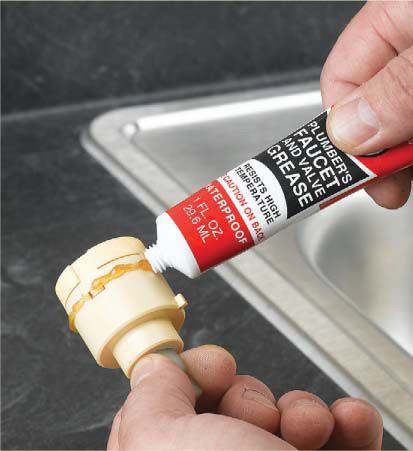
Replace any O-rings. A worn O-ring can cause water to leak out the handle. Gently pry out the old O-ring and reinstall an exact replacement. Apply plumber’s grease to the rubber parts before reinstalling the stem.
If washers wear out quickly, the seat is likely worn. Use a seat wrench to unscrew the seat from inside the faucet. Replace it with an exact duplicate. If replacing the washer and O-ring doesn’t solve the problem, you may need to replace the entire stem.
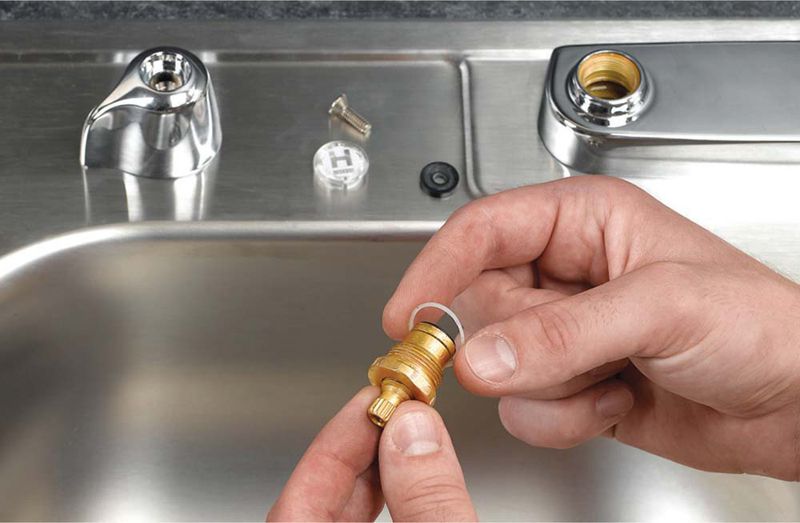
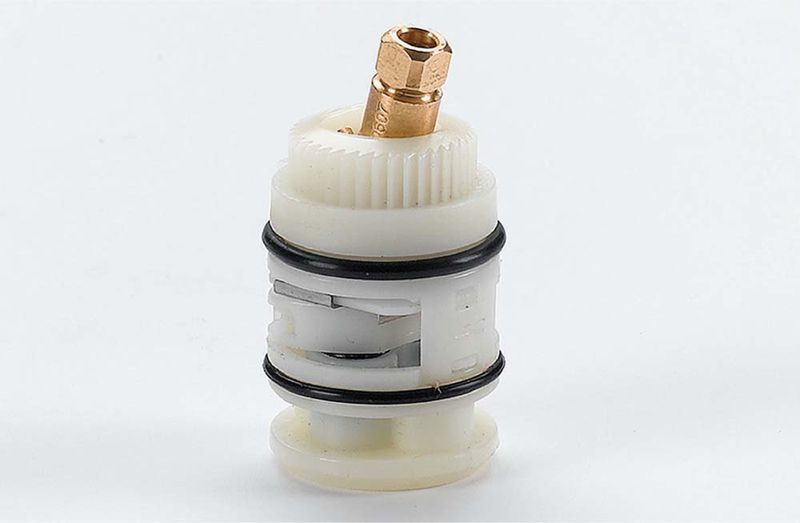
WASHERLESS TWO-HANDLE FAUCET
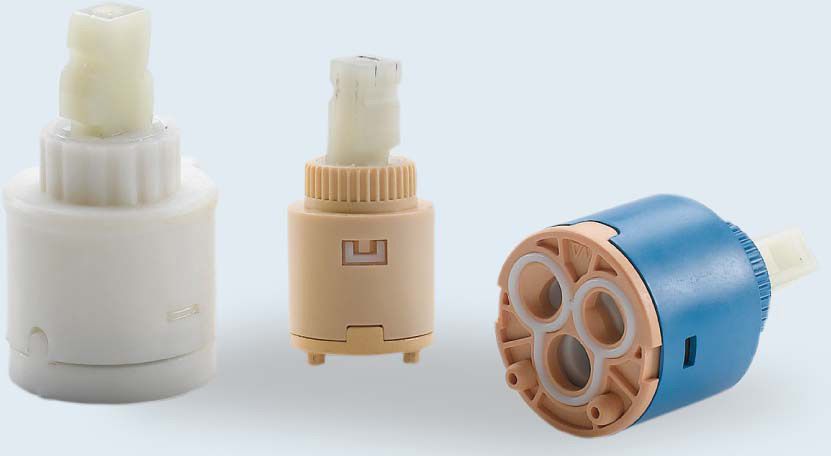
Almost all two-handle faucets made today are “washerless.” Instead of an older-type compression stem, there is a cartridge, usually with a plastic casing. Many of these cartridges contain ceramic discs, while others have metal or plastic pathways. No matter the type of cartridge, the repair is the same; instead of replacing small parts, you simply replace the entire cartridge.
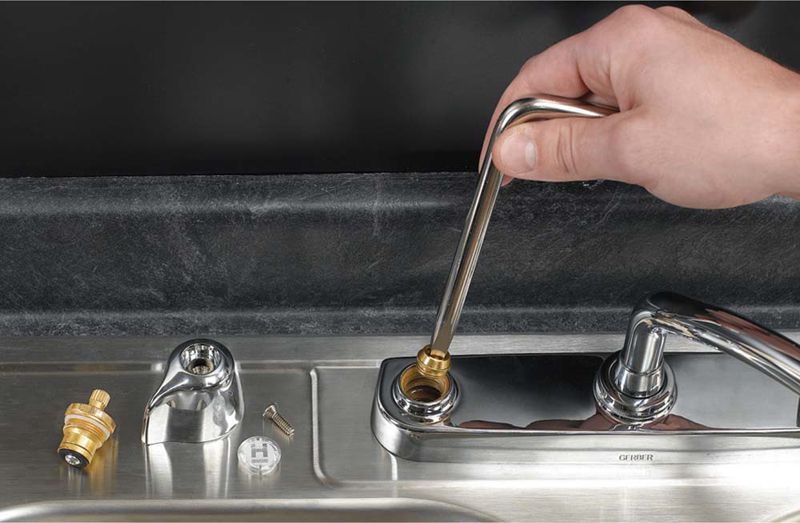
Remove the faucet handle and withdraw the old cartridge. Make a note of how the cartridge is oriented before you remove it. Purchase a replacement cartridge.
Install the replacement cartridge. Clean the valve seat first and coat the valve seat and O-rings with faucet grease. Be sure the new cartridge is in the correct position, with its tabs seated in the slotted body of the faucet. Re-assemble the valve and handles.
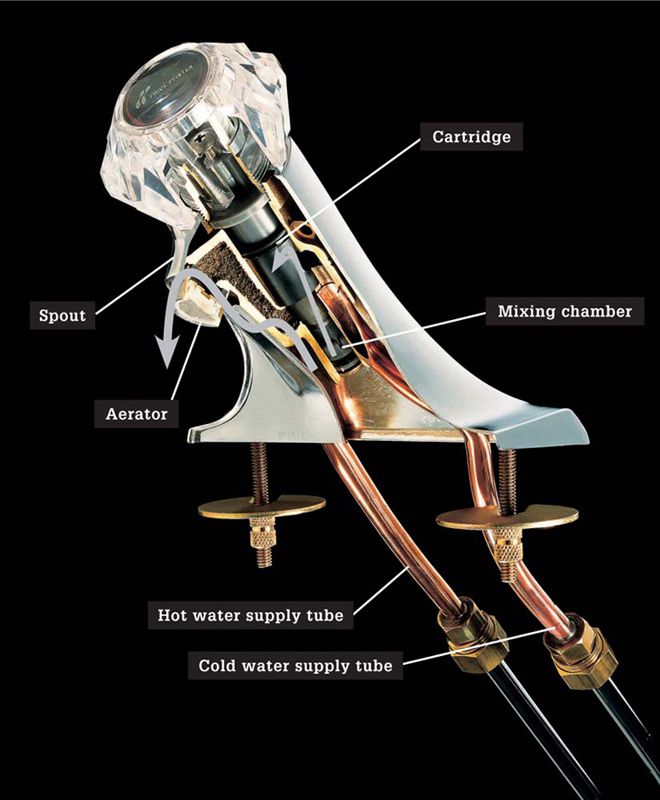
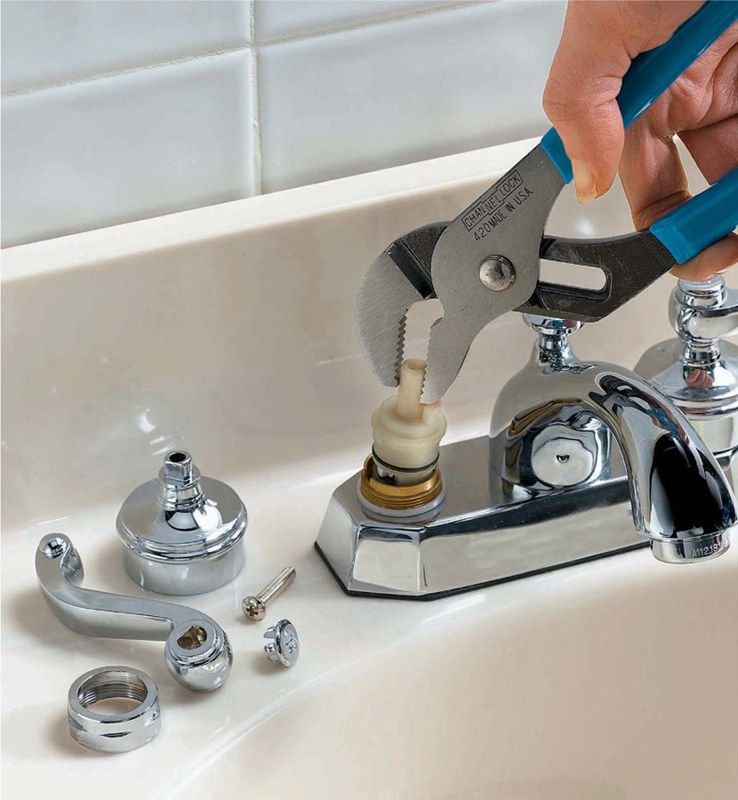
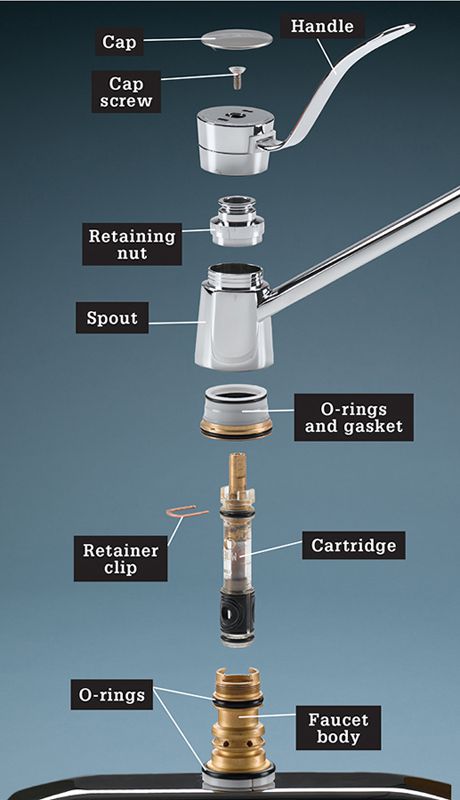
ONE-HANDLE CARTRIDGE FAUCETS
Single-handle cartridge faucets like this work by moving the cartridge up and down and side to side, which opens up pathways to direct varying amounts of hot and cold water to the spout. Moen, Price-Pfister, Delta, Peerless, Kohler, and others make many types of cartridges, some of which look very different from this one.
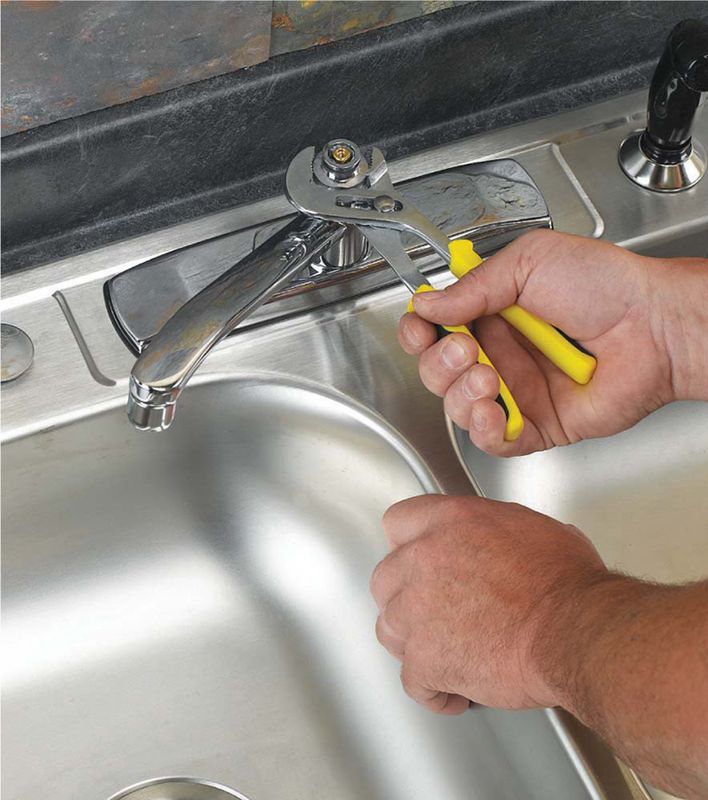
To remove the spout, pry off the handle’s cap and remove the screw below it. Pull the handle up and off. Use a crescent wrench to remove the pivot nut.
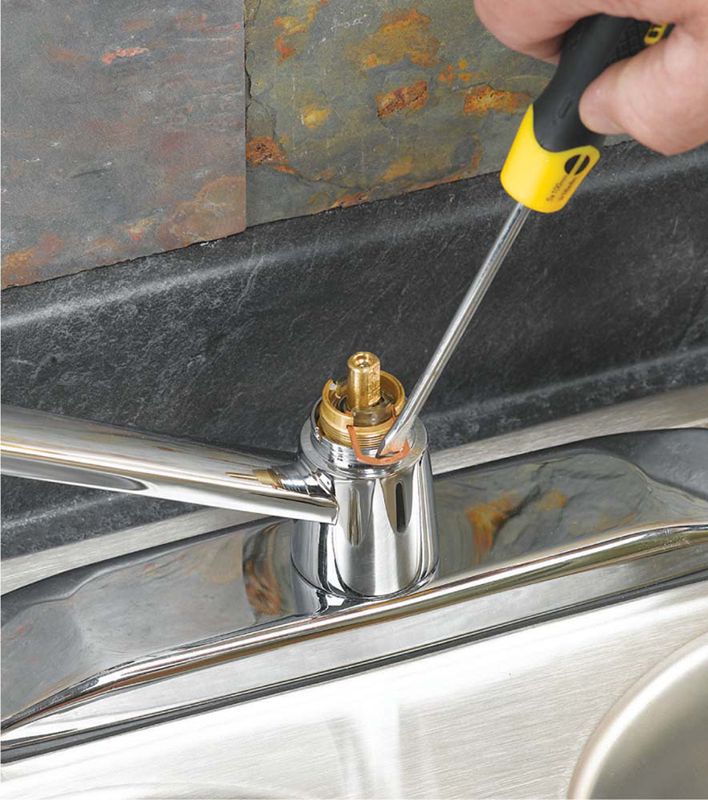
Lift out the spout. If the faucet has a diverter valve, remove it as well. Use a screwdriver to pry out the retainer clip, which holds the cartridge in place.
Remove the cartridge. If you simply pull up with pliers, you may leave part of the stem in the faucet body. If that happens, replace the cartridge and buy a stem puller made for your model.
Gently pry out and replace all O-rings on the faucet body. Smear plumber’s grease onto the new replacement cartridge and the new O-rings, and reassemble the faucet.
Here is one of many other types of single-handle cartridges. In this model, all the parts are plastic except for the stem, and it’s important to note the direction in which the cartridge is aligned. If you test the faucet and the hot and cold are reversed, disassemble and realign the cartridge.
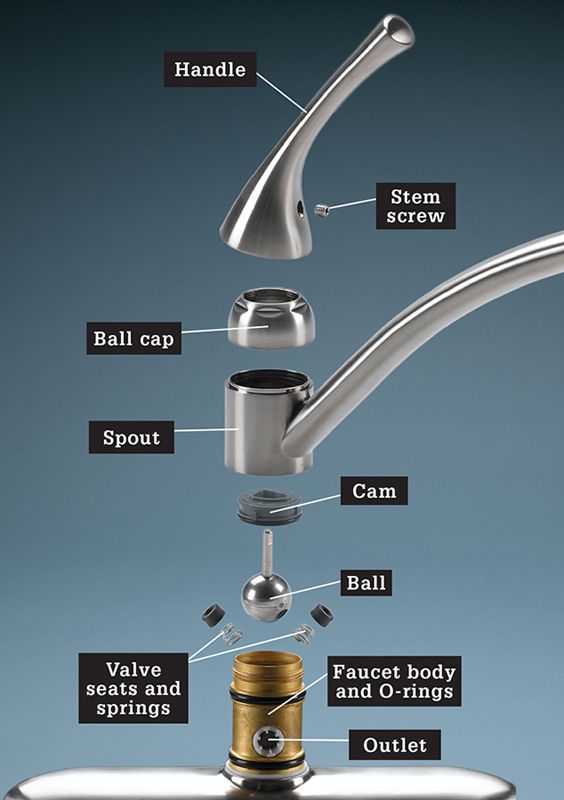
BALL FAUCETS
The ball-type faucet is used by Delta, Peerless, and a few others. The ball fits into the faucet body and is constructed with three holes (not visible here)—a hot inlet, a cold inlet, and the outlet, which fills the valve body with water that then flows to the spout or sprayer. Depending on the position of the ball, each inlet hole is open, closed, or somewhere in-between. The inlet holes are sealed to the ball with valve seats, which are pressed tight against the ball with springs. If water drips from the spout, replace the seats and springs. Or go ahead and purchase an entire replacement kit and replace all or most of the working parts.
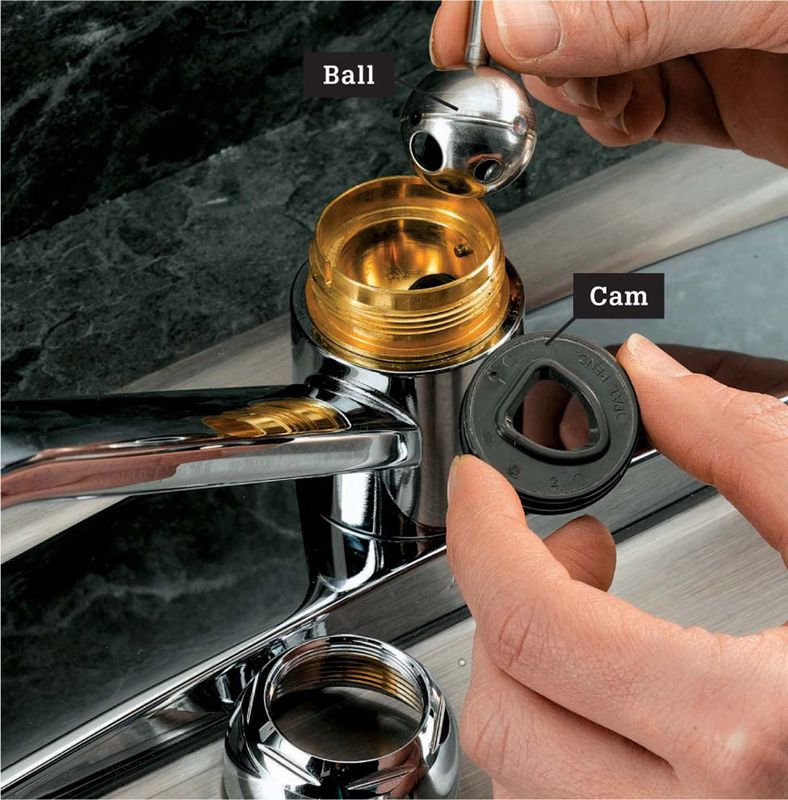
Remove the old ball and cam after removing the faucet handle and ball cap. Some faucets may require a ball faucet tool to remove the handle. Otherwise, simply use a pair of channel-type pliers to twist off the ball cap.
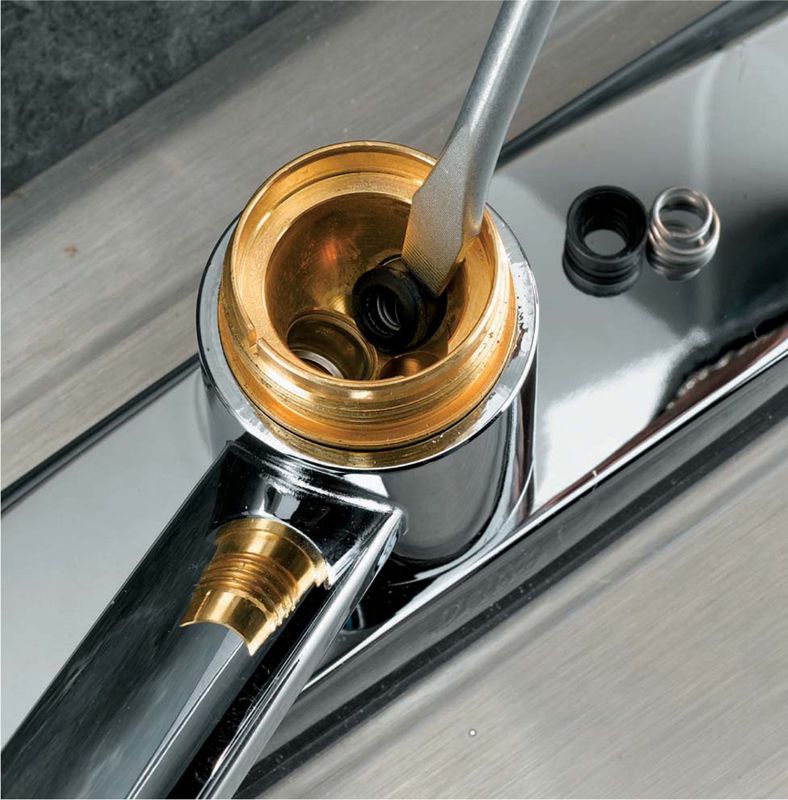
Pry out the neoprene valve seals and springs. Place thick towels around the faucet. Slowly turn on the water to flush out any debris in the faucet body. Replace the seals and springs with new parts. Also replace the O-rings on the valve body. You may want to replace the ball and cam, too, especially if you’re purchasing a repair kit. Coat all rubber parts in faucet grease, and reassemble the faucet.
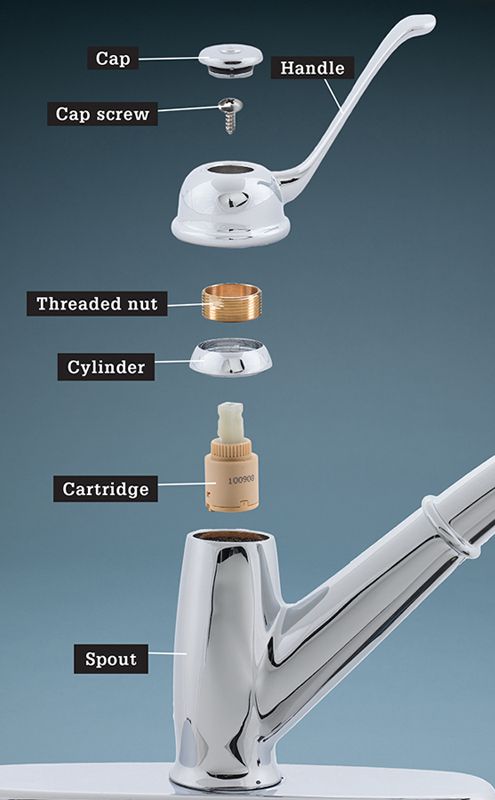
DISC FAUCETS
Disc-type faucets are the most common single-handle faucets currently being made. A pair of ceramic discs encased in a cylinder often referred to as a “cartridge” rub together as they rotate to open ports for hot and cold water. The ceramic discs do wear out in time, causing leaks, and there is only one solution—replace the disc unit (or “cartridge”). This makes for an easy—through comparatively expensive—repair.
Replace the cylinder with a new one, coating the rubber parts with faucet grease before installing the new cylinder. Make sure the rubber seals fit correctly in the cylinder openings before you install the cylinder. Assemble the faucet handle.