EXTERIOR
ROOFING: THREE-TAB SHINGLES
If you want to install asphalt shingles on your roof, then you’re in good company. Asphalt shingles, also known as composition shingles, are the roofing of choice for nearly four out of five homeowners in America. They perform well in all types of climate, are available in a multitude of colors, shapes, and textures to complement every housing design, and are less expensive than most other roofing products.
Asphalt shingles are available as either fiberglass shingles or organic shingles. Both types are made with asphalt, the difference being that one uses a fiberglass reinforcing mat, while the other uses a cellulose-fiber mat. Fiberglass shingles are lighter, thinner, and have a better fire rating. Organic shingles have a higher tear strength, are more flexible in cold climates, and are used more often in northern regions.
Although the roofing market has exploded with innovative new asphalt shingle designs, such as the architectural or laminated shingle that offers a three-dimensional look, the standard three-tab asphalt shingle is still the most common, which is the project we’re featuring here. The tabs provide an easy reference for aligning shingles for installation.
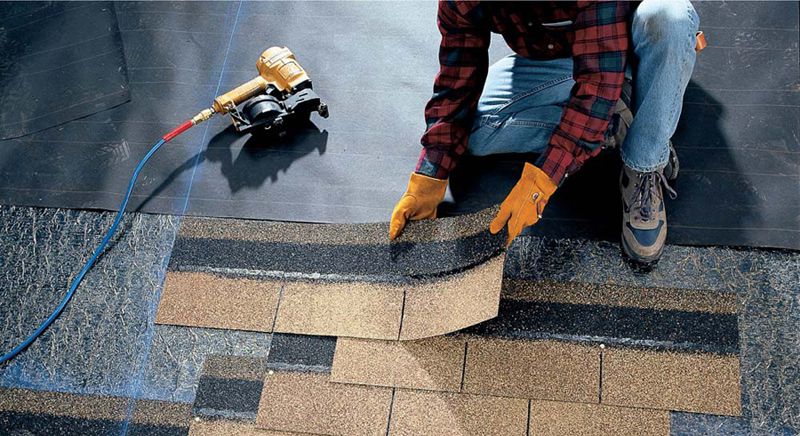
To help the job get done faster, rent an air compressor and pneumatic roofing gun. This will greatly reduce the time you spend nailing.
Stagger shingles for effective protection against leaks. If the tab slots are aligned in successive rows, water forms channels, increasing erosion of the mineral surface of the shingles. Creating a 6" offset between rows of shingles—with the three-tab shingles shown above—ensures that the tab slots do not align.
 HOW TO INSTALL THREE-TAB SHINGLES
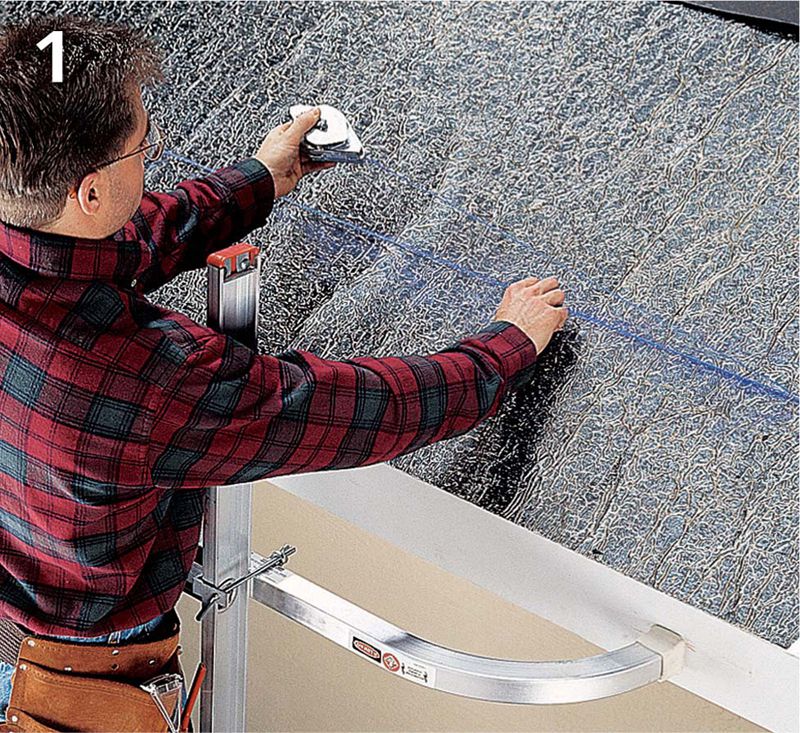
Cover the roof with felt paper (pages 70 to 71) and install drip edge (pages 72 to 73). Snap a chalk line onto the felt paper or ice guard 11 1/2" up from the eaves edge, to mark the alignment of the starter course. This will result in a 1/2" shingle overhang for standard 12" shingles. Tip: Use blue chalk rather than red. Red chalk will stain roofing materials.
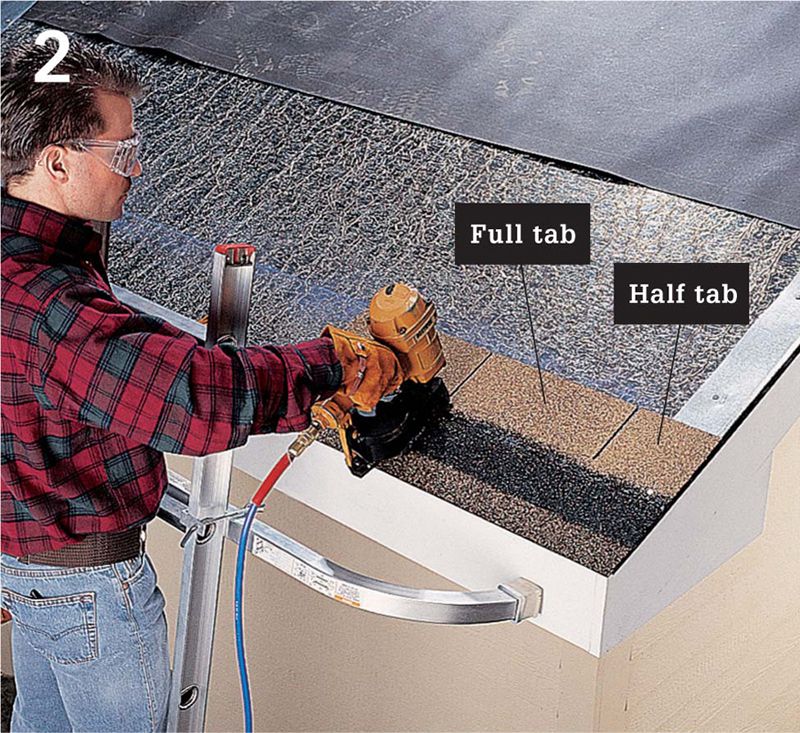
Trim off one-half (6") of an end tab on a shingle. Position the shingle upside down, so the tabs are aligned with the chalk line and the half-tab is flush against the rake edge. Drive 7/8" roofing nails near each end, 1" down from each slot between tabs. Butt a full upside-down shingle next to the trimmed shingle, and nail it. Fill out the row, trimming the last shingle flush with the opposite rake edge.
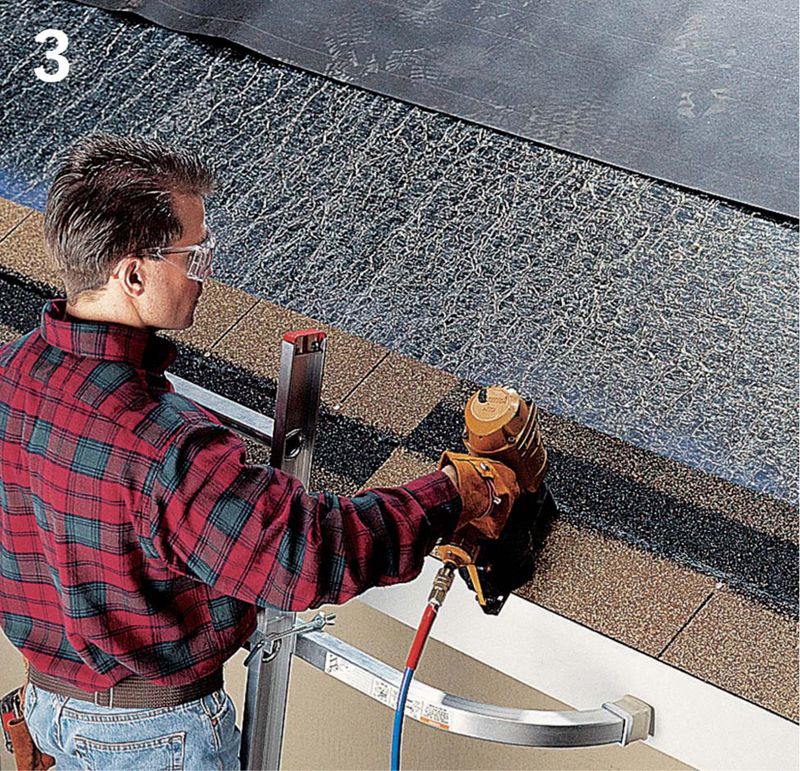
Apply the first full course of shingles over the starter course with the tabs pointing down. Begin at the rake edge where you began the starter row. Place the first shingle so it overhangs the rake edge by 5/8" and the eaves edge by 1/2". Make sure the top of each shingle is flush with the top of the starter course, following the chalk line.
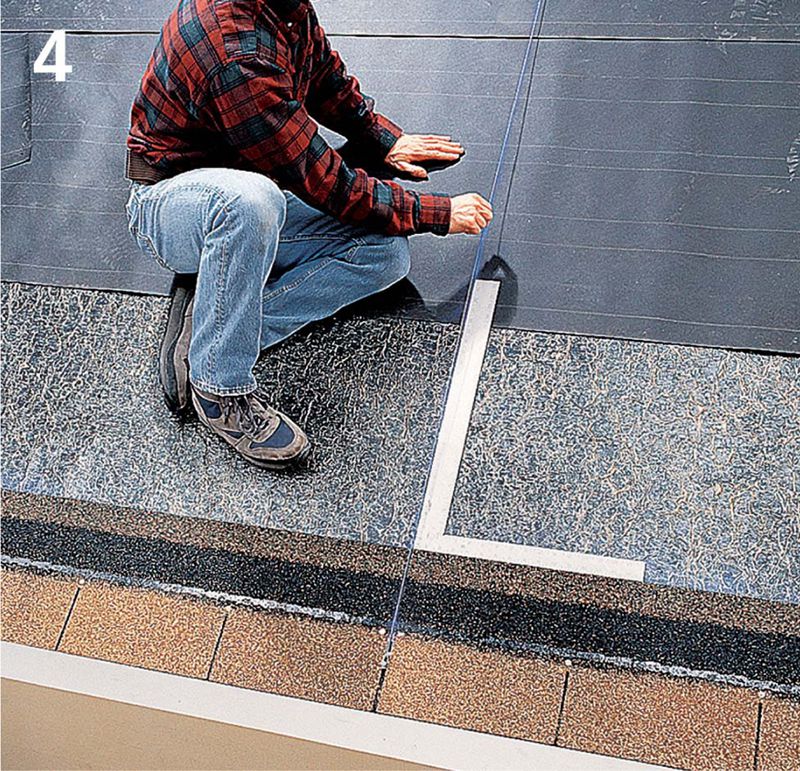
Snap a chalk line from the eaves edge to the ridge to create a vertical line to align the shingles. Choose an area with no obstructions, as close as possible to the center of the roof. The chalk line should pass through a slot or a shingle edge on the first full shingle course. Use a carpenter’s square to establish a line perpendicular to the eaves edge.
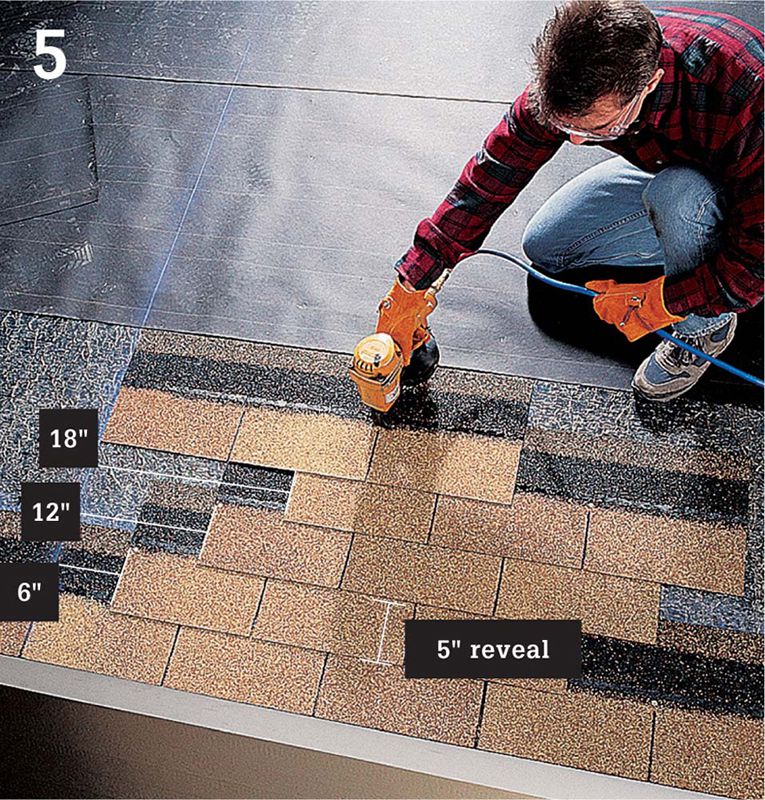
Use the vertical reference line to establish a shingle pattern with slots that are offset by 6" in succeeding courses. Tack down a shingle 6" to one side of the vertical line, 5" above the bottom edge of the first-course shingles to start the second row. Tack down shingles for the third and fourth courses, 12" and 18" from the vertical line. Butt the fifth course against the line.
Fill in shingles in the second through fifth courses, working upward from the second course and maintaining a consistent 5" reveal. Slide lower-course shingles under any upper-course shingles left partially nailed, and then nail them down. Tip: Install roof jacks, if needed, after filling out the fifth course.
Check the alignment of the shingles after each four-course cycle. In several spots on the last installed course, measure from the bottom edge of a shingle to the nearest felt paper line. If you discover any misalignment, make minor adjustments over the next few rows until it’s corrected.
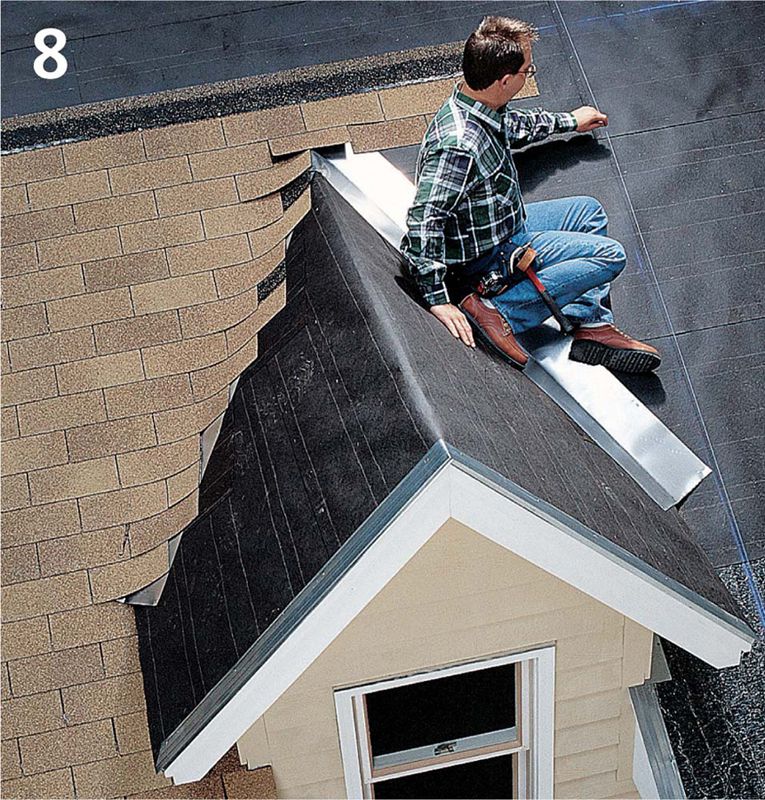
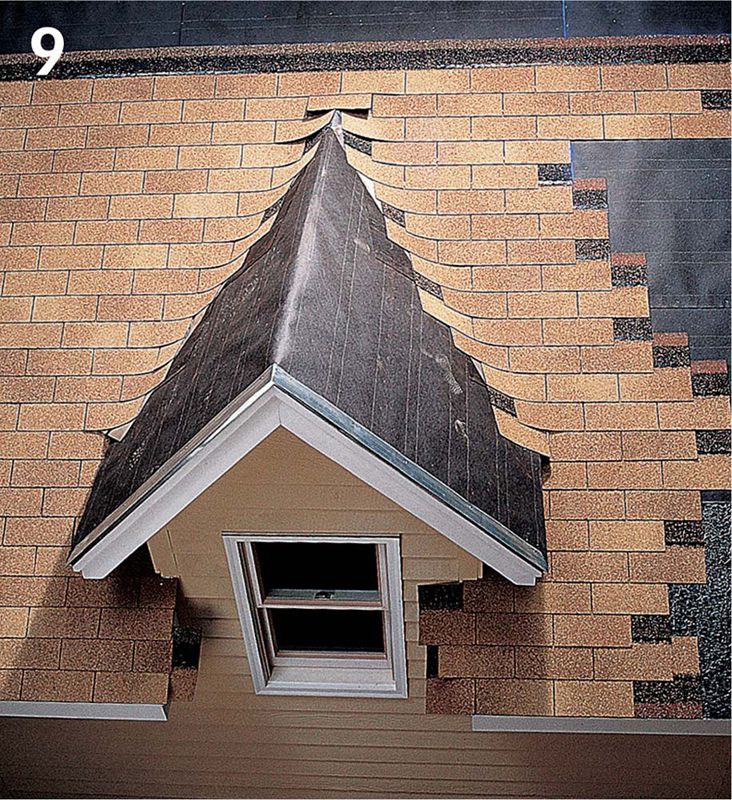
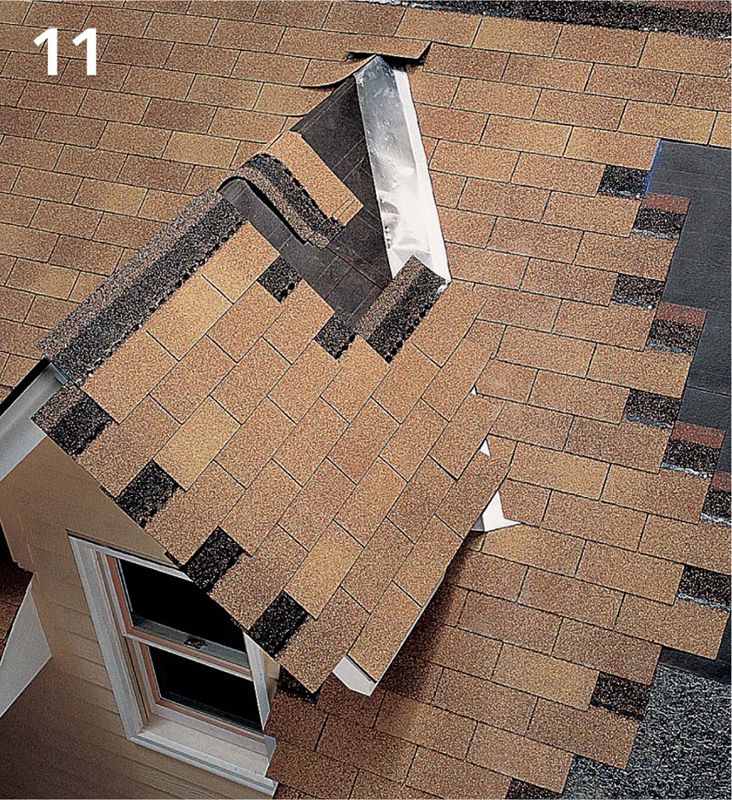
When you reach obstructions, such as dormers, install a full course of shingles above them so you can retain your shingle offset pattern. On the unshingled side of the obstruction, snap another vertical reference line using the shingles above the obstruction as a guide.
Shingle upward from the eaves on the unshingled side of the obstruction using the vertical line as a reference for reestablishing your shingle slot offset pattern. Fill out the shingle courses past the rake edges of the roof, then trim off the excess.
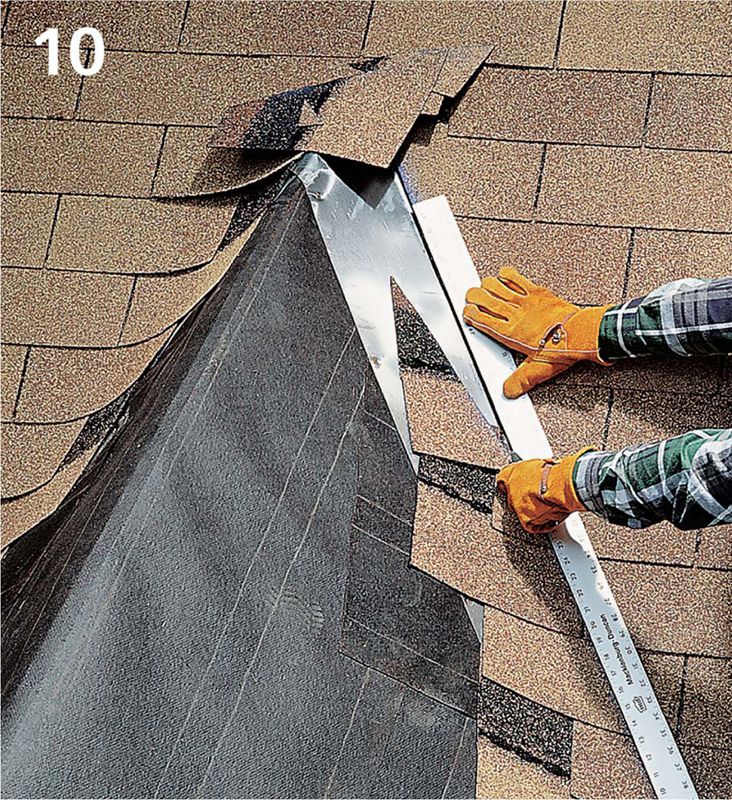
Trim off excess shingle material at the V in the valley flashing using a utility knife and straightedge. Do not cut into the flashing. The edges will be trimmed back farther at a slight taper after both roof decks are completely shingled.
Install shingles on adjoining roof decks, starting at the bottom edge using the same offset alignment pattern shown in steps 1 to 6. Install shingles until courses overlap the center of the valley flashing. Trim shingles at both sides of the valley when finished.
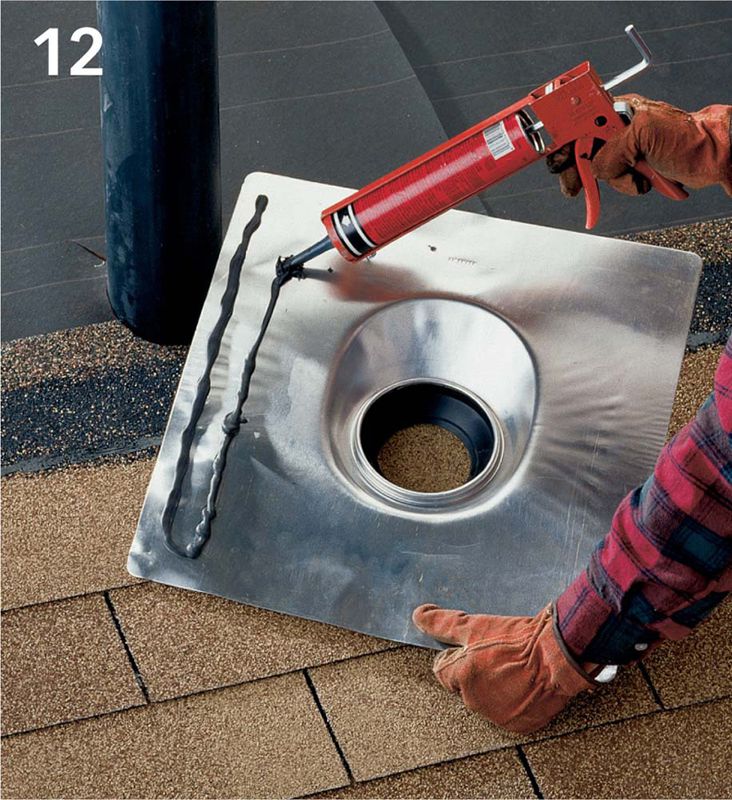
Install shingles up to the vent pipe so the flashing rests on at least one row of shingles. Apply a heavy double bead of roofing cement along the bottom edge of the flange.
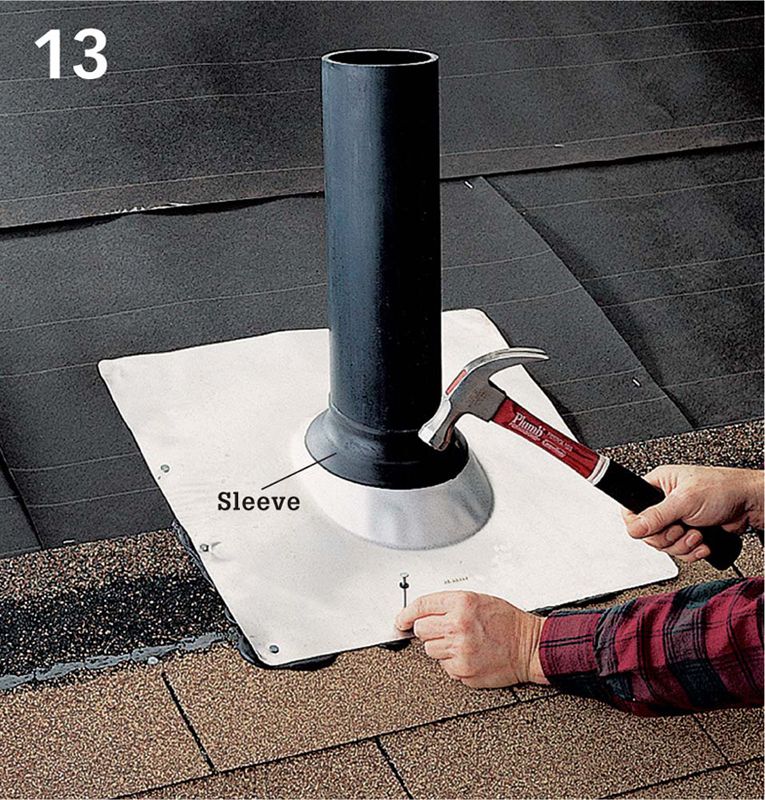
Place the flashing over the vent pipe. Position the flashing collar so the longer portion of the tapered neck slopes down the roof and the flange lies over the shingles. Nail the perimeter of the flange using rubber gasket nails.
Cut shingles to fit around the neck of the flashing so they lie flat against the flange. Do not drive roofing nails through the flashing. Instead, apply roofing cement to the back of shingles where they lie over the flashing.
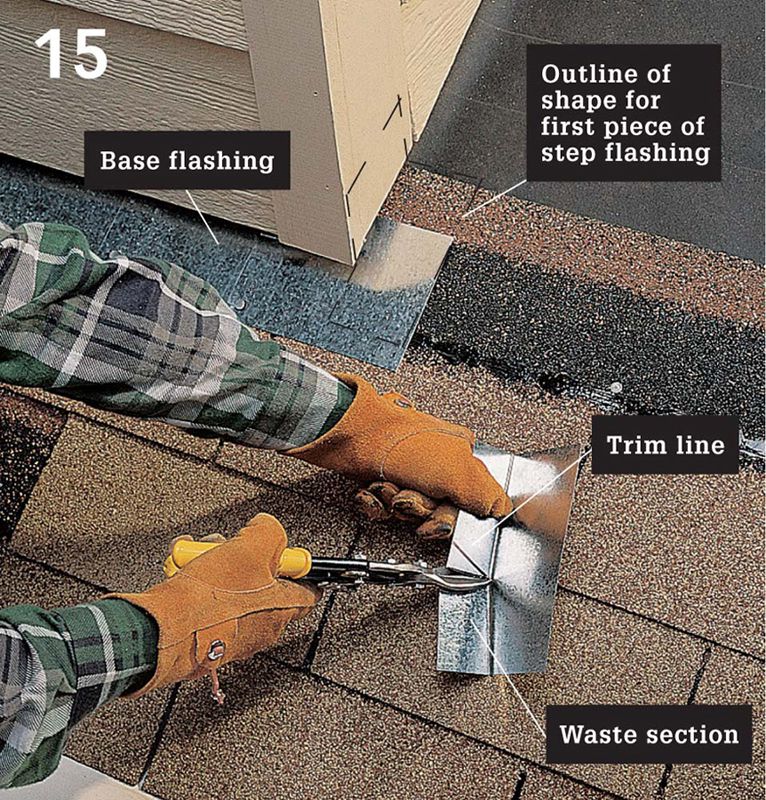
Shingle up to an element that requires flashing so the top of the reveal areas are within 5" of the element. Install base flashing using the old base flashing as a template. Bend a piece of step flashing in half and set it next to the lowest corner of the element. Mark a trim line on the flashing, following the vertical edge of the element. Cut the flashing to fit.
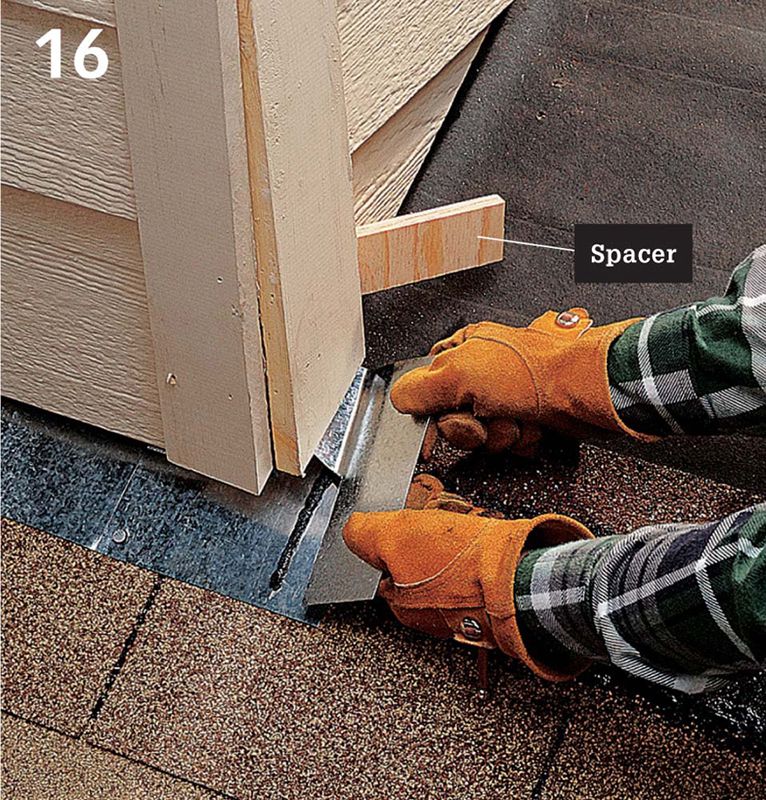
Pry out the lowest courses of siding and any trim at the base of the element. Insert spacers to prop the trim or siding away from the work area. Apply roofing cement to the base flashing in the area where the overlap with the step flashing will be formed. Tuck the trimmed piece of step flashing under the propped area, and secure the flashing. Fasten the flashing with one rubber gasket nail driven near the top and into the roof deck.
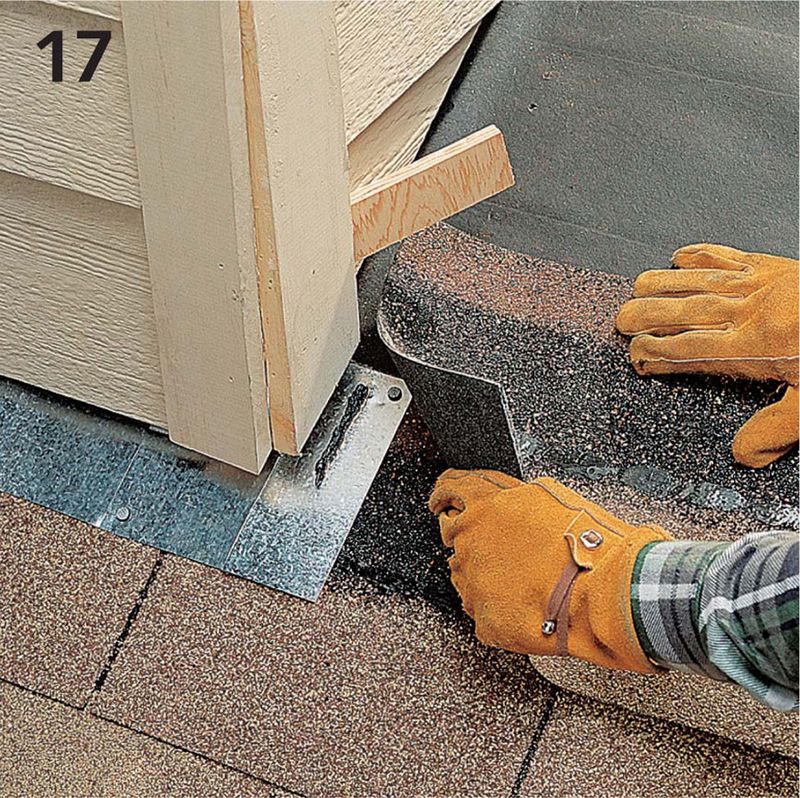
Apply roofing cement to the top side of the first piece of step flashing where it will be covered by the next shingle course. Install the shingle by pressing it firmly into the roofing cement. Do not nail through the flashing underneath.
Tuck another piece of flashing under the trim or siding, overlapping the first piece of flashing at least 2". Set the flashing into roofing cement applied on the top of the shingle. Nail the shingle in place without driving nails through the flashing. Install flashing up to the top of the element the same way. Trim the last piece of flashing to fit the top corner of the element. Reattach the siding and trim.
Shingle up to the chimney base. Use the old base flashing as a template to cut new flashing. Bend up the counter flashing. Apply roofing cement to the base of the chimney and the shingles just below the base. Press the base flashing into the roofing cement and bend the flashing around the edges of the chimney. Drive rubber gasket nails through the flashing flange into the roof deck.
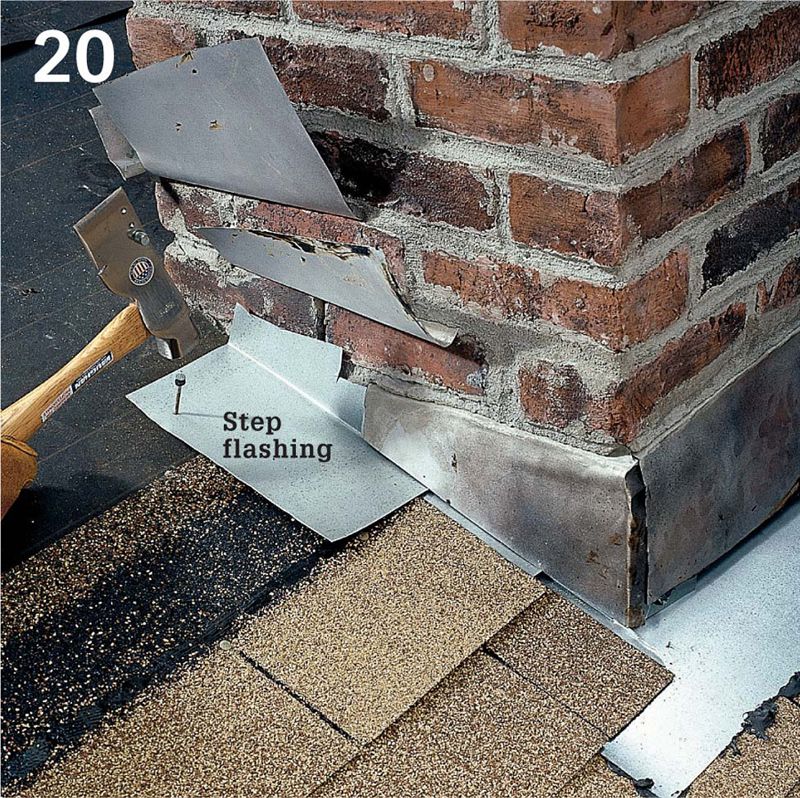
Install step flashing and shingles, working up to the high side of the chimney. Fasten flashing to the chimney with roofing cement. Fold down the counter flashing as you go.
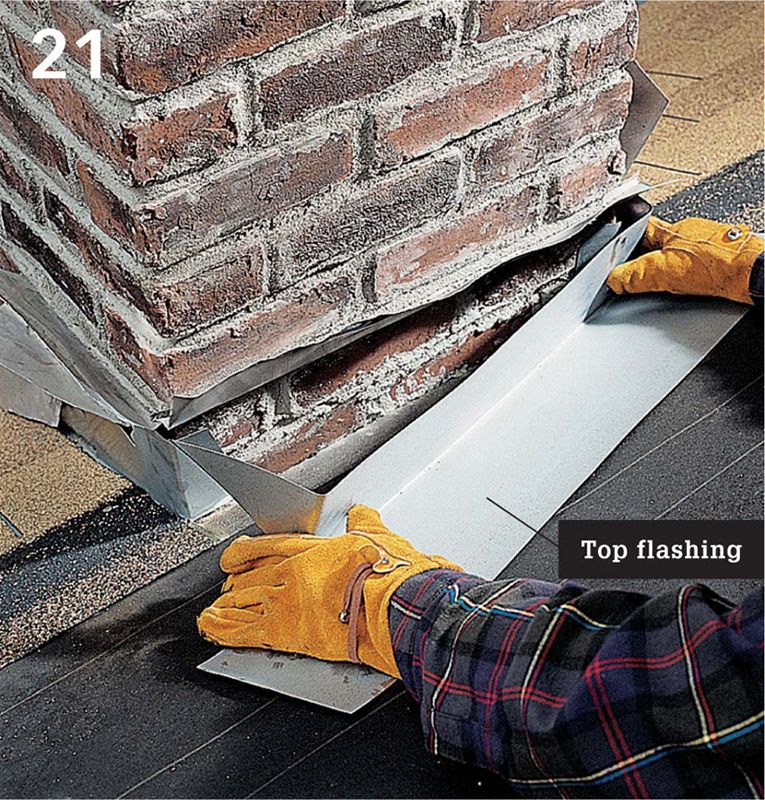
Cut and install top flashing (also called a saddle) around the high side of the chimney. Overlap the final piece of flashing along each side. Attach the flashing with roofing cement applied to the deck and chimney and with rubber gasket nails driven through the flashing base into the roof deck. Shingle past the chimney using roofing cement (not nails) to attach shingles over the flashing.
When you reach a hip or ridge, shingle up the first side until the top of the uppermost reveal area is within 5" of the hip or ridge. Trim the shingles along the peak. Install shingles on the opposite side of the hip or ridge. Overlap the peak no more than 5".
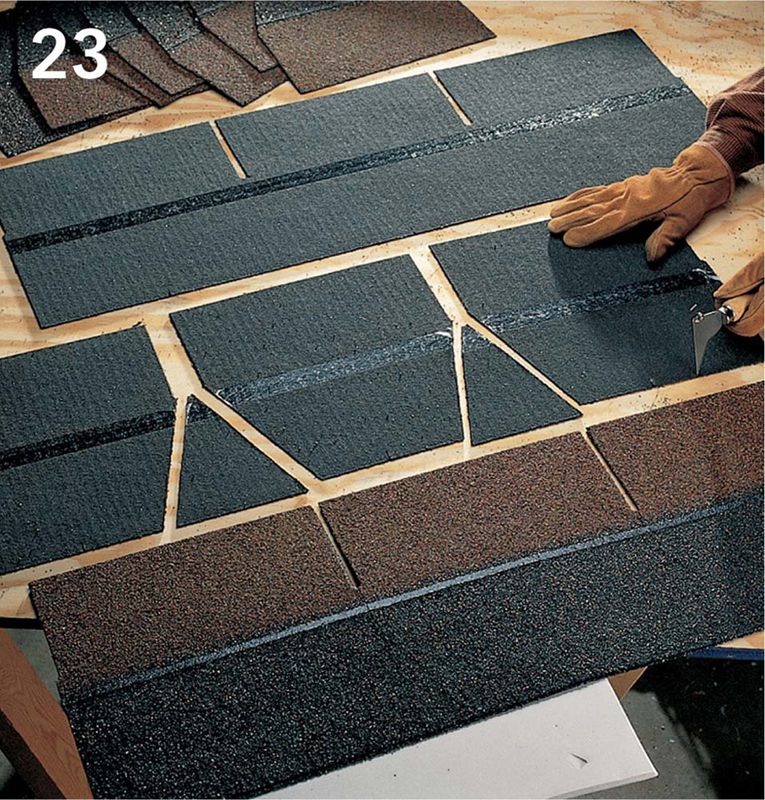
Cut three 12"-sq. cap shingles from each three-tab shingle. With the back surface facing up, cut the shingles at the tab lines. Trim the top corners of each square with an angled cut, starting just below the seal strip to avoid overlaps in the reveal area.
Snap a chalk line 6" down from the ridge, parallel to the peak. Attach cap shingles, starting at one end of the ridge, aligned with the chalk line. Drive two 1 1/4" roofing nails per cap about 1" from each edge, just below the seal strip.
Following the chalk line, install cap shingles halfway along the ridge, creating a 5" reveal for each cap. Then, starting at the opposite end, install caps over the other half of the ridge to meet the first run in the center. Cut a 5"-wide section from the reveal area of a shingle tab, and use it as a “closure cap” to cover the joint where the caps meet.
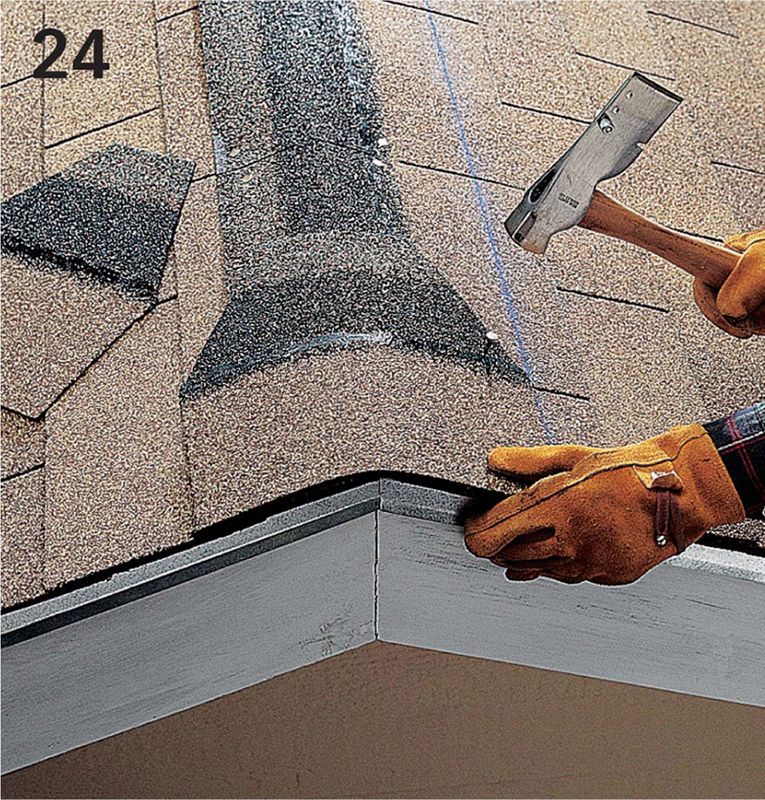
Shingle the hips in the same manner using a chalk reference line and cap shingles. Start at the bottom of each hip and work to the peak. Where hips join with roof ridges, install a custom shingle cut from the center of a cap shingle. Set the cap at the end of the ridge and bend the corners so they fit over the hips. Secure each corner with a roofing nail, and cover the nail heads with roofing cement.
After all shingles are installed, trim them at the valleys to create a gap that’s 3" wide at the top and widens at a rate of 1/8" per foot as it moves downward. Use a utility knife and straightedge to cut the shingles, making sure not to cut through the valley flashing. At the valleys, seal the undersides and edges of shingles with roofing cement. Also cover exposed nail heads with roofing cement.
Mark and trim the shingles at the rake edges of the roof. Snap a chalk line 5/8" from the edge to make an overhang, then trim the shingles.
