It picks up vibrations only in objects it’s touching, so avoiding background noise is easy.
The world is full of wonderful aural nuggets. If you have a good tool to capture them, you can mine a lot of little sounds out of everyday life. The Slinkiphone is just one specific case of this untapped wealth, and the piezo-based pickup we built for that project is commendable in many ways:
It picks up vibrations only in objects it’s touching, so avoiding background noise is easy.
It’s super sensitive, bringing out subtleties that would be lost to a normal microphone.
It’s super cheap at under $5 in parts, even if you’re stuck buying pricier off-the-rack components instead of ordering them by mail.
However, the Slinkiphone’s basic piezo pickup is also highly prone to feedback and extremely delicate. The thin leads on the piezo element feel like they’ll snap off if you just look at them funny. Fortunately, these problems are easily addressed, which is what we’ll focus on for this project.
If we rubber-coat our little piezo pickup, we can eliminate casual feedback without noticeably deadening the response. This makes for a really hearty little contact mic: I’ve soaked my Plasti-Pickups in water overnight, stepped on them, lightly chewed them, clamped them to dog bowls, squashed them between boards, taped them to drums and guitars, dropped them, kicked them, neglected them, and forgotten their anniversaries and birthdays—all with no ill effects.
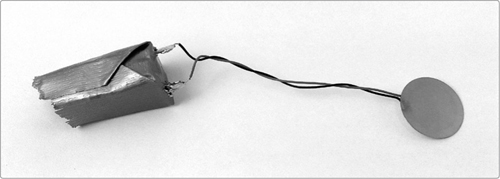
The finished Plasti-Pickup is shown in Figure 2-1. Hear samples at http://www.nostarch.com/jamband/.
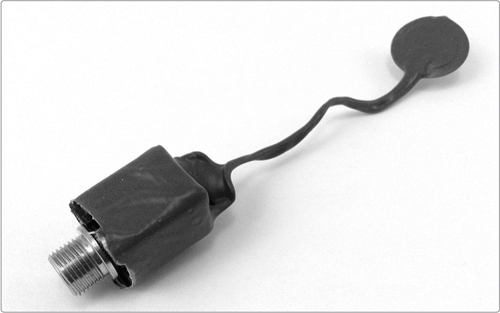
FIGURE 2-1: The finished Plasti-Pickup
Build Time
About 10 minutes (plus 4 to 24 hours of drying time)
Tools
A standard soldering kit (See page 340.)
A hobby knife, utility knife, or pocketknife with a small, sharp blade
Needle-nose pliers
A respirator mask suitable for filtering organic solvent fumes (If you’re working outside, this is optional. Use a mask if you’re working inside!)
(Optional) A 1/4-inch mono phone “guitar” cable (You can get by with a piece of string and a bent paper clip.)
A piezo element, such as Digi-Key part #102-1126-ND (Any piezo element will do, but getting one with pre-soldered leads will save your sanity.)
An enclosed 1/4-inch mono phone jack, also called a guitar jack; specifically Digi-Key part #SC1316-ND
Plasti Dip Multi-Purpose Rubber Coating
Duct tape
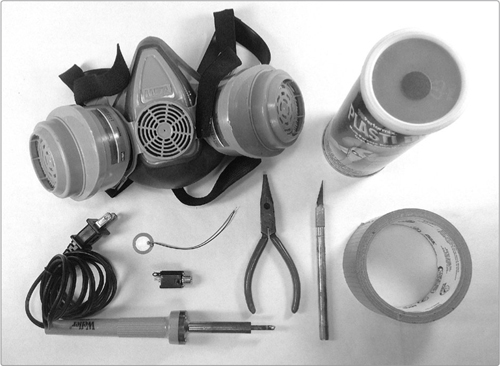
FIGURE 2-2: Tools and supplies (not shown: mono phone “guitar” cable)
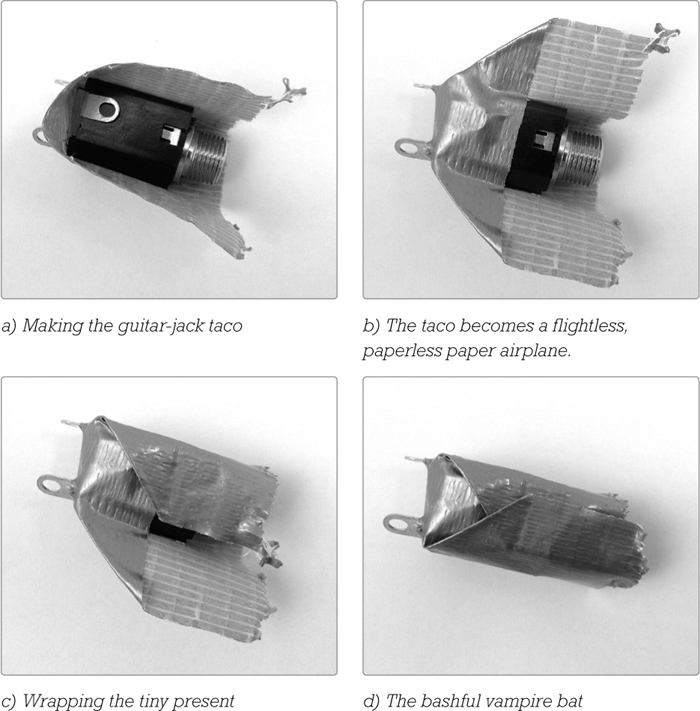
Step 1 Let’s start with the jack. You’ll note that this has more lugs than we have wires; that’s because it’s technically a switch jack, designed for situations where, for example, you have a built-in speaker and you want that to cut off when you plug in an external amplifier. This project doesn’t call for any switching, so let’s take care of that spare lug. It’s the middle lug in Figure 2-3, but keep in mind that if you buy a different jack, you’ll likely have a different number of lugs in different orientations. Take hold of the spare lug with your needle-nose pliers, twist it back, and then smoosh it flat against the plastic enclosure.
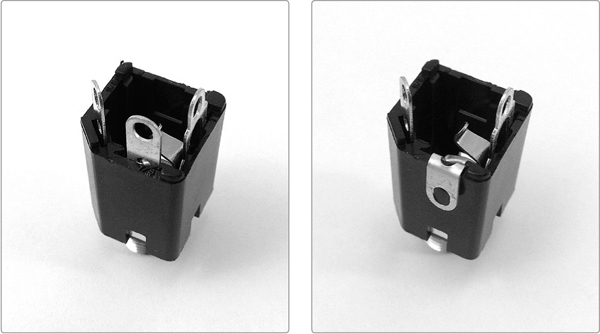
FIGURE 2-3: The lugs of our 1/4-inch jack, before and after
Your jack almost certainly came with some washers and a nut for securing it inside a case. You won’t need those for this project. Set them aside, but keep track of them: almost all instrument, effect, and amplifier jacks use the same size nuts and washers, which tend to work their way loose over time and drop off at inopportune moments. A plastic baggie of spares is often a blessing.
Step 2 Now we need to finish sealing the enclosure, lest our jack flood with Plasti Dip in Step 10, making a useless mess. Tear off a piece of duct tape roughly 1 1/2 inches wide and a bit more than 3 inches long. Push the two remaining lugs through the middle of this piece of tape. (This will be easiest if you pierce the tape with the tip of a hobby knife first. Don’t worry about making an airtight seal; Plasti Dip is very viscous, and we aren’t going to give it a chance to seep into a little gap like this.) Bring the two free ends of the tape up along the sides of the enclosure, making a sort of taco with a guitar jack filing (see Figure 2-4a).
Step 3 Fold the tape snugly up along the jack, covering the bent-back switch lug (see Figure 2-4b). This process should look a lot like the second step in making a loop-the-loop paper airplane.
Step 4 Next, fold in one wing, a little like wrapping a tiny present (see Figure 2-4c).
Step 5 Finally, fold in the other wing, making your jack into a bashful vampire bat (see Figure 2-4d). Then, flip it over and do the same steps with the other side. When you’re done, the tape will peek up over the top of the plastic enclosure by a few millimeters. This excess tape is fine: it’ll help keep the Plasti Dip out of the jack in Step 10, and it can be trimmed away once the coating dries.
FIGURE 2-4: Sealing the enclosure with duct tape
Step 6 Use your soldering iron to tin both lugs. (If you need a soldering refresher, check out “Soldering” on page 346.) This process can be a pain because the lugs are big and suck away a lot of heat. However, when you’re trying to solder together something beefy, like a lug, and something shrimpy, like pre-soldered piezo leads, it’s a good idea to tin the lugs first. The amount of heat it takes to bring the untinned lugs to temperature for a good solder joint can totally melt and mangle thin-gauge insulated wire.
Step 7 Tin both of the leads connected to the piezo, but be careful and work quickly; those little wires get hot fast. Now solder one lead to each lug, as shown in Figure 2-5. Officially, the black wire is the ground lead and should be connected to the sleeve of the jack.1 If you’re using the SC1316-ND jack from Digi-Key, then the sleeve lug is the one mounted diagonally on the jack’s enclosure.
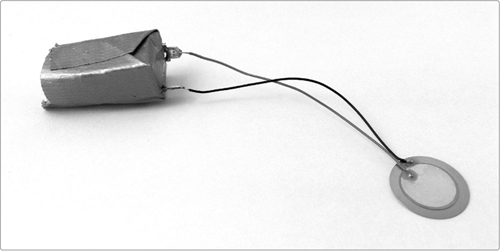
FIGURE 2-5: Your piezo pickup is now operational.
Step 8 At this stage, your contact mic is functionally complete! Let’s take a second to test it before we coat the whole thing in rubber. Power up your amp and turn the volume just a notch or three above zero (a piezo contact mic can be loud and, prior to dipping, very prone to feedback). Carefully plug in your pickup. You’ll find that the tip of the guitar cable presses against the duct tape from the inside. The duct tape shouldn’t split at this point, but take care nonetheless. If you do manage to bust a seam, just cover the breach with a little square of tape and move on. It’ll all be covered in rubber soon enough.
Give the piezo a gentle tap. You should hear a surprisingly loud rasp from the amp. Bring up the volume on your amp if you like, but the fact that the pickup is functioning should be pretty unambiguous. If the pickup is silent, take a second to be sure that all of the wires are still connected (those leads on the piezo are pretty delicate). Also, make sure there isn’t a stray snip of wire or glob of solder forming a bridge between the lugs inside the jack. If the pickup is working, then carefully twist the piezo leads together, taking care not to break any connections. Retest once you’ve twisted the wires, as shown in Figure 2-6, and then move on to plasti-dipping.
FIGURE 2-6: Twisting the two leads makes it easier to coat them in Plasti Dip.
Step 9 Once your pickup checks out, it’s time to rubberize it. You’ll want to hang your pickup up to dry, so if you have a spare guitar cable, now is the time to carefully plug it into the jack. Otherwise, you can fashion a workable dipping line from some string and a paper clip bent into a hook. Both options are shown in Figure 2-7.
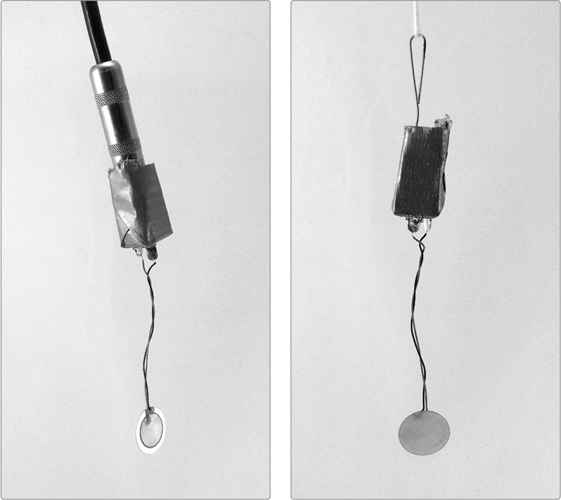
FIGURE 2-7: Ready to dip, using a guitar cable (left) or a paper clip and string (right)
Step 10 We’ll use Plasti Dip mostly according to the manufacturer’s instructions, so give it a few hard shakes, don your respirator, and pop the can. If you’re using an old can that’s been sitting around the workroom, the Plasti Dip may have separated, leaving a clear, oily layer resting on top. Stir it a few times with an old pencil or chopstick to recombine the layers. (If you do use a chopstick, throw it out. Plasti Dip is not food safe.)
You are going to slowly lower the pickup into the Plasti Dip, stopping when the liquid is just below the top edge of the jack’s plastic enclosure. Try not to overtop it, as there’s a small risk the Plasti Dip could run into the jack and foul things up. The manufacturer advises lowering whatever you’re coating at a rate of 1 inch per 5 seconds, but that might drive you nuts. I’ve found that lowering the pickup over the course of a 10-Mississippi count (and raising it at the same rate) is sufficient for a good first coat.
Once you’ve done the first coat, let the pickup hang over the can for a second or two and drip. (Plasti Dip is pretty viscous, so it shouldn’t drip much.) If the wires and jack enclosure are fully coated at this point, with no bare spots or gaps between wires or lugs, then the first coat is perfect. The brass edge of the piezo element itself might peek through, but that’s okay because we’re going to double-coat it anyway. If your wires and jack are coated and gapless, then give just the piezo element itself another leisurely dunk, and hang it up to dry. If you have gaps and thin areas along your wires and jack body, then dunk the whole thing again. This one-two dunk should be sufficient, but if you feel paranoid, you can dunk the whole thing several times. I’ve gone up to five complete coats without seeing any loss in performance—although the pickup does start to look like a goofy rubber lollipop. You can always wait until the Plasti-Pickup is completely dry and add layers later if you have second thoughts.
The Plasti Dip coating should be tack-free in about four hours, although it’s best to let it dry overnight. Once the rubber is totally dry, you can trim away any stray duct tape poking up over the edge of the coating.
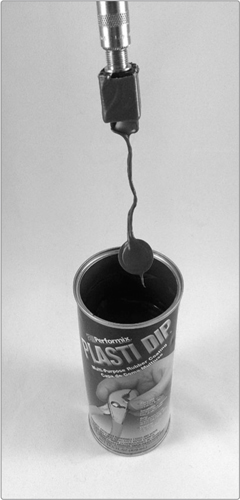
FIGURE 2-8: Ready for the second dip!
The first thing you’ll notice when you open a can of Plasti Dip is that it stinks strongly of house paint. You’re smelling a whole host of volatile organic chemicals (VOCs), including naphtha, hexane, toluene, and methyl ethyl ketone—which pretty much clears the bench in terms of “household things you don’t want to inhale.” In this context, volatile means that these chemicals readily evaporate at room temperature, which is why they are so smelly: they put lots of their molecules out into the air. All fat-soluble VOCs are bad for the brain. In the short term, they depress the central nervous system, making you feel dizzy, nauseated, or unconscious, and sometimes causing death. In the long term, they damage the brain (which uses fats to form membranes vital to most neurological functions) and also abuse the kidneys and lungs. To cap it off, these fat-soluble VOCs are all highly likely to be carcinogens.
Plasti Dip also contains carbon black, which makes the material flow nicely at room temperature and gives the rubber many of its excellent qualities once it’s dry. Carbon black, in its powder form, is traditionally associated with black lung and lung cancer. It’s unlikely you’ll inhale carbon black when it’s in a fluid suspension, but it’s still not something you want on your skin, eyes, or mucous membranes.
This all sounds pretty dire—because it is—but when you think about it, Plasti Dip is magical stuff: it’s a room-temperature liquid that, with no additional shenanigans (like spraying on catalysts or baking it in a kiln), becomes pliable, durable, resilient rubber. Most magic involves pretty noxious ingredients, and Plasti Dip is no exception. So, even if you are working outside, I strongly urge you to wear a respirator rated for VOCs. This shouldn’t put you back more than $30, and it will come in handy during lots of home projects. Also consider wearing gloves and safety glasses—oh, and a cap! This stuff is never coming out of your hair.
The Plasti-Pickup is meant to amplify things you wouldn’t normally think to amplify. You can obviously clamp one to a Slinky for an ad hoc Slinkiphone, but don’t neglect the percussive possibilities of wooden tabletops, plate-glass windows, and metal handrails and fences. Metal mixing bowls and dog dishes can also be lots of fun: they sing beautifully and are easier to record using a contact pickup than a conventional microphone. Experiment with clipping or taping your Plasti-Pickup to various points on the bowl (along the rim, underneath, and so on), or try filling the bowl with different levels of water. Blow into that water with a length of tube to make some whale noises.
The Plasti-Pickup is great for capturing some conventional musical sounds that are hard to record, like the sound of stomping out a kick-drum rhythm on a porch. You can emulate this by laying your Plasti-Pickup on the ground and covering it with a length of 1×6 or 2×4 board. Experiment with doing this over both hard surfaces (wood floors, a piece of scrap wood, in the kitchen) and soft ones (on the lawn, over the rug) to get a variety of easily recorded rollicking hoedown beats. You can also pinch the Plasti-Pickup between two boards (the pickup’s thickness will keep one end separated a bit) and then tap on the free ends for a “wooden tuning fork” sound or a simple “plank xylophone” marimba.
Yelling at the Plasti-Pickup won’t get you anywhere because the vibrations in the air are too subtle for it to pick up. However, you can press it to one side or the other of your larynx—that is, your Adam’s apple—and it’ll amplify your voice accurately without risk of pops and hisses, emphasizing the low end and losing most of the sibilant “mouth business.” Using this in addition to a conventional vocal mic is a quick-and-dirty way to get a richer vocal sound, akin to what you might produce by doubling the vocals in a studio recording.
Doubling the Vocals
Doubling the vocals (also called doubletracking) is an incredibly common trick for beefing up vocal tracks on the cheap: the singer records several very similar takes, which are then mixed together to create a very rich choral stereo effect. Classically, the best take is centered in the stereo field, with the top two runners-up panned hard left and right. This allows a singer to be a little inconsistent in each take and still sound good because, at any given instant, the listener’s ear naturally focuses on the most on-key version of the three tracks. Doubling also provides a “fatter” sound because the takes are not identical and thus don’t perfectly mesh. If you record vocals with both a conventional vocal mic and a Plasti-Pickup on the throat, you’ll get a similar effect: each mic gets a slightly different version of the take, and the two signals fill and enrich each other rather than just overlapping and blending. Not too shabby for a few bucks in supplies and some soldering.
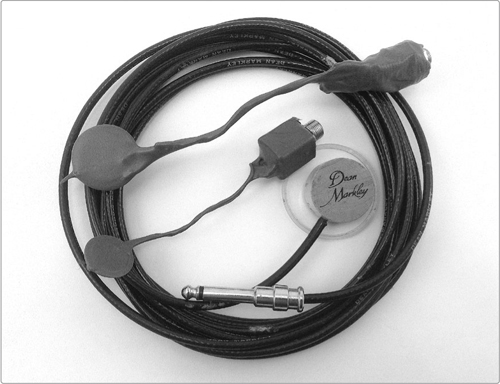
Finally, the Plasti-Pickup is a perfectly serviceable general-use acoustic pickup to amplify cellos, violins, guitars (steel or nylon string), or even percussion instruments. In essence, it isn’t at all different from the vintage Dean Markley acoustical transducer pickup I paid $40 for back in the early 2000s (when I was a foolish and callow youth). See Figure 2-9 for a side-by-side comparison.
FIGURE 2-9: My pricey Dean Markley acoustical transducer and a couple of homebrew Plasti-Pickups
You have lots of options when it comes to components for this project. Basically, any piezo element and audio jack should work. When it comes to piezos, I advise buying those with pre-soldered leads because soldering to a piezo element can be very frustrating. You should also buy cheap ones rather than tearing them out of prefab piezo buzzers; piezos harvested from buzzers will work just fine, but it’s a wasteful way to get supplies. In general, the larger your piezo, the more low end you’ll pick up, so keep that in mind if you’re planning to build an acoustic pickup for your double-bass, viola, or big fat djembe drum.
As for jacks, I favor 1/4-inch audio phone jacks because that’s what most amps, effects pedals, and mixers use. This project can just as easily be built around a 1/4-inch plug instead, as is the case with my factory-made Dean Markley transducer, or it can be built using an 1/8-inch mini-jack or plug (that’s the size of the standard headphone jack on your laptop, tablet, and MP3 player and on most cell phones). Heck, you can use any esoteric jack you’ve got that plugs into the things you want to plug into.
If your jack doesn’t have any sort of enclosure, then you can always fake it by wrapping a strip of duct tape around the jack and soldering points just prior to dipping. That’s what I did with the lower Plasti-Pickup in Figure 2-10, and it works great, despite being ugly as sin.
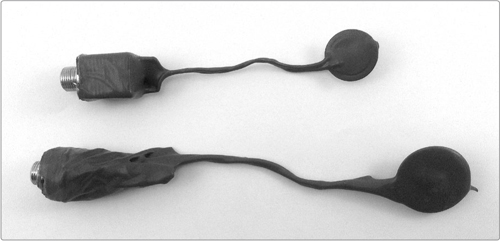
FIGURE 2-10: The top pickup was made using the piezo and partially enclosed jack from the parts list. The bottom was made using a larger piezo element and a regular guitar jack, like the common Switchcraft jack listed for most projects in this book. Both work great!