This section looks at what sort of bike and what extras you need to buy, plus clothing for summer and winter riding. It covers setting up your bike, which is really important for your comfort as well as enabling you to get optimum power into the pedals while being as aerodynamic as possible. Having the correct bike set-up will help prevent injuries. Because we are all different, it’s crucial that you get your personal bike set-up just right. You don’t have to copy what pro bike racers ride in terms of equipment, but you need to copy the way they personalise their bike set-up.
What bike do I need?
You could take part in a sportive on a hybrid bike – a cross between a road and mountain bike – or even a mountain bike fitted with slick tyres, but it would make doing so a lot harder than it should be. What you really need is the sort of bike racers use for road racing – or even better a road race bike that has been designed specifically for the demands of cyclosportive events.
What’s the difference?_
Road bikes are fitted with derailleur gears. These shift the chain between chainrings attached to the pedals, and sprockets on the rear wheel. Gear ratios depend on which chainring is driving which sprocket. A large chainring driving a small sprocket gives a high ratio, a small chainring driving a large sprocket means a low ratio.
But because cyclosportives are long and often hilly, cyclosportive bikes are fitted with smaller chainrings, often called a compact chainset, and a wider size-range of sprockets than you find on road race bikes. This preserves some high ratios but gives more low ratio gears to choose from, including very low ones. That allows you to conserve energy when climbing. Being economical with your energy is one of the keys to success in the long-distance cycling challenge of cyclosportives.
The length and hilly nature of sportive courses means you will spend a relatively long time on your bikes during an event. This places a lot of strain on your back, shoulder and neck muscles, so cyclosportive bikes are made a little shorter and a little higher at the front to offer the option of a less stretched-out riding position. At the same time though you can still use the bottom of the dropped handlebars to create a lower and therefore more aerodynamic position on the faster parts of the course. Swapping positions to make the best of a course is another key factor in sportives. It’s part of a philosophy that will reoccur throughout this book, and that’s speed for free. Being aerodynamic requires no extra input of energy from you, but you end up riding faster, so it’s speed for free.
Road race bikes – or road bikes as they are more commonly known – are light. They have narrow, smooth tyres that roll easily along the road but still grip in the corners. They also have dropped handlebars, which you can hold in several positions. Hold them at the bottom for an aerodynamic position while travelling fast on the flat or downhill; or sit higher, grip the tops of the handlebars, or the brake levers, and pull harder with your arms when riding uphill.
Cyclosportive-specific road bikes are just as light as their similarly priced race equivalents. They have the same narrow tyres and dropped handlebars, but they have two major modifications to the basic road bike design that make them more suitable for sportive events:
+ a wider and lower range of gear ratios than road bikes;
+ a shorter reach to reduce stress on back, shoulder and neck muscles.
Bike materials
You can get a good cyclosportive bike, such as the Verenti Kilmeston, for around £900. It has an aluminium frame with carbon-fibre forks, a great combination as aluminium is light and stiff, so it minimises any flex in the frame that will soak up some of your valuable energy. Carbon fibre helps absorb road vibrations to increase riding comfort and control. The bike is equipped with a compact chainset and a wide range of sprockets. The geometry and dimensions of this bike’s frame will allow you to ride for hours without overly tiring your neck, shoulder and back muscles.

+ The Verenti Kilmeston
+ The Boardman 9.2
It’s a perfect bike for cyclosportives, and could be the only bike you will ever need. However, if you really get hooked on taking part in sportives and would like to improve your time for a certain course, or even get competitive within your age group, then there are bikes that are a little more technically advanced. They are also a little more expensive.
What you are paying extra for are the lighter materials used to manufacture these bikes. As you’ll see later in this book, weight is a big issue in cycling. In fact the crucial equation that expresses cycling ability is the amount of power a person can produce divided by their weight and the weight of their bike. Any weight that can be saved translates into increased speed and a better performance. The expense comes when making light materials as strong and resilient as heavier ones. A lot of design thought and research and development go into that, and it’s these you are paying for. It’s speed for free in terms of energy, although in the case of lighter bikes, not in terms of money.
There are a lot of top cyclosportive-specific bikes on the market, and many have similar geometry to the Verenti Kilmeston but are a great deal lighter. If you are new to cycling or have any back issues they are the sort of bike I’d recommend you buy. However, if your ambition is to do faster times and finish higher up the field then a bike such as the Boardman 9.2 (see picture) would be a good choice. Its frame is made from custom-specified carbon fibre. Not only is this lighter than aluminium but it also absorbs road vibrations better, and the carbon fibres are oriented in different ways throughout the frame to optimise their properties, which accounts for some of its price. This means that the bike has a comfortable frame that resists flex, but is considerably lighter than aluminium.
This bike is fitted with a standard road race chainset, which could easily be swapped for a compact. As it is pictured here it mimics the riding position of a standard cyclosportive bike by having several spacers on the steering tube, arranged underneath the handlebar stem. However, the thing with this bike is that as you get faster you can lower the handlebars by swapping these spacers, one or more at a time, and placing them above the stem. This will make your riding position more aerodynamic, which in turn makes you faster.
The Boardman 9.4 bike has lighter equipment than the basic bike, particularly the wheels and tyres. A bike such as this could cost more than £3000, although models that are aimed at the same kind of rider start at less than £1500.
Adaptations for winter
If you are new to cyclosportives then a good reason for choosing a bike like the Verenti Kilmeston is its adaptability. You can use it in the summer then add some extra equipment to it to make your winter rides more comfortable.
How to protect yourself and your bike
+ Fit mudguards to it.
+ Fit wider and heavier tyres to help ward off punctures.
+ Fit lights. Even if you never ride in the dark, small LED lights fitted to the front and rear of your bike make you more visible to other road users on gloomy days.
+ Wash it after every wet ride (we’ll show you a quick, efficient way of doing this in chapter 8, Bike Care).

+ The Verenti Klimeston, with mudguards and lights fitted
Top cyclists say that medals are actually won during the winter, they are only awarded in summer. The same is true to a certain extent for someone taking part in sportives. Preserving and even building on your summer fitness during the winter will bring your sportive ambitions closer, but winter cycling can be a problem due to the cold and rain.
Not only does this make you less likely to put in the training you need but also rainwater corrodes your bike, especially when mixed with the salt they spread on roads when it’s icy. Punctures can be a problem in winter too, because grit and glass gets washed on to the roads. Also the days are short and even in broad daylight you can end up riding in murky conditions.
Bikes such as this Verenti Klimeston are designed to take full mudguards and wider tyres. You can fit LED lights to any bike. If you start with a bike such as this one, you can update to a lighter more expensive one later if you wish, then keep this bike for training, especially during the winter. If you start out with an expensive bike and don’t want to buy a cheaper one just for winter training, then buying some training wheels with heavier tyres, plus a short mudguard called a spray guard, will make your bike good for winter rides. You will need to lavish extra care on it though, as really light equipment is sometimes not as robust as heavier stuff.
Other bike essentials:
+ Drinks bottles and bottle cages
+ Multi-tool
+ Spare inner tube, tyre levers, and pump or other inflator
+ Under-the-saddle bag
Why you need these bike essentials
Drinks bottles and bottle cages
Keeping well hydrated is crucial when exercising, your performance level drops if you don’t. Getting dehydrated can even be dangerous. Cyclists drink from bottles designed to be carried on their bikes in holders called bottle cages, which are bolted to the frame’s down tube and seat tube. There are a wide range of cages on the market, and expensive ones aren’t necessarily the best. Go for straightforward designs such as the one pictured here.
+ Bottles and a bottle cage

Multi-tool
Multi-tools are like Swiss Army knives for cyclists. They have a body like a penknife out of which various tools, such as screwdrivers and Allen keys, can be drawn to tackle straightforward adjustments, tighten something up or make simple repairs.

+ The essential multi-tool
Spare inner tube, tyre levers, and pump or other inflator
You will have punctures, they are a fact of cycling life. And when you do it’s quicker and easier to replace the inner tube with a good one then repair the punctured one at home, which becomes your new spare. You need tyre levers to remove and replace the tyre. There are gas canisters to inflate tyres, even some that inject a sealant into the inner tube for an on-the-spot repair, but hand pumps are tried and tested. Buy a small hand pump that inflates with both in and out strokes.

+ An inner tube, tyre lever and pump
Under-the-saddle bag
Keep your spare tube, tyre levers and multi-tool, plus some money for emergencies, in a bag that clips or straps under your saddle. Very small pumps can go in the bag too. However, you should wrap these things in individual pieces of cling film to prevent damage caused when they rub together. Larger pumps should be fitted on to the frame, and most come with attachments to do this. Don’t carry pumps or other spares in your pockets as they take up valuable space, they get in the way and they can bounce out.
Kit also worth having:
+ Cycle computer
+ GPS
+ Heart-rate monitor
+ Lights
+ Mudguards
+ Turbo trainer
What to buy
Cycle computers
Cycling lends itself to numbers, and numbers can help give direction to your training. Numbers are something you can work on, you can add to or subtract from them. Numbers bring control and provide encouragement.
It’s nice to know how far you have ridden, and if you are riding further in the same time as you progress it spurs you on. Cycle computers provide information like that, plus they record your average speed, and some even tell you how many metres or feet you’ve climbed during a ride.
+ A GPS fitted on the handlebars
GPS
These are great for trying out new riding routes. You just decide where you want to go from a computer map, download the chosen route and follow it on the handlebar-mounted screen. There are models that can record valuable training information too.
Heart-rate monitors
These are a brilliant aid to your training in that they give you precise control of the effort you are making. They also help you map improvements. However, you need to be quite rigorous in the way you use them. We’ll look at heart-rate monitors in detail in the training section of the book.
+ A heart-rate monitor
Lights
LED lights are small and can be used in flashing or constant mode. A red LED on the rear and white on the front of any bike will make you more visible to other road users. If you ride at night then such lights are required by law. You can have as many of each as you like. LEDs, one of which should be on constant mode, are best at the rear. There’s a wide variety of front lights, but go for the most powerful you can afford. These often come with separate rechargeable battery packs, such as the one pictured, and as well as being seen they allow you to see where you are going in pitch darkness.
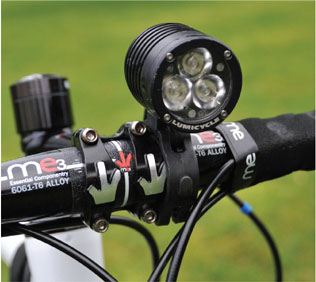
+ LED lights front and back

There are two types of mudguards: those that attach to threaded fastenings on the bike frame, and those that have their own fastenings. The latter are designed to fit race or top-end cyclosportive bikes. Top-end bikes don’t have the threaded fastenings on their frames that the Verenti has, and their frames have only enough space for the tyres to fit. This makes them more responsive, so faster, but the only mudguards you can fit to these bikes are ones with their own attachments, and even then the job can be fiddly. A spray guard that clips on to the seat post of your bike is another mudguard option.

+ A clip-on mudguard
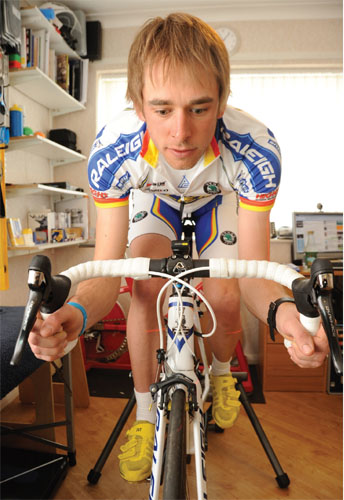
Turbo trainer
We’re inclined to put a turbo trainer in with bike essentials. Buy one, embrace what it can do for you and it will become your best friend when training for cyclosportives. Turbo trainers have two functions: you can train indoors when the weather or light conditions would make training outdoors uncomfortable or dangerous; and they bring a precision to your training that is hard to mimic outdoors. We’ll talk about turbo trainers later on and into why that precision is important for some aspects of your training.
Go for a turbo trainer with fan resistance, as these mimic the effects of riding outside. With a fan turbo trainer, the harder you pedal the faster your back wheel revolves a fan that is part of the trainer. The fan is designed to scoop up air, and any object passing through air creates drag. So, since drag increases at the square of speed, if you pedal harder the fan creates proportionately more drag for you to overcome. This mimics what it’s like to ride along the road. As you go faster the drag you create increases at a faster rate than your speed, so it becomes harder and harder to keep increasing your speed. Eventually drag becomes a limiting factor on how fast you can ride.
In addition to the fan, the turbo may also have other ways of increasing resistance, such as by using magnetic forces, which is good, because you can mimic the effects of hills like this. Some turbo trainers have fans that run in liquid instead of air, which is fine because drag in liquids is very similar to drag in air. The faster you go the harder it gets to increase speed.
It’s good to have something to listen to or watch when riding on a turbo trainer, like your favourite music on an MP3 player or you could watch a DVD. A turbo trainer’s biggest drawback is that it turns your bike into a piece of exercise machinery. That’s not what bikes are about at all, but stick with this aspect of your training because it pays back in spades.
What to wear in summer
Always start with a base layer made from a ‘wicking’ material, a thin one for summer. Thicker ‘wicking’ base layers are available for winter riding.
+ On warm days
Wear bib shorts and a short-sleeved top over the base layer. Lycra shorts ‘wick’ sweat away, and their tight fit prevents chaffing and makes them aerodynamic. Tops should fit fairly closely for the same reasons. Cycling shorts are padded where you sit on the saddle to provide a layer of cushioning and further reduce chaffing. Check the stitching in this area to ensure it’s flat and unobtrusive before buying. If you are trying on shorts in a shop, remember to bend over to see if they will be comfortable when you are riding.
Cycling tops have pockets on their backs to carry food. Full-zipped tops are best for summer as you can pull them right down to let the air circulate around you when it’s hot. Don’t forget to zip them back up on descents to prevent getting too cold or even catching a chill. Zipped-up tops improve aerodynamics too, which will increase your average speed and lower your finish time. Remember, zipping up your top equals speed for free.
Cycling fact_
Wicking materials absorb body perspiration and pass it to their surface where it evaporates. Cyclists wear them next to the skin because they help to keep it dry, reducing discomfort and the chilling effect of the wind.
Helmets are essential. Buy one that suits you. That’s important because if you aren’t happy you won’t wear it for every ride, and you should do that. Ask for help in the shop if you aren’t sure about the fit. It shouldn’t pinch you but should fit close enough to your head so that it moves your scalp when you move the helmet. Look for a model with lots of ventilation. Modern bike helmets are so light and so well designed that after a while you won’t notice you’ve got one on.
Short-fingered gloves called track mitts absorb sweat and give you a good grip on your handlebars. They prevent chaffing and can be invaluable in a fall, when you tend to put your hand out and so can suffer cuts and grazes. Track mitts greatly reduce such injuries.
Cycling shoes have stiff soles, so all your leg power gets transferred to the pedals, and breathable uppers. Make sure they are compatible with your pedals. I recommend you use clipless pedals for cyclosportives. These work by means of a cleat attached to each shoe sole, which engages with a retaining device on the pedals. Once you ‘click’ your foot into the pedal you are attached to your bike. So again, all your power goes into turning the pedals. A simple sideways twist of your foot releases it.
Cycling fact_
Why bib shorts and not just shorts? Bib shorts have high backs and loops that go over your shoulders to ensure a good fit and to cover your lower back when you bend into a crouched riding position. This stops back muscles getting chilled on descents or if the temperature is low or it rains. Chilled muscle tissue contracts, and if the big muscles in your lower back start doing that on long bike rides you will get back problems.
Finally, wear cycling-specific socks. They are thinner than running socks and wick sweat away from your feet.
+ On chilly summer days
Arm warmers and leg warmers are extensions to your shorts and top that you can add or remove whenever you wish. They should fit closely but comfortably. When you buy look for ‘grippers’ around the top. These hold the warmers in place, preventing them moving down your arm or leg as you ride along.
A gilet is a thin, sleeveless body warmer with a full zip. It should fold up small enough to stuff in a jersey pocket if the weather gets warmer. Another good top to have for summer and winter is a full-sleeved waterproof top. Buy a cycling-specific one though.
And that completes your summer wardrobe.
What to wear in winter
Again, start with a wicking base layer, thicker than summer if the temperature is low. Bib tights are next, these are just long versions of bib shorts. They are made from a fleecy kind of lycra. The light fleece is inside, next to the skin, so micro-air pockets in the fleece help retain your body heat. Don’t be tempted to buy really thick bib tights, unless you live somewhere very cold. On top of the bib tights and your base layer you can wear a winter cycling jacket, or a mid-layer plus a thinner outer windproof top. Add or subtract tops to suit the temperature.
Avoid bib tights with extra padding or thickness in the knee area. The idea of this is to keep your knees warm, but in fact the extra thickness can push your kneecap out of line and cause knee problems.
Thermal socks are a must for winter cycling, plus overshoes. Overshoes are made from a number of materials, such as neoprene. They stretch over your cycling shoes and stop the cold getting to your feet.
You’ll build up your experience of what works, but we recommend buying two thermal base layers, some bib tights, a thin winter top, plus a heavier winter cycling top. Add in the gilet you use on chilly spring, summer or autumn days and your waterproof top and you have a good cycling wardrobe. Your short-sleeved summer tops make good alternative mid-layers. And on mild winter days you can wear your bib shorts and leg warmers.
Kit fine print
Some extra bits and bobs you’ll need:
+ Chamois crème
+ Lip salve
+ Protective body oils
+ Sunscreen
+ Wind chill table
Chamois crème is a lubricant that can be applied to the protective pad inside cycling shorts. Its name comes from the fact that years ago these pads were made from real chamois leather, which required softening after washing. Most pads are synthetic chamois now, and don’t require anything to soften them. However, if you have a tendency to suffer from saddle soreness or chaffing, and some people do – even Tour de France pros – then chamois crème could be the answer. Don’t underestimate saddle soreness – it can be a showstopper in a long sportive, and in any case it’s very uncomfortable.
When training in cold dry conditions, or when wind chill is a factor, lip salves help prevent your lips cracking. Smear a layer on your lips before setting off, and it should be enough to protect you from what can be a painful experience.
Protective body oils are useful in cold and wet conditions. Often lanolin based, when rubbed on your legs, back and arms they can help preserve body heat by providing a barrier against cold water. Some cyclists prefer to coat their legs with such products instead of wearing leg warmers in cyclosportives or races run off in cold conditions.
You need protection from the sun, even on dull days, in hot countries and in mountainous terrain.
Tip_ The need for layers
Layering is a technique to combat cold by wearing several thin layers instead of one or two thick ones. The idea is that air is trapped between the layers, which the body heats, and that helps to keep you warm. Nowadays though single pieces of clothing, in particular some winter cycling tops, possess the same characteristics of several layers in one garment. That’s why a thermal base layer and a winter-specific top work just fine in all but the coldest conditions.
Also you need it all the time when the sun is out during the summer in more temperate zones. Nowadays you can buy sunscreens designed specifically for sport. Check the label: the sunscreen should protect against UVA and UVB light, contain a stabiliser so you don’t have to reapply them often, and be sweat resistant. Apply sunscreen 30 minutes before exposure so it soaks into your skin, because that makes it more effective. And put plenty on.
Wind chill is where the speed of the wind effectively lowers air temperature. It’s a bigger factor at low temperatures than high ones, so it’s significant in winter. Wind chill can lower the temperature to a point where frostbite can occur in exposed skin, even in the UK. Many clothing manufacturers produce wind chill tables, and you can get one by searching online. Wind chill has a great bearing on whether a training session is best done outside or indoors. Remember too that wind chill can be significant at altitude, even in summer, when it can be sweltering hot at the bottom of an Alpine pass, but just above zero at the top.
Bike set-up
You are the engine that powers your bike, but an engine can only provide the power it’s capable of if it is mounted correctly. It’s the same for you, your power is transferred to your bike through a series of levers: primarily your legs, but your arms, shoulders, back and mid-section come into play as well.
The first step in getting your levers working optimally is buying the correct size of bike. It pays to take advice from a reputable bike shop, or get a coach or even an experienced cyclist to help you with this. Once you have the bike though, you need to custom fit it to your body. This is done by altering the height and position of your saddle relative to the bike pedals. Once this is established you look at the position of your handlebars relative to the saddle.
There are a number of bike shops and coaches who specialise in bike fitting. We’ve asked a former Tour de France finisher, who is now a coach, Adrian Timmis, to illustrate how he fits a customer to a bike. If you follow this step-by-step guide your bike set-up should be near perfect. You’ll need someone to help you with parts of it though.
|
Step |
|
|
Start with your feet, which are a crucial although often overlooked part of getting power to your pedals. They are the last link with the pedals, so foot position is the first thing you must get right before setting anything else up. You must therefore have the cleats on your shoes positioned correctly so that you transfer maximum power when the widest part of your foot, or the ball of the foot as it is also known, is directly over the pedal axle. To ensure this, put your cycling shoes on and mark the position where your foot is widest on the outside of each shoe.
Engage the cleats with each pedal and get the person assisting you to note if the mark on your shoes is in front, behind or dead level with each pedal axle. If it’s in front or behind loosen the cleat fixings and move the cleat into line. Most cleats have a centre line marked on them, so just line that up with the mark you made on the outside of each shoe.

|
Step |
|
|
Take off your shoes and measure your inseam. That’s the distance from your crotch to the floor when your leg is straight. Multiply this figure by 0.833 and set your saddle height, that’s the distance from the top of the saddle down the seat tube to the centre of the bike’s bottom bracket, to the resulting figure plus 0.5cm. For example, if your inseam is 79cm, the saddle height you set initially will be 79x0.833 = 65.81cm (+ 0.5cm) = 66.3cm.
Place your bike on a turbo trainer. If you haven’t got one, or can’t get hold of one, just go with the 0.883 of inseam, don’t add the 0.5cm, because that’s so you can do some fine tuning and only works with a turbo. Once on the turbo begin pedalling and listen to the noise the turbo makes. If it is a constant noise then your saddle height is correct, but if it comes and goes in a whoosh whoosh noise it’s too high. Lower it by 2mm at a time until the turbo noise becomes more constant.
Timmis says: ‘You are looking for a Eureka moment when the pedalling sounds right. That sound is feedback to indicate when you are applying most power. When the sound is nearest constant you are applying power through most of each pedal revolution.’
|
Step |
|
|
The final step in getting your main lever, your legs, into the perfect position for optimal power transfer is to set up your saddle set-back. This is the position your saddle is fixed in relative to an imaginary line drawn vertically up from your bike’s forward pedal axle when the bike’s cranks are parallel to the floor.
Timmis uses a laser beam for this step, but you can use a builder’s plumbline. Pedal for a while so you are settled and your sit bones are in the most comfortable place on your saddle. Stop with your cranks parallel to the floor and get your assistant to drop the plumb-line from the hollow just behind your knee cap and to the outside of your leg. The weighted end should drop directly on to the mark you made on the outsides of your shoes, which are now both over each pedal axle. If it doesn’t, undo the saddle fixing bolt(s) and move your saddle forwards or backwards until it does.
|
|
|
Once your feet and saddle are in the right position relative to the pedals, it’s time to look at your other point of contact with your bike, the handlebars. Handlebar stems rarely need changing as they increase in size relative to the size of bike you buy. To test if yours is right put your hands on the bottom of the handlebars while you are riding. If the front hub is hidden by your handlebars the stem is the correct length. If you see the hub in front of the handlebars the stem is too short; if it’s behind, the stem is too long. If either of these is the case you need a different stem.
At the same time, if you feel constricted when holding the bottom of the handlebars you might also need a different kind of stem to raise your handlebars, or it might be possible to swap spacers on the steerer to do this.
If the stem is the correct length and you don’t feel constricted then remove the handlebar tape before setting your brake levers and handlebars to the correct position. The bottom, straight section of your handlebars should be parallel with the floor, so when you hold the bottoms your hands are in line with your forearms. Adjust the handlebars until this is so.
To set your brake levers correctly, loosen the fixing bolts so that they can move on the handlebars. With your bike on a turbo trainer, get on it and ride with your eyes shut while holding the tops of the brake levers. Move the levers up and down on the handlebars until you feel most comfortable. Get off your bike, check the levers are level with each other on the handlebars and tighten up the fixing bolts again.
With your bike set up it’s time to start riding with an eye on your first event, but what’s on offer in the world of cyclosportives? Read the next chapter to find out.
First-time participant: Jo Dytch
My first cyclosportive was a women-only event called the Diva 100 in Sussex. There were two distances, 50 and 100 kilometres, so being almost a novice cyclist I decided to ride the 50. I work in sports promotion and have worked on cyclosportives, which is why I wanted to take part in one. I’d seen how much fun they are and really enjoyed being with the people who take part in them.
I’ve always been fairly sporty and I like to keep myself fit. I run and have done some low-key triathlons, but I had had very little cycling experience before I entered the Diva. They are long-distance rides so I thought it was important to do the distance in training, or at least get close to it. So my key training sessions in the month or so leading up to the event were rides of 30 miles, which were actually a bit much for the first one, then 23, 28 and finally 30 miles. I spread these rides a week apart and in between time I cycled to work and back, did some running and my normal fitness stuff, as well as some shorter bike rides.
I did the long rides with my father, who’s an experienced cyclist, and I think that helped. It also helped being in a women-only event. It can be quite intimidating when you are surrounded by men who look like they know what they are doing and you don’t.
However, I have found that cyclists are very friendly and approachable. If you ask they will help you. I switched to using clipless pedals recently and was really worried about getting my feet in and out of them, but with a bit of advice I soon got used to them and can see why they are better.
You don’t need to be super fit to do the sort of sportive I did, but riding for 50 kilometres felt good and it has made me want to do more – a lot more in fact. I’m going to try some longer sportives now and one day I’d like to do the Etape du Tour.
The other good thing I’ve discovered about cycling is the joy of riding in the countryside. If you do the long bike rides you need to do for sportives in nice surroundings, they don’t seem like training, they’re just fun rides. And if you can do them with a friend, they are even better.
I’d also recommend anyone to commute on their bike if they can. It gets you riding and some of the skills you learn from getting around cities on your bike are really helpful. I time my commute so that I’m not in the worst traffic, but it’s still in central London, so it’s busy. You have to be quite forceful, making definite signals and manoeuvres. If you are timid and stick to the inside of the road all the time, other drivers won’t see you.
My commute isn’t long so I wear ordinary clothes for it, but I always wear a helmet. For anything longer than my commute, I wear proper cycling stuff. I have two bikes, one for commuting and one for longer rides, training and sportives.
It’s not a super-light racing bike, just a good dependable one with an aluminium frame. Looking after it and getting to know how it works was totally new, but again, other cyclists have helped, so has the shop I bought it from.