
BURIED IRRIGATION SYSTEMS ARE ideal for lawns and good for some gardens. One big advantage to having a buried irrigation system in your lawn is its appearance — or lack of it. Since the system is installed below turf, it doesn’t create an ugly fixture on your lawn. In fact, it’s difficult to tell the system is there, unless it is in use.
Buried irrigation pipes in a garden are not as practical as they are in a yard, since gardens are often plowed and tilled over every year. A series of buried pipes can create an obstacle course. A buried system is fine for a flower garden, but may not be the best choice for irrigating a vegetable garden.
A buried sprinkler system is expensive, even if you install it yourself. There are many possibilities to consider when deciding on an in-ground sprinkler system.
If you already have shopped for an underground system, you know that the number of available choices is staggering. No wonder homeowners are often perplexed by lawn irrigation. This chapter is designed to clear up the confusion by giving an overview of the many types of in-ground systems.
Most of the irrigation systems discussed up to this point are easy to understand and don’t call for extensive controls and wiring, or a vast knowledge of mechanical skills. High-tech, underground systems are different.
There are so many different installation possibilities for commercially offered sprinkler systems that it is not practical to describe each one in great detail. Instead, I will touch on the basic points of designing, installing, and using underground sprinklers. This information, however, may not apply to the particular type of system you have or plan to install. Much of the information is generic enough to be used with various types of systems, but in some cases, you may find discrepancies between these instructions and those of the manufacturer of your equipment. Follow the manufacturer’s instructions.
The design and installation of an underground piping system for use with sprinklers can be quite complicated. For some people, even the pipe sizing is overwhelming, let alone the excavation of trenching to allow for installation, which poses its own set of problems. Unless you have experience, you might very well want to hire professionals to install this type of system. In this one book, I cannot give you complete information on how to build and install all of the various underground irrigation options available to you, or anticipate all the obstacles you may encounter. However, I can make you aware of the various components used in almost any underground sprinkler system and the role that each plays in the successful irrigation of your lawn or garden.
When dealing with an expensive, underground sprinkler system, design considerations take on new importance. Much of this information applies to other types of irrigation systems as well, but it is most critical with an underground sprinkler system. This information is quite technical, but following is a general explanation.

There are many basic concerns when designing any type of irrigation system, such as cost and availability of water. Another potential issue, depending upon topography and soil conditions, is runoff water. Finally, uniform irrigation and the control of diseases are of concern. For all of these possible problems, there is one root cause: the precipitation rate.
A precipitation rate measures the number of inches of rain falling on a given area in one hour. A high precipitation rate is one inch of water per hour, or more. An irrigation system is a substitute for rain. Therefore, you must deal with precipitation rates.
If the soil on your property does not accept water well, you must avoid a high precipitation rate. If you don’t, there will be excessive runoff and possible erosion. On the other hand, if your land soaks up water like a sponge, you must provide a greater precipitation rate to keep your grass and plants watered properly, which, of course, means you must know a little about the ground that you are watering.
Let’s assume that your lawn is level, so that runoff is not likely to be a problem. Further assume that the consistency of your soil is coarse. The rough texture of the soil will result in a fast absorption rate, meaning that you must produce a higher precipitation rate. Given these circumstances, what type of sprinkler system will work best?
When a high precipitation rate is needed, two sprinkler choices most often come to mind: fixed-spray sprinklers and bubblers. A third choice could be a microspray sprinkler. Other types are not as well suited to the needs of a high precipitation rate. By using one of these three sprinklers, you can operate the system for a shorter time than with another type of sprinkler while receiving good results. This is cost effective in that the system is not operating for extended periods of time.
Suppose that you need only a moderate precipitation rate for most of your irrigation season, but there are occasions when a higher rate is needed. A microspray sprinkler best serves these needs. A microspray head can operate in all three precipitation rates: low, medium, and high. A low rate is considered to be ½ inch of water per hour, and a medium rate runs between ½ and 1½ inch of water per hour.
If your watering needs will not exceed a medium precipitation rate, you have five basic choices available in sprinkler heads:
 Rotating-Stream Heads
 Stream-Spray Heads
 Impact-Rotor Heads
 Gear-Rotor Heads
 Pop-Up Heads
Sprinkler heads can be grouped into three rating categories: low precipitation, medium precipitation, and high precipitation.
Sprinkler heads with low precipitation rates are best suited for difficult topography, such as steep and hilly lawns. With a gradual dispersement of water, runoff will not be such a problem. This is also true if your soil does not perk well. Perking is the length of time it takes for soil to absorb water.
Medium precipitation rate sprinklers are often used under the same conditions as high precipitation rate sprinklers, but the medium-rate units are operated for longer periods and give an option of varying the water fall rate, eliminating the risk of erosion and runoff in borderline situations.
Sprinklers rated for high precipitation are used when runoff is not a problem. These heads can throw out a lot of water in a short time. As long as the irrigation area is relatively level and the soil accepts water generously, this type of head is ideal.
When designing a sprinkler system, there are two factors to consider about precipitation rates. One is the direct precipitation rate, which refers to the dispersement capability of a single sprinkler, and the other is system precipitation rate, which refers to the performance of all sprinkler heads within a given system, in other words, how much water is being applied to the total area being irrigated. A sprinkler system doesn’t use identical sprinkler heads in all locations. Installing different types of heads in different spots allows watering versatility.
In calculating a system precipitation rate, the result is most accurate when all system heads are producing similar rates of water. If extreme differences exist among the types of heads being used, the rate may be inaccurate, which can result in wet and dry spots.
Before you can design a system to maximum efficiency, you need to calculate the running time of the system, based on precipitation rates. If you are not familiar with precipitation rates, you cannot possibly gauge the running time needed for an irrigation system.
The United States Department of Agriculture and your county Cooperative Extension Service office can provide you with specific infiltration rates for various types of soil, such as in the chart next page. If you are unsure of what type of soil you have, take a sample of it to your local Extension Service office or lab.
The decision about where and how many sprinklers to install is best left to professionals. Even if you plan to install the system yourself, the cost of paying for competent design consultation up front can save you a lot of money in the long run. However, since I’m sure some people want to know how a system is laid out, I will share some of the formulas used by professionals.
There are two considerations in developing a plan for spacing sprinkler heads: how far apart to set up rows of sprinklers, and how often in each row a head should be installed. Some systems are laid out in a square-spacing pattern, and others incorporate a triangle-spacing pattern. The precipitation rate of a sprinkler system is inversely related to head and row spacing. Assuming that the sprinkler flow remains constant, increasing the head or row spacing decreases the precipitation rate, while reducing the head or row spacing increases the precipitation rate.
The following formulas may seem complicated. However, if you follow the instructions carefully, I think you will be able to do the math and compute your own sprinkler needs.
Single Sprinkler. To determine the precipitation rate for a single sprinkler, do the following calculations.
1. Multiply 96.25 times the gallons of water per minute for the sprinkler head. The 96.25 figure remains constant in this formula for converting gallons per minute (gpm) to inches per hour. For the gpm rate, look on your sprinkler head. This formula is based on a sprinkler head that gives a full circle of coverage. For example, if your sprinkler has a listed rating of 6 gpm, then 96.25 × 6 = 577.5 inches per hour.

Improving Your Lawn’s Water-Storing Ability
If you water your lawn two or three times a week just to keep it from turning brown, there are things you can do to turn a barely passable lawn into a lush one. The key is to improve your soil. By adding organic matter, you can improve your soil’s water-storing ability.
Organic matter such as peat moss helps sandy soils to absorb more water and clay soils to drain better and move the moisture down to the grass roots. Organic matter comes in many forms: manure, straw, grass clippings — anything that adds bulk carbon to the soil. But peat moss is easy to work with, doesn’t smell, and is easily available in hardware stores and supermarkets as well as lawn and garden centers.
Getting peat moss into your soil before you seed a new lawn is easy. Just spread it two inches deep on top of the soil and till it into the top six inches of soil. Getting peat moss into your soil when a lawn is already growing is a bit more difficult. Follow these steps for lawn renovation if your old lawn has a drinking problem and needs peat moss treatment.
1. Aerate the problem lawn by removing plugs of soil. You can either hire out the job to a professional or rent the right power tools to do it yourself. If you have an older lawn that needs thatching, now’s the time to do it.
2. Rake up the thatch and soil plugs left lying on the grass after the above treatment.
3. Drag a bale of peat moss to the middle of the lawn. Cut it open and shovel out the contents, leaving little piles all over the lawn.
4. You may need to spray the lawn and peat moss with a fine mist of water to keep the piles from blowing away while you work.
5. Using the widest rake you can find, level the piles so that the entire lawn gets a half-inch top dressing of peat moss. Try to work the peat moss down into the holds left by the aerating machine.
6. If water tends to sit on top of your soil, add sand mixed half-and-half with the peat moss.
7. If your soil is sandy and water runs right through it, mix packaged, weed-free steer manure with the peat moss.
You can repeat this treatment every spring until you have worked a large amount of peat moss into the soil.
Excepted from Tips for Carefree Landscapes by Marianne Binetti (Garden Way Publishing, 1990).
2. Multiply in feet the distance between the sprinkler heads in each row by the distance between the rows. For example, if there are 10 feet between each row of sprinkler heads, and the sprinkler heads are spaced 5 feet apart within each row, then 10′ × 5′ = 50′.
3. Divide the first number, 577.5, by the second number, 50, to get the precipitation rate per hour, 11.55 inches. In this example, obviously, the heads and rows are too close together. This much water would result in excessive runoff and possible erosion.
Since not all sprinklers are designed to give a full circle of coverage, there is another formula for figuring the precipitation rate in such cases.
1. Multiply the constant number 34,650 by the gpm rating for your sprinkler head. For example, if the gpm is 6, 34,650 × 6 = 207,900.
2. For the second step, you must know the arc of coverage provided by your sprinkler head. Multiply the arc times the head spacing times the row spacing. Assume the arc coverage is 180°, the space between sprinkler heads is 5 feet, and the space between rows is 10 feet. Then, 180 × 5 × 10 = 9000.
3. Divide the first number by the second number: 207,900 ÷ 9000 = 23.10. What would happen if we decided the arc of the sprinkler is a full 360 degrees? The first number would be the same, 207,900. The second number would be 360 × 5 × 10 = 18,000, and 207,900 ÷ 18000 is 11.55, the same answer we arrived at in the example on page 95.
As another example, consider a full-circle sprinkler that delivers 5 gpm. With sprinkler heads spaced 20 feet apart, and rows 20 feet apart, what will the precipitation rate be? To find out, multiply the constant, 34,650, times the gpm rating, 5. The answer is 173,250. The arc (360 degrees) times the head spacing (20′) times the row spacing (20′) = 144,000; 173,250 ÷ 14,400, we come up with a precipitation rate of 1.20 inches per hour.
After figuring the rates for individual sprinklers, you can do a calculation for the entire area to be irrigated. This is necessary if you will be using sprinkler heads that do not maintain a consistent arc, flow rate, or spacing, which is not uncommon. Often different types and head style are used in a single system.
Sprinkler System. The precipitation rate for a complete system is determined by multiplying the constant number 96.25 by the total gpm of the system. Divide this number by the total number of square feet being irrigated to arrive at the precipitation rate.
For example, say that you have various types of sprinkler heads running at different gpm ratings. The total of all these gpm ratings added together is 46. The first step is: 96.25 × 46 = 4427.5. The surface area being irrigated measures 35 feet by 50 feet. To get the square footage, multiply the width by the depth: 35′ × 50′ = 1750′; 4427.5 ÷ 1750 = a precipitation rate of 2.53.
As you know, very few conditions will tolerate a precipitation rate in excess of 2 inches per hour, so the design should be altered to lower the precipitation rate. This can be done by using sprinklers with lower gpm ratings, or by eliminating some of the sprinklers. Keep in mind, however, that the precipitation rate does not reflect the uniformity with which water is delivered. To avoid dry or wet spots, you must keep the overall coverage from all sprinklers in mind.
When designing a sprinkler system, it is very important to ensure balanced water coverage. If the sprinkler heads are not matched and installed properly, the system will produce both wet and dry spots, neither of which is desirable. If a system is not balanced and dry spots occur, people often extend the running time of their sprinklers to compensate for the dry area. This results in applying too much water to most of the irrigation site in an attempt to save a small section from dying out. It is very important to consider even distribution of water when planning a system.
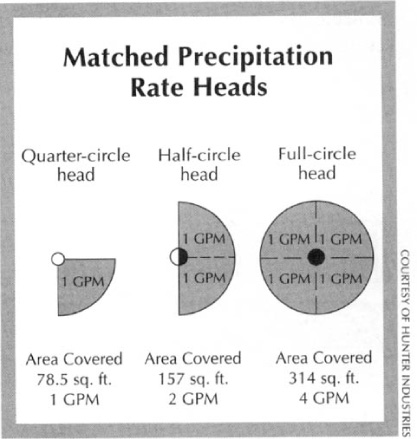
By matching the precipitation rates of all sprinklers used in a system, you can avoid hot spots. Matching precipitation rates means checking to see that all sprinklers in the system have the ability to cover an area with a flow rate equal to other sprinklers installed in the system. For example, a sprinkler that covers a 180-degree arc might be running at 2 gpm. If a full-circle sprinkler were to be used in conjunction with the half-circle sprinkler, the flow rate for the full-circle unit would have to be 4 gpm. This is a simple rule of thumb: If the arc of coverage doubles, so must the flow rate.
For example, assume you will be installing three types of sprinkler heads in your system. One type covers an arc of 90 degrees, one spans 180 degrees, and one gives full-circle coverage. To install this type of system properly, you would provide a flow rate of 1 gpm to the 90-degree heads. The 180-degree heads would need a flow rate of 2 gpm, and the full-circle heads would need 4 gpm. Installed this way, you would have a matched system in terms of precipitation rates.
What would happen if you operated the entire system described above at a uniform flow rate of 4 gpm? Well, let’s see.
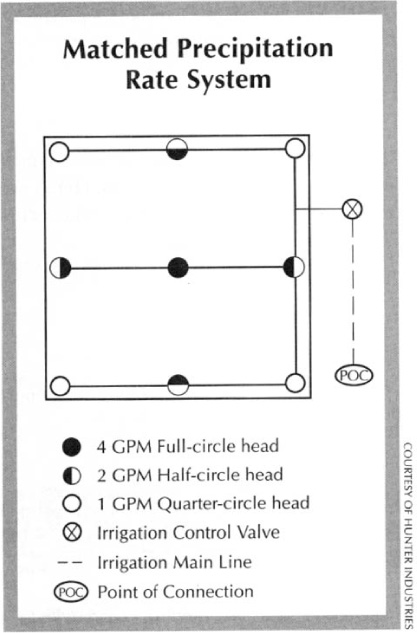
The 90-degree heads will be covering their arcs with a full 4 gpm. The 180-degree heads would produce a coverage with a rate of 2 gpm, half that of the 90-degree heads. Trouble is already starting. The area watered by the 90-degree heads is going to receive twice as much water as that watered by the half-circle heads. Add the full-circle heads, which are watering at a rate of 1 gpm, and you’ve got wet spots and dry spots.
There are only two good ways to avoid this problem. The first is to use a matched system, as we describe earlier. The second is to use controls and valves to adjust the running time on the various sprinklers. For example, run the half-circle sprinklers twice as long as the 90-degree sprinklers, and full-circle sprinklers one-quarter the amount of time allowed for the 90-degree heads. All in all, using a matched system is the best way to avoid this type of problem.
As I’m sure you’ve started to see, designing an irrigation system can be complicated. For a first-time designer, the task can be intimidating. This is why I recommend talking with local professionals in the design of your system.
Once you have determined the precipitation rates and arcs of coverage needed to adequately water your area, draw a layout plan on graph paper detailing the exact placement of various types of sprinkler heads, as shown.
A wide array of sprinkler heads is available, ranging from light-duty to industrial use. Since this book focuses on residential lawns and gardens, I will not bother with the commercial-grade heads, but will explore several types of sprinklers suited to residential needs.
In your search for the perfect sprinklers, you’re going to have to thumb through a lot of brochures, just to see the many possibilities available. As I write, I have brochures from several manufacturers at my side and I know sprinkler systems, but even so, it’s hard to pick what’s best from so many choices. Here’s my summary of some of the features and benefits of various available models.
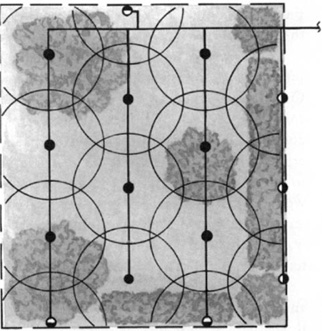
Make a layout plan for placement of sprinkler heads before you begin installing the system. This should show the exact location of various types of heads to meet the watering needs of your particular landscape.

In designing an underground sprinkler system, you will find a wide selection of sprinkler head styles to choose from, depending on your budget and specific needs.
One of the more attractive gear-driven sprinkler heads for residential and light commercial use is available in three models: shrub, 4-inch pop-up, and 12-inch pop-up. The 12-inch pop-up can rise out of the ground a full foot and spray water over low-growing plants to reach taller plants and sloped areas. When the irrigation cycle is complete, the whole thing retracts back into the ground. This is an unusual feature, and one that can come in handy for many applications.
The 12-inch pop-up head can discharge as little as ½ gpm or as much as 14.4 gpm. It can work with a feed pressure range of 30 to 70 psi, well within the range of any household water supply. It connects to a ¾-inch male adapter, which keeps pipe costs down. There is a rubber cover that protects the sprinkler, and the arc of spray is adjustable from 40 degrees up to 360 degrees. There is a filter to catch debris in the water before it harms the mechanisms of the sprinkler. Another feature is an optional drain check valve, which conserves water by keeping it in the system at the end of an irrigation cycle.
This pop-up head has a versatile nozzle selection, with 12 different, interchangeable nozzles. With this selection of nozzles, it is easier to maintain uniform coverage and avoid dry spots. If you don’t want the selection of 12 standard nozzles, you can opt for a unit with 7 low-angle nozzles.
Another available gear-driven sprinkler head is available in four models: shrub, 4-inch pop-up, 6-inch pop-up, and 12-inch pop-up. This head attaches to ½-inch pipe and will run on pressure as low as 25 psi. The arc is adjustable from 40 to 360 degrees, and the nozzles are color coded for easy identification. A two-year warranty is standard issue on this type of head.
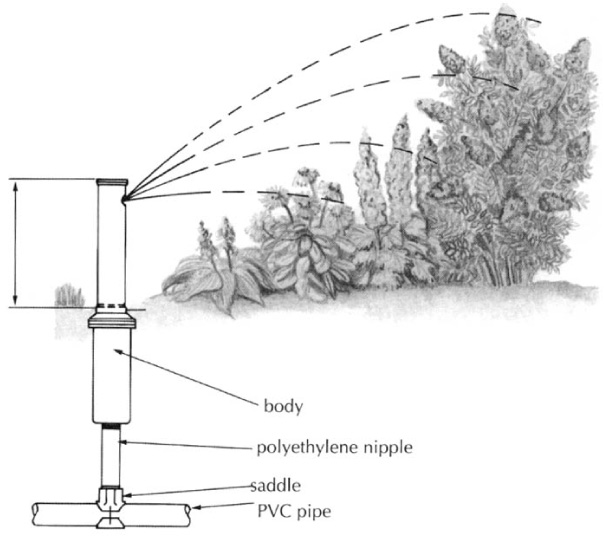
A 12-inch pop-up head sprays both the low plants in the foreground and the higher plants beyond. Once the watering is finished, the head retracts into the body, even with the ground.
Some lawns and gardens are odd shaped, which can make it difficult to get uniform water coverage from a sprinkler system. What is an odd-shaped lot? It may be one shaped like a triangle. This type of shape requires the use of various types of sprinkler heads to cover all of the turf efficiently. Another example of an odd-shaped lot could be one with a steep slope to it. The coverage angle of sprinkler heads varies, and this allows you to customize a design that will work with any type of topography.
There is a sprinkler head available that allows for arc control from 1 degree to 335 degrees. With this adjustment range, you can meet the water needs of any part of an odd-shaped plot. This particular sprinkler delivers anywhere from 0.2 to 5.3 gpm, connects to ½-inch pipe, and runs on water at pressure ratings from 20 to 40 psi.
A bubbler head can provide long, deep-soaking coverage in small areas. It is ideal for planters and tree wells when proper drainage is available. Some models offer a pressure-compensating device that allows a constant rate of flow from the bubbler even when the intake pressure varies. The operating range of delivery for these bubblers runs from 0.25 gpm to 1.5 gpm, and they run at intake pressures of 15 to 90 psi.
As you begin to shop for the sprinkler system, you’ll quickly become aware of the great diversity of sprinkler heads available. There are so many possibilities that it is not feasible to cover them all in this book. I recommend checking out each manufacturer’s line of products, comparing them to each other, and becoming accustomed to the phrases and terms being used.
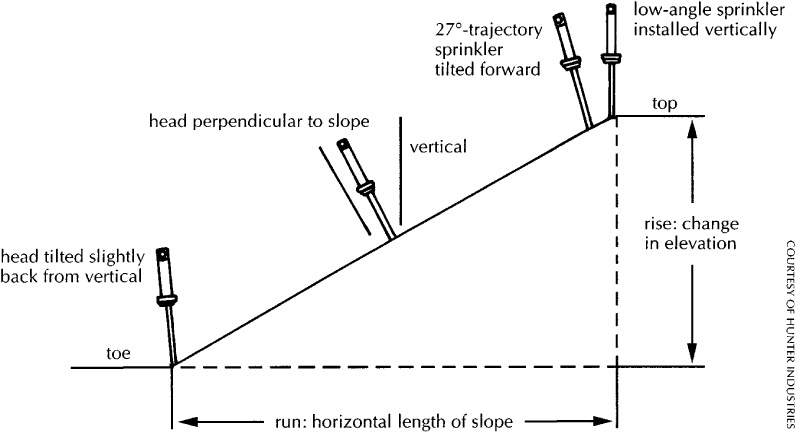
Sprinkler heads and angles can be customized to meet the watering needs of a sloped or odd-shaped lot. Here, the heads have been placed at angles to maximize the efficiency of each head.
Controls and valves are key elements in a buried irrigation system. If these devices fail, so will your irrigation equipment. Just as there is plenty to choose from in the way of heads, so is there a broad selection of controls and valves available. Again, this is an area where I recommend shopping around. The controls and valves are the heart and lungs of your system, so don’t pinch pennies too tightly when making a buying decision.
The actual installation of a commercially purchased buried irrigation system may be beyond your capabilities. This is not to say that you can’t do portions of the work, but parts of the job get quite technical. For example, you might feel perfectly comfortable with the plumbing phase of the job, but not able to handle the electrical side of the work. While it is possible for homeowners to install their own underground irrigation systems, it is often wiser to retain professional help, at least for certain parts of the work.
All in all, installing an underground irrigation system is not difficult. The hardest part is designing an effective system, and the wiring can be tricky. If you choose to hire a contractor to do the job for you, this chapter will help you to supervise the work in a more meaningful way. If you plan to do the job yourselves, you now have enough information to get well on your way. It will, however, probably be helpful for you to talk with local professionals and suppliers of sprinkler systems. These experts can assist you in designing your system and picking your equipment.
Once you have a drawing of where you will place your sprinklers, you are ready to decide on what type of pipe to use. There are three common choices: PVC, polyethylene (PE), and polybutylene (PB). I have discussed the qualities of these pipes in Chapter 6. My favorite is polybutylene. However, there are some distinct advantages to each type of pipe when used in underground applications, as I’ll review.
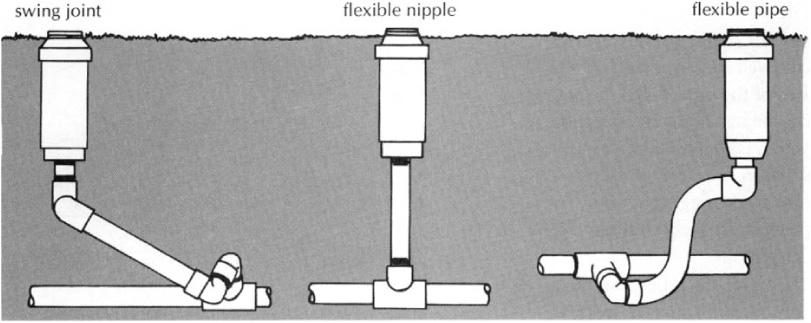
Three types of sprinkler head installation
Unless you bury your pipe below the frost line, you should drain all water from it before freezing temperatures hit. If the pipe is installed with a slight grade on it and you install drain valves, this can be done by gravity. PVC and CPVC pipes are rigid. If you want a system that can be drained by gravity when the watering season is over, rigid pipe is best. Flexible piping, such as PB and PE piping, will develop bellies and pockets of water that won’t be able to drain naturally.
However, movement in the ground can cause even rigid pipe to move, creating level or low spots where water will not drain properly. To be safe, the best way to evacuate a piping system is by applying air pressure. With drain valves open and an air compressor connected to the system, it is possible to blow water out of the pipes. This is a much more dependable way of clearing the pipes of water.
While PVC pipe is easier to install on a grade than is flexible pipe, it is not as durable when frozen. If a section of PVC pipe is holding frozen water, it is likely that either the pipe will split or the fittings will swell and be pushed off the ends of the pipe. Since the reason for installing an irrigation system is to maintain a beautiful lawn, you certainly don’t want to be digging it up every spring to fix leaks in the sprinkler piping.
PE and PB pipes are much more likely to survive freezing than is PVC pipe. Given equal circumstances, PE and PB pipes will expand without splitting when frozen. This is not to say that it is impossible for these pipes to split, but generally they won’t. However, even if the pipe doesn’t burst, constant freezing and thawing can weaken the pipe and the joints to a point where failure will occur. PB pipe installed with crimp rings and barbed fittings is the most resistant to damage from freezing. Depending on where you live, freeze-ups may not be of much concern. But, if you live in a cold climate, you should install drain valves and blow out the system with air each year, before frost sets in.
I find PB pipe to be most user-friendly. PVC is certainly not difficult to cut or glue together, but it is temperamental. If the fitting or pipe being glued is the least bit dirty, the joint may be weak or contain a void. The joints also require considerable curing time. I have glued joints and left them for several minutes and still have been able to twist them and pull them apart. If it takes this long for the glue to set when undisturbed, consider what could happen as you install sections of piping along your trench. While working on the fittings for one sprinkler head, your actions may be weakening the joint on the last station you piped. Installing all of your piping only to find more water spraying out of your piping than your sprinkler heads is disheartening.
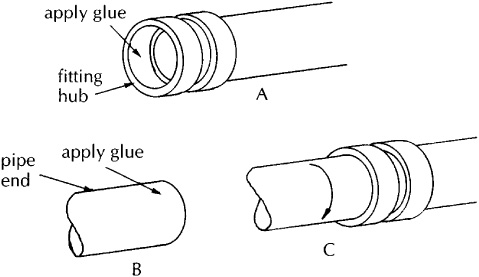
To join PVC pipe, apply glue to both the fitting hub (A) and the pipe end (B), insert pipe into fitting, and twist (C).
To join PVC pipe, make exact, square cuts. If the end of the pipe is cut on an angle, there will not be a full circle of pipe in the hub of the fitting, which weakens the joint. Next, always apply a cleaner/primer to both the end of the pipe and the fitting hub prior to gluing the joint. Be certain all areas to be glued are clean and dry. If the end of the pipe is wet, the glue will not set properly. Apply the glue liberally. Insert the pipe into the fitting and twist it. Rotating the pipe in the fitting evenly distributes the glue to all areas.
Some plumbers carry safety precautions one step further by wiping glue around the outside of the fitting after a joint has been made. This is somewhat effective, but it can also cause trouble because glue applied around the outside of the fitting does not create a strong seal. It may be enough to hold pressure during a test and even during some period of use, but if the primary seal in the joint is not good, the outer seal will blow out eventually. However, if you’re going to have a leak, it is best to find it before you conceal the piping, so you don’t have to use the wiping process.
PVC becomes very brittle in cold temperatures. Dropping the pipe on a hard surface stepping on it, or hitting it with rocks as a ditch is backfilled can crack it. You probably won’t be able to see the crack, but it will leak. Treat your PVC gently under all conditions, and be especially careful if you are working with it in cold temperatures.
PE pipe is joined with barbed insert fittings and hose clamps. The biggest challenge in working with PE pipe is to keep it from moving. The pipe comes in a coil, and it takes some effort to control it. I recommend unrolling the coil and stretching the pipe out to relieve any tension, being careful not to kink the pipe. You cannot make sharp turns and bends with it or it will kink quickly. If the pipe kinks, cut out the kink and install a coupling. Even though a kink can be worked out of the pipe, the wall of the pipe is weakened in that spot. Avoid taking chances on developing a leak by installing an inexpensive coupling and a few hose clamps.
Joints. PE pipe is easy to put together. Cut the pipe and remove any burrs around the end of it. Next, slide one or two hose clamps over the end of the pipe. One is all that is required, but I always double-clamp the joint to add a little extra insurance against future leaks.
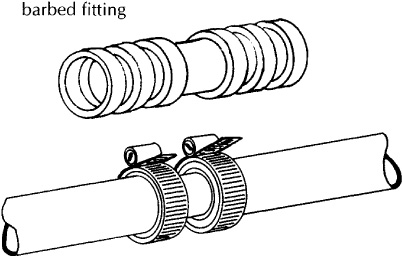
To join PE pipe, slide pipe ends over barbed fitting and attach hose clamp around each end.
Insert fitting. The next step is putting the insert fitting in place. In most cases, this is as simple as pushing the end of the fitting into the opening of the pipe. If the pipe is cold, you may run into two problems. First, the fitting may not go in easily, and, second, the clamps may not tighten up the way they should. These problems are easily solved by warming the end of the pipe with a handheld torch, heat gun, or hair dryer. Be careful not to overheat the pipe, and don’t hold too much heat in one spot for too long or the pipe may melt or burn. As the pipe warms, it becomes softer and will accept the fitting more readily. Hose clamps will compress warm pipe much better than cold pipe. However, since you will probably be working on this project in warm weather, you shouldn’t have to heat your pipe.
The cheapest fittings you can use with PE pipe are made of nylon, but I recommend using brass fittings. Either type will work well under average conditions. However, if the fittings become stressed, either from movements in the earth, such as frost heaves, or from rough handling during installation, nylon fittings may break. Also, you will be screwing sprinkler heads onto the threads of some of these insert fittings. One wrong turn on a nylon fitting can result in a crossthreaded fitting, requiring a replacement fitting. A metal insert fitting will not be nearly as susceptible to damaged threads.
Clamps. When you tighten the nose clamps, make sure they are positioned over the pipe in direct association with the ridges on the insert fitting. If you use double clamps, as I do, put one near the end of the pipe and the second one about ½ inch below the first one. Be careful as you tighten the clamps — I’ve seen many plumbers stab themselves with screwdrivers that slipped out of the groove.
I use a torque wrench to tighten hose clamps. It has a T handle and a little hub on the end that fits over the top of the screws, and works in a way similar to a rachet. This tool is faster and safer than a screwdriver for tightening hose clamps.
If you choose to work with my personal favorite, PB pipe, you are going to need a crimping tool. You can rent a crimping tool from a local tool rental store. You may also want to rent a special cutter that will make cleaner cuts and require less effort than a hacksaw.
PB pipe can be purchased in straight lengths or in long coils. I usually buy it in coils, but you may find the straight lengths a little easier to control. If you’re working with a coil, unroll it and work any tension out until it lays flat on the ground.
Installing PB pipe is similar, in principal, to installing PE pipe.
1. Cut the pipe, slide one crimp ring over the end of the pipe (you only need one because they hold very well), and insert a copper barbed fitting.
2. Slide the crimp ring up the pipe until it is positioned over the ridges in the fitting.
3. Place the jaws of the crimping tool around the crimp ring, making sure the ring is centered in the jaws. If the crimp is made off-center, the joint will not be as sound.
4. Bring the handles of the crimping tool together until they stop and the crimp as been made. If you want to check to see that the crimping tool is working properly, you will need a go-no-go gauge, which is a simple little piece of metal that measures the crimp ring. If the ring is compressed properly, the gauge will fit over it. When a crimping tool is out of adjustment, the gauge will not fit over the crimped ring. The crimping tool rental agency should be able to provide you with a go-no-go gauge.
Digging trenches. Installing pipe requires trenches. These can be dug by hand or with a rented walk-behind trencher. I recommend the walk-behind trencher, especially if you need deep trenches that go below the frostline. Before you begin trenching, double-check your installation plan to make sure you will get the proper precipitation rate and coverage needed. You don’t want to dig up your yard only to discover that the trenches are not spaced properly.
Laying pipe. Once the trenches are open, you are ready to lay the pipe. Remove any sharp objects, such as rough rocks, from the trench beds. For a first-class job, dig the trenches a little deeper than needed and add a layer of sand in the bottom to cushion the pipe. This is not necessary, but it is desirable in rough ground.
As you install the pipe, make sure it is supported by a solid base along its entire length. This is especially important if you’re using PVC or PE pipe. An unsupported section of PVC can snap during backfilling, and PE pipe can crimp badly. PB pipe is not as sensitive to this type of a problem, but it too should be supported fully.
Installing an Underground Sprinkler System
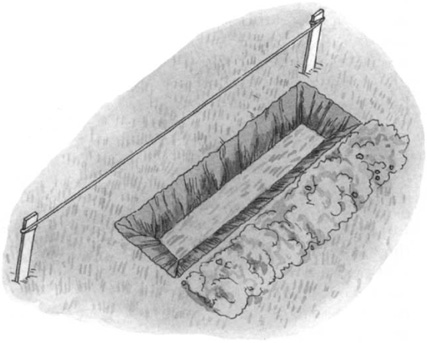
Step 1: Dig the trenches.

Step 2: Lay the pipes in the trenches.
Installing tee fittings. As you proceed with installation, you will be putting in tee fittings that will hold pipes and sprinkler heads, extending to a height determined by the type of sprinkler being installed. PE and PB pipe will not stand up straight by itself, but this is okay. Just let the risers lay over until the ditch is being backfilled, when you can support them with the fill. PVC will stand up on its own, but you must be careful not to hit it and break it off.
Installing valves. Join the pipe as described on pages 102-104. You will need some type of valve, depending on the layout and the type of system. For example, you may wish to install automatic drain valves at each sprinkler head. An automatic drain valve should be installed at least twelve inches back from the riser for the sprinkler head. The valve will be installed with a tee fitting that is turned so that the tee outlet is horizontal. You should put a crushed stone base under and around the drain valve to help the drainage.
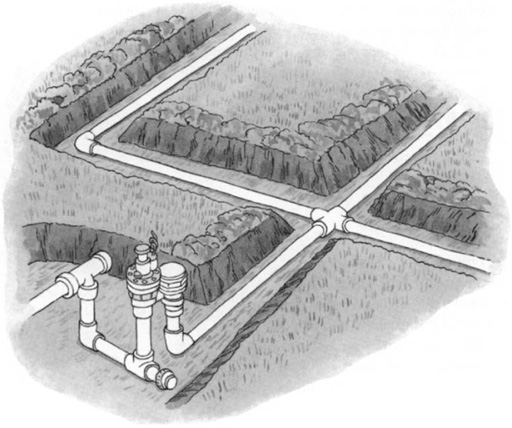
Step 3: Install the tee fittings.
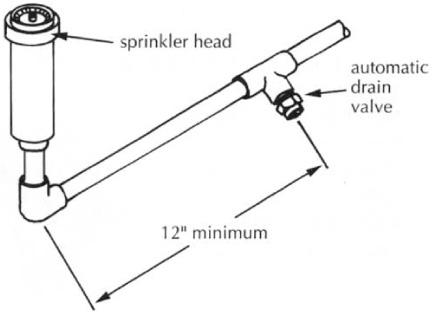
Step 4: Install drain valves.
Other types of valves you might use include check valves, electric valves (which are connected to the system controller), manual drain valves, and so on. Exact determinations will depend on the system design and the manufacturer’s recommendations.
After you have installed all of the pipe, test it for leaks. This can be done with water pressure or air pressure. All risers for sprinkler heads will terminate with threaded fittings, either male or female. You can screw caps or plugs, depending upon the types of threads available, on the riser stubs. This will seal the system and allow you to test it. The test should be done with a pressure that is at least equal to the maximum operating pressure. For instance, if your system will be working with a pressure of 40 psi, test at a minimum pressure of 40 psi. A higher test pressure will ensure that the system will stand up to its normal working pressure, but don’t get carried away. Never test at a pressure exceeding 100 psi.
If a leak is detected, don’t try to repair the joint. Cut it out and replace it. Once the pipe has been tested and found to be free of leaks, start the backfill process. Cover the pipe evenly and gently. Don’t allow rocks or other sharp objects to rest against the piping. Routine vibrations in the pipe can cause it to rub against rough objects around it, resulting in holes in the pipe. Take special care in working around your sprinkler head risers. After you have backfilled to a point a few inches below the tops of your risers, it is time to install the sprinkler heads.
The sprinkler heads used for residential purposes are usually equipped with inlet openings of either a ½-inch or ¾-inch diameter. These opening are normally provided with female threads. If you’re installing ¾-inch pipe and connecting to ½-inch heads, you will have to install reducing fittings on the riser before installing the heads. The reducer simply converts the ¾-inch pipe to a ¾-inch fitting. Depending upon your circumstances, short nipples (pieces of pipe threaded on both ends) may be needed between the reducer and the sprinkler head.
Whenever you are making a joint with threaded connections, you must use some type of thread sealant on the male threads. Apply it only to the male threads. It is generally recommended to use a tape-type thread sealant when installing sprinkler heads. Follow the suggestions provided by the manufacturer of your equipment. If you use tape, wrap it around the threads so that the tape gets tighter and the connection is made. Installing the tape backwards can result in it coming loose when the screw-connection is made. In other words, wrap the tape on the threads in a clockwise manner.
It is necessary to make screw-joints tight, but don’t overtighten them, especially when working with nylon or plastic fittings. Excessive force can damage the materials. Besides, you can always give the joint an extra turn if it leaks, and that’s a lot better than breaking a sprinkler head.
You will have to follow the recommendations of the product manufacturer in all aspects of your job. In general, most sprinkler heads are installed so that the housing/head is slightly above ground level, usually by about ¼ inch. Again, I must stress that you follow the manufacturer’s recommendations in all aspects of your installation.
The control panel for your system is its heart. It is also one aspect of the job that you might want to leave for professionals. If you are not familiar with wiring and controls, you shouldn’t attempt to install it. I don’t believe people who are not knowledgeable about electrical work should work with electricity. The risk is just too great.
I will not encourage or instruct you in how to work with electricity, nor can I tell you how your chosen control will be wired. However, I can give you an example of what you will be dealing with if you do your own wiring. Keep in mind, this is only an example and not all controllers are the same.
One of the controllers that I am most familiar with is a wall-mount model. It is fed, through conduit, with a 115-volt, 2-wire power feed, with a ground wire. The current is converted to 24-volt power before it leaves the controller, also through conduit.
As the wiring leaves the controller, there is one neutral wire. There is also a valve-control wire that powers the electric valve in the irrigation system. There are other optional wires available that can control pump circuits, other valves, and accessories. In basic terms, this is all there is to the wiring.
The principals of wiring a control panel are easy to understand, but the actual field work can be dangerous and confusing. If you are skilled enough to do your own wiring safely, you won’t have any trouble interpreting the wiring diagram for your controller. If you can’t read the wiring diagram, you don’t know enough to do this part of the job safely.
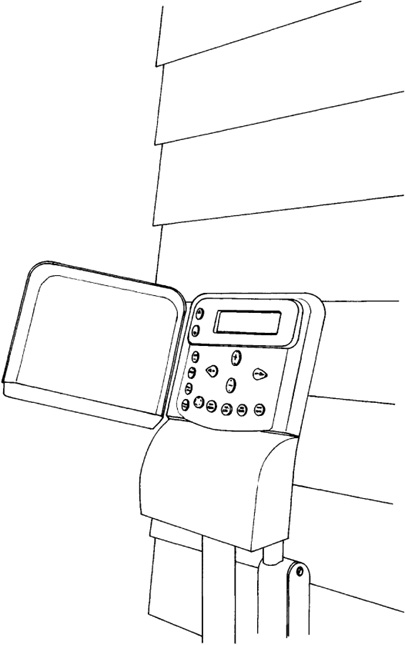
A wall-mounted control panel provides a central place for programming the operation of your entire irrigation system.
There are numerous accessories available for underground and automatic sprinkler systems. There are products designed to make installation easier, such as special wrenches, joints, riser service tools, and turf plug cutters, and there are devices that give you more control over the system, such as customized gauges. Components can also be added to your system that will enable it to sense rainfall and react accordingly. Once you have decided on a manufacturer, you can check their brochures to see exactly what accessories are available for the system you have chosen.
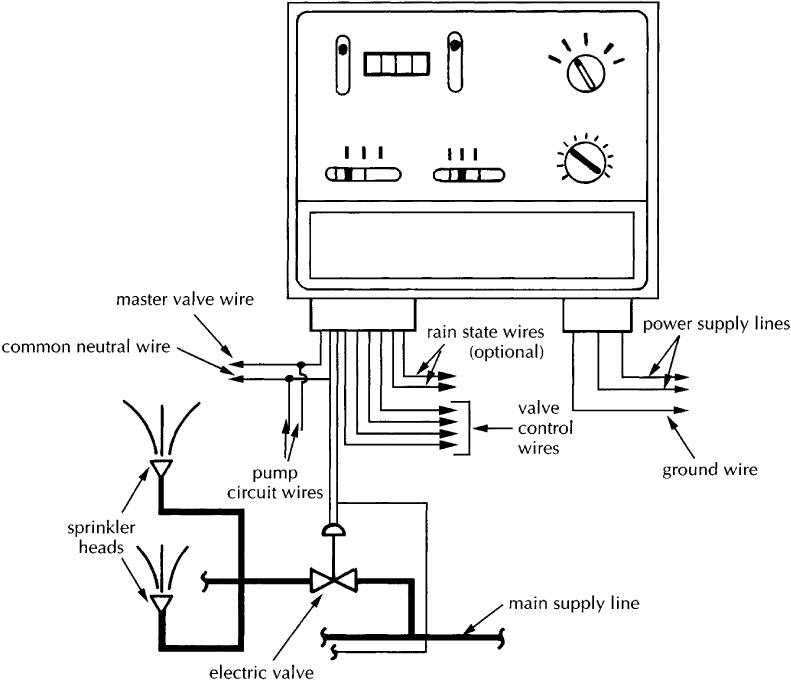
This is a typical wiring diagram for a sprinkler-system control panel. If you can’t read the diagram, you should hire someone else to do this part of the installation.