
THE GREAT THINGS ABOUT GRAVITY distribution in an irrigation system are its simplicity and its low operating cost. There is no need for either electricity or a pump. Not all irrigation situations can be handled by a gravity system, but many small gardens can be watered easily without the use of expensive equipment and electricity.
In the context of this chapter, gravity distribution applies to any way of getting irrigation water into the soil of a garden or lawn without the use of a pump. Some of the examples I mention occasionally require a pump, but the day-to-day irrigation work is done with the use of gravity flow. If you can use one of these systems, you can save considerable energy costs.
To start, assume that you live in a rural location and enjoy planting a vegetable garden each year. The garden plot measures roughly 30 feet × 40 feet. This is not a huge garden, but it is large enough to make watering a bit of a chore. You want to find a way to reduce your watering responsibilities and the time spent tending to them.
Your garden is on fairly flat ground, and there are no natural water sources close by. You receive your drinking water from a shallow well, but you don’t feel the quantity of water is adequate to use for irrigating your crops. How are you going to design an inexpensive watering system?
The first problem to solve is to find a source of water. You don’t want to go to the expense of drilling a well and installing a pump, so you must look for some other alternative. After weighing all of your options, you decide to buy an aboveground swimming pool to use as a cistern. The pool will be placed near the garden and filled periodically with water from your well. The cistern will catch rainwater and store it. By adding to the natural water supply in the pool on a gradual basis, you can maintain a satisfactory water level without putting a strain on your well.
Now that you have a source of water, you have to decide how to distribute it throughout your garden. There are various ways to go about the distribution.
A slotted-pipe system is an inexpensive way to distribute water from your cistern to the garden. The only requirement is to have a tap or drain near the bottom of the swimming pool. Since the pool and the garden are situated on land of approximately even topography, you will have to rely on the pressure of the water in the pool to push the liquid out and through the piping system. This is such a simple, yet effective, way to water a weekend vegetable garden.
Start by establishing your water source. In our example, the water source is a pool, with a drain valve installed near the bottom. The drain valve empties into the top of a solid pipe connected to a system of slotted pipes. When the drain valve is opened, water drains into the solid pipe and flows to the various branches of slotted pipe. The slotted pipe can be laid out on top of the ground or installed beneath the surface.
If the pipe is installed below grade, it should be surrounded by crushed stone and, ideally, be covered with a filter fabric to keep the system from clogging. As the slotted pipe accepts a flow of water from the cistern, it disperses the water, through the slots in the pipe, to the roots of thirsty plants. This is a low-impact, inexpensive gravity system to build.
Laying out the pipe. If you recall, the garden in our example is 30 feet × 40 feet. This gives you two primary ways to lay out your slotted pipe. Typically, the pipe will be laid to run in the same direction as the garden rows. The amount of slotted pipe needed will depend on how the pipe is routed and the amount of coverage you desire. It is best to run a length of pipe in each row of the garden, but it can be run with some other piping scheme, such as one pipe in every other row. This reduces the area covered by irrigation water, but it also reduces your costs. However, slotted pipe is not very expensive, so you won’t have to sell your house just to buy some extra pipe.
Installing the pipe. The type of slotted pipe used for this system is sold in large rolls and is the same type used as perimeter drains around houses. For that use, the solid portion of the pipe rests on the earth with the slots facing upward. Run-off water enters the slots and is then carried away from the foundation of the home.
When used for irrigation purposes, the pipe can be installed upside down with the solid part of the pipe on top and the slots on the bottom. Some people prefer to install the pipe with the slots facing upward and the far end of the pipe capped off. In this position, the pipe collects water until it is full, then any excess water entering the pipe is forced out through the slots on the top. Either method works.
Aboveground installation. If you install your slotted-pipe system on top of the ground, take some precautions against wind or other disturbances that may move it. One of the easiest ways to secure your pipe is to drive gutter spikes through the top of the pipe and into the ground. These spikes look like big nails and will pierce the plastic, slotted pipe with ease.

One design for an aboveground slotted-pipe system is to run a length of pipe along each row of the garden.
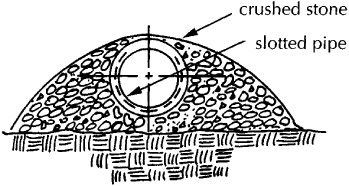
If aboveground slotted pipe is installed below grade, it should be surrounded with crushed stone and covered with a filter fabric to prevent clogging.
Other methods can be employed to hold the pipe in place, but I’ve found that gutter spikes work well. Any type of U-shaped bracket can be placed over the pipe to hold it in place. The key is to secure your drainage system so that it will not require your frequent attention.
Slotted pipe is generally thin-walled, making it susceptible to collapse if it is stepped on or run over with a piece of equipment. As long as you are aware of this, it should not pose any serious problems. The advantage of this lightweight pipe is that it is easy to move around. You can remove a section for tilling and replace it in a matter of minutes. It also is no problem to remove the entire piping system in preparation for winter.
Belowground installation. If you don’t like the idea of having black pipe laying around in your garden, you can install the pipe below grade. In doing this, it is important to mark all pipe locations. Unless you bury the pipe at a depth sufficient to protect it from a plow and tiller, you may find yourself repairing sections of it frequently.
To bury slotted pipe properly, first dig a trench to the desired depth. Fill the bottom of the trench with crushed stone. Lay piping in the trench and cover it with more crushed stone. The stone acts as a filter to reduce the likelihood of the slots in the pipe filling up with sediment. As added insurance, you can purchase pipe covered with factory-installed filter fabric.
So far, I’ve been talking about pipe that is corrugated, slotted, flexible, and sold in large rolls. This type works fine for garden irrigation, and is inexpensive. If, however, you prefer working with rigid pipe, you can use the type of slotted pipe that is used in drain fields for septic systems. You should still bed the pipe in stone and cover it with a layer of stone.
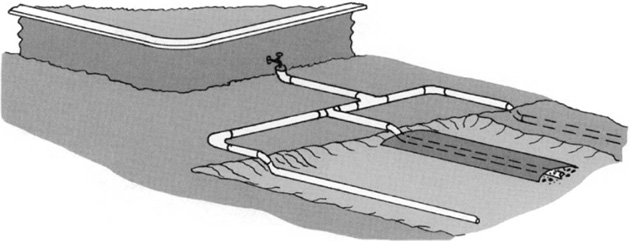
Slotted pipe can be buried below-ground to protect it from damage by a plow or tiller. To install, the pipe should be cushioned and covered with crushed stone, covered with filter fabric, and topped with garden soil.

Detail of buried slotted pipe.
Either type of slotted pipe is easy to install. You don’t have to be a master plumber to make the connections, and both types of pipe are light enough in weight to make them comfortable to work with alone. The only tool required is some type of saw to cut the pipe, such as a hacksaw, carpenter’s saw, or most any other type of saw.
Returning to our example, assume that you don’t want to install an aboveground cistern, and that your garden is less than 100 feet away from your home. You decide to construct a modest in-ground cistern by digging a hole lined with a waterproof tarp. Water will be distributed to your garden with a slotted-pipe, in-ground system. You only have two problems: How will you keep the cistern full? And, how will you get the water into the piping system?
Say that your house is equipped with gutters ending just above splash blocks. You also have a sump pump in your basement that pumps surface water out from under your basement floor during wet seasons. The discharge hose for the sump pump runs to a graveled dry well in your backyard.
With a little trenching, either by hand or with a walk-behind trencher, which can be rented by the day, you can connect your downspouts and sump pump discharge to an underground piping system that will convey the run-off water into the in-ground cistern. What a great way to manage water. Instead of wasting it, you’re storing it for dry spells.
To create this type of underground drainage system, you will need some solid pipe, some fittings, a saw, and a means for making a trench. The size of your drainage pipe should be no less than a 2-inch diameter; a 3-inch diameter is a much better choice. Schedule-40 plastic pipe, like plumbers use in homes, is ideal for this application. It is relatively inexpensive and easy to work with.
Start by putting adapters on the ends of your downspouts. Rubber couplings that slide over the end of a piece of drainage pipe and over the end of a gutter make this part of the job a breeze. If your gutter has an offset, like an elbow fitting, on the end, remove the fitting. You want your coupling to attach to a vertical section of the downspout.
Since you will be conveying excess water to the cistern with the use of gravity, the drainage pipe must be pitched slightly downhill. A minimum pitch of ⅛ inch per foot should be used. If your home sits high enough above your cistern to allow it, a ¼ inch per foot in pitch is preferable.
Assume that your home has two downspouts, one at each end of your house. Depending upon how the gutters were installed, there may be a downspout on each corner. In any event, start with the downspout farthest away from the cistern.
Use a wye fitting and an elbow fitting to connect the first downspout to the first section of underground drainage pipe. Run the underground piping along a path that will carry it near any additional downspouts. Connect every downspout to the underground piping in the same way. There are other fittings available with different angles of turns that can be used to ensure that everything comes together properly.
Once all the downspouts are connected to the underground drainage, begin to install drainage pipe leading to the cistern. Use another wye fitting, some reducing fittings, and a rubber coupling to connect the discharge hose of the sump pump to the drainage system. When you get the drainage piping to the cistern, allow it to protrude over the opening, so that your cistern will collect water every time it rains or your sump pump cuts on.
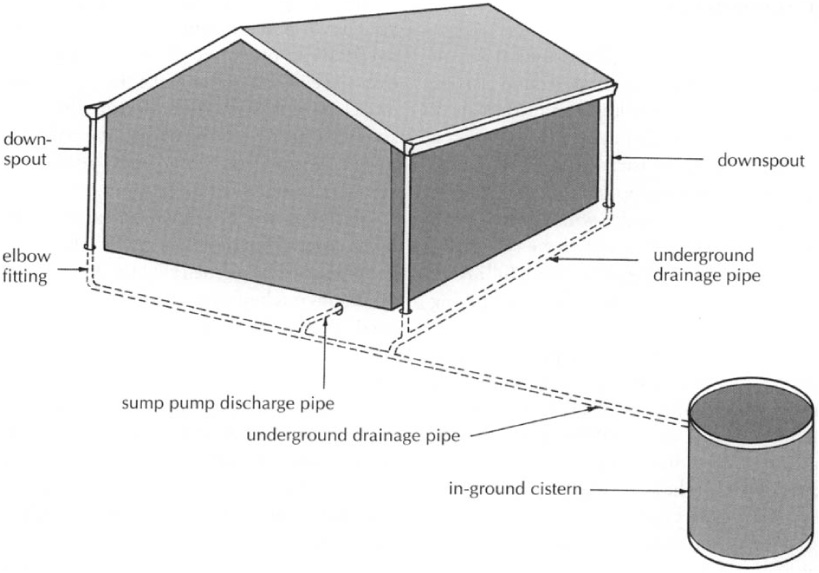
Rainfall run-off and sump pump discharge can be directed for irrigation purposes with an inexpensive system of underground drainage pipes running to a cistern. By pitching the drainage pipe slightly downhill, no power is needed to move the water into the cistern.
Now you have a water source, but how are you going to get the water into the garden? If your land is fairly level, you can’t use the same procedure discussed with the aboveground cistern. If you aren’t opposed to using electricity, you can set a submersible effluent pump in the cistern and run it off an extension cord from your home. This is a fast way to fill your irrigation pipes, and the amount of electricity used is minimal.
A hand-operated pump could be installed to allow water from the cistern to be pumped into the inlet pipe of the irrigation system. If you don’t mind spending a little time and effort in your watering program, you could dip 5-gallon buckets into the cistern and pour water into the distribution pipes. Of all the methods available, a submersible sump pump is probably the most feasible option.

Using Graywater for Home Landscape Irrigation
Residents of arid areas of the United States that suffer frequently from drought are looking to the water from showers, bathroom and kitchen sinks, bathtubs, dishwashers, and washing machines as sources for watering their home landscapes. While there are many legal restrictions on the use of this water, many of the Western states have started to ease these restrictions. Be sure to check your local ordinances before proceeding to use graywater.
Robert Kourik, author of Gray Water: Use in the Landscape (Santa Rosa, CA: Metamorphic Press), offers the following guidelines for the healthiest use of graywater.
The underground drainage system discussed above for a garden can be used for a lawn as well. If you have a sump pump or rain gutters, why not harness the water and put it to good use? The method used to divert rainwater into your lawn is a little different than the one described for a vegetable garden, but the principal is similar.
For a lawn, you’re not going to plow and till the soil, so the underground piping doesn’t have to be buried as deeply as for a garden. In fact, it only needs to be deep enough to allow grass to take root over it. Also, the distribution piping in a lawn can have a much smaller diameter, so as not to create a series of 4-inch-wide trenches.
Suppose your front lawn has a slight incline sloping down to the road in front of your home. Since this is the lawn that everyone sees, it is most important to keep it green. To accomplish this, install a loop irrigation system, which consists primarily of one large-diameter supply pipe (about 3 inches in diameter) and a network of numerous ¾-inch distribution pipes.
The design of this system is simple. The first step is to direct the gutter downspouts and the discharge hose of your sump pump connect to a common 3-inch, underground pipe, as described in the cistern example on page 59. Instead of running the end of your drainage pipe to a cistern, run it in front of your house. The drainage pipe should be in stalled parallel to the front of your home. Cap off the end of the pipe.

A simple lawn-watering system can be constructed with a network of underground perforated pipes that receive runoff from your house’s downspouts. The water is distributed solely by gravity.

There are three types of plastic water pipe you may use in your distribution system: polybutylene pipe (PB), polyethylene pipe (PE), and PVC pipe.
PB pipe is my first choice for almost all water requirements. Like PE pipe, PB pipe is sold in rolls, but can be purchased in rigid lengths. The pipe is gray and very durable. It is possible to kink PB pipe, but it takes a lot of effort to do so. Accidental kinking is uncommon. Like PE pipe, barbed insert fittings are used to make joints with PB pipe. Compression joints can be used, but insert fittings and crimp rings make a more secure connection. The result is an instant joint. I’ve used PB pipe for years in my contracting business, and to this day I’ve never had a leaky joint. I wholeheartedly recommend PB pipe.
PE pipe is a good choice for underground irrigation. This black pipe comes in a flexible roll, and joints are made with barbed insert fittings and hose clamps and require no curing time. This pipe is available in a number of sizes, but you will most likely use ¾ inch, 1 inch, and 1¼ inch.
There are a few drawbacks to working with PE pipe. If not handled properly, the pipe tends to kink up. Even if the kink is straightened out, the wall of the pipe is weakened by the stress. Sharp stones can cut through the pipe if they are allowed to rub against it, such as when a riding lawn mower is passing over the buried pipe. If pockets of water are left in the pipe during winter months, the piping may split from pressure created by ice within the pipe. All in all, PE pipe is a good choice, but there is a better one.
PVC pipe is the least suited to irrigation applications because it is rigid and becomes very brittle in cold weather. The process of making joints with PVC pipe is simple on the surface, but a bit more complicated in the field. The joints are solvent welded (glued) together. Both the ends of the pipe and the hubs of the fittings must be clean and dry, which can be a problem when installing the pipe below grade. A cleaner/primer must be applied to the pipe ends and the fitting hubs prior to making a joint.
Tee fittings. As you install the pipe in your front yard, install tee fittings at regular intervals, based on the width of your yard. The fittings should be installed so that the tee outlets are in a horizontal position, facing into the slope of your lawn. The most appropriate fittings have 3-inch openings on each end and a 1 ½-inch opening at the tee outlet. This 1½-inch opening will be reduced to a ¾-inch diameter with female adapters.
Female adapters are installed in the following manner: Place a glue-together joint between the tee outlet and the hub of the female adapter, providing you have a 1½-inch threaded opening and allowing the use of threaded reducing bushing to make the opening smaller. You will end up with an opening equipped with ¾-inch female threads. These outlets will accept male adapters.
Screw ¾-inch male adapters into the waiting outlets along the main underground drain. These create a proper connection point for whatever type of plastic water pipe you use.
Building the distribution network. Connect your first distribution pipe to a male adapter. Dig a trench so you can run the pipe underground through your lawn, perpendicular to your home. In this example, it should run down the incline and toward the road. Continue this process until you have as many feeder lines running through the lawn as you want. Cap off the end of each feeder line.
Perforate the pipe. The next step is to drill holes along the tops of the pipes. The bigger the holes, the better. If you are willing to take the time, drill holes in the top and both sides of the pipe.
Filling the trenches. After you have created your perforated pipe, backfill the narrow trenches with small, rounded stones, which will act as a filtering agent. Obviously, the stones need to be larger than the holes you have drilled in the pipes. Now you can backfill the trenches and replace the sod strips. Your system is installed and ready to work. Every time it rains, your lawn will get a nice even distribution of water.
There is an added bonus with this type of system. Not only will it water your lawn effortlessly, you can use the network of piping to distribute plant food or growth stimulators. Just loosen one of the rubber couplings from a downspout, pour in the plant food, and flush it out into the system with your garden hose. The result will be a healthier lawn.
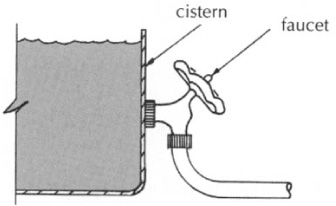
A trickle system (also called a drip system) can be an excellent way to meet irrigation needs. Sophisticated commercial trickle systems are expensive, but you can create your own homemade version inexpensively. Assume that your water source is a cistern located close to your garden, and equipped with a drain near the bottom fitted with standard hose threads, like those found on boiler drains and outside faucets.

Make the Most of the Rainfall in Your Garden
One simple way of maximizing the effect of each rainfall you receive is to dam the rows of your garden. This involves creating miniature dams at both ends of every row to trap rainwater as it falls. Depending upon the soil conditions, row dams can provide a few extra days of water to your crops. In terms of cost, all that is required is a small amount of work with a shovel.

Gardens on steep inclines will not enjoy the same benefits from row dams as gardens on level ground, since the natural slope of the land will force water to the low ends of the rows. There is, however, a way to beat this problem, and, again, the cost is negligible.
If you cut into the side of the hill where the garden will be planted, rows can be stair-stepped down the side of the hill. This might be done with a shovel and hoe, or a small bulldozer or backhoe, depending on the size of the garden and the consistency of the ground.
Once the garden rows have been stepped down the hill, looking like wide steps, they’re ready for planting. This design slows down running water from the top of the hill, reducing erosion and providing additional water to the rows. Also, since the rows now have a flat exposure to the sky, they will catch more rain as it falls. Terraced gardens are very effective in hilly terrain.
A trickle system begins with a connection such as a garden hose, attached to the drain of the cistern. You need a male connector for the opposite end of the hose, and a female connector on the end of your main trickle pipe. These adapters/connectors are sold in most hardware stores and other stores catering to lawn and garden enthusiasts. They typically come with a barbed insert on the end opposite the female connector. To install these, place a clamp over the end of a flexible pipe and push the barbed insert into the end of the pipe. Slide the clamp into place, so that it is resting over the barbed section, and tighten. Now you have your main trickle pipe adapter connected to a hose and mated to the cistern.
The type of pipe used in the trickle system is not critical, but some types are better than others. The piping doesn’t have to be large — an inside diameter of either ⅜ inch or ½ inch will do fine. My personal favorite is ½-inch polybutylene pipe (PB), which is easy to work with and will not damage easily. Polyethylene (PE) pipe is black and draws heat. If the pipe is laying on top of the ground during a hot day, it can become quite soft and stepping on the pipe or running over it with a wheelbarrow full of weeds can damage it. This won’t happen with PB pipe, which is tougher.

Compression fitting

Barbed fitting
Rigid pipe sections can be used in a trickle system, but I prefer coils of PB pipe. A 100-foot coil of PB pipe costs less than $25. Once the pipe is uncoiled and laid out straight, it is easy to manipulate. It can bend around turns, run over humps, and wind through a corn field in a serpentine method. Since PB pipe retains its shape so well, there is never a problem picking it up and relocating it. PE pipe can get so flimsy that rough handling can crimp it, and rigid pipe is difficult to move around in long sections. I believe PB pipe is the best material for the job.
How you install your trickle system will depend on the layout of your garden. Assume the crops are planted in rows that run away from the cistern. This is the easiest type of layout to work with; keep this in mind when positioning your cistern.
The main trickle pipe connected to the cistern should be one pipe size larger than the feeder pipes. For example, ½-inch feeder pipes require a main pipe with a diameter of ¾inch; ⅜-inch feeder pipes need a ½-inch main pipe. To work with PB pipe, you only need caps, several tee fittings, crimp rings, and a crimping tool. If you don’t want to go to the bother of renting a crimping tool, you can buy compression fittings to use with the PB pipe.

If you prefer to use commercially available drip irrigation equipment, you will find a wide choice of emitters, minisprays, and misters available. A drip or trickle system is especially useful where you have special plantings that are unevenly spaced or require deep or special watering.
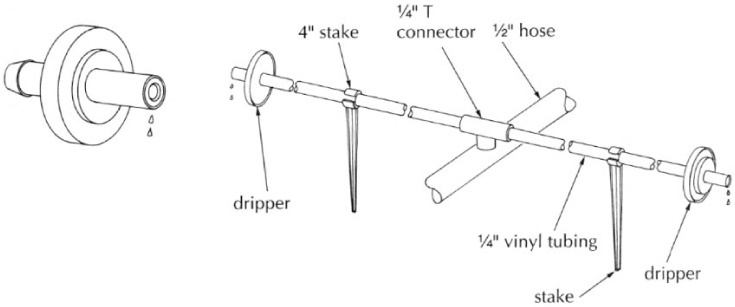
For watering individual plants, these all-purpose drippers (above) can be inserted directly into ½″ hose. You can also use ½ compression tees, elbows, or couplers as required to place several drippers over individual plants.
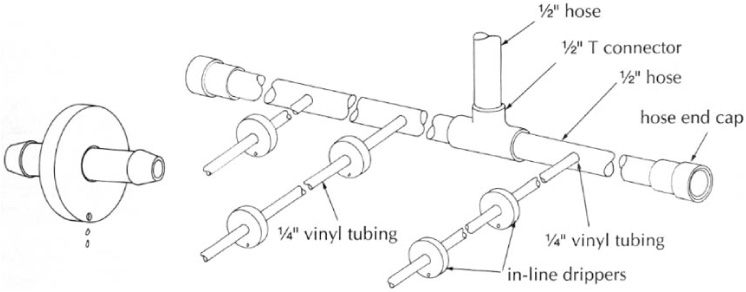
For watering multiple vegetable plants in rows (not more than 15′ long), small in-line drippers work well. These fit into ¼" vinyl tubing that runs directly from ½" hose.
While these fittings are not as dependable when the pipe is under considerable pressure, such as providing water in your home, they will work well with this low-pressure installation.
Compression fittings are easy to use, and the only tools needed to make the connections are two adjustable wrenches or a couple of pairs of pliers. To make a compression connection, first remove the compression nut, revealing a thin, round ferrule on the inside. Without a ferrule, a compression fitting will not work. Slide the compression nut over the end of a piece of pipe. Follow the nut with the ferrule. Push the end of the pipe into the compression fitting. When the pipe is into the fitting fully, slide the ferrule and nut up to the fitting. Turn the nut clockwise to tighten it. Make sure the pipe doesn’t slip out of the fitting while you are working. As the nut tightens, it compresses the ferrule, creating a watertight joint. There’s really nothing in this job to intimidate you.
Begin by installing a tee fitting with the hose from the cistern connected to the tee outlet and sections of your main trickle line (the largest one) connected to each end of the fitting. Your goal is to run the main trickle line perpendicular to the rows in your garden. With this first tee installed, you are ready to extend the sections of the main line.

You can make your own trickle (or drip) system with feeder pipes that run down every row of your garden.
Installing the main line. As you install the main line, think ahead. You need to install a tee in the main line to line up with each row in your garden. The tee fittings will be the same size on each end as the main pipe, with the tee outlet being sized to fit your feeder pipes. This installation can be buried, but an aboveground system is easy to move around and is not as prone to clogging. Once you have the main pipe running the width of your garden, cap off each end of it.
Connecting the feeder pipes. For the sake of convenience, say that your rows are fifty feet in length. Cutting a roll of PB pipe in half provides two fifty-foot lengths of pipe. You can cut PB pipe with most any type saw, but a fine-tooth hacksaw works very well. Special cutters are made for working with PB pipe, but they are expensive and not necessary.
Drilling holes. Cut lengths of pipe to run the length of your rows. Lay the pipe out and let it relax into a natural, straight shape. At some point, you have to drill holes in the feeder pipes. You can do this before or after they are connected, but you do have to do it. The size of the holes will vary with the size of the pipe, but they do not have to be large, as long as they have a diameter large enough to allow water to seep out.
Cap off pipe ends. Once you have connected the feeder pipes to the main trickle pipe, cap off the ends of the feeder pipes. With the flexibility and light weight of PB pipe, you can position your feeders close to your plants. If you need to weave your way around obstacles, the PB pipe is flexible enough to do so without using offset fittings. Now you are ready to water your garden.
When you open the boiler drain at the cistern, the distribution pipes will fill with water. As the pipes fill, water will begin to seep out of the trickle holes. Once you see how the water is flowing, you can begin to close the valve on the boiler drain until you achieve just the amount of flow you want. By having the water trickle out with a low flow rate, you give your plants the necessary water they can absorb without the waste of excess water running down the hill.
There may be some plants in your garden that require more water than others, but with the trickle system and a little advance planning, you can overcome this problem. When you plant your garden, plant the thirsty plants closest to the cistern. As you run the feeder pipes down the rows, you can install cut-off valves in the piping, which allows you to control the water flow, watering only the plants that need it. Not only does this maximize the growth potential of your plants, it conserves water. In fact, let’s look at this a little closer.
Assume that the first five rows of your garden are planted with corn. The last two rows of your garden are planted with watermelons. The middle rows are planted with tomatoes, squash, lettuce, and so forth. Let’s further assume that you want to provide more water for your watermelons than you do for your lettuce. By installing valves at each tee where the feeder pipes connect, you can cut off water flowing to any feeder pipe. If you choose to only water your melons, you can close off all the valves for every feeder pipe, except those serving the melons.
Maybe you will want to water in some alternating fashion. For example, you might water tomatoes on Monday, corn on Tuesday, and so on. This is easy. Just close the valves on feeder pipes that you don’t want in operation, and open the ones you do.
The trickle system we have just examined is very effective, and not particularly expensive. In our example we used a cistern as a water source, but you could just as easily connect the garden hose to an outside faucet on your home and do the watering with your household supply. One big advantage to a trickle system is that it doesn’t waste water like a sprinkler system. With the mobility of PB pipe, you can keep all the water coming out of your feeder pipes right where it belongs, next to the vegetables. It is also possible to introduce plant food into the trickle system and have it distributed to your crops with the water. For a garden of modest dimensions, this is one of the best systems I’ve ever used.
Irrigating with only the power of gravity is not always feasible. If you are unwilling, or unable, to have a cistern or an elevated water tank, gravity irrigation is pretty difficult. A great deal depends on the topography of your landscape. Naturally sloping lawns offer more opportunity to use a gravity system. Likewise, the elevation of your garden in relation to the surrounding land is a deciding factor. In general, the size of an area that can be watered by a gravity system is restricted. Unless your irrigation area happens to be below a large water source, like a pond, lake, or river, you will not be able to use huge amounts of water.
A sensible cistern will not hold enough water to irrigate a large garden through a whole summer. Unless you are willing, and able, to supplement the water caught by your cistern, it is highly unlikely that you will enjoy a large enough quantity of water to get through the summer. For this reason, and others, most irrigation systems rely on pressurized water systems, as discussed in Chapters 7-10.