 Underground systems work well
SURFACE AND OVERHEAD irrigation systems for lawns and gardens range from simple garden-hose sprinklers to elaborate piping systems. These irrigation methods typically depend on a pressurized water system for smooth operation. It is possible to design some systems to work on gravity distribution, but most require a higher degree of water pressure. The amount of pressure needed depends on the type of system. In general, normal household pressure will be more than adequate. The water pressure in most homes ranges from 40 pounds per square inch (psi) to 80 psi, with an average of 40 to 50 psi. Since so many of the systems discussed in this chapter depend heavily on water pressure, I’ll begin with that.
Water pressure is a critical factor in the successful operation of most irrigation systems. Some systems need strong pressure to spray water into the irrigation area. Other systems require low pressure, so as not to waste water. When installing an irrigation system, first consider your need or desire to control the water pressure.
How can you control water pressure? The answer depends on the type of water supply you are using. Managing the water pressure of a municipal water service is different from adjusting the pressure created with a pump system.
When water is run from a city water main to a home, the water pressure can be extremely high. If the street pressure is in excess of 80 psi, a pressure-reducing valve is required within the foundation of the home. There are several good reasons why the plumbing code restricts the maximum allowable water pressure in residences.
A strong water pressure can be detrimental to a plumbing system and dangerous to the users of the system. Say, for example, the water pressure in your home was unregulated and reached surge peaks of 125 psi. When you turn on the kitchen faucet to fill a glass with water, such a strong water force might knock the glass out of your hand and break it in the sink, causing shards of glass to fly about. This is not just an example I made up — I’ve worked on plumbing systems where this has happened.
When the household water pressure is extremely high (above 80 psi), the strain on pipe joints and faucets can be more than they can handle. A strong water hammer with heavy pressure can cause pipe joints to break loose, flooding a home. Extreme pressure can deteriorate faucets to a point where they drip. There are many good reasons for limiting household pressure to 80 psi.
In a residential application, a pressure-reducing valve is not very big. It is installed in the main cold water pipe close to where the incoming water service meets the main interior water pipe and serves all of the domestic plumbing.
By loosening a nut and turning a threaded control on the valve, a plumber can adjust the water pressure within certain ranges. For example, I could install a pressure-reducing valve on a water pipe that had an incoming pressure of 95 psi and set the outgoing pressure (the water being used in the home) at 70 psi. The adjustment range varies with individual reducing valves, but there is usually a range of 50 psi available.
If you have basic plumbing skills, a pressure-reducing valve is easy to install and adjust. You may find a need for installing one as you progress with your irrigation system. If you do, refer to Chapter 9 for complete details on the installation and adjustment procedures.
If you are using a pump to get water to your irrigation system, adjusting the water pressure will be done differently. There are many types of pumps used to move water, and not all are set up to allow for adjusting the output pressure. On an effluent (sump) pump, the pressure cannot be throttled. You can, however, inspect the pump prior to buying it to determine how many gallons of water it pumps per minute. All effluent pumps are rated with a gallons-per-minute (gpm) output.
Jet pumps, shallow-well pumps, and submersible pumps (for potable water) are all designed to work with pressure switches and pressure gauges that can be adjusted.
Pressure switches for well pumps are typically preset at the factory with a cut-in and cut-out pressure rating. For example, the switch will make the pump cut on if the pressure drops to 20 psi, and cut off if the operating pressure reaches 40 PSI. For more pressure, you can install a pressure switch that cuts on at 30 psi and off at 50 psi. It is also possible to make adjustments inside the pressure switch to alter the preset pressures. This process is discussed in detail in Chapter 10.
Whether you are using a well pump or water from a city supply, there are ways to control the water pressure available to an irrigation system. Of course, if you’re using a hose connected to an outside faucet, you can open and close the faucet until you achieve a pressure that works best with your sprinkler or other equipment.
Surface irrigation refers to equipment installed at ground level, such as a standard lawn sprinkler, a drip system, or a porous hose. Surface irrigation is probably the most popular system of irrigating, although it varies with regions of the country. One exception might be the irrigation of lawns in upscale neighborhoods, which are often watered with underground irrigation equipment and pop-up sprinkler heads. But in the fields of professional farmers, you’re likely to see examples of surface irrigation. Golf courses and athletic fields often are watered with surface-mounted equipment. Within the broad category of surface irrigation, there are quite a few options for equipment.
Overhead irrigation uses equipment that releases water from above ground level. These systems mimic natural rainfall. While many overhead irrigation systems might also be called surface irrigation equipment because the base of the equipment sits on the ground, the term “overhead irrigation” is used in this book to refer to water being dispersed from several feet above ground level.
An overhead irrigation system might consist of a tall pole equipped with perforated arms extending out over an area to water it. Or it could consist of a framework of posts, lattice, and a maze of overhead piping that drops water from above onto the plants.
Both surface and overhead irrigation systems have their place, but their use is not always equal in comparable situations. For example, take a front lawn. Would you want a tall, octopus-like sprinkler sitting in your front yard for most of the summer? Would you like to have row after row of overhead piping installed above your front yard? I assume your answer to both of these questions is “no.” I don’t blame you. On the other hand, would you object to a small, unobtrusive sprinkler being placed on your front lawn? Maybe, but probably not. Suppose I told you that there is a sprinkler that can move itself around your front lawn, providing good water coverage, even when you’re not home to attend to it, would you consider putting it in front of your house? A lot of people would.
Now, switch from your front lawn to your backyard vegetable garden. Do you have any problem having a series of pipes installed over your crops if the pipes will increase the yield of vegetables? I doubt it. Could you use a walking sprinkler in your garden? Of course not, because the plants would prohibit its motion.
When evaluating irrigation systems, consider how the systems will be used and their purpose. Overhead systems are rarely acceptable for use in watering lawns. Surface units don’t work well for watering a garden because the water isn’t high enough off the ground to reach all of the crops. While it’s not definitive that surface units only work for lawns and overhead systems only work for gardens, it does tend to be so.
Matching Irrigation Systems To Your Needs
For Lawns
 Underground systems work well
 Surface systems are simple, inexpensive, and effective
 Overhead systems and drip systems are not practical
For Vegetable Gardens
 Underground systems may interfere with plowing and tilling work
 Overhead systems are very good
 Drip systems ae extremely effective
 Porous hoses can be used, but may result in wasted water usage
For Flower Gardens
 Drip systems are great
 Porous hoses work very well
 Underground sprinklers work well, but are expensive
 Overhead systems detract from the beauty of the garden
For Individual Plants and Trees
 Drip systems are best for watering “scattered” plantings
When I think of gardens, I usually think of vegetable gardens, but flower gardens are extremely popular, although they don’t offer the same irrigation challenges as vegetable gardens. If you’re growing roses or low-to-the-ground flowers, you can use a surface irrigation system. A flower that stands a foot high has considerably different watering requirements than a corn stalk over six feet tall. Fruit trees require a far different approach to irrigation than a plot of blueberries. There are many different types of gardens, and each has individual irrigation needs. For this reason, I can’t lay out definitive guidelines to follow. You must assess the needs of each garden and lawn individually.
Mobility is one factor in considering an irrigation system. Do you want a system that can be put out in the morning and taken in by the afternoon, or do you want a system that is semipermanent in its placement? Few people will want a surface or overhead irrigation system for their lawn that is not easily removed. Gardeners may feel a bit differently. If you plant a garden in the same spot each year, there is probably no reason to be concerned about a semipermanent installation. As long as you can work your soil without interference from the irrigation system, there is no real need for removing it more than once a year, if that often. Lawns, however, are a different story.
Anyone who is interested in a no-hassle approach to lawn watering, without creating an eyesore, is almost sure to use an underground sprinkler system. I just can’t imagine having a lawn regularly cluttered with irrigation equipment. It’s one thing to have a hose and a sprinkler on the grass for an hour or so in the morning, but leaving the rig in place all summer is unthinkable.
Mobility refers to more than just the ability to move irrigation equipment out of view; it also refers to how much area can be irrigated with a particular system. For example, a common sprinkler and garden hose is a very mobile, versatile irrigation device. It can be moved around a lawn at will, allowing full coverage, and then can be set in the backyard garden after the lawn has been watered. In contrast, an overhead system for a garden is not mobile and is limited to watering only the surrounding area.
All surface irrigation systems offer mobility to some degree, but not fully. Big irrigation sprinklers involve quite a bit of work to relocate. Large overhead sprinklers that can be moved, generally have to be towed with a truck or a tractor. This is not the kind of equipment you move casually every few hours to extend your irrigation range, a fact to consider before purchase.
Except with simple irrigation methods, mobility is usually limited. Obviously, standing in your lawn with a spray nozzle on your garden hose does not present much of a mobility problem, and neither does an inexpensive lawn sprinkler. When you step up to the next level, to serious irrigation systems, mobility becomes more of a factor. Many systems are not intended for frequent movement. Some irrigation equipment is designed to stay in its assigned location for the entire season. Then there are units that can be rolled around with reasonable mobility, but not with enough ease to make the move enjoyable. Once you get beyond the needs of a watering can or garden hose, mobility becomes an issue to consider in selecting a system.
The physical appearance of an overhead irrigation system can be attractive or ugly, depending on how much time and money you are willing to invest. If you live in the country, like I do, the appearance of your irrigation system may have little meaning to you. On the other hand, if you live in a subdivision and don’t want your neighbors complaining about the looks of your irrigation system, you may have to spend considerable amounts of money to camouflage the piping.
Hiding the piping of an overhead irrigation system is not difficult, but it isn’t cheap either. If exposed piping is likely to create problems for you, it may be more logical to irrigate with some type of mobile surface equipment. Consider this before you buy anything.
I have developed a fairly simple method of concealing overhead piping. I designed this out of necessity, when living in an area with some overly curious neighbors who made negative comments regularly about activities in the neighborhood. Even growing a garden caused a stir. When I built an overhead irrigation system, one of these neighbors became quite upset by its appearance, and compared it to outdoor plumbing and primitive living conditions. There were no rules or laws stating that I couldn’t do what I had done, but the neighbor was persistent enough that I got tired of listening to him.
I thought about moving, just to get away from this outspoken neighbor, but moving was not a practical option. Instead, I came up with a way to conceal my overhead piping that was beautiful — it might even have made the cover of a gardening magazine!
Here’s what I did. I began by putting 4-inch × 4-inch pressure-treated wooden posts into the ground at each corner of the garden. The overhead piping was already secured to an overhead rack. I installed vertical posts for the piping inside the wooden posts so that all of the piping and the rack were contained. I then nailed pressure-treated lattice to the posts and rack, both above and below the piping. The only pipe left in plain view was the main feed pipe running up the side of one of the wooden posts. I secured this pipe tightly to the post.
Finally, I camouflaged the entire structure with morning glories, ivy, and other climbing and clinging plants. It made an outstanding trellis that covered my vegetable garden and concealed all of my irrigation piping. Oh, and my neighbor actually complimented me on how nice the project turned out! I moved about two years later.
Surface irrigation equipment is where most people begin their education in irrigation principals and practices. The first piece of equipment acquired is usually a basic garden-hose sprinkler, or perhaps it’s a perforated water hose. In either case, most people don’t start out with a high-tech watering system, because they don’t have the need. The basic equipment is often all that is needed to receive desired results.
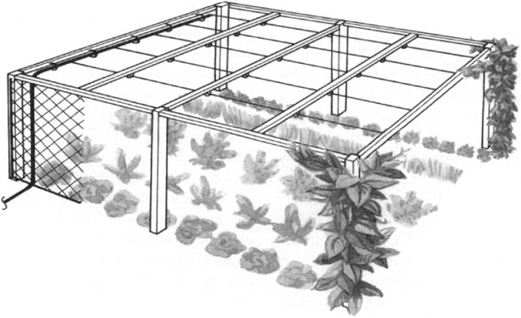
A wooden-frame overhead irrigation system doesn’t have to be an eyesore. Try camouflaging the frame by growing climbing vines and other clinging plants along the posts. Latticework can be added on the sides to complete the “trellis” look.
Low-cost lawn-watering devices are very common. They are, in fact, probably the most popular type of home irrigation equipment. A rotating sprinkler is sometimes the only watering device needed for small-scale irrigation. Everyone has seen these sprinklers, and as kids, many of us used to play in their streams on hot days. As basic as they are, garden-hose sprinklers can be effective irrigation tools when properly matched to the job at hand. They are inexpensive, easy to move, simple to connect, and they can spray a substantial amount of water.
Garden-hose sprinklers come in different shapes and sizes. Some twirl around and others roll back and forth in an arc. There are also hose-type sprinklers that pulse water out in a stream. Quality and cost for these little irrigation devices are as varied as the sprinklers themselves. While this type of sprinkler is limited in features and benefits, it can accomplish a number of small watering jobs.
For example, a small flower or vegetable garden, 10 feet by 20 feet, could easily be maintained with a hose-type sprinkler. The question is, what type of sprinkler design will work best in this garden? If you use a twirling sprinkler, water will be wasted, because as the sprinkler turns and the water pressure is set high enough to reach each length of the garden, it will overshoot the width by 5 feet. Since there is no point in wasting water, you should look at another style of sprinkler for such a garden.
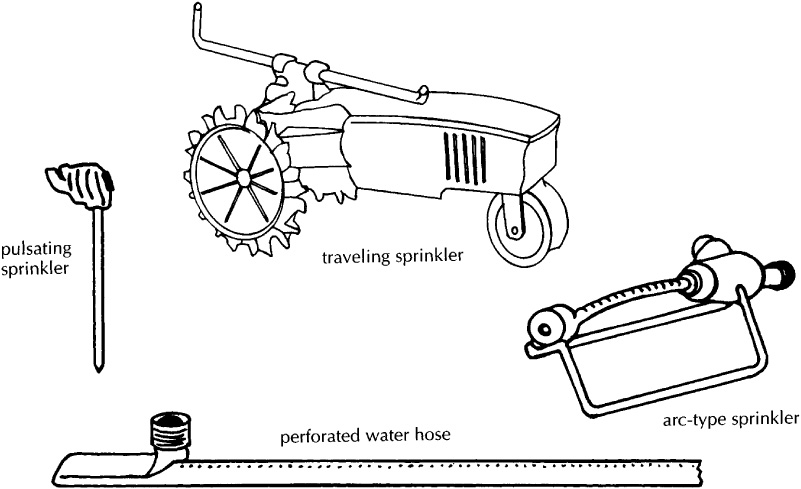
Sprinkler and other watering devices that attach to an ordinary garden hose come in a variety of models, depending on the size and needs of the area you are watering. You can set up a system connecting various sprinkler heads to meet the needs of each area of your garden or landscape.
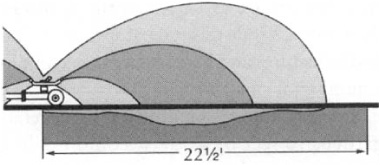
Plastic soakers, arc-type sprinklers, and sprinklers with revolving arms result in this erratic soakage.
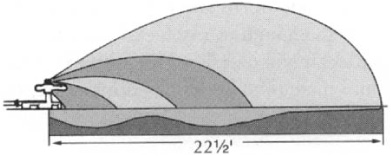
Oscillating, pulsating, or rotating sprinklers drop water unevenly, requiring overlapping sprays.
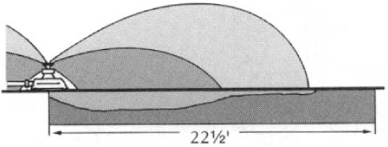
Whirling and fixed heads drop most of the water on the inside, requiring successive overlaps to obtain continuous coverage.
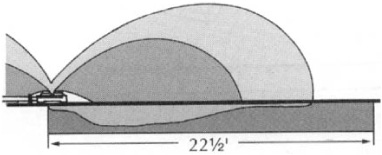
A cone spray soaks only a small area and needs to be moved often to be effective.
A pulsating model that sticks into the ground and shoots a stream of water for some distance is an option. Most models rotate to some degree, but usually not in a full circle. This type of sprinkler would work well in a rectangular garden, but there are still other inexpensive options to consider.
An arc-type sprinkler may be the best design for a small, rectangular garden. By placing this type of sprinkler in the center of the plot, water could reach each end without spilling too much out of the boundary lines. Also, the arc-type sprinkler may have an advantage over the pulsating sprinkler, because a rolling arc of water produces a more uniform watering pattern, which is more desirable.
There is yet another option that could be the best overall choice for a little garden: a perforated water hose. This is a flat hose with tiny holes in it through which water sprays. By controlling the flow of water to the hose, you can adjust the range of the water spray. If the water pressure is turned up, rising streams of water will come out of the hose and fall back to the earth, watering it. Cutting back the hose pressure will result in more of a trickle system, which can be very effective for irrigation, and for conserving water.
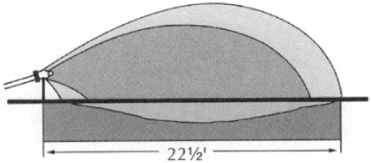
A slit-type sprinkler head throws most of the water 7 to 14 feet from its base.
Depending on the layout of the plants in the garden, it might be highly effective to use multiple perforated hoses. For example, if the garden contains three long rows of tomato plants, laying two perforated hoses on either side of the center row would provide excellent water coverage. A wye adapter could be used to connect both of the hoses to a single outdoor faucet. This type of design would be hard to beat. An alternative to hose watering is drip watering. Drip systems allow a user to pinpoint the location of water being dispersed. This not only conserves water, it ensures that the root structures of plants receive the water they need.
As you can see from this example, some irrigation devices work better than others, depending on the circumstances.
If your surface irrigation needs require bigger equipment, there is plenty from which to choose. Perhaps one of the most versatile pieces is a unit containing irrigation hoses on a large drum. These units are mounted on a frame equipped with wheels, for easy moving. This type of equipment comes in various sizes to accommodate a variety of watering needs.
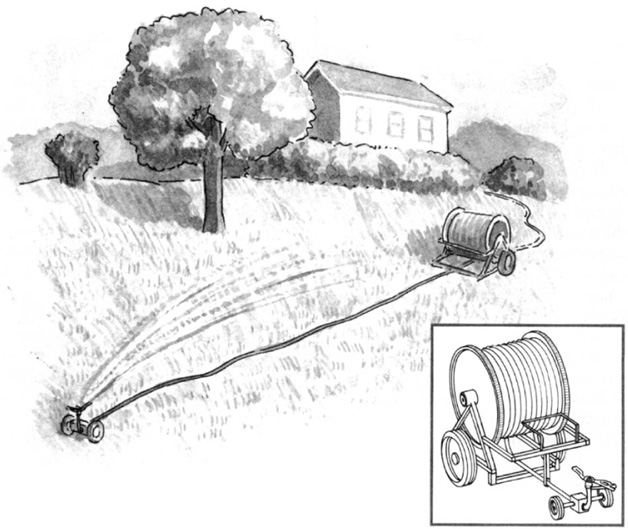
If you have a large lawn or large acreage, you may need larger equipment. A drum-mounted hose is useful for moving sprinklers around such an area.
These models use a standard hose connection. Operating water pressure ranges from 30 psi to 50 psi, depending upon the desired gpm. This pressure range is suitable for all standard residential water systems. Other features may include a two-wheel chassis for making mobility of the unit simple and easy, an automatic shutdown for the water motor, and selective automatic shutdown for the sprinkler. Various types of sprinkler heads can be used, and stabilizer feet keep the watering device stable. Hose guides assure proper hose packing, and a pressure gauge reads the inlet pressure of water serving the machine.
Mobile irrigation equipment, like the type just described, can be extremely versatile. At a flow rate of 4 gpm and an inlet water pressure of 33 psi, it is possible to produce a wet diameter of 82 feet. With a 70 percent efficiency rating, the irrigated area will be 58 feet by 250 feet — approximately ⅓ acre. A full acre can be given a 1-inch precipitation rate in just five days.
If you increase to 10 gallons of flow per minute and an inlet pressure of 66 psi, the area covered can be 77 feet by 258 feet. At this production rate, the machine irrigates nearly half an acre a day. A 1-inch soaking of three acres can be achieved in five days. This type of equipment is large enough to handle most residential irrigation needs, yet small enough to be manageable.
When you want more coverage, you can step up to a larger unit. These units can provide a wet diameter of 152 feet. The irrigation area is 106 feet by 213 feet. Over half an acre can be covered in a single day. To irrigate eight acres with a 1-inch rate of water takes five days. This coverage requires a 1-inch water connection and water pressure ranging from 45 psi to 87 psi.
Accessories are available for mobile irrigation systems. For example, a tall riser can be used to get the sprinkler head up high. This can be useful when watering corn or fruit trees. When you weigh the options of mobility, convenience, and performance, this type of roll-about irrigation system might be ideal for your lawn or garden.
Irrigation needs are as different as the people who have them. While one person may be happy with a perforated hose and another a roll-around irrigator, some people prefer the simple pleasure of using kid’s stuff to water their plants — there are some interesting items in the local toy store.
I bought my daughter, Afton, a water game consisting of a 5-foot plastic tower with a ball tied to it by a piece of string. To play, a hose is connected to the tower, the water is turned on and sprays out of the tower in two places, at the top and about mid-way up. Players stand in the spraying water and bat the ball back and forth with paddles.
This tower toy makes a dandy sprinkler for a small garden and is designed to spray water in a full circle from two heights — 2 feet above the ground, and about 5 feet above the ground. There is no bulky base to the plastic pole, it just sticks in the ground allowing it to be placed anywhere in a garden without crushing low-growing plants. By adjusting the water pressure, the amount of water spraying in your garden can be controlled.
The key to choosing the best device for the job is proper planning. Since this book is intended for people interested in watering average, residential lawns and gardens, I have not included information on irrigation equipment manufactured for professional farmers or with other large-scale commercial applications in mind.
How you construct an overhead irrigation system is up to you. You can use either rigid pipe or flexible tubing to create your waterway. You will need a support system, or wood to attach the piping. Pressure-treated lumber works well, but there are times when a pipe frame is better suited to the conditions. The framework is critical to a good overhead irrigation system.
A pipe frame has some advantages over a wood frame: it is lighter weight, depending on the type of pipe used for the frame. Do you want to dismantle your irrigation system at the end of the growing season? You can do this with either a wood or pipe frame, but plastic pipe is much easier to maneuver than heavy, pressure-treated wood. If you are building a permanent structure, either material will do nicely.
To build a pipe irrigation frame, I recommend using Schedule-40 plastic pipe and fittings. The pipe size is not critical, but 1½-inch. pipe is easy to work with, inexpensive, and sturdy. I wouldn’t recommend anything smaller. Building the frame with 2-inch pipe gives more strength to the frame, but the added strength is not needed as long as you don’t make long runs without vertical supports, and these will be needed with either size pipe.

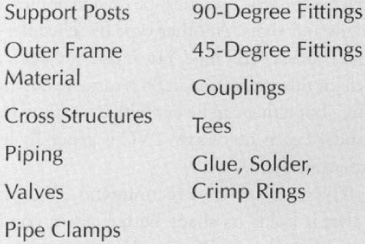
Overhead System Materials List

Advantages of a Pipe Frame
 Lightweight
 Easy to work with
 Inexpensive
 Simple to dismantle
 Easy to install year after year
 Will not rot
 Will not attract wood-infesting insects
Disadvantages of a Pipe Frame
 May lack stability
 Can warp in excessive heat
 Does not present as many options for an attractive installation as does wood
The best Schedule-40 pipe is PVC pipe, which is the white plastic pipe used in homes for drains and vents. Another type of Schedule-40 pipe is black ABS pipe, but it doesn’t work as well for this application. ABS is easier to cut than PVC, but either can be cut with a hacksaw or a standard carpenter’s saw. PVC is generally less expensive than ABS.
The main reason I recommend PVC pipe is that it holds its shape better in hot conditions than does ABS. If a 20-foot length of ABS pipe is laid across a pipe rack on a truck during a hot day, the pipe will sag and develop a warped slope. PVC pipe doesn’t do this. If you don’t like the idea of having a white irrigation frame, you can always paint the PVC another color. But if you use ABS, don’t be surprised to see your frame sagging in hot sunlight.
To build the frame, you will need to dig a few holes deep enough so they are below the frost line. Then pour concrete into the holes to create a pier foundation, or, if you prefer, you can get by with just the holes for your support.
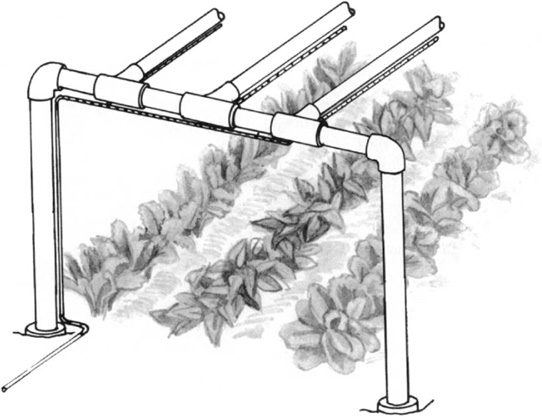
An overhead pipe frame is easy to make and to take down when the gardening season is over. The frame is constructed of Schedule-40 plastic pipe. PE pipe is attached to the frame to distribute water over each row of the garden.
Dig a hole at each corner of the irrigation boundary. In addition, you need interim posts at 10-foot intervals to support the frame pipes. Schedule-40 pipe is available in 10-foot sections.
Set the vertical supports in the holes, keeping the tops of the supports level. Sloping or rolling topography makes this a little challenging. To level, run a string between two of the corner posts, place a string level on it, and adjust the depth for the two posts until the bubble is in the center of the level. Use the string as your guide while installing additional vertical supports between the two corners. Move the string to another corner post and continue this process until all of the installed support posts are level with each other.
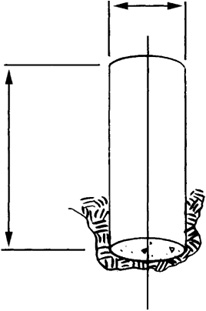
Concrete piers make a good foundation for a pipe frame. The holes need to be below the frost line to provide a permanent foundation that will last through the winter for use the next season.
If your land has a radical difference in topography, you can install a 10-foot section in one part of the garden, providing an 8-foot ceiling, and install a 12-foot section, for instance, at the low end to keep the frame level.
Now that all of the vertical sections are in place, you are ready to create the frame. For a permanent installation, glue the fittings and pipe together. For a temporary framework, don’t glue the joints. PVC pipe fits firmly into fittings, even without glue. If you glue the joints and later decide to relocate the frame, a few couplings will splice the work back together after cutting it for movement.
To create a frame you will need some Schedule-40 fittings: elbows, tees, and couplings. The tees will be used to connect the horizontal frame to vertical interim supports. Elbows or street ells (fittings where one end accepts pipe and the other end slides into the hub of a fitting) will be used in conjunction with the tees to shape the frame. There should be little need for couplings, since your interim supports are set to support the pipe at approximately 10-foot intervals.
The best way to make joints with PVC pipe is to use a primer and glue but using just glue will work also. Make certain that the hubs of fittings and ends of pipes are clean and dry, or the joints will be weak.
Place the tee outlets of the tee fittings on the vertical support pipes. Use elbows or street ells to make necessary turns in the framework. The width of your garden will determine the number of supports through the middle of the garden plot. Tees can be installed with the tee outlets laid pointing down to accommodate this need. Once the frame has been made, you are ready to install your overhead piping.
The type of pipe used for dispersing water depends on your preference. Copper pipe works well, but is expensive and needs to be soldered to put it together. Or you can use compression fittings, which again, is costly.
CPVC pipe is joined with glue. Personally, I don’t like working with CPVC, but some homeowners do. I prefer to use polybutylene (PB) pipe for the distribution system. I wouldn’t recommend polyethylene pipe (PE), because it weakens in direct heat.
Secure the pipe to the frame with cable ties, which resemble the plastic ties often sold with disposable garbage bags. One end of the cable tie slides through the hole in the other end of the tie, and the ridged strip locks the tie in place. Cable ties are available in various lengths, and can be wrapped around the frame and water pipe at the points to be secured.
If you use rigid pipe for your water distribution, you will need numerous elbows and couplings; however, when rolls of PB pipe are used, there is little need for fittings. The PB pipe is flexible enough to turn and make offsets without using fittings. You still will need some couplings, however. To save yourself the expense of renting a crimping tool, you can buy compression couplings, which work admirably in this function.
Installation. The actual installation of distribution piping is simple, and there are numerous techniques that can be employed to give your irrigation system a personalized touch. For example, you could install an overhead distribution pipe above each garden row. If you want to save some money on pipe and use less water, you can install the piping between rows. You can even zig-zag piping across the frame to water your plants. How you lay out the piping design depends on your garden’s watering needs.
Putting the pipe up on the rack can be done easily by one person. The best-suited piping materials are lightweight, and none requires strong physical strength to join them together. The best method is to secure each section (or row) of pipe to the frame as it is being installed, especially if you’re using PB pipe. Rigid lengths of piping tend to stay in place during the installation process, but coiled piping moves around considerably. Duct tape or cable ties will keep your pipes in place.
Drilling Holes. Before drilling holes in the distribution pipes, which you can do before or after you install the pipe, you must decide how you want the garden watered. Do you want a low-pressure, slow drip over each row? Do you prefer a higher pressure that will spray water to both sides and the bottom? You must answer these types of questions before drilling the holes.
If you want water to drip out of the overhead piping slowly, drill a row of holes along the bottom of the pipe. Should you desire a long-distance spray of water, drill smaller holes on each side of the pipe. Remember, also, that the end of the water distribution piping, which is not connected to the water supply, will have to be capped off.
Water Source. Perhaps you want your irrigation system to have multiple watering functions. For example, you may want a slow drip over your onions and a fine spray blowing over your squash. Don’t worry, you can have it. The installation process involves several tee fittings and valves.
By placing a T valve at the end of each distribution pipe in an overhead system, you can regulate the amount of water each row receives. You can also regulate the strength of the water flow, so that some plants receive a slow drip while others receive a steady spray.
Run one main distribution pipe along the pipe frame perpendicular to the direction of your garden rows. Install tee fittings in the main pipe, allowing branch distribution pipes to be installed over the rows. Place a valve near each tee outlet and extend the branch piping along your chosen path. Cap the open ends of all the pipes. Now you can turn each branch on and off at will, and you can drill different hole patterns in the piping to create a customized system. The cost and construction time of this system obviously will be more than a continuous pipe run, but your watering options are greatly enhanced.
Building a wooden frame uses a different construction method and, obviously, different materials than a pipe frame. Pressure-treated wood is the material of choice for a wooden frame. This green-looking wood will last much longer when exposed to the elements than untreated wood. It is not mandatory that treated wood be used, but if you want your frame to stand firm for years to come, treated lumber is a good investment.
Advantages of a Wooden Frame
 Very sturdy
 Can be bolted together for quick removal and reinstallation
 Provides a nailing surface for cosmetic add-ons
Disadvantages of a Wooden Frame
 May be expensive
 May rot, unless pressure-treated lumber is used (which is not suitable for vegetable gardens)
 Installer may suffer from splinters
 Pressure-treated wood is heavy to work with
 May attract wood-infesting insects, although this is not likely with pressure-treated lumber
Pressure-treated lumber is considerably heavier than small-diameter PVC pipe. While some people will be able to manage the lumber by themselves, other folks will want a helper. Wood also produces splinters, so a thick pair of work gloves is good insurance against puncture wounds.
Another difference in a wood frame is the type of saw used. While a carpenter’s handsaw can be used for either lumber or PVC, cutting pressure-treated wood with a handsaw can get quite tiresome. Some type of electric saw, like a circular saw, makes the work less demanding physically, but power saws are much more dangerous to use. Caution must be observed at all times, especially if small hands are “helping” you (the kids or grandkids). Unplug the saw after each use. The last thing you want to see happen is one of those tiny fingers you love reaching for the trigger of a power saw.
Wearing eye protection is a good idea any time you are working in construction. When you are cutting and nailing wood, eye protection becomes more of a need than it would be when gluing pipe together. Sawdust can blow into your eyes. A nail that is hit poorly with a hammer can fly into space, and, perhaps, your face. Safety procedures should not be taken lightly.
In addition to the basic tools, a stable area to place the wood while it is being cut is necessary. Two 5-gallon buckets will get the job done. Standard sawhorses are fine, and folding tables made for construction projects are great. You can be creative, but make sure your support is strong and stable enough to prevent accidents while cutting.
When making a wood frame, the support posts should have dimensions of 4 inches by 4 inches, and will be installed at each corner of the irrigation boundary. The top rail of the frame can be made with 2-inch-by-4-inch lumber. The 2x4s either can be laid down flat or set up on their edge. If you plan to conceal your piping, stand the lumber on edge, to allow more space for concealment.
There are three basic ways in which to join your lumber: nails, although this method makes taking the frame apart difficult; screws, which are not necessary for structural integrity and disassembly can be a bother; and nuts and bolts, which are the most expensive option but allow you to take the frame apart and put it back together again easily. If I were building a frame for permanent installation, I’d use nails. For a portable frame, I’d use nuts and bolts, and lock washers will help to keep your joints tight.
Lay out the overall frame construction just as described in the instructions for a frame made from pipe (see pages 81-85). Of course, there will be no tee fittings used when working with wood. Support poles simply sit under the frame and butt into it. Use L brackets to attach vertical posts to horizontal wood members.
When the wood frame is complete, attach the piping using standard pipe clamps. These clamps fit over the pipe and are held in place with nails. When this is done, you may wish to conceal the piping.
Pressure-treated lattice comes in 4-feet-by-8-feet sheets and is expensive, but works very well as a finishing touch to a wood piping frame. The open weave of the lattice allows water to reach your plants and, at the same time, keeps the piping out of sight from a distance. The lattice is nailed or screwed directly to the underside of the wood frame. Additional wood supports probably will be needed at the outer frame for attaching the sheets of lattice. Keep this in mind while building your frame, because it is easier to install the inner supports before your piping is hung.
When it comes to having a practical irrigation system for your garden, overhead piping is hard to beat. By building your own frame and installing your own piping, the cost of the system is kept at a minimum. Since water from the system falls on the garden from above, it is much like rain. As practical as this system is for gardens, underground and surface systems work better for lawns. Appearance is much more important to a lawn-watering system. The area requiring watering also tends to be larger and have more uniform needs. These systems are addressed in the following chapter.

Installing Piping with an Overhead Wood Frame
1. Start at the water source and work to the end of the irrigation system.
2. Make connection at water source and extend piping over the framework.
3. Secure all piping as it is installed.
4. Use appropriate pipe fittings when making turns.
5. Install cut-off valves as desired.
6. Install a cap or plug on the terminal end of the piping.
7. Inspect piping for any kinks, twists, or tight turns.
8. Open the main water valve and fill the system with water.
9. Inspect system for leaks.