Orient Express
Think Indonesia and India …
sparkly, vibrant eolors …
accents and embroidery…
curry, coriander, and cumin…
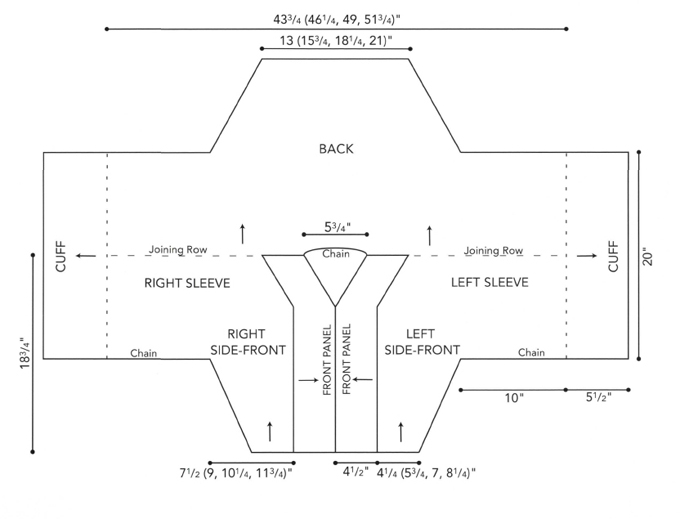
Kimono Shrug
DESIGNED BY TAMMY HILDEBRAND WITH CARI CLEMENT
EASY
In this easy project the embellishing is done along the fronts where the colors meet. By using different color trims and beads, you can create shrugs to go with as many outfits as you like.
SIZES
Small (Medium, Large, Extra-Large)
FINISHED MEASUREMENTS
Bust 36 (40, 44, 48)"⁄91.5 (101.5, 112, 122) cm
Length 18 1⁄2"/46.5 cm, all sizes
NOTE: Shrug is loose fitting and designed to be worn as shown in photo. Bust measurements are suggested sizes for a standard fitting garment; choose accordingly. Due to shaping, garment is wider than measurements indicate on schematic.
YARN
Caron International’s Simply Soft
(100% acrylic; 6 oz/170 g, 315 yds/288 m skein):
- #9730 Autumn Red (MC), 3 (3, 4, 4) skeins
- #9711 Dk. Country Blue (CC), 2 (2, 2, 2) skeins
CROCHET HOOKS
One each size US G-6 and J-10 (4 and 6 mm), or size to obtain gauge
ADDITIONAL MATERIALS
Yarn needle
1 1⁄4 yards/118 cm flat braid trim, 3⁄4"/1.9 cm wide, in color desired (shown in red, with gold metallic threads)
28 textured brass beads, 4 mm × 6 mm
14 bugle beads, 11 mm long, dark red
14 glass beads, in various sizes, no smaller than 6 mm, no larger than 11 mm, dark red
Tapestry or beading needle (thin enough to fit through beads)
Beading or quilting thread to match braid
Sewing needle and thread to match garment
Straight pins or small safety pins
GAUGE
In Stitch Pattern, 12 sc and 12 rows = 4"⁄10 cm, using larger hook and MC; in single crochet, 13 sc and 16 rows = 4"⁄10 cm, using smaller hook and CC
CROCHET STITCHES USED
ch: chain
sc: single crochet
slip st: slip stitch
Stitch Pattern (Multiple of 2 sc + 1)
- ROW 1 (RS): Sc in second ch from hook and each ch across, turn.
- ROW 2: Ch 1, sc in first st, * ch 1, skip next st, sc in next st; repeat from * across, turn.
- ROW 3: Ch 1, sc in first st and in each ch-1 space and sc across, turn.
- Repeat Rows 2 and 3 for Stitch pattern.
NOTES
- Shrug is worked from lower edge of Front, across shoulders to lower edge of Back.
- Side Front/Sleeve is worked to shoulder; CC panels are then worked on each Front.
- Back/Sleeves are joined at shoulders to Side Front/Sleeve and CC Panels, then worked down.
- Cuffs are worked down from lower edge of Sleeves.
Using larger hook and MC, chain 14 (18, 22, 26).
Row 1 (RS): Work Row 1 of Stitch pattern—13
(17, 21, 25) sc.
Row 2: Work Row 2 of Stitch pattern—7 (9, 11, 13) sc; 6 (8, 10, 12) ch-1 spaces.
Row 3: Work Row 3 of Stitch pattern—13 (17, 21, 25) sc.
Rows 4–16: Work even in pattern, repeating Rows 2 and 3, end with (WS) Row 2.
SHAPE SIDE AND UNDERARM
Row 17 (RS): At side edge, ch 1, work [2 sc in first st (increase)], beginning at *, work in pattern to end, turn—14 (18, 22, 26) sc.
Row 18: Work in pattern across to last st, [ch 1, sc in last st, (increase)], turn—8 (10, 12, 14) sc;
7 (9, 11, 13) ch-1 spaces.
Rows 19–25: Work in pattern, increasing 1 st at side edge every row, turn—22 (26, 30, 34) sc.
Row 26: Work in pattern across to last st, ch 1,
sc in last st; do NOT turn—12 (14, 16, 18) sc; 11 (13, 15, 17) ch-1 spaces.
SLEEVE
Chain 31, turn.
Row 27 (RS): Sc in second ch from hook and in next 29 ch; sc in next st and in each sc and ch-1 space to end—53 (57, 61, 65) sc.
Rows 28–42: Work even in pattern, end with a WS row.
SHAPE NECK
Row 43: Work in pattern across to last st, turn, [leaving last st at neck edge unworked (decrease)]—52 (56, 60, 64) sc.
Row 44: Slip st in next st (decrease), ch 1, sc in same st, work in pattern to end, turn—26 (28, 30, 32) sc; 25 (27, 29, 31) ch-1 spaces remain.
Rows 45–56: Work in pattern, decreasing 1 st at neck edge every row—20 (22, 24, 26) sc; 19 (21, 23, 25) ch-1 spaces remain at shoulder edge. Fasten off.
FRONT PANEL
With RS facing, using smaller hook and CC, join yarn with a sc in first row end of neck (at shoulder edge).
Row 1: Sc in each row end along Front edge to lower edge, turn—56 sc.
Row 2: Ch 1, sc in each st across, turn.
Rows 3–18: Work even in sc, repeating Row 2. Fasten off.
RIGHT SIDE FRONT/SLEEVE
Using larger hook and MC, chain 14 (18, 22, 26).
Work as for left Front for 16 rows, end with (WS) Row 2.
SHAPE SIDE AND UNDERARM
Row 17 (RS): Work in pattern across to last st, work [2 sc in last st (increase)], turn—14 (18, 22, 26) sc.
Row 18: Ch 1, sc in first st, [ch 1, sc in next st (increase)], work in pattern to end—8 (10, 12,
14) sc; 7 (9, 11, 13) ch-1 spaces.
Rows 19–26: Work in pattern, increasing 1 st at side edge every row—12 (14, 16, 18) sc; 11 (13, 15, 17) ch-1 spaces. At front edge, drop yarn, do NOT fasten off.
With RS facing, join another strand of MC with a slip st in first st of Row 26 (side edge), chain 30. Fasten off; return to front edge, pick up dropped strand of yarn.
SLEEV
Row 27 (RS): Work in pattern across to chain, sc in each ch to end, turn—53 (57, 61, 65) sc.
Rows 28–42: Work even in pattern, end with a WS row.
SHAPE NECK
Row 43: Slip st in next ch-1 space (decrease), ch 1, sc in same space, work in pattern to end, turn—52 (56, 60, 64) sc.
Row 44: Work in pattern across to last st, turn, leaving last st unworked (decrease)—26 (28, 30, 32) sc; 25 (27, 29, 31) ch-1 spaces.
Rows 45–56: Work in pattern, decreasing 1 st every row—20 (22, 24, 26) sc; 19 (21, 23, 25) ch-1 spaces at shoulder edge. Fasten off.
FRONT PANEL
With RS facing, using smaller hook and CC,
join yarn with a sc in first row end at lower edge. Work as for left Front.
BACK
Joining Row—With RS facing, using larger hook and MC, join yarn with a slip st in first sc of left Sleeve; ch 1, work in pattern (sc in each sc and ch-1 space) across to left Front Panel; working in row ends, sc in each row end across; chain 17 for Back neck; working in row ends, sc in each row end across right Front Panel; work in pattern to end, turn—57 (61, 65, 69) sc each side of chain.
Row 2: Work in pattern across to chain; sc in each ch across Back neck; work in pattern to end, turn—29 (31, 33, 35) sc; 28 (30, 32, 34) ch-1 spaces each side, 17 sc at center Back.
Row 3: Work in pattern (sc in each sc and ch-1 space) across, turn—131 (139, 147, 155) sc.
Row 4: Work in pattern across all sts—66 (70, 74, 78) sc; 65 (69, 73, 77) ch-1 spaces.
Rows 5–29: Work even in pattern. Fasten off.
SLEEVES
Row 30 (WS): Skip first 30 sts (Sleeve); join MC with a sc in next st; work in pattern across to last 30 sts, turn, leaving last 30 sts unworked for Sleeve—36 (40, 44, 48) sc, 35 (39, 43, 47)
ch-1 spaces remain.
SHAPE SIDE AND UNDERARM
Row 31: Slip st in next ch-1 space, slip st in next st (2 sts decreased); ch 1, sc in same st, work in pattern across to last 2 sts, turn, leaving remaining sts unworked (2 sts decreased)—
67 (75, 83, 91) sc remain.
Row 32: Slip st in next 2 sts (2 sts decreased),
ch 1, sc in same st, work in pattern across to
last 2 sts, turn, leaving remaining sts unworked (2 sts decreased—32 (36, 40, 44) sc, 31 (35, 39, 43) ch-1 spaces remain.
Rows 33–38: Continuing in pattern, decrease
2 sts each side every row 6 times, working as for Rows 31 and 32—20 (24, 28, 32) sc, 19 (23, 27, 31) ch-1 spaces remain.
Rows 39: Work even in pattern—39 (47, 55,
63) sc.
Rows 40–56: Work even in pattern. Fasten off.
FINISHING
Using yarn needle, weave in all ends.
ASSEMBLY
With WS facing each other, sew side and Sleeve seams, matching shaping.
CUFFS
Note: Work in joined rows, turning at the end of each row.
Row 1: Using smaller hook and CC, join yarn with a sc in row end at seam; sc in each row around, join with a slip st in beginning sc, turn.
Row 2: Ch 1, sc in each sc around, join with a slip st in beginning sc, turn.
Rows 3–22: Work even in sc, repeating Row 2. Fasten off.
LOWER EDGE
With WS facing, using smaller hook and CC, working in row ends of lower edge of Front Panel, join yarn with a sc in corner row of right Front Panel; sc in each row end across to Side-Front; change to MC, working in remaining loops of foundation ch, sc in each st across Front; sc in each st across Back; working as for Right Side-Front, work across Left Side-Front; change to CC, work across row ends of Left Front Panel to end. Fasten off.

EMBELLISHING
- Separate the beads into 3 groups: bugle beads, red glass beads, and brass beads.
- Measure distance of contrast band from shoulder to lower edge and cut trim accordingly, adding 1⁄2"/1.3 cm for turn-under.
- Fold in 1⁄4"/.6 cm hem at lower edge of trim and stitch.
- Mark the trim with pins for bead placement.
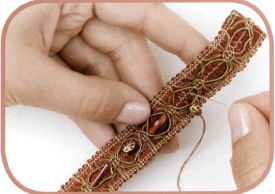
- Thread sewing needle with matching thread and bring to RS. Sew on beads as follows: brass bead, bugle bead, glass bead. Repeat in that order for the length of the trim.

- Pin trim to Kimono over the seam and stitch in place with sewing thread.
Hobo Boho Bag
DESIGNED BY NOREEN CRONE-FINDLAY
INTERMEDIATE
Inspired by paisley motifs from India, this Hobo Bag is a great splash of color! The Tunisian crochet (Afghan stitch) creates a bag that is fun to make and a true palette for embellishments.
ONE SIZE
FINISHED MEASUREMENTS
Width 12 1⁄2"/32 cm
Length (at center of Bag) 7"⁄18 cm
Strap Length 22"⁄56 cm
YARN
Caron International's Simply Soft (100% acrylic; 6 oz/170 g, 315 yds/288 m skein):
- #9723 Raspberry (A), 1 skein
- #9727 Black (B), 1 skein
Caron International's Simply Soft Brites (100% acrylic; 6 oz/170 g, 315 yds/288 m skein):
- #9605 Mango (C), 1 skein
CROCHET HOOK
One Tunisian hook size US N-15 (10 mm), or size to obtain gauge
ADDITIONAL MATERIALS
Crochet hook size US H-8 (5 mm), for embellishment
2 packages (1 yard/.92 cm each) beaded trim (2"⁄5 cm wide shown on model)
3 skeins gold metallic embroidery floss
30 gram tube mixed E beads
30 gram tube rocaille E beads, hot pink
Beading needle (thin enough to fit through beads)
Pins
Row counter (optional)
Ruler (for reading chart) (optional)
GAUGE
In Tunisian crochet, 10 sts and 8 rows = 4"⁄10 cm, using 2 strands of yarn held together
CROCHET STITCHES USED
ch: chain
hdc: half double crochet
sc: single crochet
slip st: slip stitch
NOTES
- Use a double strand of each color throughout.
- Each square on the Chart represents one stitch.
- When changing colors, always bring the new color under the working color to avoid holes from forming.
HELPFUL
READING CHART: When working from Chart, place a ruler on the Chart, covering the rows above the row that is being worked.

SPECIAL TECHNIQUES
Tunisian Crochet (Afghan stitch)
Each row of Tunisian crochet is worked in two steps after the Foundation Row.
Foundation Row (counts as Step 1)
Chain the number of sts indicated in the instructions; skip first ch, * insert hook in next ch, yarn over and draw up a loop (2 loops on hook); repeat from * across, drawing up a loop in each ch. Complete Foundation Row by working Step 2. Repeat Steps 1 and 2 for remainder of piece.
STEP 1. With RS facing, working from right to left, pick up stitches for the row: Beginning in the second vertical bar of the previous row, * insert hook into the vertical bar of the previous row, yarn over and draw loop through the vertical bar (2 loops on hook); repeat from * across, drawing up a loop in each vertical bar.
STEP 2. Working from left to right, work off the stitches: Yarn over and draw through first loop on hook, * yarn over and draw through 2 loops on hook; repeat from * across.
INCREASE IN TUNISIAN CROCHET: At the beginning of Step 1, insert hook into first vertical bar; at end of Step 1, pick up 2 sts in last vertical bar.
DECREASE IN TUNISIAN CROCHET: Insert hook into 2 vertical bars, yarn over and draw loop through both vertical bars.
Using Tunisian hook and 2 strands of C, working in Tunisian Crochet throughout, chain 8; join 2 strands A, chain 9. Begin working from Chart; work Rows 1–52, working each strap separately. Fasten off.
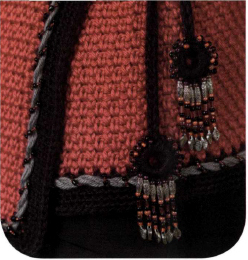
EMBELLISHING
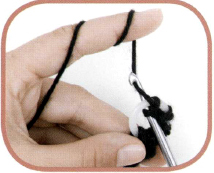
- Cut an 18"⁄46 cm length of A and split it into 4 single strands (see here).
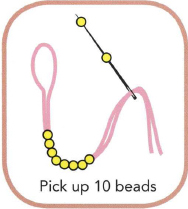
- Fold one strand in half, thread ends through beading needle, and pick up 10 beads.
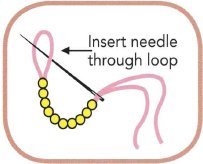
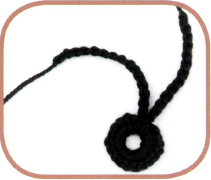
- Take the needle through the loop, pull up to form a ring of beads.

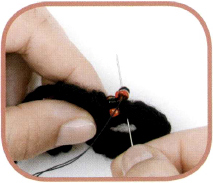
- Pull one of the strands of yarn out of the needle; thread 7 beads onto the remaining strand and push them snugly against the bead ring.
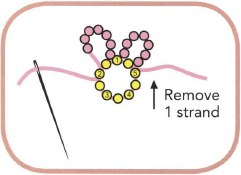
- Skip 1 bead in bead ring, and stitch through next bead in ring (see Diagram); repeat 4 more times to create 5 petals.
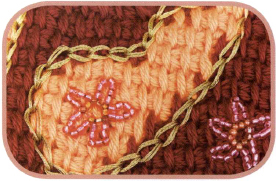
- Stitch one flower to the center of the contrasting color motifs on both sides; scatter and stitch the other flowers randomly.
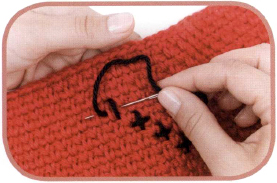
SLIP STITCH OUTLINES (CENTER OF BAG, MOTIF OUTLINES, BOTTOM EDGE OF STRAPS)
Work along lines of color changes.
- With 2 strands of metallic embroidery floss, make a slip knot.
- Hold slip knot and embroidery floss to WS of piece; insert hook through bag, pull up the slip knot.
- Insert hook into Bag again, moving along the line that you want to outline, pull up a loop of yarn, pulling it through to the RS and through the loop on the hook; repeat until outline is complete. Fasten off.
FINISHING
ASSEMBLY
Lay one piece on the other, WS together.
OUTER EDGE
- Using smaller hook and 1 strand of B, beginning at tip of one strap, work 2 sc in the row ends of the strap inner edge; working through both layers to join, continue to Chart Row 18.
- Work 1 hdc in each st, through one layer only, to form opening of Bag.
- At bottom of other strap (Row 18), work through both layers from Chart Row 18 to Row 52.
- At tip of second strap, turn, ch 1, work slip st in each sc down to opening of Bag (Row 18).
- Work 1 hdc in each st across through one layer only to form opening of bag, then slip st up to tip of first strap. Do NOT cut yarn.
EDGING
Beginning at the tip of strap, ch 2, sc evenly around outside edge of Bag, working through both layers to join front of bag to back.
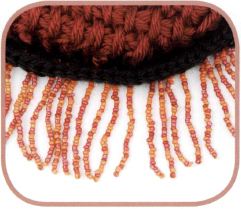
ATTACHING BEADED FRINGE TRIM
- Lay one strand of beaded trim on top of the other; join B to the outside edge of Chart Row 18.
- Fold over 4"⁄10 cm of trim and pin in place at bottom edge of Strap; using B, sc over the trim to secure it, working into the sc at lower edge of Bag.
Note: The hook will come up between the bead fringes to allow beads to hang freely. - Work 2 sc in corner sc to ease curves.
- After the first side and lower edge have been worked, pin the remaining trim, folding trim end over at Chart Row 18.
- Work over the doubled trim, finishing at the fold.
- Cut yarn, leaving an 8"⁄20.5 cm tail to weave in; take tail to WS and weave in securely.
- Join B with a slip st to opening edge of Bag; work a slip st in each hdc to stabilize opening. Cut yarn, weave in ends.
- Tie strap tips into a knot.

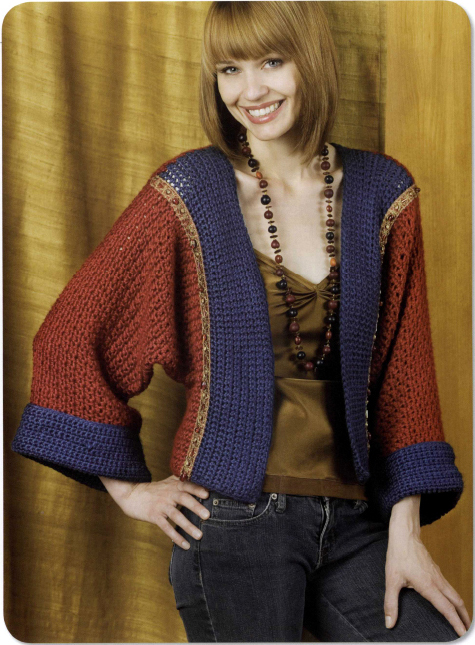
Wrap Jacket
DESIGNED BY MARGARET WILLSON
EASY
This Asian-inspired design is chic and quite easy to crochet, but it’s the detailed embellishing that really makes this a work of art.
SIZES
Small (Medium, Large, Extra-Large)
FINISHED MEASUREMENTS
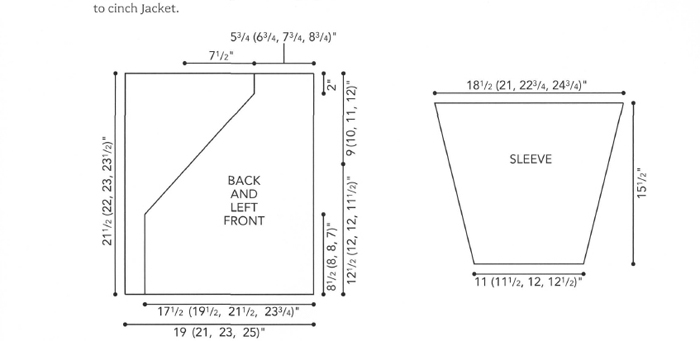
Bust 37 (41, 45, 49)"⁄94 (104, 114, 124.5) cm
Length 22 1⁄2 (23, 24, 24 1⁄2)"⁄ 57 (58.5, 61, 62) cm
YARN
Caron International’s Simply Soft (100% acrylic; 6 oz/170 g; 315 yds/288 m skein):
- #9748 Rubine Red (MC) 5 (6, 7, 7) skeins
- #9727 Black (A), 1 skein
- #9742 Grey Heather (B), 1 skein
CROCHET HOOKS
One each size US H-8 (5 mm), US 1-9 (5.5 mm), US J-10 (6 mm), or size to obtain gauge
ADDITIONAL MATERIALS
Yarn needle
Beading needle (thin enough to fit through beads)
Beading thread or black quilting thread
Two 7⁄8"/2.2 cm plastic rings
Straight pins
Safety pin
73 grams E-beads, opaque black — Bead-A
30 grams rocailles, red — Bead-B
24 grams glass spacer beads, ruby — Bead-C
30 grams E-beads, black opal — Bead-D
40 spacers, leaves, silver — Bead-E
12 metal oval barrel beads, silver — Bead-F
7 grams 11/0 round silver-lined beads, It. gray — Bead-G
GAUGE
In Stitch pattern, using largest hook (J-10), 17 sts and 17 rows 4"⁄10 cm
CROCHET STITCHES USED
ch: chain
sc: single crochet
sc2tog: single crochet 2 together—insert hook in next st, yarn over and pull up a loop (2 loops on hook), insert hook in next st, yarn over and pull up loop, yarn over and draw through all 3 loops on hook.
slip st: slip stitch
Stitch Pattern (multiple of 2 sts + 1)
- ROW 1 (WS): Ch 1, sc in first sc, * sc in next ch-1 space, ch 1, skip next sc; repeat from * across until last ch-1 space, sc in next ch-1 space, sc in last sc, turn.
- ROW 2 (RS): Ch 1, sc in first sc, * ch 1, skip next sc, sc in next ch-1 space; repeat from * across to last 2 sc, ch 1, skip next sc, sc in last sc, turn.
- Repeat Rows 1 and 2 for St patt.
- NOTE:Ch-1 space counts as 1 st for counting stitches or measuring gauge.

BACK
(RS) Using medium hook (I-9) and MC, chain 82 (90, 100, 108).
Row 1: Sc in second ch from hook, * ch 1, skip next ch, sc in next ch; repeat from * across, turn—81 (89, 99, 107) sts.
(WS) Change to largest hook ( J-10) and St patt; work even until piece measures 21 1⁄2 (22, 23, 23 1⁄2)"⁄54.5 (56, 58.5, 60) cm from beginning. Fasten off.
LEFT FRONT
(RS) Using medium hook and MC, ch 76 (84, 92, 102).
Row 1: Work as for Back—75 (83, 91, 101) sts. Continuing as for Back, work even until piece measures 8 1⁄2 (8, 8, 7)"⁄21.5 (20.5, 20.5, 18) cm from beginning, end with a WS row.
SHAPE NECK
(RS) Beginning this row, at neck edge (end of RS rows, beginning of WS rows) dec 1 st (sc2 tog) every row 50 (54, 58, 64) times—25 (29, 33, 37) sts remain for shoulder. Work even until piece measures same as Back to shoulders. Fasten off.
RIGHT FRONT
Work as for Left Front, reversing all shaping by working neck shaping at beginning of RS rows, end of WS rows.
SLEEVE (MAKE 2)
Using medium hook and MC, ch 48 (50, 52, 54).
Row 1: Work as for Back—47 (49, 51, 53) sts. (WS) Change to largest hook and St patt; work even for 1 row.
Inc 1 st each side (work 2 sc in first st and last st of row) every 2 rows 0 (8, 14, 20) times, then every 4 rows 16 (12, 9, 6) times—79 (89, 97, 105) sts. Work even until piece measures 15 1⁄2"/39.5 cm from beginning. Fasten off.
FINISHING
Note: It will be easier to work Part I of the embellishing before assembling garment.
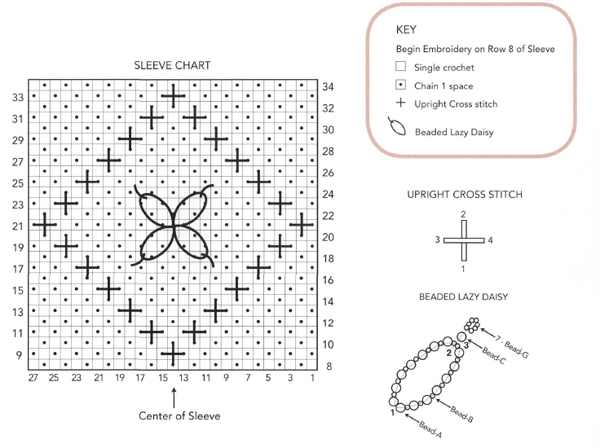
EMBELLISHING—PART I

Following Sleeve Chart and Illustrations, work Beaded Lazy Daisy stitch and Upright Cross stitch over center 27 sts of sleeve.
- Beaded Lazy Daisy: Thread beading needle with beading thread, make Back stitch on WS to secure, * needle up at 1 (center-point), thread [Bead-A, Bead-B] six times, Bead-A, 2 Bead-B, Bead-A, [Bead-B, Bead-A] 6 times, needle down at 1 and up at 2 inside the thread, then between the 2 B-beads and down at 3; needle up at 2, thread one Bead-C, 7 Bead-G, then go back through same C-bead, needle down at 3 once more.
- Couch (see photo) one side of petal to return to center-point 1. Repeat from * 3 more times to complete 4 petals, couch remaining strands, make Back stitch on WS to secure and cut thread.
UPRIGHT CROSS STITCH:
Using yarn needle and single strand of A, begin at bottom of Chart.
- Secure with Back stitch on WS, * needle up at 1, down at 2, up at 3, down at 4, repeat from * for each Cross stitch, working clockwise around diamond shape.
- Make Back stitch and secure end on WS.
ASSEMBLY
Sew shoulder seams. Measure down 9 (10, 11, 12)"⁄23 (25.5, 27.5, 30) cm from shoulder on Back and Fronts; place a marker for underarm. Sew Sleeves between markers; sew Sleeve and side seams.
EDGING
Round 1: With RS facing, using medium hook and A, join yarn at right-hand side seam at lower edge; ch 1, sc in same st, work [skip next st, 2 sc in next space] across to Front corner; work 3 sc in corner st; work [skip next row, 2 sc in next row] along right Front edge to beginning of neck shaping; work 2 sc in corner; work [skip next row, 2 sc in next row] along right Front neck shaping, across Back neck, and down left Front neck shaping to beginning of shaping; work 2 sc in corner; work [skip next row, 2 sc in next row] along left Front edge to lower corner; work 3 sc in corner; work [skip next st, 2 sc in next space] across to beginning of round, join with a slip st to first st; do NOT turn.
Rounds 2–5: Ch 1, sc in each sc to corner, work 3 sc in corner st, work [sc in each st to beginning of neck shaping, 2 sc in corner] twice, sc in each st to lower corner, work 3 sc in corner st, sc in each remaining st, join with a slip st to first st. Fasten off.
SLEEVE EDGING
Round 1: With RS facing, using medium hook and A, join yarn with a slip st at Sleeve seam; ch 1, sc in same st, work [skip next st, 2 sc in next space] around, join with a slip st in first st; do NOT turn.
Rounds 2–5: Ch 1, sc in each st around, join with a slip st in first st. Fasten off.
EMBELLISHING—PART II
TWISTED CORD (BODY)

- Cut two 10-yard/9.15 m lengths of B.
- Fold in half.
- Knot free ends together, leaving 2"⁄5 cm free after knot.
- Pin knotted end to fixed surface with safety pin.
- Holding folded end, stand far enough away that the cord is taut, and with pencil inserted in loop formed at fold, twist until the length is evenly twisted.
- Bring folded end and tied ends together, knot ends together.
- Allow the strands to twirl around each other.
- Remove safety pin.

COUCH TWISTED CORD TO BODY
- Using crochet hook, draw one end of Cord through to WS of center Back neck, below Round 1 of edging.
- Thread beading needle with beading thread.
- Attach with Back stitch at WS of Back neck.
- Needle up below twist in Cord.
- String 1 Bead-A, 2 Bead-B, 1 Bead-D, 2 Bead-B, 1 Bead-A.
- Needle down above twist, encasing cord.
- Make Back stitch on WS.
- Repeat Steps 4–7 for each twist in Cord, around entire outer edge. Fasten off.
- Using crochet hook, draw opposite end of Cord through to WS of Back neck, beside beginning end of Cord.
- Tie knot in Cord. Cut any excess Cord, leaving 2"⁄5 cm after knot.
- With yarn needle, weave each separate strand of Cord into edging on WS of Back neck.
TWISTED CORD (SLEEVES)
- For each Sleeve, cut two 1-yard/.9 cm lengths of B.
- Repeat Steps 2–8 of Twisted Cord (Body).
COUCH TWISTED CORD TO SLEEVES
- Beginning at Sleeve seam, using crochet hook, draw one end of Cord to WS at Sleeve seam.
- Couch cord to both Sleeves as for Body.
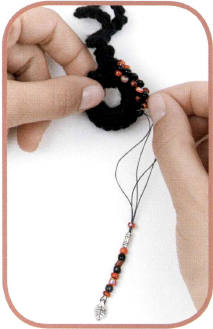
CORDED TIES WITH RING TASSELS
Right Front Tie and Tassel
Using smallest hook (H-8) and A, leave 6"⁄15 cm yarn tail before making slip knot.
- Chain 35.
- Leaving 6"⁄15 cm yarn tail after chain, cut A. Fasten off.
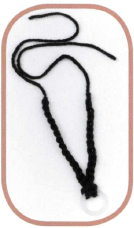
ATTACH CORDED TIE TO RING
- Fold chain in half.
- Insert folded end through plastic ring, forming a loop.
- Draw both cut ends through loop.
- Holding the ring in one hand and cut ends in the other, pull to form a half-hitch knot.
Note: Bead-C includes a variety of ruby shades; refer to photo, or use your choice from mixture when directed to use Bead-C.
- Using small hook and A, insert hook through right edge of half-hitch knot on ring and draw up loop.
- Work 18 sc over ring, join with a slip st at left side of knot.
- Cut A, fasten off ends securely.
- Thread beading needle with beading thread and make Back stitch on WS of knot.
- Thread 3 beads, 1 Bead-C, 1 Bead-A, 1 Bead-C.
- Working counterclockwise, bring needle from WS around outer edge and down through next sc.
- Work Back stitch on WS of same sc.
- Repeat Steps 5–7 five more times.
- Beaded Fringe: Back stitch on WS, needle up in next sc, thread Bead-C, Bead-F, Bead-C, Bead-A, Bead-C, Bead-A, 2 Bead-C, Bead-D, Bead-C, Bead-E; after Bead-E, thread needle up through beads to beginning, needle down in same sc.
- Repeat Step 9 five more times.
- Repeat Steps 5–7 six times, returning to half-hitch knot. Fasten off.
Tip: Use a small dot of fabric glue where beading thread begins and ends; knots made using nylon or silk thread have a tendency to loosen over time.
Using yarn needle, sew ends of Corded Tie to corner at beginning of neck shaping on right Front, weaving 6"⁄15 cm ends through edging to secure.
- Using small hook and A, leave 6"⁄15 cm yarn tail before making slip knot.
- Ch 195 (215, 235, 250).
- Leaving 6"⁄15 cm yarn tail after chain, cut A.
LEFT FRONT TIE AND TASSEL
Complete as for right Front Tassel. Using yarn needle, run end of Tassel Cord through right side seam and sew securely to corner of Left Front. Weave in ends.
Wrap long Hanging Cord across Back and around to Front; meeting short Hanging Cord to cinch Jacket.
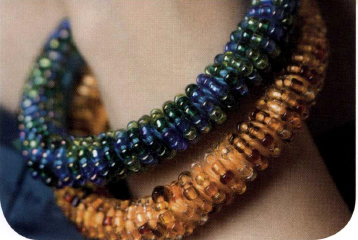
Boho Bangles
DESIGNED BY NOREEN CRONE-FINDLAY
BEGINNER
Don’t you love looking around hardware stores for something you can use in your projects? Plumbers’ clear plastic tubing is ideal for these bangles, and the softness of Simply Soft makes them so comfy to wear. You can coordinate your whole wardrobe by making bangles with any color beads.
ONE SIZE
FINISHED MEASUREMENTS
Customize to fit wrist while fitting over hand.
YARN
Caron International’s Simply Soft Brites (100% acrylic; 6 oz/170 g, 315 yds/288 m skein):
- #9608 Blue Mint and #9605 Mango: 1 skein each
CROCHET HOOK
One size US H-8 (5 mm)
ADDITIONAL MATERIALS
10 1⁄2"/26.5 cm length of 1⁄4"/.6 cm diameter clear plastic tubing for each bangle (available in aquarium section of pet store or in plumbing department of hardware store)
1 tube (30 grams) assorted glass E beads, colors to coordinate with yarn (420 beads needed)
Beading needle (thin enough to fit through beads)
Yarn needle
Fabric glue
Sharp scissors or a craft knife
Clear tape (optional)
GAUGE
Gauge is not critical to this project.
CROCHET STITCHES USED
ch: chain
sc: single crochet

NOTE
The length of tubing will determine the size of the Bangle; be sure that the length chosen will slide over hand easily. For a larger bracelet, cut a longer piece of tubing; for a smaller bracelet, cut the length shorter.
BANGLE BASE
- Measure the circumference of a bracelet you have that fits over your wrist well plus 1⁄4"/.6 cm.
- Cut plastic tubing to length, allowing 1⁄2"/1.3 cm for overlap.
- Cut a 1⁄2"/1.3 cm long, V-shaped notch at one end of the tubing.
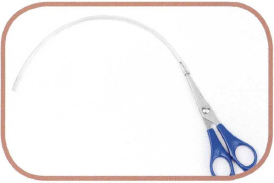
- Push the end of scissors or a pencil into the other end to stretch the tubing slightly.

- Push the notched end into the stretched end.
- If desired, secure the overlap with clear tape.
EMBELLISHING
- To reduce bulk approximately 2"⁄5 cm from end of yarn strand, separate 4-ply yarn into two 2-ply strands and cut off one 2-ply strand so that the yarn will fit through the eye of the beading needle; thread the remaining 2-ply strand through beading needle.
- Fold the yarn over and glue so the threaded 2-ply ends touch the cut 4-ply ends. When the glue is thoroughly dry, thread all 420 beads onto the yarn.
- Tie yarn to Bangle (tubing) leaving a 3"⁄7.5 cm tail; hold the yarn tail against the tubing and work over it so that it does not have to be woven in later.
BANGLE
- Holding the yarn at the outer edge of tubing, [insert the hook into the center of the Bangle from front to back; yarn over and pull up a loop, pulling the hook and loop from back to front, wrapping loop around the tubing; bring the hook up to the outer edge of the hoop (where the yarn is attached)], yarn over and draw through loop on hook (first ch made).
- Repeat from [to] (2 loops on hook), yarn over and draw through both loops on hook (sc made).
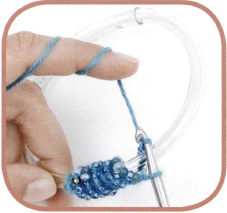
- Slide 7 beads snugly against the hook.
- Working over the tied-on end, repeat Steps 2 and 3 around, spiraling the stitches, until tubing is completely covered.
- Fasten off, leaving a 6"⁄15 cm tail.
FINISHING
Using beading needle threaded with tail, weave tail in and out along edge of crochet to secure. Put a dot of glue on woven end; trim end. Turn the stitches so the chain is on the inside of the Bangle.
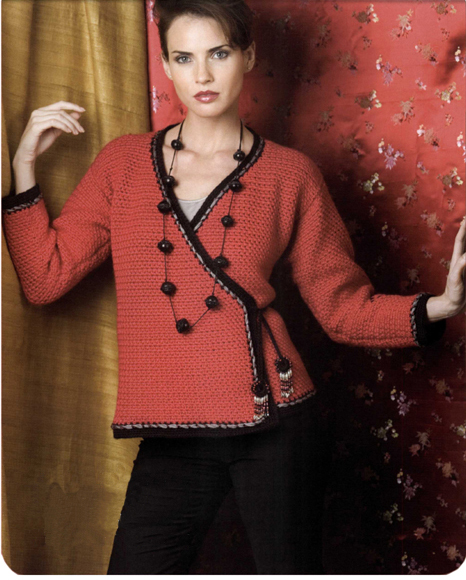
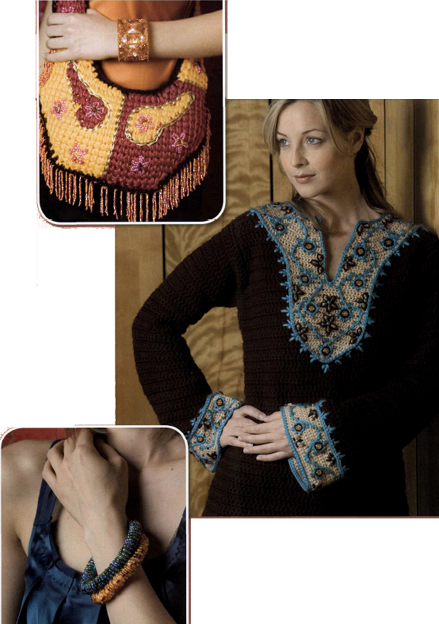
India Tunic
DESIGNED BY HEIDI STEPP
INTERMEDIATE
This comfy, unique tunic will surely garner admiration from friends and family. The beading and embellishment pattern is absolutely gorgeous and worthy of praise.
SIZES
Small (Medium, Large, 1X, 2X)
FINISHED MEASUREMENTS
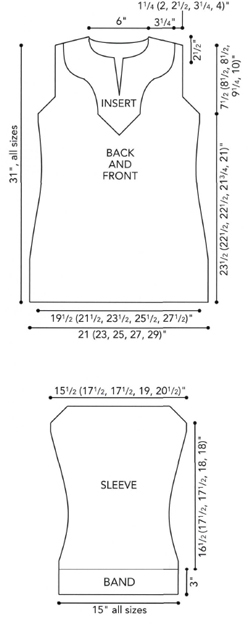
Bust 36 (40, 44, 48, 52)"⁄91.5 (101.5, 112, 122, 132) cm
Length 31"⁄78.5 cm, all sizes
YARN
Caron International’s Simply Soft (100% acrylic; 6 oz/170 g, 315 yds/288 m skein):
- #9750 Chocolate (MC), 6 (7, 8, 8, 9) skeins
- #9608 Blue Mint (A), 1 skein
- #9703 Bone (B), 1 skein
CROCHET HOOKS
One each size US 1-9 (5.5 mm), US J-10 (6 mm), or size to obtain gauge
ADDITIONAL MATERIALS
Yarn needle
Sewing needle
Sewing thread to match A, B, or beads
Tapestry or sewing needle (thin enough to fit through beads)
Large-eye beading needle
Stitch markers
Straight pins
Marking pen or chalk pen in contrasting color from B
165 round beads, 6 mm, aqua semitransparent
165 seed beads, 4 mm, brown
238 seed beads, 4 mm, gold
4 wood beads, 8 mm, blue
10 wood beads, 5 mm, blue
80 shell beads, 10 mm long
GAUGE
In single crochet, 17 sts and 20 rows = 4"⁄10 cm, using smaller hook and B
In Stitch pattern (1 row sc, 1 row dc), 12 sts and 9.6 rows = 4"⁄10 cm, using larger hook and MC
NOTES
- Beaded Yoke and Sleeve bands are worked separately, then attached to Back and Front and Sleeves.
- Bead Embellishment will be easier to work on individual pieces, before assembly; final embroidery Embellishment is worked after Yoke and Sleeve bands have been attached.

CROCHET STITCHES USED
ch: chain
dc: double crochet
dc2tog: double crochet 2 together—[yarn over, insert hook in next st and pull up a loop, yarn over and draw through 2 loops] twice, yarn over and draw through 3 loops on hook.
dc3tog: double crochet 3 together—[yarn over, insert hook in next st and pull up a loop, yarn over and draw through 2 loops] 3 times, yarn over and draw through 4 loops on hook.
dec: decrease 1 st—work next 2 sts together in pattern (sc2tog or dc2tog).
dec 2: decrease 2 sts—work next 3 sts together in pattern (sc3tog or dc2 tog)
inc: increase 1 st—work 2 sts in next st in pattern.
sc: single crochet
sc2tog: single crochet 2 together—insert hook in next st, yarn over and pull up a loop (2 loops on hook), insert hook in next st, yarn over and pull up a loop, yarn over and draw through all 3 loops on hook.
sc3tog: single crochet 3 together—[insert hook in next st, yarn over and pull up a loop] 3 times, yarn over and pull through all 4 loops on hook.
slip st: slip stitch
Stitch Pattern (Body and Sleeves)
- ROW 1: Ch 1, sc in each st across.
- ROW 2: Ch 2, dc in each st across.
- Repeat Rows 1 and 2 for St patt.
Note: First 13 rows are the neckband.
Beginning at neck edge, using smaller hook and B, chain 67.
Row 1 (RS): Sc in second ch from the hook and in each ch across, turn—66 sc.
Row 2: Ch 1, work [sc in next 3 sts, inc in next st] twice, sc in next 10 sc, inc in next st, sc in next 28 sc, inc in next st, sc in next 10 sc, work [inc in next st, sc in next 3 sts] twice, turn—72 sc.
Row 3: Ch 1, sc in next 15 sc, work [inc in next st, sc in next 2 sts] twice, inc in next st, sc in next st, inc in next st, sc in next 24 sc, inc in next st, sc in next st, work [inc in next st, sc in next 2 sts] 3 times, turn—80 sc.
Row 4: Ch 1, inc in first st, sc in next 8 sc, inc in next st, sc in next 2 sc, inc in next st, sc in next 54 sc, inc in next st, sc in next 2 sc, inc in next st, sc in next 8 sc, inc in last st, turn—86 sts.
Row 5: Ch 1, sc in next 7 sc, inc in next st, sc in next 5 sc, inc in next st, sc in next 2 sc, inc in next st, sc in next 12 sc, inc in next st, sc in next 2 sc, inc in next st, sc in next 5 sc, inc in next st, sc in next 27 sc, turn—92 sts.
Row 6: Ch 1, sc in next 5 sc, inc in next st, sc in next 25 sc, inc in next st, sc in next 28 sc, inc in next st, sc in next 25 sc, inc in next st, sc in next 5 sc, turn—96 sc.
Row 7: Ch 1, sc in next 12 sc, inc in next st, sc in next 11 sc, inc in next st, sc in next 4 sc, inc in next st, sc in next 36 sc, inc in next st, sc in next 4 sc, inc in next st, sc in next 11 sc, inc in next st, sc in next 12 sc, turn—102 sc.
Row 8: Ch 1, sc in next st, inc in next st, sc in next 19 sc, inc in next st, sc in next 58 sc, inc in next st, sc in next 19 sc, inc in next st, sc in last sc, turn—106 sc.
Row 9: Ch 1, sc in next 18 sc, inc in next st, sc in next 15 sc, inc in next st, sc in next 36 sc, inc in next st, sc in next 15 sc, inc in next st, sc in next 18 sc, turn—110 sc.
Row 10: Ch 1, sc in next 7 sc, inc in next st, sc in next 6 sc, inc in next st, sc in next 25 sc, inc in next st, sc in next 28 sc, inc in next st, sc in next 25 sc, inc in next st, sc in next 6 sc, inc in next st, sc in next 7 sc, turn—116 sc.
Row 11: Ch 1, sc in next 38 sc, inc in next st, sc in next 38 sc, inc in next st, sc in next 38 sc, turn—118 sc.
Row 12: Ch 1, inc in first st, sc in next 15 sc, inc in next st, sc in next 14 sc, inc in next st, sc in next 7 sc, inc in next st; sc in next 12 sc, inc in next st, sc in next 12 sc, inc in next st, sc in next 12 sc, inc in next st, sc in next 7 sc, inc in next st, sc in next 14 sc, inc in next st, sc in next 15 sc, inc in last st, turn—128 sc.
Row 13: Ch 1, sc in next 28 sc, inc in next st, sc in next 70 sc, inc in next st, sc in next 28 sc, turn—130 sc.
RIGHT FRONT SHAPING
Row 14 (WS): Ch 1, work across 13 sc, turn.
Row 15: Ch 1, dec across first 2 sts, sc in next 11 sc, turn—12 sc remain.
Row 16: Ch 1, sc in next 10 sc, dec across last 2 sts, turn—11 sc remain.
Rows 17–27: Work even in sc. Fasten off.
LEFT FRONT SHAPING
With WS facing, join yarn 13 sts in from opposite edge.
Row 14: Ch 1, sc in same st and in next 12 sc, turn—13 sc.
Row 15: Ch 1, sc in next 11 sc, dec across last 2 sts, turn—12 sc remain.
Row 16: Ch 1, dec across first 2 sts, sc in next 10 sc, turn—11 sc remain.
Rows 17–27: Work even in sc.
JOINING ROW
Row 28 (WS): Continuing on Left Front, ch 1, sc in next 10 sc, inc in last st; with WS of Right Front facing, sc across (11 sts), turn—23 sc.
Rows 29–44: Work even in sc.
Dec 1 st each side every row 10 times—3 sc.
Last Row: Ch 1, sc3tog. Fasten off.
FINISHING
Using smaller hook and A, work 1 row of sc evenly around outer and inner edges of Insert, working 3 sc in corner stitches and skipping a stitch as needed to keep work flat (see photo). Fasten off.
FRONT
Using MC and larger hook, chain 64 (70, 76, 82, 88).
Row 1 (RS): Sc in second ch from hook and each ch across, turn—63 (69, 75, 81, 87) sc.
Row 2: Ch 2, dc in first st and in each st across, turn—63 (69, 75, 81, 87) dc.
Row 3: Ch 1, sc in first st and in each st across, turn.
Work even in St patt until piece measures 5 1⁄2"/14 cm from beginning.
SHAPE SIDES
Dec 1 st each side every 6 rows 4 times—55 (61, 67, 73, 79) sts.
Work even until piece measures approximately 16"⁄41 cm from beginning—39 rows, end with a RS row.
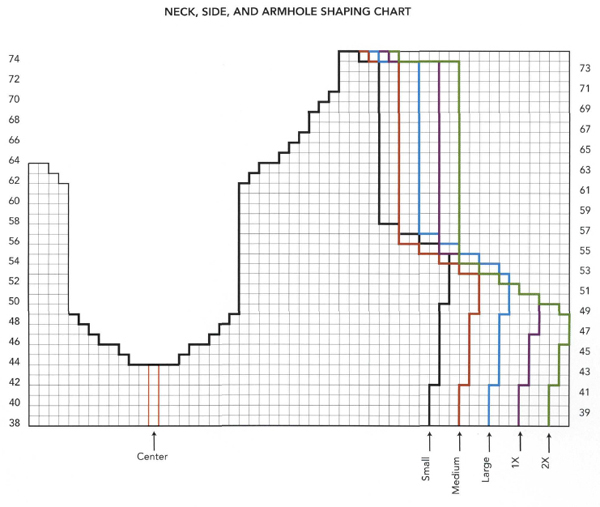
Begin working Side Shaping from Chart and instructions below.
Note: Shaping is mirror image on each side; Chart shows left-hand side of Front, with RS facing. Beginning Row 45 (right Front), read WS rows from right to left, RS rows from left to right.
Row 42 (WS): Inc 1 st each side—57 (63, 69, 75, 81) sts.
Work 1 row even, placing a marker on center st.
RIGHT FRONT
Divide for Neck and Insert Opening.
Row 44 (WS): Work across to 3 sts before center st, dc3tog, turn, leaving remaining sts unworked—26 (29, 32, 35, 39) sts.
Row 45: At neck edge, ch 1, dec across first 2 sts, sc in each st across, turn—1 st decreased.
Row 46: Ch 2, inc 0 (0, 0, 0, 1) st, dc across to last 3 sts, dc3tog at neck edge, turn—2 sts decreased.
Continue Neck and Side Shaping as established from Chart, and AT THE SAME TIME,
SHAPE ARMHOLES
Beginning Row 55 (53, 53, 51, 49), dec 1 (0, 1, 0, 1) st each side once, then 2 sts each side every row 3 (4, 4, 5, 5) times, working dc2tog or dc3tog as appropriate—14 (16, 18, 20, 22) sts remain when armhole shaping is complete. Work armhole edge even while completing neck shaping.
Row 74: Slip st across 2 (3, 4, 5, 6) sts, sc to end.Fasten off.
LEFT FRONT
Row 44: With WS facing, skip center st, join yarn with a slip st in next st; ch 2, dc3tog in this and next 2 sts, dc in each st across, turn—26 (29, 32, 35, 39) sts.
Work as for right Front, reversing all shaping.Fasten off.
BACK
Work as for Front, for 42 rows, ending with a WS row. Continue working side and armhole shaping from Chart and written instructions; do NOT divide for neck shaping. Work even until Row 66 is completed, end with a WS row.
SHAPE NECK
Right Back Neck and Shoulder
Row 67 (RS): Ch 1, sc in next 11 (13, 15, 17, 19) sts, dec across next 2 sts, turn, leaving remaining sts unworked—12 (14, 16, 18, 20) sts.
Row 68: At neck edge, slip st in first two sts, ch 2, dec, work to end, turn—9 (11, 13, 15, 17) sts remain.
Row 69: Ch 1, work across to last 4 sts, dec, turn, leaving remaining 2 sts unworked—6 (8, 10, 12, 14) sts remain.
Row 70: Ch 2, dec, work to end, turn—5 (7, 9, 11, 13) sts remain.
Row 71: Ch 1, sc across to last 2 sts, dec, turn—4 (6, 8, 10, 12) sts remain.
Work even for 2 rows.
SHAPE SHOULDERS
Work as for Front. Fasten off.
LEFT NECK AND SHOULDER
With RS facing, join yarn 13 (15, 17, 19, 21) sts from left armhole edge; ch 1, dec in same and next st, sc in each st across, turn—12 (14, 16, 18, 20) sts.
Row 68: Ch 2, dc in each st across to last 4 sts, dec across next 2 sts, turn, leaving remaining sts unworked—9 (11, 13, 15, 17) sts remain.
Row 69: Slip st in first two sts, dec, sc in each st across, turn—6 (8, 10, 12, 14) sts remain sts.
Row 70: Ch 2, dc across to last 2 sts, dec, turn—5 (7, 9, 11, 13) sts remain.
Row 71: Ch 1, dec, sc across, turn—4 (6, 8, 10, 12) sts remain.
Work even for 2 rows.
SHAPE SHOULDERS
Work as for Front. Fasten off.
SLEEVE (MAKE 2)
Using MC and larger hook, chain 44.
Row 1: Sc in second ch from hook and in each ch across, turn—43 sc.
Row 2: Ch 2, dc in each st across, turn.
Row 3: Work even in pattern.
Row 4: Continuing in pattern, dec 1 st at each side this row, then every 5 (7, 7, 7, 7) rows 2 (1, 1, 1, 1) times—37 (39, 39, 39, 39) sts remain.
Work even for 4 (4, 4, 2, 2) rows. Inc 1 st at each side this row then every 5 (4, 4, 3, 3) rows 4 (6, 6, 9, 10) times—47 (53, 53, 57, 61) sts. Work even until sleeve measures 16 1⁄2 (17 1⁄2, 17 1⁄2, 18, 18)"⁄42 (44, 44, 46, 46) cm from beginning, end with a WS row.
SHAPE CAP
Dec 1 st at each side every row 6 (6, 6, 6, 7) times—35 (41, 41, 45, 47) sts remain. Fasten off.
SLEEVE BAND (MAKE 2)
Beginning at lower edge of Sleeve band, using smaller hook and B, chain 66.
Row 1: Sc in second ch from hook and in each ch across, turn—65 sts.
Row 2: Ch 1, sc in each st across, turn.
Rows 3–7: Work even in sc.
Row 8: Dec 1 st each side, turn—63 sts remain.
Rows 9–13: Work even in sc. Fasten off.
BAND EDGING
With right sides together, sew seam; turn right side out. With RS facing, using smaller hook and A, join yarn with a slip st at seam; ch 1, work 1 row of sc around both edges of each band. Fasten off.
FINISHING
ASSEMBLY
Sew shoulder seams.
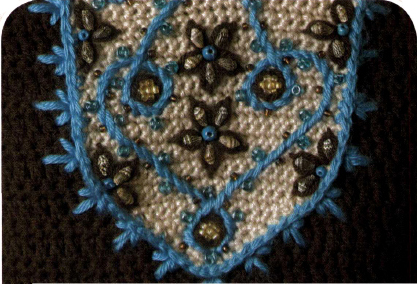
EMBELLISHING
YOKE INSERT
- Measure 4"⁄10 cm from center Fronts around inside neck edge and place markers for shoulder seams.
- Measure 15 1⁄2"/39.5 cm around outer edges of Yoke beginning at lowest center front point and place markers at shoulder seams.
- Fold Yoke in half and place marker at upper and lower center Back.
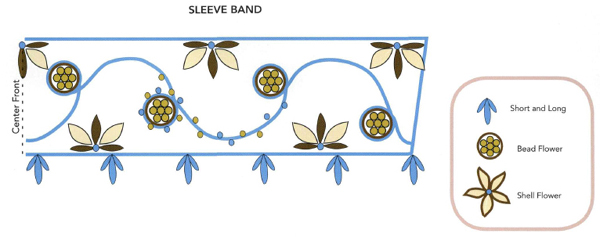
EMBELLISH YOKE AND SLEEVE BANDS
- Using Yoke and Sleeve Band illustrations as a guide, with a marking pen or chalk, mark the blue curved lines and circles on all pieces.

- Thread tapestry needle with A and work Stem stitch (see illustrations here) along marked curved lines and circles.

RANDOM BEADS ALONG STEM STITCH
Using sewing thread that matches the color of the bead, sew on beads along the edges of the Stem stitch, using photo above as guide.
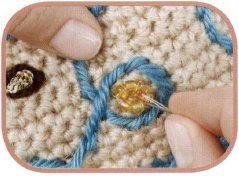
BEAD FLOWER
- Thread 6 seed beads onto sewing needle threaded with sewing thread matching color B, leaving a 6"⁄15 cm end of thread.
- Tie threads together to form a circle. Cut thread, leaving a 6"⁄15 cm end.
- Thread sewing needle with one end of the thread and attach beads to inside of stem-stitched circle. Make a stitch across the top and bottom of the circle of seed beads. Sew a seventh seed bead to the center of the beaded circle. Secure ring of beads with 1 or 2 more stitches as needed.
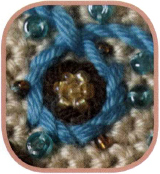
INNER CIRCLE AROUND BEAD FLOWER
Thread tapestry needle with MC and work Stem stitch circle between Bead Flower and outer circle in A.
SHELL FLOWER
- Cut two 10"⁄25.5 cm long lengths of sewing thread and thread through beading needle. Thread through shell bead.
- Repeat above for each shell bead.

- Using thread that matches the bead, sew a turquoise bead into position in center.
- Then sew the shell beads into position using the sewing thread following illustrations and photo here.
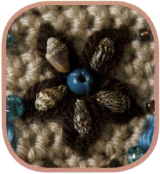
- Thread tapestry needle with MC and work Lazy Daisy stitch around shell bead to complete Shell Flowers.
ATTACH YOKE TO FRONT
- Match shoulder seam markers of Yoke to shoulder seams, and lower point of Yoke to center Front.
- Pin Yoke, RS facing, onto RS of Front, overlapping Edging over Front; turn to WS.
- Divide MC into a 2-ply strand and rethread tapestry needle. Overcast Yoke to Front, inserting needle in sts of first sc row of Yoke.
ATTACH YOKE TO BACK
Pin Insert, RS facing, onto RS of Back, matching centers and overlapping Edging over Back; turn to WS. Attach as for Front.
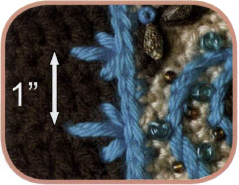
YOKE EDGING EMBROIDERY
With RS facing, using A and tapestry needle, with Short and Long sts all around outer edges of Yoke, spaced groups 1"⁄2.5 cm apart (see photo above and Illustrations).
Set in sleeves, matching shaping; sew Sleeve and side seams.
SLEEVE BANDS
- Embellish bands as for Yoke, following the chart for Sleeve Bands.
- With RS facing, pin top of Sleeve Band to lower edge of Sleeve, overlapping Band Edging over lower Sleeve edge.
- Attach as for Front and Back Yoke.
- With RS facing, using A and a tapestry needle, work Short and Long sts all around upper edge of Bands, spaced 1"⁄2.5 cm apart (see photo here and Illustrations). Weave in all ends.