Evening Elegance

Think understated opulence …
dinner at eight …
country concerts …
evenings at the symphony …


Opera Shrug
DESIGNED BY NOREEN CRONE-FINDLAY
INTERMEDIATE
Using an easy filet crochet stitch, you can use this shrug as either a hip fashion accessory or a casual layering piece, all depending on the color of Simply Soft you choose. The band is ideal for highlighting the beaded flowers and adding that extra flair to this versatile top.
SIZES
Small (Medium, Large)
FINISHED MEASUREMENTS
Bust 36 (40, 44)"⁄91.5 (101.5, 112) cm
Length 18"⁄45.5 cm, all sizes
NOTE: Filet crochet produces a very flexible fabric—sizes are approximate.
YARN
Caron International’s Simply Soft (100% acrylic; 6 oz/170 g, 315 yds/288 m skein):
• #9727 Black, 2 (3, 3) balls
CROCHET HOOK
One size US H/8 (5 mm), or size to obtain gauge
ADDITIONAL MATERIALS
One steel crochet hook, size 10 (1 mm), for edging
Two 30-gram tubes E beads, black opal
One 30-gram tube E beads, black
One spool black thread
Beading needle
GAUGE
In filet crochet, 6 mesh sts and 6 rows = 4"⁄10 cm
CROCHET STITCHES USED
ch: chain
dc: double crochet
dt: double treble crochet—yarn over hook 3 times, insert hook into st indicated, yarn over and pull up a loop, [ yarn over and draw through 2 loops] 4 times.
hdc: half double crochet
mesh st: mesh stitch—dc, ch 2; next dc completes one mesh.
sc: single crochet
slip st: slip stitch
tr: treble crochet—yarn over hook twice, insert hook into st indicated, yarn over and pull up a loop, [yarn over and draw through 2 loops] 3 times.
SPECIAL TECHNIQUES
Decrease in Filet Crochet
- At the beginning of a row, slip st in the back bar of the [ch-2 and dc] of the first space
- At the end of a row, do not work the last space.
Increase in Filet Crochet
- At the beginning of a row, ch 7, then dc in the top of the last dc.
- At the end of a row, ch 2, then work a dtr into the base of the last dc.
NOTES
- The Shrug is worked in one piece in filet crochet, following Shrug Chart; Cuffs are worked following Cuff Chart.
- The edging is worked after side edges are joined.
WORKING FILET CROCHET FROM CHARTS
- Each square represents one mesh space (mesh stitch) in filet crochet.
- When working from Charts, place a ruler on the Chart covering the rows above the row that you are working on. When you finish Row 1, slide the ruler up to reveal Row 2, and so on.
- Odd-numbered rows are read from the right to left; even-numbered rows from the left to right.

Chain 7.
Foundation Row: Dc in seventh ch from hook, ch 5, dc in base of dc, * turn, ch 5, skip 2 ch, dc in next ch; repeat from * until there are 14 (20, 26) mesh sts, turn.
Begin working from Shrug Chart; work Rows 1–13, shaping as indicated and turning at the end of each row.
SLEEVES
Rows 14 and 15: Continuing from Shrug Chart, ch 25 for foundation of Sleeve; dc in eighth ch from the hook, * ch 2, skip 2 ch, dc in next ch; repeat from * five times, ch 2, dc in last dc of previous row; continue in pattern as established across.
FRONTS
Following Chart, work to beginning of neck shaping. Work across to neck edge, turn. Work each Front separately, following Chart, shaping neck, Sleeves and Front as indicated. Fasten off.Using yarn needle, weave in ends.
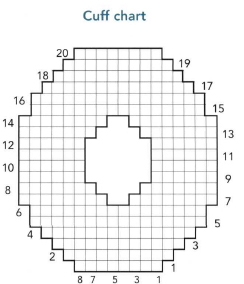
CUFFS (MAKE 2)
Chain 7.
Work Foundation Row as for Back until there are 8 mesh sts.
Begin working from Cuff Chart; work Rows 1–6, shaping as indicated and turning at the end of every row.
Rows 7–14: Work each side of Cuff separately.
Row 15: Work across to center; rejoin into one piece and complete Chart.
FINISHING
SIDE SEAMS
With RS facing, join yarn with a slip st at side on last row of one Front (Row 58 of Chart); ch 3, slip st in side edge mesh st of Back (Row 1 of Chart), * ch 3, slip st in next mesh st of Front, ch 3, slip st in next mesh st of Back; repeat from *, working back and forth between the edge pieces to end of Sleeves. Fasten off. Repeat for remaining seam.
FRONT BAND�SHRUG
Round 1: With RS facing, join yarn with a slip st at one side seam on lower edge; ch 2, work 3 hdc in each ch-2 space around lower edge, center Fronts and neck edge, join with a slip st to first st.
Rounds 2 and 3: Ch 2, hdc in each hdc around, join with a slip st in first st. Fasten off.
EDGING�CUFFS
Join yarn with a slip st in any ch-2 space on outer edge; ch 2, work 3 hdc into each ch-2 space around edge of cuff, join with a slip st to top of beginning ch-2. Fasten off. Weave in ends.
EMBELLISHING
BEAD EDGING�CUFFS
- Mix one-half of the black E-beads and one-half of the black opal E-beads in a container, then randomly thread onto a strand of black sewing machine thread; using steel hook, join the thread to the outside edge of the cuff.
- With WS facing (so beads with be on the RS when edging is completed), ch 2, * in next hdc, work [2 sc, slip bead, 2 sc] all in same st; repeat from * around, join with a slip st in first st.
- Fasten off. Weave end securely into band.
JOIN CUFFS TO SLEEVES
After completing bead edging on Cuffs, join to Sleeves in the same manner as side seams. Join yarn with a slip st at Sleeve seam; * ch 3, slip st to mesh st on Cuff, ch 3, slip st to mesh st on Sleeve; repeat from * around.
BEAD EDGING�SHRUG
- Thread remaining E-beads onto black sewing machine thread; using steel hook, join the thread to the outside edge of the front band.
- With WS facing, ch 2, * in next hdc, work [2 sc, slip bead, 2 sc] all in same st; repeat from * around, join with a slip st in first st.
- Fasten off. Weave end securely into band.
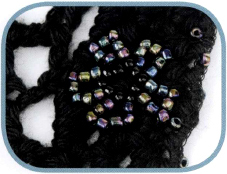
BEAD FLOWERS
- Using remaining beads, make Bead Flowers; see instructions and Illustrations for Hobo Boho bag, here.
- Make as many Bead Flowers as desired.
- Stitch the Bead Flowers to the Front bands, and 1 on each Cuff.

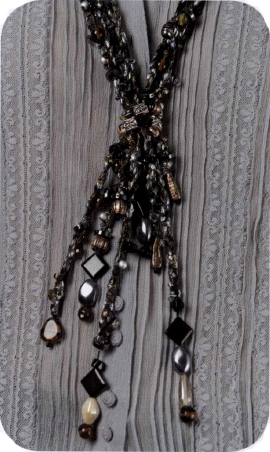
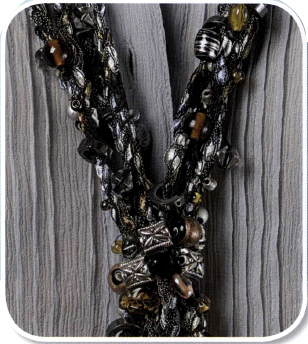
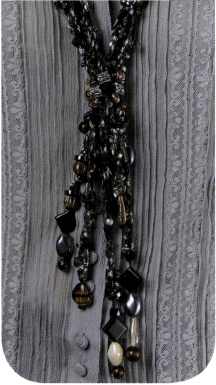
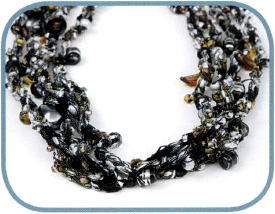
Drama Necklace
DESIGNED BY NOREEN CRONE-FINDLAY
EASY
This easy-to-make necklace made from chained chains is embellished with multiple types of beads, and is sure to add a gorgeous and elegant touch to any outfit.
ONE SIZE
FINISHED MEASUREMENTS
Necklace shown measures approximately 20"⁄51 cm to the end of the longest strand.
YARN
Caron International's Fabulous (100% nylon; 1.76 oz/50 g, 160 yds/146 m ball):
- #0013 Country Cottage, 1 ball
CROCHET HOOK
One size US H-8 (5 mm)
ADDITIONAL MATERIALS
Two safety pins or small stitch holders
Beading or quilting thread
Sewing or beading needle (small enough to fit through beads), with a sharp point
6, 8 × 10 mm rectangular silver beads
Approx. 100 large (10 mm to 20 mm) glass beads in assorted shapes in shades of gray, black, silver, tan, and brown
Approx. 200 small (#3 seed to 6 mm) glass beads in assorted neutral colors
Steel crochet hook size US 11 (.75mm) (optional)
GAUGE
Gauge is not critical for this project.
CROCHET STITCH USED
ch: chain
NOTE
The necklace is created from 4 Cords (chained chains), which are made by working a chain with one strand of yarn, and then chaining the chain (using it as if it were a strand of yarn) to form the Cord. When the Cords are completed, they're embellished with beads of your choice, using either or both of the Beading Techniques that follow.

NECKLACE
CORDS (CHAINED CHAINS)
Make 4, each between 35" and 40"⁄88 and 102 cm in length.
Using larger hook and 1 strand of yarn, chain 100. Do NOT fasten off. Remove hook from last chain; place the last chain on a holder or safety pin.
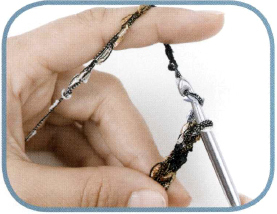
- Return to the beginning of the chain just worked (the opposite end from the holder); using larger hook, insert hook into the center of the first ch stitch.
- Using the length of chain as if it were a strand of yarn, yarn over and pull up a loop; continue to chain the chain until the stitch holder is reached; do NOT fasten off.
- Measure the Cord (chained chain); if it's not the desired length, place the last chain worked on a holder.
- Remove the first holder (on the original chain); using larger hook and strand of yarn attached to the original chain, work additional chains.
- Place last ch on holder as before; remove the holder from the last chain of the Cord, and chain the chain to the desired length.
- When the desired length is reached, unravel any excess chain, cut yarn, leaving a tail long enough to weave into cord and secure.Fasten off.
BEADING TECHNIQUES
- To attach beads with small holes to the Cords, use Beading Technique One.
- To attach beads with slightly larger holes, use Beading Technique Two, if desired.
- To add large-hole beads, slide them onto the Cords.
BEADING TECHNIQUE ONE
- Place the beads in a shallow bowl or jar lid.
- Thread the beading needle; work a couple of stitches into the Cord to secure the thread.
- Pick up a bead with the tip of the needle, slide down against the Cord.
- Stitch through the Cord to secure the bead; work small sts into the Cord for approximately 1⁄2"/1.3 cm from the bead.
- Repeat Steps 3 and 4, adding beads every 1⁄2"/1.3 cm along the length of the Cord.
- Fasten off thread and weave end into Cord.
BEADING TECHNIQUE TWO (OPTIONAL)
- Place the beads in a shallow bowl or jar lid.
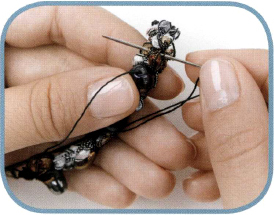
- Tie the thread to the Cord securely, leaving an end long enough to weave in.
- Using the steel hook and attached strand of thread, work 7–9 chains; attach thread chain to Cord with a sc; remove hook from loop, enlarging the loop slightly; insert hook into the hole of a bead, slide the bead onto the hook, pick up the loop of thread with the hook and pull it through the hole in the bead; attach thread and bead to Cord with a sc.
- Repeat Step 3, adding beads every 1⁄2"/1.3 cm along the length of the Cord.
- Fasten off thread and weave end into Cord.
EMBELLISH NECKLACE
- Working each Cord separately, attach beads to the Cords, using Beading Method of choice.
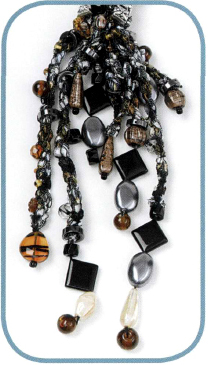
- Stitch large beads to both ends of each Cord, one at a time.
- Fold each Cord in half, gathering the center of the Cords together with a temporary tie to hold them in place while making the Tassel on the ends; ends will not all be exactly the same length.
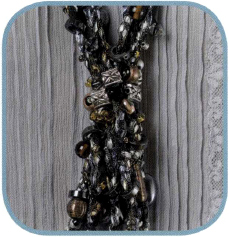
- Using beading thread, tie the ends together, 4" or 5" (10–12 cm) up from the ends, to form a Tassel; wrap yarn around Tassel, 1 1⁄2"–2"⁄3.5–5 cm below where they are tied together, forming the neck of the Tassel.
- Using needle and thread, attach beads around the wraps; fasten off securely.
- Weave any remaining loose ends inside the Cords, stitching in place to secure.
- Remove temporary tie around the center of the Cords.

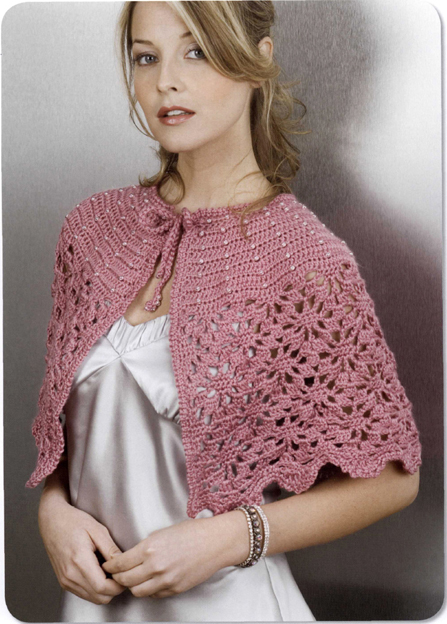
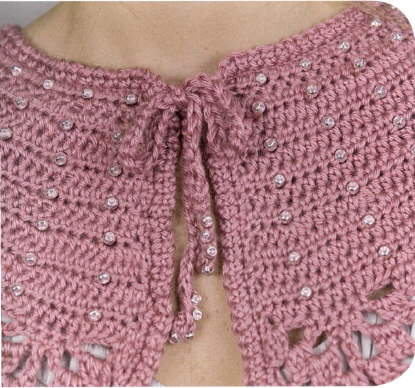
Evening Capelet
DESIGNED BY TREVA G. MCCAIN
INTERMEDIATE
This lacy, beautiful capelet is sure to grab attention and admirers. The beaded yoke adds a feminine and delicate touch to this outstanding garment.
SIZES
Small (Medium, Large)
FINISHED MEASUREMENTS
Chest/around upper arms 41 (44, 47)"⁄ 103 (110, 118) cm
Length 16"⁄40 cm
YARN
Caron International’s Simply Soft (100% acrylic; 6 oz/170 g, 315 yds/288 m skein):
- #9721 Victorian Rose, 2 skeins
CROCHET HOOK
One size US H-8 (5 mm), or size to obtain gauge

ADDITIONAL MATERIALS
Floss threader
182 (196, 210) beads with hole large enough to accommodate yarn
Yarn needle
GAUGE
In half double crochet, 18 sts and 11 rows = 4"⁄10 cm
CROCHET STITCHES USED
bc: bead chain (see here)
bhdc: bead half double crochet—work as bsc, working hdc instead of sc.
ch: chain
dc: double crochet
hdc: half double crochet
sc: single crochet
slip st: slip stitch
Lace Pattern (multiple of 14 sts)
- ROW 1: Dc in third ch from hook (counts as first 2 dc), dc in next ch, * skip 3 ch, ch 3, sc in the next 5 ch, skip 3 ch, ch 3, dc in next 3 ch; repeat from * across to last 3 ch, dc in last 3 ch, turn.
- ROW 2: Ch 3 (counts as dc, ch 1), * skip 3 dc, work 3 dc in ch-3 space, skip sc, ch 3, sc in next 3 sc, skip next sc, ch 3, work 3 dc in ch-3 space; repeat from * across, end skip 2 dc, ch 1, dc in turning ch, turn.
- ROW 3: Ch 2 (counts as dc), * dc in ch-1 space, skip 3 dc, ch 3, work 3 dc in ch-3 space, skip next sc, ch 3, dc in next sc, skip next sc, ch 3, work 3 dc in ch-3 space, skip 3 dc, ch 3; repeat from * across, end dc in ch-1 space (turning ch), dc in second ch of turning ch-3, turn.
- ROW 4: Ch 1, sc in next 2 dc, * sc in ch-3 space, skip 3 dc, ch 3, work 3 dc in ch-3 space, skip next dc, ch 1, work 3 dc in ch-3 space, skip 3 dc, ch 3, sc in ch-3 space, sc in dc; repeat from * across, end with sc in ch-3 space, sc in dc, sc in turning ch, turn.
- ROW 5: Ch 1, * sc in next 3 sc, sc in ch-3 space, ch 3, skip 3 dc, work 3 dc in ch-1 space, ch 3, skip 3 dc, sc in ch-3 space; repeat from * across, end sc in ch-3 space, sc in next 3 sc, skip turning ch, turn.
- ROW 6: Ch 1, * sc in next 3 sc, skip next sc, ch 3, work 3 dc in ch-3 space, skip 3 dc, ch 1, work 3 dc in ch-3 space, skip next sc, ch 3; repeat from * across, end sc in next 3 sc, skip turning ch, turn.
- ROW 7: Ch 2 (counts as dc), dc in second sc, * skip sc, ch 3, work 3 dc in ch-3 space, skip 3 dc, ch 3, dc in ch-1 space, skip 3 dc, ch 3, work 3 dc in ch-3 space, skip sc, ch 3, dc in sc; repeat from * across, end skip next sc, dc in next 2 sc, skip turning ch, turn.
- ROW 8: Ch 2, skip 2 dc, * ch 1, work 3 dc in ch-3 space, skip 3 dc, ch 3, sc in ch-3 space, sc in dc, sc in ch-3 space, skip 3 dc, ch 3, work 3 dc in ch-3 space, skip next dc; repeat from * across, end ch 1, dc in turning ch, turn.
- ROW 9: Ch 2 (counts as dc), work 2 dc in ch-1 space, * skip 3 dc, ch 3, sc in ch-3 space, sc in next 3 sc, sc in ch-3 space, skip 3 dc, ch 3, work 3 dc in ch-1 space; repeat from * across, end work 3 dc in ch-1 space, skip turning ch-2, turn.
- Repeat Rows 2–9 for pattern.
NOTE
Thread 26 (28, 30) beads at the beginning of each bead row to complete beading for that entire row.
YOKE
Thread beads for first row; chain 81 (87, 93).
Row 1 (WS): Hdc in third ch from hook (counts as first 2 hdc), * bhdc in next ch, hdc in next 2 ch; repeat from * across, turn—80 (86, 92) hdc, 26 (28, 30) beads.
Row 2: Ch 2 (counts as first hdc), hdc in next st, * work 3 hdc in next st, hdc in next 2 sts; repeat from * across, turn—132 (142, 152) hdc.
Row 3: Thread beads; ch 2 (counts as first hdc), hdc in next 2 sts, bhdc in next st, * hdc in next 4 sts, bhdc in next st; repeat from * across to last 3 sts, hdc in last 3 sts, turn.
Row 4: Ch 2 (counts as first hdc), hdc in each st across, turn.
Row 5: Repeat Row 3.
Row 6: Ch 2 (counts as first hdc), hdc in next 2 sts, work 3 hdc in next st, * hdc in next 4 sts, work 3 hdc in next st; repeat from * across to last 3 sts, hdc in last 3 sts, turn—184 (198, 212) hdc.
Row 7: Thread beads; ch 2 (counts as first hdc), hdc in next 3 sts, bhdc in next st, * hdc in next 6 sts, bhdc in next st; repeat from * across to last 4 sts, hdc in last 4 sts, turn.
Row 8: Repeat Row 4.
Rows 9–13: Repeat Rows 7 and 8 twice, then Row 7 once.
Row 14: Repeat Row 4, increasing 12 stitches, evenly spaced across—196 (210, 224) hdc.
BODY
Begin Lace pattern; work even for 21 rows as follows: Work Rows 1–9 once, Rows 2–9 once, then Rows 2–5 once.
EDGING
Round 1 (RS): Ch 1, * sc in each sc across to ch-3, ch 3, skip [ch-3 and next dc], work 5 dc in next dc, ch 3, skip [next dc and ch-3]; repeat from * across to the last 4 sc, sc in each of the next 3 sc, work 3 sc in last sc (corner); work 34 evenly spaced sc along Front edge, work 3 sc in first ch of beginning ch (corner); working in remaining loops of beginning ch, sc in each ch across to last ch, work 3 sc in last ch (corner), work 34 evenly spaced sc along Front edge, work 2 sc in same sc as beginning sc, join with a slip st to beginning sc.
Round 2: Ch 2 (counts as sc, ch 1), * sc in next st, ch 1; repeat from * around, join with a slip st to second ch of beginning ch-2. Fasten off.
FINISHING
Using yarn needle, weave in all ends.
TIE (MAKE 2)
Cut a strand of yarn 72"⁄183 cm long. Thread one end of yarn through upper Front corner of Capelet; pull through until ends of yarn are even. Thread 12 beads onto strands; working with both strands of yarn, ch 2, * bc, ch 2; repeat from * eleven times, ch 2. Fasten off. Repeat for opposite side.

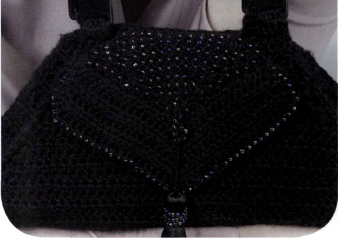
Opera Purse
DESIGNED BY CARI CLEMENT
INTERMEDIATE
Whether it's for the opera or the office, this purse is made in sections and is a great way to try your hand at bead crochet. The plastic canvas works perfectly as a purse liner by giving the purse dimension that allows you to carry your wallet, cell phone (oops, not at the opera … ), and makeup kit without sagging.
ONE SIZE
FINISHED MEASUREMENTS
Width (lower edge) 13 1⁄2"/34 cm; (upper edge) 6 3⁄4"/17 cm
Height 7 1⁄2"/19 cm
Depth 2 1⁄2"/6 cm
YARN
Caron International’s Simply Soft (100% acrylic; 6 oz/170 g, 315 yds/288 m skein):
- #9727 Black, 1 skein
CROCHET HOOKS
One each size US F-5 (3.75 mm) and US G-6 (4 mm), or size to obtain gauge
ADDITIONAL MATERIALS
Split-ring stitch marker
One pair black plastic purse handles, with slots in lower ends
Two sheets black plastic canvas, 10" × 14"⁄25.5 × 35.5 cm (for lining)
One vial (30 grams) glass E beads, Iris Iridescent
One 3"⁄7.5 cm black rayon tassel
Yarn needle
#16 tapestry needle
Scissors
Beading needle or floss threader
Straight pins
GAUGE
Gauge is not critical for this project.
In half double crochet (hdc), using larger hook, 15 sts and 8 rows = 4"⁄10 cm
CROCHET STITCHES USED
bc: bead chain (see here )
bsc: bead single crochet (see here )
bss: bead slip stitch (see here )
ch: chain
hdc: half double crochet
sc: single crochet
slip st: slip stitch
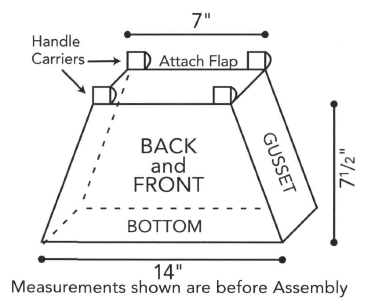
FRONT AND BACK (MAKE 2)
Using larger hook, chain 54.
Row 1: Hdc in third ch from hook and in each ch across—52 hdc.
Row 2: Ch 2, hdc in each hdc across.
Row 3: Ch 2, skip first hdc, hdc in each st across to last st, turn, leaving remaining st unworked—50 hdc.
Repeat Row 3 twelve times, dec 1 st each side every row until 26 hdc remain.
Work even, if necessary, until piece measures 7 1⁄2"/19.5 cm from beginning. Fasten off.

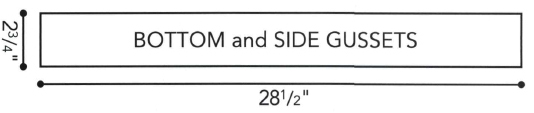
Using larger hook, ch 12.
Row 1: Hdc in third ch from hook and in each ch across—10 hdc.
Row 2: Ch 2, hdc in each hdc across.
Repeat Row 2 until piece measures 28 1⁄2"/72 cm or matches measurement along sides and lower edge of Purse Front. Fasten off.
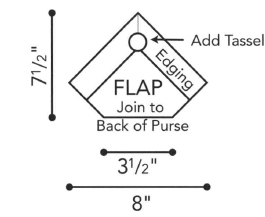
FLAP
Using beading needle or floss threader, thread yarn with 124 beads; slide beads along yarn until needed. Beginning at upper edge, using smaller hook, chain 14.
Row 1 (WS): Work bsc in second ch from hook and in each ch across, turn—13 sc.
Row 2 and all even-numbered rows: Ch 1, slip st in each sc across, turn.
Row 3: Ch 1, work 2 bsc in first st, work bsc in each st across to last st, work 2 bsc in last st—15 sc.
Row 5: Repeat Row 3–17 sc; place a marker (pm) for lower corner of Flap.
Row 7: Ch 1, skip first st, work bsc in each st across to last st, turn leaving last st unworked—15 sc.
EDGING
Rows 9, 11, 13, 15, 17, 19, and 21: Repeat Row 7 —1 st remains. Fasten off.
With RS facing, using smaller hook, join yarn with a slip st to lower corner of Flap, ready to work along the shaped side edge.
Row 1 (RS): Ch 2, work 13 hdc along side edge to point; work 3 hdc in point, place a marker (pm) in center st; work 13 hdc along remaining side to opposite corner, turn.
Row 2: Ch 2, hdc in each hdc to marked st; work 3 hdc in marked st, move marker to center st; hdc to end, turn.
Repeat Row 2 until Edging measures 1 1⁄2"/3.5 cm from the beginning, end with a RS row.Fasten off.
BEAD EDGING
Thread 57 beads onto yarn. With RS facing; join yarn with a slip st at upper edge of Flap (beginning chain), ready to work along side edge.Ch 1, work 33 bsc along side edge to point, work bsc at center point, work 33 bsc along remaining side to upper edge. Fasten off.
FINISHING
LINING
Using yarn needle, weave in all ends.
Using the Front as a pattern, cut 2 pieces of plastic canvas (Front and Back); cut a strip of plastic canvas the width and length of the Bottom and Side Gussets, piecing as necessary. Join the Back and Front plastic canvas pieces to the Bottom and Side Gussets piece, using an Overcast stitch. Set Lining aside.
ASSEMBLY
With wrong sides facing, pin Bottom and Side Gussets to Front, matching upper edges and easing to fit at lower corners. With RS facing, beginning at upper edge, join yarn with a slip st; working through both pieces, sc evenly down one side, across lower edge, and up opposite side to the upper edge. Fasten off. Repeat to join Bottom and Side Gussets to Back.
Place a marker at center of upper edge on Back; place a marker at center of straight edge of Flap (see Schematic). With RS facing, match center markers and pin Flap in place. Using smaller hook, join yarn at one edge of Flap and work a row slip st evenly across.
HANDLE CARRIERS
(MAKE 4; 2 EACH ON BACK AND FRONT)
Right-hand side: With RS facing, join yarn with a slip st, one st in from seam on upper edge.
Row 1: Ch 1, * sc in next 3 sts, turn—3 sc.
Continuing on these 3 sts, repeat Row 1 until piece measures 1 1⁄4"/3 cm from beginning.Fasten off, leaving a 12"⁄30.5 cm tail for sewing.
Thread carrier through opening at lower edge of Purse handle; fold carrier to WS; using yarn needle threaded with tail, stitch end of carrier securely in place along upper edge of Purse.
Left-hand side: With RS facing, join yarn with a slip st, 4 sts in from left-hand seam on upper edge. Work as for right-hand side.
Insert Lining into Purse: whipstitch in place along upper edges of Back and Front.
EMBELLISHING
- Cut a 12"⁄30.5 cm length of yarn and thread with 40 beads.

- Tie end of yarn around Tassel neck, slide down the beads and wrap beaded yarn around neck of Tassel.
- Secure yarn and thread through center of Tassel skirt. Fasten off.
- Make Tassel loop: Cut a 1-yard/92 cm length of yarn and attach yarn to point of Flap; thread with 10 beads.
- Work bc for 10 ch, thread chain through hanging cord of Tassel; join chain where it was attached. Weave in all ends.
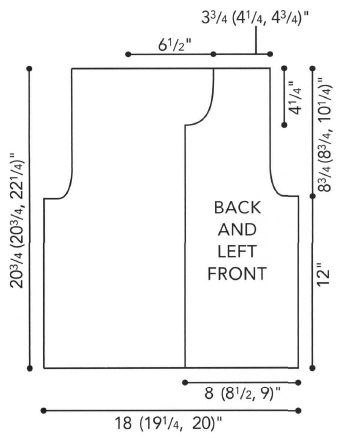
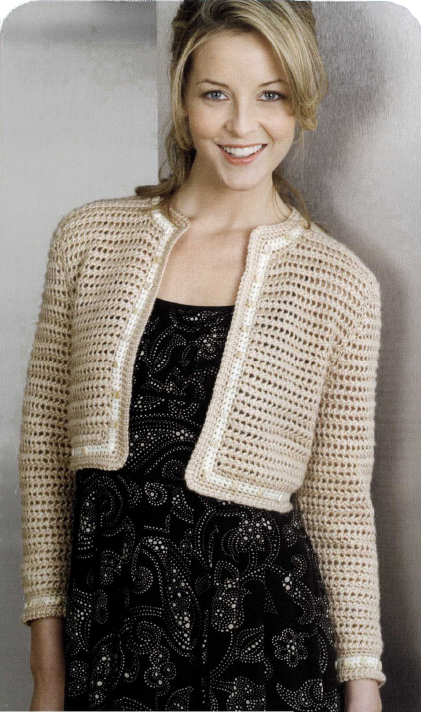
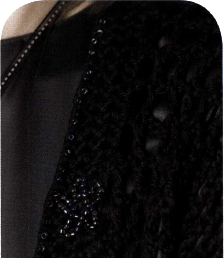
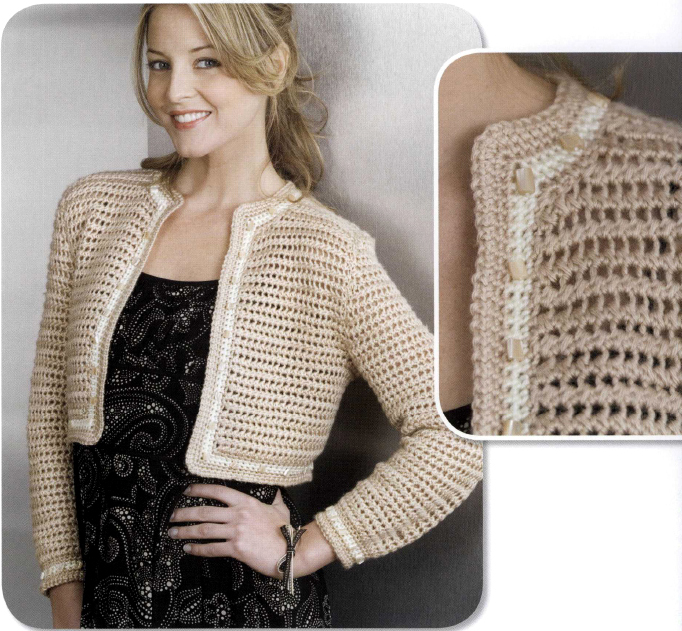
Elegant Bolero Jacket
DESIGNED BY TREVA G. MCCAIN
EASY
This super-soft jacket is ideal for evening or day wear. The unique embellishing technique on this project creates a challenge for everyone to figure out how you added the beads and leaves them admiring the results.
SIZES
Small (Medium, Large)
FINISHED MEASUREMENTS
Chest 36 (38 1⁄2, 40)"⁄91.5 (97.5, 101.5) cm
Length 20 3⁄4 (20 3⁄4, 22 1⁄4)"53 (53, 56.5) cm
YARN
Caron International’s Simply Soft (100% acrylic; 6 oz/170 g, 315 yds/288 m skein):
- #9703 Bone (MC), 2 (3, 3) skeins
- #9702 Off White (A), 1 skein
CROCHET HOOKS
One each size US I-9 (5.5 mm) and US J-10 (6 mm), or size to obtain gauge
ADDITIONAL MATERIALS
Stitch markers
Yarn needle
Long-eye beading needle
100 Rectangle Mop Shell Component-Style Pure Allure Beads (#370045)
Straight pins or small safety pins to use as markers
GAUGE
In Cluster-stitch pattern, 12 hdc clusters and 10 rows = 4"⁄10 cm
CROCHET STITCHES USED
ch: chain
dc: double crochet
hdc: half double crochet
hdc3tog: half double crochet 3 together—[ yarn over, insert hook in st indicated and pull up a loop] twice, yarn over and draw through 5 loops on hook.
sc: single crochet
sc2tog: single crochet 2 together—insert hook in next st, yarn over and pull up a loop (2 loops on hook), insert hook in next st, yarn over and pull up a loop, yarn over and draw through all 3 loops on hook.
slip st: slip stitch
Cluster-stitch Pattern
- ROW 1: Inserting hook in third and fourth ch from hook, hdc2tog (cluster made), * inserting hook in same ch as last st, then in next ch, hdc2tog (cluster made); repeat from * to end, turn.
- ROW 2: Ch 2, work cluster by inserting hook into first and second cluster, * work cluster by inserting hook in same place as last st, then in next cluster; repeat from *, working last insertion in top of ch 2, turn.
- Repeat Row 2 for Cluster-st.
NOTES
- Cluster-st pattern looks the same on both sides, therefore both Fronts are worked alike.
- Bolero is meant to be worn open; there are no buttons or closures.
BACK
Using smaller hook and MC, chain 56 (60, 62).
Row 1: Work Row 1 of Cluster-st—54, (58, 60) clusters.
Rows 2–30: Work even in Cluster-st, repeating Row 2.
SHAPE ARMHOLE
Row 1: Slip st in first 3 sts; ch 2, work cluster by inserting hook in same space as last slip st and in next st, continue in pattern across to last 3 sts, turn, leaving remaining sts unworked—48 (52, 54) clusters remain.
Row 2: Decrease Row—ch 2, hdc3tog over first 3 clusters, work in pattern across to last 3 st; hdc3tog over last 3 clusters, turn—46 (50, 52) clusters remain.
Rows 3 and 5: Work even in pattern (as Row 2 of Cluster-st.)
Row 4: Repeat Decrease Row—44 (48, 50) clusters remain.
Row 6: Repeat Decrease Row—42 (46, 48) clusters remain.
Rows 7–22 (22, 26): Work even in pattern.Fasten off.
FRONT (MAKE 2, BOTH ALIKE)
Using smaller hook and MC, chain 26 (28, 29).
Row 1: Work Row 1 of Cluster-st—24, (26, 27) clusters.
Rows 2–30: Work even in Cluster-st, repeating Row 2.
SHAPE ARMHOLE
Row 1: Continue in pattern across to last 3 sts, turn, leaving remaining sts unworked for underarm—21 (23, 24) clusters remain.
Row 2: Decrease Row—ch 2, hdc3tog over first 3 clusters, work in pattern to end—20 (22, 23) clusters remain.
Rows 3 and 5: Work even in pattern (as Row 2 of Cluster-st.)
Row 4: Repeat Decrease Row—19 (21, 22) clusters remain.
Row 6: Repeat Decrease Row—18 (20, 21) clusters remain.
Rows 7–11 (11, 15): Work even in pattern.
SHAPE NECK
Row 1: Work in pattern across to last 3 sts, turn, leaving remaining sts unworked for neck—15 (17, 18) clusters.
Row 2: Decrease Row—ch 2, hdc3tog over first 3 clusters, work in pattern to end, turn—14 (16, 17) clusters.
Rows 3, 5, and 7: Work even in pattern (as Row 2 of Cluster-st.)
Row 4: Repeat Decrease Row—13 (15, 16) clusters remain.
Row 6: Repeat Decrease Row—12 (14, 15) clusters remain.
Row 8: Repeat Decrease Row—11 (13, 14) clusters remain.
Rows 9–11: Work even in pattern. Fasten off.
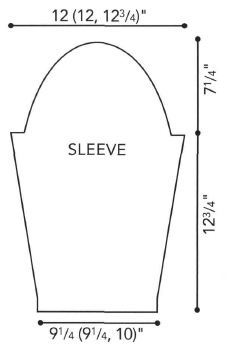
SLEEVES (MAKE 2)
Using smaller hook and MC, chain 30 (30, 32).
Row 1: Work Row 1 of Cluster-st—28, (30, 30) clusters.
Rows 2 and 3: Work even in Cluster-st, repeating Row 2.
Row 4: Increase Row—ch 2, work cluster by inserting hook in ch-2 space and first cluster; continue in pattern across to last st, work 2 clusters in last st—30 (30, 32) clusters.
Rows 5–7, 9–11 and 13–15: Work even in pattern.
Row 8: Repeat Increase Row—32 (32, 34) clusters.
Row 12: Repeat Increase Row—34, (34, 36) clusters.
Row 16: Repeat Increase Row—36 (36, 38) clusters.
Rows 17–32: Work even in pattern.
SHAPE CAP
Row 1: Slip st in first 4 sts; ch 2, work cluster by inserting hook in same space as last slip st and in next st, work in pattern across to last 3 clusters, turn, leaving remaining sts unworked—30 (30, 32) clusters remain.
Row 2: Decrease Row—ch 2, hdc3tog over first 3 clusters, work in pattern across to last 3 st; hdc3tog over last 3 clusters, turn—28 (28, 30) clusters remain.
Row 3: Work even in pattern (as Row 2 of Cluster-st.)
Rows 4–18: Repeat Decrease Row every other row eight times more, ending with a Decrease Row—12 (12, 14) clusters remain. Fasten off.
FINISHING
BOLERO EDGING
Using yarn needle and MC, sew shoulder seams, set in Sleeves, sew side and underarm seams.
Round 1: With RS facing, using larger hook and MC, join yarn with a slip st at right Front side seam; ch 1, working in remaining loops of beginning ch, sc in same space, sc evenly across to lower right Front corner; work 3 sc in next st (corner), place a marker in the center of these 3 sc; [work 2 sc in each row-rnd] to neck edge; work corner, pm; sc in each of next 2 sc; repeat from [to] to right shoulder seam; sc in each st across to left shoulder seam; repeat from [to] to beginning of neck shaping; sc in each of next 2 sc; work corner, pm; repeat from [to] to lower left Front corner; work corner, pm; working in remaining loops of beginning ch, work across to right Front seam, join with a slip st to beginning sc, changing to CC in last st before joining.
SHAPE NECK EDGING
Rounds 2 and 3: Using CC, ch 1, sc in same space and in each st across to marked corner st, work 3 sc in marked st, moving marker to the center of these 3 sc (corner); sc in each st to next marker; work corner; sc in each of the next 2 sts, sc2tog over next 2 st (decrease), sc in each st across to 4 sts before next marker; sc2tog over next 2 st, sc in each of the next 2 sts; work corner; sc in each st to next marked st, work corner; sc in each st around to beginning, join with a slip st to beginning sc, changing to MC in last st of Round 3 before joining.
Rounds 4 and 5: Using MC, ch 1, sc in same space and in each st around, working 3 sc in each marked corner st.
Round 6: Using MC, ch 1, sc in same space, ch 1, * sc in next sc, ch 1; repeat from * around; join with a slip st to beginning sc.
SLEEVE EDGING
Round 1: With RS facing, using larger hook and MC, join yarn with a slip st at sleeve seam; ch 1, working in the remaining loops of beginning ch, sc in same space and in each ch around; join with a slip st to beginning sc.
Round 2: Ch 1, sc in same space and in each sc around, join with a slip st to beginning sc, changing to A in last st before joining.
Rounds 3 and 4: Using A, work even in sc (as for Round 2), changing to MC in last st of Round 4.
Rounds 5 and 6: Using MC, work even in sc.
Round 7: Using MC, ch 1, sc in same space, ch 1, * sc in next sc, ch 1; repeat from * around, join with a slip st to beginning sc. Weave in all ends.

EMBELLISHING
BEADING
- Separate 4-ply yarn into 2-ply strand (See here).
- Place pins as markers approx 1"⁄2.5 cm apart for bead placement.
- Attach yarn on WS of jacket where first bead is to be attached.
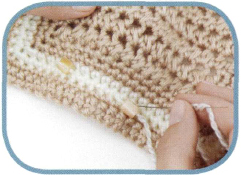
- Bring yarn through to RS, draw yarn through bead, sliding bead down to jacket.
- Leaving enough space for the bead to lie flat, insert needle through jacket border to WS as shown in photo above.
- On the WS, slide the needle through the inside of the stitches of the jacket border up to where the next bead should be placed.
- Repeat Steps 5 and 6 until all beads have been attached.