HOW TO…
• Get suitable music files for the Galaxy Tab
• Play music with the Music Player app
• Set a song as an alarm tone
In this chapter, I’ll show you how to play and enjoy music on the Galaxy Tab. If you’ve made the Galaxy Tab part of your everyday life, and music is as important to you as it is to me, the two go together like waffles and maple syrup.
We’ll start by briefly covering how to get suitable music files for the Galaxy Tab. The best way to get started is to create audio files from your CDs so that you can load them on the Galaxy Tab using Kies (as described in Chapter 3). You can also buy music online, using either the Galaxy Tab or your computer, or download music files for free—but you’ll need to know about the dangers before you do either.
After you load some music on the Galaxy Tab, you’ll want to enjoy it. You can play the music by artist, by album, or (with some luck) by genre—or you can create custom playlists that contain the songs you want to hear in the order you want to hear them.
Ready? Right, let’s get started.
Before you can enjoy music on the Galaxy Tab, you need to get suitable music files. This section outlines the four main sources you’ll probably want to explore:
• Creating music files from your own CDs
• Buying music online using the Galaxy Tab
• Buying music online using your computer
• Finding free music online
If the music you want to play on the Galaxy Tab is on CDs, you will need to create audio files of the songs on the CDs. Creating audio files is called ripping, because it technically involves extracting the audio files from the CD rather than just copying them (as you would do if music were software).
To rip CDs, you can use any of a variety of programs—but these are arguably the best two:
• Windows Media Player Windows 7 (and most known versions of Windows) includes Microsoft’s Windows Media Player, which you can launch by choosing Start | All Programs | Windows Media Player.
• iTunes iTunes is the program that Apple provides for creating and converting music files and for managing iPads, iPhones, and iPods. Even if you totally lack i-devices, you can download iTunes for free from Apple’s web site (www.apple.com/itunes/download).
After creating music files, you can put them on the Galaxy Tab using Kies or doubleTwist, as discussed in Chapter 3.
If you want to buy music online, you may be able to do so by using an app that the Galaxy Tab includes. Whether you have such an app depends on your Galaxy Tab model and (if it’s a 3G Galaxy Tab) your carrier, so display the Apps screen and see if one of these applications is there:
• Amazon MP3 This app gives you an easy way to browse and buy the millions of songs Amazon.com offers in the MP3 format.
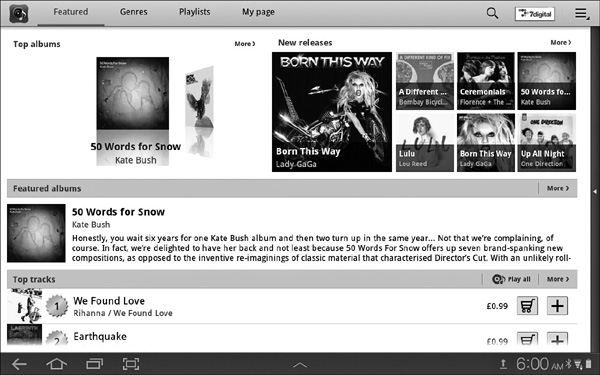
• Music Hub This app gives you easy access to an online music service or online media service from which you can preview and buy songs. Figure 4-1 shows the Music Hub app.
FIGURE 4-1 Depending on your Galaxy Tab model and carrier, you may have the Music Hub app for buying music online.
• Media Hub This app connects you to an online service for TV, movies, and in some cases music.
Instead of buying music from a proprietary music service such as the service you can access through the Music Hub app or Media Hub app, you can buy music from web sites and online services using your computer.

Because most of the music stores mentioned here work with most any web browser, you can access them using the Galaxy Tab and buy music from them. But unless you’re in a tearing hurry, it’s usually easier to buy the music using your computer and then copy it to the Galaxy Tab.
Digital Rights Management (DRM) Removes Value from Music You Buy Online
Before you buy any music or other media files via the Music Hub app or Media Hub app, make sure you understand what you’re getting if you do choose to pay.
First, find out whether the files you intend to buy are protected with digital rights management (DRM) that prevents you from transferring them to other devices and playing them there. MP3 files such as those from Amazon.com do not have DRM, but files in other formats (such as Windows Media Audio, WMA) may have DRM.
Second, find out whether the Galaxy Tab or other playback device must be connected to the Internet in order for you to play back music or other media.
Either of these restrictions is a deal-breaker. DRM is a set of technologies that music companies like to use to restrict what you and I can do with the music we buy. While DRM is mainly meant to prevent piracy, it tends to make playing music and media so much less flexible for honest buyers that it’s hardly worth buying music protected with DRM—especially as you can buy unprotected files elsewhere (as discussed later in this section).
Of the many online music stores at this writing, these are arguably the best three to start with:
• Amazon.com Amazon.com sells files in the widely used MP3 format without DRM. Prices tend to be competitive with buying new CDs. If you’ve bought books or other items from Amazon.com before, you may find this a good place to start.
• iTunes Store Apple’s iTunes Store sells music in the Advanced Audio Coding (AAC) format, which the Galaxy Tab can’t play, but you can create MP3 versions of the songs by using iTunes. To access the iTunes Store, you need to download and install iTunes from Apple’s web site (www.apple.com/itunes/download/). Apple is aggressively pushing the record companies to allow 90-second previews of songs that are longer than a couple of minutes, which is a great help in deciding whether you like the songs.

The advantage of Rhapsody and other online music services is that you can listen to a wide variety of music and buy only those songs you’re sure you want, rather than judging songs by 30-second, 60-second, or 90-second previews. The disadvantage is that you have to pay the subscription fees.
• Rhapsody Rhapsody (www.rhapsody.com) is an online music service with subscription plans that also let you buy songs. At this writing, Rhapsody claims to have 13 million songs, but not all of them are available for purchase. Rhapsody has bought Napster (www.napster.com), another subscription service with sales, and integrated it into Rhapsody.

Beware of sites that offer large amounts of songs for suspiciously small sums. Many of these sites are hosted in lightly policed countries by companies you’d likely prefer not to give your credit-card details to.
Instead of buying music at all, you can get increasing amounts of it for free online— legally. These days, more and more artists either offer sample tracks online or give away most of their songs online to encourage fans to attend their concerts, buy merchandise, and contribute to the artists’ upkeep in other ways than by buying CDs.
You can find free music online by entering terms such as free music download into your favorite search engine, but the results are likely to contain a high proportion of dangerous sites. Generally, you’re better off checking the web site of the artist you’re interested in; the artist’s presence on Facebook, MySpace, or other social-networking sites; or the artist’s record company’s web site (if the artist is beholden to a record company).
You can also download just about any music online illegally by using file-sharing networks. Before you choose to use a file-sharing network, do some research on copyright law, and make sure you understand how your computer’s IP address identifies your actions online.
After you’ve added music files to the Galaxy Tab, you can play them using the Music Player app. This app is easy to use, but it has various hidden features, as you’ll see in this section.
To open the Music Player app, follow these steps:
1. From the home screen, tap the Apps button to display the Apps screen.
2. Tap the Music Player icon.
When you open the Music Player app after copying music files to the Galaxy Tab, the Galaxy Tab doesn’t actually launch the Music Player—instead, it runs the Media Scanner to update your music library with the latest files. When you see the message that media scanning is complete, tap the Music Player icon on the Apps screen again to start the Music Player app.
To find the songs you want to play, you can browse your music library in five different ways by tapping the eight tabs on the left of the Music Player screen:
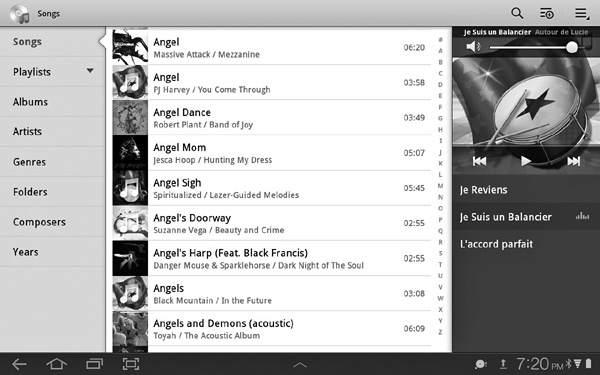
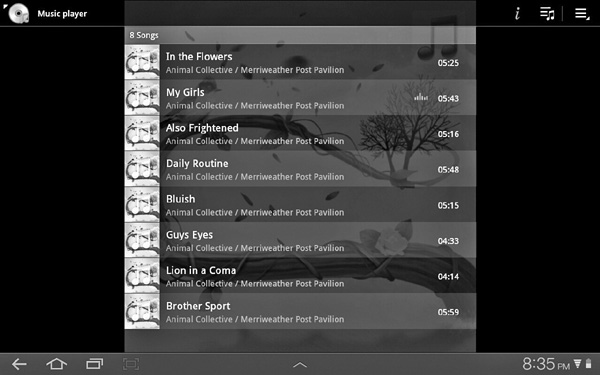
• Songs Tap this tab to display an alphabetical list of the songs on the Galaxy Tab, as shown in Figure 4-2.
FIGURE 4-2 Tap the Songs tab in the Music Player app to display an alphabetical list of the songs on the Galaxy Tab.
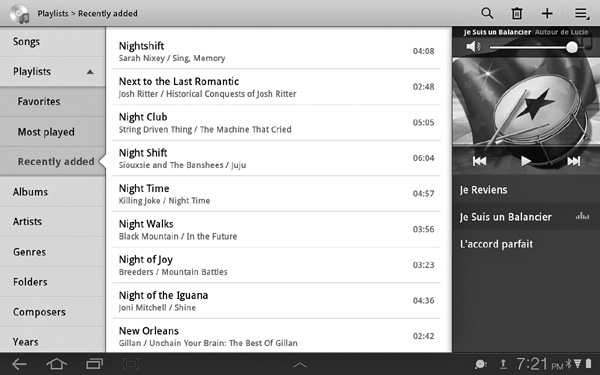
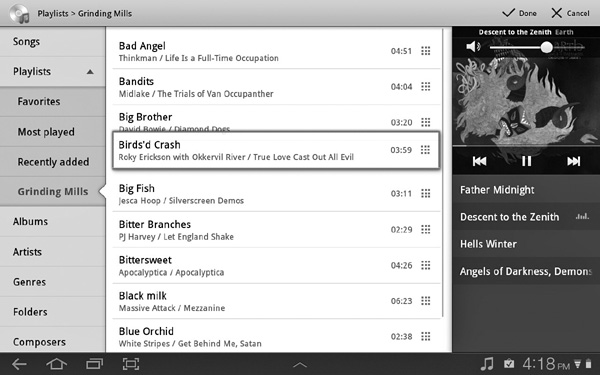
• Playlists Tap this tab to display the Galaxy Tab’s built-in playlists and the playlists you’ve created manually, as shown in Figure 4-3. Tap the playlist you want to play, and then tap the song at which you want to start playing.
FIGURE 4-3 Tap the Playlists tab to expand the list of playlists. This list includes the Music Player app’s built-in playlists and any playlists you’ve created.
The Music Player app displays a CD cover image when the song file contains one. When there’s no CD cover image, the Music Player app displays multicolored soft-focus graphics to represent the CDs and songs.
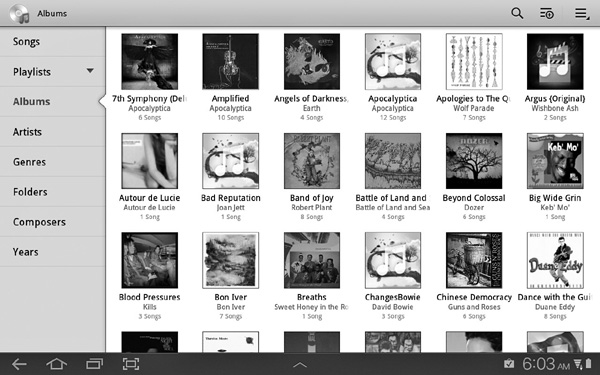
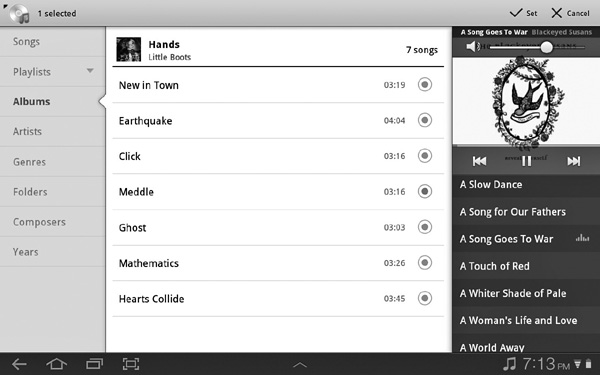
• Albums Tap this tab to display an alphabetical list of albums, as shown in Figure 4-4. When you find the album you want, tap its icon to display the album’s songs. Tap the song you want to play.
FIGURE 4-4 Tap the Albums tab in the Music Player app to browse through an alphabetical list of albums.
• Artists Tap this tab to display an alphabetical list of artists. Tap the artist whose songs you want to see. You can then tap the song you want to play.
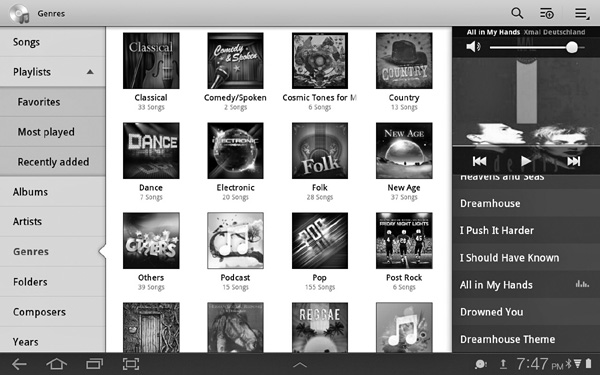
• Genres Tap this tab to display an alphabetical list of musical genres, as shown in Figure 4-5. You can then tap a genre to display the list of songs in that genre. Tap the song you want to play.
FIGURE 4-5 You can also browse by genre in the Music Player app.
• Folders If your songs are stored in different folders, you can tap the Folders tab to browse by folders. If your songs are all in the Media folder, there’s not much point in browsing by folders.
• Composers To browse by composers, tap the Composers tab, and then tap the composer whose songs you want to view. For browsing by composers to work well, you need to make sure that your music files contain an entry in the Composer tag. Many music files don’t contain an entry in the Composer tag.
• Years To browse your songs by years, tap the Years tab, and then tap the year you want to see. A list of the songs appears. For browsing by years to work properly, you need to make sure that each music file contains the correct year in the Year tag. Many music files don’t contain such an entry.
When you tap a song to play it, the Music Player app displays the song’s cover image (or its colorful stand-in) next to the play controls:
• When the Galaxy Tab is in portrait orientation, the play controls appear at the bottom of the screen, with the cover to their left.
• When the Galaxy Tab is in landscape orientation, the play controls appear on the right side of the screen, with the cover near the top. Figure 4-6 shows this arrangement.
FIGURE 4-6 You can control playback from the panel on the right side of the Music Player app in landscape mode.
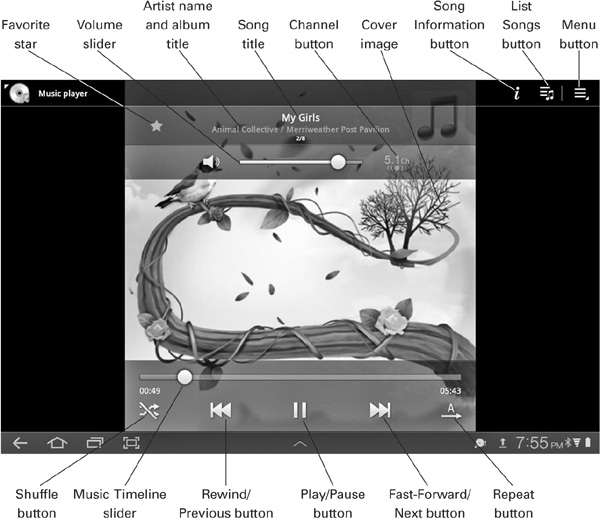
Whichever orientation you’re using, tap the cover image to display the Now Playing screen with its overlay of controls. Figure 4-7 shows the Now Playing screen with the controls labeled. The Galaxy Tab displays the overlay for a few seconds; if you don’t tap a button, it hides the overlay until you tap the screen to display it again.
FIGURE 4-7 The Now Playing screen displays an overlay of controls for playing the music.
The controls are straightforward to use:
• Song Information button Tap the i button to display the Media Info screen (shown in Figure 4-8).
FIGURE 4-8 Tap the Song Information button to display the Media Info screen. Tap the i button, or the cover picture that replaces the i button, when you want to hide the Media Info screen.
• Favorite star Tap this star to turn it gold and mark the song as a favorite. If the song is already a favorite, and you want to stop it being one, tap the gold star to turn it gray.
• Volume slider Tap and drag this slider to set the volume. You can also press the volume rocker button on the top edge of the Galaxy Tab.
• Artist name and album title This readout shows the artist name, a forward slash, and the album title.
• Song title This readout shows the song title.
• Channel button Tap this button to switch between regular stereo (with the 5.1Ch button grayed out) and 5.1 surround sound (with the 5.1Ch button white). Normally, you’ll want to use regular stereo when listening through headphones or a pair of speakers, and 5.1 surround sound only when you’ve connected the Galaxy Tab to a speaker system with five satellite speakers and one subwoofer.
• Cover image This area shows the CD’s cover image or the picture that the Galaxy Tab has substituted for it.
• List Songs button Tap this button to return to the screen from which you went to the Now Playing screen.
• Menu button Tap this button to display the menu, which contains extra commands—for example, for displaying the Settings screen.
• Music Timeline slider Tap and drag this slider to move quickly to a different point in the song.
• Shuffle button Tap this button to turn shuffling on or off. When shuffling is off, a diagonal line appears through the shuffle arrows.
• Rewind/Previous button Tap and hold this button to move back through the song a few seconds at a time; release the button when you reach the part you want to hear. Tap the button once to go back to the start of the song; tap it again to go to the previous song.
• Play/Pause button Tap this button to start playback or to pause playback.
• Fast-Forward/Next button Tap and hold this button to move forward through the song a few seconds at a time; release the button when you reach the part you want to play. Tap the button once to go to the start of the next song.
• Repeat button At first, when repeat is off, the icon shows A with an arrow under it pointing to the right, indicating that the album, playlist, or other song grouping is playing in sequence. Tap this button once to turn on repeat for the album or group of songs you’re playing; the icon shows A surrounded by counterclockwise arrows. Tap this button again to turn on repeat for a single song; the icon shows 1 with arrows going counterclockwise around it. Tap again to turn repeat off.
Playing music by artist or by album can be great, but what you’ll often want to do is play a sequence of songs in exactly the order you want to hear them, no matter which artist or album they come from. To do this, you create a playlist and add songs to it.
To create a playlist, follow these steps:
1. Open the Music Player app if it’s not already open.
2. Tap the Playlists tab to display it.
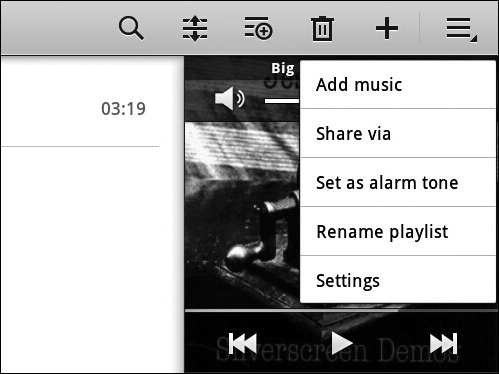
3. Tap the Menu button to display the menu panel.
4. Tap the New Playlist (+) button to display the New Playlist dialog box (shown here).
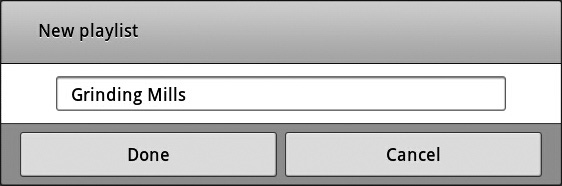
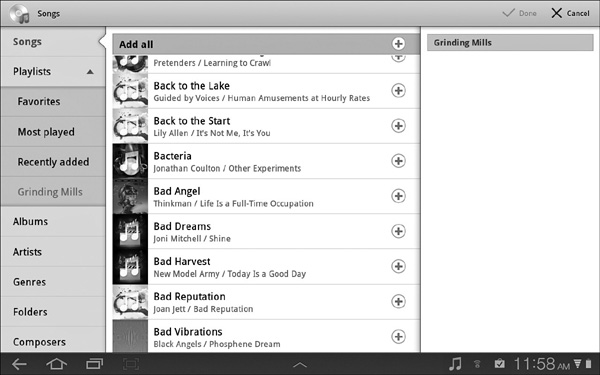
5. Type the name for the new playlist, and then tap the Done button. The Music Player app displays the list of songs in the middle of the screen, and displays on the right a pane containing the playlist with no songs in it, as you can see in Figure 4-9.
FIGURE 4-9 After you create a new playlist, the Music Player app displays the list of songs and a pane on the right containing the empty playlist. Tap the Add (+) button for each song you want to add.
6. Tap the Add (+) button for each song you want to add to the playlist.
7. After you finish adding songs to the playlist, tap the Done button above the playlist. The Music Player app displays the playlist with the songs added to it.
8. To change the order of the songs in the playlist, tap the Change Order button, the button that shows three lines with an up arrow and a down arrow, on the toolbar at the top of the screen. The Music Player app displays a movement handle (a grid of nine squares) to the right of each song.
9. Tap and hold a song’s movement handle so that a blue outline appears around the song’s button. Then drag the song up or down the playlist, as shown in Figure 4-10.
FIGURE 4-10 After adding songs to the playlist, you can leave the songs in their default order. But normally you’ll want to tap the Change Order button and then drag the songs into your preferred order.
10. After you finish rearranging the songs, tap the Done button to return to the Playlists screen.
You can now play the playlist and see how well the songs go together.
To delete a playlist, tap it in the list on the Playlists screen, and then tap the Delete button on the toolbar at the top of the screen. Tap the check box on the playlist’s name in the left column, and then tap the Delete button. In the Delete dialog box that appears, tap the Done button.
To make music sound the way you want it to, you can apply an equalization or a sound effect. You can also change which items the Music Player app includes on the Music menu.
To choose settings, follow these steps:
1. In the Music Player app, tap the Menu button to display the menu panel (shown here).
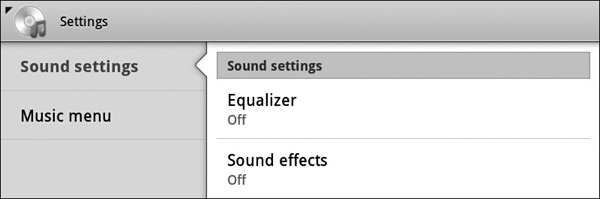
2. Tap the Settings button to display the Settings screen (shown here).
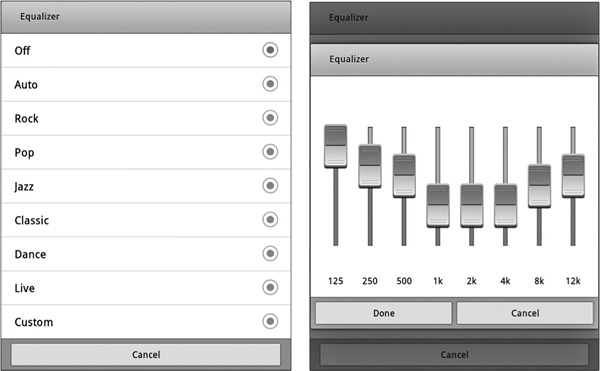
3. Tap the Equalizer button to display the Equalizer dialog box (shown on the left in Figure 4-11).
FIGURE 4-11 In the Equalizer dialog box (left), tap the equalization you want. To create a custom equalization, tap the Custom option button, and then work in the smaller Equalizer dialog box that appears (right).
4. Tap the option button for the equalization you want. To create a custom equalization, tap the Custom option button, drag the sliders in the smaller Equalizer dialog box that appears (see the right screen in Figure 4-11), and then tap the Done button.
You can create a custom equalization only when 5.1 stereo is turned off.
5. Tap the Back button to return to the Settings screen.
6. Tap the Sound Effects button to display the Sound Effects screen (shown here).
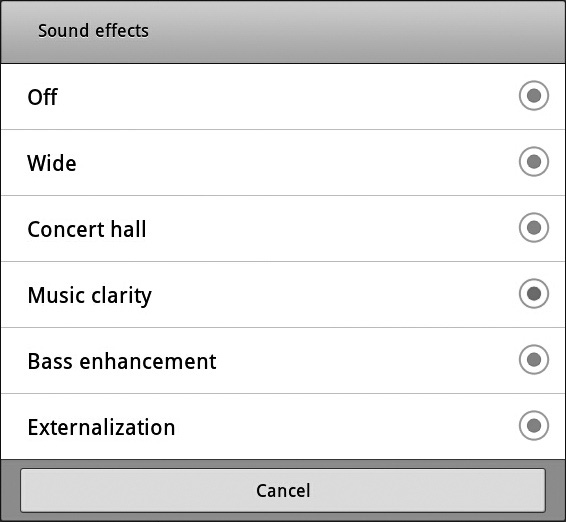
7. Tap the option button for the effect you want—for example, Concert Hall or Musical Clarity.
8. Tap the Back button to return to the Settings screen.
9. Tap the Music Menu button to display the Music Menu screen (shown here).

10. Select the check boxes for the items you want to display in the Music menu.
11. Tap the Back button to return to the Settings screen, and then tap it again to go back to your music.
Set a Song as an Alarm Tone
When you’re listening to a song, you may realize you’d like to use it as an alarm tone. You don’t need to go into Settings to use the song this way—you can do it right from the Music Player app.
To set a song as an alarm tone, follow these steps:
1. From the Now Playing screen, tap the Menu button to display the menu panel.
2. Tap the Set As Alarm Tone button. The Galaxy Tab displays an option button to the right of each song in whatever you’re playing, as shown here.
3. Tap the option button for the song you want to use as an alarm.
4. Tap the Set button in the upper-right corner of the screen. The Galaxy Tab displays the Alarm screen, from which you can set the details of the alarm.