Chapter 3. Authoring and Self-Publishing: Hacking Outside the PDF
Introduction: Hacks #24-31
Publishing documents involves a lot more than creating PDF files. The next few chapters will take a look at the details involved in publishing with PDF, but the hacks here will make that work easier and perhaps even more profitable for you.
Keep Your Source Smart
Cherish and maintain your source document; dumb PDF is no substitute.
PDF has grown to be a very capable file format. Starting out as dumb “electronic paper,” PDF is now also used as a smart authoring file format by many Adobe products. By smart, I mean that it perfectly preserves a document’s structure. For example, you can create artwork in Adobe Illustrator and then save it as a PDF without any loss of information (File → Save As... → Save as Type: PDF). Open this smart PDF in Illustrator and continue editing; it functions just like Illustrator’s native AI file format. Smart PDFs have beauty and brains.
Warning
Smart PDFs aren’t suited for general, online distribution. They are packed with application data and are much larger than their optimized, dumb derivatives. Some authoring programs give you the option to create dumb PDF. In Illustrator, for example, you can disable Preserve Illustrator Editing Capabilities when you choose to create a PDF (File → Save a Copy... → Save as Type: PDF). Or, dumb down a smart PDF with refrying [Hack #60] before releasing it for wide distribution.
Between smart and dumb, you have clever (or tagged) PDFs, which retain a loose sense of the original document’s structure [Hack #34] . Screen readers and downstream filters can use this information to extract document text and tables from the PDF. The PDFMaker macro, which ships with Adobe Acrobat and integrates with Microsoft Word, can create clever PDFs [Hack #32] .
Smart, clever, and dumb PDFs have different advantages, but they all share the same, beautiful face. Each kind can represent your document with excellent visual fidelity. This makes it hard to tell them apart by sight and leads to some confusion.
Only a few applications can create smart PDFs. Adobe Acrobat is not one of them. Acrobat can create dumb or clever PDF, but it can’t create a PDF that is clever enough to replace your source document. When using popular word processors like Microsoft Word, Sun StarOffice/OpenOffice, or Corel WordPerfect, PDF is not a substitute for the program’s native file format.
Tip
When making corrections to a PDF, remember to update the source file, too. Ideally, you would make all changes to your source document first, and then re-create the PDF edition. Depending on your workflow, this might not be practical.
So, cherish and maintain your source document. Dumb (or even clever) PDF is not a substitute. A good source document will reward you with HTML, handheld, and full-featured PDF editions. Process it to create derivative material, or easily apply new styles. As we shall see, your smart source document is pure content and should give you good service.
Meanwhile, dumb PDF remains perfectly suited for its original purpose: easy creation and distribution of great-looking electronic documents.
Authoring a Smart Source Document
A smart source document promises great rewards. Creating smart source documents takes discipline. The trick is to separate the document’s content from its presentation. We accomplish this by introducing styles, such as Heading 1, Body Text, and List Number. Styles separate content and presentation like so:
| Content → Style → Presentation |
For example:
| “Chapter One: Eno’s Work in Perspective” → Heading 1 → Arial Narrow, Bold, 18 pts. |
When you create a new paragraph, tag it with a style. In this case, we used Heading 1. The Heading 1 style, in turn, describes how all such paragraphs should appear. If you set the Heading 1 style to use the Bold, Arial Narrow font, all Heading 1 paragraphs in your document will be rendered using Bold, Arial Narrow. Without styles, changing the Heading 1 font from Arial Narrow to Times could involve selecting and changing every single heading paragraph by hand. Ugh!
The benefits of styles go well beyond rapidly changing fonts. You can also:
Create a dynamic table of contents
Create a full-featured PDF edition [Hack #32]
Create an HTML edition [Hack #35]
Create a handheld edition [Hack #36]
Generate derivative documents [Hack #55]
How? Styles give your content intelligence. When creating the
full-featured PDF, Heading 1 paragraphs also become level-1
bookmarks. When creating the HTML edition, Heading 1 paragraphs are
appropriately tagged <h1>. Styles give your
content meaning, so downstream filters can interpret it properly.
Styles in Microsoft Word 2002, Word 2000, and Word:Mac v.X
When you create a new document in Word, you inherit a collection of styles from the document’s template. If you did not specify a template, the normal.dot template is used as your document’s template. How do you access these styles?
In Word 2002, select Format → Styles and Formatting . . . , and a task pane opens on the right. If the list of styles looks too short, go to the bottom of this pane and set Show: All Styles to show everything. The list should grow to include dozens of paragraph, character, list, and table styles. At the top, as shown in Figure 3-1, it shows the style of your current selection. Change your current selection’s style by simply clicking one of the alternative styles in the list.
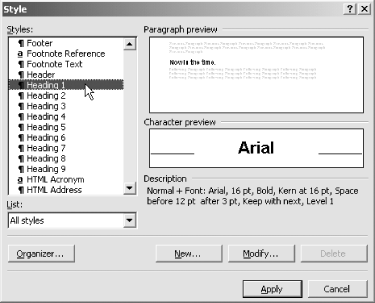
In Word 2000 or Word:Mac, select Format → Style to open a dialog that shows a list of available paragraph and character styles. Set List: All Styles to see everything. You can also use this dialog, shown in Figure 3-2, to change the current selection’s style. After you change a style, the dialog closes. This is a cumbersome way to apply styles.
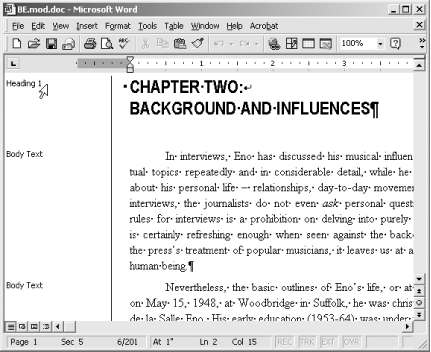
A better way to view and change paragraph styles in
Word 2000
and Word:Mac is with the Style Area, shown in Figure 3-3. In Word 2000, select Tools → Options
→ View. In Word:Mac, select Word → Preferences and
select the View option. Set the Style Area Width, near the bottom of
the dialog box, to 1" and click OK. Now, select
View → Normal or View → Outline, and a column on
the left will show you the style of each paragraph. Double-click a
style name and the Style dialog box opens,
enabling you to change the paragraph’s style.
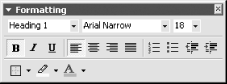
Writing a document using only styles takes discipline. Word makes it very easy to apply paragraph formatting outside of styles, so reduce temptation by closing the Formatting toolbar (View → Toolbars → Formatting), which is shown in Figure 3-4. After closing the Formatting toolbar, you can easily open the Style dialog by pressing Ctrl-Shift-S (Windows) or Command-Shift-S (Mac).
In most cases, you should change a paragraph’s formatting by changing its style (e.g., from Normal to List Bullet) or by modifying the style’s formatting (e.g., adding an indent to all Normal paragraphs). You can modify a style’s formatting with the Modify Style dialog, which you can access in many ways.
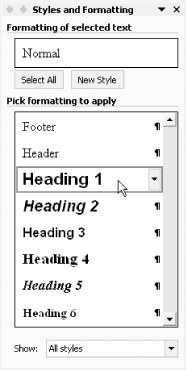
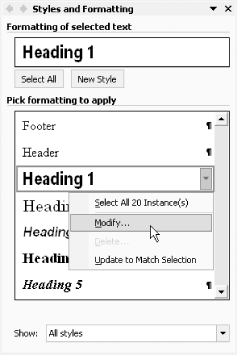
From the Styles and Formatting task pane, available in Word XP and 2003 and shown in Figure 3-5, you can open the Modify Style dialog by selecting Modify . . . from the current style’s drop-down menu. Or, in any version of Word, select the paragraph, open the Style dialog by pressing Ctrl-Shift-S (Windows) or Command-Shift-S (Mac), and then click Modify . . . . When using the Style Area, you can open the Style dialog by double-clicking the paragraph’s style name. Then click Modify . . . to open the Modify Style dialog.
Finally, avoid using tabs, repeated spaces, or repeated carriage returns (empty paragraphs) to format your content. Instead, update the style’s paragraph indents and spacing to suit your taste. Use tables for tabular data.
Convey Your Document’s Value with Good Design
Ensure that your document looks good and reads well.
Although content is king, presentation must not be overlooked. Just as you would dress up for a business interview or date, you should take care to dress your content according to its purpose. This should include practical as well as aesthetic considerations.
Your document’s design should convey the value and care you have invested in its content. It should complement your content and help the reader understand your work. So, design your document with the same eye you used to craft your content. Research and consult, and consider working with a professional whose work you admire. Once you establish your document’s design, apply it consistently.
A highly recommended book on the subject is Marshall Lee’s Bookmaking: Editing, Design, Production (W.W. Norton).
Tip
For online tips about hyphenating words, punctuating sentences, and capitalizing titles, visit the New York University Editing Workshop Syllabus (http://www.nyu.edu/classes/copyXediting/syllabus.html).
Every genre uses established styles that you are expected to follow, so you may already have guidelines to use. Some guidelines are strict (e.g., patent applications), but most leave room for personality and branding (e.g., The Wall Street Journal versus USA Today). Study established works in your genre to learn what your readers generally expect. This is also a good way to find the particular styles you prefer. Think of it as window-shopping for your document’s outfit.
I’ll Take That Font
Once you have spotted a font you want to use, identifying it can be tricky. If you found it in a book, check the back of the book for a colophon. If you found it in a PDF, check its font properties (File → Document Properties . . . → Fonts).
An online, intelligent assistant can help identify your font (it is also a fun way to browse fonts):
| http://www.fonts.com/findfonts/identifontframe.asp?FONTNAME=identifont |
Or, try the optical font recognition engine at:
| http://www.myfonts.com/WhatTheFont/ |
Thousands of professional fonts are on the market, so it might be impossible to precisely identify your font sample. Or, if you do identify your font, it might turn out to be too expensive for your budget. In these cases, you often can discover a good substitute. Later, we discuss some convenient and economical sources for fonts.
Tip
See some fonts that other people use by visiting the Best Sellers page at http://www.myfonts.com/fonts/bestsellers.html.
To install fonts on Windows, open C:\Windows\Fonts\ or C:\WINNT\Fonts\ in the File Explorer. Select File → Install New Font . . . and a dialog opens. Navigate over to the folder where your new fonts are, and their names should appear in the List of Fonts. Select the fonts you want to install and click OK.
Installing Type 1 or OpenType fonts on older Windows systems (NT, 98, or 95) or older Macintosh systems (pre-OS X) requires that you install one of Adobe’s ATM products first. ATM Light is freely available from http://www.adobe.com/products/atmlight/main.html.
Free Fonts
The Internet seems awash with free or cheap fonts. Crafting a good font takes hard work, and a bad font can actually create production problems. I advocate using professional fonts from reputable designers and foundries. Consider buying a font pack to bootstrap your font collection economically.
One source for good, free fonts is the Base 35 font package that comes with Ghostscript [Hack #39] . If you installed Ghostscript to C:\gs\gs8.14\, these fonts will be unpacked to C:\gs\fonts\. Another free, professional font family is Bitstream’s Vera (http://www.bitstream.com/categories/products/fonts/vera/).
Microsoft made its core TrueType fonts freely distributable. If you don’t have them already, you can fetch them from http://corefonts.sf.net.
Tip
The venerable Computer Modern fonts are freely available from http://www.ams.org/tex/type1-fonts.html. However, they don’t work as expected with popular word processors such as Microsoft Word. Consider purchasing European Modern (http://www.yandy.com/em.htm) instead.
System Fonts
Computer systems come with dozens of useful fonts. However, some might have licensing restrictions that could prevent you from embedding them into your PDF. When you create your PDF and try to embed such a font, Distiller will report the error in its log file. The resulting PDF might use a poor substitute font instead, such as Courier.
Warning
TrueType font files include built-in license restriction information; Type 1 font files do not. You mustn’t rely on Distiller to enforce restrictions; read the license.
Tip
If you want to minimize your PDF’s file size, consider using common fonts that you don’t need to embed. The Base 14 fonts and some system fonts are available on most computers, so you don’t need to pack them into your PDF. See [Hack #43] to learn more.
Bundled Fonts
Some authoring products come with fonts. For example, my Adobe Illustrator 9.0.1 CD has 213 fonts located in its Fonts & ATM\Fonts directory. Even though I asked the Illustrator installer to install fonts, it overlooked these. This same disc includes other goodies, such as clip art and stock photos.
Discover font files on your hard drives and CDs by searching for *.ttf (TrueType or OpenType), *.pfa, *.pfb (Adobe Type 1), or *.otf (OpenType) font files.
Font Packs
The different type foundries offer bulk discounts when you purchase collections of fonts. For example, Adobe offers the Type Basics collection of 65 fonts for $99 (http://www.adobe.com/type/). Visit http://fonts.com and http://www.myfonts.com to learn about the various font packs and CDs on the market.
Typography Tips
Here are some suggestions for formatting your document’s text and pages. There are no hard-and-fast rules for good design, so apply these tips judiciously.
When using two font families in one document, select one serif family and one sans-serif family, as shown in Figure 3-6. Avoid using more than two font families in one document. Some font families include dozens of fonts; Helvetica has 35 (http://www.myfonts.com/fonts/linotype/helvetica/).
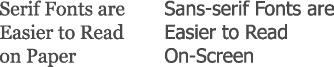
Serif body text is easier to read on paper; sans-serif body text is easier to read on-screen. Select a conservative font for long paragraphs so that they are comfortable to read. Headings can be more fanciful.
Text size is not the height of any specific letter. Rather, it is a loose measurement of the horizontal space used by a line of text. It is measured in points, and there are 72 points per inch.
A typical size for body text is 9 or 10 points. For an older audience, 11- or 12-point text is better because it is easier to read. Use 12-point body text in wide columns so that the words-per-line ratio remains reasonable.
Activate automatic kerning for your styles, particularly heading styles. Kerning tweaks the spaces between letters so that they look their best as shown in Figure 3-7.
In Word, add automatic kerning to a style by opening its Modify Style dialog and selecting Format → Font . . . → Character Spacing. Check the Kerning for Fonts checkbox and click OK.

Adjust column width and font size so that your body text averages 10 to 14 words per line. For example, text using a 9-point font might fit nicely in a 4-inch-wide column. The same text and font at 10 points might require a 4.5-inch-wide column. Long lines slow down the reader.
When you must scale a paragraph to fit into a given, vertical space, adjust its line spacing, as illustrated in Figure 3-8, before adjusting its font size. For example, 11- or 12-point line spacing looks good with a 9-point font. 13-point line spacing looks good with a 10-point font.
In Word, open your style’s Paragraph dialog, set Line Spacing: to Exactly, and enter your desired line point size.

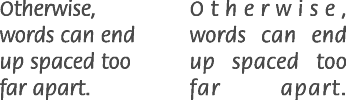
When using narrow columns (nine words or fewer per line), consider aligning text to the left instead of using justified alignment. Otherwise, words can end up spaced too far apart, as shown in Figure 3-9.
Avoid using all-caps or underlines for emphasis; use italic or bold instead. When using a light font, emphasize text using light italic or regular, not bold.
When you desire an all-caps style, try to find a font designed for that purpose, as shown in Figure 3-10.

Handling Long URLs
Placing URLs in a paragraph can leave you with awkward line lengths. Microsoft Word won’t break a URL over two lines, so the preceding line can end up looking too short. Here are some ideas for improving URL formatting.
Use page footnotes for URLs
A URL usually references related material and does not contribute to the paragraph’s narrative. So, place it in a page footnote, where references traditionally belong. This also makes it easier for readers to quickly find the URL later.
Insert Zero-Width Spaces to cue line breaks
The Zero-Width Space (ZWS) is a nonprinting character that tells Microsoft Word where it can break the URL. A natural location for the ZWS is after each slash that follows the domain name. Style the URL text a little differently than the body text, so readers aren’t confused by URLs broken over two or more lines.
In Word 2002, insert a ZWS by typing 200b (the
Unicode for ZWS) at the insertion point and then pressing Alt-X.
In Word 2000, you can replace slashes with slashes+ZWS using the Find
and Replace dialog (Edit → Replace . . . ). Set Find What:
to /. Enter a slash in Replace With: and then
append a ZWS by holding down the Alt key and typing
8203 (200b in decimal) on your keypad.
For handy ZWS Word macros and more information on ZWS, visit http://word.mvps.org/FAQs/Formatting/NoWidthSpace.htm. If you’re using a Macintosh, unfortunately this is a much more complicated process. Visit http://word.mvps.org/FAQs/WordMac/Unicode.htm for more information.
Create Charts and Graphs from Raw Data
Put a friendly face on your data before turning it into PDF.
Instead of chilling readers with tables of raw data, invite them to understand your numbers by displaying them in charts or graphs. Popular word processors can create charts for you, or you can use free software to create graphs.
Microsoft Word 2002, Word 2000, and Word:Mac v.X
Select and copy your table data. In Word, select Insert → Picture → Chart and a little spreadsheet opens. The first row and first column of this Datasheet are reserved for your data’s row and column headings. Select the upper-left cell and paste your table’s data. The chart will change to reflect your data. Activate/deactivate rows and columns by double-clicking the Datasheet’s row and column labels.
When you first create a chart, Word enters a special state called Microsoft Graph. Exit this state by clicking the document page outside the chart. Re-enter this state by double-clicking the chart. Within this state, you can update the chart’s Datasheet, change the chart type (Chart → Chart Type . . . ), or tailor the chart’s styling (to change a chart component’s color or style, double-click it). You can also resize or scale the chart by clicking its borders and dragging them around.
Corel WordPerfect
WordPerfect’s charts behave much like Word’s. In WordPerfect, you can select a table’s data, right-click, and choose Chart to rapidly create a chart. WP’s chart gallery (right-click and choose Gallery . . . ) offers dozens of chart types (as does Word’s). I find WP’s charts the easiest to style.
Sun StarOffice and OpenOffice
Sun’s word processor includes chart features that resemble those in Microsoft Word. Select Insert → Object → Chart . . . to start its wizard. Select your table’s data (step 1), select the chart type (steps 2 and 3), set the title (step 4), and you’re done. Double-click the chart to enter a special chart-editing state.
Create Standalone Plots with gnuplot
You can also create standalone plots using gnuplot. Easily create basic 2D or 3D plots from input data, or program gnuplot to precisely style the output. Preview plots on-screen, and then render them as PostScript, PNG, or one of the many other supported formats. Visit http://www.gnuplot.info for downloads, documentation, and examples. gnuplot is free software.
Store your two-dimensional data points in a text file like so (from DEMO/1.DAT):
-20.000000 -3.041676
-19.000000 -3.036427
-18.000000 -3.030596
...
Store your three-dimensional data points in a text file like so (from DEMO/GLASS.DAT):
0.568000 0.000000 -0.911000
0.518894 0.231026 -0.911000
0.380066 0.422106 -0.911000
...
Launch gnuplot and an interactive shell opens. By default, gnuplot renders plots on-screen. View a basic 2D plot of DEMO/1.DAT like so:
gnuplot> plot 'DEMO/1.DAT'
View a basic 3D plot of DEMO/GLASS.DAT like so:
gnuplot> splot 'DEMO/GLASS.DAT'
Create a PostScript file from your plot like so (the second
set
output releases the output
file handle):
gnuplot> set term postscript enhanced color solid
gnuplot> set output 'DEMO/1.ps'
gnuplot> plot 'DEMO/1.DAT'
gnuplot> set output
Run one of the DEMO scripts that come with the
Windows distribution like so:
gnuplot> cd 'DEMO'
gnuplot> load 'WORLD.DEM'
gnuplot has a good interactive help system. To learn about a keyword,
type help
keyword
(e.g., help
term). The gnuplot
newsgroup, comp.graphics.apps.gnuplot, can also
help you.
Show Relationships with Graphviz
A graph illustrates relationships between nodes by connecting them with edges. A directed graph uses one-way edges, indicated by arrowheads. An undirected graph does not. Use directed graphs to illustrate hierarchies or workflows.
Graphviz is a set of open source tools for creating graphs from input data. Visit http://www.research.att.com/sw/tools/graphviz/ for documentation, downloads, and examples.
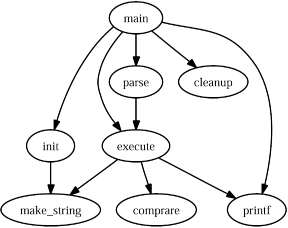
The Graphviz program we’ll use is called dot. Here is a basic example taken from the dot user’s manual. Label nodes and describe their relationships using a text file:
// example_graph.dot
digraph G {
    main -> parse;
    main -> execute;
    main -> init;
    main -> cleanup;
    parse -> execute;
    execute -> make_string;
    execute -> printf;
    init -> make_string;
    main -> printf;
    execute -> compare;
}
Pass this text file to dot and specify an output file format. We use PostScript, but you can also use PNG, SVG, or one of more than two dozen other formats:
dot -Tps example_graph.dot -o example_graph.ps
The results in Figure 3-11 look good and make sense.
Graphviz can also create elaborate, colorful graphs. Visit the Graphviz web site to see some examples.
Become a Publisher
Purchase your book’s ISBN and become a publisher.
Whoever registers your book’s ISBN is given credit for publishing your book. By purchasing your own ISBN, you also inherit the privileges of a publisher. ISBN stands for International Standard Book Number. It is a ten-digit number, and every published book has a unique ISBN. Your book must have one, such as the one in Figure 3-12, if you desire distributors and retailers to carry it. This ISBN must be printed on the book, so get one before going to press.

Think of a name for your publishing house, get out your credit card, and visit http://www.isbn.org to apply for an ISBN publisher prefix. This prefix will be used in all your ISBNs. At the same time, you must purchase a block of 10, 100, 1,000, or 10,000 ISBN numbers. As of this writing, 10 ISBNs cost $244.95, and 100 ISBNs cost $853.95. After completing the application, you should receive your numbers in about 10 days.
Tip
Publishing a book involves coordinating many resources. Assume that each step will require twice as much time as you would expect and you might have your book ready on time.
When your ISBN numbers arrive, you will also receive online account information. Use this online account to assign an ISBN to your book. Remember: you cannot reuse an ISBN. After assigning your book’s ISBN, go to Books in Print at http://www.bowkerlink.com and list your book free of charge.
When you print your book, you must print the ISBN on the inside copyright page and the ISBN barcode on the outside cover. Visit http://www.isbn.org/standards/home/isbn/us/major.asp for details on exactly how to use an ISBN number. Using it incorrectly can cause fulfillment problems.
Tip
You can create your ISBN barcode free of charge using this Lightning Source web page: http://www.lightningsource.com/LSISecure/PubResources/CoverSpecsEntry.asp. After submitting your ISBN, you will receive a PDF template for your book’s cover via email. This template is designed for use by Lightning’s system, but you can use Illustrator, Acrobat, or Photoshop to copy the barcode graphic from the given PDF template and paste it onto your book’s cover.
Now that you are a publisher, you can talk to distributors about carrying your book. Lightning Source is a wholesale distributor that also provides print-on-demand (POD) production and secure e-book fulfillment [Hack #29] . If you decide to print your own book, consider using Amazon’s Advantage program [Hack #30] .
Or, Consider a For-Fee Publisher
If self-publishing your book sounds like too much trouble, consider using a service provider that will publish your book for a fee. View a list of providers at https://www.lightningsource.com/ResourcesLinks.htm#AuthorServicesLinks. They offer various programs and à la carte features.
One example is the iUniverse Select program (http://www.iuniverse.com). For $459, iUniverse takes your electronic document and creates two editions: the POD paperback edition and the PDF e-book edition. iUniverse registers ISBNs, creates cover graphics, and lists your book with Amazon and Barnes & Noble. iUniverse pays you a 20% royalty on the money it receives (as opposed to the retail price) minus book shipping and handling charges.
Given this royalty formula, it is impossible to know how much you might receive for each book sold. Let’s make some guesses. If iUniverse gives your book a $25 suggested retail price, a sale through Amazon might pay iUniverse 50% ($12.50). Let’s guess that shipping and handling costs $1.50, which leaves $11. From that, you receive 20%, or $2.20. As I say, this is just a guess. For a broader discussion of royalty voodoo, visit http://www.booksandtales.com/pod/rword.htm.
Tip
Every book has a publisher, and every publisher has a reputation. This reputation can help or hinder your book’s sales. Before choosing a for-fee publisher, look at other books the company has published to make sure your work fits in.
Consult the newsgroups (http://groups.google.com) for opinions and testimonials on these various services. Perform an advanced search on Amazon to locate books by publisher, and check out their best-selling books.
Print at Home, at the Office, or at Kinko’s
Copy shops pick up where your laser printer leaves off.
Your electronic document’s shortest path to paper is probably a laser printer. You have one, or somebody you know has one, and its fidelity is remarkable. Your local office supply store has aisles of specialty papers and binding devices that help turn your printout into a publication.
When you need to quickly print and bind dozens of documents, your next stop might be the local copy shop. They are equipped with commercial-strength laser printers, copiers, paper trimmers, collators, and bindery equipment. A print shop with copying services might have better equipment, a greater selection of papers, and a more knowledgeable staff. They can also advise you when to upgrade from high-volume copying to offset printing. Shop around, and seek recommendations.
Tip
A trimmer is a powerful guillotine that can make a clean cut through inches of paper. A collator is a device for getting your document’s pages into the proper order. Binding is the process of attaching your pages together into a single document.
Selecting the Paper
Tasteful use of specialty or colored papers can improve your document’s appeal and make it stand out. However, different types of paper are used for different purposes. Bond paper generally is used in office copiers. Book paper is formulated for offset printing. If you want to use a special paper, ask a professional printer for advice. Naturally, a copy shop will stock only the papers they can use on-site.
A paper’s thickness, or weight , is measured differently for different types of paper. So, a 20-pound bond paper is not comparable to a 20-pound book paper. An introduction to paper choices is available online at http://depts.washington.edu/bsc/general_PDF's/Choosing_Paper.pdf.
Copying Photographs
Photographs are difficult to reproduce using a common copier. When detail or color is important, consider grouping this artwork together onto a few, select pages. Use the more expensive color laser printing or color copying on just those few pages, and then insert these color pages into your document before binding.
Binding
A staple or paperclip might serve to hold your document together, but a proper spine and covers dress up your work. And, they make your document easier to navigate. Some binding mechanisms, such as a plastic comb, allow your pages to lie flat. Other techniques, such as glue binding, do not.
If your finished document won’t be lying flat, consider using your word processor to add gutters to your document pages. Gutters keep your page text from getting lost in the spine’s fold. In Word, select File → Page Setup . . . → Margins and increase the Gutter setting as needed.
Tip
Kinko’s has combined online document hosting with POD to create its DocStore service. Visit http://www.fedex.com/us/officeprint/commsols/solutions/docstore.html to learn more about this interesting hybrid.
Publish POD and E-books
Partner with Lightning Source and plug your book into the system.
Lightning Source works with publishers (that’s you [Hack #27] ) to print and distribute books and e-books. Its POD facilities create paper books only when orders arrive, sparing you the trouble, risk, and expense of a large print run. Its secure e-book fulfillment service gives your readers more options and minimizes production costs. Distributing your book through Lightning Source will get it into the catalogs of Amazon, Barnes & Noble, and other retailers worldwide. Lightning Source is a subsidiary of Ingram Industries, which ties it to the awesome Ingram Book Group, so Lightning Source has firm footings and a broad network.
Tip
Wholesale distributors supply books to retailers, who then sell books to the public. Publishers rely heavily on wholesale distributors to get their books into readers’ hands.
Lightning Source is not for everybody. It does not provide the many services you get from a for-fee publisher. Lightning Source simply takes your finished book, prints it, and distributes it. You are responsible for everything else, which includes registering an ISBN [Hack #27] , typesetting your book to fit Lightning Source’s specifications, and creating a suitable cover graphic. Not following Lightning Source’s guidelines can cause frustration and additional expense. Guidelines and templates are available from http://www.lightningsource.com/ResourcesBookDesigner.htm.
To start, you must apply for an account at http://www.lightningsource.com. Upon acceptance, log in to upload your print-ready book and its cover art. This online account also enables you to order printed books, track your orders, and read sales reports.
Entering your book into the system requires a setup fee, which varies according to your book. For a 300-page book, your setup fee might be $100. Maintaining one book on Lightning Source’s servers costs $12 per year.
A few days after entering your book into the system, you will receive a printed proof to examine and approve. Iron out any problems you discover with the proof, and then your book will be ready for printing. When using Lightning Source’s distribution service, it could take two weeks or so for retailers to add your book to their catalogs. Meanwhile, you can order books directly from Lightning Source.
As the publisher, you control the suggested retail price of your book. You then sell your books to the wholesale distributor at a discounted, wholesale price. By giving Lightning Source a 55% discount, you leave room for them to extend an attractive discount to retailers. When you sell a book, Lightning Source charges you for printing, but not for shipping and handling. The price for printing a 300-page book is around $5 per book.
Tip
For a discussion on discount arithmetic, visit: http://julieduffy.com/writing/econo_discount.htm.
So, if we gave our hypothetical 300-page book a suggested retail price of $25, each sale through Lightning Source would pay 45% ($11.25) minus the $5 printing charge, or $6.25.
You can also sell e-book editions of your book through Lightning Source. There is no printing charge for these electronic editions.
Sell Through Amazon
Partner with Amazon and let them handle the transaction.
You have written, edited, and typeset your content. You have registered an ISBN and printed your book. Now, you must sell your book and ship it to your readers. If you are in North America and have worldwide distribution rights, consider applying for the Amazon Advantage program.
Upon approval, Amazon adds your title to its catalog and puts a few of your books in its warehouse. When customers purchase your book, Amazon processes and ships the orders. In exchange, you give Amazon a 55% discount from the suggested retail price that you set. Amazon also charges you a $29.95 annual membership fee.
So, if you gave your book a suggested retail price of $25, each sale through Amazon would pay 45%, or $11.25.
In addition to books, you can also sell CD music or VHS/DVD videos that you created, but not e-books. For more details on how to join the Amazon Advantage program, see http://www.amazon.com/exec/obidos/subst/partners/direct/advantage/home.html.
Tip
For a different perspective on the Amazon Advantage program, see http://julieduffy.com/writing/amazon_a.htm.
Sell Your Book, Sell Yourself
What are you selling? Who’s going to buy it?
Convincing people to buy your book is your greatest challenge. It helps if you think of your book as one part of a larger selling strategy. This larger strategy has to do with selling yourself. After people begin to see you as a trusted source of information or entertainment, they will also buy your book, attend your seminar, purchase your consulting, visit your site, read your blog, and refer friends. OK, maybe they’ll do just two of these things, but it all helps to move your strategy forward.
Here are some ideas on how to complement your career with publishing.
Target a Niche
Common topics are pretty well buttoned up by hundreds of popular books. A new book on Photoshop must compete with the 800 other books about Photoshop currently available. Consider aiming at a niche market instead. For example, an Amazon search suggests that only a handful of books are dedicated to scripting Photoshop. A shopper who wants to read about scripting Photoshop certainly would investigate these conspicuous titles.
As a professional, you probably have a specialty. It makes sense to highlight your specialty using a specialized, niche publication. It will be easier to write, and it will enjoy a distinctive profile in the market.
Explore Timely Topics
Write about an emerging technology or trend. Or, write about a recent event. Such publications might look more like reports than books, but shoppers will appreciate your timeliness. A related service has sprung up at http://www.LJBook.com. It creates a printable PDF from your LiveJournal blog.
Complement Your Consulting
If you are a consultant, publish a book that discusses the most common problems you encounter in your field. Think of it as a consumer-grade product that complements your high-caliber practice. Your status as a consultant will fuel book sales and your status as an author will fuel your practice. For example, the folks at http://www.irwebreport.com use a combination of gratis online articles, for-fee reports, and consulting services to advance their industry profile.
Seminar Swag
If seminars are your specialty, publish a book to sell to your students, fans, and peers. Selling a tangible book will complement your intangible seminar product.
In short, publish a book as part of your larger strategy to sell yourself. Sell yourself by participating in and contributing to your community.