
Chapter 8
Developing Redstone
In This Chapter
![]() Getting to know Creative mode
Getting to know Creative mode
![]() Engineering with redstone
Engineering with redstone
![]() Understanding Minecraft ticks
Understanding Minecraft ticks
![]() Running commands when you can’t be there yourself
Running commands when you can’t be there yourself
![]() Applying redstone to farming
Applying redstone to farming
Most of this book focuses on the various faculties of Survival mode. As a player begins to experiment with redstone, Survival mode alone can prove tricky for acquiring enough blocks and ingredients to build redstone contraptions.
You can “playthrough” and skip this chapter entirely, continuing to advance through survival gameplay toward the Nether and End. If you’re interested in learning to use redstone, however, you should switch to a notable feature in Minecraft: Creative mode.
Redstone is considered difficult to use in Creative mode — and impossible to use in Survival mode — so don’t get frustrated as you attempt your first redstone creations. Figuring out the different redstone items, timing of contraptions, and building designs takes plenty of experimenting. But first, you need to get into Creative mode.
Playing in Creative Mode
You enter Creative mode by creating a new world and clicking the Game Mode button to change the game type. Alternatively, in a world where cheats are available, you can enter Creative mode by using this command:
/gamemode 1
You can return to Survival mode by using this command:
/gamemode 0
In Creative mode, you can build whatever you want with no fear of restraint or resource consumption. You can use this mode whenever you’re feeling creative rather than adventurous and you want to try new ideas. In Creative mode, you can
- Place blocks while retaining inventory: If you use a consumable item in Creative mode, it takes effect, but the item isn’t consumed.
- Break blocks instantly: Clicking blocks always breaks them immediately, unless you’re using a sword, and then you can’t break anything.
- Press the spacebar while airborne to fly: While flying, press the spacebar to move up and the Shift key to move down. You can stop flying by touching the ground or double-tapping the spacebar.
- Avoid all damage: You have no health or hunger points, and nothing can kill you. The only way to die is to dig through the bedrock at the bottom of the world and fall deep into the Void, which is difficult to do accidentally. Another thing that’s difficult to do accidentally is to use the command /kill.
- Use items without consuming durability or ammunition: Tools, weapons, and armor don’t lose durability when used, and you can fire a bow without consuming arrows. You can also perform any enchantment without the necessary experience orbs or lapis lazuli.
- Add any item you want to the inventory: Rather than see the standard inventory screen, you pick and choose the items you want in the Creative mode inventory. The inventory consists of 12 tabs. The 10 on the left are categories of items; the Compass tab lets you search for items by name; and the Chest tab shows your Survival-style inventory, as shown in Figure 8-1.
In addition to using Creative mode for redstone, this mode is used whenever a player attempts any large projects, such as creating large homes or bases, and creating transportation systems, including railways (see Chapter 9).

Figure 8-1: Creative mode inventory.
Understanding Redstone Basics
Redstone is one of the more advanced concepts in Minecraft. You can obtain redstone dust by mining redstone ore underground. You can spread this dust across the ground as wire, attach it to levers or doors, and craft it into torches and repeaters to build machines. Whether you want a lever that performs two tasks at a time, a combination lock, or a giant virtual computer, you can build it by cleverly arranging redstone dust.
 If you read this section from start to finish, start a new game in Creative mode and follow along by building machines yourself. If you’re new to Minecraft, this chapter is somewhat advanced. Use the later section “Applying redstone circuits” as a technical reference guide.
Transmitting power with redstone wire
Put simply, redstone dust carries power. While holding a lump of redstone dust, right-click the ground to place it there, at which point it becomes a redstone wire. In its default state, the redstone wire is uncharged, which means that it does nothing.
When the redstone is powered by a device such as a lever, tripwire, button, or pressure plate, the wire begins to glow red and transmits power to open doors, ignite explosives, or activate dispensers. Figure 8-2 shows a lever connected to a mechanism that ignites three explosives at one time.
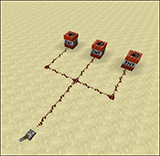
Figure 8-2: Basic mechanism.
Redstone dust can transmit power and perform more tasks than you can normally complete by pulling a lever. You should know these concepts about redstone dust. It can
- Orient itself automatically: When you first place some redstone dust, it appears as a small lump of wire that can transmit power in all directions. By placing more dust or certain mechanisms near it, the wire stretches into lines, corners, and bends to meet its task.
- Extend 15 blocks from the power source: Charged redstone wire gets dimmer as it moves away from its power source. After the wire travels 15 blocks from any power source, it can no longer transmit energy that far. Use mechanisms or items such as redstone repeaters (described in the next section) to extend it further.
- Climb blocks: Your designs don’t have to be only two-dimensional. Redstone wire can run up or down the side of a single block so that you can build staircases to carry the circuit vertically. However, the redstone still has to have an unbroken path, as shown in Figure 8-3.
By carrying power in your world, you can achieve great accomplishments by simply pressing a button.

Figure 8-3: Redstone staircase.
Using other redstone mechanisms
Of course, you can craft other items to improve your redstone creations. These allow you to build advanced circuits and accomplish more interesting goals.
 Although a block such as grass or iron technically absorbs no current, we sometimes refer to it as powered. See the later section “Applying redstone circuits” for rules governing powered blocks.
Lighting a redstone torch
A redstone torch is a useful resource that’s crafted with redstone dust and a stick. It provides a constant source of power to everything next to it, above it, and below it, and it can be placed on floors or walls. It can even power the block directly above it.
Redstone torches never burn out on their own, but you can turn them off by powering the blocks they’re placed on, as shown in Figure 8-4.
Redstone torches are important because they power sources that can be turned off by other parts of the circuit. Thus, the clever arrangement of redstone torches can allow for powerful circuits such as combination locks or programs.
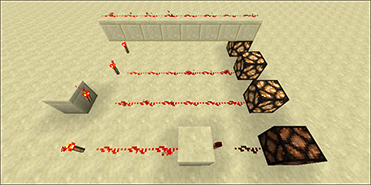
Figure 8-4: Redstone torches.
Using a redstone repeater
Redstone repeaters are interesting little mechanisms that can be placed on the ground like redstone wire, though they have a few extra faculties. They
- Transmit current in only one direction: When you place a repeater, the output faces away from you. A repeater also transmits current after a brief delay.
- Allow you to add a delay to the circuit: Right-click a repeater to edit the time it takes for the current to pass. Use a delay to make timers and choreograph large circuits.
- Extend a wire’s 15-block range: Then the circuits can move as far as you want.
Figure 8-5 shows examples of using redstone repeaters.
In addition, if you place a redstone repeater so that it powers a second one from the side, it locks the second repeater’s On–Off value. Then the circuit can store binary memory, which is useful in advanced designs.
Run a redstone repeater into a block to easily make a powered block.
Using a redstone comparator
A redstone comparator, as shown in Figure 8-6, looks similar to a repeater but has an additional input from the side and doesn’t extend the signal. When the torch is lit (by right-clicking), the comparator goes into Subtraction mode and subtracts the two signals from the back and side input to determine the strength of the output signal. The back input must be larger than the side input or else the comparator doesn’t give out an input (similar to a transistor).

Figure 8-5: Redstone repeaters.

Figure 8-6: Redstone comparator.
After you right-click again, the torch turns off and the output signal is the full strength of the back input if the back signal exceeds the side. When placed by a block with an inventory (such as a chest), the output of the comparator is based on the amount of used inventory space in the block.
Storing things in a hopper
A hopper, as shown in Figure 8-7, picks items up and stores them in its own inventory of 5 slots (see Figure 8-8). It also drops items to a block that has an inventory from its end. A hopper can send items sideways and down but not up. When connected to an item that has an inventory (such as a chest), the hopper places items directly into that inventory.

Figure 8-7: Hopper.
A major capability of a hopper is that it can remove items from storage containers and pick up items off the ground. Its “sucking” feature allows a simple collection system that can be used in farms. This feature is also used in bulk storage — multiple chests connected by hoppers — making it seem that you have 1 chest that has the space of 4 double chests.
Hoppers are often used with storage minecarts to place items into the storage carts, or they can be connected to a storage minecart and pick up items from the storage minecart as it travels over the hopper. A hopper can also be crafted into a hopper minecart, which is a moveable hopper (see Figure 8-9). Hoppers are also used to feed dispensers, droppers, furnaces, and brewing stands. You can then automate some of the work of item collection and make traps. Hoppers are deactivated by using redstone.

Figure 8-8: Hopper inventory.

Figure 8-9: Minecart with hopper.
Pushing things with a piston
A piston (see Figure 8-10) pushes most blocks when activated up to 12 blocks away. Pistons are commonly used to open and close doors, create traps, combine with redstone repeaters to create logic gates (yes, just like a transistor, if you’re an electronics geek) without a redstone torch, or to build escalators, for example. A unique feature of the piston is that it extinguishes a block that is on fire.
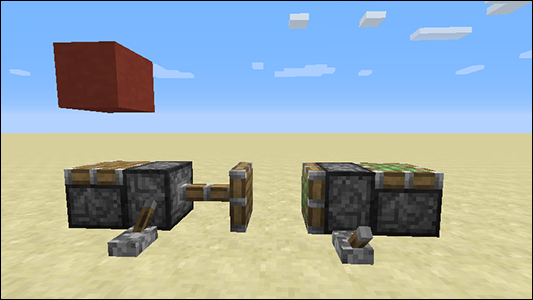
Figure 8-10: Piston.
Despite their wooden appearance, pistons aren’t flammable. Pistons are activated using redstone. It isn’t uncommon to activate a piston using a pressure plate or lever wired some distance away. This method is particularly helpful in automating farms or creating mob traps.
Redstone dust and repeaters activate pistons not only directly in front of them but also power pistons below them. Some items aren’t moved by pistons including obsidian, bedrock, blocks with extra data such as chests or furnaces, nether portals, and anvils. Items including cactus, pumpkins, jack-o’-lanterns, sugar cane, and dragon eggs are dropped when pushed. Melons and cobwebs return to slices and string, respectively. Water and lava are simply moved in their path.
Pulling things with a sticky piston
A sticky piston operates the same as a piston but also pulls blocks in addition to pushing them. The same rules apply in pulling blocks as in pushing them. A sticky piston cannot pull back a block that is affected by gravity if it pushed the block over a hole. (That is, the block will fall.) Similarly, sticky pistons cannot keep sand and gravel in the air when pushed horizontally.
Dispensing items with a dispenser
A dispenser (see Figure 8-11) is one of the coolest redstone contraptions in Minecraft. When right-clicked, a dispenser has its own inventory, allowing you to place items inside. When activated by a redstone charge, a random item is discharged from the inventory. The selected item is random and based on stacks, not on individual items.

Figure 8-11: Dispenser.
So if a stack of 6 arrows and a stack of 3 snowballs are in the inventory, the chance is equal for arrows and snowballs, even though there are twice as many arrows. Many items are simply dropped 3 x 3 blocks away. However, arrows, snowballs, fireworks, fire charges, chicken eggs, splash potions, and bottles of enchanting are shot out of the dispenser. Bombs away!
Boats and minecarts can be dispensed, but only above water and rails, respectively. Armor can also be dispensed, quickly equipping a player who is only 1 block away. Bone meal can be dispensed automatically on a farm, improving the crops. Mob eggs can also be dispensed and consequently spawned. Also, liquids can be dispensed from buckets. Finally, pumpkins and command blocks can be placed in their block form from dispensers. When the command block is placed by a dispenser, the command in the command block runs (if a command is in the command block).
Dispensers are activated by a redstone pulse running into the block or 1 block adjacent. By placing redstone wiring in a crossing pattern, 5 dispensers can be triggered at one time. A dispenser is also triggered by opening a trapped chest if the two are adjacent, so you can see the fun tricks you can play on your friends!
Dropping things with a dropper
A dropper (see Figure 8-12) works similarly to a dispenser, holding its own inventory and activated by a redstone circuit. It cannot dispense projectiles (it simply drops them). However, droppers can push items upward. This feature is handy in pushing up items from a mine.

Figure 8-12: Dropper.
A dropper also puts items into other blocks that store items. For example, a dropper can place fuel into an adjacent furnace.
Droppers and dispensers are quite similar and look almost identical. A dispenser has a cross mouth, whereas a dropper has a U-shaped mouth.
Applying redstone circuits
Of course, you can accomplish a great deal by using circuits: Open doors, move blocks with pistons, ignite explosives, play music, or complete basic tasks, for example. The following list describes additional redstone-based items and their uses, as well as mechanical items that can be powered by redstone:
- Redstone wire: A wire that powers adjacent wires and repeaters, the block it rests on, and any block or mechanism it faces. For more information, see “Transmitting power with redstone wire,” earlier in this chapter.
- Powered blocks: Technical terminology used in this chapter. These blocks power all adjacent mechanisms. Ice and glass cannot be powered.
- Redstone torch: A power source that affects every adjacent mechanism, including ones above and below; it also powers the block just above it. I discuss redstone torches in more detail in the earlier section “Redstone torch.”
- Redstone repeater: A block that’s powered by anything behind it and powers anything in front of it with a slight delay. See the earlier section “Redstone repeater.”
- Redstone block: A block of redstone that acts like a redstone torch that is always on.
- Lever: A type of switch that affects adjacent mechanisms as well as the block it’s placed on. You can turn a lever on or off by right-clicking it. You can place a lever on any surface.
- Button: A type of switch that sends a temporary current to adjacent mechanisms and to the block it’s placed on. In addition to right-clicking it, you can activate a wooden button by shooting it with an arrow. You can place buttons only on walls.
- Tripwire hook: A type of switch that affects adjacent mechanisms as well as the block it’s placed on. Tripwire hooks can be placed only on walls. Place string in a line between two hooks to make tripwire — the hooks are powered when the tripwire is stepped on or when the string is broken without shears.
- Pressure plate: A type of switch that transmits power to adjacent mechanisms and to the block it’s placed on, when weighted down. Wood pressure plates can be activated by any entity, whereas stone pressure plates can be activated only by an entity that is at least as large as a chicken.
- Detector rail: A type of rail that works similarly to a pressure plate. It transmits power when a minecart crosses over it, and it affects adjacent mechanisms and the block it’s placed on.
- Redstone lamp: A lamp that emits light as long as it’s powered. It is also a full block, so it can share the properties of a powered block.
- Powered rail: A charged minecart track that powers other powered rails (within a 9-block range). When powered, the powered rail speeds up minecarts; when it isn’t powered, it slows them to a halt.
- Piston: A device that pushes blocks but destroys redstone devices. Pushing blocks can affect circuits. A piston can be activated by any power source.
- Doors: These open automatically when powered by redstone.
- Fence gates: Like doors, these open automatically when powered by redstone.
- Trapdoors: Special doors that open automatically when powered by redstone.
- TNT: Explosive material that ignites when it’s powered by redstone (and it’s time to think up redstone schemes).
- Dispensers: A block that shoots out items and can launch a few projectiles.
- Note blocks: Blocks that play sound when powered by redstone. The sounds can be adjusted by right-clicking the note block.
- Hoppers: Devices that take inventory, and can spit them out into other blocks that have inventory (such as a chest).
- Comparators: Devices that take a signal in the side, and output a varying powered signal out the back. When a signal is applied by way of the attached redstone torch, an output signal is sent at the equivalent strength to the difference of the signal from the back, minus the signal from the side. When a signal is not applied, the full signal sent through the back, if greater than the side, will be sent as output.
- Dispensers: Contraptions that allow you to randomly drop one item from the contents when a redstone signal is applied.
- Droppers: Devices that work similarly to dispensers, but can place items from their inventory upward into blocks above the dropper.
- Pistons: Blocks that, when combined with other contraptions such as redstone repeaters, can push blocks on command.
- Sticky pistons: A type of piston that can pull items rather than push them.
Advanced redstone circuitry
You can do lots of fun things with redstone, even such tasks as building computers, calculators, and virtual RAM. First, you need to understand how to build redstone circuitry. If you want a head-start on all this, spend some time researching the topics binary logic and binary calculations on your favorite search engine. Jesse studied these topics in his childhood math classes, and they can significantly help you understand why these concepts work. A little study of transistor logic can also help. (You didn’t realize that this book would help you become an expert at electronics, did you?)
The NOT gate
Suppose that a redstone wire passes through a circuit you’ve created. If you run the wire through a NOT gate, the wire reverses its value: Off becomes On, and On becomes Off. This is useful for commands such as, “If the pressure plate isn’t being triggered, play the All Clear music.” The NOT gate, shown in Figure 8-13, is based on torches being naturally active, though they can be turned off by active current.

Figure 8-13: The NOT gate.
The OR gate
Arguably one of the simplest gates, the OR gate (see Figure 8-14) says, “If either of these redstone currents is activated, turn on this third current.” To make one of these gates, you simply connect two separate circuits.
The NOR gate
The NOR gate (see Figure 8-15) is the opposite of the OR gate. In Chapter 20, we discuss the RS-NOR latch, a memory unit composed of NOR gates. The NOR gate says, “If either of these redstone currents is activated, turn off this third current.” To make one of these gates, place a redstone torch where the two circuits meet.

Figure 8-14: The OR gate.

Figure 8-15: The NOR gate.
The AND gate
The AND gate (see Figure 8-16) is tricky to set up. How do you say, “Turn on this circuit only if both of these two other circuits are running?” The setup shown in Figure 8-16 is one of the easiest, though the concepts behind it are useful to understand.

Figure 8-16: The AND gate.
The NAND gate
The NAND gate (see Figure 8-17) is pretty much the opposite of the AND gate. This is how you say, “Turn off this circuit only if both these two other circuits are running.” This is simply taking off the third torch in the AND gate.

Figure 8-17: The NAND gate.
The XOR gate
The XOR gate means, “Turn on this circuit if only one of these other two circuits is running.” The solution shown in Figure 8-18 may be somewhat complicated, but it’s simply AND, NOT, and OR rolled into one: The OR gate turns on the output if either lever is activated, and the AND NOT gates turn it off again if both levers are down.
The XNOR gate
The XNOR gate (see Figure 8-19) is the opposite of the XOR gate. It means, “Turn off this circuit if only one of these other two circuits is running.” You just have to add an extra NOT gate at the end.

Figure 8-18: The XOR gate.

Figure 8-19: The XNOR gate.
Multicircuitous designs
To continue your experience in redstone engineering, replace the levers in the basic gates with redstone wire and hook the gates together. Figure 8-20 shows two different ways to build an advanced circuit, with a diagram of the circuit for comparison, as shown in Figure 8-21.

Figure 8-20: Advanced redstone design.
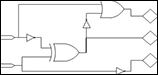
Figure 8-21: Circuit diagram.
 In case you’re interested, this circuit adds 3 to any 2-digit binary input, expressing the answer in binary form.
If you don’t fully understand the concepts explained in this section but you still want to use redstone, simply copy the models we provide or study other people’s designs on the Internet. Hide your mechanisms underground if you want them to function without being out in the open.
Counting Minecraft Ticks
Ticks in Minecraft are not bugs — they are specific lengths of time. Minecraft has three types of ticks: game ticks, redstone ticks, and block ticks.
- Game tick: A game tick lasts 1/20th of a second — for every second that goes by, 20 ticks are generated. On each tick, many things in the game happen; for example, mobs update their APIs, the sun moves, and hunger makes its scan. A full day in Minecraft lasts for 24,000 ticks, which is 20 minutes in real time. When you’re using the /time set command, the numbers you enter indicate the equivalent number of game ticks in the regular version of Minecraft. Game ticks don’t affect the number of frames per second (that cause lag).
- Redstone tick: A redstone tick lasts 1/10th of a second, making two game ticks for every redstone tick. Repeaters can control redstone ticks along with a few other redstone devices. Repeaters automatically have 1 redstone tick delay, but you can right-click to adjust to a 4-redstone tick delay. Someone who requests to put this repeater on two ticks or two ticks of delay is always referring to redstone ticks.
- Block tick: A chunk in Minecraft is a 16 x 16 x 16 block of cubes that separate Minecraft into sections. Chunks are sometimes given special properties, such as a slime chunk (a chunk that slimes can spawn in) or your spawn chunks (chunks near your world spawn that always are loaded). On every single game tick, 3 blocks are chosen at random in each chunk in 15 chunks that are centered on the player. Those 3 blocks in each chunk are given a random block tick. Though most blocks in Minecraft ignore this tick, a few blocks do something with it. For example, saplings may grow, leaves may decay, or ice may melt. You can change how many random ticks occur per section by using this command:
/gamerule randomTickSpeed [Random ticks per section]
Sometimes, blocks schedule ticks for the future. These scheduled ticks are scheduled for blocks that have a predictable pattern. A repeater has a scheduled tick to change its state from On to Off. Water also schedules a tick whenever it needs to flow.
Scheduled ticks and random ticks are two different types of ticks and follow separate sets of code, but they both involve ticks in blocks.
Nearly all video games are driven by one big, continuous loop. Every advancement in a video game synchronizes with this loop. One full cycle of this loop in a video game is a tick.
Activating Command Blocks
Command blocks (see Figure 8-22) are blocks that run commands that do not need the player to be present. Anything involving a tilda (~) uses the block’s location to do whatever command is running. This capability is quite useful for minigames on servers and adventure maps, because a player can’t be present all the time. You can activate command blocks with redstone and have multiple command blocks running at the same time, making it especially useful when you want multiple commands running and you have only one of you. Setting a command block on a superfast 1-redstone-tick clock makes it faster than you can run the command that many times.

Figure 8-22: Command blocks.
Creating Self-Sustaining Farms
Redstone — a big part of farming — lets you collect items automatically. Unlike the farming techniques we discuss in Chapter 5, redstone farming creates mechanisms that make the farm self-sustaining without much, if any, further input from you, the player.
Redstone farming can be done on crops, passive mobs (that is, farm animals), and even hostile mobs. As with most redstone concepts, searching the Internet for tutorials can be invaluable.
A basic type of wheat or sugar cane redstone farming involves activating a water supply (such as using a lever to open a dam and release the water), which pushes the crop into a holding area — automatic harvesting! When the signal is lost, the water supply turns off and the crop is left in one area, to be quickly picked up by the player.
One of Thomas’s favorite redstone farms involves chickens. The contraption shown in Figure 8-23 is an automatic cooked chicken farm. Here’s how it works: The chickens at the top lay eggs that get sucked up by a hopper and put into a dispenser. The dispenser then throws the eggs onto the half-slab, where a baby chicken is spawned. A baby chicken is about a half-slab tall, and an adult chicken is more than a half-slab tall.
When the chicken grows into an adult, it dies in the lava. Animals that die by fire (or lava) drop their cooked meat rather than their normal, uncooked meat. After the adult chicken dies, its food drops, gets sucked up by the hopper, and is placed into the chest, where it can be collected. By keeping loaded the chunks that Thomas’s chicken farm is in, an endless supply of chicken meat is being continually created and gathered for his use.

Figure 8-23: Thomas’s redstone chicken farm.