
Chapter 20
Ten Helpful Redstone Tips and Contraptions
In This Chapter
![]() Creating redstone circuit designs
Creating redstone circuit designs
![]() Building redstone contraptions
Building redstone contraptions
![]() Using TNT in redstone design
Using TNT in redstone design
Redstone contraptions are some of the most complex, yet fun things you can build in the game. Just like society has advanced from the vacuum tube, to the transistor, to the chip, knowing the basic switches, circuits, and levers that can be created with redstone will allow you to build much more complex contraptions in the game. Then you can automate every element of your game along the way! Here are our favorite ten tips and contraptions you can build in Minecraft:
Keeping the Power On with a T Flip-Flop
The useful contraption known in Minecraft as a T flip-flop (T stands for “toggle”) turns an input (where the power goes in) into a continuous output (where the power goes out). To turn a button (which turns on an item only as long as you push it) into a lever (which keeps the power on as long as the lever is flipped), you use a T flip-flop.
Building Design A
The first T flip-flop design, Design A, is a compact, simple design. To build it, you need 2 sticky pistons, 1 redstone torch, 1 comparator, 1 full caldron, and 1 input — in this case, a button. (You can see in Chapter 8 how to craft the sticky piston and the other items in that list.) The output is shown by the redstone lamp (again, described in Chapter 8), which lights when the T flip-flop is activated. Simply build it as shown in Figure 20-1.

Figure 20-1: Design A.
When the button is pushed, the sticky pistons pull the cauldron back and down, powering the comparator that then lights the redstone lamp. The lamp continues to stay lit, as though the button were a lever sending continuous power rather than sending the signal only briefly, as a button would normally do.
Building Design B
To build Design B, which is silent (doesn’t make any noise) and resource friendly (uses much fewer items to complete), you need 3 droppers, 1 hopper, 1 comparator, 1 item that is not a tool (don’t use items such as swords or hoes), and an input (a button will work for now). Again, you can read about all these items in Chapter 8.
To build the T flip-flop using Design B, follow these steps:
- Place a dropper in the middle section of the area you’re building it in, facing the dropper toward you.
In the example shown in Figure 20-2, we have laid 3 blocks on the bottom — though you can build this contraption directly on the ground.

Figure 20-2: Design B.
- Look down, jump, and place a dropper next to the dropper that you placed in Step 1.
Place a new dropper facing into the dropper you placed in Step 1. On the top of the second dropper you placed, you should see a rectangular opening at the top. If you don’t, repeat this step until the dropper’s opening is at the top.
- Hold down the Shift key and then right-click to place one more dropper, which should be on top of the last dropper you placed.
This final dropper should be 1 block above and facing toward the dropper you placed in Step 1 (refer to Figure 20-2).
- Look down, press the Shift key, jump, and then right-click with the hopper on top of the dropper you placed in Step 1. Right-click the ground next to the dropper under the hopper to place the comparator. Right-click the dropper you placed in Step 2, and then place a block into its GUI. (We recommend wooden planks.)
- Place the input (a button, in this case) on the side of the dropper from Step 2.
The comparator is the output.
 Put a repeater after the comparator because the comparator on its own gives off only a single redstone signal. To fix this, put more than one item in the dropper.
Push the button, creating a pulse, and — voilà! — the contraption powers the redstone lamp.
Building Design C
Design C uses the least amount of resources. You don’t even have to go to the Nether to get the ingredients to build it. To build it, you need 2 sticky pistons, 1 redstone torch, 2 repeaters, and 2 blocks. (See Chapter 8 to read more about sticky pistons, the redstone torch, and repeaters.) You need a 1 x 5 x 2 area. Then follow these steps:
- Start out by placing one repeater, as shown in Figure 20-3.

Figure 20-3: Design C.
- Next to the repeater, mine 1 block down, get into the hole you’ve made, look down, jump, and then right-click to place the sticky piston.
You should see that the sticky piston is facing upward.
- Place a block on the sticky piston, get on top of that block, and right-click the ground next to the block. Get down from the block and move onto the repeater.
- Continue walking forward until you’re 2 blocks away from the repeater. Turn until you face the repeater, and place the second sticky piston next to the repeater. Place the next block on the side of the sticky piston that has green on it.
- Next to the block, mine 1 block down and place the redstone torch in that hole.
- Place an input, such as a button, on the first block (not visible in the figure).
You have finished Design C. The output is directly after the hole with the redstone torch in it. (Refer to the redstone lamp shown in Figure 20-3.) Bravo! You have mastered the T flip-flop!
Getting Hopper Help
Hoppers are unique and can take some patience to get the hang of. We’ve used the hopper, which is one of only a few ways to transport items, to automate many redstone contraptions. An “available” hopper has open inventory slots, which can indicate either an empty inventory slot or not enough items within the occupied slots, which can be filled with as many as 64 of the same item per slot. When you place a Hopper on top of another Hopper, it checks to see if the Hopper underneath has empty inventory slots. If there’s an available hopper, the item being stored within the hopper goes straight into the one beneath it.
Adding a comparator (see Chapter 8) next to a hopper sends a signal (which can be used to power redstone and other redstone contraptions) depending on how many items are in the hopper. One item sends out a signal strength of 1, 23 items sends out a signal strength of 2, 46 sends out three, and so on.
You can then use this combination of hoppers, available inventory, and comparators to construct a sorting system that sorts the items from a chest of random items (such as pumpkins and apples) into their own chests, as shown in Figure 20-4. You can see in the figure the chest of random items on the top, and the 6 chests that each individual item goes into on the bottom left. To make this work, inside each of the second row of hoppers, put exactly 19 of the same block (such as an apple) in one inventory slot (to see the inventory of the hopper, just right-click on the hopper) and 1 of the same block in all the other inventory slots inside the hopper.

Figure 20-4: The hopper-sorting machine.
In addition to the hopper configuration (refer to Figure 20-4), we use a series of repeaters connected to redstone dust, followed by a row of comparators — this is what makes the items move from the chest to one hopper to another hopper, and so on, until all items are sorted. For this to work, the bottom row of hoppers remain closed from sending items from the hoppers to the chests next to them because of the redstone torches supplying power to the hoppers. (Refer to the blocks next to them in Figure 20-4.) When that power is turned off briefly, the hopper opens, allowing a single item through to the chest next to it, and the power then turns back on.
The comparators you see on the right detect that there are more than 22 items (sending a constant signal of 2 to the comparators until the number of items is fewer than 23, changing the signal of the comparator back to 1 — see Chapter 8 for more about how it works) inside the second row of hoppers, signal to repeaters and redstone torches next to the bottom row of hoppers to turn off briefly, allowing a single item through to the chest next to them. This process continues until the chest at the top is empty.
Building a Block Update Detector (BUD) Switch
In the BUD, or Block Update Detector, when a block placed next to it is updated (which can happen by changing the state of the block in any way, such as cooking in a furnace, breaking the block, or placing the block), it sets off a redstone signal. The BUD can be used for any number of purposes such as on a tree farm, to determine whether a sapling has grown into a tree. Or, perhaps you want to identify when your sheep are eating grass next to the BUD. Or, you may want to identify when other players are mining on your property.
The BUD works as the result of a minor glitch in the game: Its quasiconnectivity (partly connected) lets certain blocks be powered diagonally and even 1 block above the block, but activates only when a block update has happened next to the block. Two blocks that react to quasiconnectivity are pistons and dispensers. In Figure 20-5, you can see a sticky piston at the bottom, with a slime block on top of it, and a redstone block on top of that one, creating a BUD switch. Whenever a block is placed next to the sticky piston on the BUD switch, the sticky piston extends and then retracts quickly, triggering a redstone signal at the top that you can do other things with. (Chapter 8 describes all sorts of things you can do with redstone.)

Figure 20-5: BUD switch.
Creating a Constant Signal Switch with the RS-NOR Latch
The RS-NOR latch is sometimes called a memory cell because once a signal activates one input, it stays activated until a different signal is sent to the other input. However many times you press that button, it doesn’t change the output until the other button is pressed.
The R stands for reset, and the S stands for set. NOR is a logic gate — the output is off when at least one input is on. If you’ve ever worked with electronics, this concept may be familiar to you.
The example we show you in the following step lists uses the common RS-NOR latch system, although you can keep a signal alive by way of a latch in other ways. To build the RS-NOR latch, follow these steps:
- Place 1 block with a redstone torch on the side of the block, as shown in Figure 20-6.
This step creates one input.

Figure 20-6: RS NOR-latch.
- Place 2 redstone dust parallel to the torch.
Refer to the darker red dust shown in Figure 20-6.
- Place another block at the end of the redstone dust trail with a redstone torch on the side of that block.
This step creates the second input.
- Place 2 redstone dust next to the original block that you placed.
Refer to the lighter red shown in Figure 20-6.
- Place buttons on the side of the blocks (though other input mechanisms would also work).
To operate the RS-NOR latch, press the button on the block that has the lit redstone torch, thus turning off that torch and turning on the other one. In Figure 20-6, the glowstone lights up only when the redstone torch next to it is lit. If the button on the block of the unlit redstone torch is hit, nothing happens. That is the power of an RS-NOR latch.
Walking Through Walls with a Double Piston Extender
A double piston extender uses 2 pistons to push an item in and out (commonly used to create virtual doors out of walls by moving the blocks in the wall in and out). We show you how to do this in Figure 20-7. Below the pistons is a layer of redstone dust on 3 blocks. Then the rest of the platform is built with redstone on the outer blocks and 2 repeaters in the middle.
Here’s how to build a double piston extender:
- Place the repeater on the left and set it to 2 ticks, to refer to the repeater delay.
You can read more about this process in Chapter 8. To set the repeater to 2 clicks, right-click it once after placing it, and it changes from 1 to 2 ticks.
- Place the repeater on the right and set it to 4 ticks. (Right-click three times on the repeater after placing it.)
- Add the two pistons.
- Add a lever to activate the block next to the redstone.
- Add the block that you want to move (lapis, in this case) to the remaining piston closest to the wall. (Refer to Figure 20-7.)

Figure 20-7: Double piston extender.
When the lever is turned on, the block is extended. When the lever is turned off, the block retracts. Now imagine this switch with multiple pistons on an entire wall!
Double pistons are much harder to use vertically than horizontally.
Creating Short Pulses with a Monostable Circuit
A monostable circuit has one stable state (Off) and one unstable state (On). When the monostable circuit is powered, it emits one short redstone pulse before turning off. A few monostable circuits are used in items such as RS-NOR latches and T flip-flops.
To build a simple monostable circuit, as shown in Figure 20-8, follow these steps:
- Start with a block with redstone dust on top. Put a sticky piston facing upward next to it.
- Place a block on top of the sticky piston.
- Place a block with a repeater on top of the set.
The repeater is set to 1 tick by default, which is perfect in this contraption.
- Add a button to activate the system and a redstone lamp at the end as the output.
In this contraption, pushing the button briefly lights up the redstone lamp!

Figure 20-8: Monostable circuit.
Extending Pulses with Pulse Extenders
Unlike the monostable circuit, which shortens a pulse, the pulse extender extends a pulse. Because a button gives off only a brief redstone signal, adding a pulse extender causes the redstone signal to last longer. Here’s how to create a pulse extender:
- Using the same redstone lamp shown in Figure 20-8, this contraption lights the redstone lamp longer but with the same button input. Place 6 blocks with redstone dust on the outer 4 blocks, as shown in Figure 20-9.
- Place comparators facing each other on the middle blocks.
- Add a button to the left side of the contraption, and add a redstone lamp to the right side.
When you press the button, the redstone lamp lights up and stays on for a few seconds longer than would normally occur with only a button.

Figure 20-9: Pulse extenders.
Creating Hidden Doors with Sticky Piston Doors
Sticky piston doors are helpful because they hide within walls. Here’s how to create a sticky piston door:
- The door starts with an archway of lapis lazuli. Add 4 sticky pistons to each side, as shown in Figure 20-10. This sets the tone for Step 2.
- Add 4 sticky pistons in the back, as shown in Figure 20-11. This completes what will move your doors.
- On top, place a layer of lapis with redstone dust and 2 repeaters facing each other and set to 2 ticks, as shown in Figure 20-12. This will power your doors, moving the pistons.
- Add a lever to the front, as shown in Figure 20-13. Now you have a switch that turns on the power, opening and closing your door.
The figure shows how the contraption should look.
When you pull the lever to create a redstone signal, the door closes (refer to Figures 20-10 through 20-13).
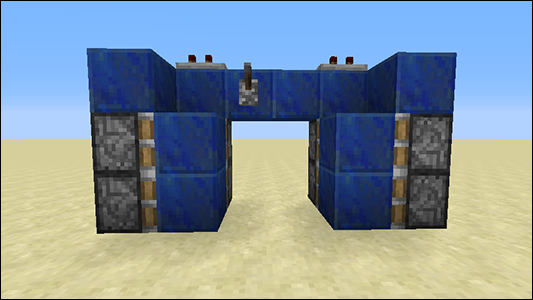
Figure 20-10: Adding 4 sticky pistons to each side.
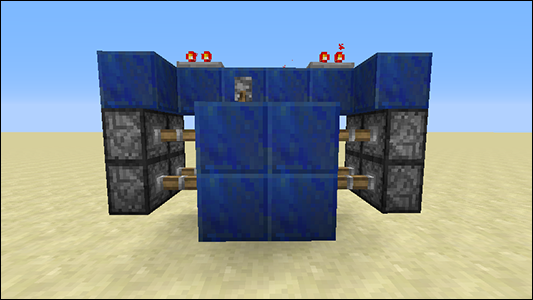
Figure 20-11: Adding 4 sticky pistons to the back.

Figure 20-12: Placing a layer of lapis with redstone dust and 2 repeaters facing each other.
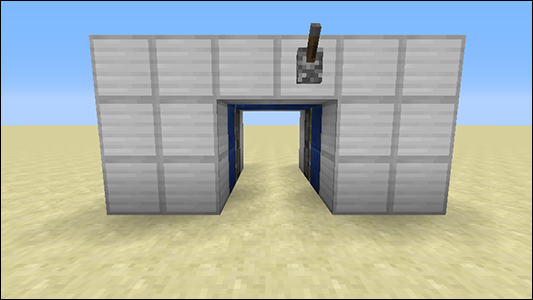
Figure 20-13: When the lever is off, the door is open.
To see how this door will function in a Minecraft game, add a wall around the lapis, using iron, in this case (as shown in Figure 20-13). Change the lever to the outside wall. When the lever is off, the door is open, as shown in Figure 20-13. When you activate the redstone signal by pulling on the lever, the doors close, as shown in Figure 20-14.

Figure 20-14: When the lever is pulled, the doors close.
This design completely hides the sticky pistons, giving the wall and door a sleek finish.
Creating Hidden Inputs
From a torch key to a BUD switch, a hidden input is a hidden way to trigger a contraption. Follow these steps for one way to create a hidden input:
- Build a hidden input is to start with 4 blocks in a row.
- Place a sticky piston on top of the left block in the row, and next to that, place a redstone block.
- Place another block on top of the sticky piston, and then place a sticky piston on top of the redstone block.
The redstone block powers the sticky piston, pushing the piston outward to the right if placed correctly (see Figure 20-15).

Figure 20-15: Hidden inputs.
- Place a redstone block on the extended sticky piston, and then place a block on top of the base part of the extended sticky piston (as shown in Figure 20-15).
- Then place a sticky piston facing toward the block you just placed.
- Place the items on which you want the contraption to operate on the right side of the contraption.
For the example shown in Figure 20-15, place a repeater on the far right block, which is connected to a glowstone. To operate, put a redstone torch on the left corner of the contraption on the wall. In the example, that step powers the sticky piston on the bottom, extending the redstone block so that it touches the repeater, which then briefly lights up the glowstone block. Then the other sticky pistons are also activated, and the mechanism “resets” itself by waiting for a new torch to reactivate it.
Blowing Things Up with TNT Contraptions
Want to troll your friends? Or maybe you’re on a faction server (a server where your friends get together and compete against each other) and you have to blow up someone’s base. Well, this is the section for you, young trickster!
One of our favorite TNT contraptions is the time bomb. To build it, follow these steps:
- Place 2 hoppers in midair, facing each other (which connects them).
- Place 2 torches under the hoppers.
- Place a comparator next to one of the hoppers with the 2-torch side of the comparator touching the hopper.
- Place a block with a torch in front of the comparator (see Figure 20-16).
- Place the TNT block as shown in the figure.
- Place any items into the hopper that’s connected to the comparator. Then break the torch under that hopper.
The items begin filling the other hopper, working as a countdown clock. The more items, the longer the clock. When the last item empties from the hopper, the TNT explodes!

Figure 20-16: TNT time bomb contraption.