Chapter 2
Installing and Configuring Input Devices
EXAM OBJECTIVES
Understanding keyboards
Working with the mouse
Working with modems and network cards
Looking at other input devices
Understanding system resources
A computer’s job is to process information, but only after someone inputs that information into the system. In this chapter, I discuss different types of devices used to input data into the computer.
At anyone’s disposal are many forms of input devices with which you can communicate with the computer, such as modems, network cards, touch pads, and biometric devices. A keyboard and a mouse, though, are the most popular.
Minding Your Keys and Qs
The keyboard is the main device you use to interact with a computer system. Keystrokes are converted into the characters that you see onscreen, and maybe eventually print. Most keyboards have five major key parts, or groups, that contain keys grouped by specific purpose. These areas (standard desktop keyboard) are shown in Figure 2-1.
The five major groupings on a keyboard are
- Alphanumeric: The alphanumeric keys are the keys on the keyboard that contain the letters of the alphabet, numerals, and punctuation.
- Function: The 12 function keys on a keyboard offer special features. For example, in Windows, pressing F2 renames a file or icon.
- Cursor: Use the cursor keys to move the cursor or insertion point.
- Numeric: The numeric keypad has the mathematical operators and numbers for quick, single-handed access for inputting numeric information.
- LEDs: The LEDs indicate whether features such as Caps Lock, Num Lock, and Scroll Lock are turned on or off.
Each key on the keyboard has a keyswitch that closes an electrical circuit on a grid when a key is pressed. When the key contacts the grid, the keyboard controller detects the keystroke and generates a keycode. The keycode is then converted into an ASCII code that is used to display the character onscreen.
Each location on the grid corresponds to a specific keycode. This is why you can’t simply move a keycap and expect to move the character as well. For example, the letter A is on the left side of the keyboard. Simply moving the A keycap to the right side of the keyboard will not allow you to press that key to type the letter A because the location on the grid that generates a keycode for letter A is on the left side of the keyboard.
Different keyboards work in different ways when you press a key. Each manufacturer decides what type of keyboard to manufacture and how the keystrokes will be interpreted by the system. The two most popular techniques used to identify what keys are being pressed are
- Switch-based: Uses micro-switches for each key. The keys deteriorate with time and tend to get dirty, but these keyboards are inexpensive. Call it retro, but there’s still quite a market out there for mechanical switch keyboards. Expect to pay a premium for this type of keyboard, though. It’s interesting how circular technology is!
- Capacitive: Also known as membrane keyboards and are more expensive than switch-based keyboards. Despite their higher cost, though, capacitive keyboards are more reliable. Each key pushes a spring, which pushes a paddle to create an impression on the capacitive surface located under the keyboard. The impression on the capacitive surface sends a signal that is interpreted by the keyboard controller. This is the most common type of keyboard in laptops and netbooks.
For a keyboard to work with a system, software must be employed that drives the keyboard actions. Two types of software routines are used to allow the keyboard to work with the system:
- Keyboard device driver: Like any piece of hardware, a driver in Windows is responsible for allowing the device to work in Windows — including the keyboard.
- Firmware: The keyboard firmware is typically stored in ROM in the actual keyboard (as in the case of an XT keyboard) or in a chip on the motherboard. The firmware contains low-level code to communicate with the hardware.
Identifying keyboard types
A number of different types of keyboards have been used over time. The following list identifies the different types of keyboards you need to know for the A+ Certification Exams:
- Enhanced keyboard: The enhanced keyboard is the popular keyboard used today, with 101 keys and 12 function keys. The enhanced keyboard has a numeric keypad along with cursor control keys located on the right side. The enhanced keyboard typically uses a wired USB connection.
- Windows keyboard: A Windows keyboard is similar to an enhanced 101-key keyboard, but the 104-key Windows keyboard contains buttons, or keys, that control features of Windows. For example, a Windows keyboard features a button to bring up the Start menu and also a key to bring up the shortcut menu (as if you had right-clicked with the mouse).
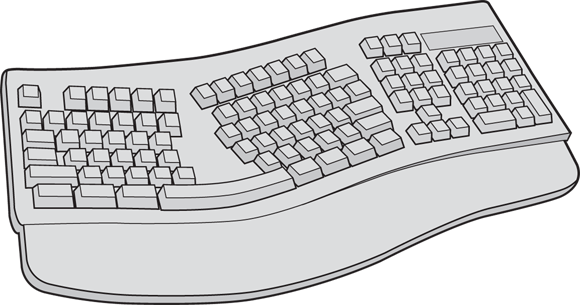
- Natural, or ergonomic, keyboards: Natural, or ergonomic, keyboards are a modification of the enhanced keyboards. A natural keyboard separates the alphanumeric keys into two parts: one part for the left hand and the other for the right hand. The keyboard is bowed and might even come apart to allow for more natural hand placement. These keyboards normally also have a wrist rest to help hands sit in a more natural position. These keyboards are designed to reduce repetitive stress injuries. Figure 2-2 shows a typical natural keyboard.
Installing a keyboard
Installing a keyboard is fairly straightforward. You pretty much plug just the keyboard into the system, and Windows uses a keyboard driver to communicate with the device.
 For the A+ Exams, know the different keyboard connectors, as described in the following list:
- PS/2 connector: A PS/2 connector — also known as a mini-DIN 6 connector — has been the most popular keyboard connector found on computers in the past but has been replaced by the USB connector.
- USB connector: Keyboards that connect to the system via a USB connector have become very popular. A number of systems today are getting away from the PS/2 connections for keyboards and mice and using USB.
Configuring keyboards and setting accessibility options
Configuring a keyboard in Windows doesn’t involve a lot of options. Typically, you just plug it in, and it works. Windows does allow you to configure the blink rate of the cursor and also change the repeat rate, which dictates how quickly a letter will repeat if you hold down a key on your keyboard.
To configure the keyboard options in Windows 7, follow these steps:
-
Choose Start ⇒ Control Panel ⇒ Hardware and Sound ⇒ Keyboard.
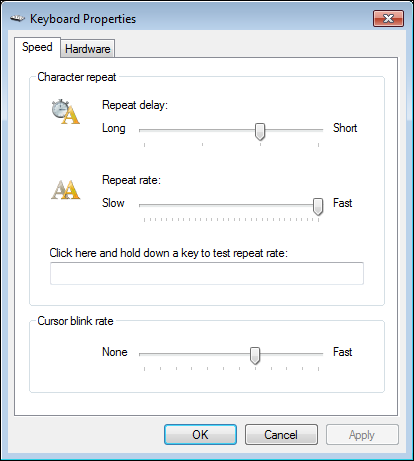
The Keyboard Properties dialog box appears, as shown in Figure 2-3.
-
Adjust the settings to suit your needs.
Here, you can configure the character repeat options and the cursor blink rate. The following options are available:
- Repeat Delay: Repeat delay controls the length of time between when you first hold down a key and when the character begins to repeat onscreen.
- Repeat Rate: Repeat rate controls how quickly additional characters are displayed when the key is held down.
- Cursor Blink Rate: Cursor blink rate controls how fast the cursor blinks.
- Click OK to apply your settings and close the dialog box.
A number of accessibility features are available in Windows that are controlled via the keyboard. Accessibility features in Windows are designed for users who have disabilities. To configure the keyboard accessibility options in Windows 8.1, follow these steps:
- Choose Start ⇒ Control Panel ⇒ Ease of Access ⇒ Ease of Access Center ⇒ Make the Keyboard Easier to Use.
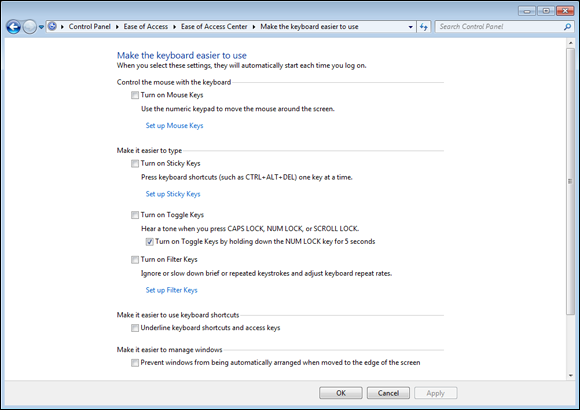
- As shown in Figure 2-4, configure the following options as needed:
- StickyKeys: This feature aids folks with an issue pressing two keys at the same time, such as Ctrl+C. Here is how it works (with StickyKeys enabled). When you press the Shift, Ctrl, or Alt key — or, if you have a Windows keyboard, the Windows key — that key remains active, as if you were holding it down, while you choose the next keystroke. If you press a key, such as the Shift key, twice then the key stays on until you press it again. Because pressing the key keeps the key held after you let go, if you wanted to perform a keystroke operation such as Ctrl+Alt+Delete with sticky keys you would simply press Ctrl, then press Alt and finally press the Delete key on its own.
- FilterKeys: Use FilterKeys to tell Windows to ignore repeated keystrokes. For example, if you hold down a key too long with FilterKeys enabled, the repeat rate of the keystroke is reduced. This prevents a character from appearing many times at a quick rate.
- ToggleKeys: Enabling the ToggleKeys option triggers audible tones when the Caps Lock, Num Lock, or Scroll Lock keys are pressed.
- Click OK.
Catching the Mouse
The other popular input device found on computer systems today is the mouse. The mouse is one of the primary input devices because of the graphical user interface (GUI) features of today’s operating systems. The following sections identify the different types of mice and how to install them.
Types of mice
You can find three types of mice on today’s desktop computer systems: mechanical mice, opto-mechanical mice, and optical mice.
- Mechanical: A mechanical mouse was the only type of mouse used with computers for many years. The mechanical mouse uses a rubber ball that moves a pair of wheels inside the mouse. The internal wheels capture the horizontal and vertical movements of the mouse and then send that information to the computer. The movement is then displayed onscreen.
-
Opto-mechanical: The opto-mechanical mouse is a very popular mouse today. It uses a rubber ball that moves rollers that control the movement of a disc — the encoding disc — which has holes along the side of it.
The prefix “opto” comes into play because LEDs and sensors use an infrared light beam to determine the movement of the mouse. See Figure 2-5. When the rubber ball moves the encoding disc, the infrared beam passes through the holes on the encoding disc, indicating that the mouse has moved and in which direction.
-
Optical: An optical mouse differs from an opto-mechanical mouse because an optical mouse has no moving parts. The rubber ball and wheels are replaced with an optical scanning system that works on pretty much any surface.
The optical scanning system is made up of optical sensors and a Digital Signal Processor (DSP). An optical mouse captures images of the surface at a rate of 1,500 images per second. The DSP then analyzes and compares the images to detect the mouse movement.
- Wireless: Most mice in use nowadays connect wirelessly to their host computer. In the marketplace you’ll find a preponderance of Bluetooth-powered wireless mice, but there’s still quite a bit of infrared hardware in use today.
Installing a mouse
Installing a mouse is very similar and just as easy as installing a keyboard. You pretty much just plug in the mouse, and the Windows mouse driver controls the device. The following is a list of the different types of interfaces you may use to connect a mouse to the system:
- PS/2: One of the most popular interfaces for a mouse on desktop computers is a PS/2 connection. A PS/2 connection is also known as a mini-DIN 6 connector. Nowadays the only situations where you’ll encounter PS/2 mice or keyboards are (a) ancient point-of-sale (POS) systems in stores; and (b) older servers in data centers.
- USB: The most popular type of connection for mice today is the USB connector. Simply plug the mouse into the USB port and click away! As you find out in many chapters of this book, USB is hot-swappable — meaning that you can plug and unplug a USB device without shutting down the system. USB can transfer data at 12 Mbps (USB 1.1), 480 Mbps (USB 2.0), or 5 Gbps (USB 3.0).
 More and more, today’s systems are using wireless keyboards and mice, which use a USB wireless adapter that connects to the computer that is responsible for receiving the signals from the wireless keyboard or mouse. The wireless signal is sent through radio frequency or via infrared depending on the keyboard or mouse. For more information on wireless, check out Book 8, Chapter 2.
Communicating with Network Adapters
In this section, you find out about installing network cards that allow computer systems to communicate with other systems on the network.
Working with network adapters
The most popular communication device found in computers today is a network card. A network card is a device that allows you to connect your computer to a network or the Internet, and is responsible for sending and receiving data on the network. Not only are network cards popular in systems found in the corporate world, but because of the popularity of high-speed Internet, you can also find them in a lot of home computers as well.
Network cards are categorized by their transfer rates. For example, a network card that can transfer 100 million bits of data per second is a 100 Mbps network card, and a network card that can transfer 1,000 million bits per second is a 1000 Mbps network card.
 The card will run at the highest common speed available between the two communicating devices. For example, if you connect your system to a 100 Mbps network switch but your system has a 1000 Mbps network card, your card will run at only 100 Mbps. This is why most systems have what is called a 100/1000 network card — the card can talk at either 100 Mbps or 1000 Mbps.
Installing a network adapter (card)
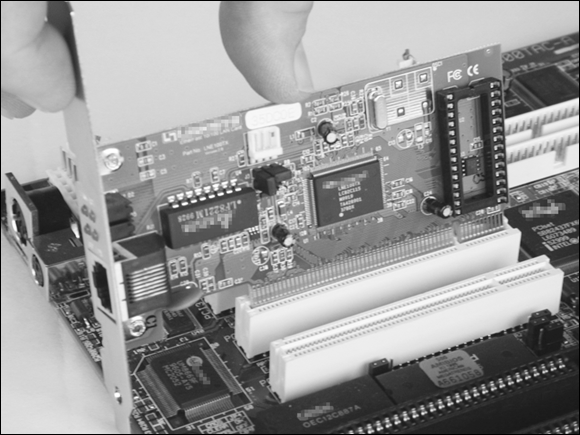
When installing a network card, you first need to determine what type of interface you want to use. There are a number of types of network cards that could be installed into the system. For example, you could install a USB network card, or a PCI/PCIe network card (shown in Figure 2-6) that is inserted into a PCI or PCIe slot.
To install a network adapter, follow these steps:
- Power-off the computer and be sure to ground yourself.
- Remove the cover from the computer.
-
If necessary, remove the blanking plate that allows access to the modem from the back of the PC.
This allows the network card to fit in the slot.
-
Place the network card into the appropriate expansion slot.
For example, you will most likely have a PCI Express (PCIe) card, so place the PCIe network card into an available PCIe slot.
- Screw the network card into place and put the cover back on the PC.
- Connect the network cable to the back of the network card.
- Power-on the PC.
Configuring a network card
After you install the network card, Plug and Play should kick in and either load the driver for you or prompt you for the driver. When the driver is loaded, you can specify settings for the network card in Windows. For example, if you want to force your network card to run at a particular speed, you can do that through the properties of the network card.
To configure your network card in Windows 7, follow these steps:
- Click Start and right-click My Computer.
- Choose Properties from the pop-up menu.
- In the System Properties window, click the Hardware tab and then click the Device Manager button.
- In Device Manager, expand the Network Adapters category on the left, right-click your network card, and then choose Properties.
-
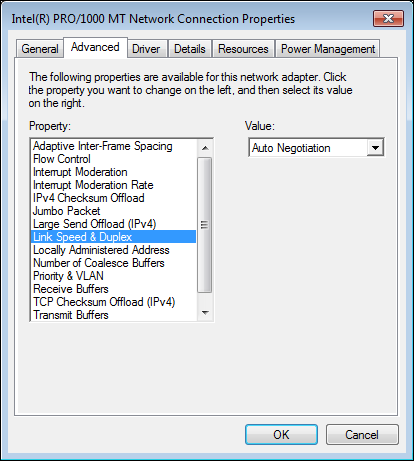
In the Properties dialog box for the network card, click the Advanced tab to see settings that can be configured for the network card (shown in Figure 2-7).
The advanced settings are different for each make and model of network card because the settings are particular to the driver that is loaded. A very popular setting is the link speed, which specifies what speed you want to run the card at. Most network cards are set to Auto, which means the card will detect the best speed. When troubleshooting, though, you can force a particular speed.
Special-purpose network adapters
Let’s take a look at some other means of attaining network connectivity. Nowadays it’s not at all safe to assume that we’ll connect to the Internet only from a full desktop or even laptop computer.
Instead, most people access the World Wide Web, their email, and instant message accounts from their smartphones or tablet devices. That said, the following examples all apply to traditional computers.
In general, these special-purpose network adapters use the USB standard for maximum flexibility, although you can always purchase a PCIe variant if you need to install the card inside your computer case.
- Wireless cards: A wireless card uses the IEEE 802.11 protocols to connect your compute to a local area network and potentially the Internet. The form factor for WiFi cards has become almost inconceivably small.
- Cellular cards: A cellular card is associated with a particular cellular service provider such as AT&T or Verizon. Thus, you need to have a cellular data plan account in order to make use of these expansion cards.
- Modem cards: Believe it or not, some people still connect to the Internet via dial-up modems. To accommodate this, analog modem cards remain available, although you'll probably need to order them online.
- FireWire cards: Recall that FireWire can be used for TCP/IP networking in addition to multimedia data transfer. The IEEE 1394 standard describes the FireWire standard.
- Thunderbolt cards: Similar to FireWire, the Apple Thunderbolt media technology not only can carry video, but also data. For example, you can quickly send data from one Mac to another by using an Apple Thunderbolt data cable.
Other Input Devices
As technology moves on, new input devices appear. For example, laptops use a touch pad as an input device, whereas handheld devices use a penlike stylus. The following is a list of input devices you might encounter:
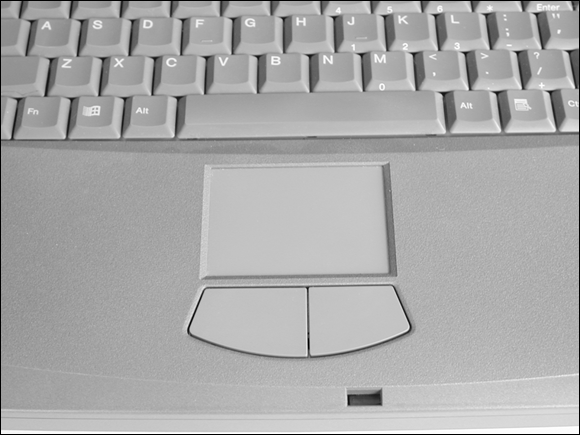
- Touch pad: A number of laptop systems today use a touch pad as an alternative way to control the mouse pointer in Windows. The touch pad — that rectangular area found below the keyboard that you move your finger(s) across to move the mouse pointer — also usually bears two buttons below the square to perform left- and right-click operations. A touch pad is displayed in Figure 2-8.
- Touch screens: You see touch screens used a lot at public terminals for things like information booths and bank machines. Touch screens require that you actually touch the screen to choose different options.
- Barcode reader: A barcode reader is a type of scanner that reads bar codes and then converts the bar code into data stored on a computer and used in applications. An inventory application is an example of an application that uses a barcode reader as an input device.
- Biometric devices: Biometric devices are used to authenticate, or log, people onto a system by using biological characteristics of that person, such as a fingerprint or a retinal scan. Biometric devices are very popular in high-security environments because of how difficult it is to impersonate someone when dealing with authentication methods such as a fingerprint scan. Some laptop makers are even starting to include fingerprint scanners in consumer-level laptops as security devices and theft deterrents.
- Scanner: A scanner is used to capture the contents of a document or real-life object and generate an image of the object on the computer that is connected to the scanner. You find out more about scanners in Book 3, Chapter 5.
- Bluetooth: Bluetooth is a popular short-range (30 feet or so) wireless protocol that’s used all the time nowadays. For example, I’ll bet that your hands-free headset or your wireless speakers use Bluetooth connectivity.
- Smart TV: A smart TV is a high-definition television that is Internet-connected thanks to an integrated wired or wireless network adapter. Normally smart TVs are set up to access paid media services such as Netflix or Hulu. You can also typically stream multimedia content from your computer or smartphone directly to the smart TV.
- Set-top box: If you have digital cable service, then you may use a set-top box to access the cable network. Other examples of set-top boxes are the Apple TV and Roku; these devices allow you to stream multimedia from the Internet through the set-top box and ultimately to your HDTV.
- USB cards: A PCIe USB interface presents a permanent alternative to a plug-in USB hub.
- Storage cards: This is a vague exam objective (thanks, CompTIA!). By “storage card” I envision a PCIe SATA card that allows you to expand the internal storage of a computer. Alternatively, we could be talking about a PCIe card that connects a server to an external disk array or storage area network (SAN).
- KVM: A KVM switch is a device that allows you to connect a single keyboard, mouse, and monitor to the KVM switch. The KVM switch is then connected to multiple computers so that you can use the one set of keyboard, mouse, and monitor to switch among multiple computers. I use this in my office because I have three computers but do not want to have to physically use three different keyboards, mice, and monitors. I simply press the toggle button on the KVM switch and it changes which computer I am viewing on the screen and managing with the keyboard and mouse.
- Microphone: The microphone is used to create audio input on the system. The microphone is connected to the microphone port on the system and can be used with recording software to record your voice.
-
Game pads and joysticks: A game pad is also known as a control pad and is a device similar to a controller for a video game console like an Xbox One or PlayStation 4. Just as those controllers allow you to navigate through the games on a console, a game pad can provide input to a computer as well. Another common input device with games on the computer is the joystick: a device that has a stick used to navigate and typically has a button on the base.
Modern day game consoles almost always ship with wireless game pad controllers; Bluetooth is the most popular connection method.
- Digitizer: A digitizer is a device that is used to create a digital form of information that is not on the computer. For example, if you have some old books or documents, you can create electronic documents out of them with a digitizer. You can also find digitizers to convert old reel-to-reel movies, VHS movies, and cassette tapes to electronic files.
This chapter discusses installing a network card into the system, but a number of other types of cards can be installed. The process to install any kind of expansion card into the system is the same as installing a network card. The following are other types of expansion cards you may need to install:
- Flash storage cards: Many computers today have a way to connect storage cards or memory cards to the system. If your system did not come with card readers, you can purchase and install a storage card reader to allow you to insert different types of memory cards.
- Riser cards: A riser card is connected directly to the motherboard and “rises up” from the motherboard. It is its own board that has a number of expansion slots on it so that you can add other types of cards to the system.
- Smart card reader: A smart card is a plastic wafer about the same size as a credit card that includes integrated circuit (IC) technology. Most commonly, smart cards and their associated readers are used to authenticate users, open doors, and the like.
- Motion sensor: Motion sensors typically use infrared technology to detect movement. You see motion sensors in residential and commercial security systems.
- MIDI-enabled device: By installing a Musical Instrument Device Interface (MIDI) expansion card in your PC, you can connect MIDI-enabled devices such as guitars or keyboards. You’ll then be able to send musical signals from the MIDI-enabled device through the MIDI interface card into the computer.
Getting an A+
In this chapter, you find out about different types of input devices. The following list outlines some of the key points to remember for the A+ Exams:
- Keyboards usually connect to the system with a USB connection with today’s systems.
- Most mice today connect to the system via a USB port wirelessly with Bluetooth or Infrared.
- Network cards are the most popular type of communication device in today’s systems. Be sure to review the networking chapters to fully understand how to network a system.
- Many new input devices have sprung up over the last few years, so make sure you enter your 900-series A+ Exam session fully up-to-speed. You need to be able to recognize and apply devices like cellular cards and storage cards to modern-day computer troubleshooting situations.
1. At what speed does USB 2.0 transfer information?
(A) 5 Gbps
(B) 12 Gbps
(C) 100 Mbps
(D) 480 Mbps
2. Which type of keyboard is designed to reduce repetitive stress injuries?
(A) AT keyboard
(B) Natural keyboard
(C) Windows keyboard
(D) Enhanced keyboard
3. The StickyKeys feature instructs Windows to ignore repeated keystrokes.
(A) True
(B) False
4. At what speed does USB 3.0 transfer information?
(A) 12 Mbps
(B) 480 Mbps
(C) 5 Gbps
(D) 480 Gbps
5. Which two popular connector types are used with a mouse?
 (A) USB
 (B) Parallel
 (C) Bluetooth
 (D) OS/2
6. Which two types of interfaces are typically used to connect a network card to the system?
 (A) Parallel
 (B) USB
 (C) PCIe
 (D) Serial

 For the A+ Exams, know the different keyboard connectors, as described in the following list:
 More and more, today’s systems are using wireless keyboards and mice, which use a USB wireless adapter that connects to the computer that is responsible for receiving the signals from the wireless keyboard or mouse. The wireless signal is sent through radio frequency or via infrared depending on the keyboard or mouse. For more information on wireless, check out Book 8,
 (A) USB