EXAM OBJECTIVES
Identifying paper feeder mechanisms
Understanding types of printers
Identifying printer connections
Identifying common printer problems
Understanding preventive maintenance and safety precautions
In today’s business world, maintaining a printing environment is one of the most time-consuming parts of managing a network. For a supposedly paperless era, we seem to spend a lot of time troubleshooting why a printer won’t print!
 This chapter introduces you to the different types of printers and describes how each type of printer works, which is important for the A+ Certification Exams. From an exam point of view, be sure you are extremely comfortable with the parts of a laser printer and the six phases of the laser printer’s print process — you are guaranteed to get some questions on it!
Be sure to also go over the troubleshooting sections. I think that most people simply skim over this topic area, but you will be presented with some common problems on the A+ Exams, and you are responsible for identifying which component of the printer is causing the problem. Be sure to spend some time on this chapter!
Learning about Paper Feeder Mechanisms
A printer is useless without something to print on, so how the paper gets into a printer seems like a perfect place to start the discussion. The paper enters the printer through a feeder, technically a paper feeder mechanism. The paper feeder mechanism pulls or pushes the paper into the printer. The two types of paper feeder mechanisms are
- Continuous form feed
- Friction-feed
The following sections take a close look at both of these types of paper feeders.
Continuous form feeders
Continuous form feed printers use a continuous sheet of 8.5"- or 14"-wide paper. The continuous sheet feeds through the printer, and then the sheets are separated after the print operation. The pages are usually perforated to make this easier and to maintain a consistent size.
The paper has holes along both sides that fit over the sprockets located on the feeder wheel. When the wheel turns, it feeds the paper into the printer. The holes are torn off the paper after the printout is complete.
And, yes, printers still use this type of feeder mechanism. One common use is for printing company paychecks. Blank checks are connected as a continuous sheet of paper and fed into the printer. After a check prints, it moves out of the printer, and the next check is fed in. After all the checks have printed, the accountant then separates each check for distribution to the employees.
Dot matrix printers are an example of a continuous form feed printer.
Friction feeders
The most popular type of printers are friction feed printers, which use two rollers that pick up sheets of paper from a paper tray and feed them through the printer.
With friction feed printers, many different types of rollers are used throughout the print process. The rollers that pick the paper from the tray are “pickup” rollers, but other rollers pass the paper through the different parts of the printer.
Laser printers, photocopiers, and fax machines are friction feed printers.
Understanding Types of Printers
The different types of printers in today’s busy world of computing are laser, inkjet, dot matrix, thermal, and virtual. You need to be familiar with each type for the A+ Exams.
Laser printers
The laser printer — also known as a page printer because it prints one page at a time — is the most popular type of printer because it is fast and reliable, and offers the best-quality printout of the three types of printers.
A laser printer gets its name because it uses a laser beam in the printing process. A laser printer, shown in Figure 4-1, is also the most expensive type of printer because of its high-cost components such as the laser.
Many parts work together to make the laser printer and its printing process run smoothly:
- Paper feeder mechanism: Laser printers use a set of pickup rollers to grab the paper from the paper tray and feed it into the printer.
- Paper transport path: Rollers are used throughout the print process so that the paper can continue to move through the printer.
- Registration rollers move the paper.
- Fuser rollers, also known as the fuser assembly, melt the toner onto the paper.
- Exit rollers guide the paper out of the printer.
- Toner cartridge: The toner cartridge (shown in Figure 4-2) contains the replaceable components of the printing process. It contains three core components:
- The toner is electrically charged material made of pigment (to give it its color) and plastic (so it can be melted to the page) that is attracted to the paper to create the printout.
- The print drum, also known as the imaging drum, holds an electromagnetic charge when exposed to the laser. That charge then attracts the toner to the page.
- The cleaning blade cleans excess toner off the drum after the print process has completed.
- Power supply: The power supply in the printer is responsible for converting AC from the wall outlet into DC that charges the primary corona wire and transfer corona wire as well as with other components of the printer.
- Primary corona wire: The primary corona wire applies the initial –600V charge to the drum.
- Transfer corona wire: The transfer corona wire gives the paper a positive electrical charge that is used to attract the toner to the paper.
Each component of the laser printer is used to perform the print operation. The process used to perform the printer operation is the laser printing process.
The laser printing process
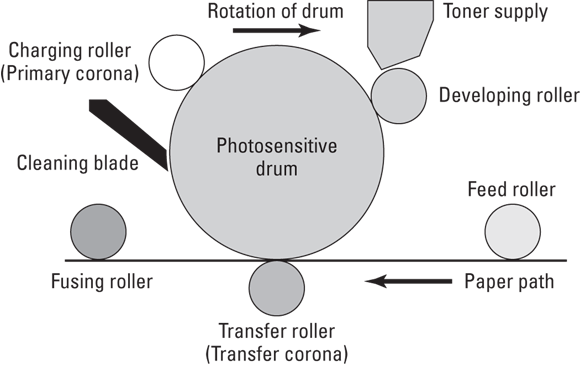
The laser printing process has six phases, and you are required to know them for the A+ Exams. Knowing the process is the basis for effective printer support and is essential for passing the A+ Exams. The six phases of the laser printing process are conditioning, writing, developing, transferring, fusing, and cleaning. As you read the following sections, identify where each step occurs in the schematic in Figure 4-3.
1. Charging the drum (Conditioning)
This phase is often known as the conditioning or charging phase. When the printer receives a command from the computer’s operating system to begin the print process, the primary corona wire applies a –600V charge to the photosensitive drum, also known as the print drum. This charge is one reason why a printer requires a high-voltage power supply.
2. Exposing the drum (Writing)
This phase is often referred to as the exposing or writing phase. After the drum has the –600V charge, a laser beam is used to hit areas on the drum to create the image to be printed. In the areas on the drum that the laser touches, the charge changes from –600V to approximately –100V. Recognize that the areas exposed to the laser beam are more positively charged.
3. Developing the image (Developing)
After the image is created on the photosensitive drum, toner is used to develop the image on the drum. Alongside the print drum is the developing roller. The developing roller has a –600V charge, which attracts the toner from the toner reservoir to the developing roller.
Because the print drum and the developing roller are both charged to –600V (except for the areas of the print drum previously exposed to laser light), the toner from the developing roller is attracted to the –100V charged areas of the print drum. This entire concept is based on the “opposites attract” principle. Although both the drum and the roller are both negatively charged, –100V is more positive than –600V, so the toner on the –600V roller is attracted to –100V areas on the drum. Now that the print drum has toner on only the areas of –100V charge, the image is ready for transfer to paper.
4. Transferring the image (Transferring)
After the toner is on the print drum, the feed rollers (also known as the registration rollers) feed the paper into the printer and over the transfer corona wire. The transfer corona wire, also known as the secondary corona wire, applies a very strong positive charge of +600V to the paper. The purpose of such a strong charge to the paper is to ensure that the toner will be attracted from the –100V areas of the drum to the paper. This, too, is based on the rule that opposites attract!
The paper continues to move through the assembly, and passes over the drum to attract the toner from the drum to the paper.
5. Fusing the image (Fusing)
After the paper moves past the print drum and holds the toner, the paper then moves through the fusing rollers, which melt the toner to the paper. The fusing rollers are needed because the only thing holding the toner to the paper at this point is a positive electric charge. During the fusing phase, the paper moves between a heated, Teflon-coated roller and a rubber roller, which melt the toner in place. The paper is then ejected from the printer.
6. Cleaning up the mess (Cleaning)
After the printing has completed, any excess toner that remains on the print drum needs to be cleaned off. That’s the purpose of this last phase — the cleaning phase. A cleaning blade scrapes any leftover toner off the print drum and into a holding tray to prepare the drum for the next print operation.
The A+ Certification Exams focus on laser printers when it comes to asking questions about printers. Be familiar with dot matrix and inkjet printers, but most of all, be sure that you are comfortable with laser printers and the laser printing process.
 Lab 4-1 will help you identify parts of the laser printer. You will need a laser printer available to perform this lab. Lab 4-1 can be found on the companion website at
 www.dummies.com/go/aplusaio.
Inkjet printers
Inkjet printers (see Figure 4-4) offer the next highest level of print quality and are relatively cheap compared to laser printers. Inkjet printers are great for home use or small office environments that don’t have large print jobs.
Inkjet printers don’t use toner like a laser printer; instead, they use ink cartridges. The ink cartridge contains all the working elements needed to get an image from the computer onto a sheet of paper. It contains compartments of ink, each sealed with a metal plate to prevent ink leakage. Each compartment has a tiny pinhole from which the ink is sprayed from the cartridge onto the paper.
What’s interesting about ink cartridges is that each has its own integrated print head. The printer’s paper roller, feeder assembly, carriage, and belt are similar to these parts on other printer types. Nowadays duplexing (the ability for the printer to produce two-sided output) is pretty standard on most mid-level inkjet print devices.
When the printer receives the command from the computer to print an image, the printer starts the print process by applying an electrical charge to the heating elements that are in the ink reservoir. The charge heats the heating elements, which cause the ink to vaporize. The vaporized ink creates pressure and is forced out the pinhole, creating a tiny bubble that hits the paper.
Color inkjet printers are very popular today because of the increased popularity of digital cameras. Color inkjet printers can require two cartridges: one for black ink and one for the colors (cyan, yellow, and magenta). Most inkjet printers today have cartridges that bundle the black ink with the other colors. These cartridges are called CYMK (C for cyan, Y for yellow, M for magenta, and K for black).
Some printer manufacturers offer individual cartridges for each color. The benefit of these printers is that if you run out of one color, you simply need to buy only the cartridge that contains that color, not all the colors.
One thing to keep in mind is the print cartridges/print heads fall out of alignment on a regular basis. Therefore, you should make a habit of recalibrating the print output for any inkjet printers that you maintain. You should find that calibration utilities are built into the print device’s management software.
 When it is time to replace a spent ink cartridge, take the old cartridge with you to the store so that you know which cartridge type to buy. Some office supply stores can recycle your old cartridges, sometimes even offering a discount when you turn in your old cartridges. If you do not want to take the old cartridge with you to the store, make sure you know the make and model of the printer that you are buying the cartridge for.
Multifunction printers
Multifunction printers are laser or inkjet printers that incorporate other functions besides printing into a single hardware device. Typically, multifunction printers include scan and fax functionality, and are often WiFi-enabled both for infrastructure and ad-hoc wireless networks. And any multifunction printer worth its salt, like the HP OfficeJet Pro 6830 that I use in my office, support advanced printing features like duplex (two-sided) printing and collation.
Many business-class multifunction laser or inkjet printers include an internal hard disk drive that the device uses to cache incoming print jobs. This hard drive caching allows the printer to service more print jobs per unit time than it could by using its much-more limited internal RAM.
Dot matrix printers
Dot matrix printers are considered impact printers because they physically strike an inked ribbon with a metal pin to put characters on paper. A dot matrix printer fires off rows of pins that strike the ribbon in patterns to create the image or characters that need to be printed. Each pin — a solenoid — is wrapped in a coiled wire held in place with a spring and small magnet. When a solenoid is needed to help create the image by striking the ribbon, an electrical charge is sent down the coil wire that surrounds the solenoid. The electrical charge around the wire causes the magnetic field from the magnet to be lost, resulting in the pin firing against the ribbon.
The solenoids are contained in the print head, which moves across the paper printing one line of dots at a time. Originally, dot matrix printers used only nine pins in the print head. The 9-pin dot matrix printers were known as draft-quality printers and were later replaced by 17- and even 24-pin dot matrix printers. The quality of the 24-pin dot matrix was much better than that of the 9-pin because the greater number of dots creates a finer image.
Thermal printers
For the A+ Exams, you simply need to focus on laser, dot matrix, and inkjet printers. Another type of printer you might encounter, though, is a thermal printer, which creates printouts on special paper by heating a stylus pen located on a print head. The pen then causes a chemical reaction on the special paper that is sensitive to heat.
Virtual and cloud-based printers
A virtual printer is a non-physical print device that exists on your local system. What do I mean, you ask? Well, I’m here to tell you that every time you use the Portable Document Format (PDF) printer with Adobe Acrobat, or the Microsoft XML Paper Specification (XPS) printer that is included with the Office productivity suite, you’re in fact using a virtual printer. A virtual printer exists entirely in software, and its sole purpose is to “print” output to a document or image file.
Printing to a file or image is a great benefit to individuals and businesses who covet the so-called “paperless office.” By using virtual printers you not only contribute to the environment by consuming less paper, but you also save money on otherwise expensive consumables like inkjet and toner cartridges.
By contrast, a cloud printer is a virtual printer whose device drivers and managed, well, in the cloud. Apple AirPrint and Google Cloud Print are two cloud printing technologies whose goal is to make it easier for you and others to print output from any print device without having to go through the trouble of installing a device driver.
Here’s how cloud-based printing works: You connect your AirPrint- or Cloud Print–enabled printer to your WiFi network. Next, you choose the Print function from any application running on another host from the same WiFi network. The cloud printer should be available, and your print job will go through despite your not having manually loaded device drivers and/or configuration utilities. Pretty neat!
For those of you who are concerned about security (and that should be all of you): As long as you have authentication enabled on your WiFi network, your cloud-based print queues should be safe from unauthorized parties. That said, the data privacy aspect is enough to scare many individuals and businesses away from any technology that mentions “cloud” in its name.
Common parts on the printer
Whether you are using a laser printer, inkjet printer, or dot matrix printer, some parts are common to each of the printer types, although how they physically print is different. The following are some common elements to each printer type:
- Print head: The print head is responsible for the printing. With inkjets, the print head contains the nozzles that shoot out the ink, while a dot matrix print head contains the pins that shoot out.
- Heading element: The “thermal” in “thermal printer” denotes the necessity of a heating element. The element heats the ink that the print head affixes to your paper. Incidentally, thermal printers require special thermal paper, so stock up!
- Feeder: The feed assembly is responsible for picking up the paper from the paper tray and feeding the paper into the printer.
- Roller: Many printers have rollers to move the paper through the printer.
- Duplexing assembly: The duplexing assembly is responsible for allowing automatic printing on both sides of the page. The duplex assembly can be added to many printers to obtain automatic duplexing capabilities.
- Carriage and belt: The carriage-and-belt system is the part of the printer that moves the print head back and forth across the page.
- Paper tray: The paper tray holds the paper while it is waiting to be picked up and sent through the printer.
Viewing Types of Printer Connections and Configurations
In this section, you find out how printers are connected to computer systems in order to communicate. The following are the most popular methods to connect a printer to a computer:
- Network connections (Ethernet)
- Wireless
- Universal Serial Bus (USB)
- Infrared
Network cable connections (Ethernet)
Network-based printers have built-in network cards that allow the printer to connect directly to the network. The printer runs the TCP/IP protocol and is assigned an IP address so that it can participate on the network.
You can assign the IP address to the printer through the menu system of the printer. After the IP address is assigned, you can typically manage the settings on the printer through a web browser by typing the IP address of the network printer in the address line of the browser.
Advantages of using a network-based printer are
- The network printer is available all the time. Network-based printers are connected directly to the network, so they don’t rely on a computer being powered-on to communicate with the network.
- Dedicated print servers are not required. A network printer can be accessed from anywhere in the network, and you don’t need to have a server to print to it. You may print to the network-based printer from the client computer directly.
Today’s network printers also support network connectivity via wireless network cards. This gives the benefit of not needing a network jack close by to connect the printer to the network. You can read more about network cards and wireless networking in Book 8.
Wireless connections
Many printers today allow you to connect the printer to the network using a wireless network connection. Many modern printers support 802.11x wireless networking capabilities. You can configure an IP address on the wireless printer (usually through software or through the menu system on the printer) and then connect to that wireless printer from any wireless or wired network client on the network.
Note that 802.11x refers to any of the IEEE 802.11 WiFi protocols. The x is used in an algebraic way; namely, to serve as a variable. The x could stand for a, b, g, n, or ac.
Not only do printers support 802.11x printing capabilities, but many printers also support Bluetooth networking capabilities that allow you to connect to the printer over short distances. You can find out more about wireless technologies by checking out Book 8, Chapter 2.
Universal Serial Bus (USB)
Most printers today purchased for home or small offices are USB printers that connect to the computer via a USB port (go figure). Figure 4-5 shows a USB connection.
USB has a number of benefits, including the fact that it is a Plug and Play technology (you can plug in the device without shutting down the system). USB 1.1 has a transfer rate of 12 Mbps, USB 2.0 has a transfer rate of 480 Mbps, and USB 3.0 has a transfer rate of 5 Gbps!
For reference, the following are some key points to remember about USB:
- It is Plug and Play.
- You may connect 127 devices to a USB chain.
- You don’t need to configure ports, IRQs, or DMA channels for each device.
- USB 2.0 has a transfer rate of 480 Mbps, while USB 3.0 has a transfer rate of 5 Gbps.
To find out more about USB ports, check out Book 2, Chapter 1.
Lab 4-2 will give you the opportunity to practice connecting a USB print device to your computer. Lab 4-2 can be found on the companion website at www.dummies.com/go/aplusaio.
Infrared
Connecting your printer to a system by using infrared technology lets your computer communicate wirelessly with the printer in much the same way you use a TV remote to change channels without getting off the sofa. The infrared signal sent from the computer to the printer is carried as a beam of light, instructing the printer what to print.
To use an infrared printer, you need both an infrared transmitter/receiver connected to your computer and an infrared printer.
The three different types of infrared devices are
- Reflective infrared: Transmitters send the signal to a central unit, which then redirects the commands to the printer. This allows a number of users to print to a single printer at one time.
- Line-of-sight infrared: With line-of-sight, the printer’s receiver must be in a direct line-of-site with the computer’s transmitter. If there is a break in the line-of-site, communication is lost.
- Scatter infrared: Scatter infrared allows the signal to bounce off walls or ceilings (or even people) all the way to the printer’s receiver. The benefit is that you don’t lose communication like you do with line-of-sight. However, scatter infrared has limited range and transmission speeds.
FireWire and SCSI
You might also find printers that connect to a system via FireWire or SCSI connections. FireWire has two versions: 400 Mbps and 800 Mbps. FireWire 800, also known as FireWire 1394b, is a fairly recent update to the FireWire technology.
SCSI is another common type of printer device that you might come across with Macintosh systems. Most PC-based systems don’t use SCSI printers, although it is possible. For more information on SCSI devices, check out Book 2, Chapter 5.
Hardware print server
In environments where a large number of print requests are happening on the network, the company may invest in a hardware print server as opposed to sharing the printer off a Windows system.
The benefit of a dedicated hardware print server is speed. Using a Windows system as a print server usually means the system is used for other tasks as well. The other tasks will slow down the printing environment as they use up the resources on the system.
Upgrading Printer Hardware
Printers aren’t nearly as upgradeable as computers. There are only a few items that may need upgrading on a printer:
- Printer memory
- Disk space on larger printers
- Firmware updates
I discuss these upgrades in the following sections.
Upgrading memory
A printer uses memory to store the information to be printed, so the more memory a printer has, the larger the print documents it can store. If you ever receive an insufficient memory message when printing a large document, your printer probably doesn’t have enough memory. As a work-around, install more memory for the printer.
Adding a disk drive
On larger printers, you can upgrade their hard disk or memory. The additional hard drive or RAM can store information used by the printer; for example, you might want to install some fonts on the printer, or you could have a print queue stored on the actual print device and use the hard drive to store the queued documents.
Upgrading the firmware
You might also need to update the firmware on the printer. Firmware, which dictates the capabilities of the printer, is similar to the BIOS of a computer. Actually, it is so similar that you upgrade the firmware in a similar way as upgrading a BIOS. Start by downloading the firmware update from the manufacturer’s website. This update is usually in the form of a self-extracting executable. Then double-click the executable to run the update.
Make sure that the printer is connected and powered-on when the update runs because the update program needs to rewrite the printer firmware within the physical printer.
Installing a Printer in Windows
After you connect the printer to the computer, typically with a parallel or USB connection, you then need to install the “printer” into Windows. Windows uses the term printer to describe the software interface (the printer driver) used to communicate with the print device. This software interface is represented as the icon that displays in the Printers folders — the icon that you right-click to change the settings for the corresponding print device. Microsoft refers to the printer as the icon found in Windows, and the print device as the piece of hardware connected to the computer. I use these terms when discussing how you manage a printer in Windows.
Installing a printer
When you connect a USB print device to a Windows computer, Plug and Play kicks in and detects the hardware. If Windows has a driver for the print device, it loads that driver automatically; if it doesn’t, it prompts you for the driver disk. After you supply the driver disk, the printer is installed, and you are off to the races!
For the following example, you’ll install a local printer in Windows 7/Vista. Follow these steps:
- Choose Start ⇒ Control Panel.
-
In the Hardware and Sound category, choose the Devices and Printers link.
You could also take a shortcut and choose Start ⇒ Devices and Printers.
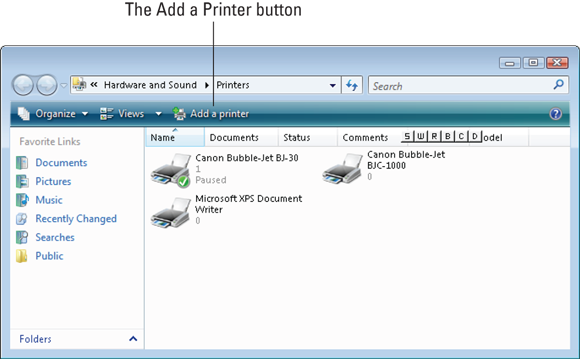
- In the Printers folder that opens, click the Add Printer button in the toolbar of the window (as shown in Figure 4-6).
- Choose Add a Local Printer.
-
Choose the port the printer is connected to and then choose Next.
You can also specify to Create a New Port and select Standard TCP/IP port from the drop-down list to reference a print device on the network.
- Select the manufacturer of the printer and then the model number and then click Next.
- Accept the default name and then make the printer the default printer and then click Next.
- Click Finish.
Configuring a printer
After the printer is installed, you might want to configure it. To configure a printer in Windows XP, choose Start ⇒ Printers and Faxes, right-click the printer, and choose Properties. The printer’s Properties dialog box opens. The following is a list of popular printer settings that might need changed, depending on how you want to use the printer:
- Priority: If a group of users needs a higher priority on a network print device, you could install two printers to refer to the same print device. After you have both printers installed, set the priority of one of the printers higher than the other — anyone’s print jobs sent to that printer will have a higher priority on the print device. You can set the priority of a printer on the Advanced tab of the printer’s Properties dialog box (shown in Figure 4-7).
- Schedule: If you have a group of users that should be printing only at certain hours, you could set the schedule of the printer so that it can print only during those times. The user can send print jobs to the printer, and the printer will queue the job, or store it, until the scheduled time. At the scheduled time, it will then print the job. The schedule option can also be seen in Figure 4-7.
- Spool settings: In Windows, when a user chooses to print a document, the print job creates a temporary file on the disk for the document being printed. After the file is stored on disk, the user gets control of the application, and the system sends the temporary file to the print device to be printed. While the temporary file is sent to the print device, the user gets to use his or her program again. This is sometimes referred to as background printing — where the user thinks the print job has been sent, but the print job is actually being sent while the user continues using the computer. The purpose of this process, called spooling, is so that users can continue using the computer instead of waiting for the 20 pages to actually get sent to the print device. Because temporary files are stored on the disk when spooling is enabled (which is the default with all Windows printers), if you don’t have the hard disk space on your computer to store the temporary files, you won’t be able to print. If you get a spooling error, you may turn off spooling by choosing Print Directly to the Printer on the Advanced tab. Again, you can see this option in Figure 4-7.
- Driver: If the printer driver becomes corrupted, you might want to change the driver. Go to the Advanced tab of the printer’s Properties dialog box and click the New Driver button. You will then be asked for the make and model of the printer.
- Print Test Page: If you run into trouble with a printer, you might want to print a test page. On the General tab of the Properties dialog box of a printer, click Print Test Page. Printing a test page will help you determine whether you are having a problem with the printer or a problem with an application. For example, if you cannot print from Microsoft Word but you can print a test page, that indicates that a setting in Microsoft Word is causing the printing problems.
- Sharing: If you are in a networked environment, you can share the printer so that other users on the network can print to it from their computers. To share the printer, go to the properties of the printer and click the Sharing tab. Select the Share This Printer option and give the printer a share name, as shown in Figure 4-8.
The configuration options to configure the printer in Windows 7/Vista are similar to those found in Windows XP, but it is a little trickier to find the printer properties in Windows 7/Vista. The following steps show how to change your printer properties in Windows 7/Vista:
- Choose Start ⇒ Control Panel.
- In the Hardware and Sound category, choose the Devices and Printers link.
- In the Printers folder that opens, select the printer you want to configure.
- Right-click the printer and choose Printer Properties to display the properties window.
- Change the settings to suit your preference, and then click OK.
Connecting to the shared printer
When you have shared a printer, users need to install a printer on their systems that points to the shared printer on the network. Users who install a printer that refers to a shared printer on the network are installing a network printer. A network printer refers to a shared printer on the network by what is known as a universal naming convention (UNC) path. A UNC path always has the syntax of
\\computername\sharename
The computername parameter is the name of the computer that has the printer shared, and the sharename parameter is the name the printer has been shared as. For example, assume you have a system with a computer name of WORKSTATION1, which has a printer shared as HP. To connect to this printer, you would type \\workstation1\hp from the Run command or when installing the network printer.
To install a network printer in Windows 7/Vista, run the Add Printer Wizard and select network printer instead of local printer. The following outlines the steps to install a network printer in Windows 7/Vista:
- Choose Start ⇒ Control Panel.
- In the Hardware and Sound category, choose the Devices and Printers link.
- In the Printers folder that opens, click the Add a Printer button in the toolbar of the window.
-
When the Add Printer Wizard appears, choose the Add a Network, Wireless, or Bluetooth Printer option.
Windows 7/Vista scans for printers on the network.
- Choose the The Printer That I Want Isn’t Listed option.
- Type the UNC address of the printer (\\computername\sharename) and then click Next.
- Click finish to complete the installation.
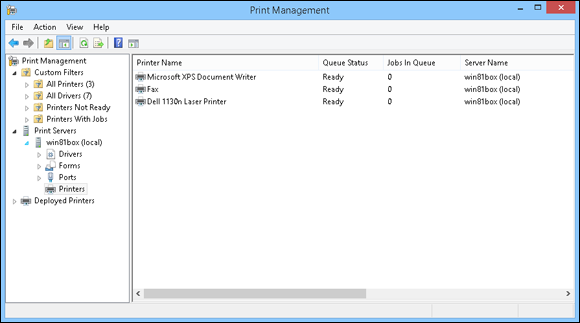
In Windows 7 and Windows 8.1, you have the nifty Print Management console to help you keep reign on your local and network printers. I show you the interface in Figure 4-9; incidentally, this is the same tool Windows Server systems administrators use to manage enterprise-grade network print queues.
Printer sharing protocols
Any shared printer nowadays makes use of the TCP/IP protocol suite and Ethernet networking. Some vendors, namely Apple, make use of special file and printer sharing protocols, like their Bonjour protocol.
WiFi-enabled printers operate at the various speeds that correspond to the IEEE 802.11 wireless protocol in use on the network:
- 802.11a: 54Mbps
- 802.11b: 11Mbps
- 802.11g: 54Mbps
- 802.11n: 600 Mbps
- 802.11ac: 1.3Gbps
Recall that WiFi networks can operate in one of two modes. In infrastructure mode, multiple clients (with network printers acting as one of those clients) attach to the WLAN through a wireless access point.
In ad-hoc mode, wireless peers connect directly to each other. Finally, for your A+ Exam success, remember that some printers include integrated print servers that bundle a network interface, RAM, and disk cache. These devices are cool because they don’t rely upon a separate computer to handle the print server duties.
Troubleshooting Printer Problems
Printers are wonderful devices that we depend on day in and day out as we prepare, conduct, and report on our business. But one of the major downfalls of a world that depends on printers is that they never seem to work!
You discover a number of general troubleshooting guidelines in the sections that follow to help you troubleshoot printer problems. You also find out about a few specific problems with each type of printer.
Check the simple stuff first
The first thing you want to do when you cannot print is to verify the simple stuff. The following is a list of simple things to check on the printer:
- Connection check: The first thing you want to verify is that the printer is physically connected to the computer or network.
- USB: If you have a USB printer, verify that the USB cable is connected to both the printer and the computer.
- Network: If the printer has a network card, verify that the network cable connects the printer to the network properly and that you have network connectivity. After you verify that the network card is connected, you might want to check that the printer has an IP address by printing out the configuration of the printer. If you’re using a wireless printer, you should recheck that the printer is in fact connected to the correct WLAN and that the printer uses the correct encryption protocol and key.
- Visual indicators: After you checked the physical connection, look at the visual indicators on the printer to verify that it is powered-on. Make sure that you can see the online lamp that indicates that the printer is ready for use.
- Error codes: While looking at the visual indicators on the printer, look at the printer for any error codes that help you identify what the issue is with the printer. Error codes are unique to each printer and are sometimes amber or red lights that turn on in different places to indicate the problem. You will need to research what those lights mean for your printer. Newer printers with an LCD will typically have text indicating what the error is, and some network printers can even be configured to email the error to the administrator!
- Out of paper: After checking the error codes on the printer, you might as well take out the paper tray while you are at the printer and verify that paper is loaded. Usually, if you are out of paper, the printer will give an out of paper error, but it is worth the time to check.
Paper jams
Another type of problem that occurs often is paper jams. If you experience a number of paper jams over and over again, verify that you are using the correct type of paper for the printer. The best thing to do here is to check the documentation of the printer and verify that you are using the correct size paper. If you are using paper that is too thick for your printer, it may jam a lot.
Garbled characters or corrupted output
If you experience garbled characters (text that doesn’t make sense) or corrupted output of any type, the driver is corrupt or you have the wrong driver installed. Printing a test page is one of the best ways to find out whether you have a bad driver or whether the application you are printing from is causing the problem.
To print a test page in Windows 7, follow these steps:
- Choose Start ⇒ Printers and Faxes.
- Right-click the troublesome printer and choose Properties.
- On the General tab, click the Print Test Page button.
-
Click OK if the page printed properly or click the Troubleshoot button if the page did not print correctly.
A troubleshooting web page will appear, giving you a number of tips on how to troubleshoot the problem.
If you print a test page and the printout is still garbage text, the driver is likely corrupt, and you need to install a new driver by going to the properties of the printer and choosing the Advanced tab. On the Advanced tab, click the New Driver button to install a new driver.
Spots or smudging on the printout
In general, spots or constant smudging on printouts are good indications that you are using the wrong type of paper for your printer. Again, check the documentation for the printer to find out what type of paper you should be using.
Slow printing
If you notice that printing is overly slow, verify that spooling is enabled. Spooling is enabled by default, but it might have been switched to Print Directly to Printer when you were troubleshooting or configuring the printer. Check the properties of the printer and ensure that spooling is enabled.
Spooling service problems
In Windows, the print spooler service is responsible for managing the printing environment. If you notice that a print job is hung in the print queue and will not print or you cannot delete it, you might have a corrupt queue.
When this happens, stop and restart the print spooler service in Windows. Stopping the print spooler service deletes all print jobs and essentially “reboots” your printing environment for you. Figure 4-10 shows the print spooler service being restarted, which you can do from the Services console. The Services console is found in Start ⇒ Control Panel ⇒ Performance and Maintenance ⇒ Administrative Tools.
If you have a number of problems printing in Windows and you determined that the problem is not hardware related, you might need to move the print spooler folder. By default, the print job is spooled to the hard drive at the %systemroot%\system32\spool\printers directory. The %systemroot% variable is typically the Windows folder on drive C:.
If you are running out of space on drive C:, you might want to change the partition for the spool directory. To change the default spool folder in Windows 7, follow these steps:
- Choose Start ⇒ Control Panel.
- In the Hardware and Sound category, choose the Devices and Printers link.
- Choose the Advanced tab (shown in Figure 4-11) to view the current spool folder location.
-
To change the spool folder location, choose the Change Advanced Settings button.
A new window opens, allowing you to change the spool folder location.
- Choose OK once you have changed the folder path.
Dot matrix problems
This section identifies some problems that occur with dot matrix printers. Be sure to review these problems and the possible causes before taking the A+ Exams:
- Faint printing: If you experience faint printing with your dot matrix printer, the print ribbon is simply worn out and needs to be replaced.
- No printing: If your dot matrix printer simply doesn’t print, a print head cable might be disconnected, or the print head might have torn through the ribbon. In these cases, connect the print head cable or replace the ribbon.
- Paper jamming: Again, a lot of paper jams is a great indication that you have the wrong type of paper or the wrong size paper. Check the documentation for your printer.
- Line across the page: If your dot matrix printer prints a line all the way across the page, you might have a pin in the print head that is stuck out. You might be able to loosen the stuck pin, or you might need a new print head.
Inkjet problems
This section identifies common problems that can occur with inkjet printers during day-to-day activity. Again, review these before taking your A+ Exams:
- Paper jam: A paper jam indicates that you might have the wrong type or size of paper. If you have the correct size paper, the feeder wheels might be dirty — they are responsible for moving the paper through the printer.
- Poor print quality: Having a poor-quality printout could indicate that the ink needs to be replaced or that you have the wrong type of paper. Change the ink or check the documentation to ensure you are using the correct type of paper.
- Fading/Ghosted print: If the print from your inkjet printer is fading, that could be an indication that you need to change the ink.
Laser printer problems
The following common problems can occur with a laser printer:
- Faint or ghosted print: If the print is getting faint in your laser printouts, you most likely need to replace the toner.
- Paper jam: If you get a lot of paper jams, verify that you are using paper of the correct size and thickness. If you are sure that you have the right paper, you could also have a problem with misaligned rollers.
- White stripes: If you have white stripes throughout the printout, your transfer corona wire is most likely the problem. There might be a problem getting the charge to the paper, resulting in toner missing on the page in areas.
- Blank page: If you have a blank page for output, you know there is nothing wrong with the feeder mechanisms because the paper is moving through the printer. A blank page indicates a problem getting the toner to the paper, so something is wrong with the corona wires or you have no toner.
- Vertical line: A vertical line on the printout typically indicates a scratch in the print drum. You should replace the toner cartridge because it is combined with the print drum. If you replace the toner cartridge and the problem still exists, there could be a problem with the laser.
- Toner not fused to the paper: If toner smears off after the page has printed, something is wrong with the fuser rollers, which might need replacing. Be cautious when working with the fusing components because they are very hot!
- Out of memory: When sending a large document or a document with a lot of images to the printer, you might get an Out of Memory error if you do not have enough memory installed in the printer. The best solution is to add more memory to the printer so that it can handle the type of print jobs you send. Alternatively, send smaller print jobs to the printer or lower the print quality of the printout through the print settings.
Common problems and tools
The following printer problems are common to many different types of printers:
- Streaks: You may experience streaks on a printout with a laser printer due to the primary corona wire being dirty. To fix the problem, use a cleaning brush to clean the corona wire.
- Creased paper: If you are experiencing creases in your paper when printing, it could be due to the registration rollers being worn out.
- Paper not feeding: If you are experiencing any trouble with the paper not feeding through the system properly, you most likely are experiencing worn-out rollers.
- Backed-up print queue: If you have a backed-up print queue, it is most likely due to a large number of print jobs being sent to the printer and the printer cannot handle the workload. Consider using a feature such as print pooling to speed your printing.
- Access denied: If you experience an access denied error, have a look at the permissions on the printer.
- Printer will not print: If the printer will not print, verify that a connection exists and then print a test page from the printer properties.
- Wrong color prints: If you find that the printer is printing the wrong colors, you may be running low on ink of a particular color. Time for a refill!
- Unable to install printer: If you are unable to install a printer, it could be because you do not have privileges to do so on the system. Log on as a system administrator and install the printer.
When troubleshooting problems, it helps if you have the right tools to do the job. The following are some common tools to help troubleshoot printers:
- Maintenance kit: You can purchase a maintenance kit for your printer. This will give you all the tools you need to clean and maintain the printer. Note that maintenance kits are specific to a certain printer make and model.
- Toner vacuum: A toner vacuum allows you to clean toner off other parts of the printer.
- Compressed air: Compressed air is always great to have around to help dust off computer parts.
- Printer spooler: The print spooler service is responsible for the printing in Windows. If you find that your print job is not printing and is stuck in the queue, restart the print spooler service to solve the problem.
Managing print jobs
When troubleshooting printing problems, it is important to be familiar with how to manage the print jobs. You can view the print jobs that are stuck in a printer (the print queue) by navigating to the Printers folder and then double-clicking the printer you are troubleshooting.
With the print queue open, you can perform a number of actions to manipulate the queue itself or a single print job. The following are the two major types of tasks that can be performed:
- Print jobs tasks: Manipulate individual print jobs, such as pausing, resuming, or deleting a single print job.
- Print queue tasks: Manipulate the entire queue. Just like a print job, you can pause, resume, and purge the entire queue.
To manipulate a single print job, open the printer (double-click it) and view the list of current print jobs. To pause, resume, or delete a print job, right-click the print job and choose the appropriate command from the contextual menu (see Figure 4-12).
To manage the entire print queue, open the printer. Double-click the icon in the Printers folder. From the printer’s folder, delete all print jobs, pause the queue, or resume the queue from the printer menu; see Figure 4-13.
The following are the popular menu options that deal with managing the print queue:
- Set as Default Printer: Set the printer as the default printer. The benefit of flagging a printer as the default printer is when you click the Print button in an application, the document automatically prints to the default printer. Also, when you choose File ⇒ Print in an application, the printer is the printer selected by default to print to.
- Pause Printing: Pause the entire print queue. To resume printing, choose Pause Printing a second time to toggle the option off.
- Cancel All Documents: Delete all the print jobs sitting in the print queue.
- Properties: View and change the printer settings that I discuss in the earlier “Configuring a printer” section of this chapter.
Understanding Safety and Preventive Maintenance
In this section, I show you some common safety and preventive maintenance practices for printers.
For the A+ Exams, be sure to review the safety points in Book 1, Chapter 3, along with the safety and preventive maintenance points presented here.
Safety precautions
The first point to make about working with printers is to be sure you turn off the printer and unplug it before doing any maintenance on it. Also be sure to give the printer time to cool down because there are many parts in the printer that can get very hot — especially with laser printers.
 If you are servicing a laser printer, be sure to give the printer time to cool down because the fuser rollers get very hot. These rollers are hot enough to melt toner to the paper, so they can cause severe burns to your skin. Be careful!
You also want to be cautious when working around toner because it can get very messy. Be sure not to get toner in your eyes or on your skin. If you have spilled toner, get a vendor-approved vacuum to suck it all up. If you have toner on your skin and want to wash it off, use cold water instead of hot water — you wouldn’t want to fuse it to yourself!
Preventive maintenance
Preventive maintenance for your printer will help reduce downtime. Think of your relationship with your printer like any other relationship — if you treat the printer well, it will stick around; if you don’t treat it well, it’ll leave you when you least expect it. Care for your printer by cleaning it every once in a while — at least once a year. (Make it an anniversary thing.)
To clean your laser printer, follow these general steps or consult the manufacturer’s documentation for exact methods of cleaning your printer make and model. Some general steps to follow to clean the laser printer are:
- Turn off and unplug the printer.
- Clean the outside of the printer with a lint-free cloth and a tiny bit of isopropyl alcohol.
-
Remove the paper tray and paper. Clean the tray, removing any dust or paper particles. Clean the area inside the printer where the tray resides.
 Be sure to clean the feeder rollers — they get pretty dirty.
- Open the printer and remove the toner.
- Clean the inside of the printer; don’t be afraid to clean the rollers.
- Put the toner and the paper tray back in and print a test page.
Lab 4-3 allows you the opportunity to review the steps to cleaning an ink cartridge on an inkjet printer. Lab 4-3 can be found on the companion website at www.dummies.com/go/aplusaio.
Unfortunately, you end up troubleshooting printing issues on the network more than any other type of system issues, so be sure to read the previous sections on troubleshooting. You can help reduce problems with printers by performing the following regular maintenance on laser, thermal, or impact printers:
- Replacing toner/ribbon/impact paper: You will need to replace the toner or ribbon on your printers from time to time as they run out or become worn out after so many print jobs. If you notice that the print quality changes over time, replace the toner or ribbon on the printer. You will also need to add paper to the printer, so be sure to find out where the paper loads.
- Replacing print head, ribbon, tractor feed: These are the internal components that are most likely to fail with repeated use.
- Calibration: Calibrating the printer is setting up the printer to print the color balance that you see on the screen. When you install new ink in a printer, you should first run the calibration feature on the printer to set up the correct distribution of colors to the paper.
- Cleaning: You will need to remove debris on parts of the printer to ensure the quality of the printout. Always use the approved cleaning supplies for the printer to clean its parts.
1. What are the two types of feeder mechanisms used in printers?
 (A) Continuous tractor feed
(B) Continuous form feed
(C) Friction feed
(D) Injected
2. Which of the following devices use friction feeder mechanisms? (Choose two.)
(A) Laser printers
(B) Fax machines
(C) Dot matrix printers
(D) A printer that prints hundreds of payroll checks
3. A positive charge is applied to the paper by which laser printer component?
(A) The laser
(B) The print drum
(C) The registration rollers
(D) The transfer corona wire
4. What is the purpose of the negative charge on the print drum of a laser printer?
(A) To attract the toner to every area of the drum
(B) To attract the toner to the areas of the drum that have a stronger negative charge
(C) To attract the toner to the areas of the drum that have a weaker negative charge
(D) To attract the positively charged paper to the print drum
5. Why are both the developer roller and the print drum charged with –600V in a laser printer?
(A) So the paper is attracted to neither
(B) So the toner is attracted to neither
(C) So the toner creates a fusion cloud between the two rollers and the paper
(D) So the toner is attracted only to weakly charged areas of the print drum
6. The paper is charged with which voltage charge by the secondary corona wire?
(A) +600V
(B) –600V
(C) –100V
(D) +100V
7. What method does an inkjet printer use to print a page?
(A) One dot at a time to form a character
(B) Spray-painting a character
(C) Striking an inked ribbon
(D) Dropping ink onto the paper
8. With an inkjet printer, what causes the ink to vaporize?
(A) Electrical charge
(B) A heating element within the ink cartridge
(C) A solenoid in each chamber of the ink cartridge
(D) Drying of the ink when the cartridge has not been used for some time
9. A vertical line on every page of a printout from a laser printer indicates what?
(A) Fleck of toner
(B) Scratch on the print drum
(C) Light leakage
(D) Fingerprint
10. What would you do if the print job refused to leave the print queue in Windows 7?
(A) Delete the printer and re-install it.
(B) Restart the computer.
(C) Turn the printer off and then on.
(D) Stop and restart the spooler service.