Chapter 1

Managing Error Codes and Startup Messages

EXAM OBJECTIVES

Recognizing and resolving common error codes and startup messages

Resolving issues with missing boot files or OS components

Identifying steps to correct operational problems

Using diagnostic utilities and tools to resolve operational problems

This chapter examines problems common to the Windows environment. Many of these problems occur during the boot process, but a few can occur at any time. I examine boot or startup errors first and then other errors that occur within the OS. The end of the chapter reviews some tools used to help diagnose the cause of the errors.

As an A+ Certified Professional, you will often need to diagnose problems based on error codes and messages from the OS. This chapter introduces you to many common boot or startup error messages that you might see when using Windows. You also are introduced to the key files required to allow you to boot a computer running Windows.

Windows Boot Files and Failure-to-Boot Errors

All operating systems are vulnerable to issues that can keep them from booting, and the current crop of Windows OSes, from Windows XP on, is no different. The following sections look at some of these problems and possible resolutions.

Officially, the CompTIA A+ Exam objectives list post-Windows XP OS versions — namely, Windows Vista, Windows 7, and Windows 8.1. However, because the 900-series objectives reference Windows XP boot files, for completeness’ sake, I cover them here.

tip To help you understand the key files that are used in the boot process, you may want to review Book 5, Chapter 6.

The Windows boot process can suffer from boot sector corruption, boot loader problems, and drive identification problems within boot.ini or the Boot Configuration Database (BCD). For most problems, the Emergency Repair Process or the Windows Recovery Environment (RE) are reasonable troubleshooting and repair steps. (I discuss the Emergency Repair Process and the Windows RE in Chapter 3 of this minibook.)

No operating system found or incorrect boot device

The No operating system found error in Windows is tied to severe corruption of the boot sector on your hard drive. To restore your drive to working condition, perform the Emergency Repair /Startup Repair process to restore the boot sector on your hard drive. This feature is called “Emergency Repair” in Windows XP, and “Startup Repair” in Windows Vista, Windows 7, and Windows 8.1.

The Emergency Repair/Startup Repair process is covered in Book 7, Chapter 3. Minor corruption of the boot files would report missing files, such as winload.exe or ntoskrnl.exe, and the next section tells you how to deal with missing files. The No operating system found error could be caused by an improperly set BIOS/UEFI boot order.

If you have multiple hard drives, flash drives, or USB devices connected to your computer, they may have been placed higher in the boot order than your normal boot drive. If that is the case, you may see messages related to missing boot files. If this is the case, your solution to the issue is to enter the BIOS/UEFI configuration on your computer and select the correct device to be used as the boot device. The solution may be simpler with removable devices, because the device can simply be removed.

technicalstuff I have had one computer that would attempt to use my iPhone as a boot device when it was connected; as you can guess, this did not work very well.
Missing boot files

Windows requires several core files to boot, and an optional file. The required files are

  • ntldr (Windows XP)
  • ntdetect.com (Windows XP)
  • boot.ini (Windows XP)
  • bootmgr (Windows Vista, Windows 7, Windows 8.1)
  • Boot Configuration Database (BCD) (Windows Vista, Windows 7, Windows 8.1)
  • winload.exe (Windows Vista, Windows 7, Windows 8.1)
  • ntoskrnl.exe (Windows Vista, Windows 7, Windows 8.1)

The optional file is

  • ntbootdd.sys, which is the SCSI adapter driver that Windows XP boots from if the SCSI adapter doesn’t have its own BIOS

In the following sections, you get a look at what you can do if any of these files are missing or appear to be missing on your computer.

ntldr

As I state earlier, NTLDR is the boot loader for Windows XP and the previous versions in the Windows New Technology (NT) OS line. NTLDR worked in conjunction with NTDETECT.COM, which performed hardware detection, and boot.ini, which pointed NTLDR to your Windows installation.

From Windows Vista forward, Microsoft replaced NTLDR with bootmgr.exe and winload.exe. Instead of recording the \Windows directory location in boot.ini, post-XP systems read startup information directly from the boot configuration database (BCD); this data can be read and modified by using the bootcfg utility.

If ntldr is missing on a Windows XP system, you will receive the following error message when your computer tries to boot:

NTLDR is missing
Press any key to restart

This message often means that the computer is attempting to boot from a device that has no boot loader present. If this file is actually missing, it can be replaced with a working copy from any pre–Windows Vista computer, although try to replace the missing file with a copy from the same or a newer version of Windows to maintain full compatibility. To replace this file, you can boot the system from the Windows DVD and perform an Emergency Repair/Startup Repair process.

boot.ini

If the boot.ini file is missing and you installed Windows XP in its default location, the system will boot but will not display a boot menu. The default location for the OS in Windows XP and newer versions of Windows is c:\windows. If you have not installed Windows in its default location, you will receive a message stating that ntoskrnl.exe or hal.dll is corrupted or missing and that you should replace the file. The message will look similar to this, from Windows XP, stating that a DLL file is missing:

Windows could not start because the following file is missing or corrupt:
<Windows root>\system32\hal.dll
Please re-install a copy of the above file.

This message is misleading because the problem is really with the boot.ini file. The reason for the message is that the boot loader (ntldr) has gone to the default location, and ntoskrnl.exe or hal.dll files were not there. If the boot.ini file is replaced and the boot path is correct for your installation, the boot process will continue as normal.

remember boot.ini is a text file and can be edited with any text editor, such as notepad.exe. To replace the boot.ini file, you might need to create a boot disk like you did to replace the missing ntldr file.

ntdetect.com

If ntdetect.com is missing, you receive the following error message:

NTDETECT failed

This file is generic, like the ntldr file, and can be replaced in the same way that you replace the ntldr file. See the earlier section, “ntldr.”

bootmgr

Windows Vista introduced a brand-new way to start the Windows operating system. Instead of ntldr orchestrating the boot process, Windows Vista through Windows 8.1 rely upon a file named bootmgr located on the system partition. The bootmgr file then reads the Boot Configuration Data (BCD) store, again on the system drive, to determine how to complete the Windows OS load.

If bootmgr is missing, you receive the following error message when your computer tries to boot:

BOOTMGR is missing
Press Ctrl+Alt+Del to restart

To resolve this type of error, look at using the Startup Repair process or the repair Command Prompt with tools like bootrec.exe /fixboot. For more information about the Startup Repair process as well as repairing errors, see Chapter 3 of this minibook.

Boot Configuration Database (BCD)

The BCD data store is located on the EFI System Reserved Partition for UEFI systems, and in the C:\boot\BCD directory for BIOS systems.

If the BCD is missing, you receive the following error message when your computer tries to boot:

Windows Boot Manager

Windows failed to start. A recent hardware or software change might be the
cause. To fix the problem:

1. Insert your Windows installation disc and restart your computer.
2. Choose your language settings, and then click "Next."
3. Click "Repair your computer."

If you do not have this disc, contact your system administrator or computer
manufacturer for assistance.

File: \Boot\BCD

Status: 0xc000000f

Info: An error occurred while attempting to read the boot configuration
data.


Enter=Continue ESC=Exit

To resolve this type of error, look at using the Startup Repair process or the repair Command Prompt, which includes tools like bootrec.exe /RebuildBCD, or bcdedit.exe. bcdedit.exe will allow you to manually rebuild the BCD.

In Windows 8.1, you can access Startup Repair by starting the system from your Windows DVD, and selecting Repair your computer from the Welcome screen.

winload.exe

From Windows Vista onward, winload.exe (or winload.efi on UEFI systems) loads the Windows OS executive (ntoskrnl.exe) and the core device drivers into memory. As such, winload.exe is a crucial system file.

If winload is missing, you will receive the following error message when your computer tries to boot:

Windows Boot Manager

Windows failed to start. A recent hardware or software change might be the
cause. To fix the problem:

1. Insert your Windows installation disc and restart your computer.
2. Choose your language settings, and then click "Next."
3. Click "Repair your computer."

If you do not have this disc, contact your system administrator or computer
manufacturer for assistance.

File: \Windows\system32\winload.exe

Status: 0xc000000f

Info: The selected entry could not be loaded because the application is
missing or corrupt.


Enter=Continue ESC=Exit

To resolve this type of error, look at using the Vista Startup Repair process or the repair Command Prompt, which includes tools like bootrec.exe /RebuildBCD, or bcdedit.exe. bcdedit.exe will allow you to manually rebuild the BCD.

ntoskrnl.exe or hal.dll

You should be able to find the ntoskrnl.exe file in the windows\system32 directory. If it’s missing, you receive a message like this, from Windows XP:

Windows could not start because the following file is missing or corrupt:
<Windows root>\system32\hal.dll
Please re-install a copy of the above file.

These messages may look familiar; they are the same messages that you receive if your boot.ini file is misconfigured. After checking the boot.ini file, if the ntoskrnl.exe or hal.dll files are actually missing, you have to do one of the following:

  • Perform an Emergency Repair Process for Windows XP or a Startup Repair in Windows Vista or Windows 7 to replace any missing or corrupted files on your system.

    For more information on Emergency Repair Process, see Book 7, Chapter 3.

  • Attempt to replace the file by using the Recovery Console.
  • Re-install the operating system.

remember Ninety-nine out of 100 times, the missing ntoskrnl.exe or hal.dll error message means an error with the boot.ini file or the BCD, and the ntoskrnl.exe or hal.dll file is fine. While hal.dll represents a missing dll file, many other dll files are integral to the OS operating correctly. If many of these are missing, the recovery option will be through the Emergency Repair/Startup Repair process, which is covered in Chapter 3 of this minibook.

Solving Linux Boot Issues

One big change CompTIA made to the 900-series A+ Exam objectives is fairly heavy coverage of Linux. This makes sense to me because you’ll encounter Linux quite a bit in business, especially in enterprise servers.

Let’s examine a few common startup-related issues you may see in Linux, and discuss how to solve them quickly.

Missing GRUB/LILO

LILO and GRUB are the two main boot loader packages used in Linux. Nowadays GRUB is used almost exclusively. In my experience, the most common cause for a Linux system “losing” its boot loader is when you attempt to dual-boot between Linux and Windows. In this case, Windows often removes the GRUB loader in order to replace it with its own.

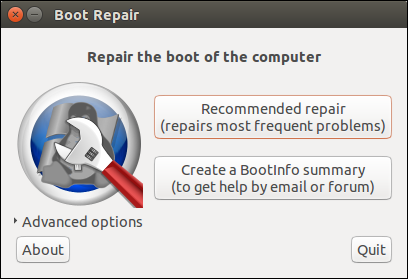
The good news is that you can easily re-enable GRUB. The specific instructions depend upon your Linux distribution, but the general procedure is to (1) start the computer from the Linux installation media; and (2) run a graphical or Terminal-based bootloader repair tool. For example, in Ubuntu Linux you can easily install the GUI tool Boot-Repair (shown in Figure 1-1) to re-install GRUB easily.

image

FIGURE 1-1: Ubuntu Linux is known for being simple to use. Even re-installing the GRUB boot loader is easy, thanks to the Boot Repair tool.

Graphical interface fails to load

If a Linux system boots to the Terminal, you should verify that the system actually has a graphical environment like GNOME installed in the first place. Many Linux systems administrators, for example, refuse to load GUI shells on servers in order to keep the system running as “leanly and meanly” as possible.

For most Linux distributions, you can manually start the graphical shell from a Terminal by running the startx command.

Missing graphical interface

What if your Linux system doesn’t have the graphical shell installed? You may need to configure an Ubuntu Linux system, but due to time pressures you need to at least temporarily load the graphical desktop to enact the repair.

Once again, Ubuntu Linux makes the process super easy. From the Ubuntu Terminal, run the following command:

sudo apt-get install –re-install ubuntu-desktop

Here, I break down each part of the previous Linux Terminal command:

  • sudo: This stands for “superuser do,” and instructs Ubuntu to run the command as the superuser as opposed to a standard user.
  • apt-get install: The Advanced Packaging Tool (apt) is one of the most popular Linux package managers. We use apt tools to find, install, maintain, and remove software, all from the command line.
  • ubuntu-desktop: This is a single apt package that bundles the Ubuntu graphical desktop environment.

Device-Related Errors

It is unfortunate that the devices and their drivers that allow us to accomplish so much of our day-to-day work with computers are also one of the biggest factors in not being able to do work on our computers. Ideally, when all the devices are configured on your computer, you should be able to work with no problems from your drivers.

Most people’s computers don’t remain in a static mode but are in constant flux. Even though devices are working fine, many people feel the need to try to improve performance by changing settings, upgrading drivers, or installing Service Packs.

Although upgrading drivers and installing items such as Service Packs are common practice, they should be done carefully. A Service Pack, for instance, can change how all drivers on your computer function. In the rare case when something does go wrong, you may find that the fix is difficult, but in most cases, it will be related to a file version or configuration setting. This section takes a look at how to address these problems.

A device referenced in system files is not found

From time to time, you will find that one of your startup files still references a device that you thought had been removed from your system. The Windows Registry holds all configuration references for installed devices. If this happens, you might have to edit the Registry manually in order to fix the problem. If an error message tells you that a referenced device does not exist, take note of the device being referenced because you will have to search for it in your startup files.

If the device is listed in the Registry, as it should be nowadays, it should be listed in Device Manager. I like to describe Device Manager as a “candy-coated front end” to the Windows Registry. Generally, it’s safer to make Registry changes through Control Panel than by using the Registry Editor directly.

Choose Start ⇒ Control Panel ⇒ System, click the Hardware tab of the resulting dialog box, and then click the Device Manager button. For Windows Vista and Windows 7, choose Start ⇒ Control Panel ⇒ System and Security ⇒ Device Manager. Locate the device in Device Manager and delete it. If the device is still physically present in the computer, it will be re-added to Device Manager when your computer is rebooted. If you keep removing the device and it keeps coming back, that is because it is still physically present. Physically remove the device first, and then remove it from Device Manager.

In Windows, if you do not see the device that you want to remove in Device Manager, choose Show Hidden Devices from the View menu. If you can’t find the device in the Windows GUI, you can attempt to search the Registry to locate the device and correct the issue. To find out about editing the Registry, see Book 6, Chapter 4.

Registry corruption

The two main ways that the system Registry can become corrupted are updates to the Registry via one of the Registry editing tools or an import of a registry settings file, and by the files that make up the Registry becoming damaged or deleted.

Of the many ways to import data into the Registry, most of them involve storing settings in a file and importing that file into the Registry. If the settings in the file are incorrect, you might be able to just continue computing without any problems, or you could end up with a system that no longer boots normally. If your system will not boot normally, your only option is to boot the system by using an alternative method, such as the Recovery Console, and replace the base Registry files with an untainted version.

You also need to use an alternative method to boot the system if the Registry files on the drive itself have become corrupted, and then you have to replace the Registry files. The user portion of the Registry — ntuser.dat — is found in your user profile directory. Your user profile directory is in C:\Users\<username> for Windows Vista and beyond. The system portion of the registry is found in %systemroot%\system32\config, in the files SAM, SECURITY, system, and software. For information about editing the Registry, see Book 6, Chapter 4.

Safe Mode

In order to let you repair the OS from within the OS, Microsoft provides Safe Mode. Safe Mode is available with most versions of Windows and is a special boot of Windows that loads a minimal set of drivers and services. The only drivers that are loaded are the ones that are required to get the OS running. Instead of loading the normal video driver, Safe Mode loads a basic VGA graphics driver. If you have issues with drivers or driver configuration, booting into Safe Mode can allow you to bypass these driver-related problems so that they can be fixed.

Safe Mode should be your “go to” boot mode when you’re repairing a system that’s been infected by malware. In Safe Mode you don’t have Internet access because Windows hasn’t loaded any network drivers; this prevents the infected system from “phoning home” and counteracting your malware removal techniques.

In Windows Vista and later, you can boot into different Safe Mode variants. For instance, you can load Safe Mode with or without networking support. Alternatively, you can skip the Windows Desktop and boot to a Safe Mode Command Prompt.

Enter Safe Mode by pressing the F8 key when the OS is booting. If your computer boots into Safe Mode, the words Safe Mode appear in each corner of your desktop. If Windows fails to boot properly, it will suggest — and attempt — to boot into Safe Mode on the next boot. If your computer boots into Safe Mode automatically, the last boot process was likely interrupted (usually by the user). For more information about Safe Mode and other boot methods, consult Book 7, Chapter 3.

Other Errors

Like with all things in life, some things cannot easily be categorized, so this section discusses errors that do not fit in the other categories in this chapter.

Paging file errors

The Windows paging file is a hard drive file that is used as additional RAM memory. Typically, with Windows, the file is called the paging file or page file, but some people may use “swap file” instead (that’s the typical Linux term).

The location of the paging file is recorded in the Registry. If the drive that contains the paging file becomes too full, you might encounter errors informing you of this fact. If this happens, create some additional space for the paging file by deleting some unnecessary files, reducing the size of the paging file, or moving the paging file to a new location. The default location for the paging file is in the same drive as your Windows directory. Windows allows you to move the paging file to an alternate drive. If you have done so and that drive has been removed from your system, you encounter errors telling you that the paging file could not be created. If this happens, configure Windows to use another drive for the paging file as shown in Book 6, Chapter 3.

Failure to start GUI

Sometimes, Windows cannot complete the boot process, but it will not generate an error, either. Instead, it seems to hang at one spot in the boot process without going any further. You can deal with this problem in a number of ways.

First, see whether the OS has loaded the networking components, which you can do using the ping utility discussed in Book 8, Chapter 3. If the networking services are running, you might be able to connect to the computer using Computer Management or Event Viewer, as described in Book 6, Chapter 4, which will allow you to view information about the OS and read the event logs. The event log might show errors that let you know what the problem is.

If you cannot connect to the computer, your only options are to continue to wait or to cycle the power on the computer. If the computer has locked up hard enough, the soft power button might not work, and you might have to unplug the computer. For a laptop, you have to remove the battery.

warning This action, like any power interruption, risks causing corruption to the file system, and should be used as a last resort.
On reboot, the system might boot properly, or you might want to use one of the F8 boot options discussed in Book 7, Chapter 3, such as Safe Mode. Safe Mode allows you to view the Event Logs via Event Viewer, and that might give you insight into the problem. The F8 boot options also allow you to create a bootlog, which if your next boot is unsuccessful, will let you know approximately where the failure has occurred. If you are unable to find the solution, disconnect all peripherals (such as USB devices) and attempt to reboot the computer. If the problem is with a peripheral or its driver, you might see a successful boot. In some cases, I have seen errors with peripherals occur after the system has successfully booted for years, and the problem can usually be traced to an OS update, a drive update, or file system corruption of the driver.

If you think you know what is causing the problem, perhaps a driver or service that will not start, you could also use Recovery Console to try to fix those problems. For more information about Recovery Console and its use, consult Book 7, Chapter 3.

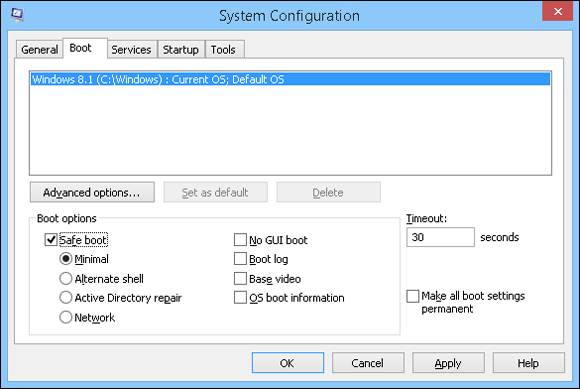
tip On newer, faster systems, getting the timing right for the F8 startup keystroke can be incredibly difficult. If this is the case, consider opening the System Configuration Utility, shown in Figure 1-2, and specifying the Safe Boot option. In Windows 8.1, you can navigate to the Start Screen, hold down the Shift key, click the Power button, and select Restart. Fast and easy!

image

FIGURE 1-2: Type msconfig from a Windows command prompt to open the System Configuration utility. From here you can force-boot into Safe Mode.

Error Diagnostic Tools

The following sections examine the different tools you can use when diagnosing errors.

Windows Error Reporting

With Windows XP, Microsoft introduced the Error Reporting Tool, which is a tool for error reporting that replaced most of the functionality originally covered by Dr. Watson in “prehistoric” Windows versions. The Error Reporting tool allows you various levels of reporting. The idea is that when an application or the operating system itself crashes, Windows sends anonymous technical data to Microsoft, where programmers can identify bugs and ultimately update the Windows code base to the benefit of all customers.

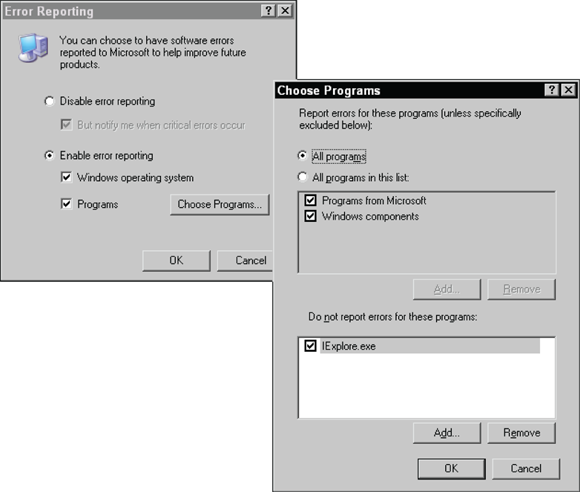
By default, it is configured to report errors in both applications and the OS directly to Microsoft, which allows its programmers the potential to use the information when creating new patches for the operating system. This “call home” functionality can be disabled in Windows XP by going to the Error Reporting button on the Advanced tab of the System Control Panel applet. Clicking the Error Reporting button opens the Error Reporting dialog shown in Figure 1-3. From this dialog, you can disable the “call home” functionality but still have Windows report the errors to you; specify that Error Reporting works for both OS components and programs; or use the Choose Programs button to specify which programs you want to have Error Reporting work with, or exclude.

image

FIGURE 1-3: Windows Error Reporting helps Microsoft fix problems with the OS.

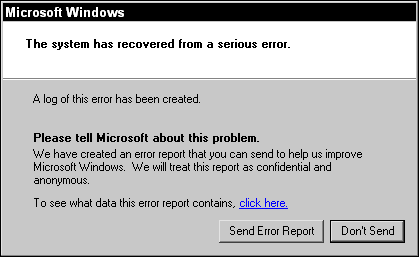
When an application crashes, you will see a message similar to the one in Figure 1-3. If Windows has a Stop error, though (described in Book 7, Chapter 2), you see the message after you reboot and log in. Click the link at the bottom of the dialog box to find additional information related to the error. When you see this dialog, you can send a summary of the error data and system state to Microsoft, as shown in Figure 1-4. If you disabled Error Reporting but kept the notify option enabled, you get a smaller dialog box without the option for notifying Microsoft, but only an OK button to acknowledge the error.

image

FIGURE 1-4: Even with Error Reporting enabled, you can control what errors go to Microsoft.

Event Viewer

Windows offers various logging tools, the greatest of which uses the Event Log service. The Event Log service logs errors and events into several different log files. The Event Viewer is the application you use to view the contents of these log files.

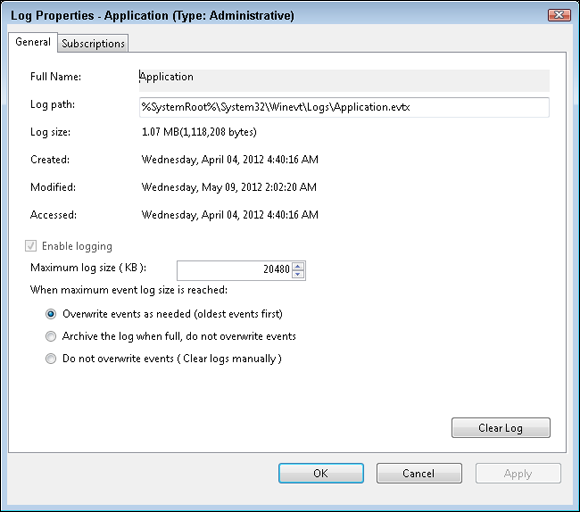
Windows always has at least three default logs: Application, Security, and System. These log files have a default size of 512KB each and automatically overwrite events after seven days in Windows XP and have a default size of 20MB each and automatically overwrite events as needed in Windows 7 and Windows 8.1. These settings can be adjusted for each file by right-clicking the log file in Event Viewer and choosing Properties to open the Log Properties dialog box, shown in Figure 1-5.

image

FIGURE 1-5: The default settings for the Windows 7 log files will prevent them from filling.

In the event that any log fills up, you receive a pop-up message.

  • On Windows Vista, Windows 7, or Windows 8.1, choose Start ⇒ Search, type Event Viewer, and press Enter. Then expand Windows Logs in the navigation pane, right-click the log, and choose Clear Log.

When you clear the log, you have the opportunity to save the events to a file.

tip Before clearing the filled log, examine the most recent events for an error that might have caused the log to fill quickly.

Getting an A+

This chapter examines a number of common errors that you are likely to encounter with Windows computers. These errors range from configuration settings and files to boot files and driver-related problems. You also see some common resolution methods, such as booting into Safe Mode. Some key elements to remember in this chapter are

Prep Test

1. Which of the following options are valid procedures for trying to resolve corrupted boot files with Windows 7? Choose all that apply.

box (A) Recovery Console

box (B)winload.exe

box (C)ntoskrnl.exe

box (D) Emergency Repair/Startup Repair Process

2. Which of the following are loaded when you boot into Safe Mode? Choose all that apply.

box (A) Base video driver

box (B) Your mouse driver

box (C)Auto-start services

box (D)Enabled device drivers

3. What is the purpose of a swap file?

(A) To prepare files to be copied to other disks

(B) To act as additional memory for the system

(C) To act as an extension to the hard drive

(D) To prepare files that are saved to disk

4. Where do you go to read and clear the Windows 8.1 Event Log?

(A) Event Log

(B) Event Viewer

(C) Log Reader

(D) Disk Cleanup

5. Which of the following is the default user profile path in Windows 7?

(A) C:\Users

(B) C:\Windows\System32

(C) C:\Windows\Config

(D) C:\Documents and Settings

6. Which of the following tools can you use to force your Windows 8.1 system to boot into Safe Mode?

(A) PowerShell

(B) Event Log

(C) Regedit

(D) Msconfig

7. Which of the following is a Linux boot loader?

(A) SCSI

(B) MBR

(C) GRUB

(D) NTDETECT

8. When should you boot into Safe Mode?

(A) At every boot-up

(B) When your system will not boot normally

(C) When your computer is connected to the Internet

(D) Only to play Solitaire

Answers

  1. A, D. Both Recovery Console and the Emergency Repair/Startup Repair Process allow you to repair problems with the boot files. Check out “Windows Boot Files and Failure-to-Boot Errors.”
  2. B. A base video driver and your mouse driver are the only items on the list that load when you enter Safe Mode. It also loads a VGA-compatible video driver and a minimal set of device drivers. Peruse “Safe Mode.”
  3. B. The Windows swap file acts as additional memory, or virtual memory, for the OS. Take a look at “Paging file errors.”
  4. B. Event Viewer is used to read, back up, and clear your event logs. Look over “Event Viewer.”
  5. A. Microsoft simplified the user profile path in Windows Vista and beyond, switching from C:\Documents and Settings to the easier-to-type C:\Users. Review “Registry corruption.”
  6. D. You use the System Configuration (msconfig) utility to adjust various startup options on Windows Vista, Windows 7, or Windows 8.1 computers. Look atSafe Mode.
  7. C. GRUB is the most common bootloader found in Linux distributions today. ReadSolving Linux Boot Issues.”
  8. B. You should enter Safe Mode to correct problems when your computer won’t boot normally. See “Safe Mode.”