Chapter 2
EXAM OBJECTIVES
Securing systems through BIOS
Implementing users and groups
Implementing permissions and rights
Implementing auditing
Implementing firewalls
Implementing security best practices
In this chapter, you find out how to implement security best practices on systems at home or at the workplace. The preceding chapter introduces terms such as authentication and authorization; this chapter demonstrates how to perform such tasks. You find out how to create a user account that can be used for authentication and how to authorize the user to access a folder or perform an action within the operating system. This chapter will ensure that you know how to perform basic security-related tasks!
When thinking about network security, understand that security is to be implemented at multiple layers, meaning that you cannot focus on just one security-related feature. You want to implement multiple security features to secure your environment. For example, a number of people feel that their systems are secure because they have a firewall. They don’t realize that the firewall protects the system only from attacks coming across the network. What if the hacker is in the same room as the computer? The firewall is of no use at that point, so you need to ensure that you implement other security features to protect the system from all potential threats.
When securing systems, your first security concern is physical access. This involves ensuring that critical systems, such as servers, are in locked rooms that are not accessible to unauthorized users. Physically securing systems could also involve changing some of the CMOS settings, such as boot device order, power-on password, and CMOS password.
Changing these settings in CMOS is different for each type of system, but the first thing to do is enter CMOS. Normally, you press Delete, F1, F2, or F10 when the system is booting.
After the system is booted, you will find the following settings in the CMOS setup program to help secure the system:
In this section, you find out how to create user accounts that can be used to log on to the system and how to create groups to organize users together as a single object that permissions can be assigned to.
To secure the Windows OS from unauthorized access, you can create a user account for each person who is allowed to use the system. Anyone without a user account will be unable to log on to the system and, as a result, will not be able to use the computer. The other benefit of creating user accounts is that even if a person has a user account and logs onto the system, he might not be able to access a file because you have not given permission to that user to access the file.
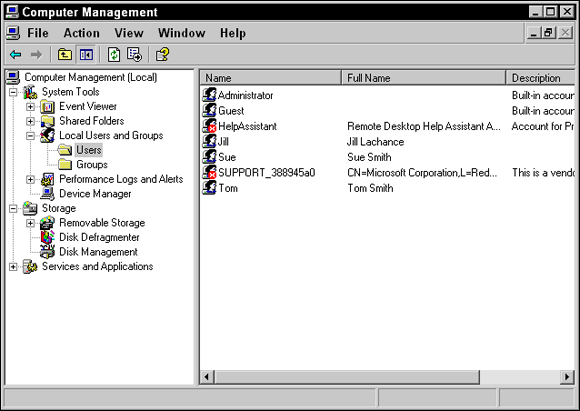
To create a user account on a Windows system, go to Control Panel ⇒ Administrative Tools ⇒ Computer Management. In the Computer Management console that opens, expand Local Users and Groups and select the Users folder (shown in Figure 2-1). In the Users folder, you will notice some user accounts on the right side. These user accounts are built-in accounts, meaning that they were built by the OS or by a piece of software you have installed. Note that the home editions of Windows do not have a Computer Management console, so you will have to manage user accounts through the Control Panel.
Two built-in accounts you should be familiar with for the A+ Exams are
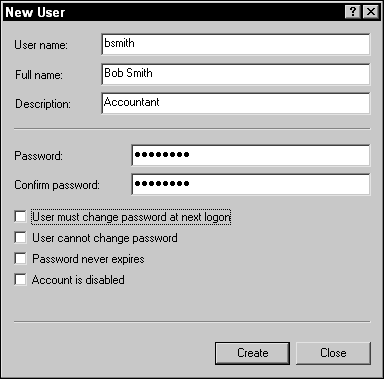
Now that you have identified the two major built-in accounts, you can create your own user accounts. To create your own user accounts in the Computer Management console, right-click the Users folder and choose New User. The New User dialog box appears (shown in Figure 2-2). Fill in the following account details:
After you enter all the account information, click the Create button and then click Close to dismiss the New User dialog box. The user account has been created, and you can start using it right away to log on to Windows.
It is also possible to create user accounts from within the Control Panel. In Windows 7, click User Accounts from the Control Panel and then select Family Safety ⇒ User Accounts ⇒ Manage Another Account. At this point you can select a user account you want to alter or create a new user account by choosing the Create a New Account link.
In Windows 8.1, you can also manage user accounts from the Control Panel by selecting User Accounts and Family Safety ⇒ User Accounts ⇒ Manage Another Account (Figure 2-3). Choose the account you want to alter and then choose the action on the left side that represents the change to the account you want to make. If you want to create a new account, click the link for Add a New User in PC settings from the Manage Another Account screen. This takes you to the PC settings screen where you can add a new user account.
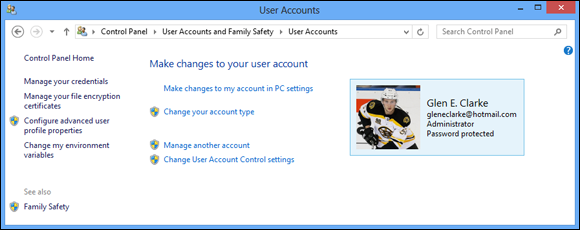
One user account setting you can change is the type of account. In Windows you can create a standard user account (the default), which is just a plain account with no administrative permissions. You can also create an Administrator account, which has permissions to alter settings on the computer.
To change the account type after the fact, simply go to Control Panel ⇒ User Accounts and Family Safety ⇒ User Accounts ⇒ Manage Another Account, and then select the account you want to alter. On the left side of the screen you will see settings you can change. Choose Change Account Type and then choose either Standard User or Administrator.
A group in Windows is a collection of user accounts. The benefit of using groups when managing access to resources is that you don’t need to assign the same permissions multiple times. Instead, you assign the permission to the group, and anyone who is a member of the group receives the permission.
Like user accounts, Windows offers a number of built-in groups. A built-in group has predefined capabilities within Windows. For example, printer operators can manage all printers on the system, and anyone who is a member of the printer operators group will have that capability. The following is a list of some of the popular built-in groups found in Windows OSes:
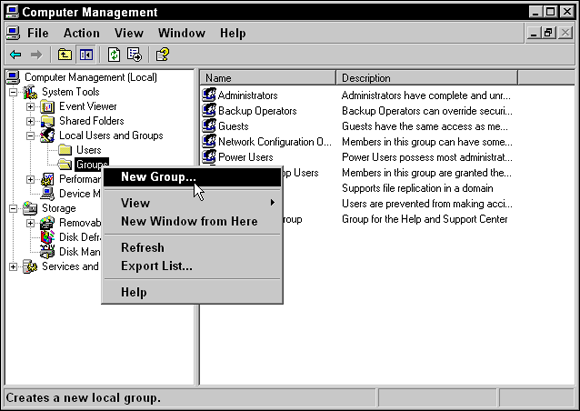
If the built-in groups do not satisfy your needs, create your own groups:
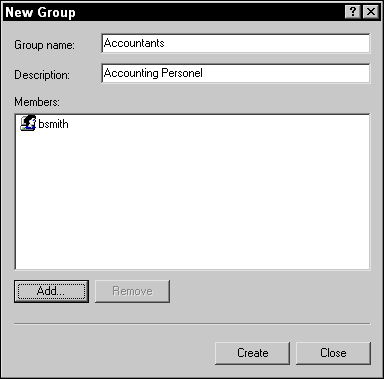
In the New Group dialog box that appears, type the name you want to use for the group.
In this example, I use Accountants (shown in Figure 2-5).
To begin adding members to the group, click the Add button.
The Select Users dialog box appears.
Type the name of the user account you want to add and then click the Check Name button on the right side.
Windows should underline the account name, indicating that the user account exists and that you can add it to the group membership.
After you create the users and place them into their appropriate groups, you are now ready to assign them permissions.
When controlling a user’s access to the system, you typically modify the user’s rights and permissions. Microsoft has made a huge distinction between a permission and a right.
In this section, you discover the difference between permissions and rights within the Windows OS and how to implement both within the local security policy in Windows.
If you were to log on to your Windows system as just a user account and then double-click the time in the bottom-right corner to change that time, you get an error message indicating that you do not have the privilege to change the time. This is an example of user rights. The user account that you are currently logged in with does not have the right to change the system time, which is an action that typically has to be performed by an administrative account.
There is a large list of user rights; some of the most popular ones are listed below:
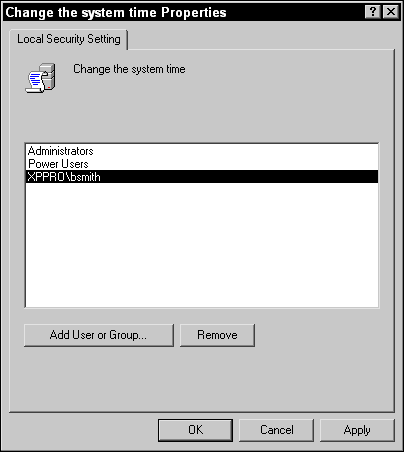
To change the user rights (for example, to assign Bob Smith the right to change the system time), you need to modify the user rights assignments in the local security policies of the Windows computer. The local security policy controls all security settings for the system. To change the local security policies in Windows, follow these steps:
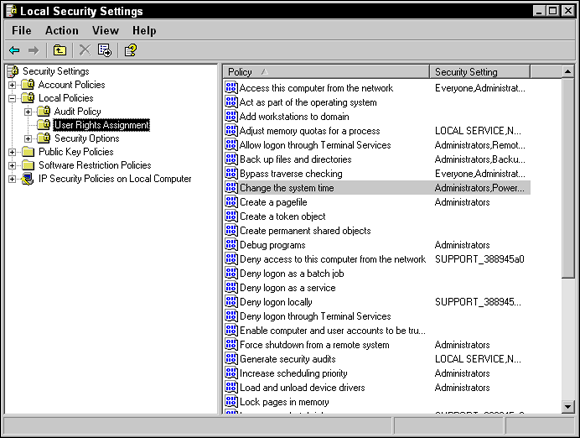
To modify the user rights within the local security policy, expand Local Policies and then highlight User Rights Assignments, as shown in Figure 2-6.
When the User Rights Assignments node on the left side has been selected, you will notice the list of user rights on the right side of the screen in the Details pane.
To modify a user right, double-click the user right.
You see a list of users or groups that have been assigned that right.
Starting with Windows Vista, Microsoft added the User Account Control (UAC) feature, which was improved in Windows 7. When an administrative account logs onto Windows, that user is not initially given administrative access to the system. When the administrator launches a program to perform some administration, Windows prompts the user to raise the privilege level to the administrative level. If the administrator chooses Continue, Windows then elevates the user’s privileges to the administrative privileges.
Microsoft created the feature because over the last few years, a number of security incidents were caused by hackers that caused the user of the computer to run malicious software without the user’s knowledge — and because the user logged on had admin access to the system, so did the program that the user did not know was running. This malicious software that now had admin access could do anything it wanted to the system.
In response, Microsoft created the UAC feature. Now if software runs without your knowledge and tries to manipulate the system, you are prompted to decide whether you want to continue. Unfortunately, you also get prompted when you launch the software yourself, which is why most people get frustrated with the UAC feature. Still, it is a great feature from a security point of view.
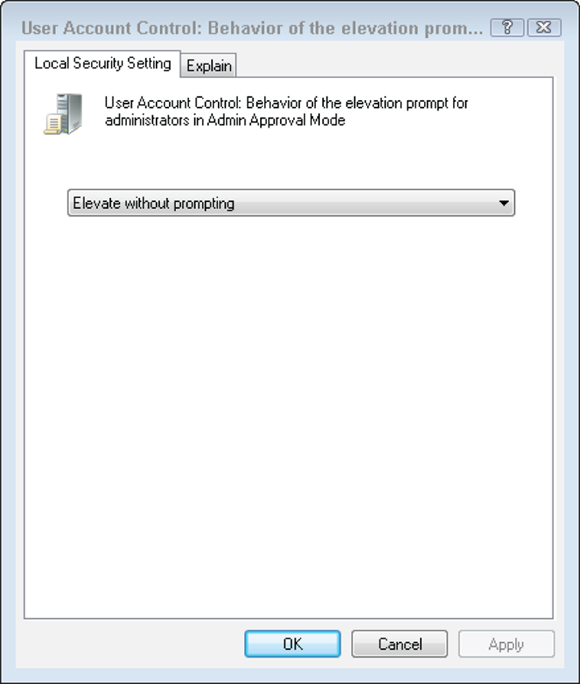
You can modify the local security policy to get rid of the UAC prompt and automatically elevate the admin privileges (not recommended). Locate the User Account Control: Behavior of the Elevation Prompt for Administrators in Admin Approval Mode setting in the Security Options section of the Local Policy. You can set the value of the policy to Elevate Without Prompting, as shown in Figure 2-8.
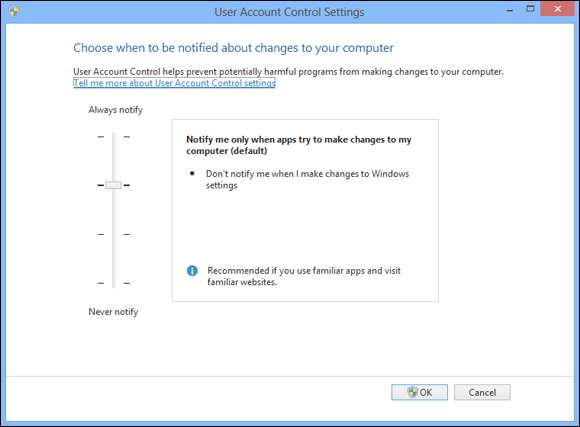
You can also change how the UAC feature works in Windows via the Control Panel (instead of the security policy). To change the UAC settings through the Control Panel, select User Accounts and Family Safety ⇒ User Accounts, and then choose the Change User Account Control Settings link. A dialog box appears that allows you to control when you get the notifications about elevating your privileges (see Figure 2-9). The default is to notify you when a program tries to make a change, but not notify you when you make a change. If you want to remove all notifications, drag the slider to the bottom to the Never Notify setting.
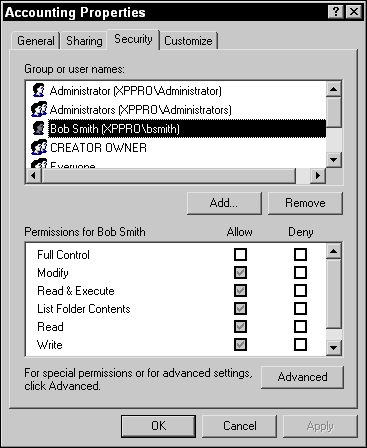
Permissions are different than rights: A right governs an action that can be performed on the computer, but a permission is a user’s level of access to a resource. For example, you can give a user permission to read or modify a file. Figure 2-10 shows the permissions you can set for a file.
To modify the permissions on a folder or file in Windows, simply right-click the file or folder and choose Properties. In the Properties window, choose the security page tab to set the permissions.
Here are the available permissions:
Full Control: Allows a user to do everything that the Modify permission allows, and the user can also change permissions on the resource or take ownership of the resource.
If someone can take ownership of the resource, that person can change the permissions. The Full Control permission should be used sparingly so that not everyone has the permission to change permissions on you.
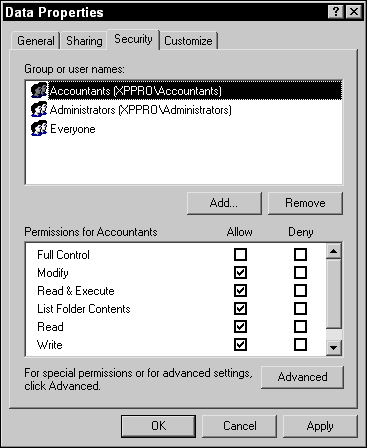
Looking at Figure 2-10, you will notice a number of permissions with gray check boxes next to them. The gray check box means that you are not allowed to change the permission because the permission is being inherited from a parent level. Permission inheritance (also known as permission propagation) is a feature of Windows that is designed to minimize how much permission management you need to do. With permission inheritance, when you set permission on a folder, that permission applies to all subfolders and files; you don’t need to go to subfolders and files to set the same permission.
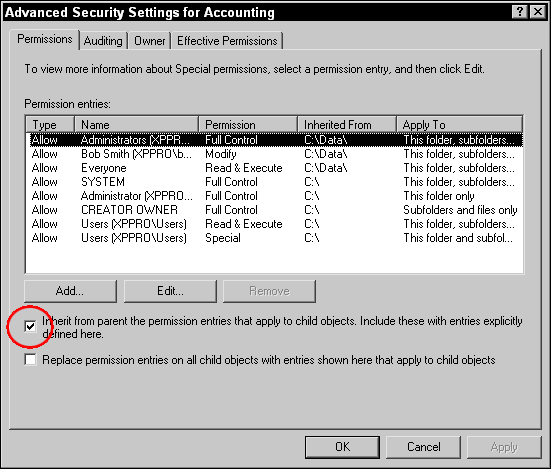
When you go to modify the permissions on a folder, however, you need to understand that the existing permissions are being inherited from the parent folder. To change the permissions, you need to break the permission inheritance feature on the folder by going to the properties of the folder, clicking the Security tab, and clicking the Advanced button. That invokes the Advanced Security Settings dialog box for the folder, where you can turn off the Inherit from Parent … option (see Figure 2-11).
After you turn off the inheritance option and click OK to close that screen, you are presented with a dialog box asking whether you want to remove the existing permissions or copy the permission down from the parent folder so that you do not have to set all permissions again. Typically, I choose Remove and then add whoever needs to have access to the folder.
After you remove the existing permissions, you can add new users or groups to the permission list on the Security tab by clicking the Add button. You can type the name of the account or group you want to assign the permission to and then click the Check Names button. After you add all the users and groups to the permission list, you then choose which permission you want assigned to each user by selecting the user in the permission list and then choosing the permission. For example, in Figure 2-12, notice that the Accountants group has the Modify permission.
Note that the descriptions in this chapter have been about allowing a permission such as the modify permission. From time to time, you may want to take someone’s permissions away with a deny permission. A reason to do this would be if the user is a member of a group that has been allowed a permission and you do not want the user to have the permission; you simply add the user to the access control list and deny him the permission! All users in the group will be allowed the permission except for that one user. Remember that in Windows, the deny permission wins over an allow permission when a conflict occurs.
You can change the attributes of a file and make it read-only so that no one can modify the file, or you can make it hidden so that no one can see the file. These are not great practices as far as security goes because when setting a file attribute, it applies to everyone. For example, if you set the read-only attribute on a file, the file cannot be modified by anyone, including users and administrators. With permissions, you get to choose who gets the permission.
Permissions on a file can change as you perform file management tasks, such as moving and copying files. The following list shows the outcome if you move or copy a file that has permissions set on it:
When you share a folder, you have the opportunity to place permissions on the share, as well as to set up your NTFS permissions. (Book 8, Chapter 3 covers sharing network resources such as folders and printers.) The big question is what happens when the two permissions conflict? If a conflict in permissions between NTFS and shared folders exists, the most restrictive takes effect. For example, if you have NTFS permissions of modify on a folder and then you share the folder and give all users the read permission, the permission that takes effect will be the read permission because it is the most restrictive. Remember this for your A+ Certification Exams!
You learn about shares in Book 8, Chapter 3, but let’s do a quick review of the key points here and focus on security-related facts you need to know about shares (on top of what you just read).
The purpose of sharing a folder is to ensure that users from across the network can access those files. Once you share the folder, the share is given a name, and users on the network will connect to that folder using the UNC path of \\servername\sharename.
There are two types of shares in Windows: administrative shares and local shares. Administrative shares are default folders that are already shared by Windows, but the permissions on the administrative share are configured so that only administrators can connect to the share. An example where an administrator may use an administrative share is if he or she needed to connect to the root of the drive on the server to copy some files from the server. The roots of all drives are administrative shares by default.
In Windows the following are default administrative shares:
Not only do we have administrative shares, but administrators can also create local shares. A local share is a folder that is manually shared by the administrator of the system.
You learn how to share a folder in Book 8, Chapter 3, but let’s review the steps to share a folder. To share a folder in Windows 8.1, follow these steps:
From a security point of view, you should be familiar with where the system files and folders are for the operating system and ensure that you do not give users unnecessary access to these folders. The Windows operating system is stored in the c:\windows directory, with many of the files being stored in c:\windows\system32. Other examples of folders that store files used by the system are c:\program files and c:\program files (x86). Be sure to limit who has access to those folders.
After you set up security on a Windows system by setting permissions on the folders and files, configuring user rights, and placing users in the appropriate groups, make sure that the security of the OS is effective. To monitor what is happening on the system, you enable auditing, which notifies you when certain things happen on the system. For example, you might want to be notified if someone fails to log on to the system, using a correct username and password — this could be someone trying to guess the password of the account.
To effectively work with the auditing feature in Windows, there are two steps:
Enable auditing.
You must first enable auditing. Simply choose what events you want to audit. The nice thing about auditing in Windows is that you choose which events you care to know about.
Review the audit log.
After you enable auditing, ensure that you monitor the log regularly for any security-related issues. For example, if you notice a failure to log on over and over for the same account, that is an indication that an account is being hacked.
The following sections offer more details about these two steps.
To enable auditing in Windows, modify the Local Security Policy:
In the Local Security Policy console, expand Local Policies and then highlight Audit Policy.
On the right side of the screen (the Details pane) is a list of events for which you can enable auditing (see Figure 2-13):
Audit Account Logon: Audit any remote users who are authenticated by this user account database. This is the event to enable auditing on a domain controller.
A domain controller is a server in a Microsoft network environment that holds all the user accounts for an entire network. In the corporate world, users log on to the network, not a particular machine, which means that the logon request is sent to the domain controller where the username and password are checked against a database. The database that holds the user accounts on a domain controller is known as the Active Directory database.
Audit Object Access: Audit access to a specific folder, file, or printer.
After you enable Object Access Auditing, you need to go to the Security page in the properties of a file, folder, or printer and click the Advanced button. Click the Auditing tab and choose which users and which permissions to audit for. You must perform this step on any folder, file, or printer you want to audit.
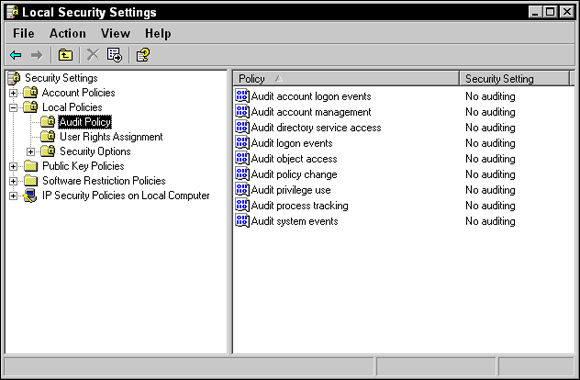
To enable auditing on one of these events, double-click the event and then choose whether you want to audit the success of that event or the failure.
For example, I do not care about the success of logons, so I would choose Failure for that event.
After you enable auditing on the different events, you then need to view the audited information in the security log of event viewer:
On the left side, expand Windows Logs and then select the log that you want to view.
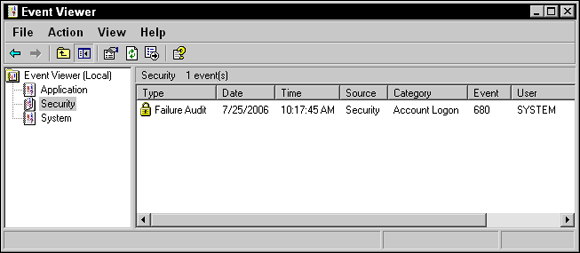
Note the events on the right side of the screen. If you select the security log, as shown in Figure 2-14, any events with a lock are failure events, and any events with a key are successful events. Figure 2-14 shows an account logon event with a lock, indicating a failure to log on.
(Optional) To view a description of a particular event, double-click the event.
Going back to the account logon failure example, you can see the date and time the logon was attempted. You can also view the username that was attempted and the computer that the person used to try to log on to the network.
A firewall is software or hardware designed to stop information from reaching your system unless you selectively choose certain pieces of information to pass through. This information is sent in the form of network packets (pieces of data) that are broken down into three parts:
A firewall is designed to look at the contents of the packet — specifically, the header information — to decide whether the data should be allowed into the system or discarded. The firewall uses the source and destination IP addresses from the header, as well as the port number, to help make this decision. A port number represents an application that runs on the system. For example, the web server installed on my system runs at my IP address on port 80. The FTP server I am also running on my system uses my IP address but uses port 21 instead of port 80. If I want to allow the public to see my website but not my FTP site, I configure the firewall to allow information to reach port 80 but not port 21. So each TCP/IP application that is running on your system uses a different port number, which is how data is sent to one application and not the other.
My point is that the firewall also uses the port number to decide whether the data should be allowed into your system. For example, I have a website at www.gleneclarke.com
so I had to configure my firewall to allow data destined for port 80 to be allowed in. Now, I don’t have an FTP server, so I ensured that the firewall disallows data destined for port 21.
To enable the Windows Firewall, follow these steps:
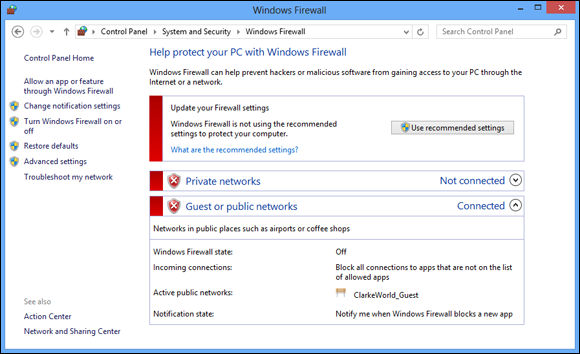
In the Control Panel, choose System and Security and then Windows Firewall (see Figure 2-15).
You will notice a green check mark on the screen, stating that the Windows Firewall is turned on, or red squares indicating the firewall is off. You can also see the status of On or Off in the Windows Firewall state.
Most companies that want to publish their own websites or host other types of servers (such as FTP servers or email servers) need to allow traffic to reach these types of servers. Placing public servers such as these alongside your private network servers is unrealistic because it means that you need to open the firewall to allow traffic into the network to reach these servers.
As a work-around, most network administrators create a demilitarized zone (DMZ) to hold these servers. A DMZ is a network segment between two firewalls where you have allowed selected traffic to reach the servers in the DMZ. The DMZ is different from your private network because you will not allow any content to come into your private network.
Figure 2-16 displays a typical DMZ setup. Note the two firewalls: firewall 1 and firewall 2. Firewall 1 connects the DMZ to the Internet and will allow only traffic destined for the three servers in the DMZ to pass through the firewall. The second firewall (firewall 2) is designed so that no systems from the Internet can pass through it, essentially protecting the private company network from outside access.
There are hardware firewall solutions that are physical devices placed on the network between the clients on the network and the Internet. The benefits of using hardware firewalls are that they typically outperform a software firewall, and you get the extra security benefit of having a separate security device between you and the Internet. Too, a hardware firewall solution typically protects the entire network and not just one system. Software firewalls have the benefit of being much cheaper than a hardware firewall.
A number of vendors make hardware firewalls; for example, Cisco offers the Cisco ASA firewall device. You can also use your home router as a firewall; home routers have firewall features that allow you to control what traffic is allowed to enter your network.
Software firewalls are applications installed on your computer that protect only that computer. So-called personal firewall software, this kind of firewall protects only your personal computer: the one with the firewall software installed.
A number of different software firewall solutions are available. For example, Zone Alarm is a free software firewall that you can download and install on your system. Each operating system will typically have its own firewall software built-in as well. For example, Linux has iptables, and Windows has the Windows Firewall. Because most operating systems have built-in firewall software, you will most likely not need to download and install any other software.
When configuring the firewall, you typically specify rules that control which packets are allowed or not allowed to enter the network. A default rule that you typically set first states “Drop all packets” or “Accept all packets,” and then you build a list of exceptions to that default rule.
For example, on my network, I have the default rule to drop all packets, but then I have an exception that says if traffic is destined for port 80, allow that traffic into the network. This way, people on the Internet can reach my website.
To configure exceptions in Windows, follow these steps:
Choose the Allow a Program or Feature through Windows Firewall link, located on the left side of the screen.
You can then select the type of traffic that is allowed to pass through the firewall. For example, if you want to be able to Remote Desktop into the system, choose the check box for Remote Desktop to open the RDP port on the firewall (which is TCP port 3389).
If the program you want allow traffic through does not exist in the list, you can add an exception to the list.
In Book 8, Chapter 3, you read more about the firewall in Windows. Within the Control Panel ⇒ System and Security ⇒ Windows Firewall dialog box, you can choose Allow a Program or Feature through Windows Firewall. If you need more flexibility, you will need to add exceptions through the Windows Firewall with Advanced Security. Here you can add exceptions by port values.
If you need full control of the firewall in Windows and the capabilities to create firewall rules (exceptions) that control both inbound traffic and outbound traffic, you need to use the Windows Firewall with Advanced Security tool. Let’s walk through an example of opening a port on the firewall by creating our own rule:
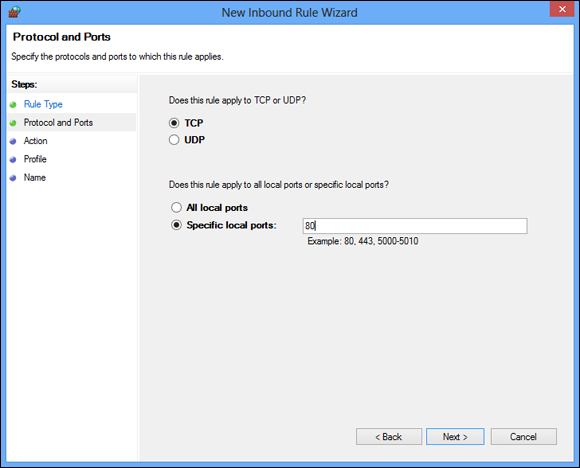
Select the protocol — either TCP or UDP — and then type the port number you want to open and choose Next.
In my example, I am going to create a custom rule to open a port for my web server so I am using TCP and port 80 (see Figure 2-17).
Choose whether you are allowing this traffic through the firewall or blocking it and then choose Next.
I am choosing Allow the Connection.
Once you have added the rule, you can then enable or disable the rule at any time by right-clicking the rule and choosing Enable Rule or Disable Rule.
The Action Center in Windows is a central window that informs you of critical security mistakes with your system. In the Action Center, you can see whether you have a firewall enabled on your system and whether antivirus software is installed. (If Windows does not see antivirus software installed on the system, it reports virus protection as not found!) You can also see from the Action Center if Windows Update is not receiving automatic updates or if Windows Defender is out of date. Windows Defender is the malware protection software built into Windows.
From the Action Center, buttons are available so that you can manage Windows Defender updates, change your Windows update settings, or even perform a backup.
In the Action Center, you can also change your UAC settings, perform a backup, or perform a restore of a restore point. To get to the Action Center, choose Start ⇒ Control Panel ⇒ System and Security ⇒ Action Center.
In the following sections, you discover some basic best practices that can help you secure your environment. These sections are designed to be a summary of features that I discuss throughout the chapters of this book.
The first thing you can do to secure your system is to harden it: You remove any software that you are not using and disable any Windows services that are not needed. The concept of hardening comes from the fact that hackers compromise systems by leveraging software that is installed or running on the system. The less software you have running, the less likely you are to be hacked!
Regularly patching the system by running Windows Update is critical. As Microsoft finds out about security problems with its OS and software, its programmers fix the problem and deliver the fix through the Windows Update site. To ensure that you are getting the security fixes and patches, you must run Windows Update often. More on this topic in the next chapter.
Make sure you turn on the Firewall feature in Windows. The firewall helps protect your system from network attacks, but it is not the be-all and end-all of network security. You also need to follow the other best practices presented in this chapter.
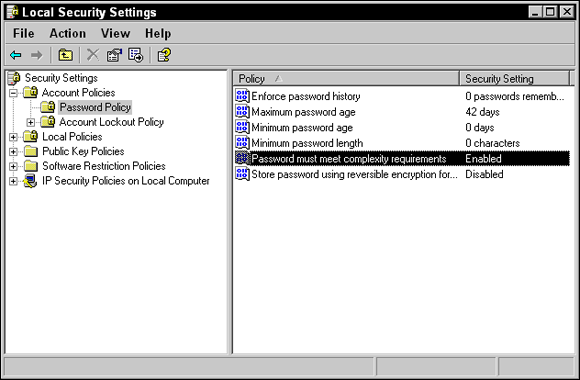
Stress to your users the importance of using strong passwords. To enforce strong password usage, you can set a password policy in the Local Security Policies. To set the password policy, follow these steps:
Ensure that users use strong passwords by double-clicking the Password Must Meet Complexity Requirements policy and then choose Enable (see Figure 2-18).
This setting ensures that users use passwords of a minimum of six characters, with a mix of uppercase and lowercase characters, numbers, and symbols. The password will also not contain any part of the username.
Make sure that you enable auditing on critical systems so that you will know (hopefully) when the system has been compromised. For example, if a hacker makes his way into the system and builds himself a hidden user account, you will know about it if you have enabled account management auditing.
Another big part of security is ensuring the confidentiality of your data. The best way to ensure confidentiality is to use encryption technologies to encrypt your data as it sits on the hard drive. This ensures that if someone steals your computer or hard drive, he or she will not be able to read the data as it is encrypted.
Windows has a number of features to encrypt data, such as EFS, Bitlocker, and Bitlocker-To-Go.
Encrypting File System (EFS) is an older NTFS feature that is designed to encrypt files (and not the entire disk). To encrypt a file with EFS, follow these steps:
Keep in mind that this is a feature that is designed to be transparent to the users. Once the file is encrypted, as soon as you open the file it is automatically decrypted. When you close the file, it is again encrypted to disk.
Once you have encrypted the file you can go back to the Advanced Attributes dialog and add additional people who can decrypt the file. Underneath the scenes EFS uses certificates to encrypt the information.
BitLocker is a Windows feature that allows you to encrypt the entire disk. This ensures that if someone steals your hard drive and then tries to connect it to another system to read the data, he or she will be unsuccessful because the entire drive is encrypted. Keep in mind that BitLocker is only available to the Ultimate and Enterprise editions of Windows Vista and Windows 7, and the Pro and Enterprise editions of Windows 8.1.
With BitLocker you can have the encryption keys stored in a computer chip on the computer, known as a Trusted Platform Module (TPM). A TPM is a chip on the motherboard that is used to store encryption keys that can be used by BitLocker to encrypt the drive. You can also use BitLocker in USB key mode where the keys are stored on a USB device. This means you would need the USB key to be able to decrypt and access the drive.
BitLocker-To-Go is the Windows feature that allows you to encrypt the contents of a removable drive such as a USB drive. This ensures that if your USB drive that contains sensitive data is ever lost, you have the confidence of knowing the data is unreadable on the drive.
You can enable a number of security features when working with switches instead of hubs on the network. To begin with, switches filter traffic by sending only data to the port on the switch that the data is destined for. This can add to the security of the network because it is harder for a hacker to monitor network traffic when the port the hacker is using is not getting a copy of all data — just data destined for his system.
The second thing you could do to secure your environment with a switch is disable any unused ports on the switch. This way, if the hacker gets physical access to your network, she cannot simply plug into the switch to get access to the network.
The other thing you could do with more advanced switches is to configure a virtual local area network (VLAN), which is a grouping of ports on the switch that are allowed to communicate with one another but cannot communicate with other VLANs on the same switch. For example, I have a 24-port switch with two VLANs. The first VLAN comprises the first 12 ports, and the second VLAN comprises the last 12 ports. Any systems plugged into the first 12 ports cannot communicate with the systems on the second set of 12 ports, and vice versa. Essentially, you have two networks — but only one switch.
Using antivirus software is another security best practice. Ensure you are using antivirus software on all your systems and keep the virus definition database up to date! Antivirus software is designed to protect your system against viruses. For more information on antivirus software, check out Book 9, Chapter 3.
As a last note, I just want to add a few tips here to help secure your wireless environment. You can configure most of these settings on the wireless router by navigating to the administration site of the router, which involves starting a web browser and entering either 192.168.0.1 or 192.168.1.1. If you have hit the web administration pages of the wireless router, you will be asked to log on. Most routers have a default username of admin with no password that you will use to logon.
After you are logged onto the router, locate the following options in the administration pages:
For more information on wireless networking, check out Book 8, Chapter 2.
This chapter introduces you to a number of best practices for securing your Windows environment. Some of the key points to remember for the A+ Exams are to
1. You are the IT technician for a company and working on ways to secure the system. You would like to control network traffic that enters into the Windows 8.1 system. What security feature stops network packets from entering the system through the network card?
(A) Auditing
(B) Password policy
(C) Permissions
(D) Firewall
2. What is the network name assigned to the wireless network?
(A) WEP
(B) SSID
(C) SID
(D) WPE
3. You are securing a folder and want to allow a user to read, modify, create, and delete a file. What permission would you assign?
(A) Read
(B) Full Control
(C) Modify
(D) Deny
4. You are working with the security team within your company to ensure systems are configured securely and monitored on a regular basis. You have enabled auditing; where do you go to view the audit information?
(A) Local Security Policy
(B) Event Viewer
(C) LAN Connection Properties
(D) Firewall
5. A privilege to perform an operating system task is known as what?
(A) Permission
(B) Policy
(C) Right
(D) Firewall
6. You need to give Sue the capabilities to manage permissions on a file. What permission allows her to modify the permissions?
(A) Read
(B) Full Control
(C) Modify
(D) Deny
7. Management has requested that users be able to change the time on the computer. What is the best way to allow Bob to change the time on his computer?
(A) Enable an Audit Policy.
(B) Place Bob in the Administrators group.
(C) Assign Bob the Change System Time permission.
(D) Assign Bob the Change System Time right.
8. Which security features might you enable through the system BIOS?
(A) Boot devices
(B) Password policy
(C) Permissions
(D) Audit policy