In this chapter, I explain how to make four basic pastries, salted, sweet, puff, and choux, which are all you need to make the recipes in chapters 2–5, and to make virtually any other pastry dish you can think of. It’s a good idea always to make at least double quantities of salted, sweet, and puff pastry and freeze what you don’t use so you will always have some pastry on hand to make a comforting pie or an impressive-looking tart.
Throughout the book, all eggs are US size large and butter is unsalted unless stated otherwise.
Like all bakers and pastry makers, I am a stickler for weighing ingredients because baking is all about being precise and consistent. If you are making a casserole, it really doesn’t matter if you use more carrots than parsnips, or a whole bottle of wine rather than half, but if you were to be that loose with your ingredients when you are baking, you would have a disaster on your hands. So when I am making pastry, I weigh everything, including water, because weighing is more accurate than judging the level in a measuring cup. I know it sounds pedantic, but in my classes I encourage people to be as accurate as possible so that they get the best and most consistent results.
I have given the quantity of salt and other ingredients measuring less than 1 tablespoon in teaspoons because the American system of pounds and ounces makes it difficult to weigh out such small quantities.
A word about ovens, as I am always being asked what type we use at our bakery and cooking school. Well, we use convection ovens. The heat is more consistent at top and bottom, which helps to give more even baking. That said, if you have a good conventional oven, you will get equally good results.
Some baking books give different temperatures for conventional and convection ovens, but the ethos of this book is to keep everything as clear and unambiguous as possible, so I give only one oven temperature. The reality is that 25 degrees Fahrenheit either way shouldn’t make a dramatic difference to your baking. Also, the only way to bake with complete confidence is to get to know your oven. It might give you perfectly uniform heat, or on the other hand it might have hot spots or be slightly hotter or cooler than the dial indicates.
Every oven is different, which makes it difficult to write foolproof baking recipes that will work for every oven in every kitchen. In my classes, I always suggest that the first time you use a recipe, you don’t take the baking time as gospel. I have a “five minute rule,” which means check every 5 minutes—a tart that bakes in 20 minutes in my oven might need only 15 minutes, or up to 25, in yours. There is no substitute for keeping an eye on whatever you are baking and, if necessary, moving baking sheets and pans higher or lower, or turning them around if you feel one side is coloring more quickly than the other.
After a while, you will get to know the way your oven behaves, and be able to adjust the temperature a little one way or another to suit. Even better, it is worth investing in a good oven thermometer to find out what the temperature actually is in different parts of your oven.
It is a myth that you need cold hands to make good salted or sweet pastry, but you do need cold butter and a quick, light touch. It is squeezing and overworking that heats up the pastry and makes it greasy and sticky, not the temperature of your hands. In my classes, people are always amazed that I leave the butter in the refrigerator until I am ready to use it, as most pastry recipes call for softened butter. Then, unless you have planned ahead, the temptation is to put the butter into the microwave to soften it quickly, and it melts and turns oily, which makes your pastry even more likely to be greasy. The key is to keep the butter very cold but still soft and pliable, and I will show you how in the method beginning on page 18.
Although you can mix pastry by machine, doing it by hand is such a quick and easy process that I suggest you do it that way, at least at first if you are new to making pastry. Even if you move on to using a machine later, you will get the feel of what you are looking for in terms of texture, and be more in control of the machine. Besides, you still need to finish the dough off by hand once it is mixed.
There was a time when pastry recipes always began by telling you to sift the flour, but nowadays there is usually no need to because the modern milling process sifts the flour so many times that it will flow quite freely and have no lumps. The only time I sift flour is when making choux pastry, because this helps incorporate it more swiftly and smoothly into the mixture of boiling water and butter. (For the same reason, I would also sift the flour when making a sponge cake, as the flour needs to be quickly folded in at the last minute.)
Once you are comfortable with making salted and sweet pastry, you can vary the flavors in any number of ways, perhaps replacing some of the all-purpose flour with whole-wheat or semolina flour, adding caraway seeds, chocolate, or the zest and juice of a lemon. For some of the recipes, I have suggested using a particular one of these flavored pastries, but you can experiment as much as you like.
This recipe makes about 15 ounces of pastry dough, and each of the recipes in the Salted chapter uses 1 recipe of it. This is enough dough for any of the following pan sizes:
• 24 tartlets made in 12-hole tartlet pans
• 8 individual tarts made in 4-inch removable-bottomed pans (¾ inch deep)
• 1 large tart made in a 10¼-inch removable-bottomed pan or ring (1½ inches deep)
These sizes are what I use in my kitchen, but don’t worry if your pans or rings are slightly different. And naturally, you can use whatever shape of pan or ring you like: just keep an eye on your tarts and pies while they bake, as you might need to adjust the time in the oven (see page 13). If you don’t need all the pastry, you can freeze what is left (see page 63).
1 egg
8.9 ounces all-purpose flour
1 teaspoon sea salt
4.4 ounces butter, straight from the refrigerator
1.2 ounces cold water
Whole-wheat pastry: Use whole-wheat flour instead of the all-purpose flour.
You might need an extra tablespoon of water.
Spelt pastry: Substitute 4.4 ounces of the all-purpose flour with whole-grain spelt flour.
(If using white spelt flour, substitute all of the all-purpose flour with this.)
Semolina pastry: Substitute 1.7 ounces of the all-purpose flour with semolina flour or polenta, and add a pinch of ground turmeric.
Cornish pasty pastry: Use margarine instead of butter (to give the baked pastry the flaky softness that is characteristic of pasties).
Caraway pastry: Add 4 teaspoons caraway seeds to the flour.
This recipe makes about 25 ounces of pastry dough, and each of the recipes in the Sweet chapter uses 1 recipe of it. This is enough dough for any of the following pan sizes:
• 36 tartlets made in 12-hole tartlet pans
• 24 slightly larger tartlets made in 3¼-inch removable-bottomed pans or rings (¾ inch deep)
• 12 individual tarts made in 4-inch removable-bottomed pans or rings (¾ inch deep)
• 4 larger tarts, made in 6¼-inch removable-bottomed pans or rings (¾ inch deep)
• 2 large tarts made in 8-inch removable-bottomed pans or rings (1½ inches deep)
• 1 large tart made in a 10¼-inch removable-bottomed pan (1½ inches deep), with enough left over to make smaller tarts of your choice
The recipes in the Sweet chapter use quite a range of pans, as I find that different fruits and toppings lend themselves visually to particular sizes. But remember, the sizes given are just a guide. Feel free to use whatever size or shape of pans and rings you have, and keep checking while the tarts are in the oven, as you might need to adjust the baking time (see page 13). If you don’t need all the pastry, you can freeze what is left (see page 63).
2 eggs plus 1 yolk
12.4 ounces all-purpose flour
pinch of sea salt
4.4 ounces butter, straight from the refrigerator
4.4 ounces sugar
Chocolate pastry: Add 0.7 ounce unsweetened cocoa powder with the flour.
Almond pastry: Use only 8.9 ounces flour and add 3.5 ounces ground almonds with the flour.
Hazelnut and almond pastry: Use only 9.7 ounces flour and add 1 ounce hazelnuts,
1.7 ounces sliced almonds, and 3.5 ounces ground almonds with the flour.
Pistachio pastry: Use only 8.9 ounces flour and add 3.5 ounces ground pistachios with the flour.
Lemon pastry: Add the grated zest of 1 lemon and the juice of ½ lemon when you add the eggs.
Measure out all your ingredients before you start, and break your egg(s) into a small bowl—there is no need to beat it (them). If making sweet pastry, separate the remaining egg yolk(s). Put the flour and salt into a mixing bowl.
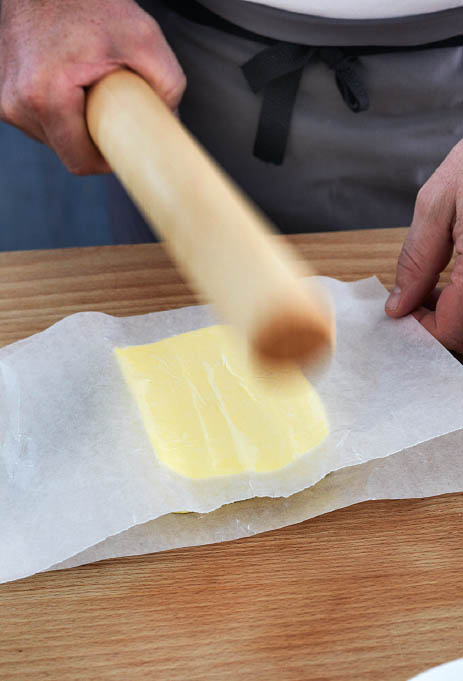
Now for the cold butter. What I do is take it straight from the refrigerator and put it between two pieces of waxed paper or butter wrappers (I always keep butter wrappers to use for this, as well as for greasing pans and rings), then bash it firmly with a rolling pin.
The idea is to soften the butter while still keeping it cold. I end up with a thin, cold slab about ⅜ inch thick that bends like plasticine. Put the whole slab into the bowl of flour—there is no need to chop it up.
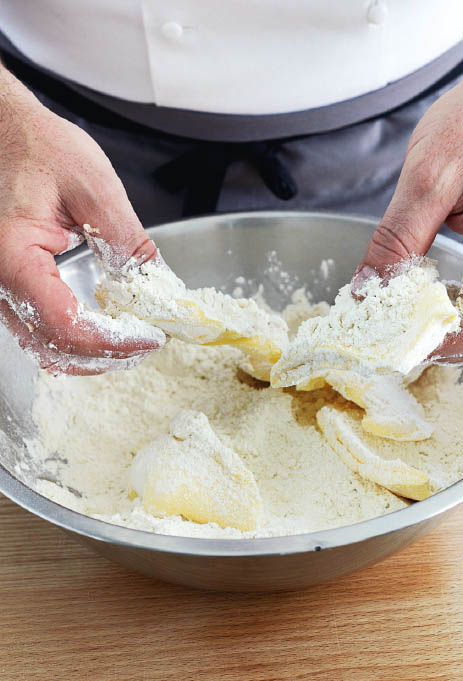
Cover the butter well with flour and tear it into large pieces.
Now it’s time to flake the flour and butter together—this is where you want a really light touch. With both hands, scoop up the flour-covered butter and flick your thumbs over the surface, pushing away from you, as if you are dealing a deck of cards.
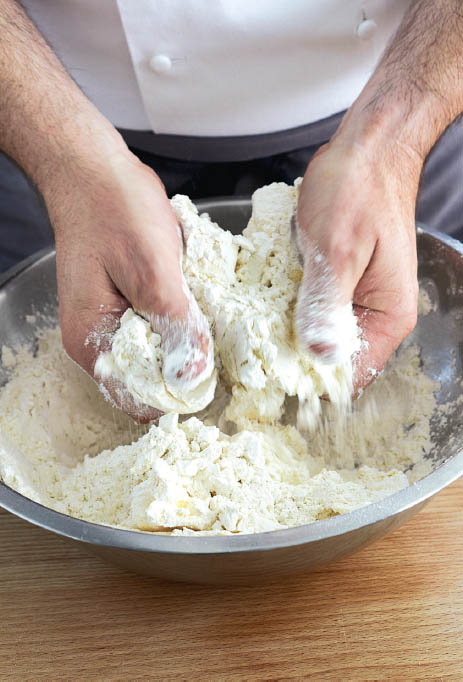
You need just a soft, skimming motion—no pressing or squeezing—and the butter will quickly start to break into smaller pieces. Keep plunging your hands into the bowl, and continue with the light flicking action, making sure all the pieces of butter remain coated with flour so they don’t become sticky.
The important thing now is to stop mixing when the shards of butter are the size of your little fingernail. There is an idea that you have to keep rubbing in the butter until the mixture looks like bread crumbs, but you don’t need to take it that far. When people come to my classes, I find they can’t resist putting their hands back into the bowl to rub it just a little bit more, but if you want a light pastry, it is really important not to overwork it. If the mixture starts to get sticky now, imagine how much worse it will be when you start to add the liquid at the next stage. If you are making sweet pastry, add the sugar at this point, mixing it in evenly.
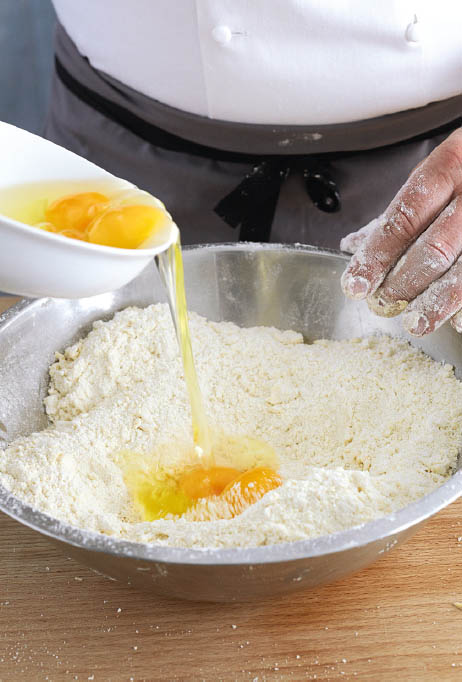
Pour the egg(s), and the extra yolk if making sweet pastry, into the flour mixture, add the water (salted pastry only), and mix everything together.
You can mix with a spoon, but I prefer to use one of the little plastic scrapers that I use for bread making. Because it is bendy, it’s very easy to scrape around the sides of the bowl and pull the mixture into the center until it forms a very rough dough that shouldn’t be at all sticky.

While it is still in the bowl, press down on the dough with both thumbs, then turn the dough clockwise a few degrees and press down and turn again. Repeat this a few times.

Work the dough as you did when it was in the bowl: holding the dough with both hands, press down gently with your thumbs, then turn the dough clockwise a few degrees, press down with your thumbs again and turn. Repeat this about four or five times.
Now fold the pastry over itself and press down with your fingertips. Provided the dough isn’t sticky, you shouldn’t need to flour the surface. But if you do, make sure you give it only a really light dusting, not handfuls, as this extra flour will all go into your pastry and make it heavier.
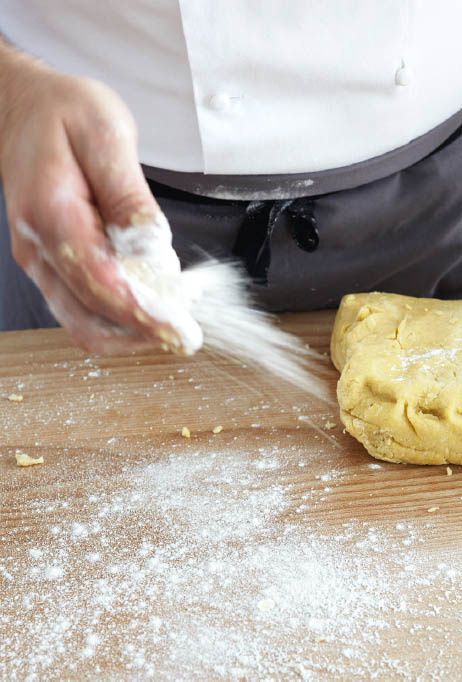
When you flour your work surface, you need to do this as if you are skipping a stone over water, just tossing out a light spray of flour. (Funny as it seems, people in my classes actually practice this, like a new sport.) You need just enough to create a filmy barrier so that you can glide the pastry around the work surface without it sticking.
Repeat the folding and pressing down with your fingertips a couple of times until the dough is like plasticine and looks homogeneous.
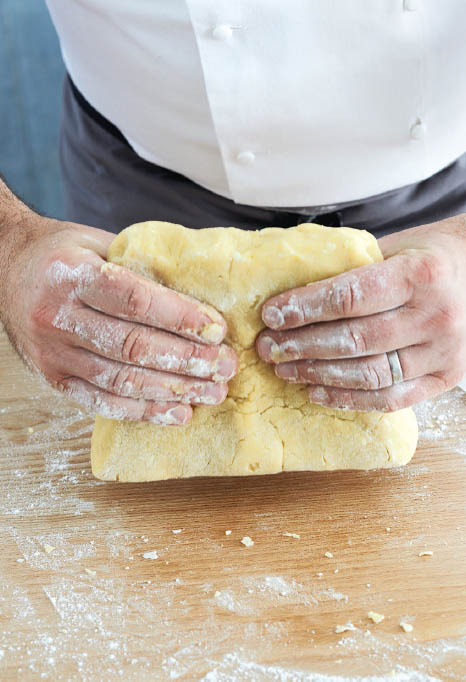
Finally, pick up the piece of pastry and tap each side on the work surface to square it off, so that when you come to roll it, you are starting off with a good shape rather than raggedy edges.
Put the flour and salt into the bowl of the machine. Bash the butter as described in the hand-mixing method, then break it into four or five pieces and add it to the flour. Using the paddle attachment rather than the hook or whisk, mix the ingredients at a slow speed until the pieces of butter are about the size of your little fingernail. You will need to scrape the butter from the paddle a few times as it will stick. If you are making sweet pastry, add the sugar at this point and mix in well. Add the egg(s), and yolk (if making sweet pastry) and water (if making salted pastry), then mix very briefly just until a dough forms. As soon as it does, turn it out onto your work surface with the help of your scraper and follow the hand-mixing method, starting with the second photo on page 23.
It is very easy to overwork pastry in a food processor, so be very careful. Put the flour and salt into the bowl of the machine. Cut the cold butter into small dice and add to the bowl. Use the pulse button in short bursts so that the flour just lifts and mixes, lifts and mixes. You don’t want to blitz everything into a greasy ball, as that will result in hard, dense pastry. If you are making sweet pastry, add the sugar at this point and mix in well. Add the egg(s), and yolk (if making sweet pastry) and water (if making salted pastry), then pulse briefly just until the pastry dough comes together. Turn it out with the help of your scraper and follow the hand-mixing method, starting with the second photo on page 23.
Wrap the pastry in waxed paper, not plastic wrap, which will make it sweaty, and rest it in the refrigerator for at least 1 hour, preferably several, or, better still, overnight. The reason you rest pastry is that it helps the gluten in the flour to relax so that the pastry becomes more elastic and easier to roll. It also helps to prevent shrinkage later when it goes in the oven.
If you are really in a hurry to use the pastry, flatten it to about half its thickness with a rolling pin before wrapping it in waxed paper, as this will allow it to chill more quickly. Alternatively, put it into the freezer for 15–30 minutes.
Some of the recipes in this book use 12-hole tartlet pans; others use pans with removable bases, or rings and squares that are simply placed on a baking sheet.
Even if you’re using removable-bottomed pans, it is best to put these on top of a baking sheet rather than straight onto the oven rack, partly in case the filling leaks but mainly because it is much easier to move them around and take them out of the oven, especially if you are wearing oven mitts.
It’s preferable to use nonstick pans and rings. After baking, I wipe all of mine, whether nonstick or not, with a clean dish towel. I try not to wash them or put them in the dishwasher, and I am careful not to scratch the nonstick ones with anything sharp. Then, before using them, I rub them very lightly with butter (butter wrappers are best for this), or coat them with a little baking spray (again, I do this even if I am using nonstick pans or rings, just in case). If you are going to be baking the next day, you can do this greasing before storing the pans and rings away (that is what I do), so that they are ready to go straightaway.
The secret of a great pie or tart is to get the right balance of pastry and filling so that neither dominates. The more you bake, the more you will get a feeling for this, but for the recipes in this book, I suggest you use a simple guideline. For small tarts and pies up to and including 4 inches in diameter (or the equivalent square or rectangular shape), roll out the pastry  –⅛ inch thick. For larger tarts and pies, roll out the pastry
  inch thick. Remember, if you’re not using all of the pastry straightaway, you can divide it up and freeze some of it at this point (see page 63).

Lightly dust your work surface with flour (see page 24), then move the pastry around to coat it. Lightly flour your rolling pin, too. Keeping your fingers on the outer ends of the pin, roll it backward and forward in short, sharp movements without pressing down too hard on the pastry or stretching it.
Keep lifting the pastry up after every two rolls, and move it a quarter turn to get some air underneath it and stop it from sticking to the work surface. Continue rolling until it is the size and thickness required for your recipe, and large enough to leave an overhang when you line your pan or ring.
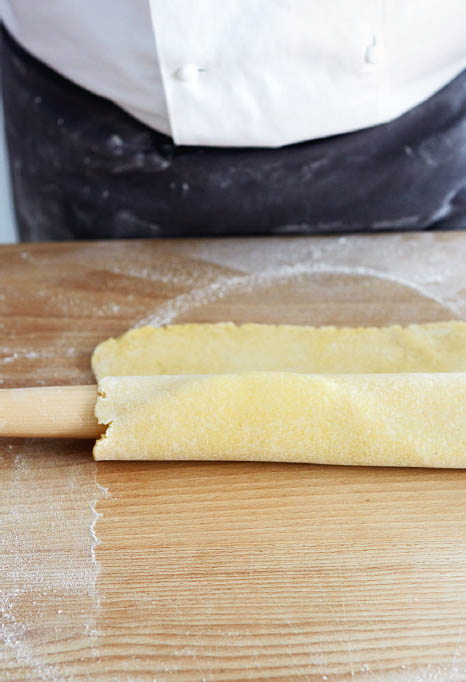
Roll the pastry around your rolling pin so that you can lift it up without stretching it.
To line a 12-hole pan, or 3¼-inch removable-bottomed tartlet pans, use a circular cutter or tumbler to stamp out circles of pastry about 1 inch bigger than the holes or, in the case of individual pans, about 1¼ inches bigger to allow for the depth and leave a little bit of overhang. The 12-hole pans are more common in England, but you could substitute a miniature muffin pan with cavities that hold about 2 ounces each (the same as the individual tartlet pans).
If using individual pans with unusual shapes, such as the leaf ones pictured, place one of them upside down on the pastry and cut around it, again leaving a border of about 1¼ inches. To line larger pans or rings (over 3¼ inches in diameter), make sure you roll out your circle or square of pastry large enough to cover the depth of the pan or ring and leave about 1 inch overhang. If you are using rings, set them on the baking sheet before lining with dough; if using removable-bottomed pans, set them on the baking sheet after lining them with dough so that it is easy to move them in and out of the oven.
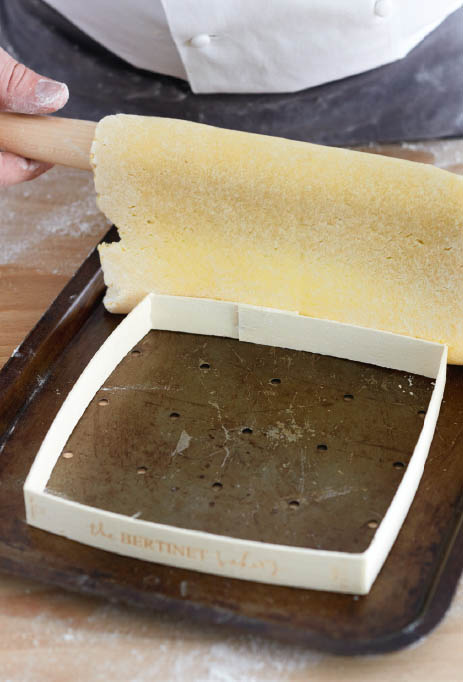
Holding the pin at each end, drape the pastry over whatever pan or ring you are using.
Let the pastry fall inside, easing it gently and carefully down into the base and sides without pulling or stretching it.
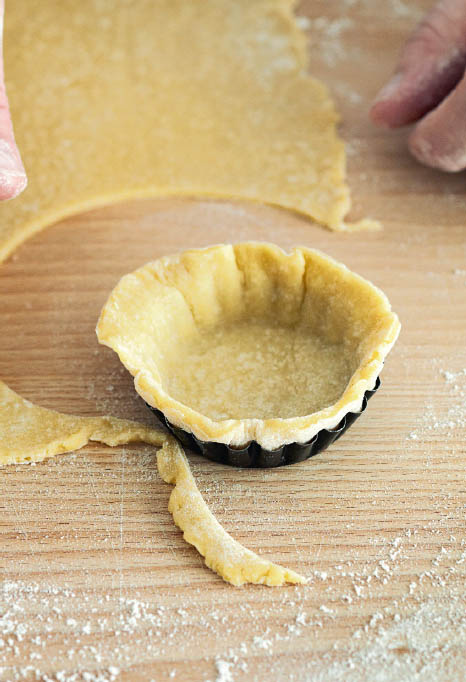
Leave the pastry overhanging the edges of your pan or ring. If using fluted pans, press the pastry lightly into the shaped sides.
Once your pan is lined, tap it lightly against the work surface to settle in the pastry. If using a ring, just lift up the baking sheet it is sitting on and tap it down. If you are going to blind bake the pastry, see the facing page. Otherwise, put the lined pan or ring in the refrigerator for at least 30 minutes (or in the freezer for 15 minutes). This will help to stop the pastry from cracking, shrinking, and pulling away from the edges when it is later put in the oven.
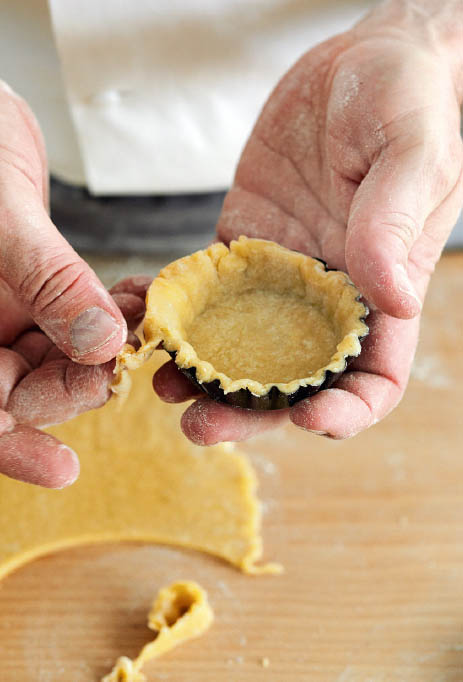
Remove the pastry crust(s) from the refrigerator. The pastry overhang on large pans can be left in place and removed with a sharp knife just before serving. If you are using small pans, trim the pastry around the edges with a knife before filling and baking, as trimming will be tricky to do once the tarts are baked. (Provided the pastry has rested for long enough, it shouldn’t shrink.) If the pans are fluted, you might find it easier to carefully tear away the excess with your fingers.
It sounds obvious, but make sure you turn on your oven in plenty of time so that it is properly hot when you’re ready to bake. You don’t want your beautifully chilled pastry to sit around getting warm while you wait for the oven to reach the right temperature. One of the secrets of avoiding the dreaded “soggy bottom” and achieving a good, crisp finish to your tarts and pies is to get the heat to the base immediately. As a baker, I always have a hot baking stone, which is actually a piece of granite, in my oven—so every time I switch the oven on, the stone heats up. In my classes, I always suggest people get the same effect at home by using the broiler pan bottom and turning it upside down. Then all you have to do is place the baking sheet holding your pan or pans straight onto it. If you’re baking more than will fit on the broiler-pan bottom, you can always put an inverted baking sheet on a separate shelf.
There is a great deal of confusion about blind baking, and I find it helps to explain that blind baking is not part baking, it is pre-baking. Baking blind is simply a way of fully baking a pastry crust, large or small, without a filling so that you can use it as you wish—putting in something cold and ready to eat, such as fruit and cream, or adding a liquid filling, such as crème fraîche, eggs, and bacon, that needs to be cooked and set. I know people worry that returning a baked pastry crust to the oven for another 30 minutes or so after it is filled will result in burnt pastry, but once the filling is put in, unless the tarts are very tiny, the temperature in the oven is turned down, and the pastry won’t color any more, except around the overhanging edges, which will be trimmed off anyway.
Why bake blind if you are going to put the crust back in the oven anyway? You do this either because the filling will be set in a shorter time than it takes to fully bake the pastry, or because the filling is very liquid. Think about a mixture for quiche: when you put it in the oven it is quite runny, and even though it will take around the same time to cook as it would for the pastry to bake, the pastry actually has no chance of crisping up with all that wet filling on top. The result: soggy bottom pastry.
I think it helps to understand the principle of what actually happens when you blind bake. You do it in two stages. First, to help the pastry hold its shape when it goes into the oven, you line it with parchment paper filled with ceramic baking weights. Then, once the pastry has begun to dry out and keep its shape, you take it out of the oven, brush it with beaten egg (egg wash), and put it back in the oven to form a hard seal that is fully “waterproof,” so the pastry will stay crisp, whatever you put into it.
It’s always worth holding on to leftover pastry, even if it’s just scraps, because if you are blind baking, these can be used to patch up any broken pastry crusts before they’re brushed with egg wash and put back in the oven. Of course, if you have rolled and rested your pastry properly, there won’t be any holes or cracks, I hope.
First, prick the base of the pastry all over with a fork. This stops it from rising up when in the oven (even though it will also be held down by ceramic baking weights, it can sometimes manage to lift a little). Unless you are making small tartlets (up to 3¼ inches), don’t trim the pastry. Leave it overhanging the edge.
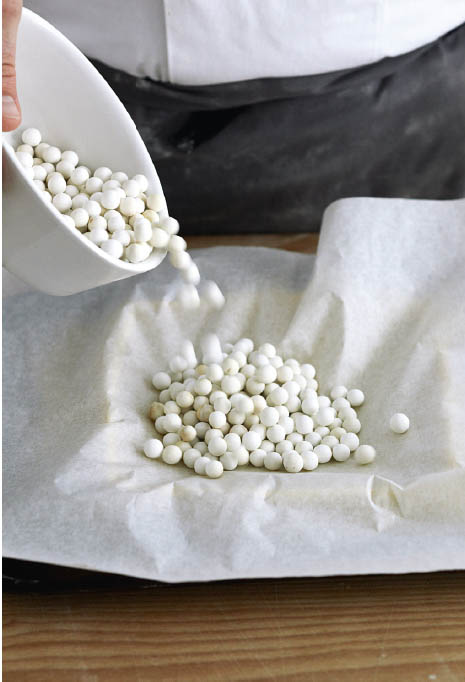
Place a large sheet of parchment paper over the top of the pastry crust, then pour in the ceramic baking weights and spread them out so that they completely cover the base. (Traditionally, dried beans or peas were used for this, and are fine, but the ceramic ones can be kept in a container and used over and over again.) Put the lined pan in the refrigerator for 30 minutes (or the freezer for 15 minutes) to rest and relax.
Preheat the oven to the temperature specified in the recipe. Bake small tarts and pies (4 inches or less) for 15 minutes, and larger ones for 20 minutes. As I mentioned on page 13, in my classes when people ask me how long to bake for, I say, “Five minutes!” Of course they look at me as if I’m crazy, but I explain that I want to get everyone in the habit of keeping an eye on pastry in the oven. If I were to say 20 minutes, in their minds they would just switch off and forget about it for that length of time. But baking times are only a reference, not to be taken as gospel, especially when you are new to baking and not quite sure how your oven behaves. (There is no uniformity where ovens are concerned.) So have a look after 5 minutes, then after another 5 minutes, then . . .
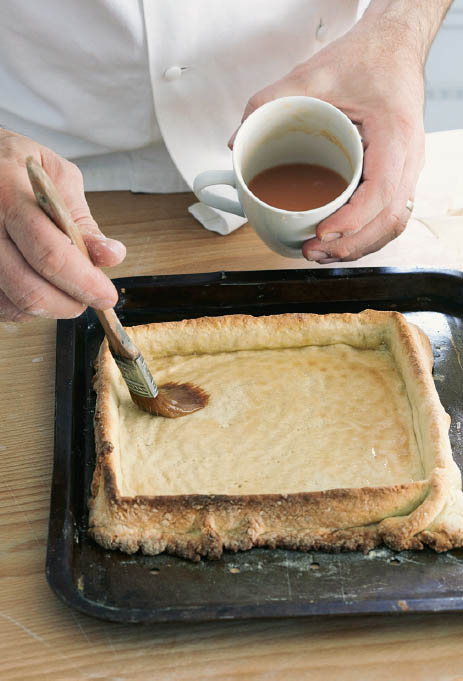
When the base of the pastry has dried out and is lightly golden, remove it from the oven and lift out the parchment paper and weights. Don’t worry if the overhanging edges are quite brown, as you will be trimming these away after you have finished baking your tart. Have ready some beaten egg. (I add a pinch of salt, which breaks down the egg and makes it easier to spread with a pastry brush. It also makes the color look darker, so don’t worry, this is normal.) Brush this over the inside of the pastry crust to seal it. Hopefully, there will be no cracks or holes, but if there are, don’t panic. Just take a tiny scrap of leftover pastry, dip it into your beaten egg, and use your finger to rub it over the crack, as if you were putting filler in a wall. Return the pan to the oven.
Small crusts need another 8 minutes, and larger ones a further 10 minutes. If you have done a little bit of patching, the extra dough will be so thin that it will bake in this time, and once the pastry crust is filled, no one will ever know. The inside of the pastry will now be quite a dark golden brown and shiny from the egg glaze.
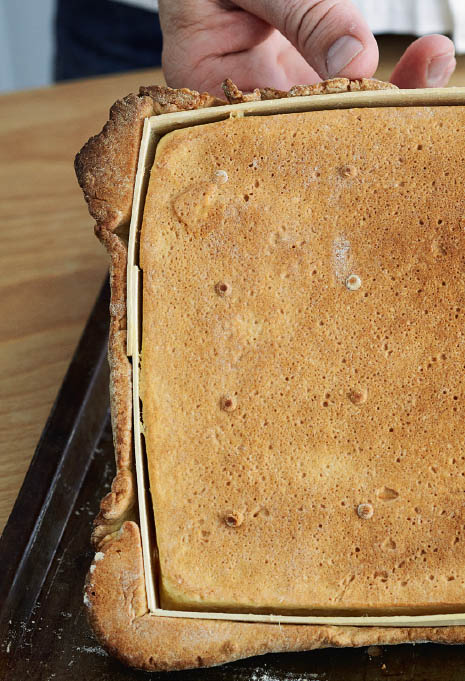
If you turn the tart crust over, the base should also be well browned and crispy.
The easiest way to blind bake a 12-hole pan is simply to put an identical (empty) pan on top, but first grease the base very lightly with butter or a nonstick baking spray. Then put something like an ovenproof dish on top to weigh it down. Bake for the time stated in the recipe, then remove the baking dish and top pan. Brush the inside of the pastry crusts with beaten egg and return to the oven for the time given in the recipe. Alternatively, 12-hole pans can be blind baked in exactly the same way as individual pans and rings, using parchment paper and ceramic baking weights.
I really hope that when you have the time, you will have a go at making puff pastry, as it is very satisfying. However, I know that it is a long process, and even when you have mastered the technique and gotten into the habit of making it in big batches so that you can keep some in the freezer, there will inevitably be a day when you have none left and no time to make more. Since the whole point of this book is to encourage more people to have a go at baking and enjoy themselves while doing it, I would much rather you used a good, ready-made puff pastry than not bake at all. There are some really good all-butter puff pastries out there, and it is worth keeping a supply in the freezer—hopefully alongside your own homemade pastry.
Puff pastry differs from others in that you make it by constantly rolling and folding the dough so that you create lots of layers or “leaves” with air trapped in between. (The French name for this pastry is feuilletée, which means “leafy.”) In the heat of the oven, these air pockets expand, so the layers separate and the pastry as a whole puffs up.
The more rolling and folding you do, the more layers you create. Each series of foldings is known as a “turn,” and six turns is the ideal. These are easy to achieve in bakeries, where they have an automatic rolling pin called a pastry brake. At home, though, quite a bit of time and effort is involved, as you need to put the pastry back into the refrigerator after each turn so that it is always cold to work with. The first few times you make it, I suggest you do three double turns instead of six single ones, as explained on pages 53–55. In bakeries, this is known as a “double book.”
This recipe makes about 1 pound of pastry, but I find it is much easier to make puff pastry in large amounts, so I always suggest making double the quantity, and then putting whatever you don’t need into the freezer so you will always have some ready to go (see page 63).
8.9 ounces all-purpose flour
1 teaspoon sea salt
3.5 ounces cold water
juice of ¼ lemon
7 ounces butter, straight from the refrigerator
Place the flour and salt in a bowl, and the water in a measuring cup. Squeeze the lemon juice into the water at the last minute. (The juice helps stop the pastry from darkening during the long folding and resting process.)

Gradually add the water and lemon juice, mixing with a scraper or spoon until you have a rough dough.
Turn the dough onto your work surface and knead it by folding it onto itself, then pressing down with your fingertips or the heel of your hand. The important thing is to stop just as it comes together—this will take about 2 minutes—then shape it quickly into a rough ball.
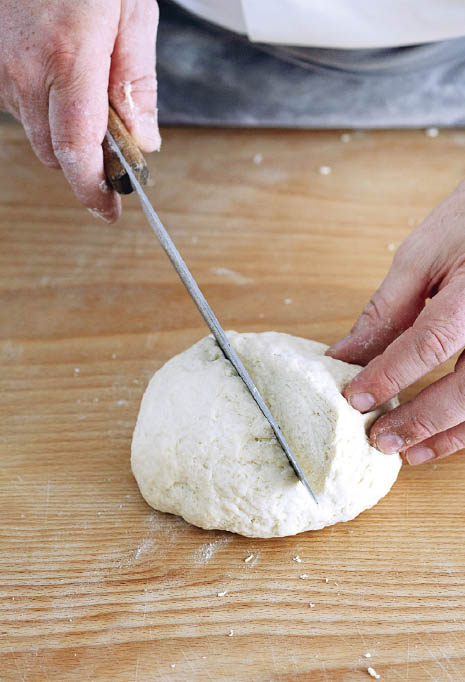
Now you need to make two deep cuts in the shape of a cross on top of the dough, then open it out a little and lift it into a bowl. Cut open a resealable plastic bag, lay it loosely over the top, then rest the dough in the refrigerator or a very cool place for 1 hour.
Very lightly dust your work surface with flour (see page 24) and set your rested dough on it. Gently ease out each of the four corners of the dough.
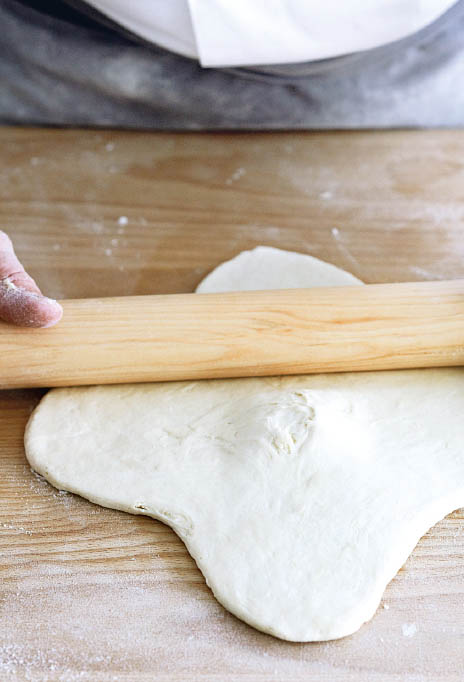
Then roll out the dough, just until it forms a square of roughly 8 inches. Place your cold butter between two sheets of waxed paper and bash it with a rolling pin (see page 18). You want the butter to be a smaller square shape than your dough, about ¾ inch smaller all round (i.e., roughly 7¼ inches). Lift off the top sheet of waxed paper, then turn the butter over onto the center of the dough so that it is at a 45-degree angle to it (i.e., its straight sides are opposite the corners) and remove the remaining sheet of waxed paper (see photo opposite). Doing this means that you don’t touch the butter directly, so you avoid warming it up.
Fold each side of the dough over the butter to enclose it completely in a parcel. This is the crucial part of the process, as you need to make sure there are no gaps where the butter could seep through.
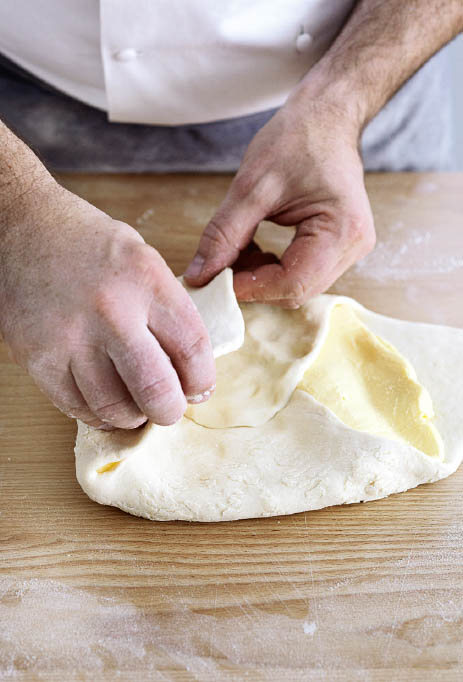
Gently, using your rolling pin, make dents all the way across the parcel to squash the butter a little inside (see photo opposite). Now roll out the pastry lightly and gently, lengthwise only, into a rectangle two to three times longer than its original length. (It’s important to do this lightly, because if you press down hard on the dough, you run the risk of the butter warming up and seeping out, and the pastry will become heavy.) Each time you roll, lift the dough a little and move it around slightly to get some air underneath it and help stop it from sticking.
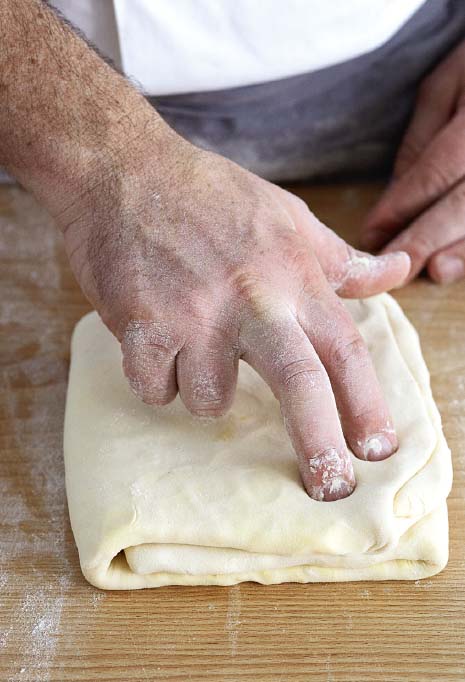
Turn the dough so a long side of the rectangle is nearest you. Fold in the two ends to meet in the middle, then fold them over again. With your finger, make a dimple in the top of the dough to indicate that this is the first turn. This is an old bakery trick—very handy if you go off and do something else, then forget how many turns you have given the dough. Put the dough on a baking sheet, cover loosely again with the opened-out resealable plastic bag, and leave to rest in the refrigerator for 20–30 minutes.
Lightly flour your work surface and place the rested dough on it with a short end facing you. Roll it again lengthwise, then turn it so that a long side is nearest you and fold as before. This time make two dimples on the top to indicate the second folding, and again rest in the refrigerator for 20–30 minutes. Repeat this rolling and resting process once more. The pastry is now ready to use.
Once you are more experienced, you can try doing six single turns rather than the double book described on page 53. Place the pastry with a long edge nearest you, but this time fold in just one side, then fold the other side over the top. With your finger, make a dimple in the top of the dough to remind yourself that this is the first turn. Put the dough on a baking sheet, cover loosely again with the opened-out resealable plastic bag, and leave to rest in the refrigerator for 20–30 minutes.
Lightly flour your work surface and place the rested dough on it with a short end nearest you. Roll it again lengthwise, then turn it so that a long side is nearest you and fold as before. This time make two dimples on the top to indicate the second turn, and again rest it in the refrigerator for 20–30 minutes. Repeat this rolling, folding, and resting process until you have done six turns in all, marking the top of the dough each time with the appropriate number of dimples. The pastry is now ready to use.
Although this is a type of puffed pastry, it is made using a completely different but very simple technique that involves boiling water and butter in a pan, whisking in the flour, and then beating in the eggs to create a batter the consistency of thick custard. This expands in the oven, leaving a light, airy center.
As I mentioned earlier, while I don’t sift flour for making salted or sweet pastry, I do sift it when making choux pastry, as it helps to incorporate the flour more quickly and smoothly into the boiling water and butter.
4.3 ounces all-purpose flour
8 ounces water
2.1 ounces butter
½ teaspoon sea salt
4 eggs
Have all your ingredients ready before you start. Sift the flour into a mixing bowl. Bring the water, butter, and salt to a boil in a large saucepan.
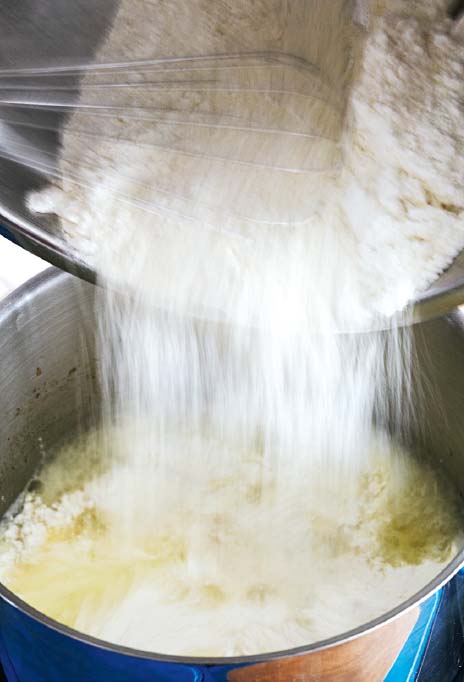
Pour the flour into the saucepan in a steady stream.
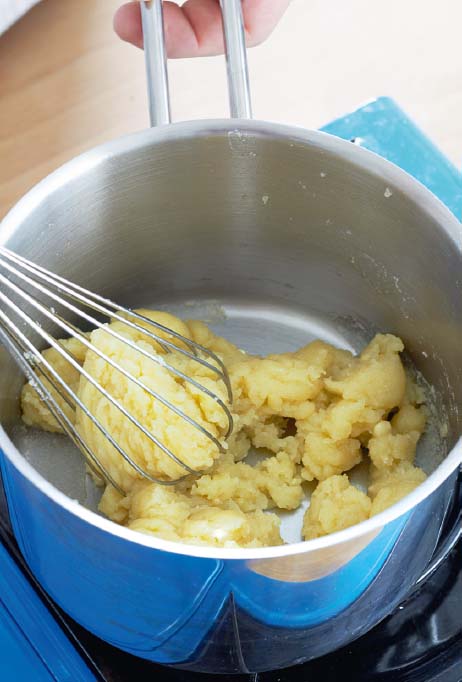
Swap the whisk for a wooden spoon and beat well over the heat for 2–3 minutes, until the mixture is glossy and comes away from the sides of the pan. This hard cooking dries off the batter and makes it ready to take the eggs.
Because the mixture is quite hard to work by hand, I would use a stand mixer, if possible. Beat the mixture with the paddle attachment for 1 minute.
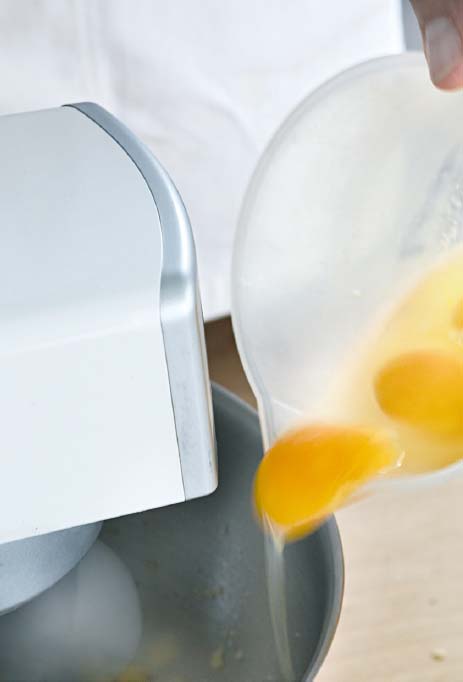
Now start to add the eggs one at a time while keeping the motor running. If you prefer to beat in the eggs by hand, transfer the mixture to a bowl and beat them in one by one with a wooden spoon. Whether mixing by hand or machine, go carefully with the eggs as you might not need them all. You are aiming for a mixture that is smooth and glossy but that will hold its shape for piping. When you reach that point, it is ready to use.
Of course you can spoon choux batter onto your greased baking sheets in little mounds or strips to make buns or éclairs, but it is much more controllable if you pipe it, and you will need to do this if you want to make the classic choux swans on page 181. Like any other baking skill, piping is about technique and practice—and once you get the hang of it, it is very simple and satisfying to do.
Although you can buy very good disposable piping bags, I prefer the fabric ones because you can get a better grip on them as you pipe. The drawback is that they need to be washed out very carefully with hot soapy water, rinsed, and then hung up to dry somewhere warm, such as near the oven, once they have been used. And they must be completely dry before you use them again. So it is worth investing in several bags in various sizes, especially if you need to have two or three on the go at one time, with different tips, as you do when making the swans. I would suggest buying one large fabric bag, a couple of medium ones, and a small one, so you can adapt to the quantity of batter you need to pipe. The bags have a small hole where the tip goes, and you can cut this to the correct size for the tip you want to use.
You can buy plastic tips, but I like the stainless-steel ones that give a sharper edge to the piping. Again, they come in different sizes, so I would have a set of plain tips in large, medium, and small, and another set of star-shaped tips, again in large, medium, and small.
To fill a piping bag cleanly, turn the bag inside out over one hand and use the other hand to fill it just half full. Pull up the sides of the bag and twist the top so that the mixture is forced down toward the tip.
As I explain on page 182, the way to pipe fluently and stay in control is not to hold the bag in one hand and squeeze with the other, but to squeeze with the same hand that is holding the bag, with your other hand underneath, steadying and guiding as you pipe.
Salted, sweet, and puff pastry will keep for up to 1 week in the refrigerator. However, I always make at least double the quantity of pastry I need and immediately freeze what I am not using. I wrap it first in parchment paper, then put it in a resealable plastic bag and write the date on it. The pastry will keep for about 3 months in the freezer, and you will find that, after defrosting, it is a dream to roll out.
Pastry that has been frozen for about 3 months can discolor a little. If you don’t want this to happen, add a drop of lemon juice or vinegar to the water before mixing it into the dough. You won’t taste it in the pastry, but it will be enough to keep the dough fresh looking.
If you like, you can roll out your pastry and line your tart pans, then freeze them, stacked inside one another, wrapped loosely in parchment paper inside a resealable plastic bag. Simply defrost before use.
Alternatively, when using salted or sweet pastry, you can blind bake your pastry crusts, remove them from their pans or rings, and keep them in an airtight container at room temperature for 2–3 days before filling.
In the Sweet chapter, the tarts that contain almond cream can usually be frozen in their entirety, or at least up to the point of topping with fruit. Or, they can be baked first, and then frozen—see page 119, together with the instructions in each recipe, for more details. You can also bake cheesecakes (see page 116) in their entirety and then freeze them. When you defrost them, they are ready to eat. Just be aware that the pastry might not be quite as crispy as when it is freshly baked.
I don’t recommend freezing choux pastry when it is raw, but once baked, you can put choux buns, éclair shells, and the like on a tray in the freezer and, when they are frozen, transfer them to an airtight container and return to the freezer. Then you can defrost them and fill and/or glaze according to your recipe.