As I mentioned in the introduction, I call this chapter Salted not because the pastry is full of salt, but because this was the generic name for savory pastry that I learnt as an apprentice baker.
The recipes in this chapter are for all the kinds of things I associate with the traiteur in France, even though they include very British Cornish pasties, sausage rolls, and pork pies. The traiteur’s shop makes the best food to go, and the traiteur himself is like a multi-event athlete who has the skills of a baker, pâtissier, butcher, charcutier, and chef without specializing in any one. When I was growing up, it was always a treat to go inside the shop and, from among the many dishes ready to take home, choose a slice of freshly made quiche, a wedge of pie, or a small tart, with a selection of some of the big, colorful salads that would be set out in bowls.
Yes, the dreaded quiche. In Britain, it is so often associated with bland, soggy slices on the buffet table at parties, but in France it is a staple of the traiteur, and the quality of the pastry and the variety of fillings is a matter of pride. Personally, I think a freshly baked quiche, not long out of the oven, with a crisp salad dressed with good vinaigrette, is fantastic. In my classes, to help convert people, we start off by making small tartlets and individual ones rather than big quiches because it is so much easier to roll out the pastry and get it to crisp up well in the oven, eliminating the limp pastry factor that puts off so many people.
The base filling is a mixture of crème fraîche and eggs to which you can add any flavorings or ingredients you like. I use crème fraîche because it is light and has a slight tang, but if you prefer a richer, creamier texture, you can substitute it with heavy cream, or use half crème fraîche and half heavy cream. I have given three of my favorite fillings on page 68, but other ideas include chopped walnuts and Roquefort cheese, or even some slivers of roast chicken plus potatoes and vegetables left over from Sunday lunch. Varying the fillings helps keep the quiches interesting, and is a great idea for parties.
To make things simpler, if you are catering for a number of people, you can blind bake the pastry crusts up to 2–3 days in advance and keep them in an airtight container until you are ready to fill them and pop them into the oven for half an hour or so. I think the tartlets are at their best if you allow them to cool down to room temperature before eating: if they are too hot or too cold, the temperature suppresses the flavor.
I have chosen to make the quiches as tartlets, but they can be made bigger (10¼ inches) if you prefer (see page 16). However, you will need to double the quantity of your chosen filling, and bake them for 30–35 minutes.
Makes 24
1 recipe Salted Pastry (see page 16)
1 egg, beaten with a pinch of salt, for sealing the pastry
For the base filling
14 ounces (1¾ cups) crème fraîche
4 extra-large eggs
sea salt and freshly ground black pepper
½ whole nutmeg, grated
Rest the pastry in the refrigerator for at least 1 hour, preferably several, or, better still, overnight (see page 29).
Lightly grease two 12-hole tartlet pans. Dust your work surface with flour, roll out the pastry  –⅛ inch thick, and line the pans (see pages 30–36). Line with parchment paper and ceramic baking weights. Place in the refrigerator to rest for at least 30 minutes (se pages 37–42).
Preheat the oven to 375°F.
Remove the pans from the refrigerator and bake for 15 minutes. Lift out the parchment and weights, brush the pastry with the beaten egg, then bake for another 8 minutes. Set aside.
TO MAKE THE FILLING: Whisk the crème fraîche a little to loosen it, then mix in the eggs with a wooden spoon. (This is a tip I learnt from my days as an apprentice baker in France: using a spoon instead of a whisk prevents overmixing, which can make the filling dense. More restrained mixing helps to lift the filling so it becomes nice and light in the oven.) Season well with the salt and pepper and add the grated nutmeg.
Now you can flavor the base filling as you wish. The three combinations below are my favorites, and each makes enough for 12 tartlets. But you can mix and match and divide or multiply as you like.
Smoked salmon and parsley (or dill): Put 2 cherry tomato halves and some salmon trimmings into each pastry crust, with a little chopped fresh parsley (or dill) on top. Spoon some of the base filling over the top and bake for 25–30 minutes.
Bacon, leek, and reblochon: Gently heat a dry frying pan and, when hot, add 2 chopped slices smoked bacon or 3.5 ounces smoked lardons. When golden, transfer to a paper towel to absorb the excess fat. Boil and slice 2 small potatoes and very finely slice the white part of 1 thin leek. Divide the bacon, potatoes, and leek among the pastry crusts. Spoon some of the base filling over the top, and top with a slice of reblochon (or any cheese you like: Emmentaler, Port Salut, goat cheese, Camembert, Brie, or even Cheddar is fine). Bake for 25–30 minutes.
Mushroom and spinach: Melt a knob of butter in a frying pan, add 6 quartered small button mushrooms, and fry gently for a couple of minutes, until they color a little. Add 5 ounces baby spinach and cook quickly until it has wilted. Put the mixture into a sieve and drain off the excess liquid—there should be very little. (You could also use frozen spinach for this; just defrost it quickly and mix it with the sautéed mushrooms.) Divide the mixture among the pastry crusts. Spoon some of the base filling over the top and sprinkle with a little grated Gruyère. Bake for 25–30 minutes.
If you like, you can blind bake the tartlets and keep them in an airtight container until you are ready to fill them with ingredients that need no further cooking—a great idea for parties. Try fillings such as mayonnaise and poached salmon or trout, blanched green beans and a little fresh dill (see photo opposite), smoked salmon and crème fraîche, smoked trout and creamed horseradish, or smoked ham and chutney. Or just experiment!
You don’t need to blind bake the pastry for these tartlets, as the filling isn’t as liquid as the quiche filling on page 67. This means that you can make them up in their entirety and freeze them. Defrost them thoroughly, then bake as normal.
Makes 24 tartlets
1 recipe Salted or Spelt Pastry (see page 16)
2 tablespoons butter
large pinch of sea salt
large pinch of sugar
6 onions, thinly sliced
1 garlic clove, crushed
1 bay leaf
1 tablespoon grated Gruyère cheese
24 small thyme sprigs
Rest the pastry in the refrigerator for at least 1 hour, preferably several, or, better still, overnight (see page 29).
Preheat the oven to 375°F.
Melt the butter in a heavy-based pan with the salt and sugar. Add the onions, garlic, and bay leaf and cook slowly until the onions are softened and browned a little. Remove the bay leaf.
Lightly grease two 12-hole tartlet pans. Dust your work surface with flour, roll out the pastry  –⅛ inch thick, and line the pans (see pages 30–36). Place in the refrigerator to rest for at least 30 minutes.
Fill the chilled crusts with the onion mixture and top with a pinch of Gruyère and a sprig of thyme. Bake for 18–20 minutes, until the pastry crusts and cheese are nicely browned.
I sometimes like to make one large, rustic-looking tart, rather than the traditional round quiche. The hand-shaped tart is slid straight onto a preheated inverted broiler-pan bottom or baking sheet at a high heat, so there is no need to chill a dough-lined pan or to blind bake the pastry; the heat of the tray will help to give a nice crisp base. In this case, too, the topping is quite thin, so it will bake quickly.
Makes one 10-inch tart
1 recipe Salted Pastry (see page 16)
1 recipe Savory Tartlets base filling (see page 67) plus choice of Hot Variations (see page 68)
Preheat the oven to 425°F and put an inverted broiler-pan bottom or baking sheet in to heat.
Roll out the pastry into a rough circle about 10 inches in diameter or into an 8½ by 11-inch rectangle, making either about  inch thick. Place it on a sheet of parchment paper and use your fingers to pinch a high rim all the way around to contain the filling.
Spoon the base filling and your choice of ingredients into the pastry. Open the oven and carefully slide the tart, still on the parchment paper, onto the hot inverted pan. Bake for 25 minutes, until the pastry is golden.
This tart has a really oozy, creamy filling, and makes a great contrast to the semolina pastry, which is a little shorter and crispier than the basic salted pastry, and has a slightly grainy texture.
Makes one 10¼-inch tart
1 recipe Semolina Pastry (see page 16)
1 egg, beaten with a pinch of salt, for sealing the pastry
For the filling
7 tablespoons butter
¾ cup all-purpose flour
4 cups whole or low-fat milk
4 egg yolks
½ cup grated Emmentaler cheese
¼ cup grated Parmesan cheese
2 teaspoons Dijon mustard
sea salt and freshly ground black pepper
½ whole nutmeg, grated (or more, to taste)
1 pound boneless, skinless chicken breasts or thighs
2 tablespoons light olive oil or canola oil
9 ounces small button mushrooms
2 tablespoons finely chopped fresh tarragon
1 tablespoon finely chopped fresh parsley
Rest the pastry in the refrigerator for at least 1 hour, preferably several, or, better still, overnight (see page 29).
Preheat the oven to 375°F.
Lightly grease a 10¼-inch tart pan. Dust your work surface with flour, roll out the pastry  inch thick, and line the pan (see pages 30–36). Line with parchment paper and ceramic baking weights. Put into the refrigerator to rest for 30 minutes. Remove the pan from the refrigerator, place on a baking sheet, and bake for 20 minutes. Lift out the parchment and weights, brush the pastry with the beaten egg, then bake for another 10 minutes (see pages 37–41). Set aside.
Lower the oven to 350°F.
TO MAKE THE FILLING: Melt the butter in a saucepan, add the flour, and cook for 1 minute, whisking all the time. Add the milk gradually, whisking continuously until the mixture comes to a boil. Lower the heat to a simmer and let the mixture cook, continuing to whisk, for at least 1 minute more, until it thickens. Whisk in the egg yolks, both cheeses, and the mustard, then taste and season with salt, pepper, and nutmeg. Take off the heat and leave to cool.
Cut the chicken into fine strips. Heat the oil in a frying pan and gently cook the chicken for 4–5 minutes; it needs to be cooked through, so cut into a piece to check. Transfer the chicken to drain on paper towels and set aside.
Add the mushrooms to the frying pan and brown them a little (just for a minute or two). Add them to the saucepan, along with the reserved chicken and the herbs, and stir well. Spoon into the pastry crust.
Put the tart back onto the baking sheet and bake for 20–25 minutes, until the filling is golden and just set if you wobble the sheet. You can eat the tart either warm and runny (I love it like this), or put it in the refrigerator to set and eat it cold with a big green salad.
If you like, you can blind bake the pastry crusts 2–3 days in advance and keep them in an airtight container until you are ready to fill and bake them.
Don’t throw away the squash seeds, as you can toast them and then use them to decorate the tarts, or you can eat them as a snack, sprinkled with sea salt. Just spread them out on a baking sheet and put them in the oven for the last 8–10 minutes of the roasting time for the squash, until they are lightly toasted.
Makes eight 4-inch tarts
1 recipe Spelt Pastry (see page 16)
2 butternut squash
3 tablespoons olive oil
3 eggs, plus 1 egg, beaten with a pinch of salt, for sealing the pastry
1 cup ricotta cheese
3 ounces Parmesan cheese, grated
1 tablespoon chopped fresh sage
sea salt and freshly ground black pepper
Rest the pastry in the refrigerator for at least 1 hour, preferably several, or, better still, overnight (see page 29).
Preheat the oven to 400°F.
Cut the squash lengthwise into quarters. Remove the seeds, but don’t throw them away (see headnote). Place the squash quarters on a baking sheet and drizzle with the olive oil. Roast in the oven for 40–45 minutes, until the flesh is soft.
Lower the heat to 375°C. Lightly grease eight 4-inch removable-bottomed pans, about ¾ inch deep.
Dust your work surface with flour, roll out the pastry  –⅛ inch thick, and line the pans (see pages 30–36). Line with parchment paper and ceramic baking weights. Place in the refrigerator to rest for at least 30 minutes.
Remove the pans from the refrigerator, place on baking sheets, and bake for 15 minutes. Lift out the parchment and weights, brush the pastry with the beaten egg, then bake for another 8 minutes (see pages 37–41). Set aside.
Lower the heat to 350°F.
Mix the 3 eggs and the ricotta together in a bowl. Stir in the Parmesan and sage.
When the butternut squash is cool enough to handle, scrape the flesh from the skin into a bowl and mash it with a masher or fork. Stir it into the cheese mixture and season with salt and pepper. Spoon the mixture into the pastry crusts, put back onto the baking sheets, and bake in the oven for 20 minutes, until the filling is just set and the pastry is golden brown. Remove and eat warm, or allow to cool and put in the refrigerator to eat cold.
Originally, the pasty was poor man’s food, made for Cornish field workers and miners to take to work with them. As a Breton, I know I am walking into a minefield here because there is so much controversy about what makes an authentic pasty. Although most recipes would have lard in the pastry, I prefer to use my usual salted pastry, though made with margarine (in a block or sticks, not a tub) instead of butter to keep it feeling authentic and give the traditional flaky softness required.
Purists, I know, insist that the filling should be made with turnip, not rutabaga, and that the pasty should be crimped around the side, not over the top. But this is my version, and I like crimping over the top because it looks more distinctive and less like an apple turnover.
You can make up the pasties completely, brush them with beaten egg, and then freeze them. Before baking, defrost them completely (allow 3–4 hours, and insert a skewer into the center to check that they are defrosted all the way through), then bake as normal.
Makes 4 large pasties (about 6¼ inches long), or 10 small pasties (about 4 inches long)
1 recipe Salted Pastry (see page 16), made with margarine, not butter
1 medium rutabaga
1 large potato
1 large onion
14 ounces good-quality skirt or chuck steak, diced quite small
sea salt and freshly ground black pepper
1 egg, beaten with a pinch of salt, for glazing the pastry
Rest the pastry in the refrigerator for at least 1 hour, preferably several, or, better still, overnight (see page 29).
Preheat the oven to 400°F.
Roll out the pastry  –⅛ inch thick (for small pastries) or
  inch thick (for large ones) and cut out circles either 6¼ inches or 4 inches in diameter. (Use a pastry cutter or cut around a plate.) Stack up the circles, interleaving them with waxed paper, and put in the refrigerator while you make the filling.
Peel the rutabaga, potato, and onion, and cut into small cubes around ⅝ inch—don’t worry about perfection, but try to keep them roughly the same size so they will cook evenly. Put all the vegetables in a bowl with the diced steak, mix together, and season well with salt, and especially with black pepper.
Divide the filling among the chilled pastry circles, spooning it into the center of each circle. Brush a little water around the edge of the pastry, then bring the sides together and crimp neatly over the top.
Place the pasties on a lightly greased baking sheet and brush them with the beaten egg. With the tip of a sharp knife, make a small hole just to one side of the crimping to allow steam to escape. Bake for 10 minutes, then lower the heat to 350°F and bake for another 30 minutes, until golden brown and the base is brown and firm.
This is a fantastic, rich open pie that is finished with a little sherry or port jelly poured into it after baking. It is served cold, topped with roasted beets and shallots, so it looks quite spectacular. You can find beets in all sorts of colors and stripes in good produce stores or farmers’ markets, so have fun with the topping. I promise it is much simpler to make than it sounds; you just need to allow plenty of time. Ideally, start the night before: make the pastry and line the pan, then put the meat in a bowl to marinate, and keep both in the refrigerator overnight. If you’re pressed for time, a couple of hours in the refrigerator for both is fine, but note that once you have made the pie, cooled it for 2 hours, then poured in the jelly, it will need to go back into the refrigerator to set for another 4–5 hours. For deep game and pork pies like this, I always dust the greased pan with flour, which seems to help the finish of the pastry.
Makes one 8-inch pie
1 recipe Caraway Pastry (see page 16)
For the filling
7 ounces pork belly, skin removed
7 ounces pork shoulder
7 ounces duck leg meat
7 ounces duck liver
6 juniper berries
2 teaspoons whole allspice
1 teaspoon whole green peppercorns
1 teaspoon smoked sweet paprika
¾ teaspoon thyme leaves
Scant 1 cup dry or sweet sherry or port
18 small shallots, unpeeled
light olive oil or canola oil
1 smoked duck breast
2 extra-large eggs
⅔ cup half-and-half
sea salt and freshly ground black pepper
For the jelly
2 tablespoons water
1¾ teaspoons unflavored powdered gelatin
¾ cup plus 2 tablespoons good chicken stock
6½ tablespoons sweet sherry or port
For the topping
3 medium golden (or striped) beets
3 medium red beets
a few sprigs rosemary and thyme
olive oil
Rest the pastry in the refrigerator for at least 1 hour, preferably several, or, better still, overnight (see page 29).
TO MAKE THE FILLING: Trim and dice the pork belly and shoulder and duck legs and liver and place in a bowl. Add the spices, thyme, and sherry, stir, then leave to marinate for at least 2–3 hours, but preferably overnight, in the refrigerator. Give the bowl a shake from time to time.
Lightly grease an 8-inch removable-bottomed square or round cake pan and pour in a little flour. Tilt the pan around so that every surface is lightly dusted, then tap out the excess.
Remove the pastry from the refrigerator and roll it out on a very lightly floured surface (see pages 30–31) to form a square or circle about  inch thick and twice the size of your pan (i.e., 16 inches square or in diameter).
Lift the pastry over the pan and gently line it (see pages 34–36). Place it back in the refrigerator for at least 30 minutes (or until the meat has finished marinating).
When you are ready to make the pie, preheat the oven to 350°F.
To finish the filling, put the unpeeled shallots in a saucepan with enough oil to cover and simmer very slowly for 10–15 minutes, until they are soft and can be easily pierced with the tip of a knife. Leave to cool, then slice off the base and squeeze from the other end so that the shallots pop out of their skins. Keep the shallot flesh to one side.
Dice the smoked duck breast, then set aside.
Remove the marinated meat from the refrigerator and put through a meat grinder (use the largest holes), or chop finely with a large knife.
Mix the eggs and half-and-half together in a bowl, stir in the minced meat, add the diced duck breast, and season with salt and pepper. To test that it is seasoned to your liking, take a little bit of the mixture and fry it in a pan. Make sure it is cooked through, then taste it and adjust if necessary. Now mix in half of the shallots.
Take your pastry crust out of the refrigerator and fill it with the meat mixture.
Cover the top with a piece of parchment paper to stop the pastry from browning too quickly, place on a baking sheet, and bake for 1½–1¾ hours, until the meat is cooked through. During baking, rotate the pie and move it around the oven if necessary so that the pastry is evenly baked. You can test for doneness by inserting a metal skewer into some pieces of meat and checking that the skewer comes out piping hot. For the last 30 minutes, remove the parchment paper.
Take the pie from the oven and leave to cool for at least 2 hours.
TO MAKE THE JELLY: Pour the water into a small bowl, sprinkle the gelatin over, then let stand for a few minutes.
Heat the stock and sherry in a saucepan over low heat, add the gelatin, and stir well until dissolved. Take off the heat and leave to cool, but not until the jelly becomes too thick to pour.
Now take the cold pie (still in its pan). You will notice that the meat has separated a little from the pastry crust, so pour the sherry jelly into the gap and over the top of the meat. Put the pie in the refrigerator so that the jelly sets. This will take 4–5 hours, but the pie will be at its best after 24 hours (it will keep in the refrigerator for up to 1 week if you don’t want to eat it straightaway).
Before serving, heat the oven again to 400°F.
TO MAKE THE TOPPING: Wash the beets and put them whole into a saucepan of water. Bring to a boil, then lower the heat and simmer for about 20 minutes, until you can slide the tip of a knife into the beets, but there is still a bit of resistance. Lift out the beets and, when cool enough to handle, cut into wedges, leaving the peel on and any little bits of root or stalk—these give the wedges character and will make the topping for your pie look even more eye-catching. Place in a baking pan with the rosemary and thyme, drizzle with a little olive oil, and roast in the oven for about 25 minutes, or until tender. Remove and allow to cool.
When the jelly has set, ease the whole pie carefully from the pan, arrange the beet wedges and reserved shallots on top, and serve.
Consider this a bonus recipe that stands apart from the others in this chapter because it uses hot-water crust, which is a different type of pastry from those described previously. It is used only for making raised pies that are eaten cold.
Raised pies are something that the British have always been good at making, from the humble to the elaborate, filled with all kinds of meat, game, and fruit. But the one I loved instantly when I came to England was the individual pure pork pie. Well seasoned and made properly with good-quality meat and great jelly, it is just beautiful.
Traditionally, the jelly is made using a pig’s trotter, and there is a recipe for this on page 98. But if you are short of time you can make the simple version here (which I also use for the Duck Pie on page 81). In most traditional recipes, the pastry is also hand-raised, which means that it is shaped without the help of a mold. However, I know that many people find the idea of doing this quite daunting, so these pies are made in a much easier way, in dariole molds (you may substitute 4-ounce ramekins if you cannot find dariole molds).
If you don’t want to try the hot-water crust, you could make these pies using Cornish pasty pastry (see page 16). It will obviously have a slightly different flavor and texture, but you will still have some very tasty pies!
Makes 8
1 egg, beaten with a pinch of salt, for glazing the pastry
For the hot-water crust
1 egg
15.7 ounces all-purpose flour
6.1 ounces lard (or goose or duck fat)
6 ounces water
1 teaspoon salt
1 teaspoon sugar
For the filling
10.5 ounces pork belly, skin removed
10.5 ounces pork shoulder
2 anchovies in oil, drained
2 tablespoons chopped fresh sage
7 ounces bacon or pancetta
½ whole nutmeg, grated
sea salt and freshly ground black pepper
For the jelly
2 tablespoons water
1¾ teaspoons unflavored powdered gelatin
¾ cup plus 2 tablespoons good chicken stock
6½ tablespoons sweet sherry or port
TO MAKE THE HOT-WATER CRUST: Break the egg into a small bowl. Put the flour into a large bowl and make a well in the center. Add the egg to the flour and stir in briefly.
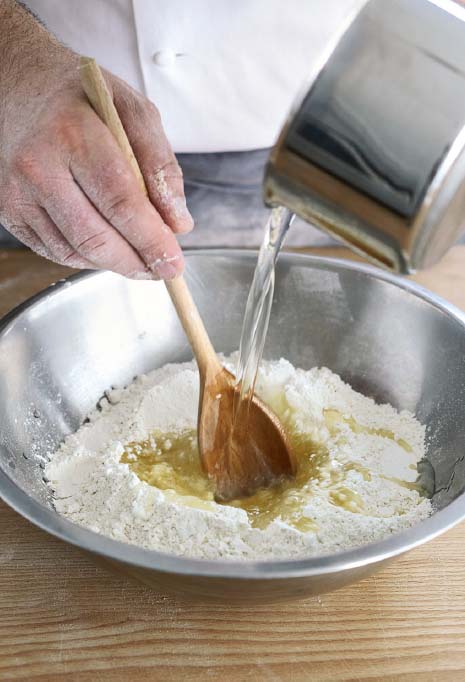
Put the lard in a saucepan with the water, salt, and the sugar. Bring to a boil, stirring as the lard melts. When it comes to a boil, count to 30 seconds and immediately take the pan off the heat. Pour the liquid into the flour mixture, stirring continuously with a wooden spoon.
When the mixture forms quite a sticky dough, cover the bowl with a clean dish towel and leave to rest and cool for 1 hour.
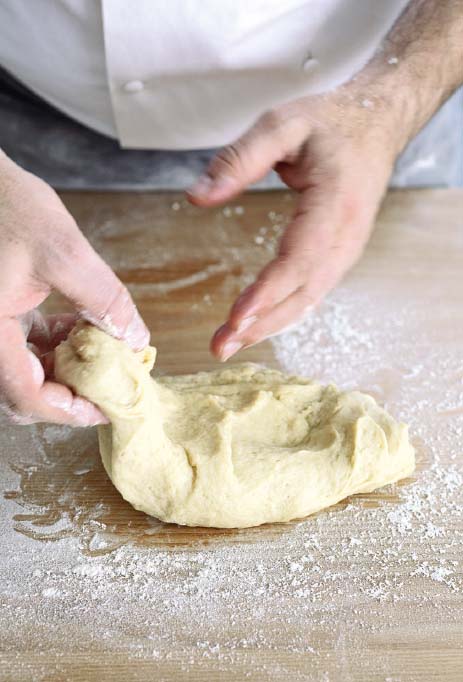
Turn the dough onto a lightly floured work surface (see page 23). Flatten it out with your hands.
Fold the dough into thirds by taking one side into the center and pressing down with your fingertips.
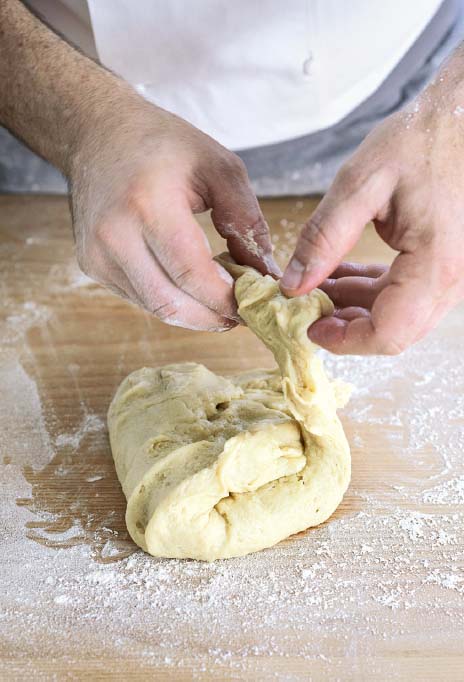
Next, bring the opposite side over the top.
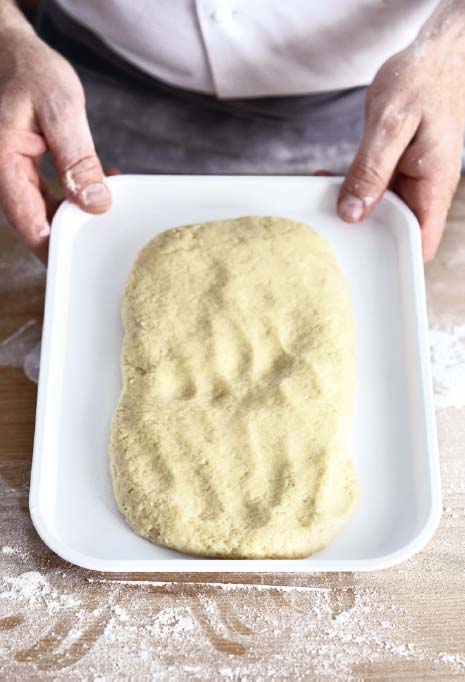
Flatten the dough into a rough oblong shape, lift onto a baking sheet, then cover with waxed paper and put into the refrigerator to rest for at least 30 minutes.
WHILE THE PASTRY IS RESTING, MAKE THE FILLING: Dice the pork belly and shoulder roughly and mix with the anchovies and sage. Put the mixture through a meat grinder (use the larger holes). Alternatively, place in a food processor and pulse briefly, stopping and starting, until you have a coarse texture. (By pulsing in short bursts, you will avoid overdoing it and ending up with meat paste.) If you don’t have a machine, you can chop all the meat very finely with a big knife; it is just a bit more tedious.
Cut the bacon into small pieces and stir it into the ground meat. Add the nutmeg, then season with salt and pepper and mix well. To test that the filling is seasoned to your liking, take a little bit of the mixture and fry it in a pan. Make sure it is cooked through, then taste it and adjust if necessary.
Preheat the oven to 350°F.
Take the pastry out of the refrigerator—by now it should be firmer. Roll it briefly on a lightly floured work surface (see page 30). Fold it into thirds and roll out again about ⅛ inch thick.
Finally, using a pastry cutter or saucer about 5 inches in diameter, cut out eight circles. Now use a cutter or tumbler 3¼ inches in diameter to cut out another eight circles.
Lightly grease eight dariole molds or ramekins, then dust with flour, emptying out the excess. Line each mold with a large circle of pastry, pushing it gently into the base and against the sides, and leaving about ⅜ inch overhanging the rim. An easy way of doing this is to drape your pastry over a smaller inverted mold or glass, then put the dariole mold you want to line over the top.
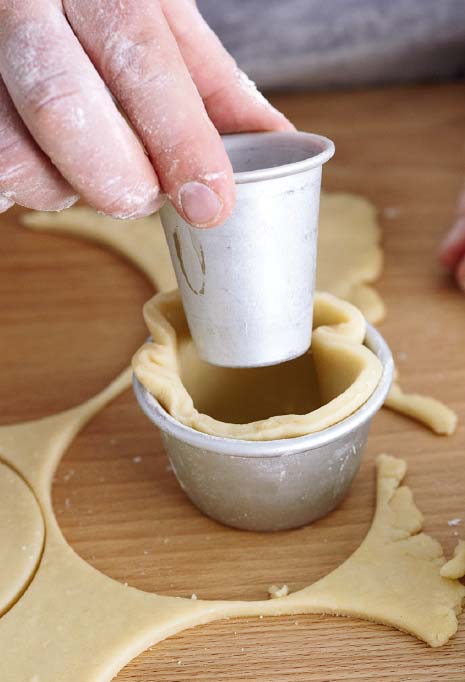
Turn both over and remove the smaller mold or glass.
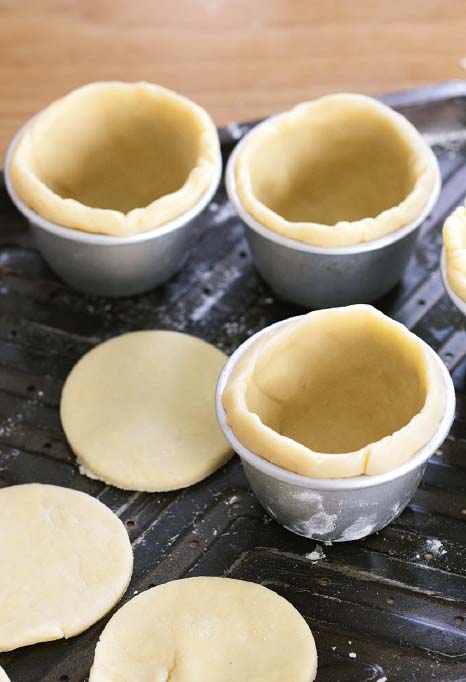
Repeat with the rest of the molds. Now you are ready to fill them.
Divide the meat mixture among the molds, then tap each mold on the work surface to help the meat settle down. Put a small pastry circle over the top of each mold. Starting in the center and working outward to the edges, press it gently onto the meat with your fingertips without stretching it.
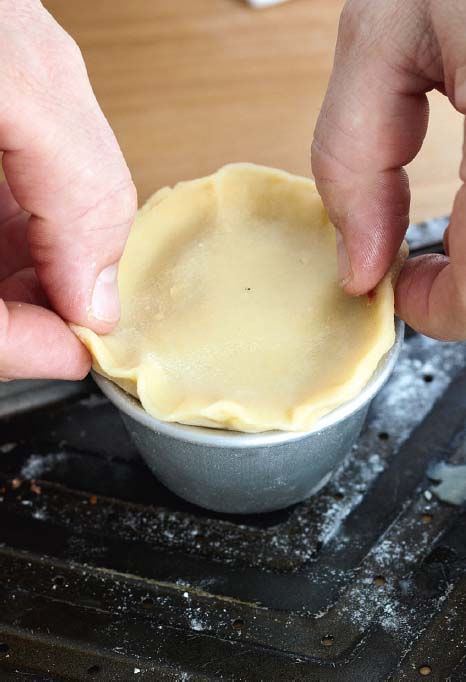
Crimp the edges of the pastry together all around, making sure they are firmly sealed.
Brush the top of each pie with the beaten egg, then use a skewer to make a hole in the top of each one to allow steam to escape in the oven.
Place the molds on a baking sheet and bake for 40 minutes, until the meat is cooked through (a skewer inserted into the center of the pies should come out piping hot, or an instant-read thermometer should register 190°F–195°F). Leave the pies to cool for at least 2 hours.
MEANWHILE, MAKE THE JELLY: Add the water to a small bowl, sprinkle the gelatin over, then let stand for a few minutes.
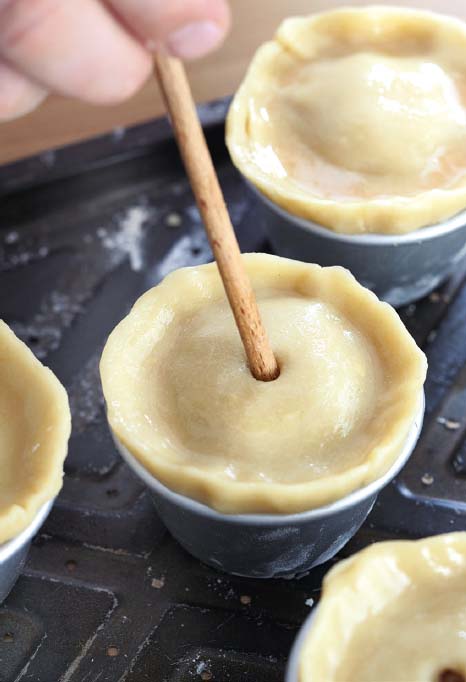
Heat the stock and sherry in a saucepan over low heat, add the gelatin, and stir well until dissolved. Remove from the heat and leave to cool, but not until the jelly becomes too thick to pour.
When the pies are cool, take a little funnel, a piping tip, or a syringe (or make a small cone with some parchment paper) and push it into the hole you made in each pie. Carefully pour in enough jelly to come to the top. Put the pies in the refrigerator for 8 hours to set, then turn out and eat!
When you make this with a pig’s trotter, it is naturally gelatinous and needs no additional thickening, but if you make it with a chicken carcass, you will need to add some gelatin. This recipe makes a generous amount, and you will need only 1¼ cups of it for the Pork Pie recipe on page 85, so freeze any left over for another occasion.
Makes about 1 quart
1 pig’s trotter or 1 chicken carcass
8 cups water
1 bay leaf
1 carrot
1 onion
6 black peppercorns
1¾ teaspoons unflavored powdered gelatin and 2 tablespoons water, if using a chicken carcass
Place the pig’s trotter or chicken carcass, water, bay leaf, carrot, onion, and peppercorns in a saucepan and bring to a boil. Skim the scum from the surface, then lower the heat and simmer for 2 hours, skimming regularly. Remove from the heat and pour the liquid through a sieve into clean saucepan. Bring to a boil and simmer for 10 minutes more to reduce and thicken slightly.
If you have used a chicken carcass rather than a pig’s trotter, put the 2 tablespoons water in a small bowl, sprinkle the gelatin over, then let stand for a few minutes. Add a little of the hot liquid to the gelatin and stir to dissolve. Add this to the pan and stir well.
Remove the pan from the heat, leave to cool, then use to fill the pork pies (see page 96).
These crispy wafers, which are great with cheese, are made with spelt pastry, a variation of salted. I use all whole-grain spelt flour, rather than a mixture of spelt and all-purpose flours, and I add some extra whole-grain spelt so that you get a really good, crunchy texture.
Makes about 20
1 recipe Salted Pastry (see page 16), with whole-grain spelt flour substituted for the all-purpose flour, plus 1 tablespoon whole-grain spelt
Make the pastry as usual, adding the whole-grain spelt to the spelt flour at the beginning. Rest the pastry, neatly squared off, in the refrigerator for at least 1 hour, preferably several, or, better still, overnight (see page 29). The firmer it is the better.
Preheat the oven to 325°F.
Using a very sharp knife, cut the chilled pastry into wafers  –⅛ inch thick. Lay them on one or more baking sheets and bake for 10–12 minutes. They will be a dark golden color, thanks to the spelt. Remove from the oven and leave to cool and crisp up a little on the sheet(s) before transferring to a rack to cool completely. The wafers will keep in an airtight container for 2–3 weeks.