2
Alive

You should have some goals for your time in the outdoors: maybe you want to reconnect with nature, find something that will help you get in shape, learn to take better photos, or totally disconnect from our fast-paced world for a few hours. Here are the two goals that should be at the top of your list, and all your other goals can fill in the spots after them:
1. Don’t die.
2. Have fun.
This chapter will help you with goal number one, which will ensure that you have plenty more opportunities to achieve goal number two. Learning some survival techniques before you head outdoors will make you better prepared for your adventures and will help you avoid anything that could mess up your experience in the wild. This chapter will teach you how to deal with cold temperatures, hot weather, running out of food and water, getting lost, bears, snakes, mountain lions, bees, scorpions, equipment failure, crossing rivers, and avoiding avalanches. And if all else fails, you’ll learn how to arrange for a rescue. But obviously getting rescued is a huge bummer, so read up on the other stuff before you head out and you’ll have a safe and enjoyable adventure.
How long can I make it without food and water?
Remember the “rule of threes” when it comes to survival: you can survive about three hours in bad weather without shelter, three days without drinking water, and three weeks without eating food. These are fairly general estimates, and there’s a lot of variance depending on the situation and a person’s physical condition—for instance, you can last a lot longer without water if you’re lying in a hospital bed than if you’re trudging through the desert under the hot sun. And a person who has a high percentage of muscle and fat can make it a lot longer before starving to death than a skinny person with 5 percent body fat (when your body starts to eat itself, it will eventually run out of “food”—fat and muscle). The point of the rule of threes, though, is that you’ll die of dehydration a lot faster than you’ll starve to death, so prioritize water first and then food. In extreme cases, mountaineers pinned down in a storm have survived almost a week in a snow cave with almost no water, and others have survived up to six days in arid environments without any water. Suffice it to say that if you’ve gone a day and a half without water somewhere in the wilderness, you should start looking for it in earnest. And if you find water, then maybe start looking for some food.
How long can I survive in the cold?
Many factors need to be considered when it comes to surviving in the cold: How cold is it and are you wet or dry? Are you physically fit? Hypothermia, when the body’s core temperature drops below 95°F, happens much faster when your body is wet and even faster if you’re submerged. If you should fall into water that’s just half a degree above freezing, you probably won’t survive more than a half hour. If you’re in cold rain or your clothes are soaked, your body won’t be able to warm itself, and if you can’t get out of your wet clothes or find shelter, you’ll eventually go hypothermic. If you’re just cold and you stay dry, you can survive a lot longer. And if you have a good fitness level, your body will be able to shiver and/or keep moving longer, potentially postponing the amount of time you have before your body temperature becomes hypothermic.
If your body is approaching hypothermic temperatures, stop moving and find a place to give yourself some shelter. Remove any wet clothing that’s next to your skin and add as many warm layers as you can. If you have the ability to make warm drinks, do it, and drink and eat immediately. If you have a sleeping bag with you, get in it. If you are with another person, spooning them is a great way to use their body heat to rewarm yourself (whether you want to spoon them romantically or not).
Your body has several mechanisms that work before hypothermia sets in: first you start shivering in an attempt to get warm, and if that doesn’t work, your body will start shutting off blood flow to your extremities in order to keep your core warm. After that, the body’s metabolism will begin slowing down in an attempt to decrease the need for blood and oxygen. At 95°F, the body is clinically hypothermic, but the heart won’t stop beating until your core temperature drops just below 65°F. Between those two temperatures, you’ll experience difficulty with everyday tasks (like putting on a pair of gloves to keep your hands warm) and confusion will set in (some hypothermia victims have removed all their clothes before dying, for unknown reasons). It’s impossible to say exactly how long you can stay alive in the cold, but the longer you keep your core warm, the better off you will be until help arrives.
How do I protect myself from a swarm of bees?
If you find a beehive, stay away from it—at least 300 feet away from it. Count on one hand all the reasons it would be cool to get up close to a beehive (zero), and count on the other hand all the reasons it would not be cool to get stung by about five hundred bees (one). If it’s just not your day, and the bees swarm you, here’s one thing you should do:
• Run. Run in a straight line as fast as you can. Do not, as you may have seen on a TV show, run in a zigzag pattern. Run in a straight line away from the bees, into a building or a car where you can shut the door, and if that’s not an option, just keep running away—most bees won’t go more than a quarter mile from their hive. Does that sound like too far a distance to run? How about 1,300 feet? That’s safe. If you have a jacket handy, cover as much of your face and head as possible with the jacket while running. But your first priority is to run away, and fast.
Here are a couple of things you shouldn’t do if you encounter a bee swarm:
• Do not run and jump into a body of water. The bees will wait for you to come up for air, and then they will sting all the parts of you that are sticking out of the water (like your head).
• Don’t swat at the bees or flap your arms or wave wildly. The bees will just get mad and sting you.
How do I get out of a forest fire?
If you find yourself in the middle of a forest fire, it’s not exactly your lucky day: fire can move at up to 14 mph without getting tired, and unless you’re an Olympic marathoner, you probably can’t run that fast for very long. Your best bet is to find a natural firebreak—a place where the fire will not have any fuel to burn, such as a wide creek, a river, a lake, a road, or even a rocky canyon. If you see a fire, figure out where you are on a map and locate a firebreak to put between you and the fire (keep in mind you also don’t know how the fire will spread or in which direction or directions). But if you can very quickly put a nearby road or creek between you and the fire, your bad luck might change to good. If your nearest best bet for a firebreak is a pond or lake, get to it, and if the fire gets close, swim out into the water, away from the shore.

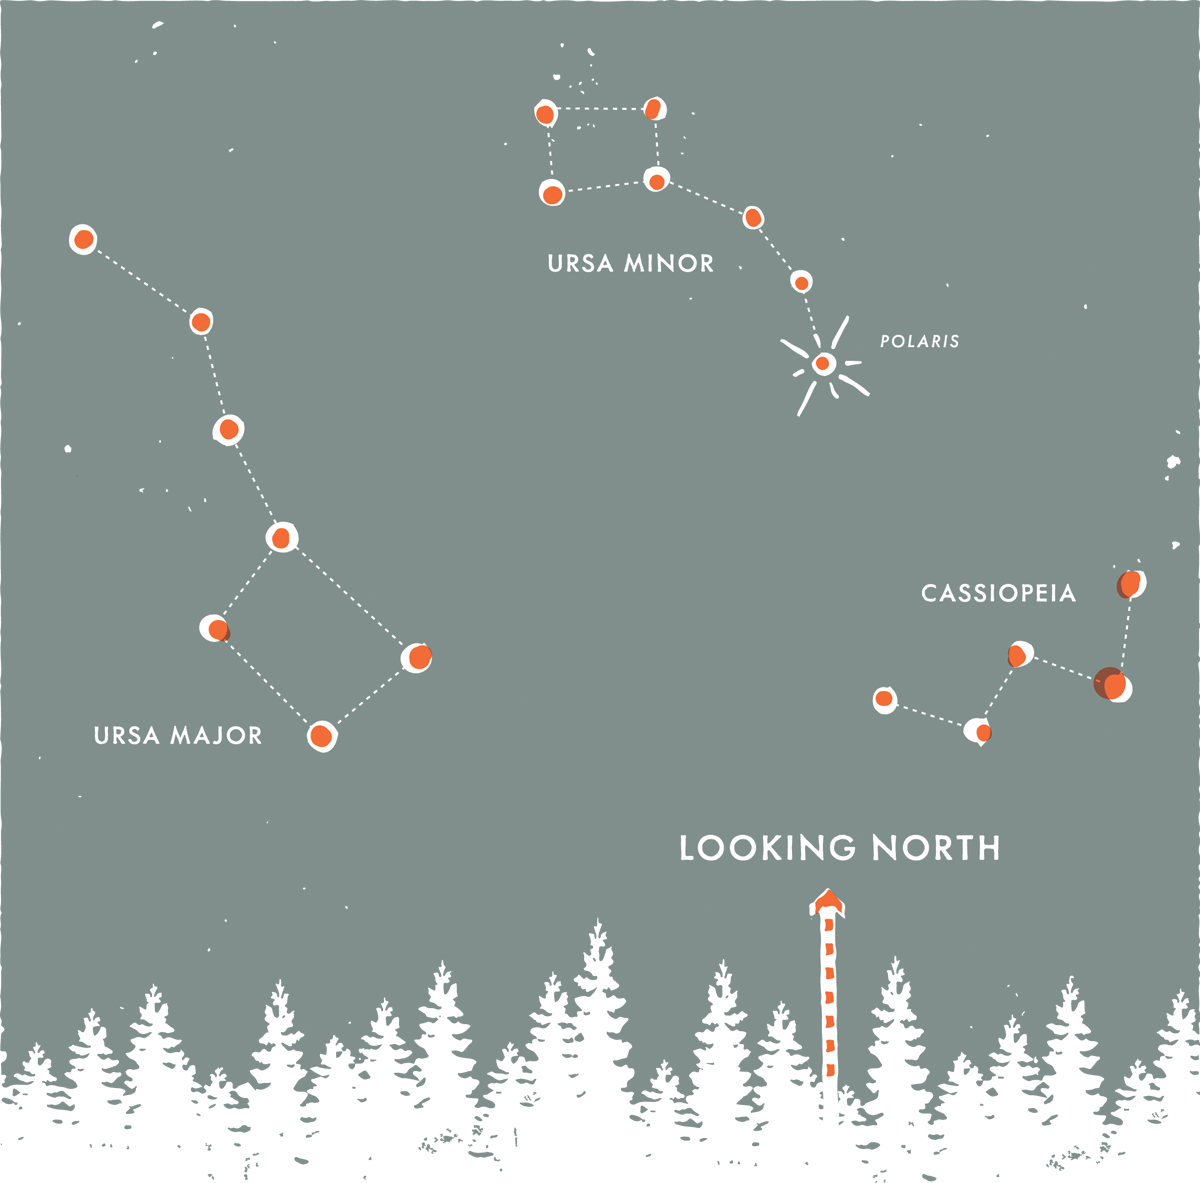
How do I navigate by the stars?
Although humans have navigated by stars for thousands of years, it’s a bit of a lost art nowadays since we’ve developed so many other ways to navigate (thanks, science!). But should all those other methods fail, and you find yourself walking around at night, you might need to figure out where you are. You may not be able to do extensive navigation by stars, but if you know a few constellations you can at least get a bearing and find north, and using north, find east, west, and south. Identify Cassiopeia (see here) and the Big Dipper. Between them should be the Little Dipper/Ursa Minor. The very tip of the handle of Ursa Major is Polaris, the North Star, which is always over the North Pole, and if you face Polaris, you’re facing north. And if you’re facing north, east is to your right, and west is to your left.
What should I carry in a survival kit?
There’s no magic ingredient list for a survival kit—although on the Internet you can choose from hundreds of different survival kits that might make you believe you can live through anything. If you’re on a wilderness trip, your survival kit is whatever you have in your backpack, in your head, and as your means of communicating with the outside world. You should be carrying the Ten Essentials (see here) and a small first aid kit (see here) and should have (1) a way of communicating with someone who can initiate a rescue (such as a personal locator beacon, satellite phone, or cell phone—which will work only if you have reception), or (2) a plan worked out with someone who knows where you are and will call the authorities if you do not report back within a certain time frame (see here). But for long-term survival, your primary concerns are staying warm at night and finding drinking water, so two things you should always carry, even if you’re just going on a day hike, are water purification tables and an emergency blanket. One small jar of iodine tablets weighs 3 ounces and contains enough iodine to purify 6 gallons of water, which is enough for up to six days. An emergency blanket weighs another 3 ounces and will give you an emergency shelter to keep you alive for several nights. Note that we’re talking here about keeping you alive, not sleeping comfortably. The total cost of both those items is about eleven dollars, so for 6 ounces and eleven dollars you’ve got a pretty good insurance policy. Yes, you might get hungry, but unless you’re a very, very thin person, you will be able to survive a couple of weeks without eating while you’re waiting for a rescue.
What should I carry for emergency gear repairs?
You don’t need to carry an entire hardware store of repair supplies in your backpack—have a little faith in your innate ability to MacGyver yourself a solution out of whatever materials you have and can find out there. But these few basic items can get you through a jam.
• A travel sewing kit: Or a needle and a small spool of thread. You’re not going to hem a pair of pants or take in a shirt out on the trail, but if you rip a hole in a backpack or jacket, a few yards of thread and a needle will be a lifesaver, even if your patch job reflects that you haven’t sewn anything since your tenth-grade home economics class.
• Multitool: Your tool should at the very least contain a knife blade and pliers (see here).
• Krazy Glue: It’s light, small, and surprisingly strong. Krazy Glue can fix all kinds of things, including lacerations in your skin. Just make sure the tube you keep in your repair kit doesn’t dry out over time.
• Duct tape: Obviously you need to carry duct tape, but not an entire roll. Tear off several 3-foot sections and roll them into small spools, and that should be enough to fix almost anything, including small tears in your sleeping bag or your down jacket.
• Baling wire: A 12-foot roll of baling wire (again, don’t take a whole spool of it, but cut some off and make a small roll of it for your repair kit) can be used to repair or jury-rig broken snowshoes, backpacks, crampons, and all kinds of other things.
• Seam Grip and tent patches: If you rip your tent fly or floor, a tube of Seam Grip and a few patches are the best fix you can get in the field. They also work well if you happen to punch a hole in your rain jacket.
• Sleeping pad repair kit: Carry the kit made by the manufacturer of your sleeping pad (see here).
• Safety pins and nylon cord: These will fix almost anything that duct tape can’t fix (yes, duct tape is the wrong tool for certain situations).
What is the one thing you should always do before hiking by yourself?
Aron Ralston famously amputated his own arm after it became pinned beneath a boulder in a Utah canyon in 2003. Plenty of people have opinions on what he did wrong, but most everyone can agree that his situation could have been quite different if he had just done one thing: let someone know where he was going. Ralston’s biggest mistake was that no one knew where he was, and only after some very skilled and determined detective work by his mother and law enforcement agencies was he found—after he had already cut off his arm and started to walk out. If you leave on a hike or backcountry trip, always let at least one person know where you’ll be—including the trailhead location, your license plate number, your plan, and when you expect to come home. If you’re supposed to return home by 5 p.m. on a Tuesday and you don’t, your friend can alert the authorities and organize a search. That way, instead of spending five days and cold nights outside by yourself with a broken ankle, hopefully you can limit it to only one or two days before someone finds you.
What should I do if I see a bear?
Seeing a bear in the wild is a lucky thing—provided you’re far away from it (300 feet or more is ideal). If you’re nearby and the bear has not seen you, or isn’t paying attention to you, calmly and quietly move away. Scan the area—you do not want to place yourself between a grizzly sow and her cubs. Don’t run, and keep your eyes on the bear, watching to see if it notices you and/or starts to charge you, but don’t make eye contact with the bear. Do you have bear spray in your backpack? Bear spray is a form of pepper spray. It comes in a small container that you can attach to your pack so that when you need it, you can have it ready to fire. If the bear notices you, stand your ground. Don’t make any sudden moves, don’t run, and don’t climb a tree (the bear is a better climber than you). Avoid making eye contact with the bear, and speak to it in a submissive tone, saying, “Whoa, bear. Whoa, bear.” Back away slowly while saying this. The bear can do several things at this point: ignore you (great!), stand up and get a better look at you, make any number of signs that it might charge you—or just charge you with no warning. A bear that’s making eye contact with you with its ears back, or a bear that is popping its jaw, may charge you. Sometimes bears will “bluff charge,” getting close and then peeling off course at the last second—but don’t count on this, because a bear can move up to 35 mph and that doesn’t give you much time to escape. If the bear gets close, fire your bear spray at it, aiming at its face, or creating a cloud it has to run through. That should repel and occupy the bear long enough for you to walk away. If the spray doesn’t work, fall to the ground and get into a ball, protecting your head and neck with your arms. If the bear starts to swat at you and you can’t protect your head and neck, it’s time to fight.

How do I fight off a bear?
It pretty much goes without saying that you should never try to fight a bear (because the odds you’ll win are very slim). But if a bear starts getting physical with you, you really don’t have a choice except to put up a fight. Well, you have a choice between giving up and fighting, but let’s assume you want to put up a fight. Hit, kick, punch, gouge at its eyeballs, and generally concentrate your efforts around the bear’s face, nose, and eyes. You have about zero chance of knocking the bear out à la Muhammad Ali or Mike Tyson, so instead try to be enough of a hassle that the bear will just leave you alone because you’re not worth its time. A few people have survived bear attacks by throwing themselves off cliffs or into deep ravines where the bear couldn’t climb down and reach them (obviously, a last resort), and it’s been documented that at least one person has shoved his arm down a bear’s throat and made the bear gag. If you are unlucky enough to have a bear pick a fight with you, fighting back might work and it might not, but it’s really your only chance for survival.
Should I carry a gun in the backcountry?
The subject of guns in the backcountry is, of course, a hot debate topic. If you’re hunting, obviously you’re probably carrying a gun or guns. If you’re not hunting, however, it’s your call. If you feel you need a gun to protect yourself from bears, consider that it takes a pretty large-caliber bullet to penetrate a bear’s muscle and fat and actually reach a vital organ—so your 9mm pistol won’t be much protection from bears. Studies have shown that bear spray is more effective than a gun in a situation where a bear charges. In the heat of the moment, you might not be able to hit a target moving at 30 mph with a rifle shot, but you can probably spray a cloud of bear spray that will deter the bear. If you are wondering about carrying a gun for something other than wildlife (i.e., to protect yourself from other humans), it’s up to you, but crime in the backcountry is rare and the majority of hikers and backpackers don’t carry firearms.
Are moose dangerous?
Author Bill Bryson wrote in his famous book A Walk in the Woods, “Hunters will tell you that a moose is a wily and ferocious forest creature. Nonsense. A moose is a cow drawn by a three-year-old.” Yes, moose are goofy-looking animals, but unfortunately they’re also dangerous. They kill more people annually in the United States than bears do. Moose are not aggressive animals, but they will attack if they’re threatened, surprised, or disturbed—so if you see one in the wild, don’t try to walk over to it and take a selfie. Mothers will protect their young calves from threats, so if you see a cute little moose (which will still be a large animal), be wary of your position relative to it and its mother. If you make one mad, it will charge, and it’s not a good thing to have one intent on running you over—they weigh 1,500 pounds and can run up to 35 mph. If you see a moose while you’re on the trail, give it a wide berth. If it’s standing in the middle of the trail, definitely go out of your way to go around it.
Should I worry about mountain lions?
Human encounters with mountain lions are very rare, and human sightings of mountain lions are rare too—but that doesn’t mean a mountain lion hasn’t seen you (even though they do have fairly bad vision). It’s a good idea to know if the area you’re venturing into is mountain lion country, and if it is, hike with a friend and wear bright colors. Mountain lions’ prey are earth-toned animals like deer, and if you’re wearing a bright shirt or jacket, this will clue the lion in to the fact you’re not a deer. If you’re hiking with a dog, keep it on a leash and close to you. If you do see a mountain lion, do not make one feel cornered. Look as big as you can and back away. If the lion charges you, it will be very fast—lions can accelerate up to 45 mph very quickly. If the lion attacks, fight back—claw, punch, kick, whatever you can do. Again, human–mountain lion encounters are rare, so in general don’t worry about them, but be aware that you’re on their turf.

How do I avoid scorpion bites?
Here’s the good news about scorpions: they aren’t out to get you. Unlike mosquitoes, which love to land on your skin and bite it (and usually hang out with dozens of friends intent on doing the same thing), scorpions are content minding their own business. But if you mess with a scorpion, it will sting you, and it will be one of the most painful stings you ever experience. Yes, bee stings hurt, but they’re nothing compared to scorpion stings, which can cause tingling and/or burning, numbness, difficulty swallowing, difficulty breathing, blurry vision, seizures, and, in rare cases, pancreatitis, which has its own set of very uncomfortable symptoms.
If you’re camping or hiking in the desert, don’t walk around with bare feet, because a scorpion chilling under the sand will not hesitate to whip its tail around and sting you if you step on it. Zip your tent closed every time you go in and out of it, and if you keep your shoes outside your tent, take a good look inside before putting your feet in them (yes, even in the middle of the night when you get up to go pee)—a curious scorpion may have crawled into the toe of your shoe, and surprising it with your toes will lead to, again, a painful sting. If you get stung by a scorpion, it will hurt, but it will not kill you. Clean the wound, and do not take ibuprofen or aspirin for the pain, as they can make the venom spread more quickly; instead take acetaminophen. Apply a cold compress (but not ice) at the area of the bite.
How do I avoid rattlesnake bites?
Here’s a fun fact for you: 40 percent of rattlesnake bites happen to people who are playing with or handling snakes, and 40 percent of people bitten by rattlesnakes have a blood alcohol content of .10 or higher. Rattlesnake bites are rare, and in the United States they somehow happen almost exclusively to males. One study divided rattlesnake bites into categories of “legitimate” and “illegitimate,” the latter being bites that happened to people who did not attempt to move away from the rattlesnake after they recognized it was a rattlesnake. Only 43.4 percent of the rattlesnake bites in the study were deemed “legitimate.” So for the most part, leave rattlesnakes alone and you’ll be fine. However, you can obviously accidentally encounter a rattlesnake on the trail. To protect yourself, remember that spring and summer are the prime seasons for rattlesnake activity. Wear ankle-height boots, and know if the area you’re hiking in has seen rattlesnake activity lately. Avoid brushy trails or trails where foliage covers the trail in spots and you can’t see your feet, and if you do hike brushy trails, carry trekking poles to help you push aside plants to see the trail. If you encounter a rattlesnake, walk away from it or give it a wide berth as you pass. If you’re already too close, freeze and move back slowly. If the snake feels threatened, it may coil up, then shake its rattle, and as a last defensive move to strike you. If you’re carrying trekking poles, hold a pole between you and the snake, and the snake may go for the pole instead of you. If you don’t see a snake but hear a rattle, make sure you know where the rattling sound is coming from before you dart away—or you may step right on the snake.
How do I deal with a snakebite?
If you are bitten by a snake, the first thing you will want to do is decide if there’s a chance the snake could be venomous. Actually, the first thing you will want to do is yell something like “ouch,” possibly in addition to a string of curse words. That’s natural. So then, the second thing you’ll want to do is try to determine if the snake is venomous. If you have no idea or aren’t sure, err on the side of caution and call 911 or initiate a rescue. Lie down with the snakebite area below your heart, and move as little as possible to keep the venom localized. Do not (as you may have seen on TV) try to suck the venom out of the wound or tie off the bitten appendage with a tourniquet. If a snake is venomous, you will need to get antivenom at a hospital—there is no other effective treatment (including those snakebite kits you can buy, which have been proven to do more harm than good).
If you are absolutely sure the snake is not venomous, then you just have a puncture wound—which is still painful and needs to be dealt with, but is much less terrifying. Clean and bandage the wound, and monitor it for bleeding and pain.
How do I know if a snake is dangerous?
There are four types of venomous snakes in North America, and many more throughout the world, each with different characteristics separating them from nonvenomous snakes. If you aren’t that interested in herpetology or memorizing the characteristics of venomous snakes, here’s a good rule of thumb to protect you from getting bitten by one: treat all snakes as if they’re venomous. If you’re tempted to pick up a snake and play with it, ask yourself a couple of questions first.
1. Why am I messing with this snake that’s minding its own business and not messing with me?
2. What is the worst-case scenario possible if I pick up this snake?
The answer to Question #2 is the snake bites you and it turns out to be venomous, and you’re in a heap of trouble. So it’s not worth it; leave the snake alone.
How do I know if I’m getting frostbite?
The first sign of trouble is the first stage of frostbite, called frostnip: a part of your body (usually extremities like fingers, toes, or the end of your nose) gets cold and tingly and/or numb and turns red. If you feel these symptoms, you may have frostnip, which is serious but won’t leave permanent damage. Frostnip can turn into frostbite if you don’t rewarm the skin.
Depending on where the skin is, you can rewarm it using other body parts—if your fingers have frostnip, you can put them in your armpits inside your clothing. If your feet have frostnip, a common rewarming method is to put them on your tentmate’s stomach inside their clothes. If you don’t/can’t rewarm the skin, it will next turn white or very pale and possibly begin to feel warm again. This is bad news. When deep frostbite, the next stage, sets in, it means the frostbite has gone past the epidermis into the deeper layers of your skin—you will stop feeling pain and cold in the frostbitten area as underlying tissues freeze. If this happens, you should not try to rewarm the skin if you’re outside in the backcountry—instead get yourself to a hospital, where there’s no chance of the skin refreezing after it thaws. If you experience deep frostbite, expect to lose lots of dead tissue and possibly even appendages.
How do I know if I’m becoming hypothermic?
We think of hypothermia as something expected in very cold temperatures, but it’s actually more common at milder air temperatures combined with wet weather. Hypothermia starts when your body’s core temperature drops to 95°F, and the first thing you’ll probably notice is shivering—not like the kind of shivering you have when you sit down on cold bleachers at a football game and decide you could use a cup of hot chocolate, but intense, wow-I-can’t-stop-shivering shivering. You might have a difficult time doing tasks with your hands (like putting on gloves or clipping a buckle), or you’ll stumble when you’re walking. This is mild hypothermia. If you don’t warm up after mild hypothermia and it progresses into moderate hypothermia (a core body temperature of 89 to 82°F) or severe hypothermia (below 82°F), you’ll stop shivering and basically start acting very similarly to someone who is drunk: you are confused, slur your speech, have a hard time remembering things, and may pass out. Your breathing may become shallow and your pulse may become faint.
To treat hypothermia, as soon as possible (obviously preferably before it escalates to moderate or severe hypothermia), remove wet clothing; get out of the wind; cover up with any available warm clothing, sleeping bags, and other layers; and drink fluids—warm liquids are preferred, but the priority is on drinking any liquids to help rehydrate the body.
What should I do if I’m caught in a thunderstorm?
If you’re caught outside in a thunderstorm, your main objective is to find natural shelter from lightning: if you’re on a ridge or exposed summit, make your way to lower ground as fast as you can (but carefully). Find a low spot in a valley, or find a cluster of trees to take shelter under (but don’t ever take shelter under a single tree standing by itself). Get away from water sources like lakes, ponds, and creeks—and if you’re swimming in water, get out of the water immediately. Don’t try to set up a tent—although it will give you shelter from the rain, the poles can conduct electricity and make you a target for lightning. If you’re carrying any metal objects that might attract lightning, take them off; this includes trekking poles, ice axes, tent poles, and crampons. Minimize your contact with the ground: squat on a foam pad or sit on your backpack with your knees pulled up to your chest and your feet resting on the pack. This will insulate you from ground currents caused by lightning hitting the surface or a nearby tree. Wait out the storm before moving on.
How do I know if a snow slope might avalanche?
Avalanches, like weather, are the subject of books, classes, studies, and frequent monitoring in mountainous regions. There are no simple rules that can tell you which slope might slide and which slope won’t slide, but a few things can help you understand avalanches and mitigate your risk.
• Most avalanches occur on slopes steeper than 30 degrees—and of course, slopes steeper than 30 degrees are what we like to ski and snowboard.
• If you’re traveling on a slope measuring 30 degrees or less, a steeper slope above can still avalanche and hit you.
• Avalanche risk is greatest within the twenty-four hours after a storm drops twelve or more inches of snow.
• In nine out of ten avalanche accidents involving humans, the victim or someone in the victim’s party unintentionally set off the slide.
• Just because one person, or twenty people, walked or skied across a slope and it didn’t avalanche doesn’t mean it won’t avalanche when you walk or ski across it. Generally, staying on marked ski runs and on popular snowshoe trails will keep you out of harm’s way.
If you’re on a hike and there’s a spot where you have to cross a river or creek without a bridge, it might be the most dangerous part of your trip. A river that looks calm from the bank can surprise you with the amount of force it pushes against your legs once you’re in the middle of it, so don’t underestimate the power of rushing water. Here are a few tips for safe passage.
• If you’re wearing a backpack, unbuckle the waist belt and sternum strap. If you fall in while crossing, ditch your pack and worry about it later. Dozens of hikers have drowned when a backpack took on water and dragged them under the current.
• Don’t try to cross water more than knee-deep.
• Cross at the widest part of the river—the current is stronger where the river has to funnel through narrow passages.
• Look upstream but cross at an angle that points slightly downstream.
• Use trekking poles for balance, pushing their tips under the water down into the riverbed.
• Move slowly. Don’t be in a hurry, and move your legs with purpose—stay in balance first and make progress second.

How do I avoid being caught in a flash flood?
In the desert, especially in the American Southwest, flash floods occur when rain falls and funnels into the tributaries of a canyon, growing and building until it pulses through a narrow passage in a 5-, 6- or even 20-foot-tall wave of water, dirt, and debris with massive force, obliterating anything in its way (except the canyon walls, usually). If you’re standing in a narrow canyon or slot canyon and it’s raining 15 miles away, a wall of water can build in a matter of minutes, pushing rocks, trees, and logs with it—you might see a 3-inch-deep stream of water come from up canyon and two minutes later it could be a wave 6 feet high that rips you off your feet and drags you down the canyon. Flash floods are serious and scary and can kill you. To stay safe, know the weather forecast where you’re going, especially during the desert monsoon season of May through October. If there’s a chance of rain in the forecast, don’t venture into narrow canyons. If you’re camping in a canyon, camp on high ground so you’re not surprised in the night by a flash flood. If you can see thunderhead clouds in your area when you start the hike, change your plans—once you’re in a canyon, it may be hard to see weather forming, and as previously stated, you may not even see the storm 15 miles away that causes the flash flood in your canyon.
How do I know if I’m dehydrated?
If you’re dizzy or lightheaded when on a trail, it might be because you’re getting seriously dehydrated. Try to remember the last time you stopped for a bathroom break, and if it’s been hours and you’re feeling slightly lightheaded, you’re probably dehydrated, so drink some fluids. As you hike, when you stop to pee, always check the color of your urine—if it’s yellow, you’re starting to get dehydrated. If you’re drinking enough fluids your urine should be clear or the color of lemonade. If it’s not, drink more water. Remember that your body can process only a maximum of 32 ounces of water per hour, so don’t chug a liter and a half of water if you notice your urine is yellow—sip it gradually for a few minutes.
If you know you’re going to be hiking or spending all day being active, it might be a good idea to skip that second cup of coffee in the morning—coffee is a diuretic and dehydrates you, so if you drink a lot of coffee, you’re setting yourself back a step before you’ve even left the house. The same is the case if you decide to drink five or six beers the night before and you go to bed dehydrated, then wake up thirsty and peeing dark yellow. You’ll have a tough time hydrating yourself, especially if you drink a couple cups of coffee to get things going in the morning too.
What do I do if I run out of water in the backcountry?
Always keep an eye on the amount of water you have in your bottles and how much water you’re drinking compared to how much terrain you have to cover until your next water source (or, if you’re day-hiking, until you get back to the car). If you’re starting to run low on water and you still have a few miles to hike until you get back to the trailhead, don’t panic—remember, you don’t need to be sipping water right up until the moment you step off the trail and into the parking lot. Your body will be just fine walking a couple of miles without water (especially if you have some extra water in the car or can drive a few minutes to a place where you can get some water). It’s also a good idea to keep a small supply of iodine tablets in your backpack, just in case you do run out of water—you can refill your bottles in a stream or lake and purify them with your iodine tabs so you’ll have drinkable water in half an hour. If you do run out of water far in the backcountry and have no purification options available, it’s better to keep hydrated by drinking untreated water than it is to go without water because you’re worried about catching something from untreated water. Giardia, for example, one of the more common parasites people pick up from drinking untreated water in the backcountry, usually takes weeks to form in your gut—whereas dehydration can kill you in a matter of days. You need to keep moving to get home, so to stay hydrated, drink the untreated water, and worry about the side effects later.
Can I get water by cutting open a cactus or digging in sand?
Survivalist Bear Grylls famously has squeezed elephant dung to get water out of it, which is a neat trick but may not be that sustainable if you’re really thirsty. Plus, the water tastes like crap, or so we’ve heard. The techniques of digging in sand for water and cutting open a cactus are fairly dubious in emergency situations. If you’re already running low on fluids, digging in sand is unlikely to yield enough water to make it worth your effort, and cutting open a cactus is the same—also, if you cut open a cactus for its water, it’s likely to be in an acidic or bitter state that might not agree with your stomach, causing further dehydration. Plus, cutting open a cactus isn’t the easiest thing in the world, and you’re pretty likely to get some spines stuck in your hands—talk about more trouble than it’s worth. For better options, see here.
Can I drink my own urine in an emergency situation?
This is a free country. You can drink your own urine in any situation, emergency or not. But for survival purposes? It’s not very effective. If you run out of water, you can drink your urine once, maybe twice, but remember, your body peed that urine out the first time because it is a waste product, and now you’re forcing your body to deal with those waste products again, and it has to work harder each time as your urine becomes darker and darker—and more disgusting to drink. That said, if you’re stumbling back to the trailhead, haven’t had water in hours, and can’t find a nearby creek or pond, a little dose of urine might get you those last few miles back to your car—if you can actually pee enough to drink. Bon appétit.
Should I eat snow if I’m thirsty?
You already know not to eat yellow snow. But it’s also true that you shouldn’t eat snow of any color—white or otherwise—to try to rehydrate yourself. Although eating snow doesn’t directly dehydrate you, your body has to use a lot of energy to melt it and warm it to a temperature where it can use it. If you’re hiking or camping in cold temperatures, eating snow can make your body hypothermic, which will dehydrate you further. So eating snow, while something you might have done as a little kid and fondly remember as a sort of flavorless sno-cone, isn’t a good policy in the wintertime for survival purposes. In an emergency, you can melt snow in a pot on a backpacking stove, heat it until boiling (to purify it), and then drink it.
Should I carry a personal locator beacon?
If you are going somewhere where cell phones don’t work, and you’re unlikely to encounter other people, and you’ll be far from the nearest road or town, a personal locator beacon is a good idea—especially if you’re venturing into the wilderness by yourself. Even if you’re going on a trip with another person, consider how far you or your partner would have to go to get help in case of a broken bone or other injury or medical emergency. If you’re hiking 20 miles into the wilderness from a trailhead that’s a two-hour drive from the nearest town or cell phone service, and you break your ankle on a rock, your friend will have to hike, at best, six or seven hours and drive two hours just to get help—and then the help has to come find and rescue you. With a personal locator beacon, you can push a button and start the rescue process as soon as you break your ankle. Obviously personal locator beacons should be used only for real emergencies and you should never call for a rescue if you’re tired, or if you run out of the snack mix you like so much, or if you’re not really having fun anymore. But a beacon can save your life in an emergency. Note: A personal locator beacon is not the same thing as an avalanche beacon. If you’re spending time in avalanche terrain, you’ll need an avalanche beacon. A personal locator beacon enables emergency rescue crews to find you using a locator signal. An avalanche beacon sends a signal that can be picked up only by someone nearby who has an avalanche beacon too—that is, the friends you’re skiing or snowshoeing with.
How do I get rescued?
Before you leave the trailhead, riverbank, or lakeshore, know your options. If you’ll have cell phone reception where you’re going, that’s your best bet. If you won’t have cell phone coverage, carry a personal locator beacon (see opposite) or satellite phone and know how to use it. If you’re going someplace where a cell phone won’t work and you won’t be carrying a personal locator beacon or satellite phone, let someone know what your plans are before you leave (see here).
When something happens that requires a rescue, consider alternatives before you take action (because even if you have a cell phone in your hand, a rescue will take a long time and will mobilize ten or more people, most of whom are volunteering for the job out of the goodness of their hearts). For example, can you walk out on that sprained ankle, even if it’s painful? Are you really starving to death or dying of thirst? (see here).
If rescue is your only option, figure out your location as accurately as you can. GPS coordinates are great, but if you don’t have a GPS, knowing how far you are along a trail (in miles or in hours of hiking) or how close you are to a certain lake can help a rescue go much more quickly. Call 911 using your cell phone or satellite phone, or activate your emergency locator beacon. If you can’t make a phone call, send a text message with as many details as possible to an emergency contact and ask them to call 911.
Once you’ve called or signaled for a rescue, try to get to an open area and spread out bright clothing or your tent, and if it’s safe to do so, build a fire. These things can all help a rescue helicopter or passing aircraft spot you. If you do see a helicopter and can stand up, hold both arms over your head so your body forms a Y—this means “Yes, I need a rescue”; one arm over your head means “No, I don’t need a rescue.”
How do I survive an unplanned night outside?
For one reason or another—you’re lost, the climb or hike took way longer than you thought, you forgot to bring your headlamp, you took a wrong turn—it’s getting dark and you have the sinking feeling you’re going to have to stay out in the backcountry for the night. It’s not the end of the world, and it’s happened to many people who came out of the situation with no more than a good story to tell. There’s one thing that can make your unplanned night out much more comfortable, and that’s an emergency blanket—a four-dollar, 3-ounce sheet that takes up almost no space in your backpack but will take up a huge space in your heart if you ever have to use it.
So if it’s getting dark and there’s no way you’re making it back home tonight, first thing, stay calm. Second thing: stay put. If you got lost in the dimming light of dusk, you’re not going to do yourself any favors by wandering around in the dark. Then get out of the wind, find a comfortable spot, and figure out how you’re going to spend the hours before the sun comes back up. If it’s raining or going to rain, try to find some shelter—a rock outcropping doesn’t have to be deep to help shield you from the rain, and if you can’t find one, look for a partially downed tree you can lean some branches against and hide under. Is there a spot where you can build a small fire? If so, do it. If you don’t have an emergency blanket with you, a fire is your best hope to stay warm through the night. If it’s winter, you’ll want to dig a snow cave (see here). Once you’re set up for the night, have some food and water—your body has more of a need for the calories in your remaining food during a cold night than it will in the morning.
Should I carry my wallet in the backcountry?
You’re probably not going to need to carry a credit card if you’re going into the backcountry, but if you’re worried about your car being broken into at the trailhead, it’s not a bad idea to keep your wallet in your backpack. If you’re the type of person who has a 2-inch-thick George Costanza wallet, thin it out before you leave the house and bring just your driver’s license, credit card, and some cash, so you’re not hauling an extra 6 ounces the entire time you’re on the trail. Or just clean out your wallet, for heaven’s sake.
Even if you’re not worried about your car being broken into at the trailhead, it’s good to keep your driver’s license or ID and your health insurance card in your pocket or in your backpack as you hike. If you for some reason become unconscious (from a fall, heart attack, etc.) and passing hikers find you, they’ll be able to identify you when emergency personnel arrive to take you to a hospital.
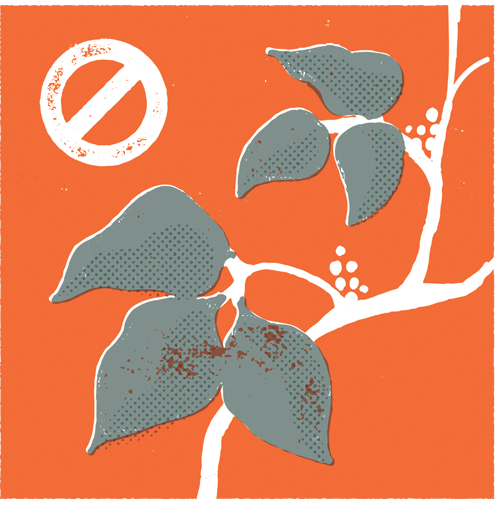
What does poison ivy look like?
The old saying “Leaves of three, let it be” has helped many hikers avoid the itchy burning of a poison ivy skin reaction, and it’s still a good rule to remember: poison ivy plants are green and have leaves that grow in clusters of three (not a three-tipped leaf). Poison ivy leaves are pointed at their tips. Poison oak grows on the Pacific and Atlantic coasts in North America, and also can be identified by its three-leaved leaflets, which, unlike poison ivy, have scalloped edges. Poison sumac grows in very wet soils, and can be identified by its compound leaves that have seven to thirteen leaflets, each of which grow from red veins.
If you are exposed to poison ivy or think you might have been, wash the areas of your skin with liquid dishwashing detergent; apply it directly to your skin to remove the oils from the poison ivy plant and then rinse it off. Wash your hands first before rubbing them onto other areas of your body, because you can easily spread the poison ivy oil from your hands to other skin areas. If your clothes brushed poison ivy plants, wash them as soon as you can, and if you are in a situation where you can’t wash them, put them in a plastic bag before storing them with other clothes.
If needed, apply poison ivy treatments such as hydrocortisone creams or calamine lotion to your skin. If the itching is persistent, over-the-counter antihistamines like Benadryl can help ease your discomfort.
How do I remove cactus spines?
Finding cactus spines in your skin is about as fun as finding a wood splinter in your skin—they’re painful and seem to snag on everything. You’ll want to remove cactus spines as soon as possible. If you have a piece of cactus, like a bulb of cholla, stuck to your skin, don’t grab it with your hand to pull it away—have a friend grab two sticks to pull it off for you. And then it’s time to remove the spines. Removal depends on the size of the cactus spine (or spines) embedded in your skin. You’ll want to pull out very large spines with pliers; for thinner spines, tweezers are more effective. For glochids, the tiny spines that look like small fine hairs, you’ll need a piece of gauze and a tube of white glue (the kind you used in elementary school). Spread a layer of the glue all over the affected area, and gently smooth the sheet of gauze over it. Wait for the glue to dry (ten to fifteen minutes), and peel the sheet of gauze and the glue off slowly. The glochids should come out with the glue/gauze. If there are still some remaining, pull them out with tweezers, or do a second glue/gauze application.

If I get lost for several days, what’s more important, finding food or water?
The conventional wisdom is that you can live for three weeks without food but only three days without water (and of course every situation will be different and may not be exactly three weeks/three days; see here). Unless you have spectacularly low body fat (i.e., you can see your oblique muscles), your body will be able to work off its fat stores (and in extreme conditions your muscles) for a long time—but it won’t be able to do so without water. Food, in the places most people go backpacking and climbing, will probably take more effort to find than it’s worth, calorie-wise—unless you’re an expert at hunting and skinning animals with a pocketknife or have a gift for foraging and mushroom hunting. Find water first, and if you can purify it, do so. If you can’t purify it, worry about potential parasites later, and get hydrated now.
What is snow blindness?
Snow blindness is temporary blindness caused by overexposure to UV rays from the sun. It’s actually—as painful as this sounds—a sunburned cornea. High-altitude mountaineers and skiers are at risk for snow blindness, especially when they spend long periods of time crossing snowfields or glaciers. The sunlight coming from above reflects off the snow and bounces upward, doubly exposing the eyes to the UV rays. Judicious use of glacier glasses, specially darkened sunglasses with full eye coverage, is the best defense against snow blindness. If you’re spending a lot of time on snow or glaciers, it’s best to use a pair of glacier glasses and carry a pair of regular sunglasses or ski goggles as a backup just in case you lose your glacier glasses.
What’s windburn?
In most cases, windburn will feel just like sunburn, and it can even look like it. You’ll have red dry skin that hurts when you wrinkle or scratch it. Windburn can happen anytime your skin is exposed to cold, dry winds for a long period of time. The good news is, windburn doesn’t usually last as long as a sunburn—your skin will recover faster. To prevent it, wear sunscreen on exposed skin (even if it isn’t sunny), and use lip balm to protect your lips and around your nostrils. If you’re out all day in the wind, reapply sunscreen often, just as you would if you were outside in the sun for several hours. If you do get windburn, apply lotion to the affected area when you get home. In extreme cases, lotion or gel containing aloe can help soothe painful areas.
How do I avoid ticks?
Ticks are about as fun to find as parking tickets, and like parking tickets they will often show up even after you think you’ve done everything right. Ticks can drop off tree branches onto you or hop onto your clothes or skin as you pass through tall brush or grasses on a slightly overgrown trail. If you’re venturing into an area that has ticks, wear a hat (a brimmed hat is best), pants, and a long-sleeve shirt. Spray your skin with an insect repellent with DEET, and spray your clothing and shoes with a repellent containing permethrin. After your time outdoors, do a thorough tick check of your entire body—yes, everywhere, including your groin and armpits. Ticks can imperceptibly creep around under your clothes for minutes or hours before burrowing into (or more ideally, falling off) your skin. A mirror or cell phone camera can help with your post-hike inspection. Have a friend thoroughly check your hair and scalp.
What do I do if I find an embedded tick in my skin?
You may have heard of tick removal strategies such as using a match or a lighter to get a tick to back out of your skin, or painting a tick with Vaseline or nail polish to suffocate it, or any number of things that just annoy the tick and force it to dig itself deeper in. If you find a tick that’s burrowed its way into your skin, get tweezers and grab the tick as close to your skin as possible, and pull with even pressure straight out (lengthwise along the tick’s body, or from the mouth toward its rear end). Don’t pull with jerky motions—it shouldn’t be that hard to remove, and if you yank it you could break off its mouth parts in your skin. If you do accidentally leave its mouth parts in your skin, do your best to get them out with tweezers. Swab the area with rubbing alcohol or soap and water, and place the tick in a plastic bag or other sealed container in the trash (don’t crush it with your bare fingers).

Is it possible to drink too much water?
It is possible to drink too much water and cause hyponatremia—a condition in which the level of sodium in the blood is too low, causing cells to swell. It can be dangerous and has even been fatal in some cases. Exercise-associated hyponatremia happens when athletes drink too much water over a long period of time—for example, a long day of hiking in the Grand Canyon—and the body can’t keep up and is unable to get rid of the excess water through sweating and urination. Symptoms include headaches, nausea, vomiting, and confusion. Hyponatremia is rare, but it can happen. To prevent it, drink if you’re thirsty, drink more at high altitudes, and if you’re sweating a lot (on a hot day in the desert, for example), consider adding electrolyte drink mix to one of your water bottles—this will supply your body with enough electrolytes to stay in balance as opposed to flushing them out by drinking too much plain water.
How do I know when to bail?
Although it’s disappointing to abort a backpacking or climbing trip and retreat to civilization to sulk over a cheeseburger and a beer, it’s far better than pushing your luck and never getting to eat a cheeseburger or drink a beer again. All kinds of things happen when you’re experiencing the outdoors—bad weather moves in, partners get injured, equipment fails (and sometimes you say it “failed,” but the truth is you actually broke it), and people get sick. Sometimes a combination of a bunch of factors adds up to you realizing that continuing the trip won’t actually be fun and you have to call it quits. Bailing is okay—it happens to everyone, and the more adventures you go on, the more often you’ll have to bail because something wasn’t quite right. In all situations, trust your gut, talk to your partners, and make a decision. The trip can always be rescheduled next week or next year; you can come back and try again.
Ten Classic Survival Books Everyone Should Read
1. Touching the Void, by Joe Simpson (1988)
2. Endurance: Shackleton’s Incredible Voyage, by Alfred Lansing (1959)
3. Adrift: Seventy-Six Days Lost at Sea, by Steven Callahan (1986)
4. Alive: The Story of the Andes Survivors, by Piers Paul Read (1974)
5. Between a Rock and a Hard Place, by Aron Ralston (2004)
6. The Long Walk: The True Story of a Trek to Freedom, by Slavomir Rawicz (1956)
7. Minus 148 Degrees: First Winter Ascent of Mount McKinley, by Art Davidson (1969)
8. The Worst Journey in the World, by Apsley Cherry-Garrard (1922)
9. The Journals of Lewis and Clark, by Meriwether Lewis (1814)
10. K2: The Savage Mountain, by Charley Houston and Robert Bates (1954)