5
Back-country

Sleeping on the ground will never be quite as comfortable as sleeping in a bed indoors—but if you can learn to love it, camping out has many side benefits: great views of the sunset and sunrise, campfire conversations, an unobstructed look at the stars in the middle of the night, and the unique satisfaction of sipping from a mug of hot coffee the morning after a chilly night spent in a sleeping bag. Knowing a few basic skills and tips can make a night outside more comfortable so you don’t feel as though you’re roughing it.
This chapter will give you a sense of where to camp, how to find a good campsite, the gear you need, what to eat and how to cook it, how to light a campfire (and more important, how to put it out), how to pitch a tent, and everything you need to plan your first camping or backpacking trip. Follow these tips and you’ll find that sleeping in a tent is like staying in a million-star hotel.
Why should I try backpacking?
Backpacking can definitely seem like a lot of work. After all, you’re carrying everything you need for a few days and nights on your back, and that can be pretty heavy to haul around steep trails for miles and miles. And, of course, there are no bathrooms or electricity in the backcountry. But if you’re the type of person who believes all good things come at a price, it’s worth it. What you trade in comfort you get back in solitude and scenery: statistics show the majority of national park visitors never get more than a mile from their cars, and if you’re willing to put in a little sweat equity and carry your tent, sleeping bag, and food into the backcountry, you’ll be rewarded with an escape from people—and likely a great view of an alpine lake or mountains, or a secluded forest campsite. If you’re interested in hiking and you’re interested in camping, backpacking combines both: simply put, you’re just hiking to your campsite.
Where can I go camping?
There are two basic designations for camping: campgrounds and dispersed camping (see here).
Developed campgrounds include privately owned campgrounds and RV parks, national park campgrounds, state park campgrounds, county park campgrounds, municipal campgrounds, US Forest Service campgrounds, and Bureau of Land Management campgrounds. Almost all developed campgrounds charge a fee per night of usage, from five dollars to forty dollars. Generally, developed campgrounds will have—at minimum—established campsites, fire rings, picnic tables, water spigots, and bathrooms or vault toilets. Some developed campgrounds have amenities like bathrooms with running water and electricity (and sometimes showers), trash receptacles, grills, campground staff, and even laundry.
Dispersed camping is a term for primitive camping that’s allowed anywhere on public land managed by the US Forest Service or the Bureau of Land Management. Dispersed camping covers both car camping and backpacking or backcountry camping—as long as you can get your stuff there, you can sleep there. Dispersed camping is entirely without the amenities and infrastructure of developed campgrounds—for example, you might find a flat spot with a fire ring just off the side of a dirt road on Forest Service land, or you might backpack two or three miles from a trailhead on Bureau of Land Management land and pitch your tent in a flat spot.
When using a dispersed camping site (or creating your own), you are expected to take all trash with you and bury human waste.
Can I camp next to a river or lake?
You can camp near a river or lake, but it’s bad form to camp right next to it (even if you really, really, really want to take a photo of your tent next to a lake for Instagram). To protect the area for future users (remember, someone protected it for you), camp at least 200 feet from a water source. You don’t have to be exact, just respectful: walk about seventy-five big steps from the edge of a lake (that’s roughly 200 feet) and find a spot near there, or better yet, find an existing campsite and use that.

How do I find a campsite in the backcountry?
When you’re backpacking, finding a place to sleep isn’t quite as simple as pulling off the freeway at the next motel or Googling “hotel” on your smartphone—but it’s pretty easy. You’re going to need water to cook breakfast and dinner, so the most logical place to camp is near water—luckily for you, most other people who have gone backpacking before you are just like you, so they’ve probably established campsites near water sources. When planning your trip, look at the map and figure out a few possible goals for your first night, based on how far you can reasonably hike (whether that’s 2 miles or 10 miles). Lakes and ponds are the easiest places to find campsites, as there’s usually flat land somewhere nearby. Creeks and rivers are also good water sources but sometimes don’t reliably have flat spots nearby—the blue line signifying a creek on your map can be pinched in a steep gully, with nowhere nearby to pitch a tent. But if the contour lines on your topographic map are far apart near a creek, there’s a good chance there’s some flat land.
Hike to your water source—again, a lake or pond is your safest bet—and when you arrive, explore the perimeter of the water for established campsites—they should be about 200 feet away from the water’s edge and should have one or more flat spots free of vegetation where tents have been pitched in the past (and where you can pitch your tent). It’s best to use established campsites for a couple reasons: it minimizes damage to the area, and it’s easy—you don’t have to stamp down grass and pull out rocks to clear a spot for your tent. Additionally, if you’re lucky, someone has pulled a downed tree over to the campsite and made it into a good bench for you to sit on while you’re emptying your pack and/or cooking dinner.
In a pinch, of course, you can camp somewhere not near a water source, but remember, the only water you’ll have to make dinner and breakfast (and coffee!) is what you’ve got in your backpack, so plan wisely.
How can I tell if a spot is flat enough to sleep on?
You’ll never find a spot in the backcountry that’s truly flat, not in the way you can measure with a carpenter’s level when you’re working on your house. If you think a spot looks flat, it’s probably pretty close. One trick that will help: Before you set up your tent only to find out it’s slanted downhill at an unacceptable angle, lie down in the exact space where you’re going to put your tent. If it feels too tilted, find another spot. If you think it might be okay but you’re not sure, go ahead and set up your tent but don’t stake it down. Set it in the exact spot, and if it looks tilted too much, try turning it or moving it to the right or left a little bit—the visual will help you decide. If you’re still not sure, unzip the door and get in the tent and lie down—if you’re sliding (even a little bit) in one direction or another, it will probably be a pretty miserable spot. Look for a better spot nearby, and if you can carry your tent over to the new spot without breaking it down, go for it.
How close to someone else’s campsite can I set up my tent?
It’s safe to assume—unless the person indicates otherwise—that everyone you see in the backcountry has gone there to get away from people. A person may be friendly and chatty when he sees you on the trail, but unless he specifically invites you to camp right next to him, it’s probably better to keep your distance. If at all possible, set up your tent out of sight from other tents, and if that’s not possible, give the other tents 150 feet or so of space. If you’re in doubt, it never hurts to ask before you put up your tent, with a simple “Would it be okay with you if I set up camp over here?” Most people aren’t territorial about campsites or interested in hogging the view of an alpine lake—but it’s courteous to ask first.
Is it okay to listen to music at my campsite?
It’s okay to listen to music at your campsite, with a couple of caveats: be aware of how close the next campsite is, and whether there are people camping there who may or may not like to listen to your EDM all night—or really at all. Most people head to the backcountry to escape noise, and although it might be hard to imagine, plenty of people have different musical tastes than you do and might find your choice of dinner music undesirable. But if you don’t have close neighbors at your campsite, there’s no reason you can’t listen to some music. Just make sure it’s not reaching everyone else at the campground. After you turn on the music, take a walk away from your campsite and see if you can hear the tunes from other spots in the campground, especially near other people’s campsites. If not, you’re probably okay. If you can hear it, the courteous move is to turn the music down (or off). Just remember not to mess with the volume after you’ve had a beer or three, because obviously your judgment will be altered somewhat. Whatever you do, try not to be that person that everyone in the campground hates.
How do I light a campfire?
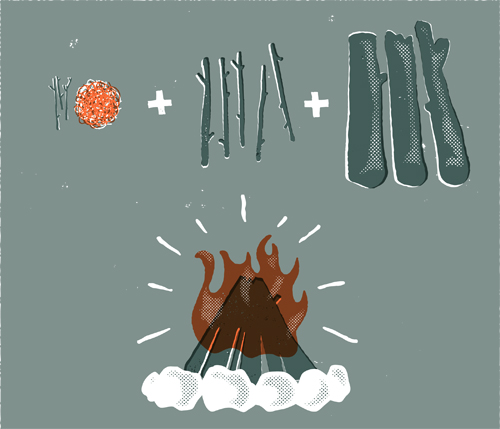
First, build a fire ring or find an existing fire ring near your campsite to keep the fire from getting out of control. A dozen or so fist-sized rocks should be enough for a fire for two people, and double that number for three or four people. The diameter of your fire ring shouldn’t be bigger than about 2 feet—you are building it to stay warm while camping for an evening, not roasting a whole pig over it. There are three components to a campfire.
1. Tinder: Has to be dry, has to catch fire easily, and will burn quickly (so grab a lot of it). Dry green cottony fungi works, as do dry leaves, dead grass, small shards of leftover firewood (often easily found surrounding campfire rings at campgrounds), dry bark found around downed trees, and wood shavings (which you can whittle and/or splinter off your fuel wood).
2. Kindling: Imagine your fire having to work its way up to big chunks of wood. It has to burn the small stuff first (the tinder), then medium-sized stuff, which is the kindling: pinky-diameter or smaller pieces of wood. Again, your kindling has to be dry or it won’t burn. So don’t go snapping small branches off live trees. Look for downed trees or broken-off branches, and gather a bunch—two large fistfuls or more.
3. Fuel wood: Fuel wood is wood that will burn hot and long once you’ve gotten your actual fire going. When gathering wood, look for pieces the diameter of your wrist or bigger. Don’t go too big—you’re not looking for a Yule log. Grab a few pieces that are wrist sized and some bigger than that. Look for dry wood.
Now, imagine a fire having to climb up stairs—the first step is the tinder, the second one is the kindling, and the third step is your fuel wood. Place the tinder and kindling in the shape of a teepee: tinder on the bottom and the kindling on top of that in a small teepee—twigs and sticks balanced against each other in a cone shape, with enough space in between the twigs so that air can move through the teepee, and enough space on a few sides that you can reach the tinder with a lighter or lit match. Once you’ve got a good teepee of tinder and kindling, light the tinder in three or four spots. Watch closely to see if the fire is spreading from the tinder to the kindling—gently blow on it from a few directions to help it get oxygen. When blowing on the fire, don’t be afraid to get close—down on all fours, face close to the ground. Once you’re convinced the fire is taking to the kindling, start to put on your fuel wood—again, build a teepee, and start with your smallest-diameter fuel wood. As the small fuel wood starts to burn, go ahead and add the larger-diameter fuel wood.
At some point, your teepee will probably collapse on itself—don’t sweat it, just make sure that when you add wood you arrange it so the wood can get some oxygen on the bottom as it burns. Lay pieces of wood at angles on each other, and keep a stick handy to adjust wood in the fire as it burns to keep oxygen flowing through it.
Should I carry matches or a lighter?
It’s really a matter of personal preference, but the best thing to take to light a fire is actually two things: matches and a lighter, or two lighters. Unless you’ve got a 100 percent reliable lighter, either matches or a lighter can fail (or just be impossible to light in certain windy or rainy conditions), and then you’re without a fire for the night—unless you’ve mastered making a fire without ignition. With both matches and lighters, make sure they’re in a waterproof container, because even getting them damp can make them impossible to light. A prescription pill container can work as a carrying case, or a sturdy ziplock bag (just make sure it doesn’t get holes poked in it as it starts to rack up the miles riding inside your backpack). Outdoor gear stores usually sell several types of waterproof or “light anywhere” matches, which can be nice but are often unnecessary—a book of matches from a restaurant or bar is usually fine as long as you keep it dry.
Can I make a fire on a rainy day?
A few sprinkles or even a major downpour doesn’t have to put the kibosh on having a campfire. If it’s just sprinkling intermittently, your campfire might not get wet enough to go out, so light it and see what happens. If it’s going to downpour, you have two issues to deal with: finding dry wood and keeping your fire from getting soaked. If there’s a lot of rain in the forecast for your camping weekend, consider bringing a tarp and lots of cord to string up a shelter to keep your fire from the rain. Remember, heat rises, so when you’re stringing up a tarp above where your fire will be, give the fire some respect and distance so it doesn’t burn through the middle of your tarp. Anchor the tarp to four trees, making sure it’s taut so rainwater won’t gather in the middle of the tarp and weigh it down, and slightly angled so the rain will drip off one edge of the tarp. If the tarp is roughly 7 or 8 feet above the ground, it should be high enough that it won’t be in danger of getting burned by the fire, as long as you’re not building a ridiculously large fire. If you’re buying a tarp specifically for the purpose of sheltering a campfire, take into account the fact that you and your friends will probably want to stand or sit around the fire, and ideally you’ll be out of the rain too—so get a tarp big enough to cover both the fire and a circle of chairs around it (15 by 15 feet should be big enough for a group of up to six people). And don’t forget the dry wood—keep it in, or underneath, your car, or if you have enough space under your tarp keep a stash there.
How big should my campfire be?
It’s fun to make big fires—just admit it. But a big fire is unnecessary unless you’re trying to keep twenty-five people warm, which you’re probably not. On a camping trip, make your fire size proportional to the number of people in your group. If everyone’s huddling around the fire, it’s a little too small. If you find everyone keeps scooting his or her chair back away from the fire because of the heat, it’s too big. And remember, unless you brought a trunk full of firewood, the fire lasts only as long as the supply of wood lasts. So keep your campfire as small as comfortably possible, and you’ll be able to sit around your caveman TV much later into the evening.
Should I burn my garbage?
Although throwing your garbage in a campfire to get rid of it might seem like a good idea (then you won’t have to carry it out, right?), you’ll probably find that most of your backpacking garbage doesn’t burn well and you won’t be saving that much weight either. Plastic food bags and energy bar wrappers don’t weigh that much after they’ve been emptied, so it’s best to just bring them out with you. Don’t attempt to burn aluminum foil in a campfire either—it never completely burns, and it leaves pieces of aluminum in the ashes, which eventually blow all over the forest and spread trash everywhere. A 1-gallon ziplock bag should fit a week’s worth of trash on a backcountry trip.
Devote a little energy to minimizing trash when you’re packing your food before your trip—get rid of cardboard boxes and put things in plastic bags whenever possible. That box of macaroni and cheese will take up less space in your pack if you transfer it into a plastic bag before the trip, and it will be in less danger of bursting open inside your pack and spilling everywhere.
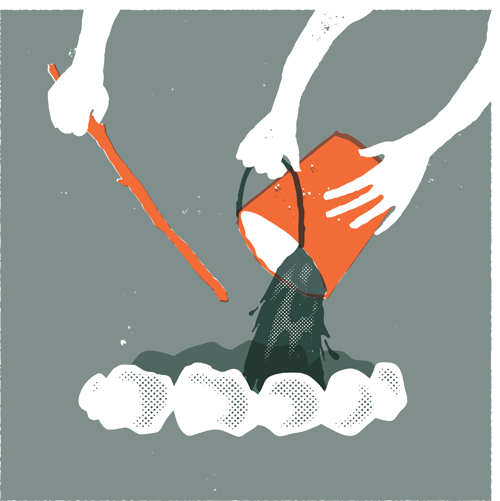
How do I put out my campfire?
Smokey Bear will tell you to make sure you put your campfire out every time, for good reason: some of the most catastrophic forest fires in the past few decades have been human caused (some intentional, some unintentional). To make sure your fire is completely out, break up any still-hot coals into smaller pieces (use a stick so you don’t burn your hands), spread them around the fire ring, and then pour water on the coals to make sure they’re completely out. If you’re conserving water, you can pee on the coals, but be warned: urine on hot campfire coals produces a pretty bad smell. Another good policy: Be careful not to put a large piece of firewood on the fire as things at camp are winding down for the night. You don’t want to be the last person up waiting by yourself for that thing to burn down, and it’s an amateur move to leave a big piece of unburned wood in a campfire ring for the next party to find.
Is it okay to leave apple cores and banana peels on the trail?
Fruit is biodegradable, so it’s okay to leave it on the trail, right? Yes, it’s biodegradable, but no, it’s not okay to leave it out where you’re hiking. Orange peels and apple cores take six months to decompose in the outdoors, and banana peels take up to two years—and they don’t exactly blend in with the natural environment when you toss them off to the side of the trail. So keep a small trash bag in your pack and carry everything out with you.
The Eight Backpacking Trips of a Lifetime
1. Grand Canyon Rim-to-Rim, Arizona, USA: A three-day backpacking trip down to the bottom of the Grand Canyon and up the other side
2. John Muir Trail, California, USA: A classic twenty-one-day trek across the Sierra Nevada, including Yosemite
3. Inca Trail, Peru: A four- to five-day trek to the fifteenth-century Inca dwelling of Machu Picchu
4. Routeburn Track, New Zealand: The premier mountain hut–to–mountain hut hiking route in the mountains of New Zealand’s south island
5. Hiker’s Haute Route, France/Switzerland: The famous hut-to-hut hiking route across the Alps connecting the famous mountain towns of Chamonix and Zermatt
6. Alta Via 1: The weeklong hut-to-hut trek across the Italian Dolomites
7. Everest Base Camp: A ten- to fourteen-day trek through the giant mountains of the Himalayas to the base camp for Everest climbers, elevation 17,600 feet
8. Torres del Paine trek, Chile: A five-day trek through the famous granite spires of Patagonia
What do I need to go car camping?
Car camping is the most beginner-friendly type of tent camping—you can pretty much take whatever you want, as long as it fits in the vehicle you’re driving to the campground. And you don’t need the highest-tech or most expensive gear to do it. Here are the basics.
• Stove: You can, of course, choose to cook over an open campfire, but it usually leaves your pots and pans coated in a layer of black soot, and a fire is tougher to keep at a consistent temperature, so stoves are easier and more reliable. Most department stores with a sports section sell camping stoves that work great. If you think you might like to try backpacking, buy a one-burner stove—it will work for car camping and also for backpacking (because there’s no way you’ll haul a big two-burner stove anywhere in a backpack). With the stove, you’ll also need fuel, so be sure to buy the corresponding fuel to whichever stove you buy (propane or isobutane, usually).
• Pots: If you don’t want to spend money on specific camping pots and pans (usually you’ll only use one or two pots, or a pot and a pan, when you go camping), just grab a pot or two from your kitchen and toss it in your car—as long as it isn’t a precious gift from your deceased grandmother and you can’t bear to think of getting it dirty or scratching it while camping. If you do want to buy pots, consider getting a set in which a smaller pot rests inside a bigger pot—these sets are great for packing and are also ideal if you decide later to try backpacking.
• Flatware: Again, your flatware from your kitchen at home will work just fine. Or you can buy a set of plastic/Lexan spoons and forks from an outdoor store for a couple dollars. Just don’t forget to bring some, or you’ll be eating your pasta with your fingers.
• Plates and/or bowls: The plates and bowls you have at home are probably breakable and not designed to handle a bumpy car ride or much abuse in the outdoors, so it’s best to buy some hard plastic, steel, or titanium bowls and/or plates made for camping. If you’re choosing between plates or bowls, bowls are usually more versatile for camp food (you can eat oatmeal out of a bowl but not off a plate, for example).
• Food: Generally, if you can cook it in a pot or pan, you can cook it while camping. You won’t have an oven, so things like lasagna and cookies are probably out. But everything else is fair game: hot dogs cooked over the fire, pasta dishes, soups, oatmeal, pancakes, and even tacos are great camping meals. If you’re nervous about what to cook, bring something simple that cooks in a single pot, like macaroni and cheese.
• Water/water container: Many campgrounds have running water, but it’s not that likely that the water pump will be right next to your campsite. It’s good to have a 3- to 7-gallon jug in your car that you can either bring filled with tap water from home or fill at the campground—you’ll be doing lots of cooking, washing dishes, and washing hands, and you’ll probably use more water than you think.
• Coffee-making apparatus: If you’re a regular coffee drinker, camping isn’t the time to try to go without it. Bring instant coffee or another way to make your morning coffee (see here).
• Firewood: If you want to have a campfire, it’s best to bring some firewood to the campground (if it's allowed). Some campgrounds will sell firewood, but don’t count on it. Pick up a bundle or two from a grocery store or gas station on your way. It’s also a good idea to bring a hatchet to split up thick chunks of wood.
• Camp chairs: You might get lucky and find a fire ring with perfect-sized logs surrounding it, but for long-term campfire sitting a good canvas camp chair is best.
• Tent: You don’t need to spend a thousand dollars on a tent, but if you buy a lower-end tent make sure it has a rain fly—inexpensive tents are often sold separately from their corresponding waterproof rain flies, and without the rain fly you might be in for a wet night.
• Sleeping bag: Again, you don’t need to spend a pile of money (see here), but the more you spend, the higher quality your bag will be, and usually the less likely you’ll be to freeze. Consider the low temperature for the nights you’ll be camping, and buy a sleeping bag rated to well below that (e.g., if the low is in the 40s, get a sleeping bag rated to 20°F or even 15°F).
• Sleeping pad: It’s tempting to buy a thick air mattress for camping, since they’re theoretically the most comfortable. But be warned: All that air underneath you will act like a refrigerator when it cools down in the night, and sleeping on 5 or 6 inches of cold air can be very uncomfortable. Thinner sleeping pads will be less comfy but warmer, so they’re better for sleeping overall. If you’re worried about a sleeping pad being too thin, bring a thin foam mat to place underneath it to double up the cushioning.
Should I bring a flashlight or a lantern?
When it comes to lighting your campsite, the most functional thing you can pack is not a flashlight or a lantern—it’s a headlamp, a light worn on a strap around your head. The light points where your head points, and you don’t have to hold it in your hand like a flashlight, so you can do things that require both hands, like carrying firewood, cleaning dishes, or cooking. Lanterns are nice to light up tables or cooking areas and they add ambience to campsites; although they used to require fuel and sometimes hard-to-replace parts, many lanterns nowadays are battery powered or rechargeable by USB or AC outlet. Flashlights are fine if you don’t want to spend the money on a headlamp, but once you convert to using a headlamp while camping, you may find yourself using it at home more often than a flashlight too.
How do I pack a cooler?
Fill it with beer. Done.
Actually, there are a few techniques to help you get the most cooling possible from your cooler. First, when you start packing the cooler, try to have it be as cool as possible. If you’re at home, an hour before you want to pack the cooler, throw something out of your freezer (a few ice cubes or a bag of frozen vegetables) into the cooler and shut the lid—this will cool it down. Second, be organized and get the cooler loaded all in one go: put down some ice, put your beer on top of that, add some more ice, some food, then a little more ice, then shut the lid and load it into the car. Taking an hour to pack it and repeatedly opening and closing the lid will lower the temperature. Third, the ice that turns into water is almost as cold as the ice itself, so don’t get overzealous with draining the cooler—do it only when necessary. Fourth, keep the cooler cold once you’re outside. Put the cooler in the shade during the day, and minimize opening and closing it—when you get up to get yourself a beer, ask if anyone else wants one. That’s just the nice thing to do anyway.
How do I cook in a Dutch oven?
A Dutch oven is a heavy, three-legged cast-iron pot with a lid that can revolutionize your camp cooking if you’re willing to put in the effort to lug one around and also to learn how to use it. If you can cook something in a slow cooker, you can cook it in a Dutch oven, and if you can bake something in a regular oven, you can probably bake something similar in a Dutch oven.
To use a Dutch oven, you’ll need a campfire, a bag of charcoal, a set of tongs, a pair of leather gloves, and, for best results, a recipe that’s designed specifically for Dutch oven cooking. For your first time cooking in a Dutch oven outdoors, try something simple like canned biscuits or a chocolate cake from a simple box mix. The Dutch oven works by cooking from both above and below, so you’ll need an area of a campfire where you can build a small nest or seat of hot coals in which to set the Dutch oven.
Heat up the charcoal in a side spot of the campfire bed, coat the inside of the Dutch oven with a small amount of cooking oil, and mix up your chocolate cake mix or open your biscuits. Put the cake batter or biscuits in the Dutch oven, and place the Dutch oven on top of the hot coals. Put the lid on the Dutch oven and place some hot charcoals on top of the lid, building an even layer. Monitor the cake/biscuits every few minutes to see how they’re cooking—it’s a good idea to rotate the Dutch oven in the bed of coals to make sure it’s cooking evenly throughout the process. Once the cake/biscuits are done, clean out the Dutch oven with only water (no soap). Once you’ve mastered an easy recipe like cake or biscuits, you can make more complex meals like soups or stew.

What kind of tent should I buy?
There are a bajillion different tents on the market, costing from $25 to $10,000 (really). As with everything else, the more you spend, the higher the quality of the product you can expect to get, but how much do you need to spend if you’re not going to Mount Everest and camping locally? Generally, spending a minimum of $150 to $200 will get you a tent that won’t leak or break on you with regular use. To decide which type of tent you need, you’ll want to consider how you’re going to use it: Will you take your whole family camping and need enough space for six people, or will it just be you and one other person sleeping in the tent? If you’re going to be backpacking, a giant six-person tent you can stand up inside is not going to be very useful, because it will weigh 30 pounds and you won’t want to walk too far with it in your backpack (if you can even fit it inside your backpack). A good, basic tent that’s good for backpacking as well as car camping would be a small, two-person tent that weighs around or under 5 pounds—big enough to sleep two people but not luxuriously huge (more of a sleeping room than a living room). At 5 pounds, it can be packed in a backpack and not feel as though it’s crushing you. A basic but quality two-person tent will cost $150 to $300 and will come with poles, a rain fly, and stakes, and you can confidently take it on weekend car camping trips as well as weeklong backpacking trips and be sure it won’t burst a leak or blow over in gusty winds. For an extra $25 to $60, you can also buy a tent footprint, an extra layer of fabric that clips onto the bottom of your tent to protect the floor of the tent from punctures. Make sure you buy the footprint that corresponds to your exact tent brand and model—any other footprint likely won’t integrate with the shape of your tent.
How do I pitch a tent?
If you can, it’s best to just convince your friend to set up your tent while you sit down and rest or take a nap, but if you can’t do that it’s good to know how to pitch it yourself. Tent designs are varied, and each one has its own specific setup protocol, but most contemporary tents are extremely user-friendly and won’t take more than five minutes or so to set up. In general, the basics of pitching a tent are as follows.

• Locate all the parts. Tent body, rain fly, tent poles, tent stakes. As you’re setting up the tent, make sure the lightweight tent body and tent fly are weighted down and won’t blow away in a gust of wind.
• Lay out the tent body. Figure out which side is the bottom and which side is the top (the top will be made mostly of mesh), and lay it out where you’d like to sleep for the night—a flat spot free of sharp sticks and rocks.
• Set up the poles. Almost all tent poles are made of a number of short sections connected by bungee cords and will snap together quite easily as the end of one section fits inside the end of the next section. Be careful that each pole section is fully inserted into its neighbor—if not, it’s possible to break the tent pole.
• Insert the poles into their proper places in the tent. The poles will slide into either nylon sleeves or plastic clips, and the ends of the pole will pop into grommets near the bottom of the tent. As you do this, the tent will begin to take shape.
• Attach the rain fly. The rain fly will attach to the tent body via clips or hooks. Make sure that it’s attached securely and evenly and that the doors of the rainfly match up with the locations of the doors on the tent body.
• Stake it down. First stake down the tent body, then the doors, then the guylines. Make sure the tent is as taut as possible—any loose sections of the tent will make a lot of noise if the wind picks up in the night, and setting it up correctly in the first place is far better than getting out of your warm sleeping bag in the middle of the night to readjust the stakes and guylines because the tent is flapping in the wind.
What do I do if the ground is too hard to get tent stakes into?
If you’re camped on hard-packed dirt or a flat rock surface, driving tent stakes into the ground can be difficult or impossible. Fear not, and consider a few options.
• Move your tent to a spot with softer ground so you can put in the tent stakes.
• If you’re in a spot with sufficient tree cover that acts as a solid windbreak, you can probably get away with staking down only the doors of your tent. Keep your gear inside the tent to weigh it down, or carry two or three heavy rocks inside the tent to weigh it down when you’re not inside it (your body weight will hold it down when you’re in it), and set the rocks outside the door when you turn in for the night.
• Stake it down with rocks. If your tent has a sufficient number of guylines, you might be able to use only the guylines to secure it. Find the biggest rocks you can carry and place them around your tent. Wrap each guyline around a rock and tighten it so there’s no slack. Pay attention to your tent’s position—if it’s sheltered from the wind, you might be okay with minimal stake-down points. If it’s not, consider moving. Just because there’s no wind at 4 p.m. when you’re setting up camp doesn’t mean there won’t be 35 mph gusts at midnight. Move the rocks back when you’re done.
• Tie your guylines to nearby trees.
How do I set up guylines?
When you pulled your brand-new tent out of the bag for the first time, you probably noticed some cords attached to the rainfly in a few spots and thought, “What are these?” They’re guylines. If utilized, they help stabilize your tent in windy weather, help the tent ventilate, and keep the rainfly from touching the tent body and building condensation. You will also likely trip over one of them at some point. But they’re useful, and in a storm they can mean the difference between your tent poles snapping and your tent poles staying intact. A few pointers:
• When you bought your tent, it probably came with too few stakes to utilize all the guylines (this is a regular, if mysterious, practice). The tent also was probably built with several tabs that can optionally be used to tie guylines to, but no cord to make guylines with. Do yourself a favor, and before you leave the store, buy four or five additional tent stakes and 40 feet of thin cord so that when you get your tent home you can utilize all those guyline options.
• You don’t have to tie guylines to every single spot on your tent, but a minimum of four guylines will do wonders to keep it upright in gusty weather. If your tent’s rainfly has tabs or loops where the fly runs over the tent poles (and it should), utilize those spots first—they oppose each other and basically pull the tent in four different directions to anchor it down and add stability.
• You stake a guyline down just as you do a tent: pull the cord taut and push the stake into the ground at about a 45-degree angle, with the top of the stake pointing outward away from the tent.
• After you stake down the first guyline, do the opposing guyline next (the one diagonal from the corner of the tent you just staked down). Then do the last two guylines.
• Guylines are wonderful, but they are not superpowered—don’t set your tent up in an exposed place (a mountain ridge with no windbreak, for example) and expect guylines to keep you safe. Use them as a safeguard, not a substitute for good judgment.
• You’ll likely have to adjust the tension of your guylines during a stormy or windy night. The best way to do that is to have them tied with an easily adjustable knot like a trucker’s hitch (see below).

How do I tie a trucker’s hitch?
The trucker’s hitch is a knot that was traditionally used to tie down loads to truck beds, and it works just as well to secure your tent to the ground. The magic is that it’s adjustable after it’s tied, so it’s great for guylines that need to be retightened throughout the night. Tying a trucker’s hitch might seem complicated at first, but it will become your new best friend once you master it.
• Tie one end of your guyline cord to your tent, pull the cord out toward the ground, and put a stake in the ground at about the halfway mark on the cord (this is not necessarily the final spot where you’ll stake down your guyline). Pull the cord out and loop it around the stake so you are pulling the loose end of the cord back toward the tent.
• On the strand of guyline between the tent and the stake (not the loose end), tie a figure eight on a bight knot about halfway up.
• Take the loose end of cord and run it through the loop of your figure eight on a bight knot. Pull the cord tight, and secure it to both strands of cord with two half-hitch knots.
• You now have a trucker’s hitch. Find the optimal spot for your tent stake, and vary the length of your guyline accordingly—you want the guyline as taut as possible, but with enough room to adjust it when it needs to be tightened later. You may have to untie the trucker’s hitch and start over if your initial figure eight on a bight knot is too close or too far from the tent.

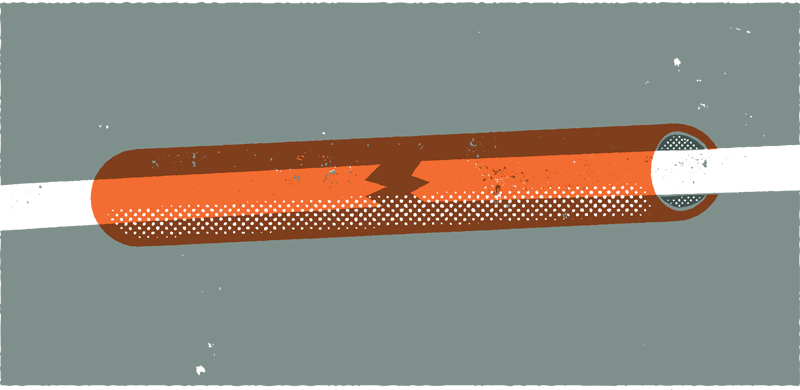
What do I do if I break a tent pole?
Almost all decent backpacking tents come with an emergency pole repair sleeve, a cigarette-sized aluminum tube that slides onto a broken section of tent pole to stabilize it. If your tent didn’t come with one (check the bag the stakes came in), you can buy one at most outdoor stores for about five dollars.
When you snap a pole, carefully pull it out of the tent. It will probably have sharp edges, so make sure you don’t snag it on anything that it can tear—which is pretty much every inch of fabric on your tent. Slide the repair sleeve up the pole until it’s centered on the broken spot, and use a small strip of duct tape on each end to hold it in place.
If you don’t have a pole repair sleeve, the best you can probably do is use a tent stake (you can very likely spare one from your tent unless you’re camped in an extremely windy spot) or a very stiff stick to splint the pole where it’s broken—wrap it tightly with a few feet of duct tape.
How do I rig a tarp?
A tarp is the most minimalist and often the cheapest camping shelter option—besides sleeping in a cave. All you need is a 10-by-10-foot tarp, 50 feet of lightweight cord, and eight tent stakes. There are many different configurations to rigging a tarp, but the simplest and most stable is the A-frame pitch.
To rig your tarp, find two trees with a flat space between them (or at least a space flat enough that you can sleep on it without rolling downhill all night). Tie a long length of cord between the trees so it’s taut and about 4 feet above the ground in the middle. Flip the tarp over the cord so the cord splits the tarp in half, and tie short sections of cord to each corner grommet. Stake the corners of the tarp down so it forms an A-frame roof over the ground, and when the tarp is taut, tie cord to the other grommets along the edges of the tarp that are touching the ground, and use your remaining stakes to stake them out.
Rain will come in the ends of your tarp, so don’t set up your sleeping bag so your head is near either end—put your sleeping bag more toward the center of your A-frame so you’re covered.
Can I sleep outside without a tent or tarp?
If you really do want to sleep out under the stars, as in when you open your eyes in the middle of the night, you see stars, you can ditch your tent. But if you ditch your tent, you’ll want to take into consideration a couple of things, the first of which is (maybe quite obviously) the weather forecast—if it rains, you’re going to get soaked if you’re sleeping in an unprotected sleeping bag (almost no sleeping bags are made waterproof enough to withstand much of a rain shower). So pick a night where there’s a minimal chance of rain and go for it. But also remember that you won’t have any protection from bugs if you don’t have the mesh of a tent between you and any mosquitoes or other insects that might like to feast on your blood or just crawl around on your face. If you’re squeamish about spiders or other creepy-crawlies, you might consider the alternative of sleeping under the stars, which is setting up your tent but leaving the rain fly off. That way you’re still sleeping under the stars, obstructed only by a layer of see-through mesh.

Can I cook in my tent?
If it rains, or if it’s so cold you don’t want to get out of your sleeping bag to cook dinner or breakfast, you might think it makes sense to bring your stove inside your tent to cook. Don’t do it. Cooking inside a tent on a canister stove can easily produce enough carbon monoxide to kill you, not to mention melt or burn your sleeping bag, sleeping pad, and the tent itself. Cooking inside a tent on a white gas stove is an even bigger risk for fire. If you absolutely have to cook without leaving your tent, place the stove outside under the rain fly under one side of your tent door, and leave the other half of the door open. If your tent has a second door, open the door on that side for ventilation. Be careful with hot liquids and hot pots near the tent—just touching the tent fabric with something hot will melt a large hole in it.
How do I brush my teeth when I’m camping in the backcountry?
Brushing your teeth in the backcountry will teach you how little water you actually need to get your teeth clean. Use a small amount of toothpaste and a tiny amount of water on your toothbrush, and when you’re done, blow the toothpaste spit out of your mouth in several bursts, pursing your lips tightly so the spit vaporizes as much as possible (nobody wants to see a pile of toothpaste spit in the backcountry). To rinse your toothbrush, pour a little water out of your water bottle onto the bristles, or pour an ounce or two of water into your mouth and forcefully spit it through the bristles to rinse it out. Yes, your brush might not get 100 percent clean, but your teeth will.
What happens if I get a hole in my tent?
If you get a hole in the rain fly of your tent, it’s not an issue—until it rains, and that could be the next night of your trip. In that case, your first instinct might be to duct-tape the hole, but the old maxim that duct tape fixes everything is not exactly true. It can work for a short time, but for a real repair job that will actually hold, it’s best to carry and use a field repair kit (which costs around eight dollars and weighs a couple of ounces). A field repair kit should contain a small tube of a product called Seam Grip or an equivalent, and a couple patches made of waterproof material. This will repair small holes in your tent fly. If you manage to rip a hole larger than about 2 inches in diameter, duct tape might be your only option (along with really hoping it doesn’t rain) until you can seek out a professional repair when you get home.
If you rip a hole in the body of your tent, including the floor, use the same repair kit to fix it. If you rip a hole in the mesh of your tent, it’s not as much of a big deal in the field (unless you’re camping in an area with tons of mosquitoes or other insects that will fly in through the hole). Either leave it as is or patch it with duct tape, and when you get back home find a mesh repair kit in an outdoor store or online and fix the hole.
How do I put up a hammock?
Hanging a hammock is simple, right? You just hang it up between two trees and voilà, you’re done. Not so fast. There’s actually some math that goes into it, and your particular hammock should come with instructions specific to the measurements of the hammock. Here are the basics you’ll want to know:
• Always use webbing straps to attach a hammock to trees. These are simple strips of webbing with loops at the ends to run cord through. Find two trees roughly 12 to 25 feet apart and around 8 inches in diameter or slightly smaller. Wrap one of your two webbing strips around the tree trunk at about shoulder height so that the webbing wraps around twice and the loops are facing the direction where you’ll hang the hammock (the space between the two trees).
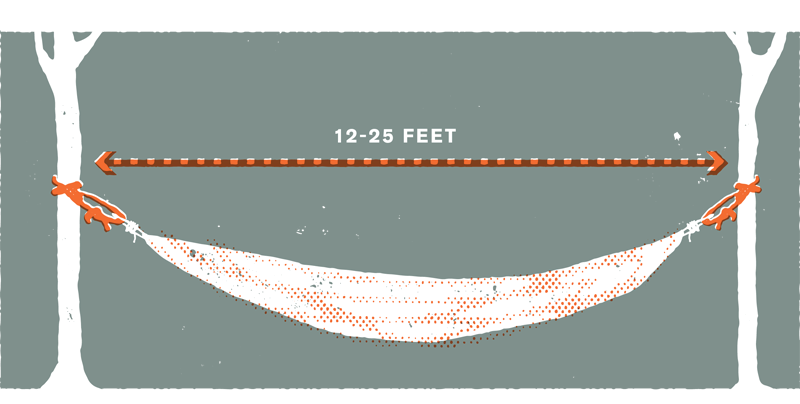
• Your hammock has a cord on each end (one on the foot end, one on the head end). Pick an end and estimate how much cord you’ll need to hang the hammock evenly between the two trees, and tie it to the webbing with a couple of half-hitch knots (see here). Don’t worry; this isn’t your final position, so don’t tie the knots too tight—just enough to keep it in place while you figure out the exact position of the hammock.
• Wrap your second strip of webbing around the other tree, and run the cord from the opposite end of the hammock through the loops in the webbing. Tie a couple of half hitches in the cord just as you did with the other side, and step away from the tree and eyeball the hammock. Is it hanging with an even amount of cord on each side? If not, adjust your half hitches until it is. The hammock should be hanging at a height where you can sit down in it from a standing position—if it isn’t, move your webbing straps up or down the tree trunks as appropriate.
• Once you’ve got the hammock in the correct position, secure it to the webbing. Untie your half hitches and begin lashing the cord to the webbing. Pull the cord taut and wrap the tail (the loose end) under the section of cord running from the webbing to the hammock, then bring it back up and across the cord. Run the tail through the webbing, between the two loops, and bring it back toward the hammock, pulling it tight. Repeat this process four times, pulling the tail tight each time. Tie up the loose end with a couple of half hitches. Lash the cord on the other end of the hammock in the same fashion.
What’s a bivy sack?
Bivy sack is short for bivouac sack, a minimalist waterproof shelter that is used instead of a tent or tarp (or sometimes in combination with a tarp). It’s the same shape as a sleeping bag and is large enough to fit a sleeping bag inside. If you choose to use a bivy sack in lieu of a tent or other shelter, you are likely doing it to save weight in your backpack. The advantages are that it is lightweight and easy to pack (no tent poles, no stakes), and the disadvantages are that the inside of a bivy sack is a small place to spend a long rainy day or night—you generally can’t sit up in a bivy sack, and if it’s raining you will want it zipped almost all the way up with you inside it (don’t worry, you’ll still be able to breathe). You also lose the ability to shelter your gear from the rain—with a tent, you can always shove your pack and cooking gear inside during a rainstorm, but in a bivy sack you don’t have that space. But bivy sacks can be great if you’re on a trip with little chance of rain and you want to keep your backpack as light as possible—even the heaviest of bivy sacks weighs only 2 pounds, compared to most tents, which weigh 3½ to 6 pounds.
Should I keep the tent in the bag it came in?
Your backpacking tent probably arrived in a nice sleek bag, and you might think that it would make a nifty little package to strap to the back of your backpack. It might, but then you’re putting a bunch of weight on the outside of your pack, and that weight will pull your pack backward. Plus, the tent poles will be on the outside of your pack, and if you accidentally set your pack down hard somewhere, the poles are in an unprotected spot and can bend or break (not good). It’s better to remove the tent body, rain fly, poles, and stakes from the bag, leave the bag at home (or bring it along to use as a bear bag—see here), and pack the tent in your backpack in pieces—or split the tent in half and give part of it to your backpacking partner to carry (one person gets the poles and fly, the other gets the stakes and the tent body). When you get home, store the tent back in the bag.
How do I clean out my tent?
In the backcountry, hopefully you’re able to keep from spilling food and liquids in your tent (because bears like that sort of thing). So most of the things you want to clean out of your tent should be dry solids—pieces of grass, dirt, and small rocks that got into the tent as you were moving in and out of the door. The easiest way to clean out the tent is to wait until the next morning when you’re packing up camp. Take your tent stakes out of the ground, remove the rain fly, unzip the door (or both doors), pick up the tent by the poles, lift it over your head, and shake it, letting the dirt fall out the open door. If you want to do an even better job, take out the poles, turn the tent body inside out, and brush the dirt off the floor with your hand.
Once you get home, if you need to do further cleaning, set up the tent in your garage, front yard, or living room, and wipe it out with a wet paper towel or rag. You shouldn’t need to use any sort of cleaning product unless you spilled something nasty in there—but if you do, use a little soapy water, which won’t damage the fabric of your tent floor.

What do sleeping bag temperature ratings mean?
Strangely, sleeping bag ratings have always been a bit nebulous. For years, there was no universal rating system, and one manufacturer’s 30-degree rating (meaning that you could comfortably sleep in the bag in weather 30°F or warmer) was something far different than the next manufacturer’s 30-degree rating. Thankfully, many (but not all) sleeping bag manufacturers have started to use the EN (European Norm) methodology, which is used to test sleeping bags and establish their true insulative value. However, the rating is not printed on the sleeping bag—you’ll find it on a tag attached to the bag. The EN system lists three ratings for each sleeping bag.
1. The Comfort Rating (for women) is the lowest outside temperature at which an average woman will stay warm inside the sleeping bag.
2. The Lower-Limit Rating (for men) is the lowest outside temperature at which an average man will stay warm inside the sleeping bag.
3. The third rating, the Extreme Rating, is the lowest outside temperature at which an average woman can survive in the sleeping bag.
How does that relate to a manufacturer’s rating of sleeping bags? For one sleeping bag that the manufacturer itself rated as 15 degrees, for example, the EN ratings were as follows:
• Comfort Rating: 27.1 degrees
• Lower-Limit Rating: 15.6 degrees
• Extreme Rating: -17.5 degrees
Should I get a down or a synthetic sleeping bag?
Most sleeping bags will fall into one of two categories, according to the type of insulation they contain: down (plucked from geese), or synthetic (some type of synthetic insulative fiber). There are advantages and disadvantages to both.
Down sleeping bags are almost as a rule more lightweight and compressible than synthetic sleeping bags. Because down is extremely compressible, down sleeping bags pack smaller in your backpack. They’re also more expensive, starting at around $250 for a low-end bag and running nearly $1,000 for a high-end, custom-made sleeping bag. A major disadvantage to down sleeping bags is that when down gets wet, it loses its insulative capability, so if your bag gets soaked somehow, whether by a rainstorm or a leaky water bottle or a fall during a river crossing, you’ll be in trouble. Many companies have started to make “hydrophobic” down, which is not waterproof but will resist soaking and dry more quickly than regular down. This can be good in damp camping conditions but still takes a long time to dry in the event of a full soaking. Down sleeping bags are a great choice for adventurers who are conscious of the total weight of their backpack (backpackers and climbers in particular) and people who spend most of their nights camping in dry environments like the desert or the Rocky Mountains.
Synthetic sleeping bags are usually less expensive than down sleeping bags but are heavier and bulkier (although gear companies are perpetually making lighter and more compressible synthetic bags). Synthetic insulation, unlike down, will hold some of its insulative properties when it’s wet, so synthetic bags are a good choice for adventurers who spend more time in wet environments where they’re likely to deal with rainy or snowy weather multiple days in a row. Synthetic bags are also appropriate for people who are less worried about weight or space (kayakers or whitewater raft enthusiasts) or who are just more concerned with warmth in all conditions (snow and rain) than they are with weight and space.
What’s the difference between a $50 sleeping bag and a $250 sleeping bag?
Yes, you could save a lot of money on camping gear by buying it all at a discount department store that also sells toasters, jumper cables, and Christmas decorations, but it might not last that long or work that well. The primary difference between a $50 sleeping bag and a $250 sleeping bag is performance. An inexpensive sleeping bag is likely to be a rectangular-shaped bag with a large opening at the top. This lets in lots of cold air, which makes you cold and probably means you’ll have a night without sleep and a general dislike of camping. A mummy-style bag of any quality will insulate better than a rectangular bag simply because it has a much smaller opening at the top and less dead air inside for your body to heat up. A $50 bag will also probably not have quality insulation or zippers, and zippers can be the bane of your existence if they don’t work correctly. If one breaks, you can pay half of the cost of your $50 sleeping bag getting a new zipper put in it.
And, as with a lot of inexpensive things, durability will be an issue. If you want to go camping five times in your life, buy a $50 bag. If you want to go camping twenty-five or more times, spend some extra money and get yourself a quality sleeping bag.
How do I wash a sleeping bag?
A sleeping bag might seem straightforward to clean (isn’t it just like a duvet?), but it requires a little extra care so you don’t ruin your investment. You don’t need to wash your sleeping bag every single time you use it. Unless you really stank it up somehow, washing it once every twenty or thirty nights of use (or once a year) will keep it from getting too funky. It’s best to avoid washing it in a top-loading washing machine because the cords on your sleeping bag can get caught on the spindle and wreak havoc on the bag, and the agitator can rip apart the stitching. So use a front-loading machine. If you don’t have one, head to a laundromat and use a front-loader there. Wash the bag in cold water, on a gentle cycle, using a nondetergent soap. When it’s done, put it in a dryer set on no heat (not low heat—no heat) with a couple of tennis balls or dryer balls. Without something bouncing around the dryer to break up the clumped down (or synthetic insulation), it will just stay clumped and take days to dry—plus you’ll have to break up all the clumps by hand. Your sleeping bag works only as long as it has loft and the insulation is evenly spread throughout it, and improperly drying it can ruin the distribution of insulation.
How do I store my sleeping bag at home?
Your sleeping bag should come with two bags with drawstring closures: one big (possibly mesh) bag of about the same dimensions as a queen-sized pillowcase, and one “stuff sack,” which you should use to compact the bag and carry it in the bottom of your backpack while you hike. Storing the sleeping bag in the stuff sack for prolonged periods of time can nearly permanently compact the down so it has almost no loft (or it can take weeks for it to regain the loft once you pull it out of the tightly compacted storage)—so keep it in the bigger, mesh bag at home, or better yet, store the bag completely rolled out if you have enough space to lay it down somewhere or hang it from its foot end.
How do I store my tent when I get home?
When you get home from your backpacking trip, it’s a good idea to set up your tent in your garage, backyard, or living room for a day to make sure it’s 100 percent dry before you put it away—mildew has caused the premature death of many tents. If it’s clean and dry, store the tent in the bag it came in when you bought it. Some people like to neatly fold and roll up the fly and tent body, wrapping them around the tent poles before sliding them into the bag, and some people just stuff the tent in the bag around the poles. Neither way has been proven to be superior for any significant reason—although folding it generally leaves the tent with fewer wrinkles and creases (or at least neater-looking wrinkles and creases) the next time it comes out of the bag for camping use.
What should I do if my sleeping bag gets wet on a camping trip?
If your sleeping bag gets wet on a camping trip and you’re camping for another night, you’ll have to do your best to dry it out. If it’s a synthetic sleeping bag, find a sunny spot and ideally a tree branch to hang the bag over so the sun and the breeze can dry it out. If you can’t find a tree branch that will hang the bag facing the sun, lay it out on a dry rock. If it’s a down sleeping bag and it got wet, do the same thing—hang it on a tree branch in the sun. If the down insulation in the sleeping bag got wet enough that it has clumped inside the bag, break up the clumps by pinching them with your fingers. As the bag dries, keep working to break up the down. It may take several hours for the bag to dry, especially in a humid climate.
If your sleeping bag gets wet and it’s the last day of your camping trip, don’t worry about getting the bag dry before you head home. Pack it away, and when you get home hang it up to dry or put it in a clothes dryer on a “no heat” (not “low”) setting. If it’s a down sleeping bag, make sure to place two tennis balls in the clothes dryer to bounce around and break up the clumps of down.
How do I sleep (comfortably) in a sleeping bag?
There’s no sleeping system that can really approximate your bed at home, and the sooner you understand that, the better off you’ll be. Instead of trying to replicate a bedlike experience, learn to sleep in a sleeping bag with a few basic tips. Understand that you’ll be zipping yourself into a bag, and you won’t be able to spread out your limbs and starfish like you can in a bed. That’s the bad news. The good news is, a decent sleeping bag will keep you warm as the temperature drops to below freezing. Follow these tips to make your sleep more comfortable.
• Make a pillow by putting your extra clothes inside a stuff sack and put it under your head, either inside your sleeping bag hood or outside it.
• Zip up your sleeping bag, get all your limbs inside, and make sure you’re not breathing into the bag itself (condensation on the inside will make you cold). To prevent this, when you roll onto your side, roll so the bag rolls with you, not so your head turns facing away from the opening. The smaller you make the opening around your face, the warmer you’ll be—in extreme cold, your nose and mouth might be the only things poking out.
• If your socks are wet or damp when you go to sleep, either put on dry socks or just take your socks off your feet (they’ll dry overnight inside your sleeping bag).
• If you wake up in the night and you’re too warm, work your way out of the bag in increments: often just popping your head out is enough to cool you down to a comfortable temperature. If it’s not, unzip the zipper six to twelve inches and see if that works. Then try sticking one arm out, and so on.
• You’ll likely wake up in the night more times than if you were sleeping at home. That’s normal; just accept it as part of sleeping outdoors.
What kind of sleeping pad should I buy for underneath my sleeping bag?
There are three basic choices when buying a sleeping pad: foam, self-inflating, and air pad. A foam pad is the least technologically advanced, lowest cost, lightest weight, and usually lowest comfort of all the options—it’s basically just a ½-inch-thick strip of closed-cell foam, which is fine for a lot of people. You can also skip the foam pad and find a campsite with some natural cushion under it (such as pine needles or grass). A self-inflating pad is generally an inch or more thick and will fill itself with air at least partially—but you’ll need to blow it up by mouth to get it completely inflated. Self-inflating pads are more comfortable than foam pads and generally warmer and more durable than air pads (but a little heavier than both foam pads and air pads). An air pad that you inflate by blowing air into it with your mouth is the most cushioned and usually the most lightweight option—think of a pool air mattress, but a bit more high-tech and durable. It’s generally 2½ inches thick or more, which is a luxurious amount of padding in the backcountry, but it can be cold unless it has an insulating material inside its cells (all that air underneath you cools quickly overnight and can lower your body temperature, even through your sleeping bag). Many models of air pads puncture more easily than self-inflating pads, so they’re not the best for “sleeping out” without a layer of protection underneath them.
How do I roll up a sleeping pad to be as small as it was when I bought it?
When you buy a self-inflating sleeping pad, it’s tightly wrapped in vacuum-sealed plastic. This is the smallest it will ever be. Let go of any delusions that you will ever stuff an object that size in your backpack again. It’s impossible. The sleeping pad you bring home from the store was packed by a machine, and you are no machine. Don’t try to compete with it; instead, compete with yourself. See how small you can roll up your sleeping pad. To do this, unscrew the air valve and let the air seep out. Start slowly rolling the foot end of the pad toward the head end (or from the end opposite the air valve to the end with the air valve). Squeeze the air out as you go, and roll slowly enough that air has a chance to escape and doesn’t gather in the rolled part. When you reach the end and you’ve rolled up the pad completely, close the air valve so no air can get back into the pad. Unroll it again, fold the pad in half lengthwise (or in thirds, depending how it was originally packed), and start rolling from the feet end again. As you get closer to the top, you will have to open the air valve to let more air escape. Do that, and when you have the pad completely rolled up, close the valve again and tighten a strap around the pad to keep it compacted in your pack.

How do I patch a hole in my sleeping pad?
If you somehow get a hole in your sleeping pad, you’ll know. Halfway through the night, you’ll notice that you’re feeling much closer to the ground or that your hip seems to be sitting on something quite firm when you roll over (that’s the ground). To patch the hole, you need two things: a patch kit and the ability to find the hole.
When you bought your sleeping pad, hopefully it included a patch kit. If not, look up the manufacturer and purchase a patch kit from them—a patch kit is lightweight, inexpensive, and insurance against uncomfortable nights trying to sleep in your tent. The patch kit should consist of a small tube of adhesive and a few patches that match the material of your pad (if you buy the patch kit from the manufacturer of your sleeping pad versus buying another brand’s patch kit, it will match).
Finding the hole is the true crux—especially if you’re in the backcountry. Unless you have superpowers, you probably won’t be able to find it without sinking the pad in a body of water—the air pressure inside a sleeping pad isn’t usually enough that you can hear a hissing noise indicating air escaping. So when you have a chance, either before you leave camp or when you arrive at your next night’s camp (or when you pass by a pond or lake sometime during the day), inflate the pad and dip it into a calm body of water, watching for bubbles indicating the leak. When you find the leak, apply the adhesive around the hole (don’t be shy) and stick the patch on. Open the air valve on the pad, and leave the pad out to dry as long as the manufacturer’s instructions indicate. If you discover the hole on the last day or night of your trip, fix it at home: just fill up your kitchen sink or bathtub and find the hole, then patch it.
Should I share my tent with my friend?
Your relationship with your friend can, of course, dictate this—whether you want to get that close to him or her. But there’s no reason to have a hang-up about spending the night in a small tent with another person. It’s actually way better than sharing a bed with someone, since you’re both zipped into sleeping bags and no one can awkwardly, accidentally, try to spoon you in your sleep. One tent split between two backpacks means about 2½ pounds for each of you, whereas each of you bringing your own tent means 5 pounds each—that’s a lot of extra weight and bulk. Although it’s most economical to carry one tent, there are a few reasons why you’d want to take separate tents: your friend is a chronic snorer, or taller than 6 foot 6 and needs to lie diagonally in a tent, or maybe you’re on a trip that’s a week or longer and you each just want your own space.
How do I have sex in a tent?
Assuming you already know how to have sex, there are a couple of things that are different about doing it in the great outdoors as opposed to indoors:
• Air temperature: Just because you’re warm and toasty inside your sleeping bag doesn’t mean you can unzip it, get completely naked, and be comfortable. If it’s chilly outside at all, you might consider waiting until morning, when the sun will warm the air temperature significantly.
• Fluids: Washing a sleeping bag isn’t as easy as throwing a set of bedsheets in the dryer, so think about that when you’re about to get busy. If it’s warm enough, it’s a good idea to shove both parties’ sleeping bags aside, out of the way of any bodily fluids. Also consider that a wet spot inside a sleeping bag might be unavoidable when you zip yourself up in the bag afterward. Bring a wet wipe or two to clean up any stuff you don’t want sticking to your tent when you pack up camp.
• The ground: The ground is often harder than you might first think, especially on the back and knees. Try to push your sleeping pads together and eliminate gaps, and make sure knees aren’t rubbing against bare ground during the act itself.
How do I find firewood?
If you’re in an area where firewood gathering is permitted (i.e., Forest Service land, Bureau of Land Management land, or anywhere that doesn’t have a sign reading “Firewood Gathering Prohibited”), firewood gathering should be pretty easy. Grab a wide selection of different thicknesses of wood—a few twigs for kindling, a few finger-sized pieces to burn after that, then some “quarter-sized” pieces, or limbs about the diameter of a quarter, and then a few larger ones. If you’re in a heavily used backcountry area and can’t find firewood near your campsite, remember that most humans generally try to conserve energy and thus won’t go too far from camp to look for firewood. Grab a strap or piece of cord to bundle together any pieces of wood you’ll find, go farther out from your camp, and climb higher (most people don’t want to walk uphill to find wood). As you pick up pieces, strap them together, and when you’ve found enough, head back to camp and start your fire.
How do I split firewood?
Unless your fireplace is the size of a taxicab, you don’t want to be throwing a log as thick as your waist on your fire (no matter how trim your waist is)—big chunks of wood are hard to get lit, and when they finally catch they take forever to burn. So at some point you’ll need to split at least a few chunks of wood in order to build a fire.
For thick, round sections of wood 6 or 8 inches in diameter, you’ll want to use a splitting maul, a long-handled ax with a heavy, wide head. Take your chunk of wood and set it upright (it’s nice to have a chopping block underneath, but not mandatory). Inspect the top of the wood, where your ax blade will be hitting it: you want to aim your blade so it drives itself into the wood parallel with the grain, not perpendicular to it. Don’t worry about picking a specific line on the top of the wood and hitting it exactly—you won’t, and it’s not important. Just concentrate on lining up the blade and the grain. Don’t hit a knot, because you won’t get through it (the tree will almost always win that battle).
Stand facing the wood you’re going to split. Hold the maul with your nondominant hand (in this case, we’ll say your left hand) near the bottom of the handle and your dominant hand near the blade, with the blade pointing away from your thumb (or down toward the ground as you hold the maul parallel to the ground in front of your body). Bring the blade end of the ax back past your right hip and swing it up over your head, simultaneously sliding your right hand down the ax handle to join your left hand.
With both hands near the bottom of the handle, swing the maul into the wood. Don’t try to hit it as hard as you can—you will rarely get through a big chunk of wood in one swing, and you want to remain in control—firm, but controlled. Your elbows should be almost exactly straight when the ax blade hits the top of the wood. Aim for the center of the wood or slightly off center toward you (not away from you)—if you miss the center by too far toward the back, your ax handle will hit the wood, and most ax handles can’t endure too many hits like that. The blade will get stuck from time to time—when it does, slide one hand up the ax handle close to the blade and wiggle it out (you may even need to step on the wood with one foot and work it out using both hands). Keep swinging the maul into the same spot on the wood until it splits.

For smaller chunks of wood, you’ll want to use a hatchet, holding your small chunk of wood in your nondominant hand, using an abbreviated swing into the wood: lean over the chunk of wood, holding it in one hand and swinging the hatchet no higher than your head. Obviously be careful to avoid hitting your nondominant hand with the hatchet, and if you want to be extra-safe, stand the wood up in a stable spot and don’t hold it with your other hand when you swing the hatchet. If the hatchet gets caught in the wood on your first swing, you may not even want to bother pulling it out—simply swing the hatchet with the chunk of wood attached to the blade and slam it into the ground until the hatchet splits through the wood.
What kind of ax should I buy (a big one or a hatchet)?
As sexy as it is to whip a heavy splitting maul over your head and swiftly drive it through a chunk of wood, for general camping purposes it’s probably unnecessary, especially if you’re buying firewood from a gas station on your way to the campsite or making a fire from firewood you’ve gathered from the forest near your campsite. A small hatchet, or one-handed ax, will suffice to split your firewood into smaller pieces when necessary or to trim small branches from downed logs. Look for a hatchet with a 12- to 20-inch-long handle and toss it in the trunk of your car, where it will be for your next camping trip.
Do I need a saw?
For general backpacking purposes, you will probably never need a saw. If you’re building a campfire in the backcountry and you are burning pieces of wood you can’t snap in half by bending them over your knee or standing on them, you’re probably gathering wood that’s too big. If you’re car camping and bringing in your own firewood, a hatchet will probably do more of what you need (i.e., splitting logs into smaller pieces). That said, if you foresee some sort of need for one, get one that’s specifically designed for backpacking—they break down so they’re easy to pack, and they add much less weight to your backpack than a regular saw (some weigh less than a pound).
Should I take a machete hiking?
If you want to draw suspicious stares, or scare the crap out of other hikers, or have everyone talk about you after you pass them on the trail, you should definitely take a machete hiking. If you are reading this book, you will absolutely not need a machete when you go hiking. If you do need a machete where you go hiking, your trip is far beyond the scope of this book, and we will probably read about it in the pages of National Geographic, because your hiking is not in a fun place where trails are at least somewhat cleared prior to your hike, and you are hacking at vegetation with a machete to gain passage to something in the name of science or exploration.
Can I cut down a tree for firewood?
Putting your lumberjack/Brawny Man fantasies aside, cutting down trees for campfires is generally a bad idea for many reasons. Cutting down a live, green tree for firewood doesn’t usually work because the wood is so wet it won’t burn properly. Cutting down large dead trees can be dangerous unless you’re experienced at accurately felling them—meaning you can get them to fall in the exact spot you want, so that they don’t get hung up on neighboring trees or land on the hood of your car. And on Forest Service land, you can cut down trees for firewood, but you first have to have the proper permit. So bringing your own firewood, or gathering wood from near your campsite, is your best bet. If you want to hack away at a tree for a while, you should have no problem finding one on the ground that’s already been felled by Mother Nature.
How do I poop in the outdoors?
Pooping in the outdoors is a rite of passage: when you learn how to do it, the world opens up to you. You are no longer limited to short one-day hikes during which you will not have to worry about going number two. If you can poop in the woods, you can sleep in the woods, wake up the next morning, do your business, and hike for a second day, and repeat the process. So how do you do it?
First, you dig a hole. For this, you’ll need a small backpacking trowel, procurable at any outdoor gear store. With your backpacking trowel in hand, select a spot—ideally it’s private, 100 feet away from a trail, and 200 feet from water—and start digging. Make sure the hole you dig is at least 6 inches deep in order for your poop to decompose properly (and to bury it under enough dirt to keep its smell and sight hidden). It’s not a bad idea to anticipate your bowel movement and “pre-dig” a hole near your campsite for when the time comes.
Once you have a hole 6 inches deep, it’s time to do your business. Squat down and aim toward the bottom of the hole. If you need help balancing, extend a hand backward (watch out for the hole). And relax.
Congratulations. You’ve now pooped in the woods. Spread the dirt back over your hole and tamp it down. If you missed a little bit, grab a stick and nudge your stuff into the hole before burying it.
What do I do with my toilet paper?
You probably never give much thought to your used toilet paper. But in the woods you have to give a little more thought to where it goes, because you can’t just flush it away. Here’s the deal: not using toilet paper at all in the backcountry is the true mark of the expert outdoorsperson. Yes, for real. Sticks, rocks, leaves, even the occasional snowball work just as well, once you figure out your technique. This means you don’t have to carry toilet paper with you when you go backpacking.
However, few people achieve, or even aspire to, this expert level of outdoors pooping. So here’s what you do: take only white, nonperfumed types of toilet paper in your pack, and either bury it deep in the cathole you dug to poop in or pack it out with you in a sealed plastic bag. Try to minimize your toilet paper usage—don’t bury half a roll of it every time you poop, and maybe experiment with using a few squares of toilet paper only for “buffing” after you’ve tried using some sticks/rocks/leaves first. Of course, you’ll want to make sure you don’t wipe with poison ivy, poison oak, or poison sumac (see here).
Do not under any circumstances burn your toilet paper to get rid of it. Yes, it would disappear faster that way, but if you do it incorrectly (or if there’s a gust of wind at the wrong moment), you could burn down the forest, which is not worth the risk.
How do I toast a marshmallow?
The most important thing to remember in toasting a marshmallow over a campfire is that there’s really no right or wrong way to do it—just a matter of preferences.
Grab a stick about the length of your arm or slightly longer (unless you want to toast your forearm as well as the marshmallow), preferably with a semisharp end. If one end isn’t sharp enough to poke into a marshmallow without ruining it, take a minute and whittle the end down a little bit with your pocketknife.
Poke the stick into your marshmallow, and hold the marshmallow over the fire, keeping it in the edges of the flames. Watch the marshmallow and rotate it as it turns golden brown on each side. When you’ve achieved your level of toastedness (light brown, brown, dark brown, or black), pull the marshmallow out of the fire and give it a few seconds before biting into it.
An alternative method: Stick the marshmallow all the way into the fire until it catches on fire, then pull it out of the fire and blow it out. It’ll be singed, but gooey on the inside.
What’s the best way to make coffee in the backcountry?
Coffee is a very touchy subject among outdoorspeople, and everyone has his or her own opinion on how to make it best. Here are a few options and their pros and cons.
• Starbucks Via (or other instant coffee): Simple, easy, no wet grounds to pack out, no mess.
• Cowboy coffee (see here): Simple, easy, but gritty.
• French press: Makes wonderful coffee, but carrying the apparatus can be bulky, and there are lots of grounds to deal with.
• French press mug or French press attachment for cooking pot or Jetboil: Makes wonderful French press coffee and is less bulky than a regular French press, but there are still lots of grounds to deal with.
• Pour-over: Also makes wonderful coffee and isn’t very bulky but leaves lots of grounds (and filters) to deal with.
• Aeropress: Makes great espresso; is somewhat bulky but leaves less waste/grounds to deal with than other options.
• Abstaining from coffee: Ridiculous!
I absolutely love my French press—can I take it backpacking?
Here’s the great thing about backpacking: you can take whatever you want to take, no matter what anyone says. The only bad thing is that everything you want to take adds weight to your pack, so you have to make some choices or deal with a crushingly heavy pack. If you want to bring your special coffee-making apparatus because it’s the only way you can wake up, and when you get your coffee everyone on the trip will be better off, then do it. Think about jettisoning something else unnecessary if you need to make room for that moka pot (an extra pair of socks, a paperback book, deodorant, etc.). And when you hand your buddies a cup of wonderful espresso 5 miles from the nearest road, say, “I told you it was going to be worth it.”
There are a hundred fancy, even precious, ways to make coffee in the backcountry, but everyone should know how to make cowboy coffee—it’s the simplest possible way to make a cup of coffee. First, decide how many cups of coffee you’re making and pour the appropriate amount of water into the cooking pot. Bring the water into a rolling boil over your heat source (stove or open fire), remove the pot from the flame, and stir in the equivalent amount of coffee grounds. Let the pot sit for five minutes and allow the grounds to settle to the bottom, and then carefully pour the coffee into cups. You (or someone in your group) will get a coffee ground or two in your teeth at some point, so sip with awareness.

How do I cook over a fire?
Humans have been cooking over fire for thousands of years, and you can still reconnect with your ancestors by doing the same thing, even if you’re heating up some pasta instead of a saber-toothed tiger you killed with your bare hands. There are three ways to do it.
1. In a cooking pot over coals. Get a good campfire going and stoke it so a small bed of coals is exposed. Place your cooking pot (with the lid on) directly on the coals, making sure to keep the handle pointing away from the fire (because you need to be able to pull the pot out of the fire later without burning your hand). Keep an eye on whatever you’re cooking, as you can’t really turn the heat down—to turn your coals to a “low” setting, just pick the pot up and hold it a small distance above or to the side of the coals.
2. Wrapped in foil. With a small amount of aluminum foil, you can cook fish, meat, even leftover pizza or burritos. Just prepare a bed of coals the way you would for a cooking pot, place your foil-wrapped food on the coals, and monitor it. Keep something handy to flip the item over when it’s cooked on one side—a pair of sturdy sticks can work great.
3. On a stick. Using a sharp stick, you can cook hot dogs, sausages, bratwurst, vegetables, or any other food you can stab and hold over a fire. Just as you would cook a marshmallow, keep rotating it and make sure it’s thoroughly cooked before you eat it.
What size backpack do I need?
The size of your backpack depends on how long you’re going to be out on the trail or in the mountains. Packs are sold according to volume, usually measured in liters. If you’re only going out on a one-day hike, a 30-liter or smaller pack should be plenty—unless you plan on taking a whole watermelon and the entire Hunger Games series on your hike. If you’re going on an overnight hike, you’ll need room in your pack for a tent, a sleeping bag and pad, a stove and pots, and a water filter, so you’ll need a bigger pack—something in the 55- to 60-liter range. If you’re staying out for four or five days or longer, you’ll need a pack in the 60- to 85-liter range.
How should my backpack fit?
Finding a backpack that fits is a bit different from finding jeans that fit—and believe it or not, it doesn’t have much to do with how tall you are. Backpacks are sized on the basis of your torso size, or the length of your spine from your iliac crest (the top of your hip bones on the sides of your body) to your C7 vertebra (which is the bone that sticks out farthest from the base of your neck when you’re standing up with your chin to your chest). Get a friend to help you measure the distance between these two points by holding a measuring tape (not a ruler) between your C7 and the spot where your thumbs meet when you hold your hands on your hips with your middle fingers running across your iliac crest. This measurement will indicate your torso size.
Once you know your torso size, you have a starting point to find the right backpack for you. If your torso size puts you in between backpack sizes (i.e., it places you at the top end of a “medium” pack but at the bottom end of a “large” backpack), try the smaller-sized pack first. More and more companies now make backpacks specifically designed for women, so explore those options when shopping for a backpack—you might have to check the tags to tell the difference between men’s and women’s models.

The best way to fit a backpack is to work with a sales associate at an outdoor gear store, but if that’s not an option, here’s how to do it at home.
• Load the backpack with some weight, padded by towels or pillows. Stuff a pillow at the bottom of the pack, and then put ten to fifteen pounds of books or gear in the pack, and fill in the rest of the air spaces in the pack with clothes or towels. Cinch down the compression straps (the straps on the actual pack that compress the load inside, not the shoulder straps and waist belt). Loosen the shoulder straps, waist belt, and sternum straps all the way out. Pick up the pack and slide your arms through the shoulder straps.
• Tighten the waist belt first, making sure to pull both straps evenly and keep the buckle in the middle. Your iliac crest should split the waist belt, and the bottom of the waist belt should be high enough so it doesn’t interfere with your hip joints when you step up.
• Tighten the shoulder straps next, pulling them so they’re snug but not putting pressure on the tops of your shoulders—your waist should be supporting most of the weight in the pack, and the shoulder straps should more just hold the pack in place. Look in a mirror at your side profile; if there is air between the shoulder straps and your shoulders, either tighten the shoulder straps or adjust the harness to move the top attachment point for the shoulder straps down.
• Tighten the pack’s load-lifting straps next—they’re the straps that rise from the tops of your shoulder straps to the pack at an upward angle. Don’t crank them down too much, just enough that the pack doesn’t wiggle around when you lean forward or move side to side.
• Tighten the sternum strap last—again, don’t cinch it too tightly, just enough to keep the shoulder straps at a comfortable width across your chest.
• If you’ve done everything correctly, the weight should rest on your hips and the pack should not feel as if it’s crushing your shoulders. No fully loaded backpack is going to feel that great to carry, but it should be comfortable enough that you don’t feel as if you have to take it off every half hour on the trail. If your pack doesn’t fit correctly, exchange it for a different size.
How do I pack a backpack?
There are a few goals to keep in mind when you’re packing a backpack for an overnight trip.

1. Get all your stuff inside the pack with a little room to spare.
2. Balance the pack so its weight isn’t pulling you to one side or the other.
3. Get most of the heavy stuff as close to your back as possible—not up at the top of the pack, or at the back of the pack where it will pull you backward. To do this, put the light stuff that you’re not going to use during the day—tent, sleeping bag, sleeping pad—at the bottom. On top of that, put your stove, fuel, and food and most of your water (if you’re using a hydration reservoir like a Camelbak, the reservoir pocket will be against your back already) in the middle section of the pack. Use your clothes to fill the spaces left in the pack (but keep your rain jacket as close to the top as you can, because you might need it while hiking). Once you’ve got everything as tightly packed as possible, throw your snacks and a water bottle on the top, close the pack, and cinch down all the compression straps. You should have a tight, balanced package.
How do I lighten my backpack?
Your pack could always be lighter. Always. You can do two things: choose to deal with it psychologically, or take steps to minimize the weight wherever possible. There are entire books written about the subject of ultralight backpacking and a thousand different opinions about what the best tactics are. Here are three basic things that will help get you started on the path.
1. Adjust your definition of “comfortable.” Leave your pillow at home and your extra pair of socks too. Learn to sleep under a tarp instead of packing a whole tent. Take a lighter-weight sleeping bag, and chop your foam sleeping pad down to two-thirds your body length; use your empty backpack as padding for your legs when you sleep. These are just some suggestions. You can probably think of some others too.
2. Buy a luggage scale. Geeky, yes, but weighing and knowing the weights of every single piece of gear will help you quantify what’s worth the weight and what’s not.
3. Make spreadsheets. This is also geeky, but it’s effective. Once you have a luggage scale to weigh all your stuff, type every item and weight into your spreadsheet so you can obsess over where you can spare an ounce or two.
Should I clip things to the outside of my backpack?
There is a tendency for beginner- to intermediate-level backpacking enthusiasts to clip items to the outside of their backpacks. This is either a phase all backpackers go through or some sort of idea we picked up somewhere that we should have at least one piece of gear clipped to the outside of our pack. There are no real rules about this sort of thing, but your pack should be big enough to hold all your stuff. If it’s not, maybe you’re taking too many things, or maybe you need a bigger pack. Either way, you will find that keeping items inside your pack leads to fewer missing items than does clipping things to the outside of your pack. Backpacking is not a fast sport—if you have items you think you will need to access throughout the day while you’re hiking, put them near the top of your pack. Unclipping a couple of buckles and loosening a drawstring to get to that item takes a few seconds, and you’ll be less likely to arrive at camp to find that, say, the coffee mug you clipped to the outside of your pack or the bandanna you were sure you had securely tied to one strap has gone missing somewhere along the trail.
How should I train for backpacking?
Compared to training for a marathon, backpacking isn’t something a lot of people prepare for physically. But if you’ve got a big trip coming up, a little effort can go a long way in making your outing as comfortable as possible. Hiking, of course, is the best training for backpacking, because it gets you used to utilizing your stabilization muscles, as compared to walking on a treadmill or riding a bicycle (although any cardiovascular exercise is great for general fitness). If you can fill up a backpack with a few pounds of extra weight and go for a hike, it should help ease you into the first day of your backpacking trip, and putting on your 30- or 40-pound pack at the trailhead won’t be such a shock. Take a few short hikes with the actual pack you’ll be using on the trip, if possible, to get your hips and shoulders used to the weight they’ll be carrying. If you strap a 45-pound pack to your hips and shoulders at the beginning of a multiday trip and you haven’t so much as worn a 10-pound pack all year, you may be in for quite a surprise.
What’s the best way to keep my pack dry while backpacking?
There are two different strategies to keeping your pack dry: keep the entire thing dry, or just keep the stuff inside it dry. The first school of thought uses a pack cover, which is a piece of waterproof fabric with an elastic band that covers your entire pack except the part that actually touches your back—it looks and functions like a giant shower cap. The only problem is, it leaves open the part between your back and the backpack, so in downpours some rain can get in and soak your stuff. The second school of thought, keeping the stuff inside dry, uses a simple piece of gear: a trash bag (or a more durable trash compactor bag), lining the inside of the backpack and holding all your stuff, and sealed at the top. The second school of thought subscribes to the theory that your pack itself actually doesn’t need to stay dry, which is true—just make sure that if you go the trash bag route you remember to remove all the items from the external pockets of your backpack and put them inside the trash bag, or they’ll get soaked too.
Can I ever drink water in the backcountry without treating it first?
Plenty of hiking and climbing guides in the Sierra Nevada and other places drink water from mountain streams without treating it. The rationale is that at a high-altitude or other remote location animal activity that would contaminate a stream isn’t present at a high enough level to actually worry about. That theory is of course never a guarantee, and if you’re a better-safe-than-sorry type of person you’ll want to treat your water every chance you get. The advantage of not treating your water is simply convenience (you don’t have to carry a filter or chemicals with you), and the advantage of treating your water is the assurance that you won’t get Giardia or another parasite or virus. Mountain water sources aren’t tested for contamination, so all claims that the water is fine at high altitudes are anecdotal or informally studied. If the testimony of someone who’s been hiking in, say, the Sierras for years without treating drinking water and has never gotten sick is proof enough for you, then go for it. If you’re not sure, it’s probably best to treat the water before you drink it.
How do I find water to drink?
Your water filtration system won’t be of much use if you can’t find any water to filter with it. If you’re backpacking on a somewhat popular route, or are reading about it in a guidebook, there should be well-established information about where the water sources are located—make note of those and remember if there’s a long distance between them at any point. Established campsites are usually near creeks, ponds, or lakes, or at least within short walking distance (300 feet or so) of a nearby water source. If you’re striking out on your own on a route that doesn’t have a lot of information published about it, the map is going to be your best friend in finding water. Look for lakes, ponds, and tarns along your route, as well as creeks. Just finding any water isn’t exactly enough—you still need to be able to get it into your water bottle. If the creek you’ve found isn’t more than a ½ inch deep, you won’t be able to get your water bottle deep enough to get any water into it, which means you might be sitting there for quite a while using a spoon to fill your bottle. In the desert, information about water is critical, so research it before your trip. If it’s rained recently, you may find potholes full of water in slickrock, but if it hasn’t rained in a long time, water sources could be few and far between.
Which water treatment option is right for me?
There are four basic types of water treatment options, and each has its own advantages and disadvantages. Here’s a quick rundown:
• Water filters: Water filters remove pathogens including protozoa and bacteria but don’t remove viruses—this is widely considered to be adequate for wilderness water treatment in the United States and Canada. Filters include pump-style devices as well as gravity filters, filtering water bottles, and filtering straws.
• Water purifiers: Water purifiers remove bacteria, protozoa, and viruses. Some purifiers are just pumps with more stringent filter systems that catch viruses, some are pumps with the additional step of a chemical additive, and some are electronic devices that kill microorganisms with UV light.
• Halogens: Iodine and chlorine dioxide are chemical additives (usually carried as tablets in the backcountry) that kill bacteria, viruses, and Giardia but not cryptosporidium. Halogens are lightweight but alter the taste of water.
• Boiling: Boiling water is the simplest, most effective method of treating water, but it consumes lots of fuel (and time) in the backcountry. Usually the amount of fuel needed to boil all drinking water on a backcountry trip makes it prohibitive.
How do I fish for my dinner?
Types of fish, fishing methods, and equipment used to catch fish all vary widely—as does individual success at catching fish. But a basic and ancient method of fishing, cane pole fishing, can be done with limited equipment: an inexpensive cane pole (made of bamboo, aluminum, or fiberglass), monofilament fishing line, fishing hooks, and bait (or lures, depending on the type of fish you’re trying to catch and where you’re located). Roll out a length of fishing line a foot or two longer than the pole, tie one end to the top of the pole (there may or may not be an eyelet), and tie your hook or lure to the other end. Bait the hook (if you’re using bait), and you’re ready to fish. In cane pole fishing, you won’t “cast” the line as you would in other types of fishing—you swing the hook/bait out into the water. With the bottom of the pole in one hand, hold the fishing line just above the hook with your other hand, and gently swing the line out into the water. Then remember that this is fishing, so be patient. Wait a few minutes with your line in the water, and if you’re not catching anything try a different spot. If a fish bites your line, slowly but firmly pull the line out of the water and bring the fish into shore and your hand. To remove the hook, hold the fish with one hand, thumb on the gills of one side of the fish’s head, fingers on the gills on the other side. Work the hook out, making sure to angle the barb correctly so it doesn’t catch.

Which stove/fuel should I use?
There are five main types of camping stoves, and all have their pros and cons. There’s no one correct stove for all situations, but plenty of them can be used on almost all camping outings.
• Two-burner propane stoves: Generally used only for car/campground camping because of their weight and bulk (typically they’re the size of a briefcase and weigh around 10 pounds). Although a two-burner stove probably doesn’t seem like much compared to most home stoves that have four burners, in the backcountry two burners are a luxury. Two-burner stoves use propane canister fuel, are available at almost all stores that sell camping gear, and are often sold at supermarkets too.
• Isobutane/canister stoves: Canister stoves, or single-burner backpacking stoves, are the first choice of most backpackers because they’re lightweight, easy to use, and straightforward: you screw a canister of isobutane fuel onto the stove, light it, and adjust the flame to your preference. Many popular models integrate a stove and pot or cup and break down to a small size for packing in a backpack. The isobutane fuel canisters are convenient but are not legal as checked or carry-on baggage on airline flights and are sometimes not available for purchase in all areas. And if you only use half a fuel canister on a trip, it is not refillable, so you’ll be starting your next trip with a half-full canister that may or may not contain enough fuel.
• Liquid fuel stoves: Liquid fuel, or “white gas,” stoves use a fuel bottle that you hand-pressurize with a small pumping mechanism and refill from a larger gas can in between trips. Liquid fuel stoves are single-burner, are used for backpacking and other backcountry activities in which weight and bulk are of concern, and have a reputation for being reliable. They are usually repairable and cleanable in the field, and many people prefer them because they leave less of an environmental footprint—instead of using disposable canister fuel and producing waste, you simply refill the bottle. White gas is generally available in most of the world, and if you’re flying, airlines allow empty, cleaned fuel bottles in luggage. One disadvantage to liquid fuel stoves is that they have only two heat settings: high and off.
• Alcohol stoves: Alcohol stoves are a favorite of ultralight backpackers; they’re tiny, lightweight, and simple, and the fuel—alcohol or often methanol sold as gas-line additives at convenience stores—is readily available. Many long-distance hikers choose to make their own alcohol stove out of an empty beer can. Alcohol stoves aren’t a particularly good choice for beginning backcountry travelers because they take a little know-how and practice to use safely and effectively.
• Solid-fuel stoves: Solid-fuel stoves run on either special tablets or wood. Tablet stoves are extremely lightweight but are often not as efficient at producing heat as other stoves, and the fuel tablets are expensive compared to other fuels. In dry environments like the desert, solid-fuel stoves (or “twig stoves”) can be advantageous because you don’t have to carry fuel with you—you pick up dry sticks and twigs and use those to fuel the stove. Obviously twig stoves can be tough to use in places where finding dry firewood is an issue.
How do I forage for food?
Ideally, most of your adventures won’t force you to the point of foraging—hopefully they all end with a beer and a cheeseburger back in civilization. But just in case it comes down to survival, here are a few basics of foraging for food.
• The bark of most pine trees and cottonwoods is edible, once you scrape down through the brown/gray outer bark through the green stuff into the white cambium.
• The roots of cattails, roasted over a fire, contain as many carbohydrates as a potato.
• Beechnuts, walnuts, pecans, butternuts, and pine nuts are pickable in the fall and can all be eaten raw. Wild berries are a good source of nutrients. Avoid white berries—they are not edible—but wild red raspberries, blackberries, blueberries, and huckleberries are fair game. Many wild berries are poisonous, but most aggregate berries—berries like raspberries and blackberries, made up of tiny fruits packed together into a single berry—are not.
• Rosehips are great sources of vitamin C and are tasty once you cut them open to remove the seeds.
• The idea of eating insects may be somewhat gross, but they are a good source of protein. Both ants and beetles have 14 grams of protein per 100 grams of weight. Brightly colored insects are usually poisonous. Flies, mosquitoes, and ticks all carry disease and shouldn’t be eaten.
What kinds of pots and pans should I take backpacking?
If you’re backpacking, you don’t want to carry a bunch of extra weight, so your cast-iron skillet is most likely going to have to stay home. Lots of companies make smart cook-sets that include pots, cups, bowls, and even silverware, all nested inside each other in a compact setup that doesn’t take up much room in a backpack. A set like this is good to have but is not mandatory—you can assemble a decent cooking setup for a few bucks with a few basic pieces.
• Cooking pot: You can use pots with or without a nonstick coating. Nonstick is of course helpful to have but will add a little cost to the pot. Most pots are made of aluminum, but you can also spend a few more dollars and get titanium pots, which are lighter in weight. You’ll have to decide if you want one pot or two—lots of cook-sets include two pots, one large one, and a smaller one that nests inside the large one for easy packing. You can cook great meals in the backcountry with only one pot, so buying two isn’t 100 percent necessary if you don’t mind a one-pot meal. But you can buy the set and leave the second smaller pot at home if you want to go light, bringing it only on trips where you don’t mind the extra weight.
• Cup/mug and bowl: If you’re a true minimalist, you’ll learn to eat and drink out of a single cup and not deal with the extra weight of dishes. Backcountry meals tend to be pasta meals eaten out of a bowl anyway, so learning to eat out of a mug isn’t such a stretch. A simple aluminum or plastic mug will work great (you don’t need a heavy insulated travel mug with a lid). If you’re the type of person who absolutely has to have coffee and breakfast at the same time, though, you’ll want to bring a bowl in addition to your mug. An inexpensive mug does the job in the backcountry, and a plastic or aluminum bowl won’t run you more than ten dollars. Again, titanium bowls and mugs are lighter but more expensive.
• Spoon and fork or spork: A good durable plastic spoon will run you about one dollar at most gear stores. If you want, you can also bring a fork. Forks aren’t that advantageous in the backcountry—you won’t be stabbing salad greens or twirling pasta—but if you want a fork it’s not that much extra weight. Or you can split the difference and bring a spork.
Do I need to carry a fork, knife, and spoon?
The backcountry is no place for regular table manners. Actually, the backcountry is usually not the place for a table. You are of course free to take whatever dining utensils you want on a trip, but if you’re packing everything in a backpack, you might consider how much weight and bulk you’re adding and how much functionality you’re getting for that weight. Take, for example, a knife. You should have a pocketknife with you already, or at least one on a multitool, so packing a dining knife is probably redundant. Most backpacking meals tend to be pastas or other spoonable dishes, not steaks or other foods that necessitate a fork. If you limit yourself to a single spoon or a spork, you’ll find you can eat pretty much everything with that one piece of cutlery—or at least make do.
Do I have to eat dehydrated meals or MREs?
You absolutely do not have to eat dehydrated meals or military Meals Ready to Eat (MREs). Although plenty of visionary food companies make wonderfully tasty dehydrated meal flavors and you can feast on herbed mushroom risotto and cheese enchilada ranchero, dehydrated meals can be a bit on the expensive side (and can sometimes contain downright dangerous levels of fiber). Instead, bring anything you want to eat on your trip, but keep in mind you’ll have limited water and no refrigeration, so you probably won’t be bringing a stick of butter along. Macaroni and cheese can be a wonderful one-pot camp meal, and so can lots of other pasta options—check for powdered pasta sauces, and think about tossing in some nuts as a protein source. If you’re just camping for one night and you don’t want to carry a stove, you can pack leftover pizza, takeout Chinese food, or a burrito and eat it cold.
Each of these easy meals should be enough to feed two hungry backpackers.
1. Pesto Pine Nut Pasta
You’ll need: 3 cups fusilli pasta, 1 cup pine nuts, 1 package dried pesto, and 2 tablespoons olive oil.
To cook: Boil water, cook the pasta, and drain. Stir in the dried pesto, olive oil, and pine nuts.
2. Thai Peanut Noodles
You’ll need: 2 packages ramen noodles (minus the seasoning packets), ½ cup Thai peanut sauce (repackaged in a plastic container, if necessary), ⅔ cup peanuts, and ⅔ cup dehydrated peppers or dehydrated vegetables.
To cook: Boil water, cook the ramen noodles and vegetables, and drain. Stir in the Thai peanut sauce and peanuts.
3. Chili Macaroni and Cheese
You’ll need: 1 box of macaroni and cheese, 2 tablespoons olive oil, ⅓ cup powdered milk, and 1 can chili.
To cook: Boil water, cook the pasta, and drain. Stir in the olive oil, powdered milk, and powdered cheese until the sauce is consistent. Pour in the can of chili and reheat the entire mixture over low heat.
How do I wash my dishes in camp?
It’s probably your first instinct to take your dishes over to a source of running water to rinse them off, but this is pretty much the worst policy in the backcountry—the ecosystem in the nearest creek is much better off without your food scraps floating through it. Since you don’t have a nice pair of yellow dishwashing gloves and a sink full of water, make do with what you have: some water from your water bottle and your finger. That’s right. Get all the solid food particles out of your pot or cup, and then dump a small amount of water into the dish, scrubbing with your finger to remove food. Scatter the small amount of dishwater in a wide area—preferably far from where you’re sleeping (bears!)—or, if you prefer the tough-guy method, drink the dishwater, because come on, it’s only food plus a little water. This process won’t get your dishes squeaky clean, but this is camping, not glamping. If you’ve got some stubborn food residue on a pot, such as cheese sauce from your mac and cheese, pour some water in the pot and heat the water on your stove for a minute or two to help loosen it—this is the backcountry version of “soaking” your dishes in the kitchen sink. When you’re done washing your dishes, let them air-dry before putting them away.

Can I take perishables like meat and cheese on a backpacking trip?
A good general rule is that if a meat or cheese product can survive at room temperature in a convenience store or grocery store, it will be fine in your backpack for a few days (or sixteen months, depending on the product). Most processed-sausage products are good for several days in the backcountry (salami has long been a staple for outdoorspeople) and are good sources of protein and fat. Jerky is also of course absolutely fine without refrigeration. Cheeses can do surprisingly well on multiday trips, especially semihard cheeses like cheddar and jack, and hard cheeses like Parmesan and Pecorino Romano can last for days in a backpack without spoiling—generally, the harder a cheese, the longer it will keep without refrigeration.
How do I keep from stinking on a long backpacking trip?
On a long backpacking trip, it’s a hard truth that you’re going to develop some BO. The good thing is that your friends probably don’t expect you to smell like the fragrance department at Macy’s the entire time—and they will smell as bad as you do. You don’t have running water, but a few strategic things can keep you smelling a little better. Carry a couple of wet wipes and take care of the problem areas every couple days (pack out the wet wipes with you), and if you have a chance to do a little washing up, grab a pot of water from a stream or lake and give those same areas a good rinse (don’t worry about purifying the water—it’s fine as long as you’re not drinking it, and the next time you use the pot, bring whatever’s in it to a boil first). If you notice the armpits of your synthetic-fabric shirt seem to be smellier than usual, it’s not your fault—synthetics have a tendency to develop and hold body odor more than other fabrics. It’s just another reality to deal with. You’ll get used to it.
Should I bring something to keep me entertained during downtime at camp?
Entertainment is never a bad idea to help pass a rainy day spent in a tent or to give you something to do if you have some extra time in the afternoon before dinner and you aren’t the type to, say, just sit next to an alpine lake and contemplate the size of the universe. Keep your source of entertainment light and you won’t regret packing it even if you don’t end up using it: a deck of cards, a small notebook and pencil or pen, a light paperback book, or, if you’re taking your phone on your trip, a book on an e-book phone app. If it’s a long trip with a partner who likes the same type of books you do, consider bringing a paperback of short stories (or anything that can be read out of page order), splitting it roughly down the middle at the binding, and carrying half in your pack and half in your friend’s pack. You can read your respective halves of the book and trade halves when you’re both finished, thus saving a few ounces of weight versus each carrying your own book.
Can I take booze in the backcountry?
When it comes to imbibing around the campfire, you’re really only limited by your willingness to carry extra weight in your backpack. Yes, you can take a six-pack of your favorite IPA, but that six-pack weighs just over 4½ pounds—which is a lot of weight. A better solution is to take a flask of bourbon or scotch, which has way more firepower per pound of weight in your backpack. Several companies make lightweight plastic flasks specifically for camping. Whatever you do, don’t take glass bottles—a broken bottle inside your backpack will soak everything you need to stay warm (including your sleeping bag), not to mention how broken glass shards will shred the fabrics in your tent, jackets, and sleeping bag. If you think a couple cans of beer are worth it, by all means, stuff them in your pack before you leave, and when you get to camp, bury them in a creek or a snowbank for a few minutes and cool them down (but make sure they don’t float downstream). And be sure to take your empties with you when you leave.
What are some easy constellations to see when I go camping?
• Ursa Major: Probably everyone who’s ever looked up at the night sky outside of a city can identify the Big Dipper. Find that, and you’ve found the butt and tail of Ursa Major (The Great Bear). Follow the top of the cup toward the bear’s head.
• Ursa Minor/Little Dipper: Although it’s a bit of a stretch to imagine the Little Dipper being a bear, it’s easy to find. The tip of the handle of the Little Dipper is Polaris, the North Star.
• Orion: Orion is one of the most visible and famous constellations in history. Find it by finding Orion’s Belt, the tight row of three stars that connect the shoulders and feet.
• Cassiopeia: Cassiopeia is a W-shaped grouping of five bright stars in the northern sky. It’s most visible in the fall, but easy to spot year-round.

Should I take an extra pair of “camp shoes” on a backpacking trip?
If you can convince yourself that you can live without your purple dinosaur slippers for a couple nights, a backpacking trip is the time to do that—they’re bulky and heavy and will get dirty from walking around camp. Serious answer: Some people prefer to have a second pair of shoes to wear at camp after a long day of hiking or a second pair to wear while wading into lakes or crossing streams. Some people prefer to not pack a second pair of shoes because of the added weight and bulk. If you do pack a second pair, try something lightweight like Crocs or Sanuks or a pair of flip-flops, rather than a second pair of hiking or athletic shoes, which can add up to 2 pounds to your pack weight.
Should I use a bear canister?
Bear canisters, sealed canisters made of hard plastic that have been tested to be bear-proof, are mandatory in some areas, such as Yosemite and Glacier National Park. In others, they’re only recommended. Bear canisters are completely bear-proof if used correctly but are bulky and of course heavy (around 2 pounds empty). Fitting one into a pack, and packing all your other gear around it, can get tiresome. On the other hand, when you’re tired after making dinner and you’re ready to crawl into your sleeping bag for the night, using a bear canister is much easier than stringing up a bear bag—you can just close it, lock it, and walk it a little ways from your camp and leave it for the night. Since they’re so sturdy, a bear canister also make a great stool to sit on while cooking. If bear canisters aren’t required in the area you’re hiking in, it’s your call whether to take one. If all your camps are above treeline, the general thinking is that bear canisters are unnecessary because bears spend almost no time above treeline. Another option is the Ursack, a Kevlar sack that closes tight with a Kevlar cord and is lined with a ziplock plastic bag that keeps food odors inside. Ursacks are lighter weight than bear canisters and much easier to pack, but they’re not legal substitutes in all areas that require bear canisters.
Bears like food, and they don’t care if it’s yours. So before you zip yourself into your sleeping bag at night, you need to secure your food from potentially curious bears—and keeping it in your sleeping bag is a bad idea. To secure your food in a “bear bag,” you’ll need one extra stuff sack that can fit all your food in it, plus a 60-foot (or longer) length of cord. Grab all your food (and toiletries that have any sort of smell, like your toothpaste), stick them in the stuff sack, and find a tree at least 100 feet from your campsite. Tie one end of your cord to a rock, and toss the rock over a tree branch that’s at least 14 feet high. Your cord will trail the rock over the branch. Make sure it loops over the branch at least 6 feet away from the tree trunk (bears can climb up the trunk and reach out). Grab the rock end of the cord, untie the rock, and tie your stuff sack full of food to the cord. Pull on the opposite end of the cord, hauling your bear bag up until it’s almost touching the branch—it helps to have a friend pushing the bag from below as you pull on the cord. Tie the non–bear bag end of the cord to something secure (you can wrap it around the tree trunk or other lower branches) to make sure the bag stays in place all night.
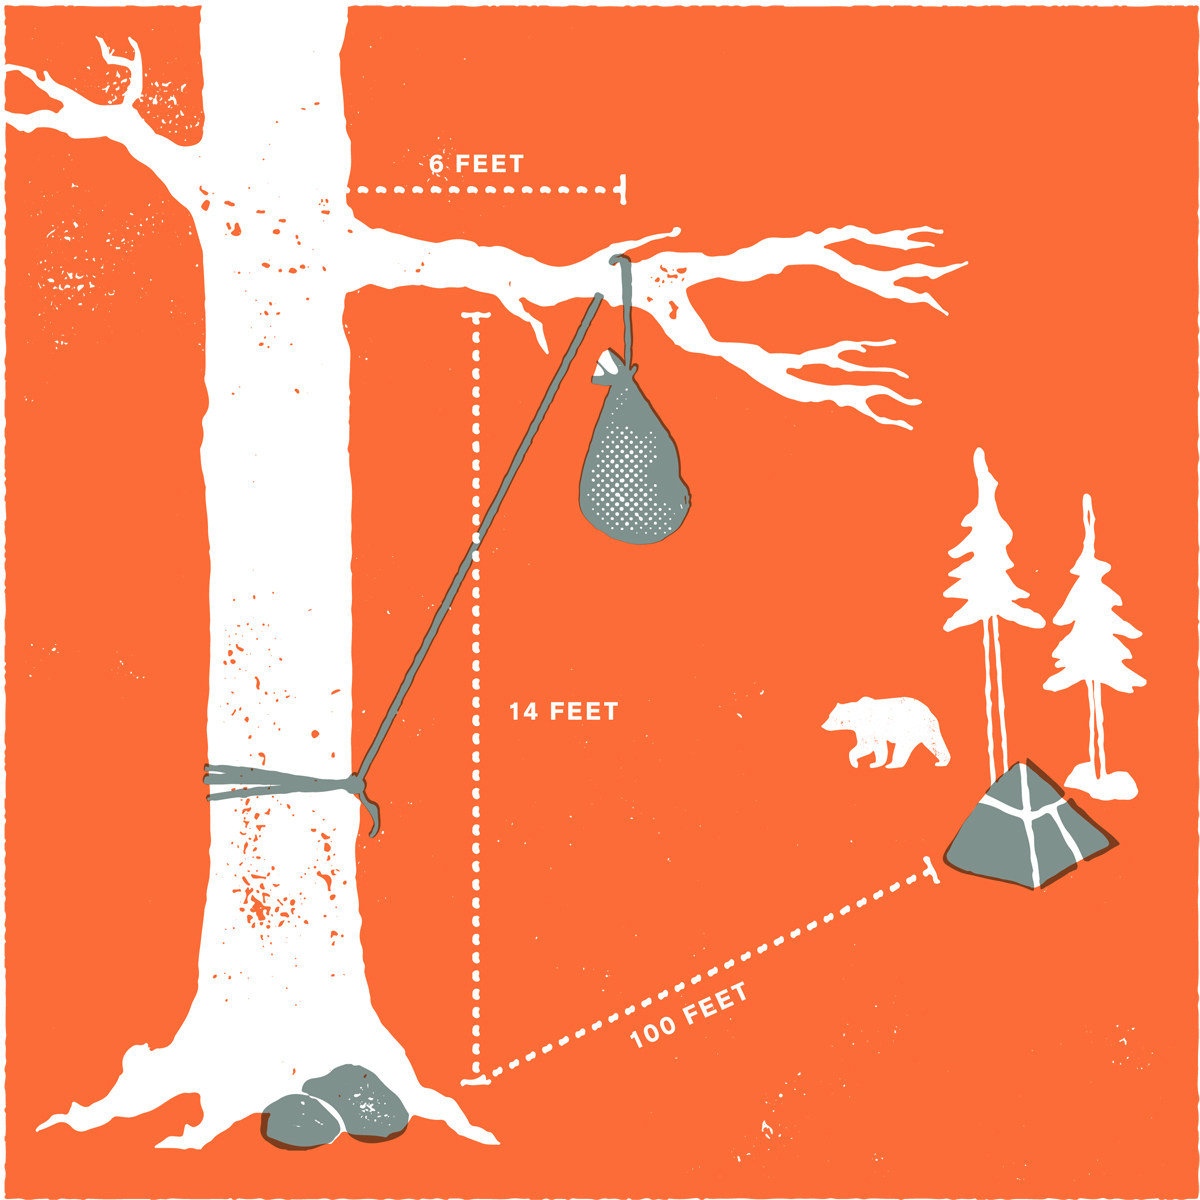
How do I keep smaller critters from eating my food?
Bears are a danger because if they’ve found your food they’ve pretty much found you, and it’s best to not be that close to a bear. Other animals, like mice and squirrels, are much less of a threat to your life but can get into your food and put a huge hitch in your trip, whether it’s a weeklong backpacking trip or a day out climbing. If you’re leaving your pack somewhere with food in it (such as at the base of a climb, or at camp while you head out for a quick trip to summit a peak), you might consider a little insurance for your food. For small day trips, a screw-top plastic container (like the kind powdered drink mix comes in) can function as a sort of bear canister that protects against aggressive squirrels, who in some areas have learned how to open backpack zippers, or, lacking that skill, might just chew through your pack to get to your PB&J sandwich. For longer trips, an Ursack, a Kevlar bag that cinches tight with a cord at the top, can stop pretty much any critter from getting inside (lots of people carry them instead of bear canisters in areas where they’re accepted) and will hold up to about six days’ worth of food.
Should I carry a solar panel when I go backpacking?
A small solar panel can give you the capacity to charge electronic devices that charge off a USB port, but to charge anything with an AC plug you have to carry an additional battery and converter that weighs about 1 pound. Decide what your needs are before the trip—if you’re recharging only your smartphone and you need to do it only once during the trip, you can probably just take a lipstick-sized USB charger and forgo the solar panel. If you need to charge bigger batteries for, say, a DSLR camera, maybe consider buying one or two extra batteries, which would save lots of weight and bulk over packing a solar panel and battery unit. But if you’re going heavy on the electronics for a long trip (and are shooting a lot of video, for example), a small solar panel and battery unit will keep all your gear charged.
Should I take a chair with me?
Rocks are nature’s original chairs, but humans have managed to create furniture that offers more back support and a little more cushioning. If you’re traveling light and you don’t mind sitting on rocks or logs, you’ll probably forgo the idea of packing a chair. But if you want a chair, several manufacturers have been making lightweight, nonbulky options for many years—from the classic style that essentially acts as a lightly padded sling holding you by the back and butt as you sit on the ground, to the newer, ultralight miniature-butterfly-style chairs that keep your butt a few inches off the ground. Backpacking-style camp chairs usually pack down to a size smaller than a rolled-up sleeping pad and weigh between one and two pounds.
How do I make a camping trip romantic for my significant other?
As is true in every relationship, romance comes from the little things you do to show someone you care about him or her. A camping trip is no different—just probably smellier than usual. But little things can make a big difference, like blowing up your boyfriend or girlfriend’s sleeping pad for them, bringing a string of battery-powered lights to hang up in the tent, or surprising him or her with a small bottle of wine or dessert you secretly packed. Fortunately, when you’re roughing it, effort seems to be appreciated more than when you’re in the city, so you don’t have to 100 percent nail it. Just put in some effort and be creative and it will be appreciated.
How do I dry out damp clothes on a backpacking trip?
If your clothes get wet from sweat, rain, or wading through a creek, sometimes your body is the best dryer—for example, if your pants get soaked up to the knees in the morning and you still have 8 miles to hike that day, they’ll be dry by the time you get to camp. But if you got drenched in a rainstorm and the sun comes out, you can treat your backpack as a clothesline, tying some wet layers on the outside of the back of the pack so they can dry in the sun. Just make sure to tie them securely—a shirt falling off your pack behind you doesn’t make much noise, so you’re unlikely to hear it hit the ground and you might walk miles before you realize it’s missing. In camp, hang wet layers on the outside of your tent in the sun (again, hang them securely; the wind can blow them away easily). If you have only a couple damp articles of clothing, such as a pair of socks or a T-shirt, take them off after you’ve gotten in your sleeping bag for the night and place them near your legs. Your sleeping bag will act like an oven, and in the morning, your once-damp socks and shirt will be dry.
How can I hike the John Muir Trail?
The John Muir Trail has become one of America’s most famous long-distance trails: 211 miles through California’s iconic Sierra Nevada, from Yosemite National Park to the summit of Mount Whitney. Its fame has, of course, brought popularity: as many as 3,500 people per year apply to hike the trail south to north. If you want to hike it, you’ll need a few things (not including the gear).
• A permit. Permits to hike the John Muir Trail are distributed by either Yosemite National Park (for hikers going north to south) or the Inyo National Forest (for hikers going south to north). For Yosemite-issued permits, apply exactly 168 days in advance of your desired start date. For Inyo National Forest permits, apply for the lottery starting April 1 for the year of your hike.
• Fitness. The hike takes most hikers two to three weeks of walking, carrying up to seven days’ worth of food at a time, and it’s not a flat walk. It’s a good idea to train for your trip (see here), and to take a few two- and three-day backpacking trips to get used to carrying your pack.
• Food. Two to three weeks’ worth of food is heavy, so Muir Trail hikers utilize food drops provided by resorts and ranches along the route, as well as resupply drops arranged in advance with horsepacking services. Research, plan ahead, and figure out how many food drops you’ll need for your trip well before your departure date.
Can I hike the Appalachian Trail or the Pacific Crest Trail?
Here’s the biggest obstacle to completing a thru-hike of the Appalachian Trail or the Pacific Crest Trail: your job. Yes, the thing you do forty hours a week or more to ensure that you can eat and pay your rent. Here’s why: The Appalachian Trail and the Pacific Crest Trail are both journeys of six months or more, the Appalachian Trail being 2,190 miles long and the Pacific Crest Trail being 2,650 miles long. And your employer’s vacation policy probably doesn’t guarantee you six months of vacation per year, so you have to make arrangements for a sabbatical or make arrangements to quit your job.
So after you quit your job, how tough is it? It’s not advisable to take on a 2,000-plus-mile trail as your first backpacking trip (although it has been done), but once you’ve figured out your systems and you’re comfortable with two-, three-, and six-day backpacking trips, there’s no reason to think you can’t do the Appalachian Trail. The Pacific Crest Trail can, in some years, require a few more mountaineering skills, such as negotiating a snow slope and self-arresting with an ice ax (see here), and it’s advisable to get a couple of alpine backpacking trips under your belt before taking on the PCT. But the length is the main challenge, both in the time off work required to do it and the day-after-day stick-to-itiveness to finish a six-month walk.
How can I backpack to the bottom of the Grand Canyon?
There are two major challenges to a backpacking trip to the bottom of the Grand Canyon: getting a permit and doing the grueling hike in and out.
The Grand Canyon is a popular backpacking destination, and the best way to see it for the first time is a hike down to the Bright Angel Campground at the bottom, which fills up almost every night during the high season. How do you secure a spot? Fill out a permit request and get it to the National Park Service the first day of the month, four months before the month you want to do your trip (e.g., June 1 for a backpacking trip starting October 15). Weekends are popular (and thus harder to get permits for), so aim for a midweek trip instead and you’ll have better odds. Once you’ve gotten your permit, you need to get in shape.
The tough part of backpacking in the Grand Canyon isn’t getting down to the bottom—it’s getting back out and up to the South Rim, which is 4,400 vertical feet up a rocky, dusty trail, with all your gear on your back. But if you train for it, there’s no reason you can’t do it. Prepare by getting as many vertical feet under your belt as possible—if you’re at the gym, get on the stair climber instead of the treadmill, and at work take the stairs instead of the elevator. Imagine climbing the stairs to the top of a 440-story building: that’s approximately what you’ll do to get from the Colorado River back up to the South Rim of the Grand Canyon. Cardio exercise is obviously good for you, but more important is working and developing those leg, hip, and butt muscles that will help you climb out of the canyon with that heavy pack on your back. So focus on up, up, up when you’re training.
Can I take stove fuel, ice axes, and trekking poles on an airline flight?
No type of backpacking stove gas is allowed on any airline flight, even in checked luggage. However, most airlines do allow empty white-gas bottles in checked bags—just make sure you clean the bottle out with soap and water before flying, and leave it unsealed in your bag. Ice axes, not surprisingly, are allowed only in checked bags (make sure you determine whether your ice ax will actually fit in your checked bag a few weeks before you leave—if it’s too long, you’ll have to buy a shorter one or arrange for another option at your destination). Trekking poles are sometimes okay to take in carry-on luggage, but it’s better to be safe than sorry and to pack them in a piece of checked luggage instead of gambling on it.
Can I rent camping gear?
One of the great things about many outdoor sports, like skiing and camping, is that you can often try something out before committing hundreds or thousands of dollars to buying all the appropriate gear. So if you rent a tent and try a couple of nights sleeping in it and find out you totally hate it, you’re out only a fraction of the dollars you might have been had you gone on a quick shopping spree before your trip. Many outdoor stores like REI and EMS rent camping gear, including backpacks, tents, sleeping pads, stoves, and sleeping bags. Sleeping bags are typically rented out with a liner (which is washed in between rentals) so you’re not spending your nights out under the stars in a dirty sleeping bag. All you have to do is return the gear undamaged and clean. Rental sleeping bags can also be great for including a friend who doesn’t have gear for your weekend camping trip, or for planning a trip where a rented three-person tent would be more ideal than the two-person tent you have at home.
Is it still considered camping if I’m in an RV?
It’s funny—people who go camping sometimes have this idea that if they’re roughing it more than the people at the next site in a campground—they have a smaller tent, or fewer things to make them more comfortable—they’re doing camping correctly. Those in an RV of course have the most comfortable digs at any campground (unless they’re sharing it with a world-record-holding snorer/farter), and some people believe that it’s not camping. But the number one objective in camping is to have fun, and whether that means sleeping on the hard ground in an ultralight sleeping bag or pulling into a campground in a 44-foot RV, you do you. If you are in an RV, it’s good to be courteous and use a generator sparingly (what doesn’t sound like much noise when you’re inside an RV can be extremely annoying to people camping in tents 50 or 150 feet away from you), and it never hurts on a cold night to invite the neighbors into your rig for some hot chocolate (or wine).
What should I do to make my friend’s first camping experience a good one?
If you’re an experienced camper and you have friends (or even better, a girlfriend or boyfriend) who you think might like it too, the best thing you can do for them is to make sure they have fun on their first camping trip—because ideally, they’ll go with you again, and in the case of romantic relationships won’t break up with you. When planning, remember that your friend’s experience level is zero, so he or she knows nothing about gear or how to sleep outside or how it’s not exactly as clean as, say, a room at the Radisson. Find out if your friend has any gear at all, and if not, do your best to find it for him or her—rent or borrow whatever is needed before the trip. Take care of all the food shopping, cooking, and campsite reservations, and maybe do a little extra to make sure he or she is comfortable. Sleeping outside can be quite a shock to someone who’s not used to it, so an extra sleeping pad, a pillow, hand sanitizer, earplugs, or a good camp chair can make a big difference. If your friend has never camped before at all, car camping is probably a better introduction than a backpacking trip, as many campgrounds have restrooms and picnic tables. Start there, and if he or she enjoys the first trip, ease your way into longer trips and the backcountry.