06 Building Pots from Multiple Vessels
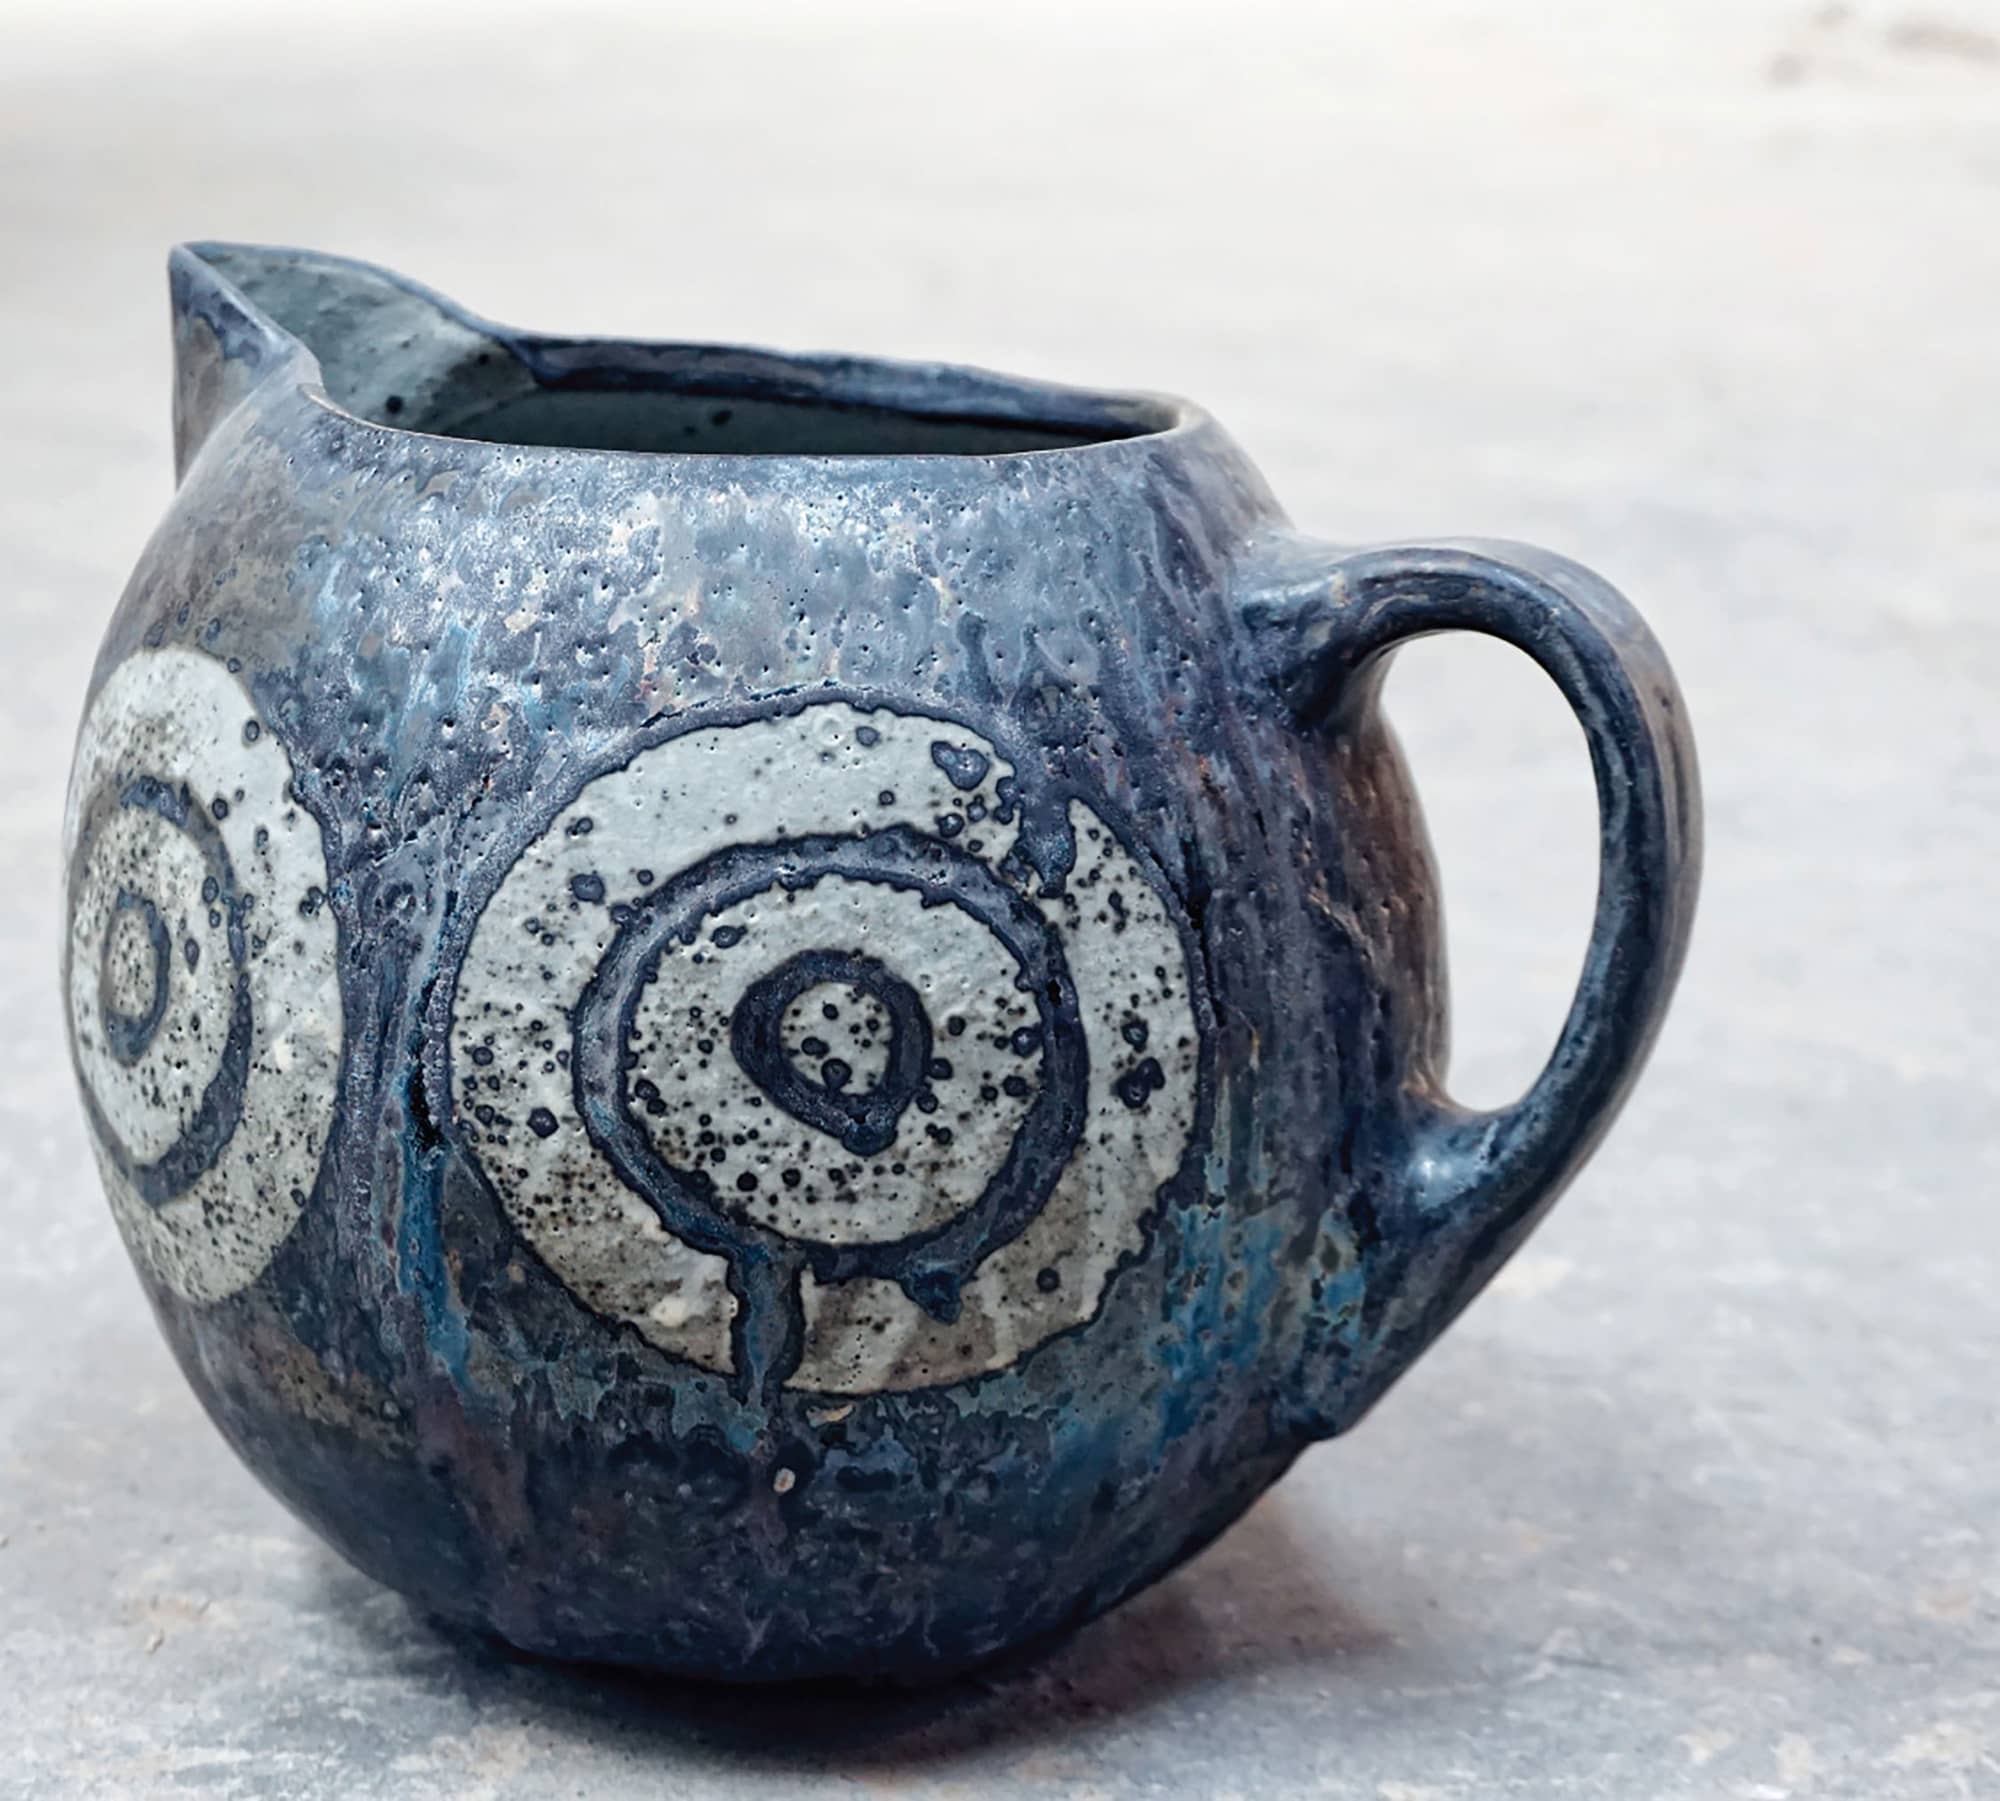
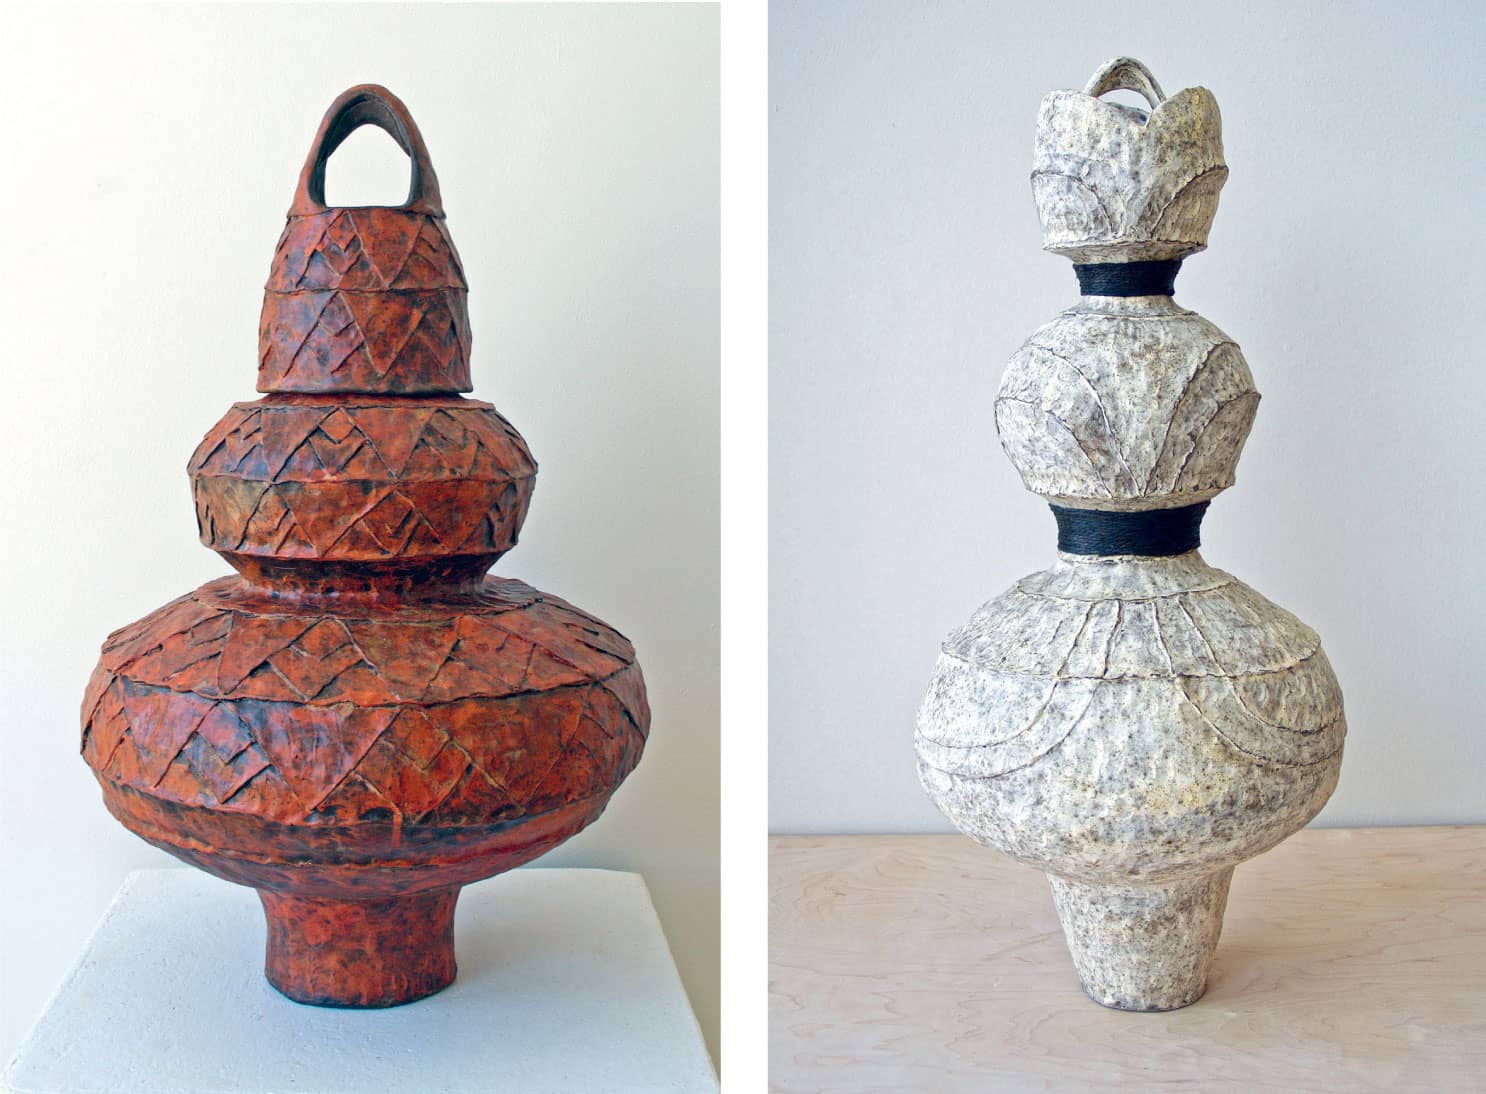
Make a Moon Vase
I got to a place where I wanted to make larger forms, but I just didn’t have the strength to throw them. There is a way to throw multiple forms and put them together on the wheel, but I didn’t love that technique. So, I tried making two bowls from the same mold and attaching them and it worked really well: It was a fun form to leave as is or expand upon.
WORKING LARGER WITH MULTIPLE POTS
By using a single joining technique and then varying the size of the opening, you can make the pot a vase or a pitcher. By adding coils to the opening you can create a neck at any height you wish. You can add handles and spouts. Putting two pots together is a fun way to make larger forms without struggling on the wheel. And it's a great way to experiment and find unconventional and interesting shapes for new pots.
YOU’LL NEED
 Surform
Flexible knife
Plastic ribs
Mason jar or other tall prop
Slab roller, rolling pin, or slab sticks
Ware board
Serrated rib
Slip
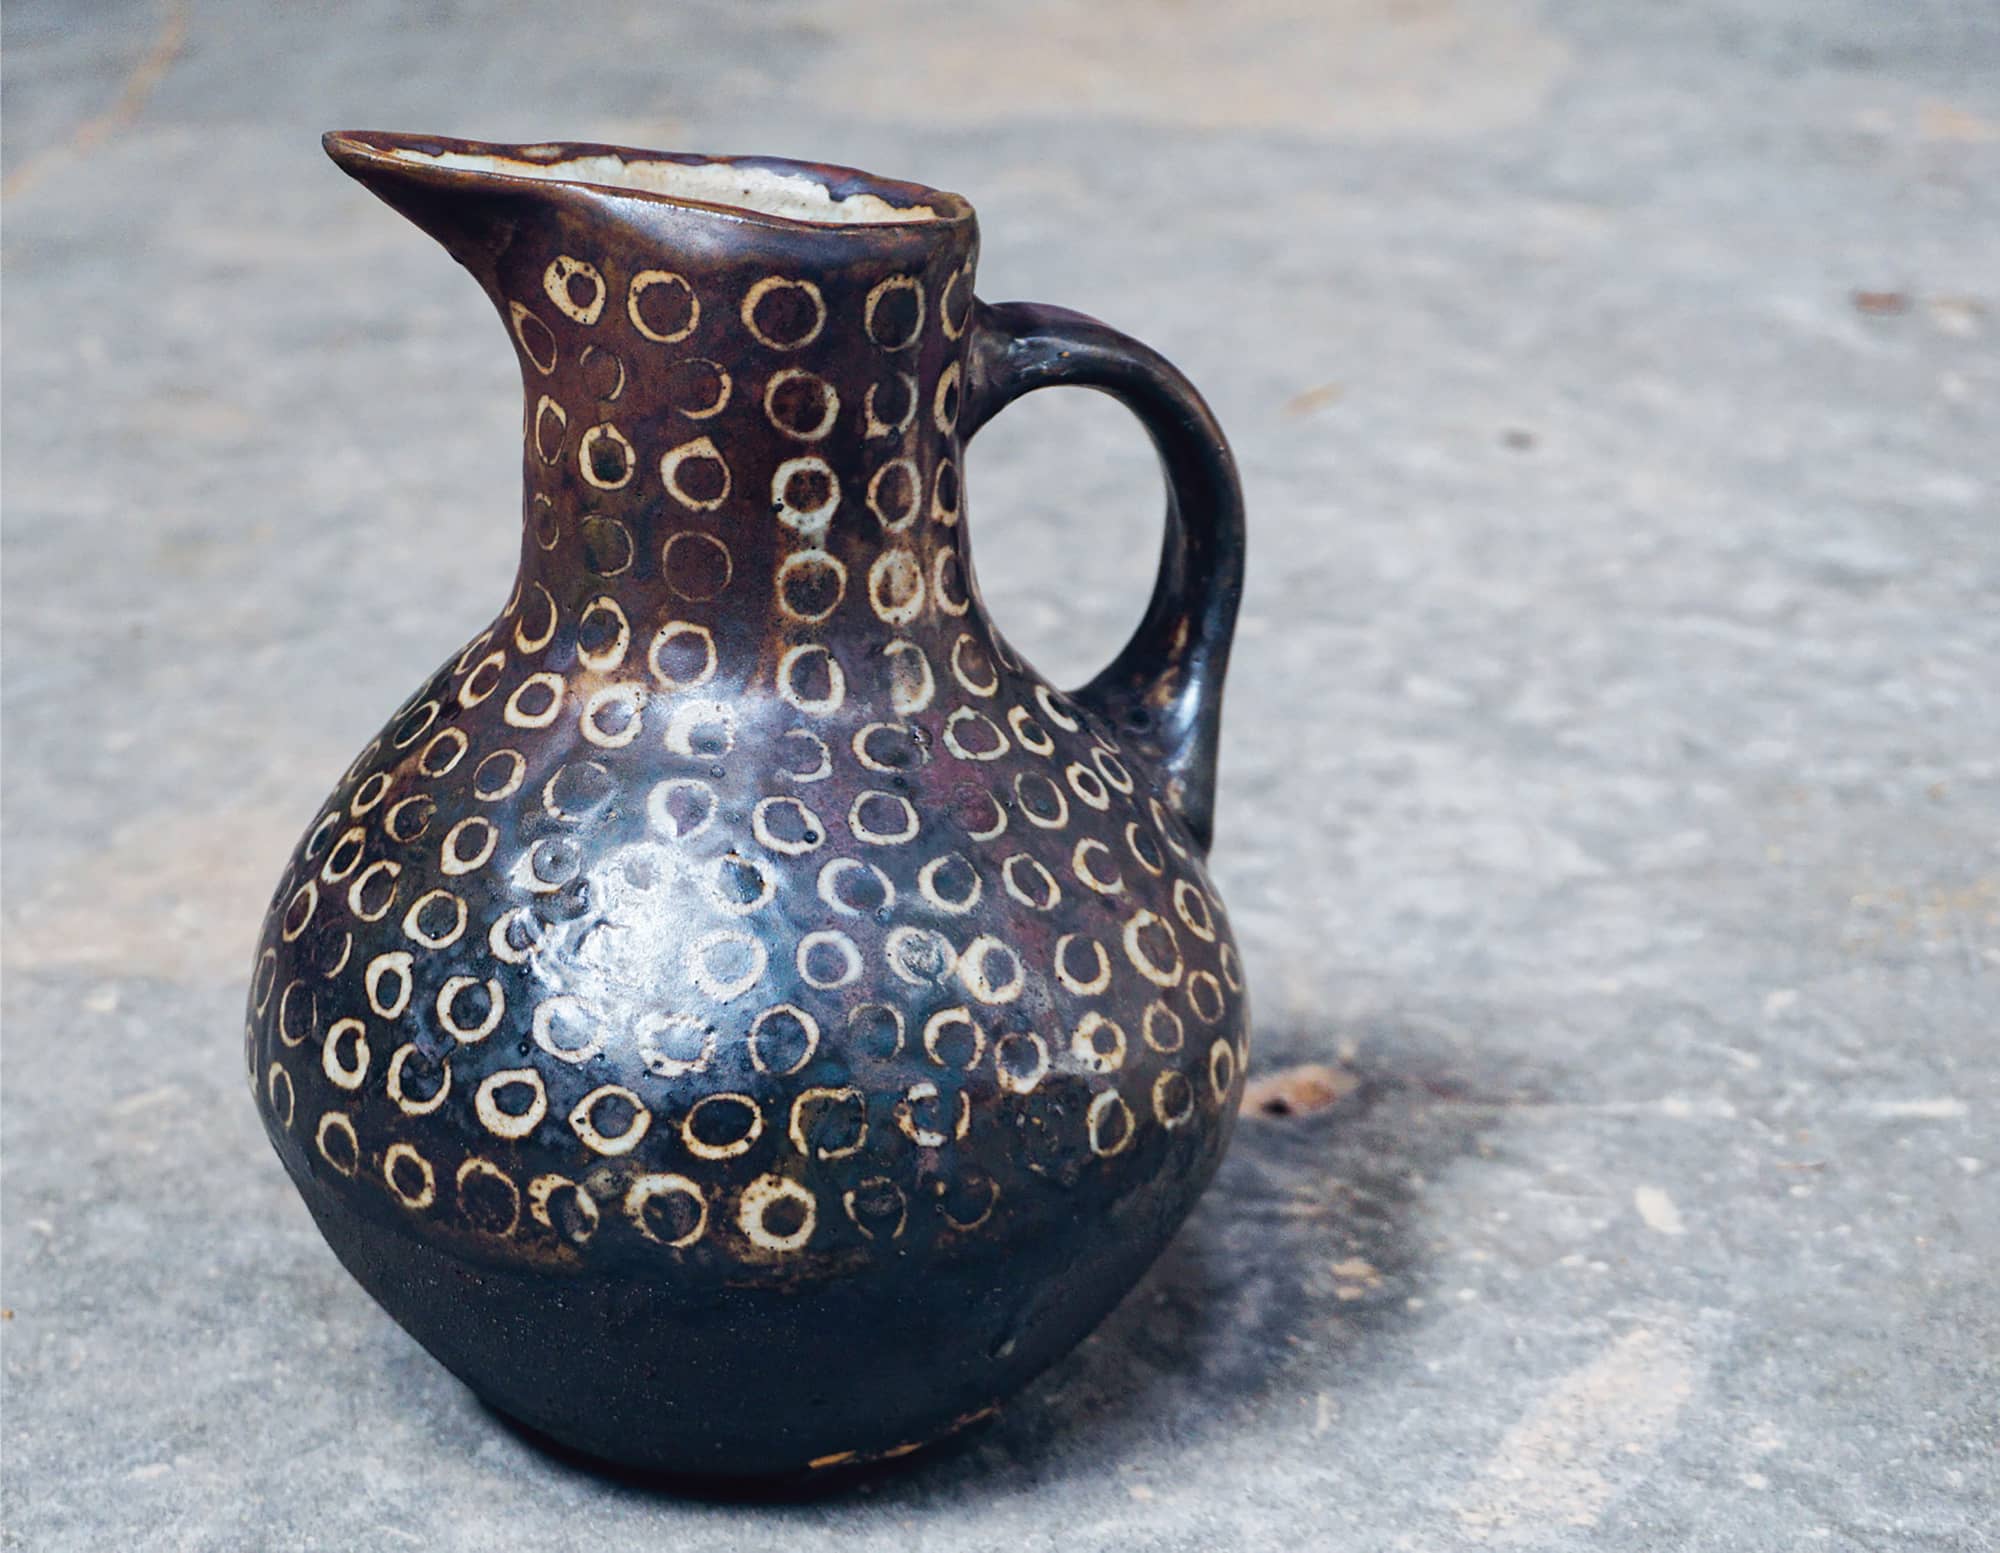
MOON VASE MADE FROM TWO BOWLS
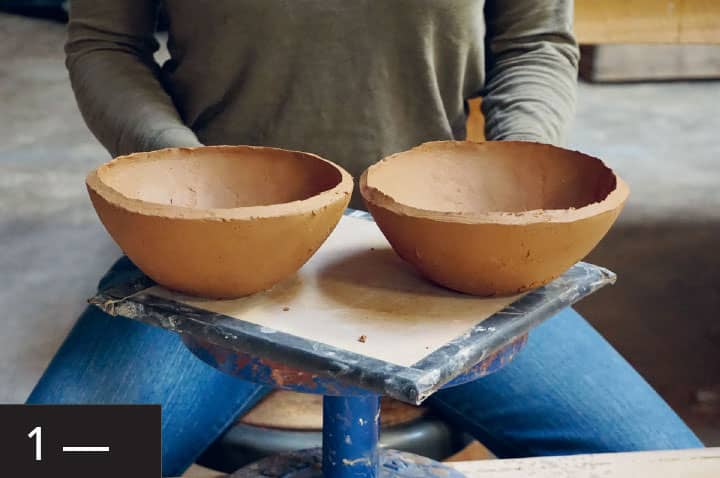
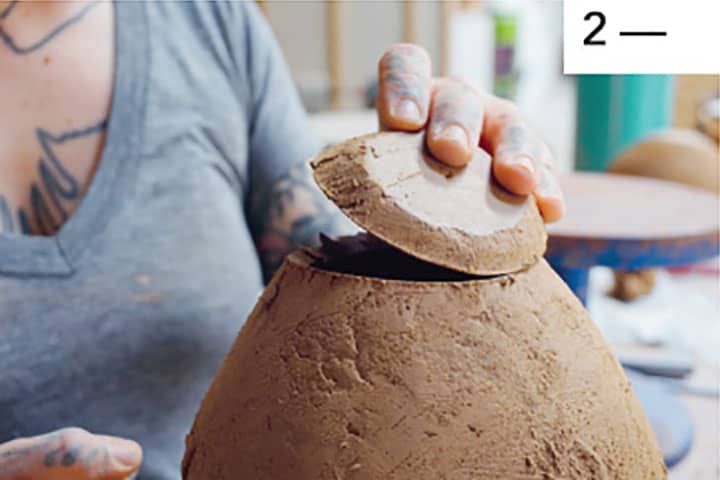
1 | Make two slab bowls from the same mold. Use the directions for making a slab dish from a hump mold shown here.
2 | Take the bowls off the mold at soft leather-hard. If you have a banding wheel, place one bowl right side up on the wheel.
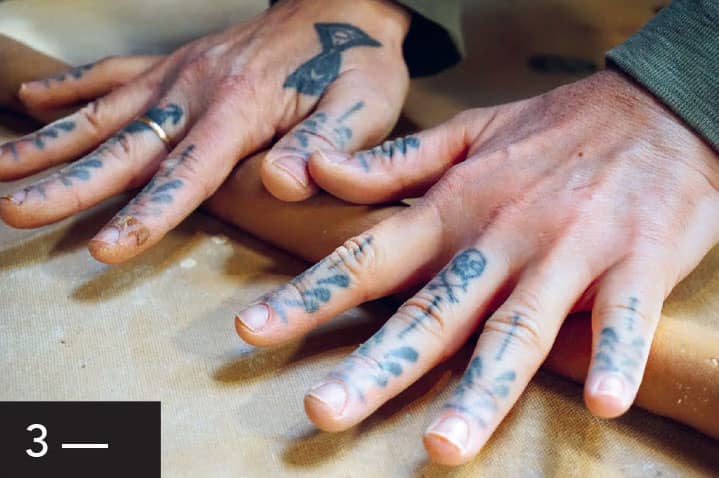
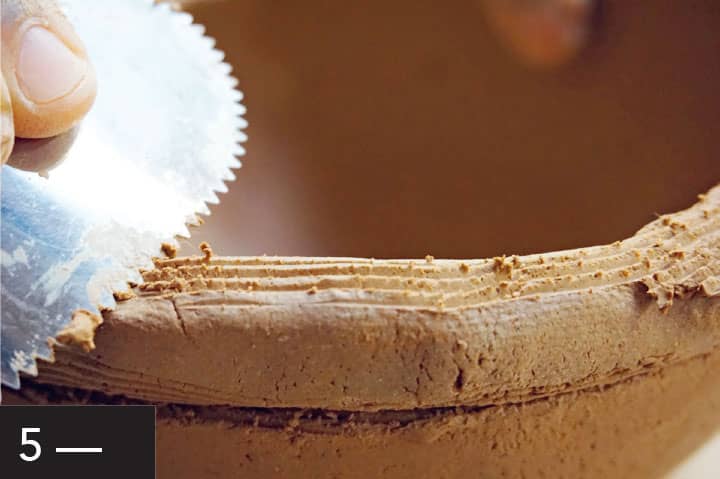
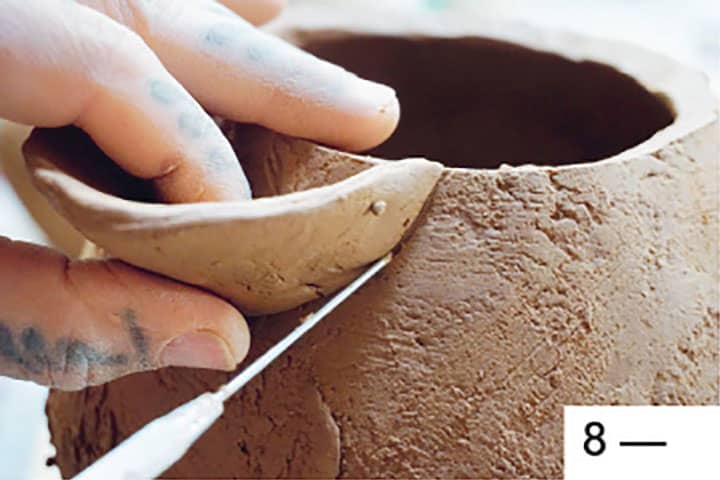
3 | Roll out a coil about the width of a pencil and long enough to go around the rim of the bowl. Score the coil.
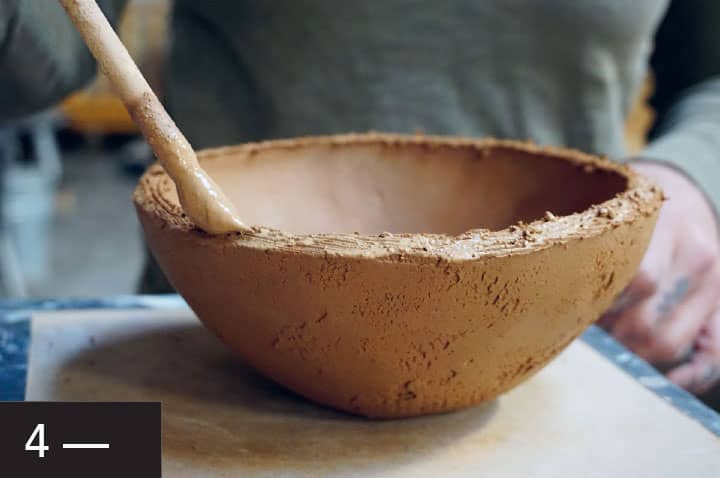
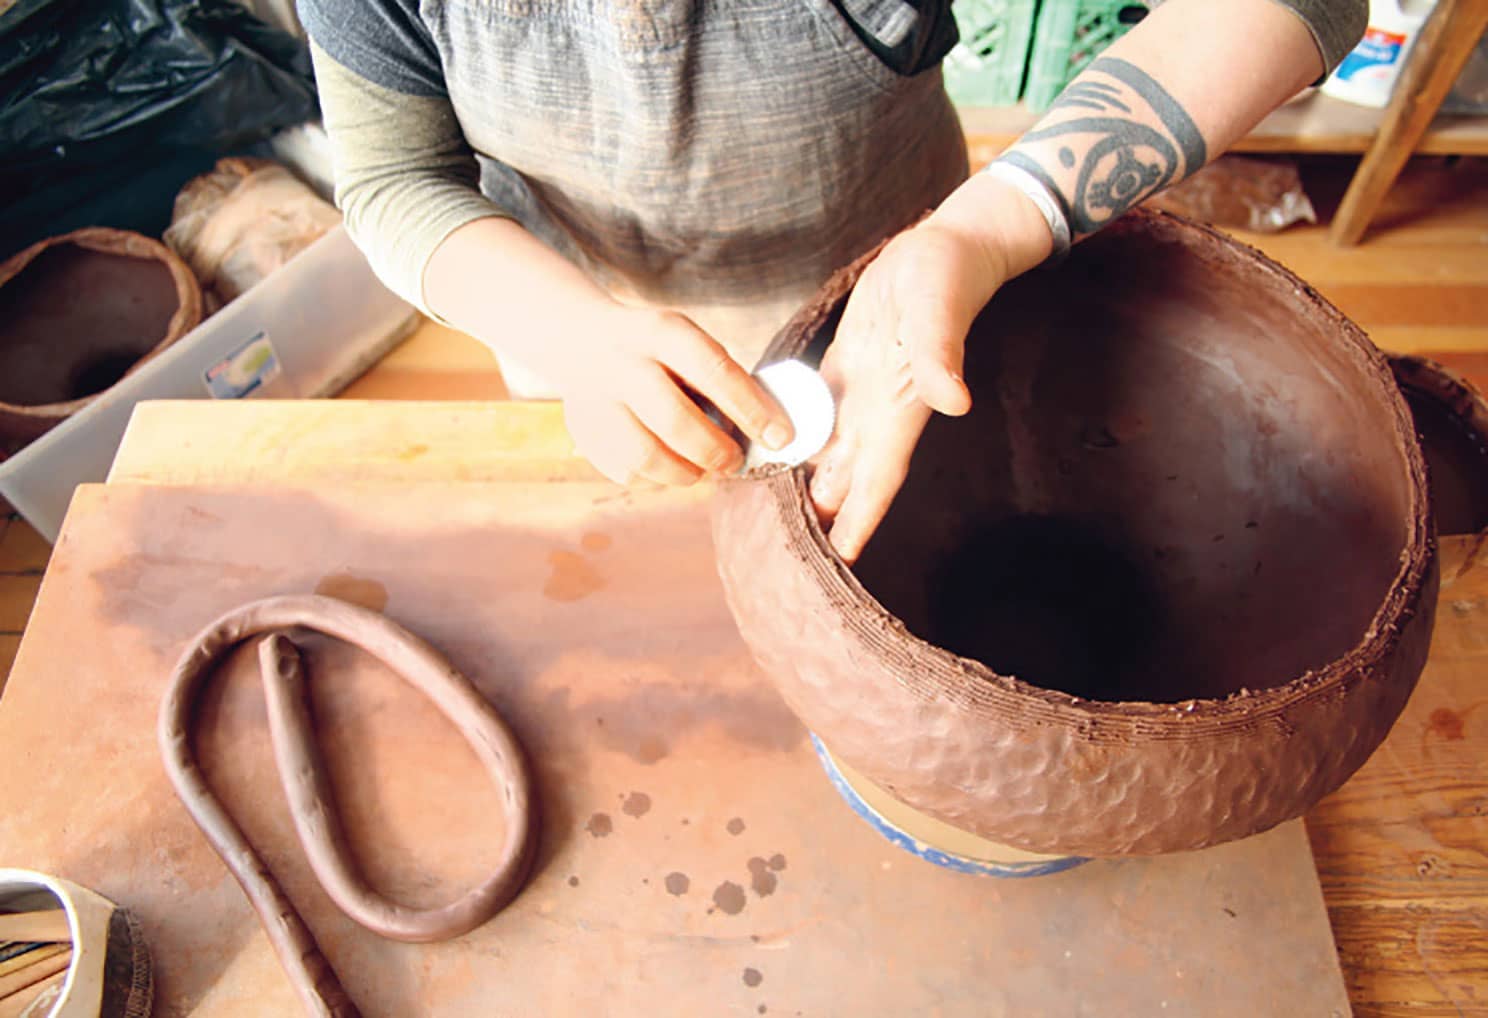
4 | Score and slip the rim of the bowl and attach the coil to the rim.
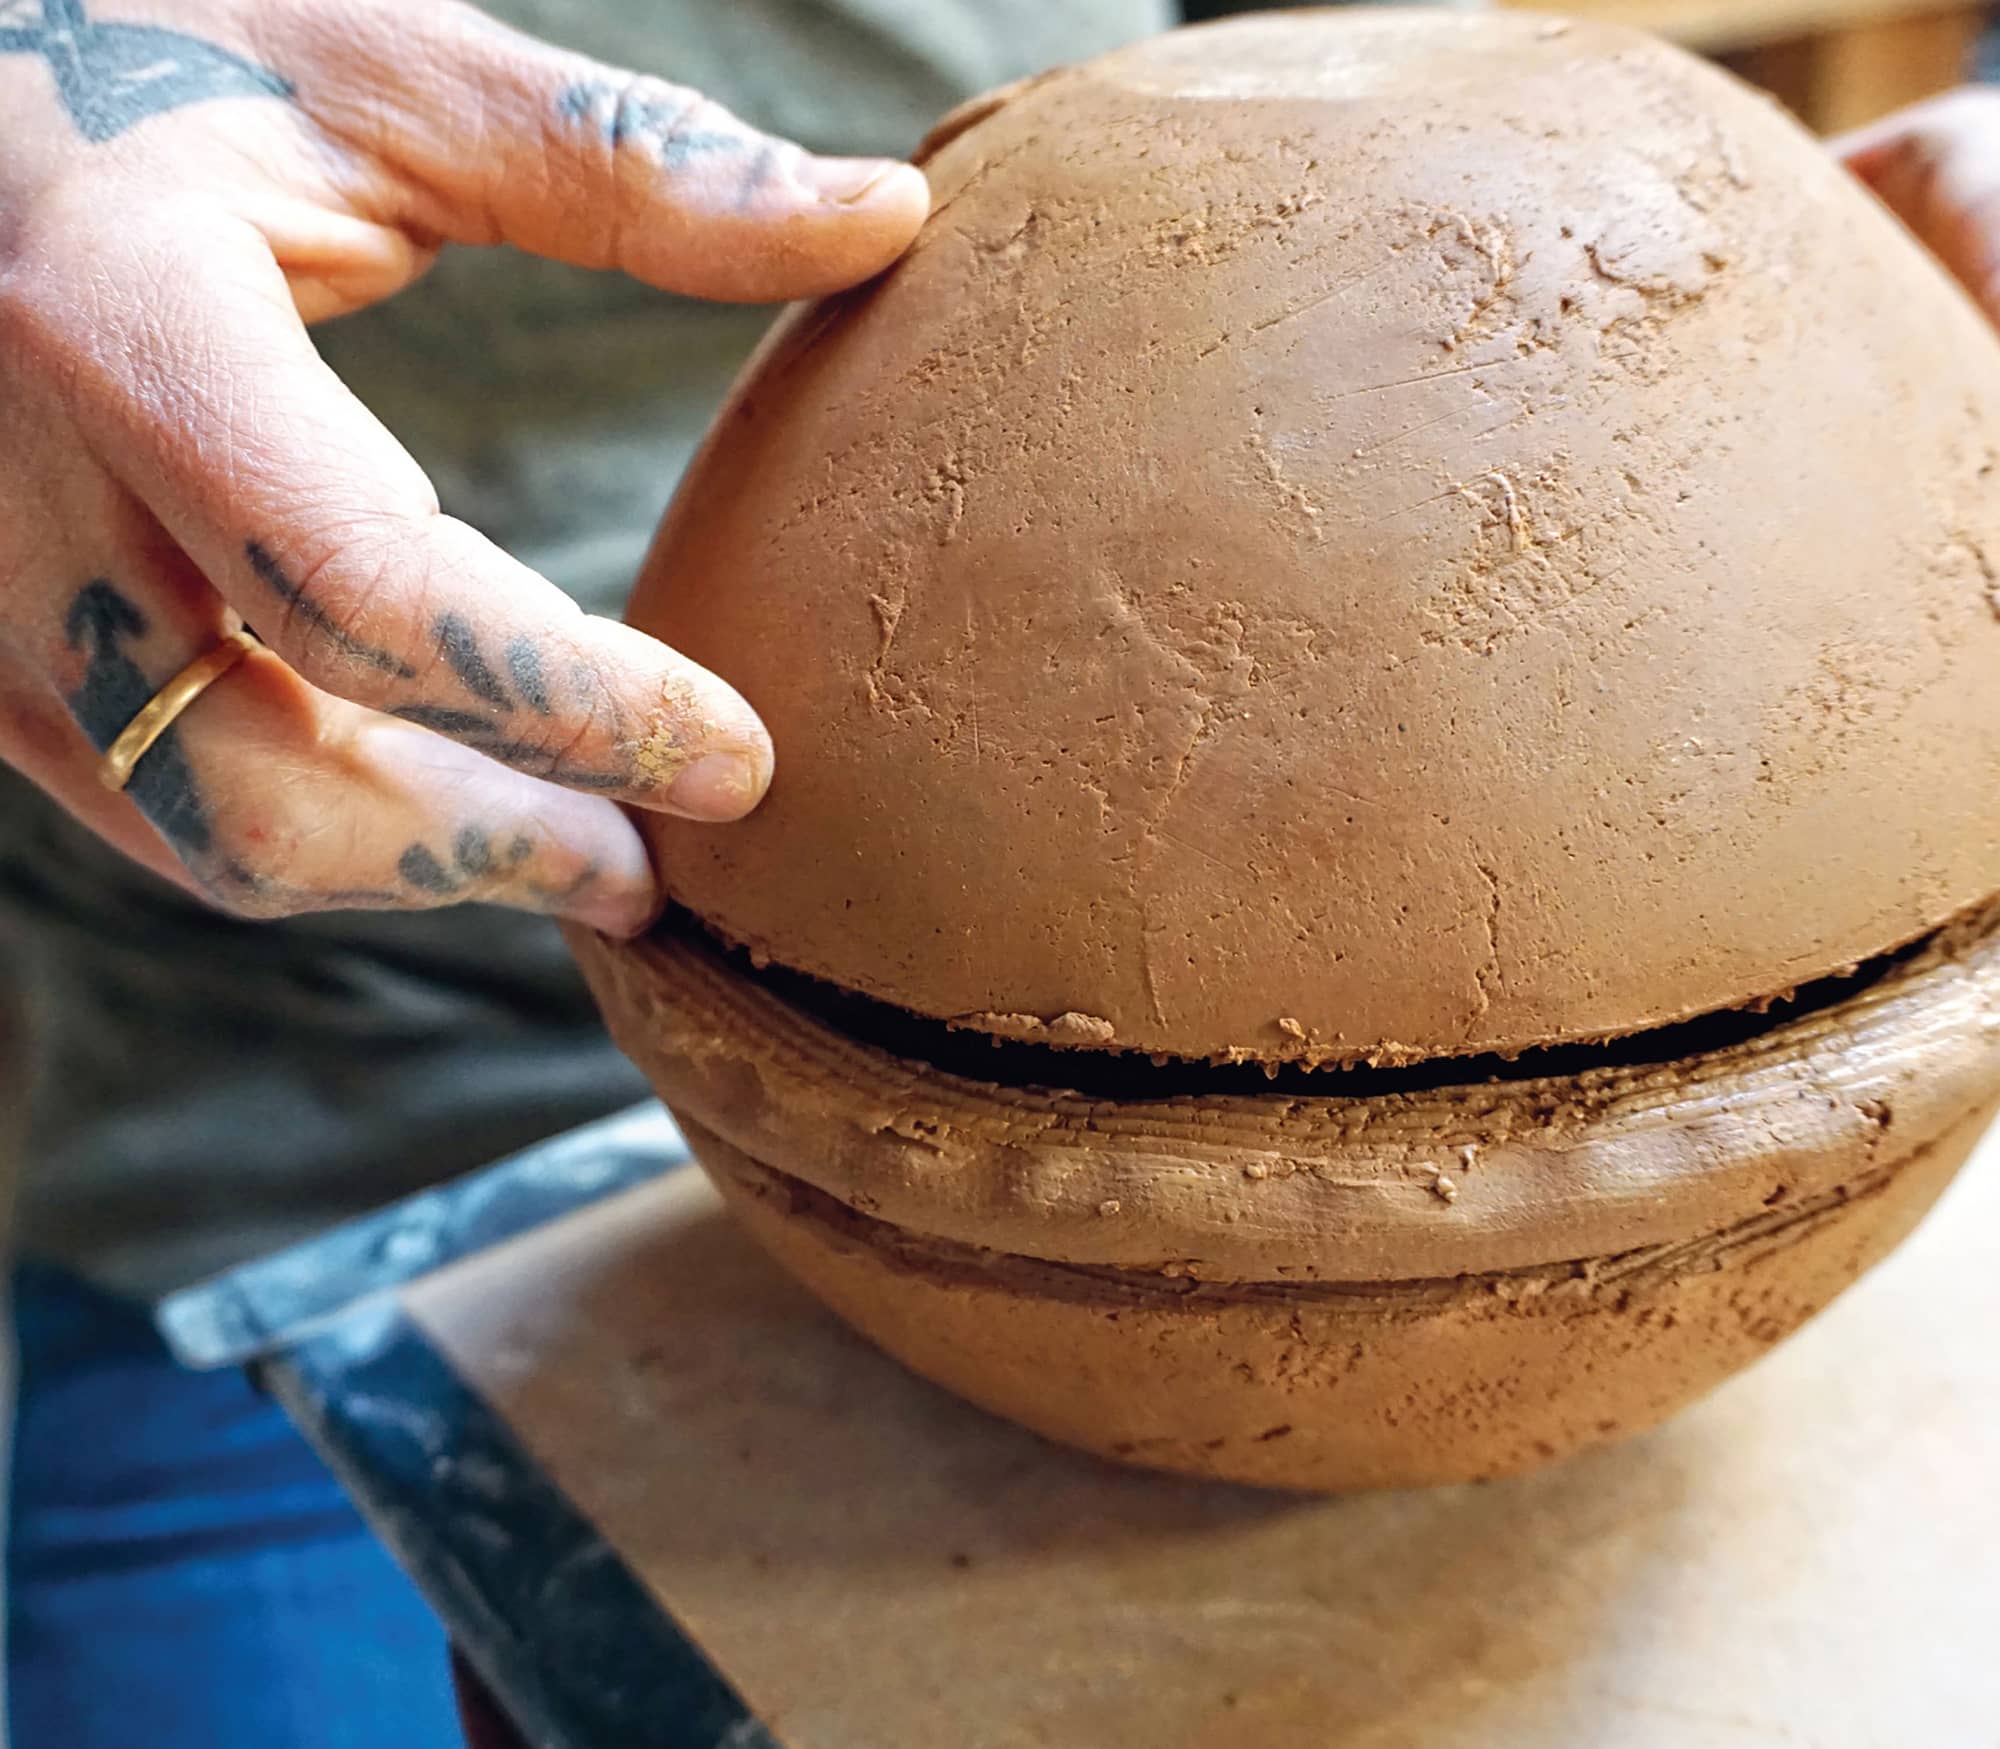
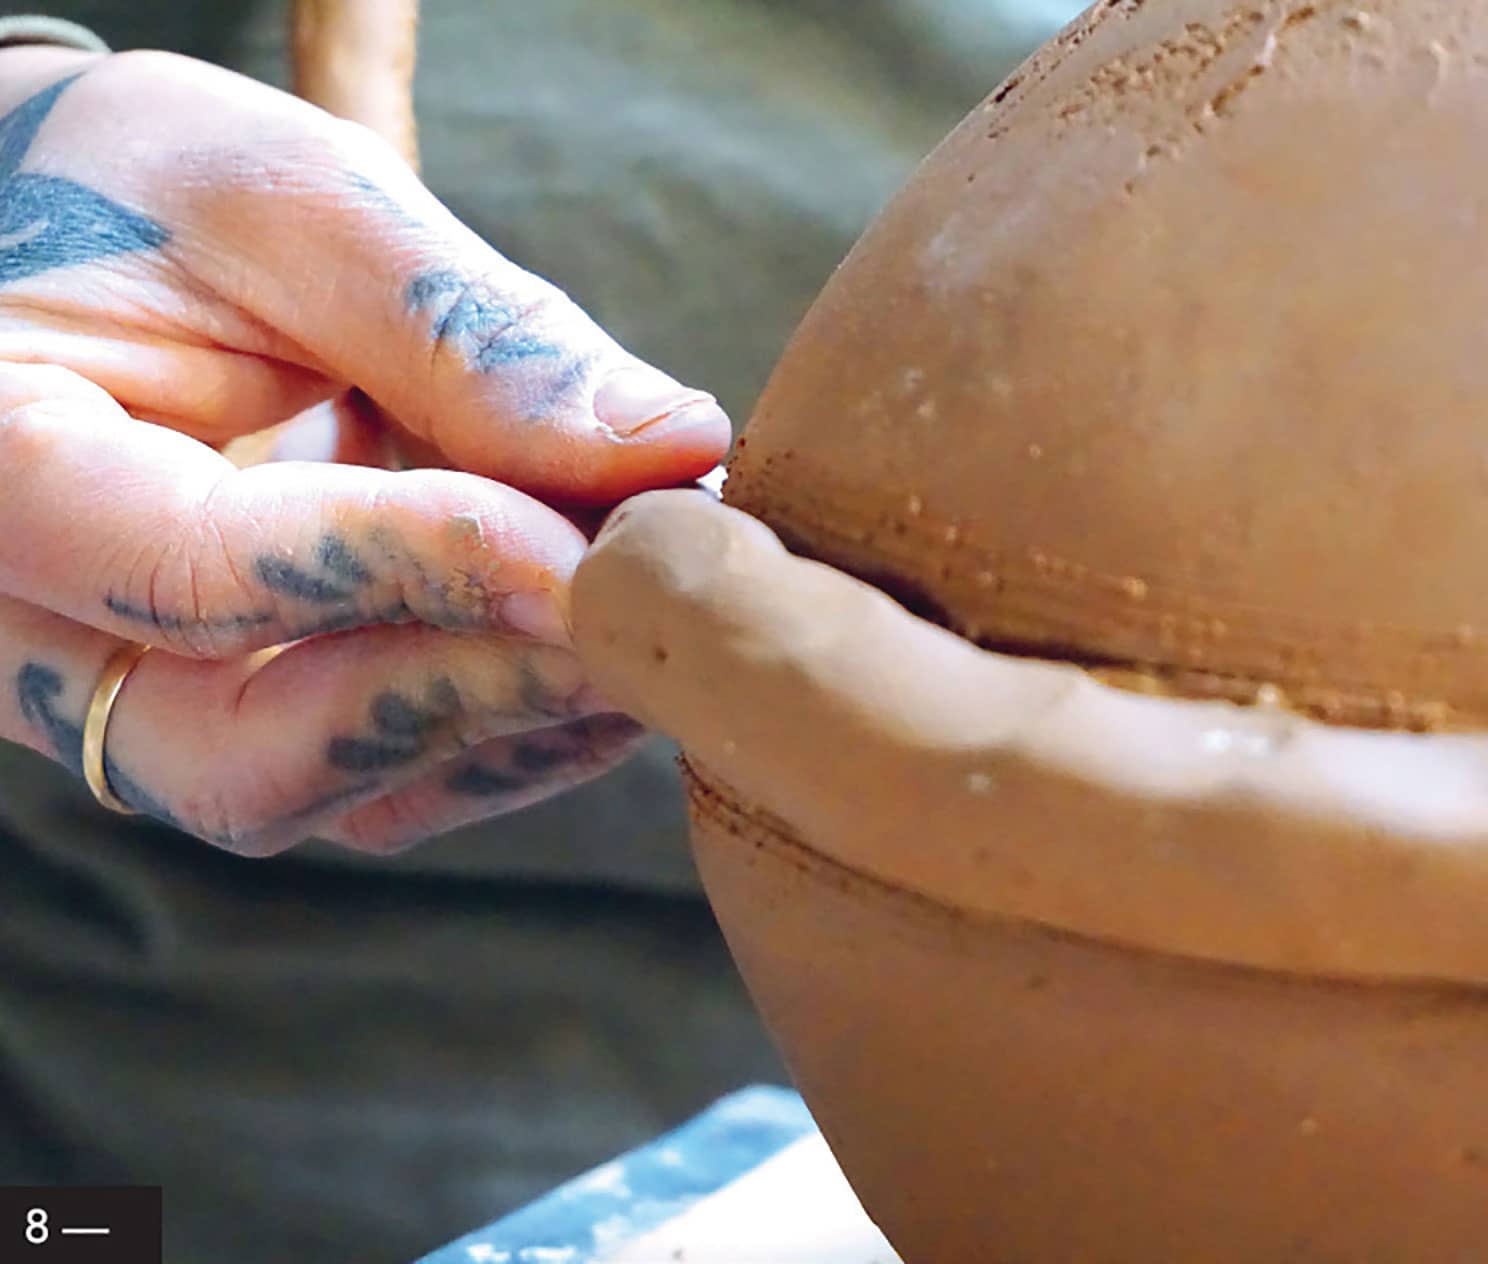
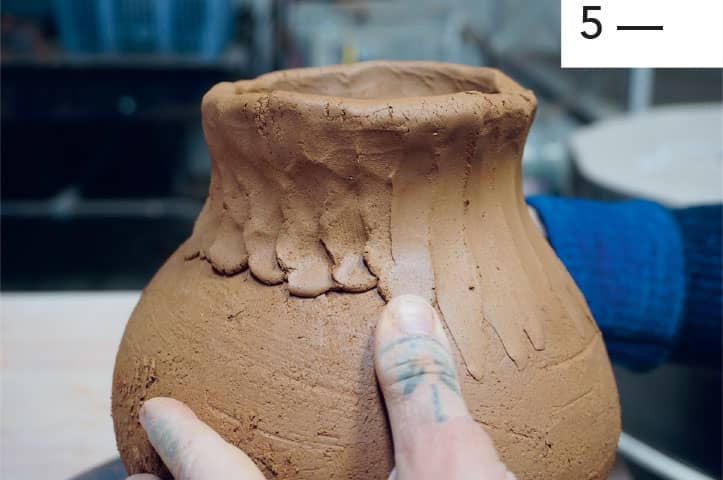
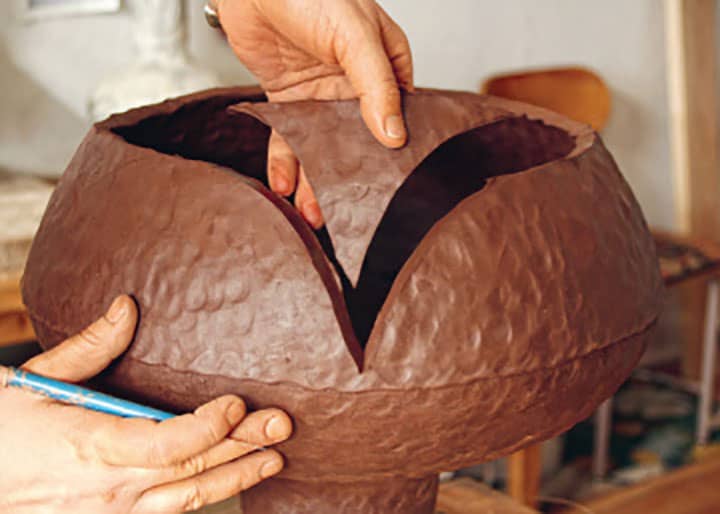
5 | Score the top of the coil you just added. Score and slip the lip of the other bowl. Place this bowl upside down so the lip is on the coil. You now have the two bowls resting lip to lip with a coil between them.
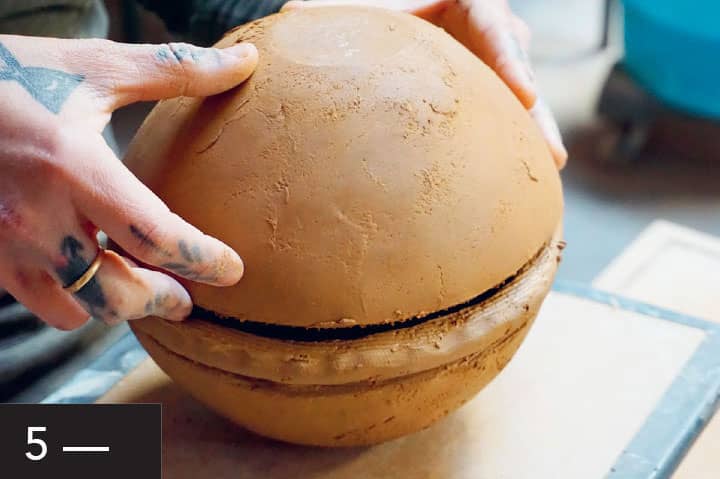
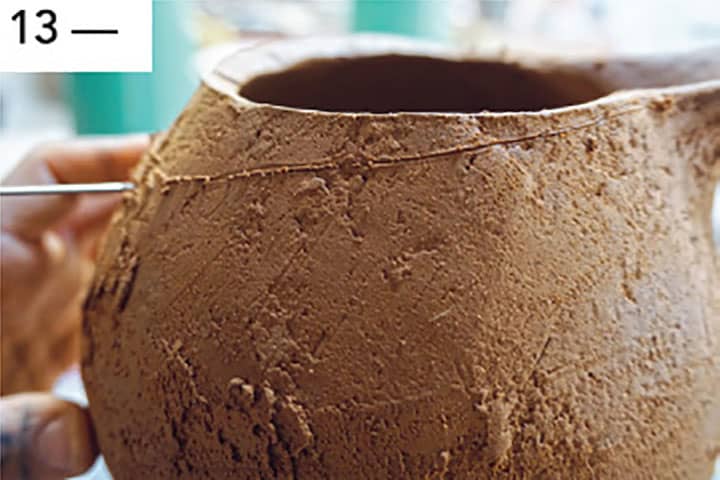
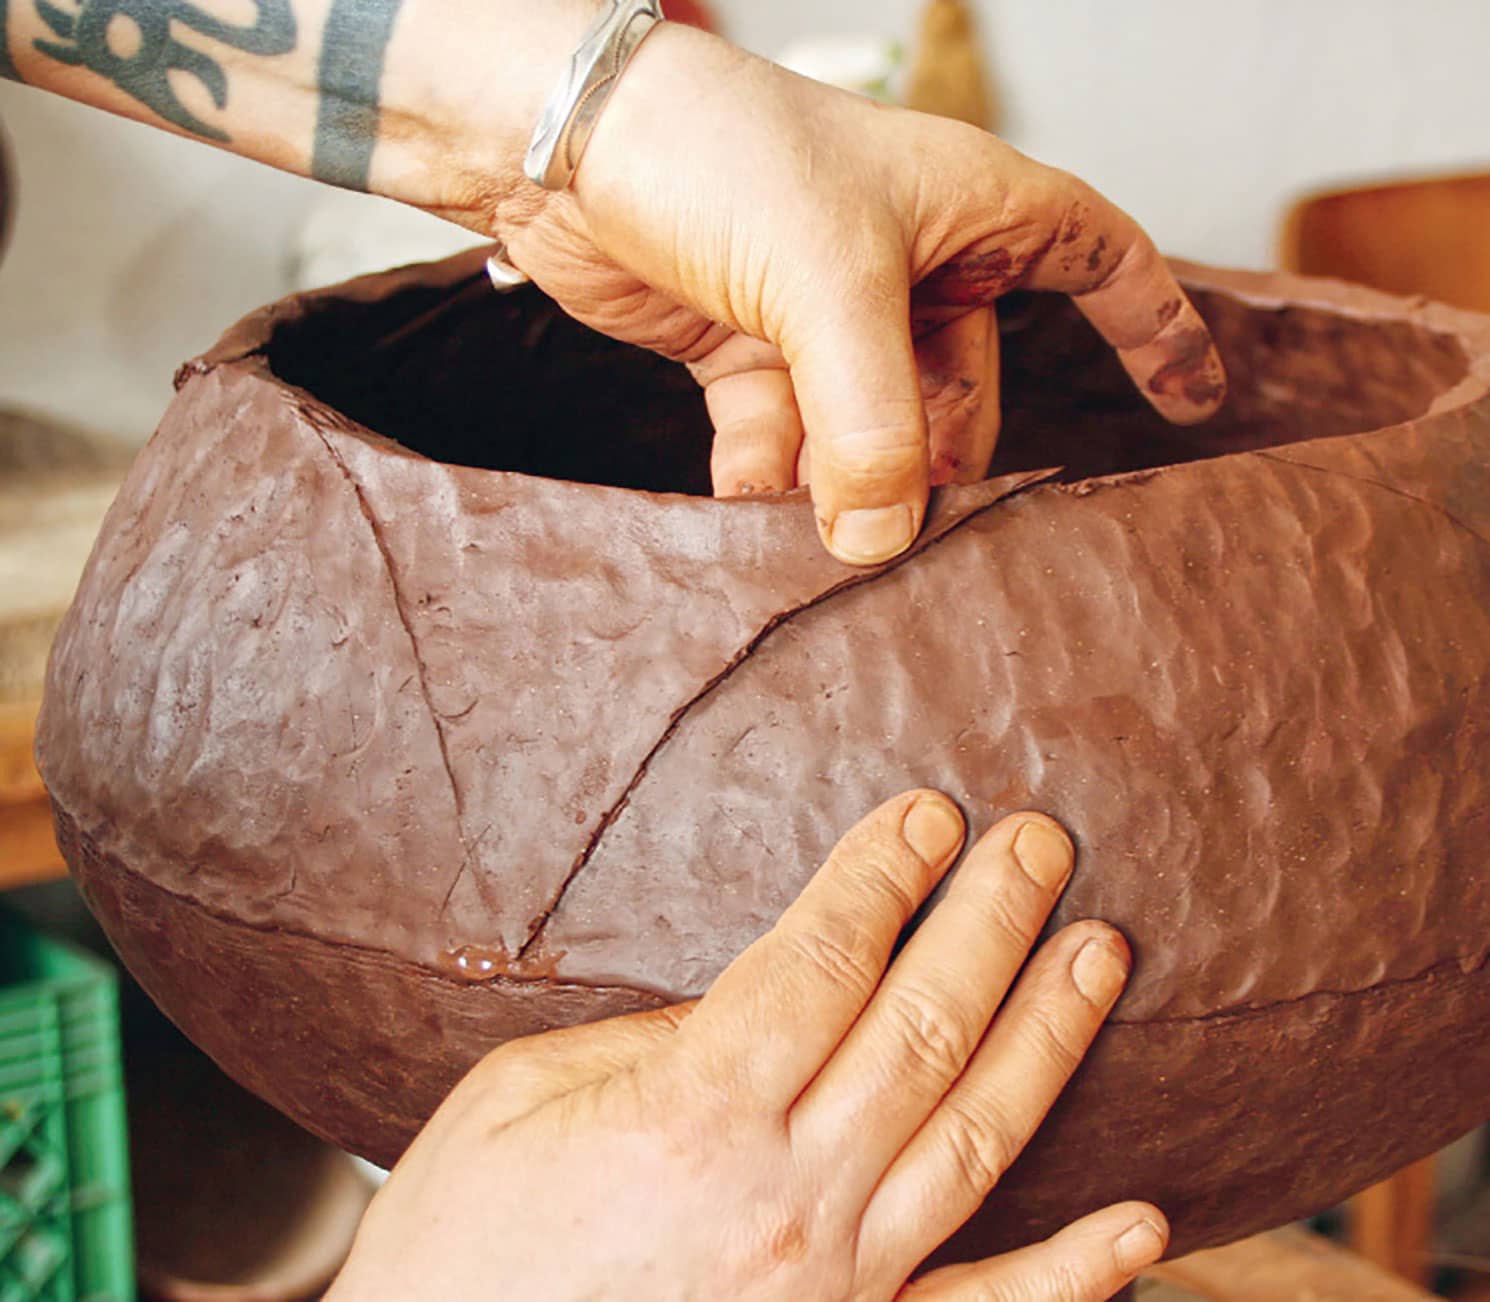
6 | Gently tap the top bowl with your hand to help attach it to the coil. Score around the seam of the coil.
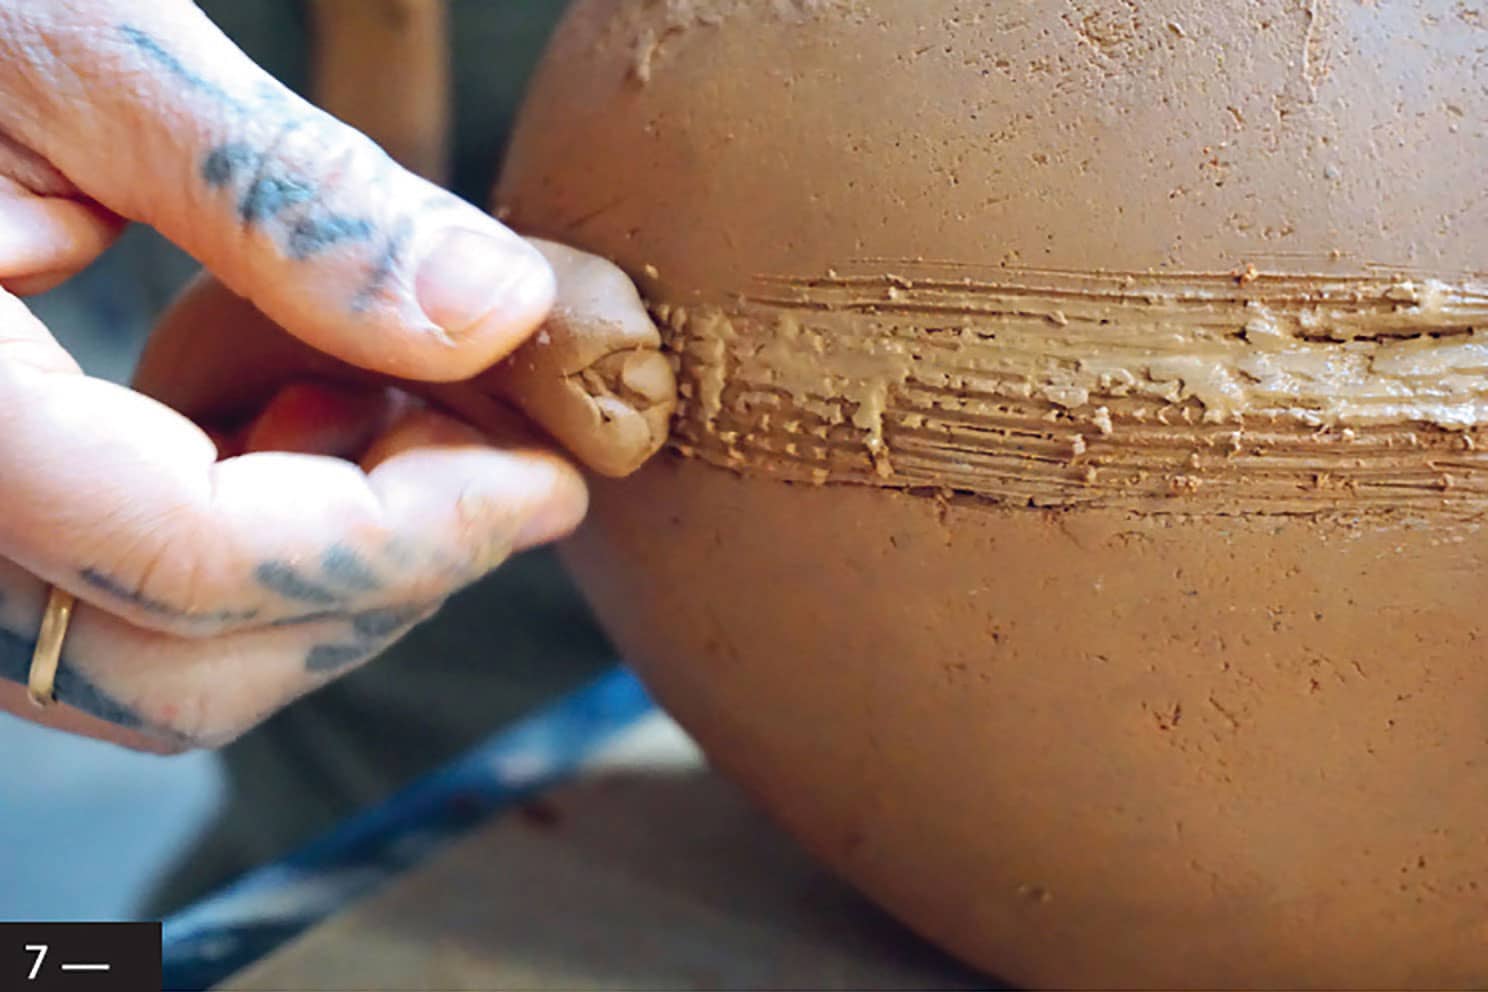
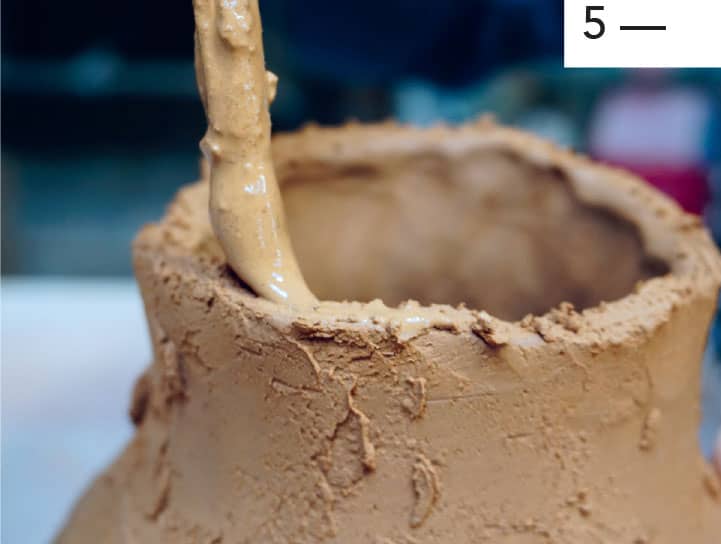
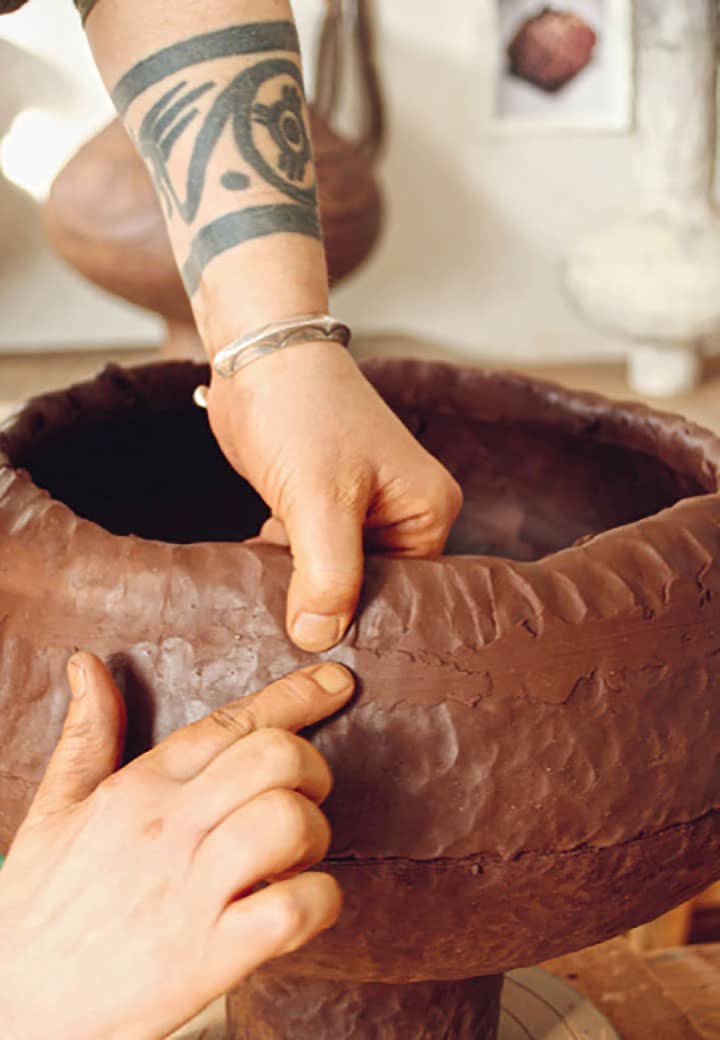
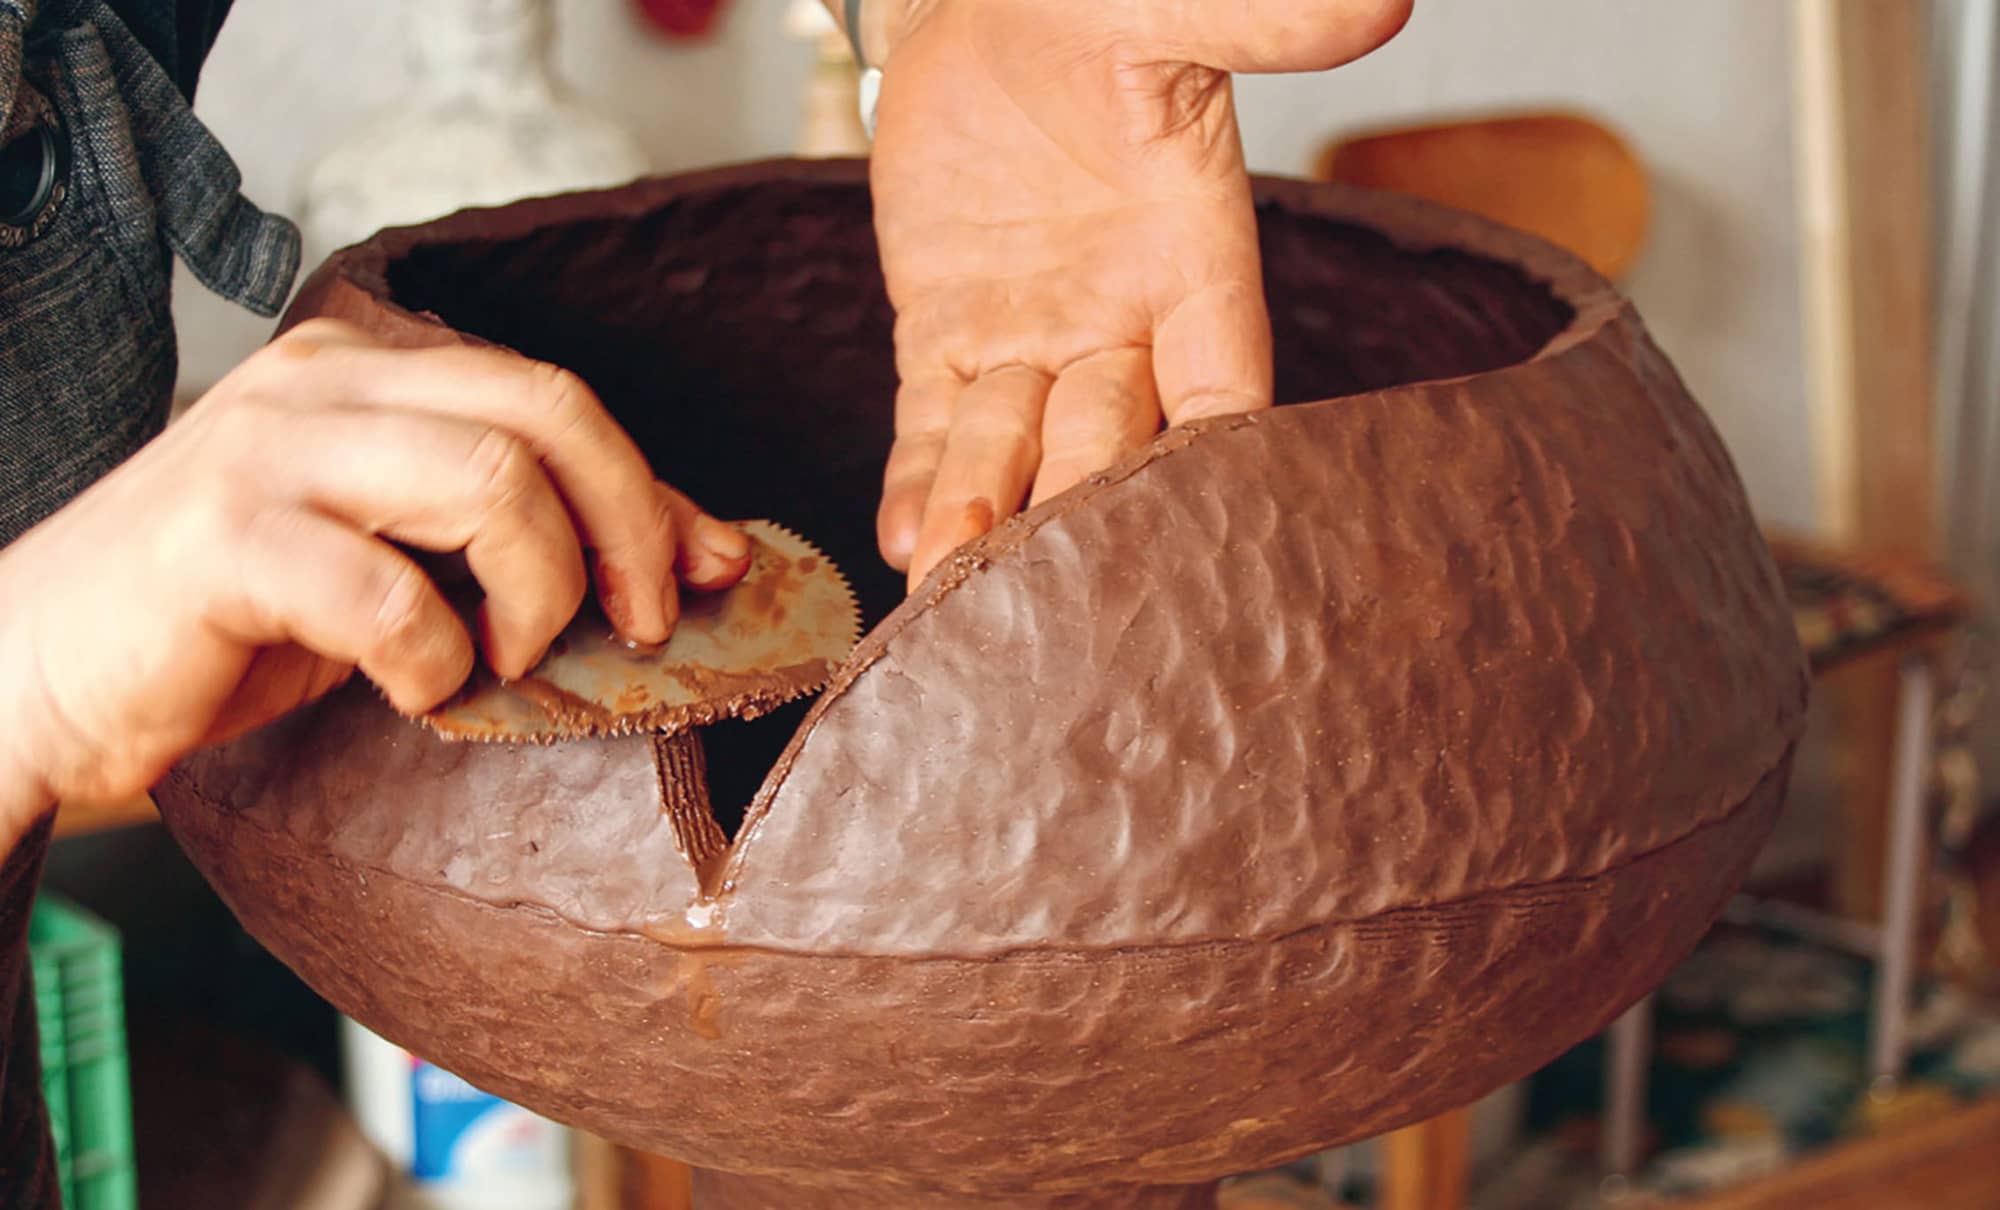
7 | Roll out another coil, about twice as thick as the first, and long enough to wrap around the entire form.
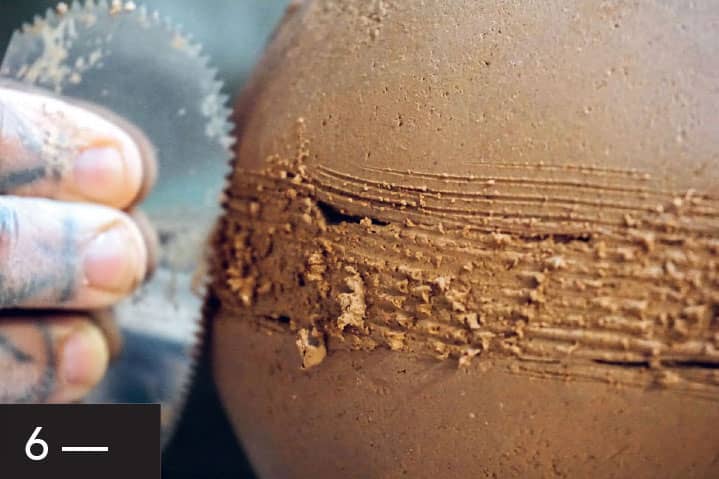
8 | Score and slip the coil and wrap it around the bowls at the seam.
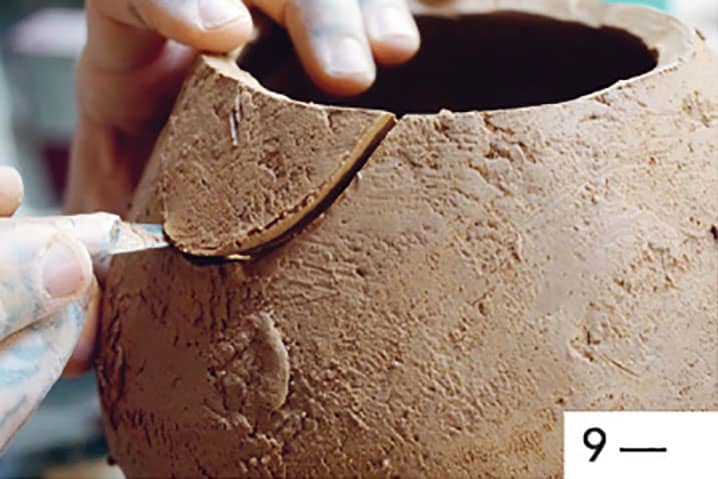
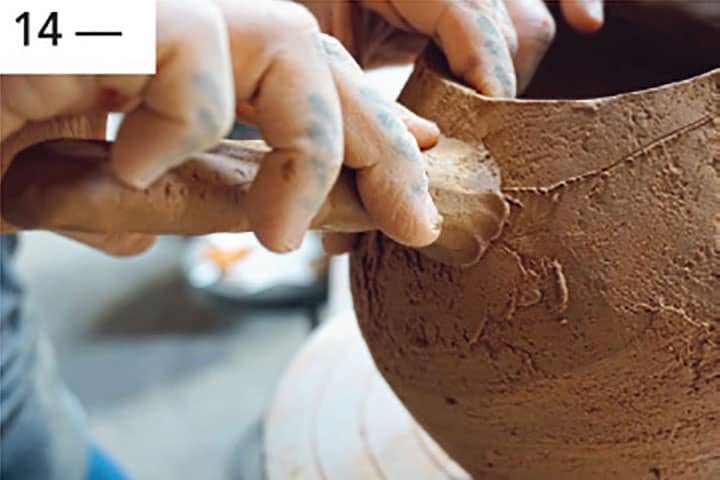
9 | Use your fingers to smooth this coil, blending it into the bottom half of the coil downward, and the top half upward.

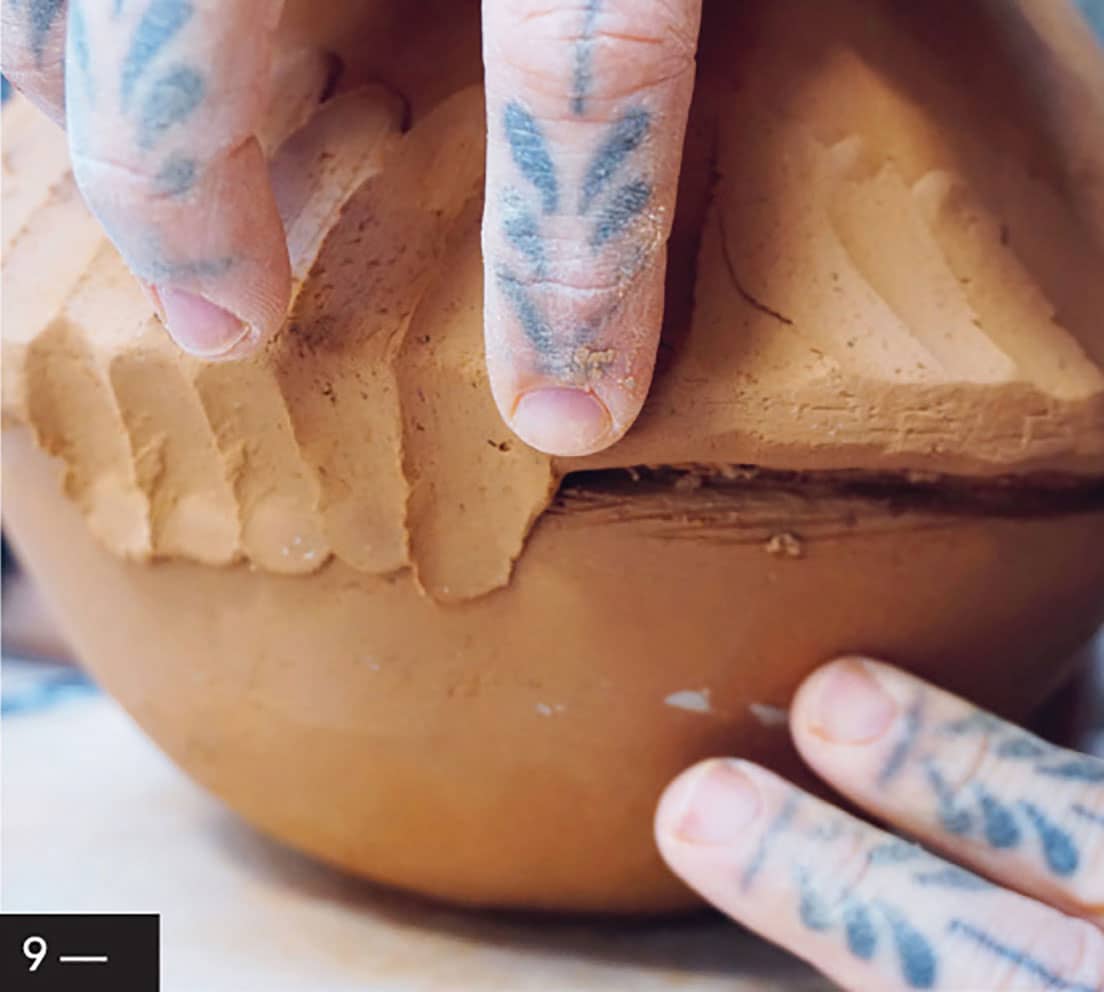
10 | Use a rib to further blend the attachment, eliminating the seam.
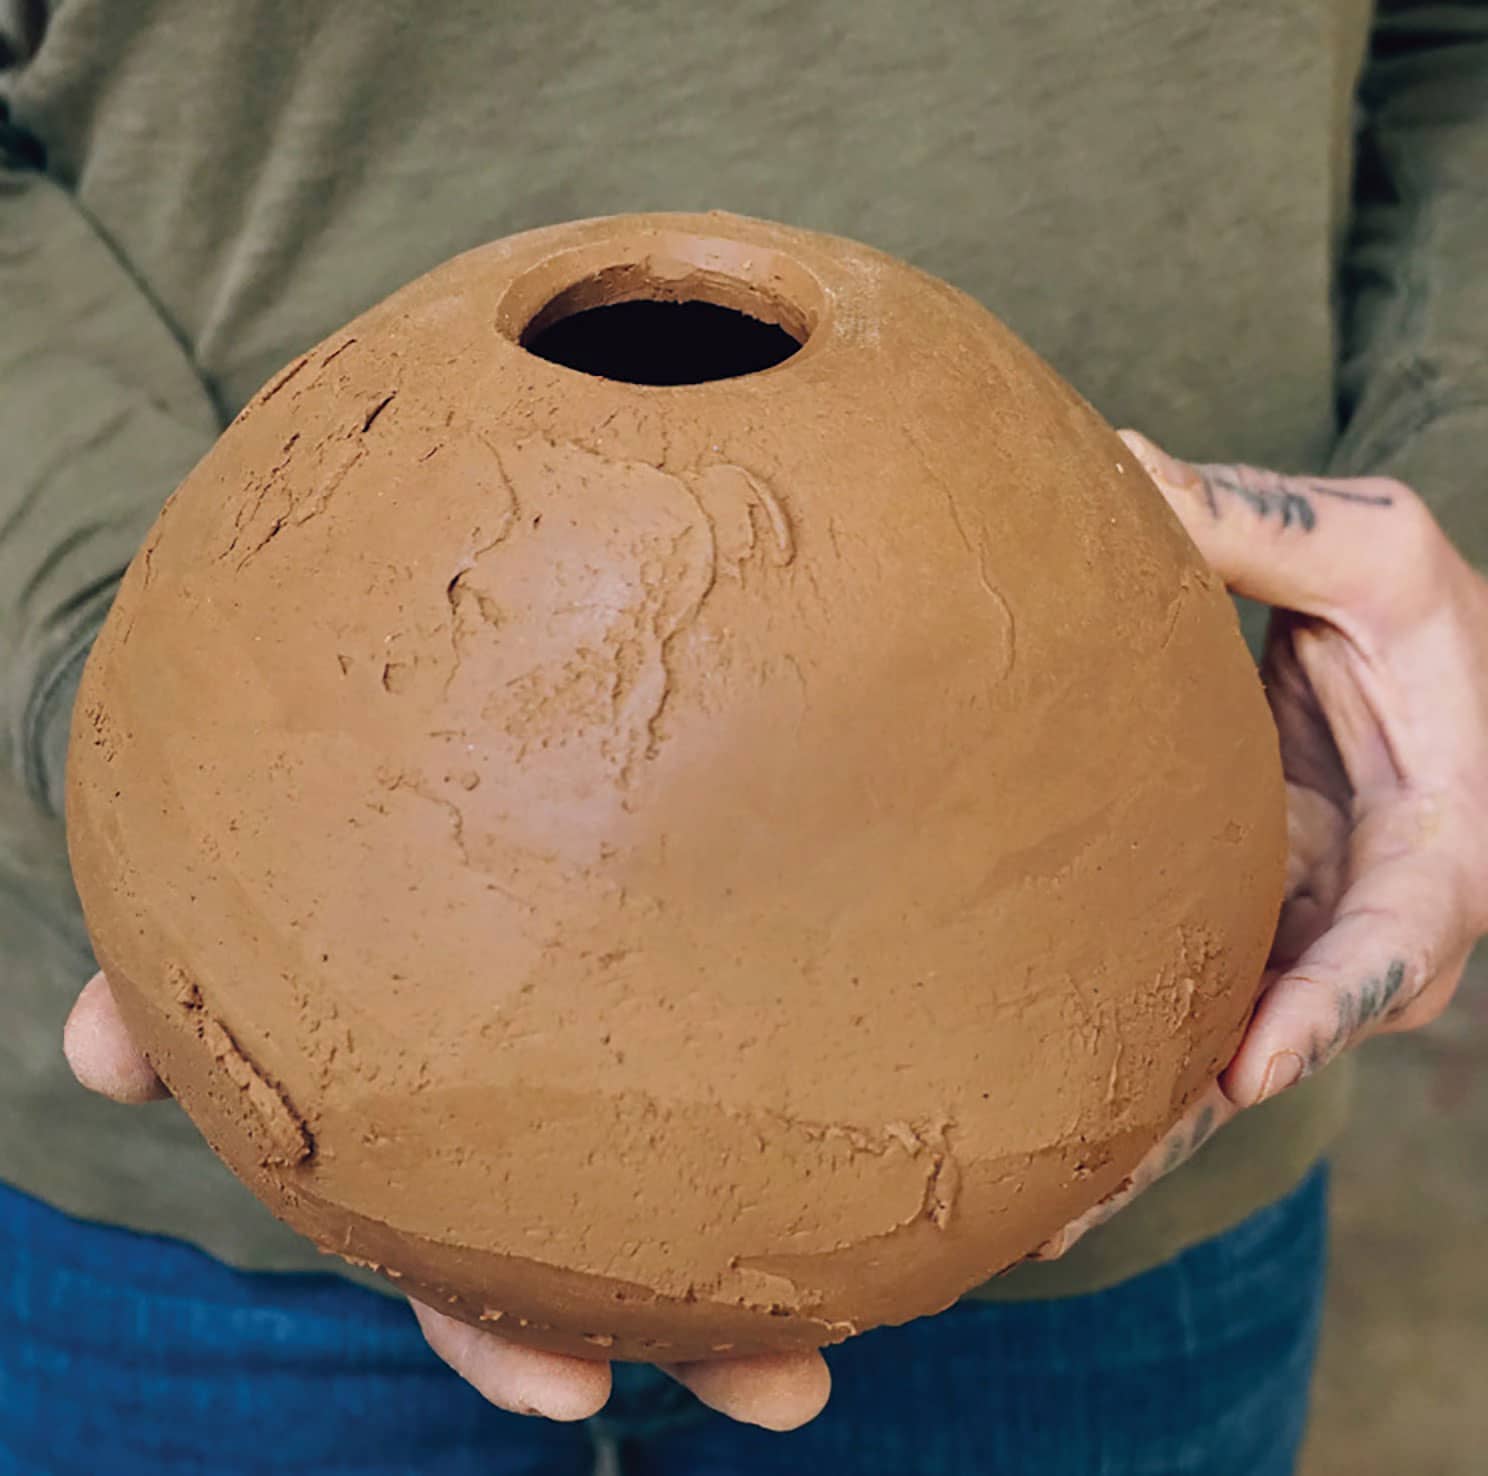
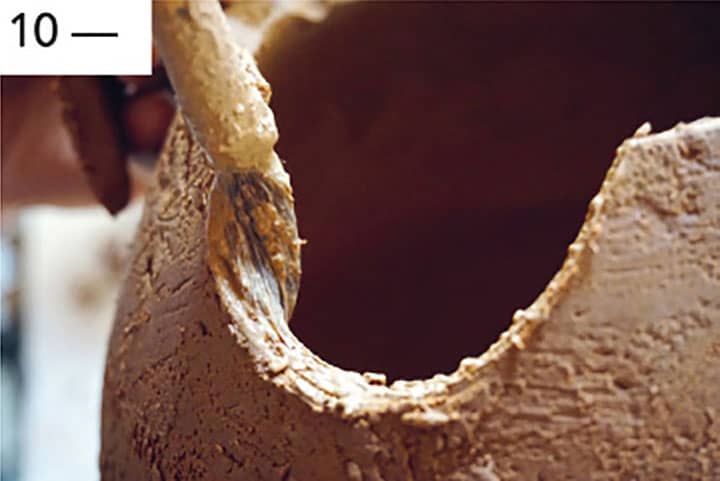
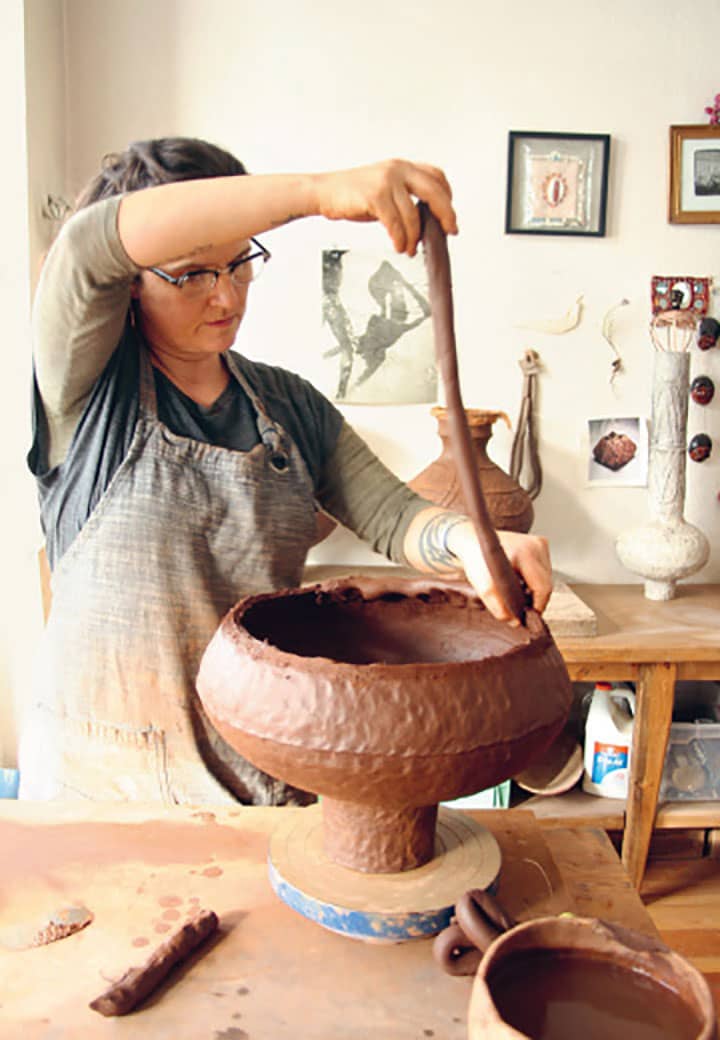
11 | Stick the needle tool into the center top of the form to make a hole.
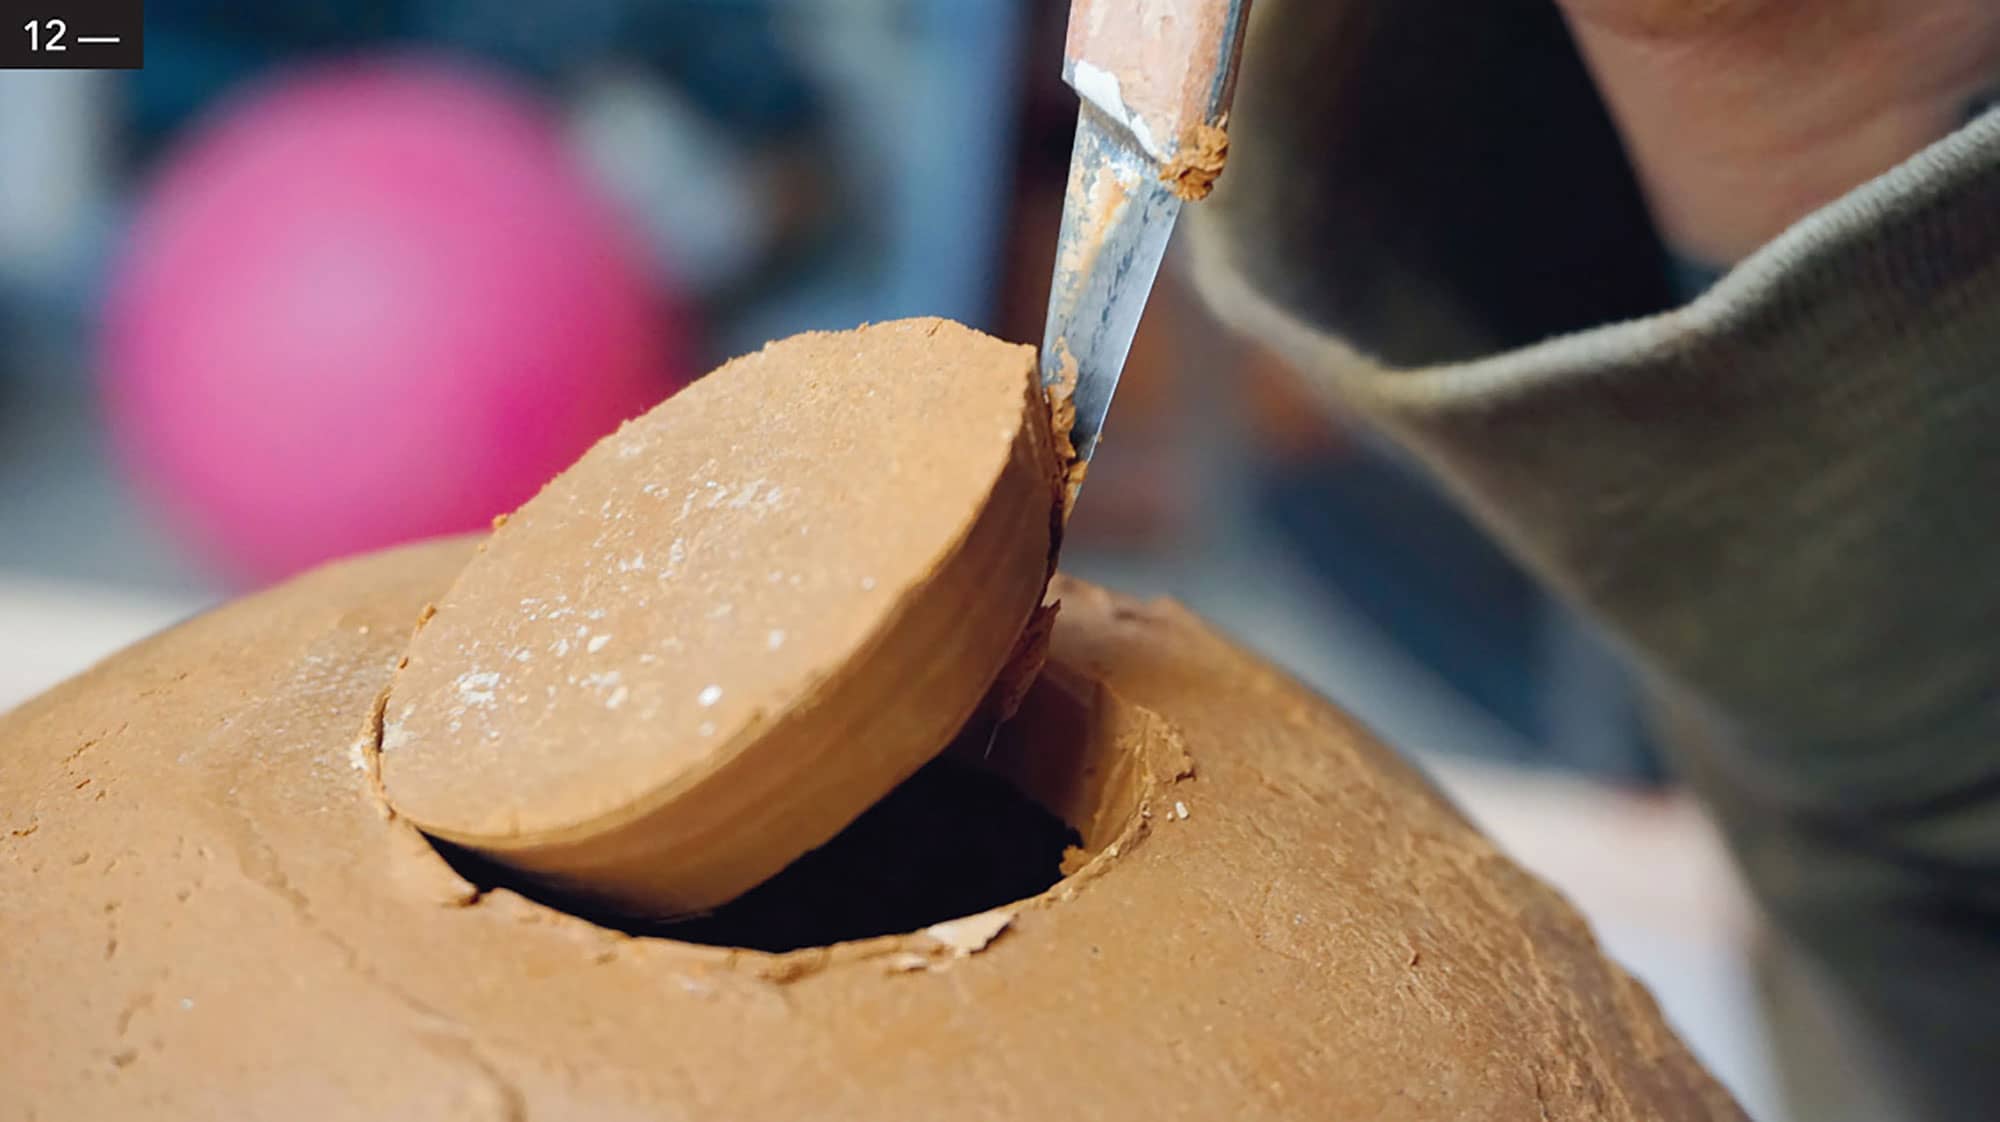
12 | Decide how large you want the opening and cut around it, keeping the hole in the center. I think these look beautiful with about a 1" (2.5 cm) wide opening. Use your knife or rib to refine the opening by beveling or just smoothing the cut.
Make a Vase with a Coil Neck
1 | Follow the directions for making a moon vase until the cutting of the opening, step 11.
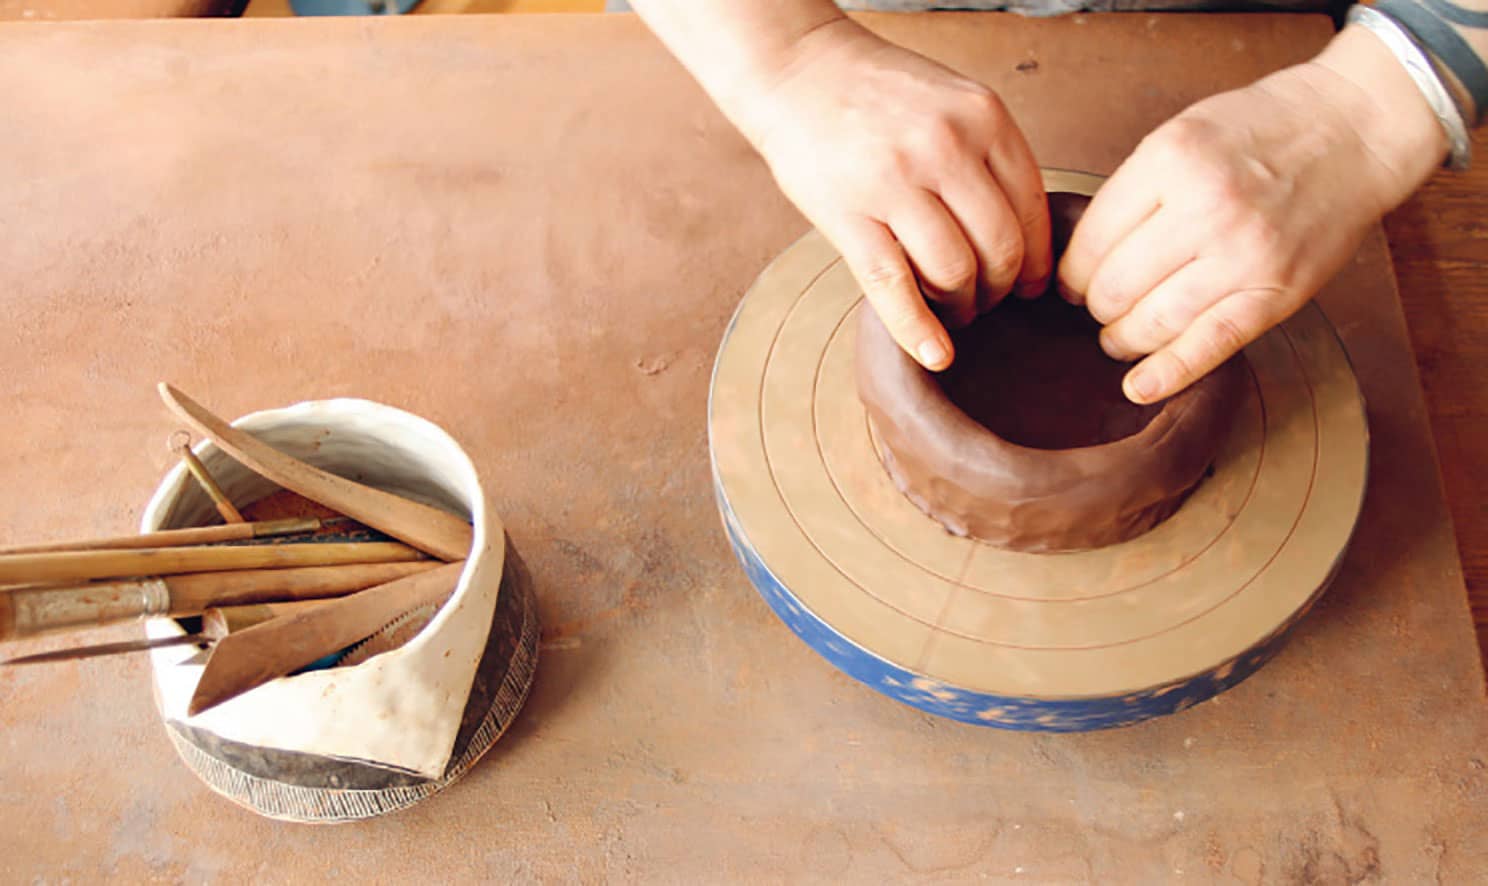
2 | Decide what size neck you want and cut the opening to that size.
3 | Roll out a coil long enough to wrap around the opening. Score and slip the rim of the opening and coil.
4 | Apply the coil around the opening, blending it at the seam. Pinch the coil to thin it out as you go.
5 | Add as many coils as you need to reach the desired length of the neck. Score, slip, and attach each new coil to the previous one.
6 | Let the neck dry to leather-hard. Use a rib to refine, smooth, and shape the neck. Use a flexible knife and/or rib to refine and shape the edge of the neck.
MAKE A SPOUT TEMPLATE
YOU’LL NEED
Cardstock
Scissors
Pencil
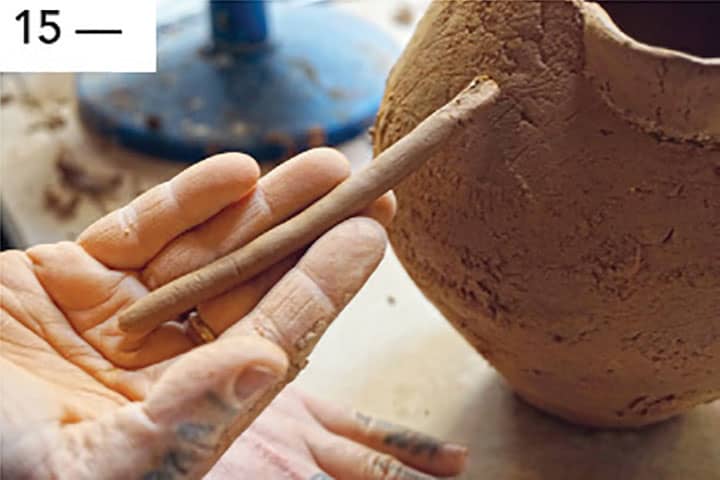
1 | Roll out a piece of clay to experiment with making spout templates.
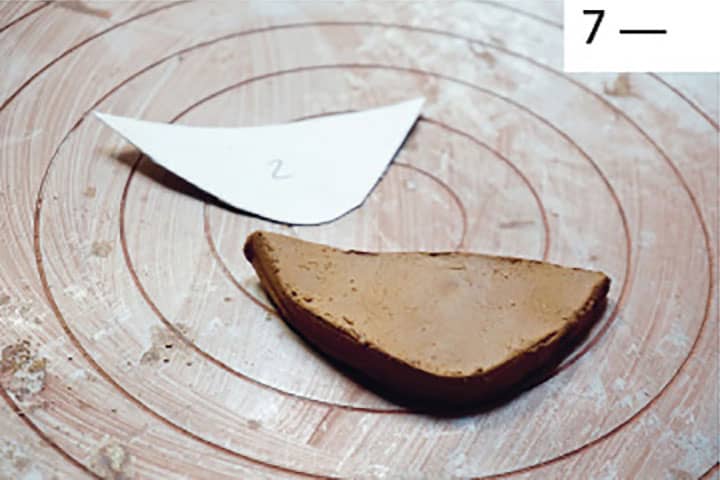
2 | Gently mark a few triangular shapes with a rounded bottom and soft curve at the top point. Try some about 2" (5 cm) across, some slightly bigger, and some smaller.
3 | When you have a few mapped out, cut them out of the clay. Gently curve them and hold them up to your pitcher.
4 | Make adjustments and cut out more samples until you find one or more that you like. Take those and lay them on a piece of cardstock. Trace around the clay and cut out the shapes. Keep the templates to use for future spouts.
Make a Pitcher from Two Slab Bowls
YOU’LL NEED
Surform
Flexible knife
Plastic ribs
Mason jar or other tall prop
Slab roller, rolling pin, or slab sticks
Ware board
Serrated rib
Slip
1 | Follow steps 1 through 9 for making the moon vase shown here.
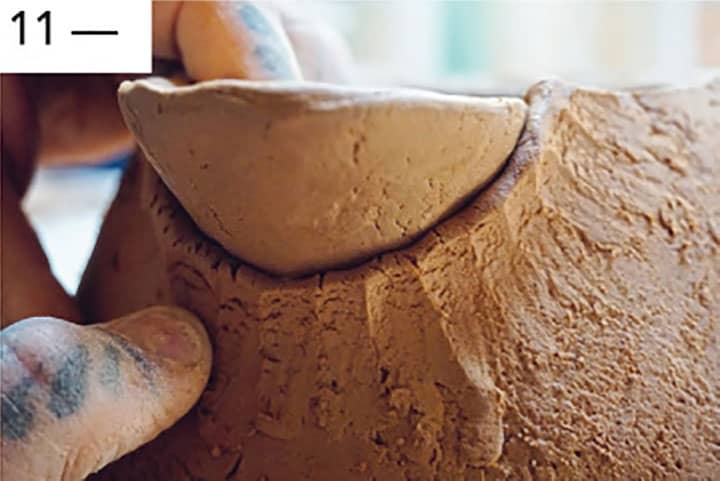
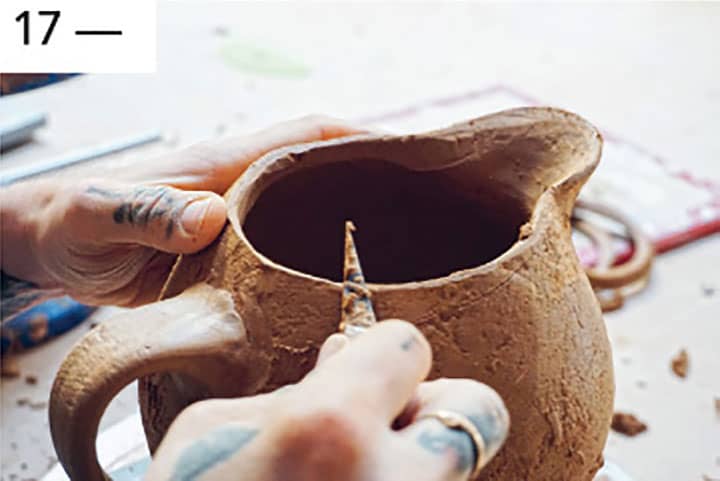
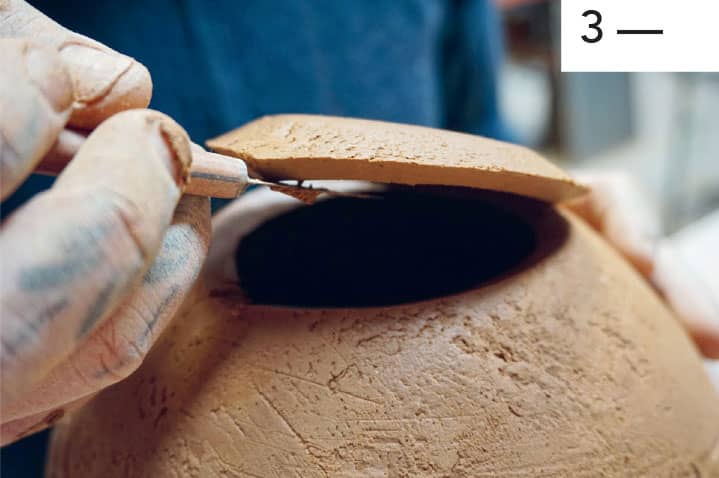
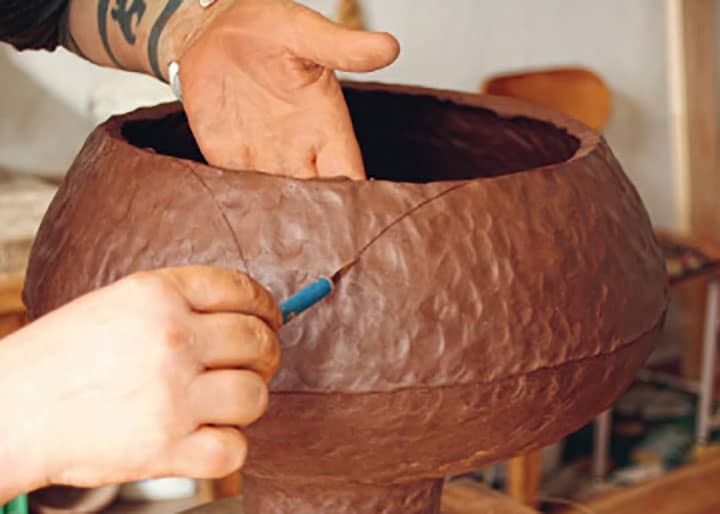
2 | Note where the sphere starts to curve in toward the top. Use your needle tool to cut all the way around, removing the top of your sphere. (You can use this circle for a plate by refining the edge.)
3 | Add a coil over the inside seam, where the top and bottom halves join, just as you did on the outside seam.
4 | Blend the coil to eliminate the seam on the inside of the pitcher. You can use a plastic rib to help smooth. You may need to go back to the outside seam and smooth again. (As you use pressure to smooth the outside seam, the inside seam may bulge and vice versa. It’s a delicate back and forth.)
5 | Cover the pitcher with plastic to keep it from drying while you work on the spout.
6 | Follow the steps for making a spout template shown here. The rough rule for making a spout that pours well is to make sure the spout sticks out further than the belly of your pitcher and is level with the top. Unfortunately, the only way to really know if your pitcher pours well is after it’s fired.
7 | Roll out a small piece of clay about a 1/4" (6 mm) thick and, using your template, cut out the spout.
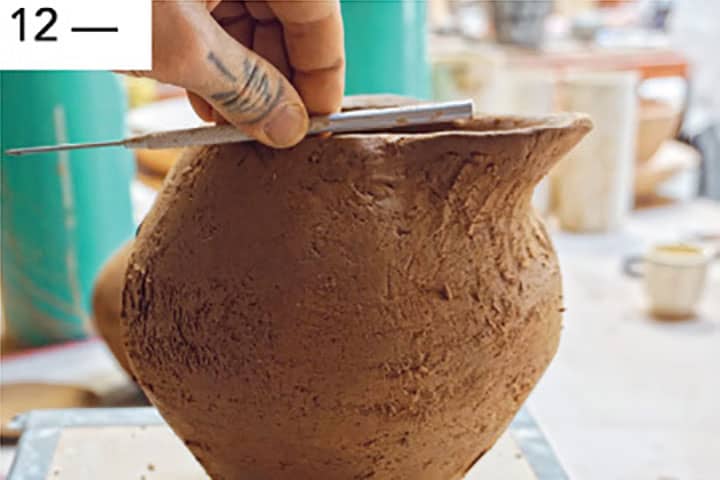
8 | Hold the spout gently where you want it on your pitcher and trace around the outside of it with your needle tool to mark its placement. Set the spout aside.
9 | Using your flexible knife, cut out the clay from the rim of the pitcher along the line you marked.
10 | Score and slip the 1/4" (6 mm) below the cut on the pitcher and the edge of the spout.
11 | Attach the spout (with gentle pressure to keep from squishing it) onto the pitcher. (You will come back to the spout when it firms up and add coils, blending them in to eliminate the attachment seams.)
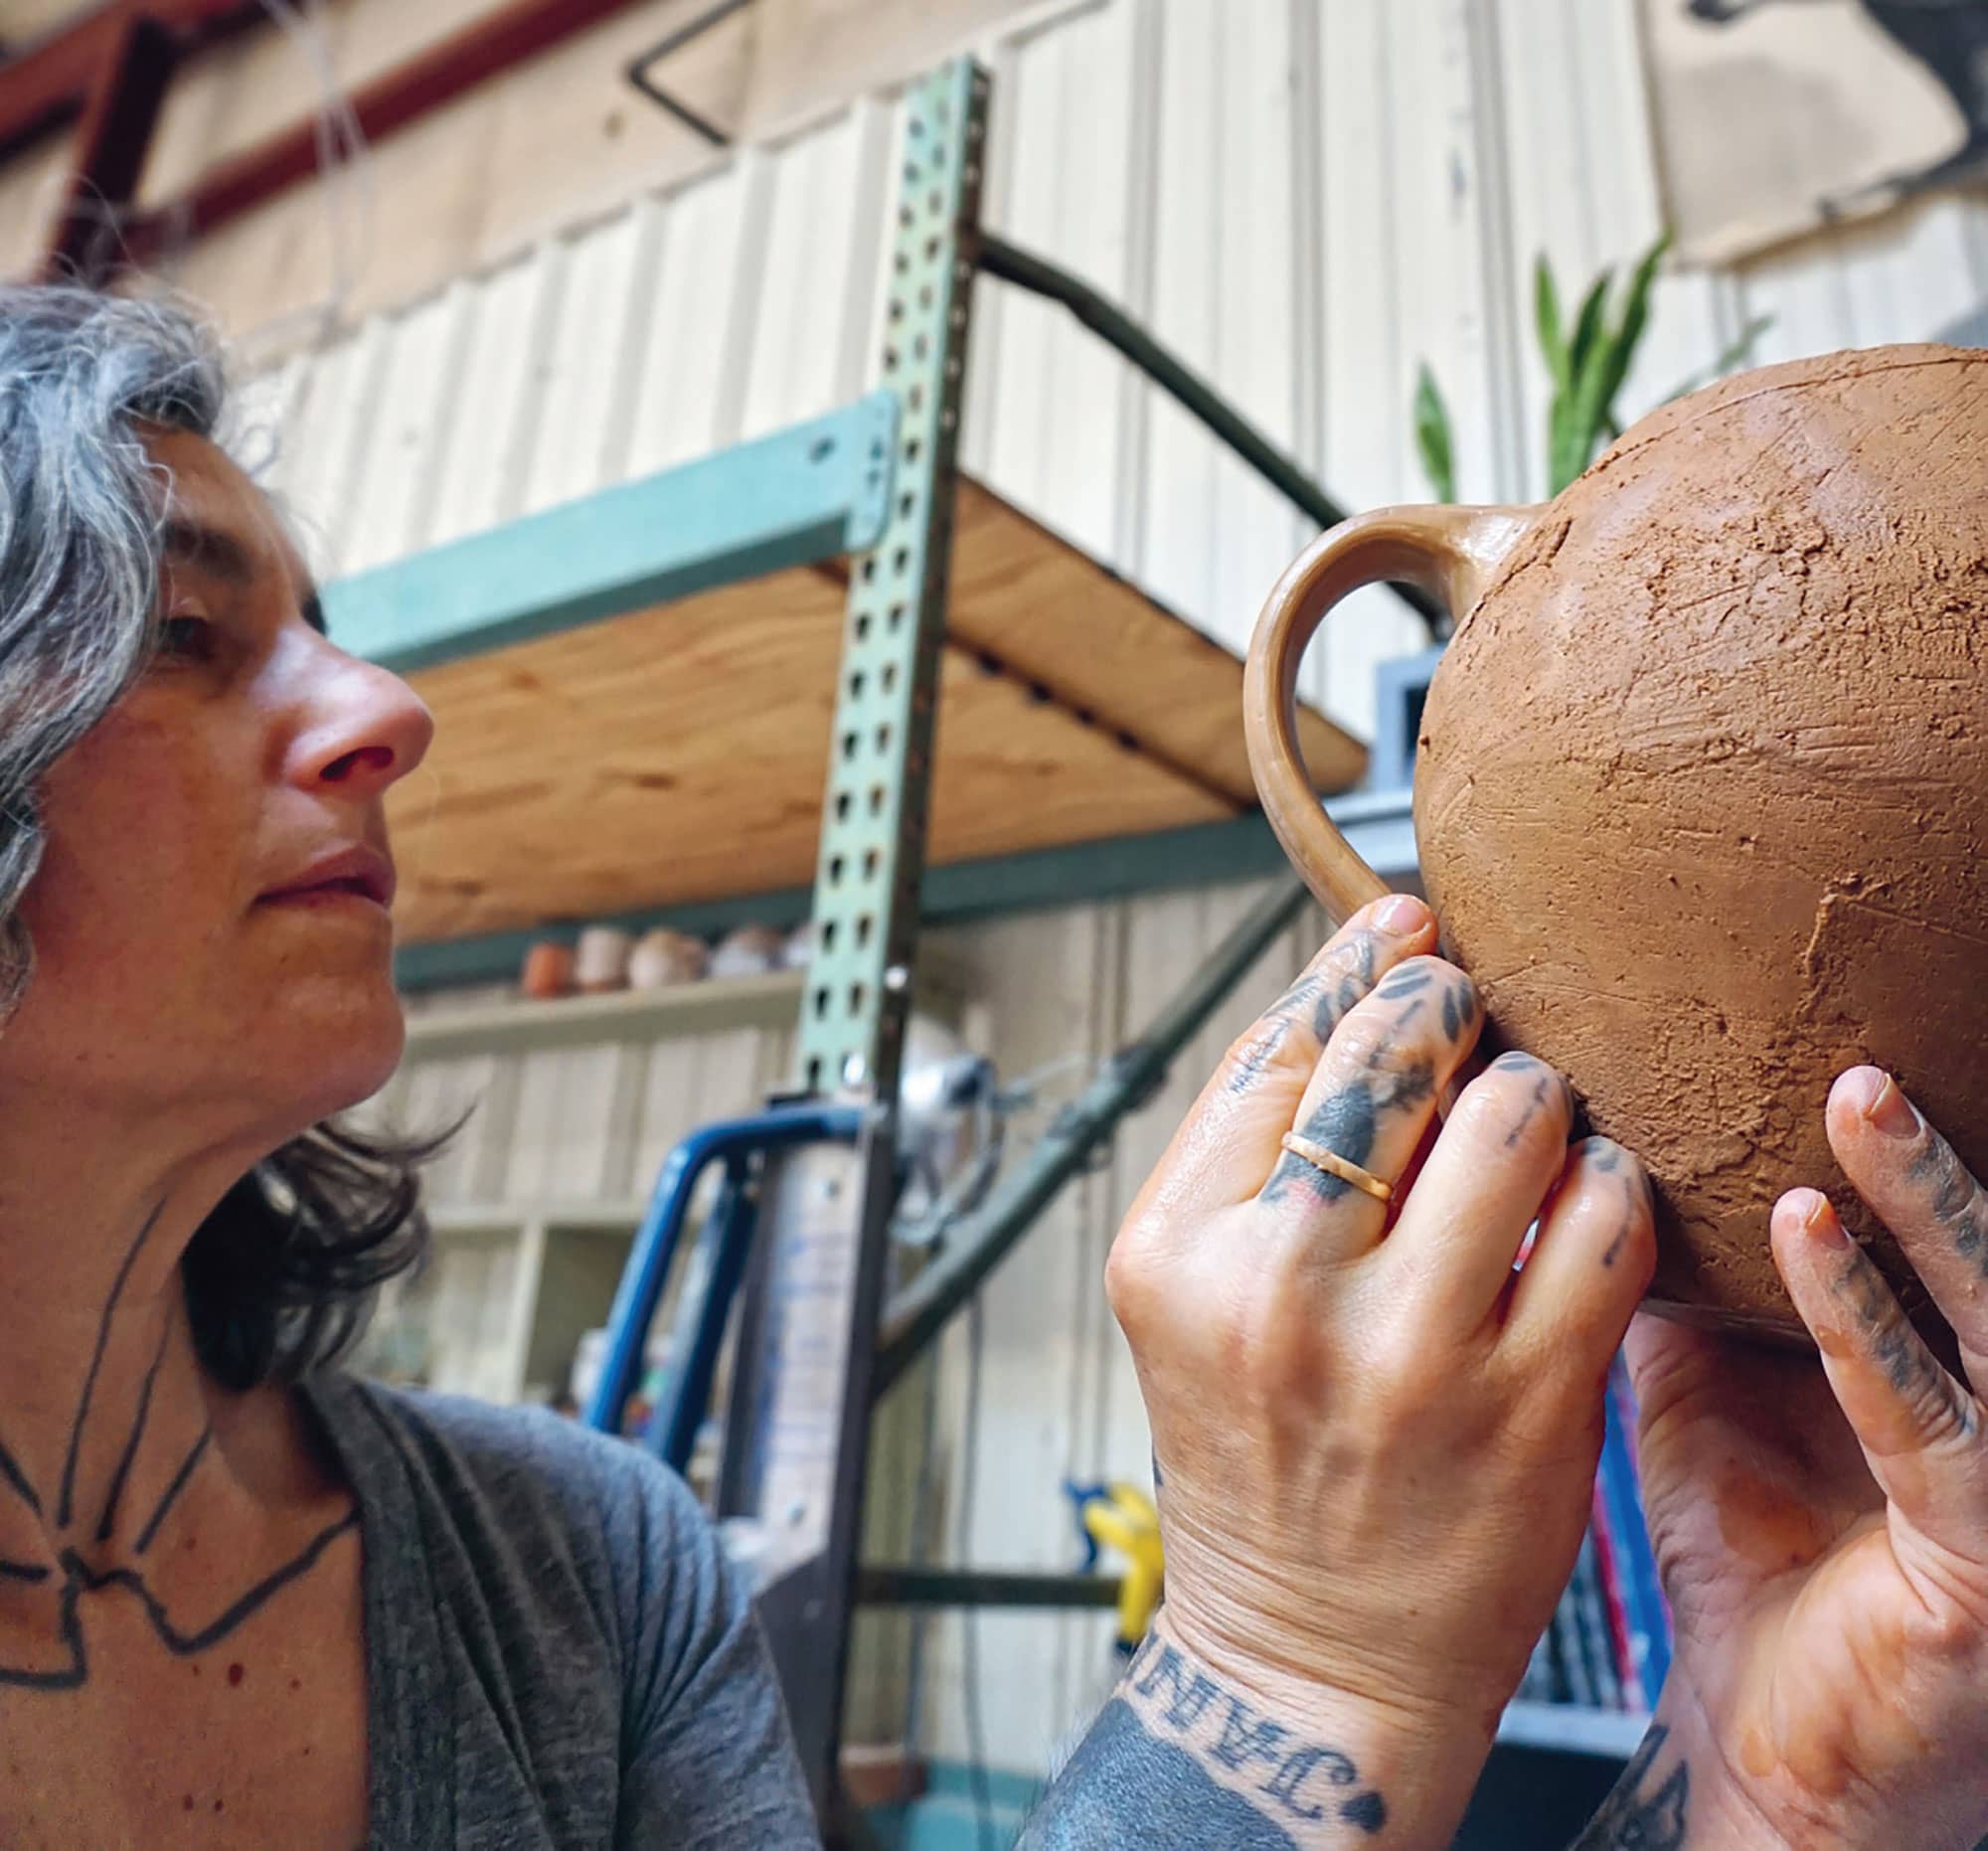
12 | While the spout is setting up, make the handle. Find a spot for the handle opposite the spout. I eyeball this by holding the pitcher with the spout on the far side and placing a stick above the middle of the spout to rest on the rim. I mark this point.
13 | To decide where to place the top of the handle, I turn the pitcher sideways and draw an imaginary line from the spout across the pitcher to the back. I like it when the top of the handle falls slightly lower than the spout in a gradual diagonal line.
14 | Decide where you want the handle to attach on the bottom. Consider the curve of your pitcher and where it visually makes sense for the handle to attach. Think of the pitcher filled with liquid and if it will be better to get all your fingers around the handle to hold and pour. There is no right or wrong here; it will just look right or wrong. It’s a good idea to play with different placements and shapes using a practice handle. When you decide what kind of handle you want and where it goes, score and slip the attachment on your pitcher and add your handle.
15 | When your spout and handle are leather-hard, refine. Add a thin coil to the inside seam of the spout where it attaches to the pitcher. Blend it in, eliminating the attachment seam.

16 | Do the same on the outside of your spout.
17 | Using your flexible knife, carefully refine and taper the edge of your spout. Use the knife or a rib to refine, bevel, smooth, and finish your handle.
18 | I wrap the handle, rim, and spout in plastic to slow down their drying. You might have cracking issues if these dry too fast.
Make a Pitcher with a Coil Neck
YOU’LL NEED
Surform
Flexible knife
Plastic ribs
Mason jar or other tall prop
Slab roller, rolling pin, or slab sticks
Ware board
Serrated rib
Slip
1 | Start the pitcher as in step 1 of the previous pitcher shown here.
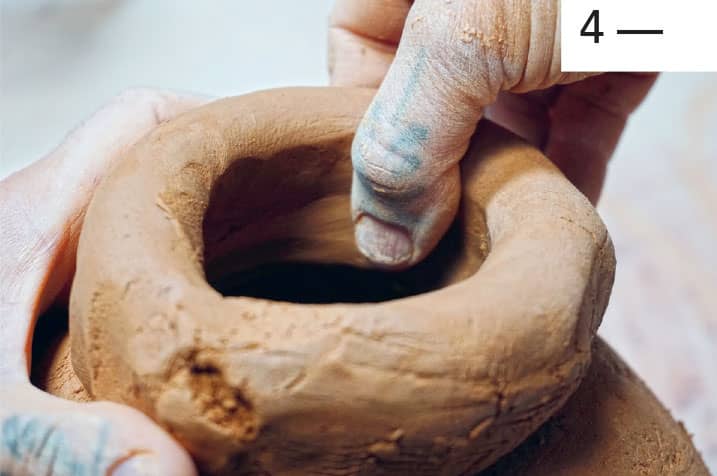
2 | In step 2, make a hole in the top of the pitcher with your needle tool and decide how wide you want your opening.
3 | Cut out the opening.
4 | Add coils to build your neck, following directions for the coil-neck vase shown here.
5 | When the neck is the desired height, follow steps 6-18 of the previous pitcher shown here for adding a spout and handle.
Guest Potter Interview: Candice Methe-Hess
Commanding Presence in Handbuilt Forms
Candice Methe-Hess received her BFA from Northern Arizona University in 2011 and her MFA in clay from the University of Minnesota in 2015. She works from Helena, Montana, where she teaches at the Archie Bray Foundation for Ceramic Arts and shows her work at the Red Lodge Clay Center. In 2016 she received a Warren MacKenzie Advancement Award through Northern Clay and traveled to Ghana, West Africa, for a month to learn indigenous clay methods and practices with the women in the northern part of the country.
MW: YOUR POTS LOOK LIKE ANCIENT VESSELS MADE BY AN EDUCATED MODERN HUMAN. DO YOU LOOK AT A LOT OF HISTORIC FORMS?
CMH: I do look at a lot of historic forms spanning many cultures. I look at historic pieces from Africa, Japan, and a lot of Native American work as well. I am not just looking at clay, though—I am looking at wood, textiles, and basketry as well.
MW: HOW HAS YOUR CERAMIC EDUCATION INFORMED YOUR WORK?
CMH: When I first began my graduate education, I felt that my work was really missing something—fundamentally and foundationally. I had acquired skills, but I hadn’t found my voice yet. Being in a supportive environment that helped push my boundaries and understanding of the material was very beneficial. What I also appreciated from my time at the University of Minnesota, Minneapolis, is that it is a contemporary art–based program, which I also believed would be important for me to understand. All the graduate students had their studios together, so I had the opportunity to see and experience how artists of other mediums interact with their practices. With clay, we have a very long history that precedes us that we can explore, but it’s also imperative to understand the times in which we live.
MW: YOU MAKE VERY LARGE VESSELS, YET, UNLIKE MOST LARGE-SCALE CERAMICS I'VE SEEN, YOURS HAVE A FEMININE QUALITY. THEY HAVE A STRENGTH AND PRESENCE THAT DOESN'T COMPROMISE THEIR DELICATE GRACE. I PICTURE YOUR PIECES COMMANDING A PRESENCE IN A SPACE NOT UNLIKE A LIVING BEING. DO YOU AGREE?
CMH: I do agree. We do see a lot of masculine forms in large vessels, and I think that is based in tradition and function: a lot of men make these large forms. When I started making large work, which was very much by accident, I quickly recognized its relationship with the human form—both through making the pieces and through proximity. It’s a component of my work that I feel is important: I'm constantly exploring it and taking it into consideration. I think the vessel is the perfect metaphor for being human. When I create a piece, I feel that I am making an individual: the spirit of the moment and the material come together and are present in the work. I want my work to be voluminous and relatable.
BEGINNING WITH A SIMPLE PINCH POT
SUCCESSIVE ROWS OF COILS GROW THE POT OUTWARD AND UPWARD
“I look at historic pieces from Africa, Japan, and a lot of Native American work as well.”
MW: WORKING ON SUCH A LARGE SCALE PRESENTS ITS OWN SET OF CHALLENGES. WHAT, IF ANY, DO YOU FACE AND HOW HAVE YOU DEALT WITH THEM?
CMH: As much as I love working large scale, it can become very technical very quickly! The challenges lie in firing the work, storage space, transportation, shipping, and all of those practical concerns. To work large scale, you have to be in an environment that supports you through those concerns, and that in itself can be challenging to come by.
MW: WHAT IS YOUR HANDBUILDING PROCESS?
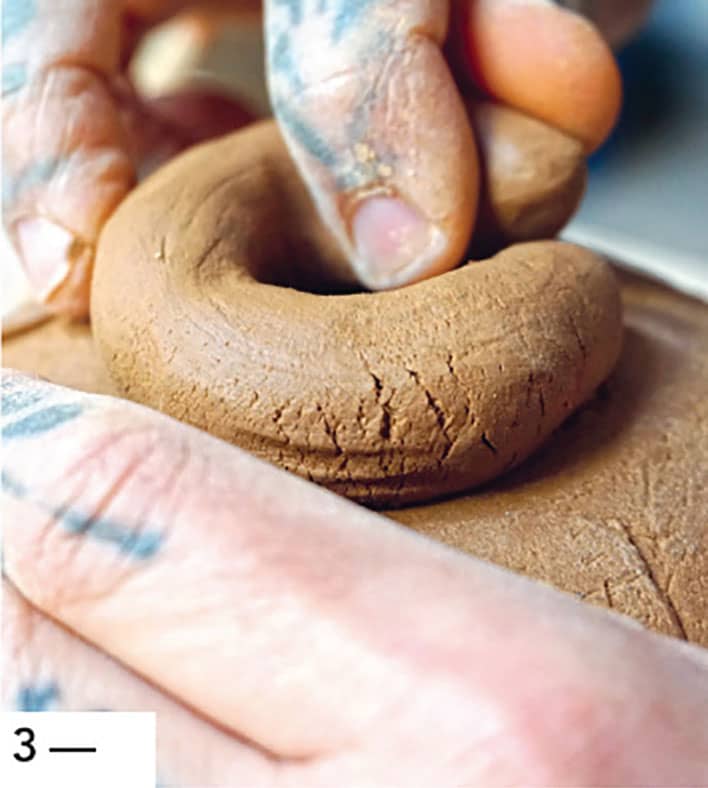
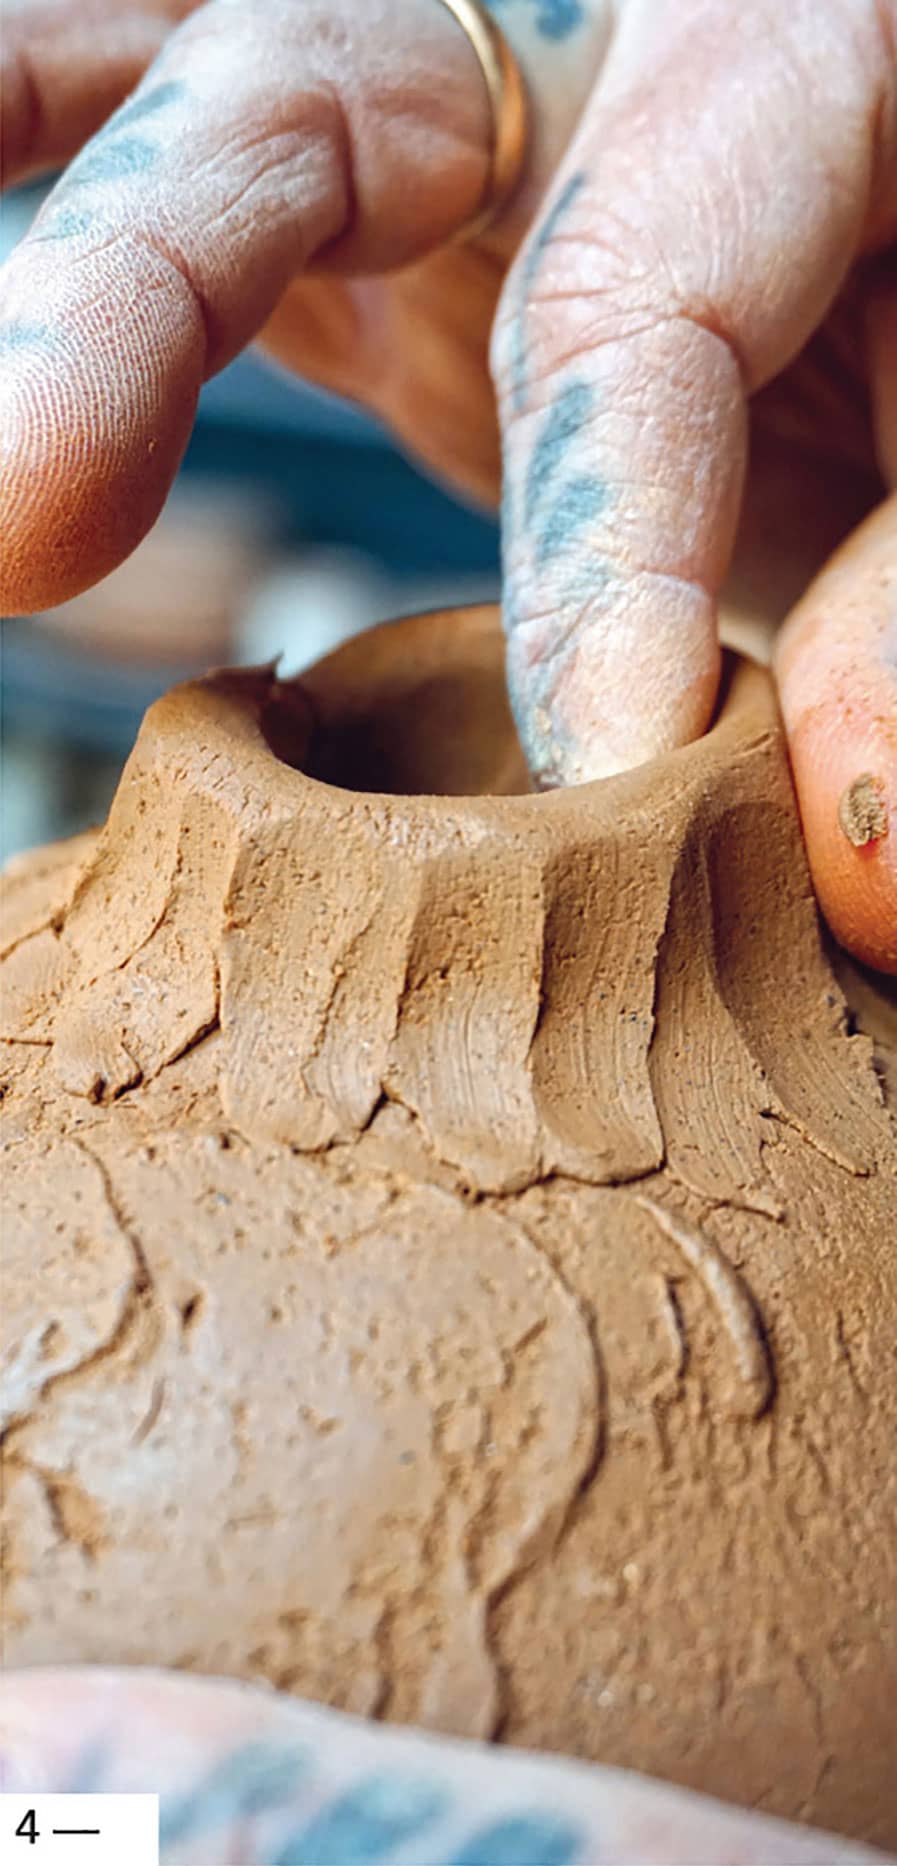
CMH: I work in the round, from the bottom up, and build as I go through coil and pinch methods. The way I work is pretty straightforward and I use very few tools. For the lines, I will usually cut out the shapes and put them back together, leaving a little overlap as I build up. Sometimes I add a small coil to create the line.
ADDING ANOTHER COIL
BLENDING A COIL
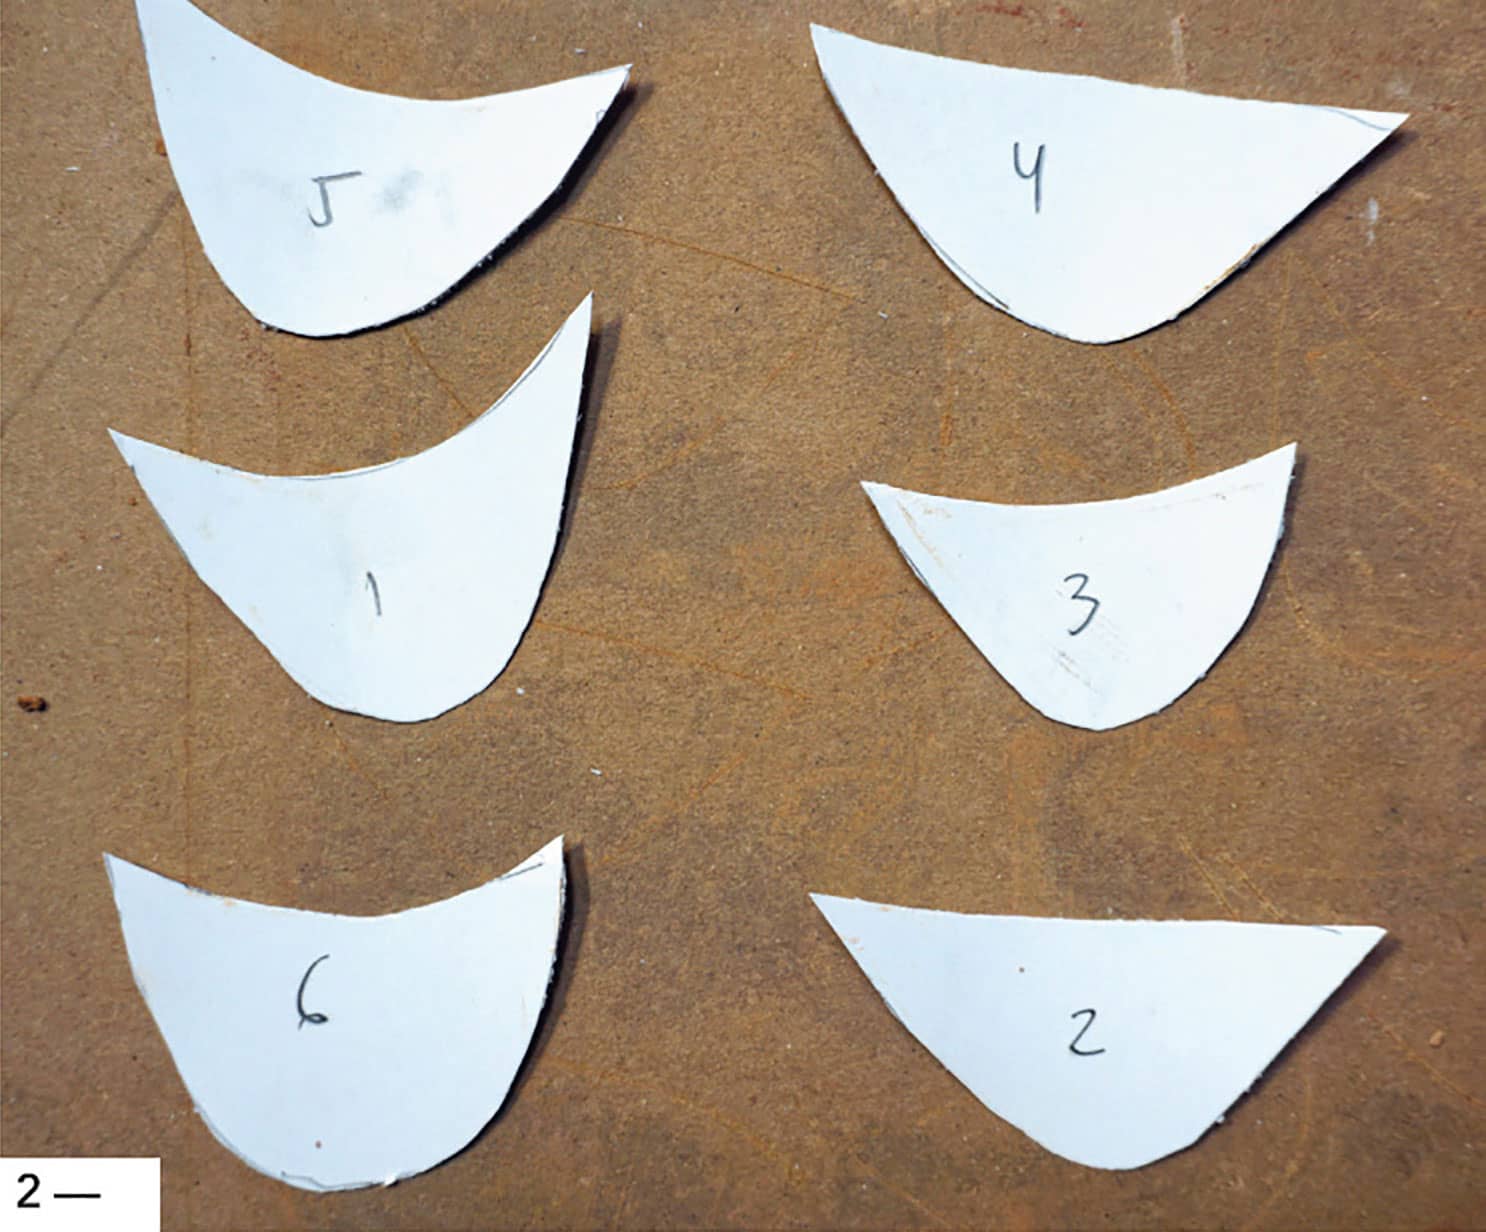
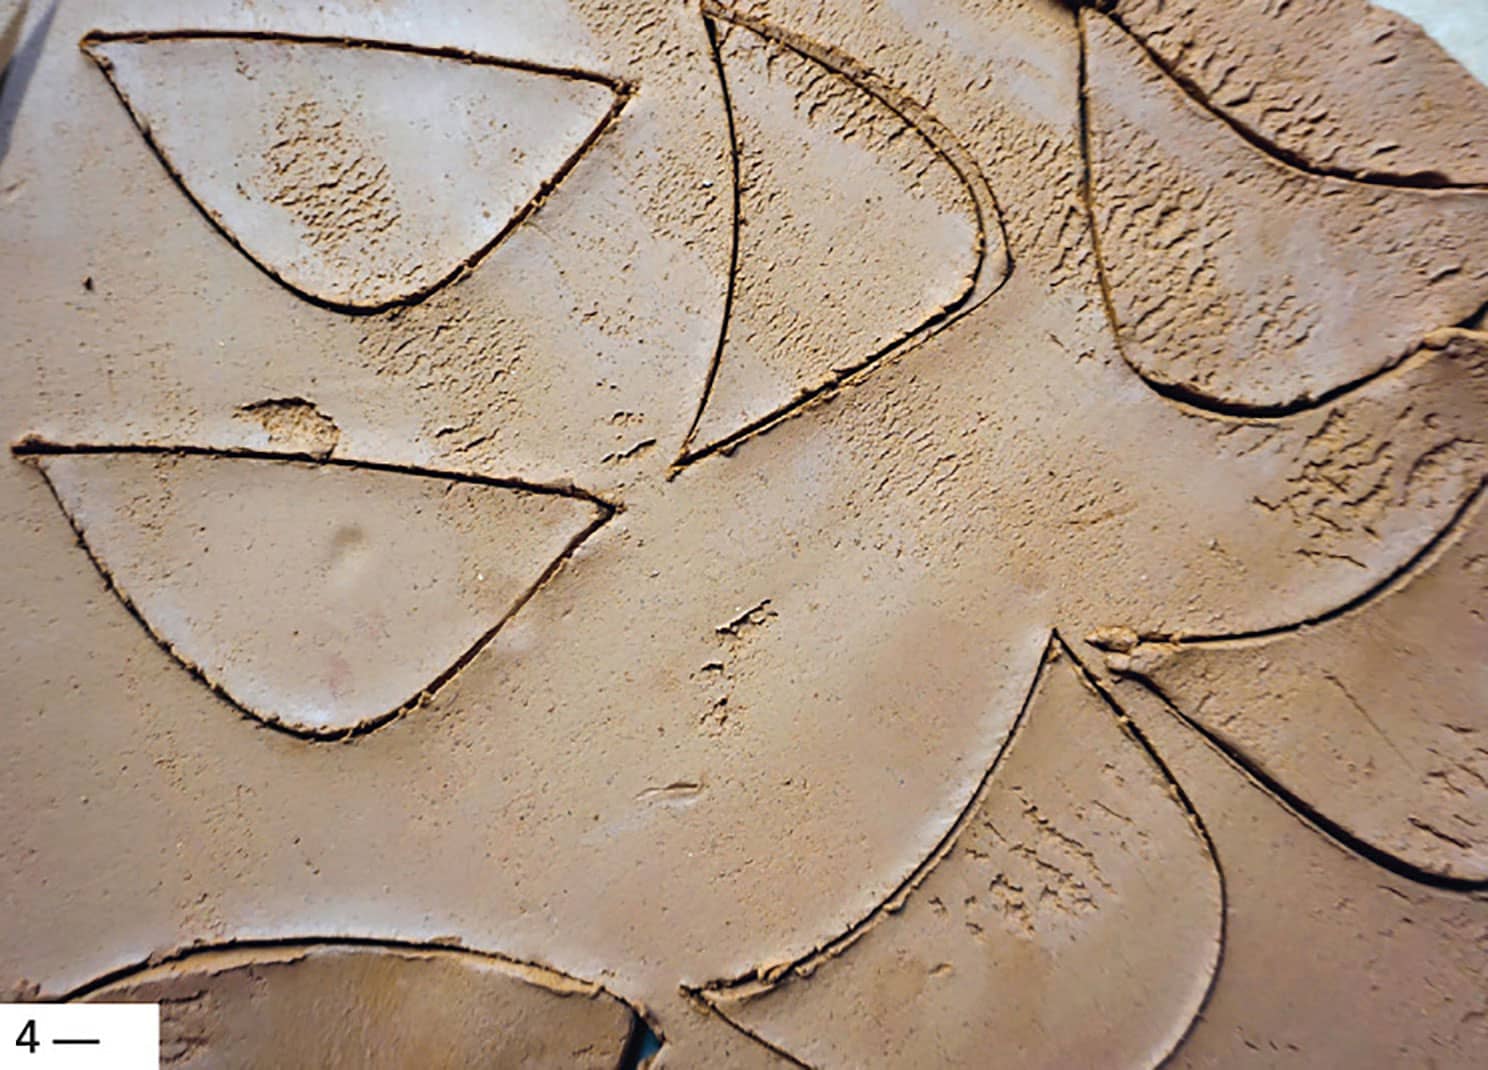
MARKING THE CUT-OUT SHAPE
CUTTING OUT THE SHAPE
MW: YOUR MUGS AND SMALLER-SCALE FORMS SEEM TO INFORM THE LARGER WORK, LIKE A MAQUETTE. IS THIS THE CASE?
CMH: No. Although it is all the same family, the smaller works I see as more functional, and their shapes are dictated by that. With the larger pieces, they are more “exhibition” and exploratory.
MW: WHAT ARE YOUR INFLUENCES?
CMH: As I mentioned before, I look at a lot of African artwork, mostly carved wood pieces. I look at a lot of Zulu basketry as well. There is so much going on there in terms of scale, texture, form, and color. I gain inspiration through reading about the ways of life of ancient cultures, in terms of agriculture, architectural designs, cooking, rituals, and burials. Nature is always a bountiful place of inspiration, but I think my biggest influence comes from just making. The process of making fuels the ideas.
SCORING THE EDGE
ADDING THE CUTOUT BACK AGAIN FOR A DECORATIVE ELEMENT