Just as in Microsoft Word or Adobe Photoshop, before you start working in SketchUp, you have to create a new document to work in. Unlike some other programs, SketchUp always creates documents from a template that defines the units of measure and sets up the background colors for the drawing area. Some templates may even include prebuilt models or other objects. For example, the Architectural Design templates include a human model as a visual reference. The Product Design and Woodworking templates include a carpenter's square for the same purpose. This section shows you how to choose the right template for your project.
SketchUp comes with a bunch of templates that give you a head start depending on the type of model you're building. When you choose the right template, you don't have to begin your project by setting all the preferences—like units of measure, the way objects snap to each other, the way the ground is represented, and the geographic location.
Here are the questions to ask when deciding which template to choose:
Are you working in feet and inches, or metric?
What size is your project? For example, is your basic scale inches or feet?
Are you working in 3-D or 2-D? (Yes, once you get used to SketchUp's tools, you'll find yourself firing it up for quick 2-D projects.)
After you answer those questions, it's easy to make your choice from SketchUp's standard templates. Just look over the helpful template names and the description of typical projects for each template. For each template style, you can choose either feet and inches, or metric measurements. Here are the templates that come with SketchUp:
Simple Template. This general-use 3-D modeling template offers basic styling and simple background colors—green for earth, blue for sky. The line styles are simple, with the sketchy, hand-drawn look used in the other templates. As the name implies, it's great for quick sketching and a variety of projects large and small.
Architectural Design. Another 3-D template, with a large measurement scale for designing buildings and their interiors. The line styles in this template match the hand-drawn effects used by architects.
Google Earth Modeling. Use this template if you are designing a building and want to place it on the map in Google Earth (Chapter 14).
Engineering. If you're a mechanical or design engineer, this template is for you. For example, the Feet and Inches version of the engineering template displays decimal units of feet. Use this when you're designing an electric car or the innards of a blender.
Product Design and Woodworking. Use this template for smaller-scale projects like furniture design or building a birdhouse.
You can't create a SketchUp document without using a template. For this example, choose a 3-D template that's suitable for furniture building: "Product Design and Woodworking – Feet and Inches". To change from one template to another, you change SketchUp template preferences and then start a new document. SketchUp doesn't give you a way to change a template in an open document nor, oddly, a way to choose a template when you use a File → New command.
Choose Window → Preferences (Windows) or SketchUp → Preferences (Mac).
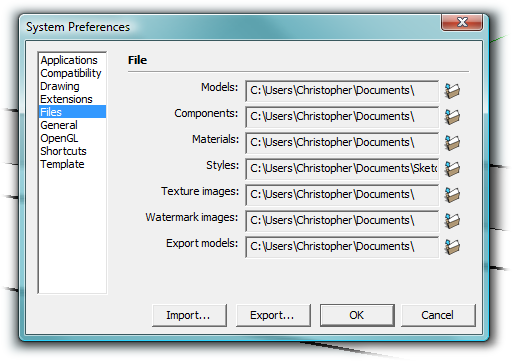
The System Preferences window opens, as shown in Figure 1-7. Along the left side of the box, you see the all the types of preferences you can set.
From the list on the left, choose Template.
You see a list of templates with the heading Default Drawing Template.
Choose "Product Design and Woodworking – Feet and Inches" and then click OK.
With this setting, SketchUp starts with a 3-D woodworking template when you open a new document. It doesn't change the document that's already open.
To open a new document using the template you just chose, go to File → New.
A new document opens. You may see changes in the drawing area from the last time you opened a document—like a different background color. More importantly, the units of measure and other settings are preset for a woodworking project.
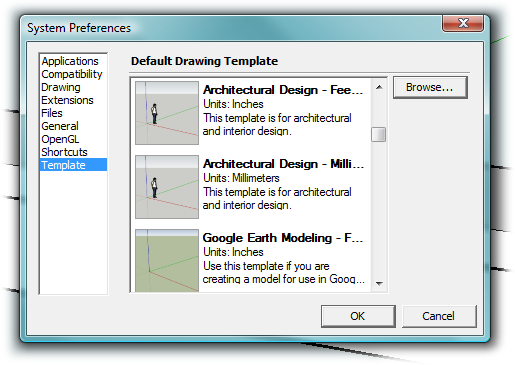
Figure 1-7. Use the System Preferences window (SketchUp Preferences on Mac) to choose a drawing template that gives you a head start on the type of projects you do most often. Templates come with specific units of measurement, and they can even include predrawn models. You'll see more of the preferences when you choose file locations for components and materials.
Once you're a SketchUp pro, you'll probably want to create templates that are set up for specific projects. For example, imagine you're designing houses for a development; you could save the structure of a basic home in your template. From the template, you could design a neighborhood full of fancier custom homes by adding extra rooms, five-car garages, or balcony decks.
Here are the basic steps to create and save a new template:
Open a new file by choosing File → New.
A new empty document opens.
Open the Model Info box with the button that looks like a blue i or with the menu Window → Model Info.
The Model Info box shows details about your project and gives you a way to change settings for Units, Text Size and Font, Animation settings, and more. You'll learn more about all these features later in this book.
Adjust the settings in the Model Info box.
As you go through this book, you'll learn about all of these options and which ones you need for various kinds of projects. In most cases, you change settings by typing directly into text boxes or choosing from lists. When you're done, close the box by clicking the close button in the upper-right corner.
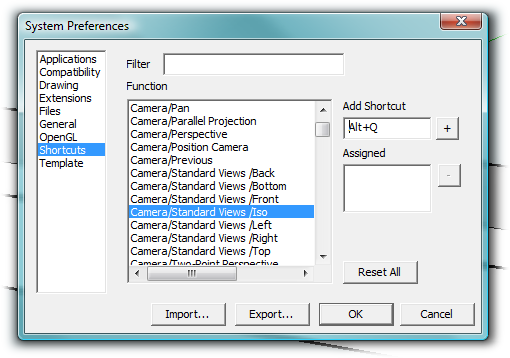
Choose Window → Preferences (Windows) or SketchUp → Preferences (Mac) to open the System Preferences window (Figure 1-9).
Change the settings to create the SketchUp environment you need. For example, you can change the locations where SketchUp saves files, components, and materials. You can create your own shortcut keys for features you use frequently. You'll find more details about creating shortcut keys in the box on Bench: Starting Your First Model.
Note
Mac preferences are always in the same spot under the first menu that bears the name of the program. In Windows, the Preferences command (sometimes called Options) may appear in different menus. In many programs, it's under the Edit or the Tools menu. The Windows version of SketchUp stashes Preferences in an unusual spot under the Window menu. There's some logic to this choice, in that the command opens a window where you set your preferences.
In the drawing area, add to your SketchUp template any drawings, models, or components that you want.
Here's where you can add the geometry for that basic house for your development.
Choose File → Save As Template (Figure 1-10).
The Save As Template dialog box opens, where you provide a Name and File Name for the template. It's also helpful if you provide some more details about the purpose of the template in the Description box.
SketchUp automatically saves the template in the proper directory. In Windows, it's usually C:\Program Files\Google\Google SketchUp 7\Resources\en-US\Templates. On a Mac, the location is Macintosh HD/Users/username/Library/Application Support/Google SketchUp 7/SketchUp/Templates.
After you've saved your file in the SketchUp Templates directory, it appears in the list along with the other templates. In fact, any .skp file that's in your Templates folder appears on the list, so if you've already got a SketchUp document that has everything you want in your template, just copy it to your Templates folder.
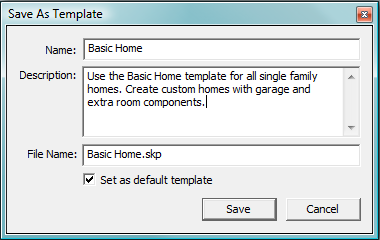
Figure 1-10. When you create a template, give it a name that will appear in the Preference → Templates view and give it a file name. A description is optional, but it's usually helpful for you and anyone else who uses the template. Turn on the "Set as default template" option if you want SketchUp to automatically use this template when you create new documents.
When you work in 3-D, you constantly change views, so it's important to learn where the view tools are and how to use them. It's one of the most important skills you can develop for 3-D work. View tools fall into two categories: tools that jump to the Camera Standard Views, like the Front, Back, Left, and Right commands, and tools that let you gradually move from one view to another, like the Zoom tool or the Pan (hand) tool.
The factory settings for the Standard Views are buried under the Camera menu (Camera → Standard Views) as shown in Figure 1-11. If you followed the setup steps earlier in this chapter (Customizing Your Workspace), then you added the View toolbar to your SketchUp window for easier access. In the View toolbar (Figure 1-12), you find these handy buttons to jump to a new view, in the following order:
Iso. A slightly angled front view, as you can tell by the icon. It's great when you need to get a feeling for perspective and the relationship of objects.
Top. Viewing your model from the top sometimes makes it seem flat and two-dimensional, even unrecognizable (here, you're looking down on the roof and chimney). On the other hand, if something feels odd about the relationship of objects, it can help to change to a top view and to Zoom out or to use Zoom Extents (Shift-Z). You may find that the objects are farther from each other than you think.
Front. A straight-on front view, usually a good place to start when you're building a model.
Right. It's common practice to jump back and forth between Front, Right, and Left views as you build.
Back. Depending on the object, the back may get less attention, or it may be just as important as the other views. This house apparently has no back door, which helps distinguish it from the front.
Left. It's anybody's guess why the button for Left view is at the right end of the toolbar. You can glance at the Front view button to remind yourself that the left side is the one with no chimney.
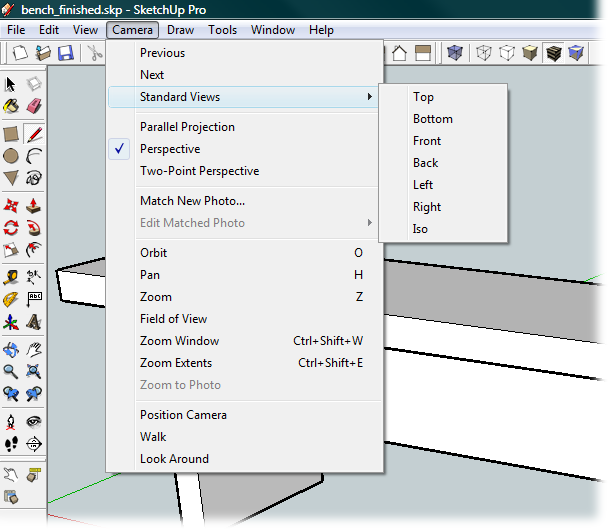
Figure 1-11. For commands that you use constantly, the individual views such as Front, Left, and Top are oddly buried under two menus: Camera → Standard Views.
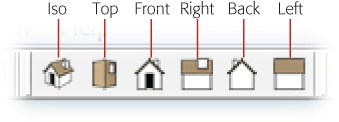
Figure 1-12. The View toolbar is a handier way to jump to a new standard view. Think of changing view as positioning your camera in a new location. If you have trouble remembering which is which—how does a house with no door signify "Back"?—just hover your mouse over the button.
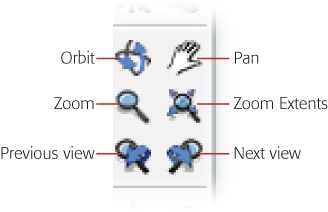
Often, instead of jumping to a completely new view, you want to gradually move the camera from one spot to another, so you can inspect your model at different angles along the way. The tools you use to move to a new view are in the Camera toolbar (Figure 1-13). It's also the best way to change your angle of view in small increments. If you followed the setup steps earlier in this chapter (Customizing Your Workspace), you added these tools to your workspace when you selected the Large Tool Set. Here's a rundown of the tools, with keyboard shortcuts (when available) in parentheses:
Orbit (Windows shortcut O; Mac shortcut ⌘-B). You can move in any direction with the Orbit tool. Just drag your drawing in the direction you want to turn it. It may take a little practice to get used to the Orbit tool, but once you've mastered it, you'll love it. If you have a three-button mouse or a mouse with a scroll wheel, you can use the Orbit tool by pressing the center mouse button and dragging.
Pan (Windows shortcut H; Mac shortcut ⌘-R). Using the Pan tool with its hand icon (hence the H in the Windows shortcut) feels like you're grabbing the image and dragging it to a new spot. If you have a three-button mouse, an even easier way to pan is to press Shift, and then drag with the middle button. (But you know you're really just changing the camera position, right?)
Zoom (Windows shortcut Z; Mac shortcut ⌘-\). The grander your model, the more you'll be zooming in to see details and then zooming out to view the big picture. If your mouse has a scroll wheel, you can spin it to zoom. (Whee!)
Zoom Extents (Windows shortcut Shift-Z or Ctrl+Shift+E; Mac shortcut ⌘-[). A very handy button, Zoom Extents zooms out just far enough so that all the objects in your drawing are in view. If you accidentally lose an object by moving it far away from everything else, you can use Zoom Extents to find it. Another time Zoom Extents comes in handy is when you're lost. Perhaps you're staring at an empty drawing area and wondering why your model disappeared. The problem may be that the camera is pointed at nothing. Click Zoom Extents and the camera shows all the objects in your drawing, so you can get your bearings.
Tip
If you like using these keyboard shortcuts and want more, see the box on Changing Your Camera View for a list of popular shortcut keys you should memorize. SketchUp even lets you make your own! See the box on Bench: Starting Your First Model for instructions.
Bonus Tip for Mac Users: Almost all of the Windows single-letter shortcuts work on Macs. So, if you'd rather use "O" for orbit than use ⌘-B, go ahead. In general, the single-letter shortcuts are easier to use because they're mnemonic and they're single letters as opposed to key combinations. To keep things simple, this book uses the single-key shortcuts when they work on both Windows and Mac. If you need to look up a shortcut, check out Appendix B. It includes all the shortcuts for every command.
Previous. Jumps to your previous view. Points of view are automatically saved as you work in SketchUp.
Next. Works just like the Next button on a web browser. For example, if you used the Previous button, click the Next button to move back to your original view.