At first glance SketchUp doesn't look much different from other programs you use to work with photographs, drawings, or even words. You have menus, toolbars, and a large work area. The difference, of course, is that SketchUp's work area is a window into a three-dimensional world where you can build just about anything. It can be as big as the Empire State building or as small as an iPod. By using SketchUp you can design your new beach house inside and out, and build all the furniture for each room. It's your world, and this chapter is your first-class introductory tour.
In the first part of this chapter, you'll learn about SketchUp's menus, tools, and the drawing window. You'll see how to customize your workspace to make it easier to follow along with the exercises in this book. The rest of this chapter describes how to build a simple bench made from just four pieces of wood, as shown in Figure 1-1.
Tip
If you'd like to see how the finished bench looks in SketchUp, you can find the document file bench_finished.skp at http://missingmanuals.com/cds.
Even though the bench is simple, the step-by-step exercises introduce many of SketchUp's drawing and navigation tools. You'll get a taste of how much fun it is to push and pull your 3-D drawings into shape. You'll also learn some valuable techniques for navigating a 3-D workspace and for moving and aligning 3-D objects. Don't worry if it seems that the exercise moves quickly. In later chapters, you'll see the concepts introduced here explained in much greater detail. In fact you'll see references along the way that point to more detailed explanations. So if you're ready for a fast-paced tour of SketchUp, grab your virtual sculptor's chisel and follow along.
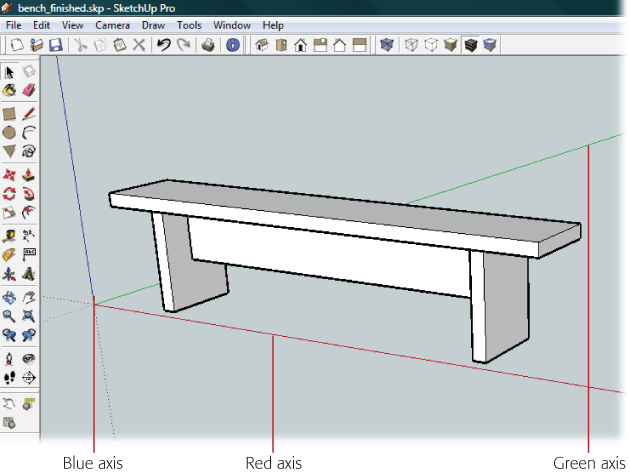
Figure 1-1. The steps in this chapter describe how to build this simple bench in SketchUp. Three colored axes help you keep your orientation in the workspace. In this image the red axis in front of the bench runs from left to right. The blue axis runs up and down. The green axis runs from the front of the image to the back.
After you first install SketchUp (Installing SketchUp), you start it just like you would any program. For Windows computers:
Go to Program Files → Google → Google SketchUp 7, and then double-click the program's icon.
Click Start → All Programs → Google SketchUp 7.
Click Windows → Recent Items, and then click a SketchUp (.skp) document.
If you're of the Mac persuasion:

You can always double-click any SketchUp document to start up SketchUp and open that document. That's probably the easiest way to start SketchUp on any platform.
At first, every time you start the program, SketchUp greets you with a "welcome" window. This window includes a few subpanels, which vary depending on whether you're running SketchUp 7 or SketchUp Pro. Both versions, though, display Learn and Template subpanels. SketchUp Pro also shows a License subpanel. The purpose of the Learn panel is to introduce some basic SketchUp concepts. After a quick introductory animation, you can click links to "Watch more videos" or "Read the documentation". The Template subpanel holds several preformatted documents that you can use to get a head start on your project. For example, if you're beginning a furniture or woodworking project (as shown later in this chapter), click the "Product Design and Woodworking – Inches" template. If you grow tired of the welcome window popping up every time you run SketchUp, turn off the "Always show on startup" box in the lower-left corner.
The other window that appears when you first start SketchUp is the Instructor window (Figure 1-2). This clever feature provides quick visual and written tips on how to use whatever tool you've selected. When you're first starting out, the Instructor tips can be pretty helpful. If you've had enough, you can close the window by clicking its close button. (You can always bring it back with Window → Instructor. Use Help → Welcome to SketchUp to show the welcome window.)
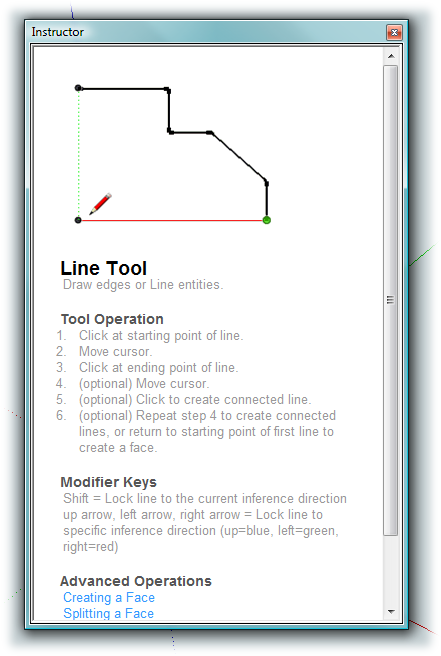
Figure 1-2. The Instructor window knows what tool you're using and provides an animated demo complete with step-by-step instructions for using the tool.
Once you're past the Learning Center, you see the main window. You use its five main areas when you're building in SketchUp (Figure 1-3):
Menus. Just as in your word processor, you get menus and submenus that give you access to SketchUp's tools and commands.
Toolbars. Click an icon in a SketchUp toolbar, and you've got a new tool in hand. SketchUp has several different toolbars that you can show, hide, or drag around the workspace. In Windows, you can reach toolbar central by going to View → Toolbars, where you see over a dozen toolbars that you can show or hide with a mouse click. On a Mac, choose View → Tool Palettes. You have as many toolbars to choose from, but Macs have their own nifty toolbars. Control-click on the top of the SketchUp document window and choose Customize Toolbar. A window opens with all of SketchUp's tool buttons. Drag buttons on and off the toolbar to customize your workspace.
Drawing area. The main portion of the SketchUp window is devoted to your drawing area. Think of it as your camera's view of a 3-D world.
Status bar. In the lower-left corner is the status bar. Like a friend of few words, the status bar's Hint tool gives you facts related to the tool and job at hand. If you need a hint about what to do next, look to this corner. For more verbose instructions, click the question-mark button to open the Instructor window (Figure 1-2).
The latest version of SketchUp added three new buttons to the status bar. From left to right they display geographic references (in Google-speak, it's called georeferencing; see Using Google Earth to Set Geographic Locations for details), credits (the model or component's designer), and the Google account login.
Measurements toolbar. Previously known by SketchUp fans as the Value Control box (VCB), this humble-looking box is magic. You use it to enter the dimensions of objects or the distance you want to move something, but that only scratches the surface. Once you learn how smart and versatile the Measurements toolbar is, you'll be a fan, too.
Note
Traditionally, the Measurements toolbar appears in the lower-right corner of SketchUp. But it can also be displayed some other ways. In Windows, choose View → Toolbars → Measurements, and SketchUp produces a toolbar that can float anywhere on your screen and that you can dock at any edge of the window. On Mac, when you customize your toolbars (For Mac), you can place the Measurements toolbar at the top of the Document window.
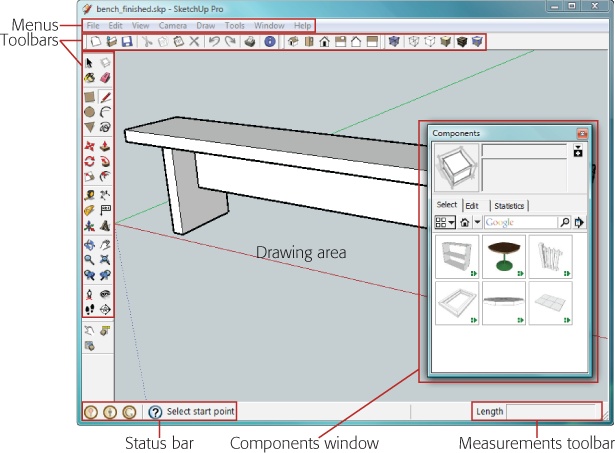
Figure 1-3. The SketchUp workspace has five main areas. SketchUp also has a number of windows that you open from the Window menu. Like the Components window shown here (and described fully on Exploring the Components Window), these windows give you access to additional tools, settings, and prebuilt models from the Taj Mahal to a kitchen sink.
In addition to the five main workspace parts, SketchUp uses several different windows, such as the Components window that's open in Figure 1-3. You can open and close them as needed by using the Window menu. With the tools in these windows, you'll apply color and shading to your models, select prebuilt components, add shadows and lighting effects, and organize your project.
SketchUp's menu bar is stocked with the usual suspects, such as File, Edit, Window, and Help. SketchUp's View menu is a little different from the ones in most programs (Figure 1-4). The View menu lists items in the SketchUp window that you can show or hide, including things like drawing guides, axis lines, measurement marks, and even different toolbars. If you're looking for tools that change your view of the drawing window, such as a Zoom or Pan tool, look under the Camera menu.

The concept behind SketchUp's camera is that the drawing area is your view of a 3-D world. Imagine you're a movie director, you've set up your camera, and the drawing area is your view through the camera. Want to see a different view? Move the camera. For example, in Figure 1-1, you have a front view of the bench. To view the bench from above, you use the command Camera → Standard Views → Top. For a side view, you can use Camera → Standard Views → Right (or Left).
When you make these changes, you're moving the camera view. You're not moving the bench. It's remaining in the same place. When you use some of the tools from the toolbar such as the Orbit or Pan tools, there's a tendency to think that you're moving objects in the 3-D world when actually it's just your viewpoint of the world that's changing.
Tip
In SketchUp, the mouse is your primary building tool, so it helps to have a mouse that plays well with SketchUp. Whether you're working in Windows or Mac, it's more convenient to have a three-button mouse, where the middle button is a scroll wheel. You can use that middle button to easily move around the drawing window without disrupting your work in progress. For Mac users, the standard Mac mouse with the roller button doesn't work quite as well with SketchUp as it should. You may want to invest in a cheapo three-button mouse to use with SketchUp.
The folks at Google don't want to overwhelm you with too many tools and options when you're just starting out. In both the Mac and Windows versions of SketchUp, your first view shows a minimum number of tools. This tool set is officially dubbed the Getting Started tool set. However, to work along with the exercises in this book, you may as well make a few changes so your SketchUp workspace matches the pictures in this book. The suggestions in this section display, with a minimum of onscreen clutter, the tools you'll use most often and will save you from digging into a lot of menus to find commands. You can always change them later as you adjust to working in SketchUp. When you add or remove toolbars, SketchUp remembers those changes even after you close the program.
Follow these steps, and your Windows version of SketchUp will look like Figure 1-3. If you're a Mac fan, skip to the next section and set up your workspace to match Figure 1-5.
Choose View → Toolbars → Large Tool Set.
A new toolbar appears with buttons running vertically down the left side of the window. This new toolbar includes all the tools that are in the Getting Started toolbar, so in the next step, you'll hide the Getting Started toolbar. Initially, the large toolbar is attached to the drawing area, but by clicking the bar at the top, you can drag it away from the drawing area to create a floating toolbar.
Choose View → Toolbars → Getting Started.
Before you click, checkmarks are next to both the Large Tool Set and the Getting Started options. In the View menu a checkmark indicates that an option is visible in your workspace. Clicking a checked item hides it from view and removes the checkmark.
Choose View → Toolbars → Standard.
The Standard toolbar provides the tools that you find in almost every program, though the buttons look a little different. These buttons let you create, open, and save SketchUp files. You also see Cut, Copy, Paste, and Erase buttons. In the next group, you see Undo and Redo arrows. Bringing up the rear is a Print button. Last but certainly not least is a button that's unique to SketchUp. The blue circle with the letter i is the Model Info button, which provides juicy tidbits about the model you're building.
Choose View → Toolbars → Views.
When you work in 3-D, you change views frequently; or from the "SketchUp think" perspective, you move the camera. For example, suppose you want to make sure your model is fitting together properly. Sometimes the only way to see whether a gap exists between two objects is to view them from a different angle. The six view buttons get a lot of use. The Camera Standard Views buttons are Iso (short for isometric or angled view), Top, Front, Right, Back, and Left.
To add one final toolbar, choose View → Toolbars → Face Style.
The six buttons on the Face Style toolbar change the way SketchUp objects appear in the drawing area. For example, the X-ray button makes object surfaces semitransparent—helpful for working with complex models. The other face styles are wireframe, hidden line, shaded, shaded with textures, and monochrome. (Face Styles are covered in detail on Changing Face Styles.)
The Mac toolbars have some of the tools embedded above the drawing area (Figure 1-5). Here's how to set up your Mac version of SketchUp to match the examples in this book.
The suggestions in this section display, with a minimum of onscreen clutter, the tools you'll use most often and save you from digging into a lot of menus to find commands. You can always change them later as you adjust to working in SketchUp.

Figure 1-5. With its special toolbar area above the drawing area, the Mac version of SketchUp looks a little like Finder or other Mac document windows. Customizing your Mac toolbars is as easy as dragging.
Choose View → Tool Palettes → Large Tool Set to display the Large Tool Set.
The Large Tool Set shows two columns of buttons. The position of the individual tools and the appearance of the icons are identical on Mac and Windows. In Mac tradition, this toolbar is always floating.
Initially, SketchUp displays a few basic tools in the custom toolbar. Once you've displayed the Large Tool Set, you don't need these duplicate tools, so in the next steps you'll replace them with some more helpful tools.
Choose View → Customize Toolbar to open the "Customize toolbar" window (Figure 1-6).
At the top of the window, you see the tools that appear on the custom toolbar. Below, you see a palette with dozens of tools you can add. It's simply a matter of dragging tools on and off the toolbar as shown in the next few steps.
Drag all the tools on the toolbar away from the toolbar.
To remove tools from the toolbar, just drag them off the silver bar area. As you do, they disappear in a poof of smoke. (Don't worry, you still have a copy in the palette below if you need it later.)
Drag the Undo and Redo buttons to the toolbar.
These handy buttons let you step forward and backward through actions that you've taken in SketchUp.
Drag the Print button to the toolbar.
With a click of the Print button, you can send your SketchUp image to the printer.
Drag the Views tool set to the toolbar.
When you work in 3-D, you change views frequently; in SketchUp-speak, you move the camera. For example, you can do so to make sure your model is fitting together properly—sometimes the only way to see whether there's a gap between two objects is to view them from a different angle. Put these six view buttons on the main toolbar, because you'll be clicking them a lot. The Camera Standard Views buttons are Iso (short for isometric or angled view), Top, Front, Right, Back, and Left.
Drag the Face Styles tool set to the toolbar.
These buttons change the way SketchUp objects appear in the drawing area. For example, the X-ray buttons make object surfaces semitransparent, which helps when working with complex models (Changing Face Styles). The other face styles are wireframe, hidden line, shaded, shaded with textures, and monochrome. (Face Styles are covered in detail in the section on materials, Changing Face Styles.)
Drag the Get Current View tool to the toolbar.
This tool copies a view from Google Earth so you can use it in your document. You must have the Google Earth application running to get a snapshot.
Drag the Model Info button to the toolbar.
The blue circle with the letter i is the Model Info button, which provides juicy tidbits about the model you're building.
Click Done to save your changes.
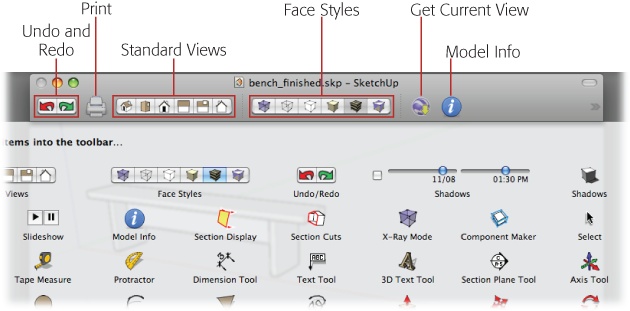
Figure 1-6. To customize the toolbar at the top of the drawing area, drag the tools you want from the window into the toolbar area. To remove buttons from the toolbar, just drag them off.
Note
You're free to move your toolbars around as much as you like, but don't move them constantly. Leave them in one place for a while, and see how your new setup works. If it works well, you'll soon find yourself automatically clicking tools and zipping right along. If not, you'll be able to see what's not working and change it.