Components are an important part of SketchUp. It's likely that many of your models will include both components that you create and readymade components that you find in SketchUp or the 3D Warehouse:
Choose Window → Components.
The Components window opens.
In the Components window, click the In Model button (Figure 9-17).
The Components window shows the components that are in your model. You see your window component. You may or may not see Sang, depending on how you disposed of him. You don't see the planter that you created at the beginning of this chapter (Understanding SketchUp's Sticky Behavior), because the planter is a group, not a component.
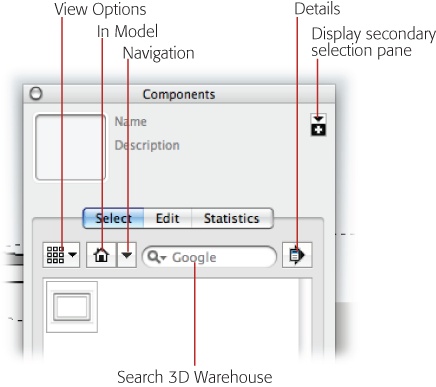
Figure 9-17. The Components window packs a lot of SketchUp power in a small bit of real estate. Use the buttons above the preview area to adjust your view of components, to choose which collections appear in the window, and to search for components including those stored on the Internet in the 3D Warehouse.
Click the window component and place a couple more windows on both sides of the house on the second floor.
The number of windows and how carefully you want to place them is up to you. Use the Orbit (O) and other view tools to maneuver around your model. If you're going for precision, use the Tape Measure (T) to create guides and the Array feature to add copies.
Place two windows on the roof as skylights.
At this point, you run into a "gotcha!" The windows appear to align with the surface of the roof, but notice that they don't cut an opening in the face of the roof. The edges and faces of the roof are inside of a group. For the window component to do its cut-opening magic, you need to open the group for editing and place the window inside of the group.
Use the Select (space bar) tool to select the windows and then press Delete.
The windows disappear from the model. You can use Shift-click to select both windows at once before you press Delete.
Right-click the roof and choose Edit Group from the shortcut menu.
The Group opens for editing. The rest of the model is faded. If you have set View → Hide Rest of Model, then all you see is the roof group.
Click the window component and then click the roof. Place two windows on the roof.
The window components are now glued to the roof surface and cut an opening in the roof.
As your models become more complex, it becomes second nature to open groups and components for editing. Sometimes you want to make changes, and other times you want to add new elements to the group or component. In this example, you made changes to a group. Those changes only affect that group. As you see later in this chapter (Editing Components), when you make changes to components, those changes affect all the other instances of that component.
As far as components are concerned, the Components window is Grand Central Station. That's where you find all the components in your model and where you hunt for premade components. In the next few steps you add premade door components to your model. In the process, you make a visit to the 3D Warehouse—think of it as Home Depot for SketchUp.
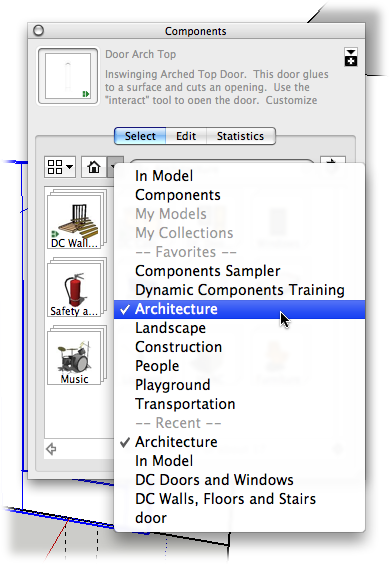
Click the Navigation button and then choose Architecture from the drop-down list.
When you click Architecture, several collections of architectural components are displayed in the preview window.
The Navigation list shows collections of components (Figure 9-18). Click one of the collections' names to see the components it holds. At the top of the list, you see the familiar In Model option. Further down the list, you see collections grouped under "Favorites" and "Recent". You add and remove collections from your Favorites list by using the commands under the Details button on the Components window. The Recent list keeps track of collections that you've used recently.
Click the View button and choose List View.
In the drop-down menu, you see several options:
Figure 9-18. When you click the Navigation button in the Components window, you see a list of all component collections. At the top of the list, the In Model collection shows the components that are stored in your SketchUp document. The other collections may be stored on your computer or at the Google 3D Warehouse.
Small Thumbnails displays icon-sized images representing the collection or the component.
Large Thumbnails displays larger, but still icon-sized, images representing the collection or the component.
Details shows on the left the icon for the collection or component. On the right is descriptive text, which may include a link to a website with even more information about the collection or component.
List View shows no image, just a few words to describe the collection or component. When you need to cut through the clutter, the list view can help.
Refresh is similar to your browser's refresh button. Choose Refresh when you want SketchUp to reread and redisplay the component or collection info.
Choose "DC Doors and Windows".
"DC" stands for dynamic components, so you see several door and window components that offer special features. For example, you may be able to change the dimensions of the components, or you may be able to open and close them in your model. If you're in Details view, make sure you click the icon, not the text. If you click the text, SketchUp opens the 3D Warehouse in your web browser.
Choose Door Arch Top from the list.
SketchUp downloads the component from the 3D Warehouse. Briefly you see a progress bar on the screen, indicating that SketchUp is downloading the component from the 3D Warehouse. When the download is complete, the component is already attached to your cursor, so all you have to do is click in your model to place the component.
Note
SketchUp's 3D Warehouse is a website: http://sketchup.google.com/3dwarehouse/. The Search box in the Components window searches the component collections on your computer and the ones in the 3D Warehouse. If you don't find what you want using the search function in the Components window, check the website. The two don't always show the same results.
Click the bottom edge of the wall next to the garage.
The door component is placed in the wall.
Right-click the component and then choose Dynamic Component → Component Options.
The Component Options window displays an image of the component and its name at the top. With most components, you see text that explains how the component works and what options you can change (Figure 9-19). Below that are controls for making changes to the component.
Click the Height menu and choose 8. Then click the Width menu and choose 3-4. Click Apply and close the Component Options window.
The door changes dimensions according to your specifications.
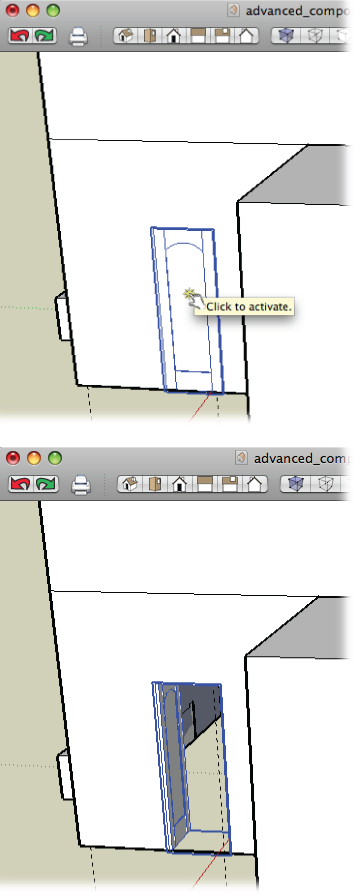
Choose Tools → Interact and then click the door (Figure 9-20).
When you choose Interact, the cursor changes to a finger with a highlight on the end. When you click the door, it opens or closes.
Double-click to open the garage group for editing.
If you open the garage in edit mode before you hunt down a garage door, you'll save some time and a click or two.
In the Search box of the Component window, type one car rolling garage door.
SketchUp searches the online 3D Warehouse for a component that matches your description. When it finds a match, it shows the component in the Components window.
Click the garage door and then click to place it on the face of the garage.
The garage door snaps to the surface of the garage and cuts a hole in the face. If you hadn't opened the garage group for editing, the door would not be glued to the face and it wouldn't cut an opening.