If you've been following the exercises up to this point, no doubt you've experienced SketchUp's "sticky" behavior. When edges and faces come in contact with each other, they tend to weld themselves together in a way that makes it difficult to separate the entities. In these next steps, you'll deliberately experiment with SketchUp's sticky behavior, and then by creating a grouped object, you'll see how to overcome this natural tendency in SketchUp:
Note
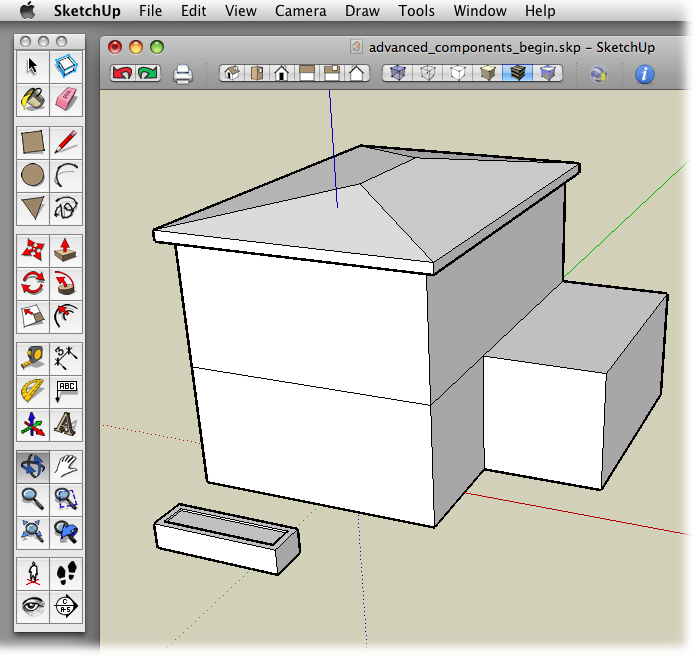
The exercise in this section uses the house model that was designed in Chapter 8 (shown in Figure 9-2). You can use your model or you can download advanced_components_begin.skp from http:// http://missingmanuals.com/cds.
Using the Rectangle (R) tool, begin to draw a rectangle in front of the house. Then type 10',3' and press Enter (Return on a Mac).
A rectangle appears in front of the house. Make sure none of the rectangle's edges touches the house model.
With Push/Pull (P), begin to pull the rectangle up and then type 2' and press Enter.
Your planter box begins to take shape.
With the Offset (F) tool, click the top edge of the box and, on the top surface, begin to move to the inside of the rectangle. Type 6 and then press Enter.
The Offset tool creates an additional face on the top of the box.
With Push/Pull (P), click the center face in the top of the planter and begin to push down. Then type 2 and press Enter.
At this point the planter looks like the one in Figure 9-2. You can easily select it with a triple-click because it isn't touching any other surfaces. You're going to place this planter against the house, so it doesn't need a back wall.
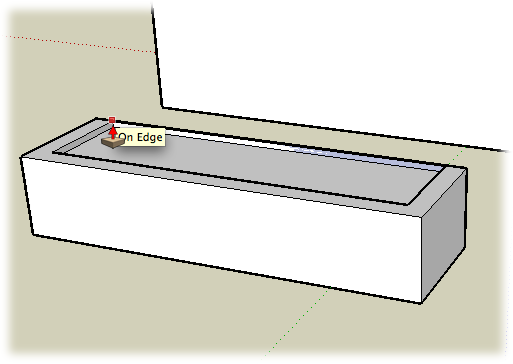
With Push/Pull (P), click the interior face of the planter's back wall. Push back and then click one of the back edges.
After the interior face of the planter wall is aligned with the exterior face as shown in Figure 9-3 the wall disappears.
Using the Select (space bar) tool, triple-click the planter.
The entire planter is selected; because the planter isn't connected to any other entities, nothing but the planter is selected.
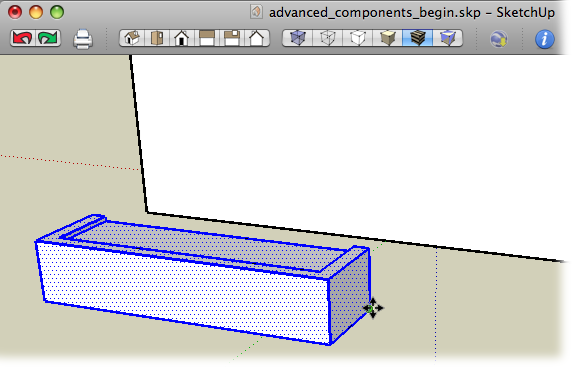
With the Move (M) tool, click the lower-right back corner of the planter (Figure 9-4), and then click the bottom edge of the house's wall.
The planter moves so that the back face of the planter is against the wall of the house. The bottom of the planter is aligned with the bottom of the house. The planter remains selected.
Still using the Move tool, click one of the planter's faces, and move the cursor in different directions around the modeling window.
The planter is "stuck" to the wall of the house (Figure 9-5). It moves easily back and forth along the red axis. When you move the planter along the green axis, it actually pulls the wall out, distorting the shape of the wall.
Figure 9-3. Using the Push/Pull tool, you remove the back wall of the planter. Click the inside face of the back wall, and then click one of the back edges to remove the wall.
Figure 9-4. When you're moving entities, it's always best to match a specific point on the object being moved to a specific point on another object. Here the lower-right back corner is selected with the Move tool. It will be moved to the bottom edge of the house's wall.
Don't confuse the sticky behavior of ungrouped entities with the glue-to behavior of components. They're two different things, as explained in the box on Editing a Group.
Press Ctrl+Z (⌘-Z).
The planter is back in front of the house, not touching the rest of the model. The planter is still selected.
Right-click the planter and choose Make Group from the shortcut menu.
An extra highlight appears around the planter indicating that it's now a group. You may want to go ahead and give it a creative name like Planter.
Choose the Move (M) tool, and then click the lower-right back corner of the planter. Click the bottom edge of the house.
The planter snaps to the edge of the house as before.
Still using the Move tool, click one of the planter's faces, and move the cursor in different directions.
This time you can move the planter in different directions without bringing parts of the house along with it.

The behavior of the planter as a grouped object is dramatically different from the behavior of the planter when it was just a collection of selected edges and faces. So the lesson here is simple but important to keep in mind. If you don't want parts of your model to stick to each other, keep them in groups or components. You're still able to align them with other parts of your model; the difference is they won't weld together in a way that makes your model difficult to manage.
If you want to keep the entities in your SketchUp model from sticking to each other, the best thing to do is to select the edges and faces that make up a logical object and then combine those entities in a group (right-click → Make Group) or in components (right-click → Make Component). Groups and components offer many other benefits, but controlling sticky behavior is at the top of the list.
So what do you do if you've created a model (or one is passed along to you) and the logical objects in the model weren't grouped? That's the situation with the house model used in this exercise, and you need a way to take care of the problem after the fact. Logically, the roof, garage, and maybe even the individual floors should be separate groups. Go ahead and try to grab the roof and move it to another location. The walls of the second floor are stuck to the bottom of the roof. The result looks like Figure 9-6.
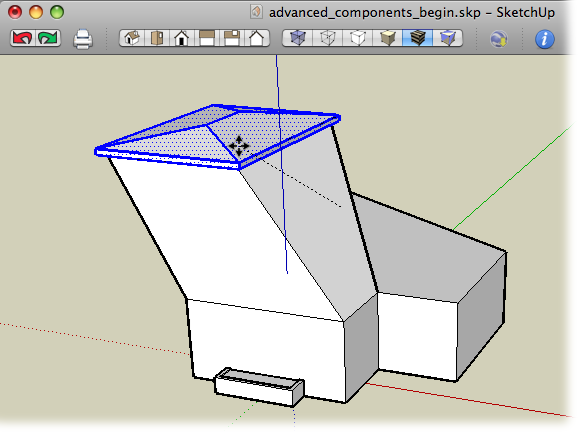
Figure 9-6. Logically, the roof is a separate element from the walls of the house, but SketchUp doesn't know that unless you turn the roof into a group or a component.
The cure is to select the edges and faces (also known as entities) that make up your roof, and then turn them into a group. Sometimes it can be a little tedious to find all those edges and faces, and you have to be careful not to include the wrong edges and faces in the selection. Using the house roof as an example, here are some procedures to follow:
Click the Front view on the View toolbar, or choose Camera → Standard Views → Front.
SketchUp shows you the Front view of the house with the planter.
With the Select (space bar) tool, starting to the left and above the roof, drag a selection window around the entities that make up the roof.
When you drag from left to right, the entities that are completely within the window are selected (as shown in Figure 9-7).
On the View toolbar, click the X-ray button, or choose View → Face Style → X-ray.
The faces in the model become semitransparent, making it easier to see the edges in your selection (Figure 9-8). Because you're able to see through the house, you can tell without changing your view whether the back edges or faces are selected.
Right-click the selection and choose Make Group from the shortcut menu.
The entities that make up the roof become a group, and SketchUp highlights the group. When you click any part of the group, you select the entire group.
With the Move (M) tool, click the roof and move it away from the top of the house.
As expected, because the roof is grouped, it moves as a single unit and doesn't bring parts of the house walls as you move. Now you can look down into the second floor of the house. Moving or hiding the roof is a great way for you to examine separate floors in a model.
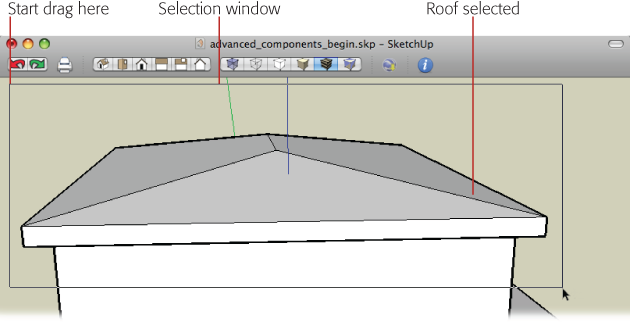
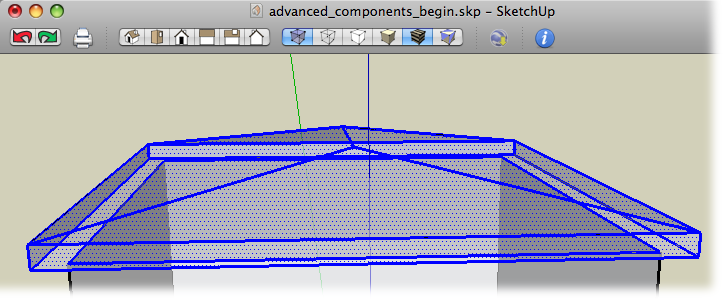
Figure 9-8. Use the X-ray view to double-check your selection before making a group or component. Make sure that all the edges you want in your group are highlighted and also that you don't catch any unwanted edges in the selection.
It's much easier to group your model as you build it, as opposed to separating an existing model into groups after the fact. Still, sometimes you need to divide and conquer after the fact, so a little practice never hurts. Go ahead and separate the garage from the rest of the house. Here are a couple of tips to keep in mind:
Drag your selection window from left to right. That way, only entities entirely inside of the selection window are selected.
Remember that it's easiest to see selected entities when you're in X-ray mode.