You're the creator of the newly named "skylight" component. It wasn't one of the components that you retrieved from a collection or the 3D Warehouse. So at this point the only place the skylight component exists is inside of this SketchUp document. With a decent chance you'll need a skylight again, it makes sense to save it where you can reuse or even modify it for some other purpose.
In the Components window (Window → Components), click the Select tab.
The Select tab shows your components as thumbnails, a list of names, or longer descriptions, depending on the View Options (Figure 9-17). Choose the view you like best.
Click the In Model button.
SketchUp displays the components that are in your model. If you added components to your model but later deleted them, they'll show here, too.
Right-click the skylight component, and choose Save As from the shortcut menu.
A file browser window opens. Use the browser to find a folder where you want to store your SketchUp components. If this is your first component, you may want to create a special SketchUp Components folder. Over time, it's likely that you'll want to create subfolders to hold different types of components: windows and doors, landscape furniture, people, and pets. It's your collection, so organize it in a way that makes sense to you and provides room for growth.
Click the Save button.
SketchUp saves components in files that are exactly the same as any SketchUp document. In fact, the files have a .skp extension. That means you can use any SketchUp document as a component, and you can open any component file as a SketchUp document.
SketchUp keeps track of all the components in your model. Click the In Model button (Figure 9-27), and you see a list of all the components that are currently in your model. If you added a component, then decided you didn't need it and deleted it, you'll still see the component in the list. What's more, SketchUp keeps a copy of the component saved in your document, so it's ready to use if you need it. Complex components dramatically increase the size of your documents, so if you're not using and not planning to use components, it makes sense to get rid of them. To purge your SketchUp document of any component that isn't actually used in your model, click the Details button and then choose "Purge unused".
It's a good idea to purge your SketchUp documents of unneeded components and colors before you save a final copy or email it to a colleague. It keeps the file size to a minimum, and it keeps everything neat and tidy.
Tip
There's a similar "Purge unused" command in the Materials window. It makes just as much sense to purge your document of unneeded materials. In Windows, click the Select tab and then choose Details → Purge Unused. On a Mac, go to Window → Materials. Instead of a Materials window, you see a window named Colors that's part of the Mac's standard color system. Click the SketchUpColorPicker—it looks like a brick. At the bottom of the window, click the List pop-up menu and choose Purge Unused. If you want to purge your document of materials, components, and empty layers, go to Window → Model Info → Statistics and click Purge Unused.
SketchUp stores components in collections. When you first use SketchUp, you see the collections that came with the program, and you see additional collections that are stored in the 3D Warehouse. As you create your own components, you'll want to start creating your own collections. You can organize your collections however you want—by object, by client, or by project. It's up to you. Suppose you want to create a new collection named My Windows for the window and skylight created in this chapter. Here are the steps:
In the Components window (Window → Components), click the Select tab.
The Select tab shows your components as thumbnails, a list of names, or using longer descriptions, depending on the View Options setting.
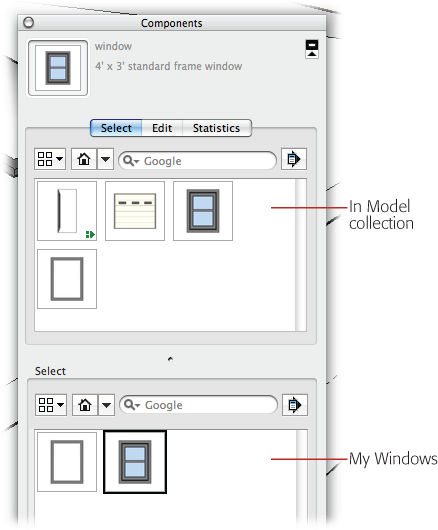
Click the In Model button, as shown in Figure 9-27.
SketchUp displays the components in your model. If you added components to your model but later deleted them, they'll show here, too.
Click the Details button and choose "Open or Create a Local collection"; "Create a new collection" on a Mac.
A standard file browser window opens, where you can navigate through your folders and create new folders. Find or create a folder named My Windows where you want to store your windows.
Select the My Windows folder and then click Open.
SketchUp creates a new collection named My Windows.
In the upper-right corner, click the "Display the secondary selection pane" button.
A new pane opens at the bottom of the Components window. With two panes open in the Components window, you can drag components from one collection to another.
In the drop-down menu in the secondary pane, choose the My Windows collection.
Nothing yet is in the My Windows collection.
Drag the "skylight" and "window" components into My Windows.
SketchUp saves copies of the skylight and window components in the My Windows folder as .skp files. The next time you use SketchUp for this or any other document, you'll find the two windows in the My Windows collection (Figure 9-28).

You can move SketchUp components between computers or share them with colleagues in many ways. Because SketchUp components are SketchUp (.skp) documents, you can shuffle them in and out of your collection folders using your computer's file management tool: Windows Explorer or the Mac Finder. Want to move components between your home and office computer? Copy them to a thumb drive or email them to yourself; then place them inside of one of your component collection folders.
If you work on a computer network and want to share components with your colleagues on the network, create collections in a public or shared folder. That way everyone with permission to access the folder can access the same components.