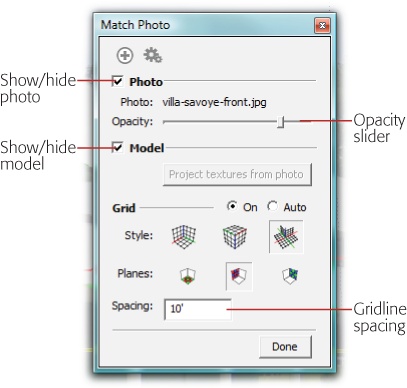
After you've imported an image for Photo Match, as described on Importing a Photo for Photo Match, the Match Photo window appears on your screen (Figure 10-5). Many of the other menu commands are grayed out, meaning you can't use them. That's the case until you click the Done button in the Match Photo window. The assumption is that the first and most important thing you need to do at this moment is to calibrate the photo. If that's not the case, you can click Done and then reopen the Match Photo window later by choosing Camera → Edit Matched Photo → villa_savoye_front.jpg (or the name of your imported photo).
Photo Match needs your help identifying a few key elements in your photo. Armed with that information, SketchUp can set up a camera view that matches the photo, making it easy for you to trace over the two-dimensional image to create a three-dimensional model.
Here are the elements that Photo Match needs identified:
You identify these elements by dragging parts of the grid that's superimposed over the image when the Match Photo box is displayed. Follow these steps to calibrate the Villa Savoye photo for use with Photo Match:
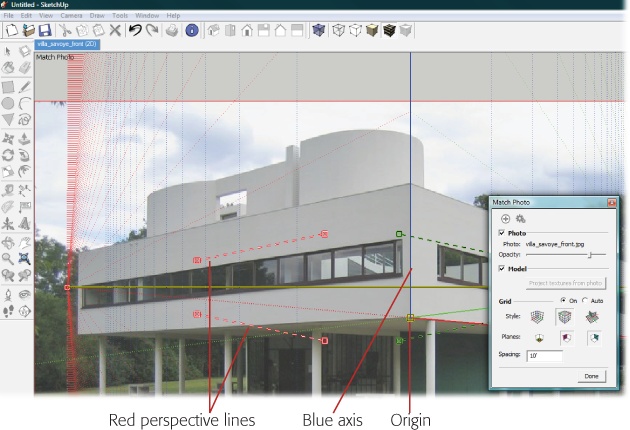
Find the Origin point in the Photo Match grid, and then drag it to the lower corner of the Villa Savoye structure, as shown in Figure 10-6.
As you drag the Origin, the grid rearranges itself over the image. When the Origin is in place at the corner of the building, the blue axis runs along the front corner of the building, as shown in Figure 10-6. If your mouse has a scroll wheel, it may help to zoom in to get a better view of the corner and the blue axis. You don't need to worry about any of the other lines at this point—you'll deal with them in later steps.
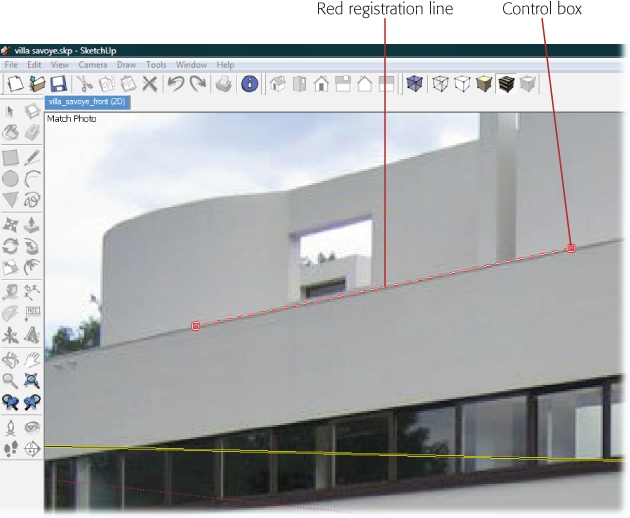
Find the two red, dashed registration lines with the boxes on the ends. Drag the boxes to arrange the top line along the top edge of the building, as shown in Figure 10-7.
As you drag the control boxes, the other lines in the grid change position over the photo. For example, the blue axis pivots around the Origin point. Don't worry about the other lines, just work to get the registration in position. Once all the registration lines are in place, the rest of the grid will shape up just fine.
Tip
To quickly zoom out so you can see the entire building, right-click the picture, and then choose Zoom Matched Photo.
Figure 10-6. The grid's Origin is a hollow, yellow square. A solid red and a solid green line lead into the Origin. On the opposite side of the Origin, you see a dotted red line and a dotted green line heading off in the other direction.
Figure 10-7. Use the control boxes on the ends of the dashed lines to arrange the registration lines along parallel lines in the structure. The rectangular faces of the building are perfect for aligning the registration lines. The windows in this building would also work well for aligning the registration lines.
Drag the control boxes of the lower red registration line to align it along the bottom edge of the windows.
It's not necessary to position the boxes at the corners of the building, just align them on the edges you know to be parallel to the first line.
Repeat steps 2 and 3, to align the green registration lines along the other face of the building.
The purpose of positioning these registration lines is to identify two lines that you know are parallel. By identifying these lines, you give Photo Match the information it needs to position the SketchUp camera in the modeling window.
Double-check the alignment of the origin, and the registration lines.
At this point, you may want to zoom in on each of the lines and make small adjustments. The order doesn't matter; just make adjustments until you're satisfied with the results.
Move the Origin point to the right-back corner of the building, and then drag the Origin point down to the ground level.
The blue axis may not be perfectly aligned with the back corner of the building, due in part to distortion in the photo. A dotted line extends next to the columns (called pilotis).
Right-click the image and choose Rotate 90 Right.
The axes rotate 90 degrees around the Origin point. What you see depends on the original orientation of the axes around the Origin, but it's likely that one of the lines (red or green) emanating from the Origin changes from dotted to solid, making it easier to see. If you don't see a solid line, right-click and choose Rotate 90 Right a second time.
Move the Origin to the back corners of the building, and double-check the alignment of the axes.
You can move the Origin to different positions in the photo. When you do, you should see a red or green line emanating from the Origin. Check to see if this line is aligned with an edge in the photo, such as the bottom of Villa Savoye. If the red or green line is dotted, right-click and choose Rotate 90 Right until you see a solid line.
Adjusting the registration lines is one of those processes where you tweak the position of the lines, change your view, and tweak a little bit more. Some photos are easier to work with than others, but you'll seldom get everything lined up perfectly. It's just the nature of photos and camera lenses to introduce some distortion into pictures. For example, when you move the Origin to the back corners of the building, it's likely that the blue axis line will be slightly skewed. Still it's worthwhile spending some time to do the best you can with your image.
Measurements are important in SketchUp whether you create a model from scratch or from a photo. When you type 20' in the Measurements toolbar, you want SketchUp to respond accurately. So when you're creating a model from a photograph and Photo Match is setting up the camera view, how do you set the scale for measurement? You do that by adjusting the grid that's superimposed over the photo to match something of known height.
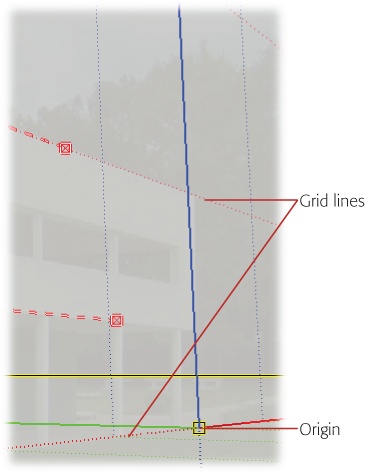
In addition to the thicker axis lines, you see lighter, dotted grid lines over the photo. These grid lines form squares, like graph paper, along the axes in the modeling window. By setting the grid spacing in the Match Photo box, you establish the measurement system for the model. Sometimes you know exact dimensions of a building, and other times you may have to make an estimate from the photograph. With Villa Savoye, you can estimate that the height from the ground to the top wall is about 20–22 feet. To adjust the grid, you tell SketchUp the size each square represents. Then in the photo, you adjust the grid itself to match. It's easier to understand by actually doing it. Assuming that the height of Villa Savoye is 20 feet, here are the steps:
Drag the Origin back to the right-back corner of the building.
The right-back corner gives you a clear view of the height of the building. Place the Origin all the way down on the ground for this operation.
In the Match Photo window, type 20'.
Remember to enter the unit symbol for feet, otherwise SketchUp assumes you're talking inches.
Drag the blue axis line so that one square in the grid reaches from the ground to the top of the wall, as shown in Figure 10-8.
When your cursor is over the blue axis line, it changes to a double arrow. When you drag, the axis line doesn't actually move, but the size of the grid squares grows or shrinks, depending on the direction of the drag. You know that one corner of the grid begins at the Origin, so you want to position the next horizontal line at the top of the wall.
Tip
Sometimes it's difficult to see the grid lines over a photo. In addition to whatever is going on in the photo, you see axis lines and the registration lines, which appear brighter and bolder than the grid lines. If you're having trouble seeing the grid lines, use the Opacity slider in the Match Photo window. Drag the slider to the left. As the photo disappears it becomes easier to see the grid lines.
In the Match Photo window readjust the Opacity of the photo and then click Done.
If you made changes to the opacity of the photo, you want to bring it back to its fully opaque glory for the next exercise, "Applying an Image to a Model" on Applying an Image to a Model. Adjusting the grid is the last step for calibrating the photo, so when you choose Done, the grid and all the other calibration apparatus disappear.
The Match Photo window is still on the screen, but its name is changed to Sketch Over.
If you need to bring it back later for adjustments, choose Camera → Edit Matched Photo. You can also click the gears icon in the upper-left corner of the Sketch Over window.
With the grid properly adjusted, you can use the measurements that appear in the Measurements toolbar as references. And you can be confident that when you type measurements for dimensions, moves, and push/pull operations, they'll be to scale.