Chapter 6. Text and Language
This chapter explores the practical side of implementing text- and language-related AI features in your Swift apps. Taking a top-down approach, we explore five text and language tasks and how to implement them using a variety of AI tools.
Practical AI, Text, and Language
The five text and language tasks that we explore in this chapter are:
- Language Identification
-
Determining what language some text might be in.
- Named Entity Recognition
-
Identifying the elements of text that are people, places, or organizations.
Lemmatization, tagging, tokenization Identifying the lemma of every word in a string, finding the parts of speech (verbs, nouns, and so on), and splitting a string up by words.
- Sentiment Analysis
-
Determining whether some text has a positive or negative sentiment.
- Custom Text Classifiers
-
Another way of classifying text for sentiment, extending Apple’s tools.
Note
In Chapter 8, we also look at generating text. We put that task there because we think it’s more closely related to generating things than it is to text. But really, you’re probably reading the whole book, so it doesn’t matter where it goes.
Images, human movement, and sound might be flashy, but the majority of apps you’ll build in your life will also, or perhaps primarily, deal with text. Humans generate vast amounts of text, and it’s often useful to be able to use a clever machine to figure out what’s going on with text so that you can make decisions or show the user something contextual relating to it. In this chapter, we tackle the problem of text classification. Specifically, we’re going to look at implementing an app that can perform sentiment analysis on some text and determine whether its sentiment is positive or negative.
Note
You might see other sources mix and match the terms “text classification,” “sentiment analysis,” “natural language processing,” “opinion mining,” and many others. The authors of this book are of the opinion that they are quite different things. This chapter explores the specific task of sentiment analysis, which is part of the domain of text classification. In doing so, we use natural language processing (NLP) techniques.
Task: Language Identification
Language identification refers to (surprising no one) figuring out what language a string of text might be in. This is actually a very simple practical artificial intelligence (AI) task.
To cut straight to it, we do this task in a Playground:
-
Create a new iOS-flavor Playground in Xcode, as shown in Figure 6-1.
Note
We’re using iOS because we’re choosing to use iOS. Everything we’re using for this task is available on macOS, too.
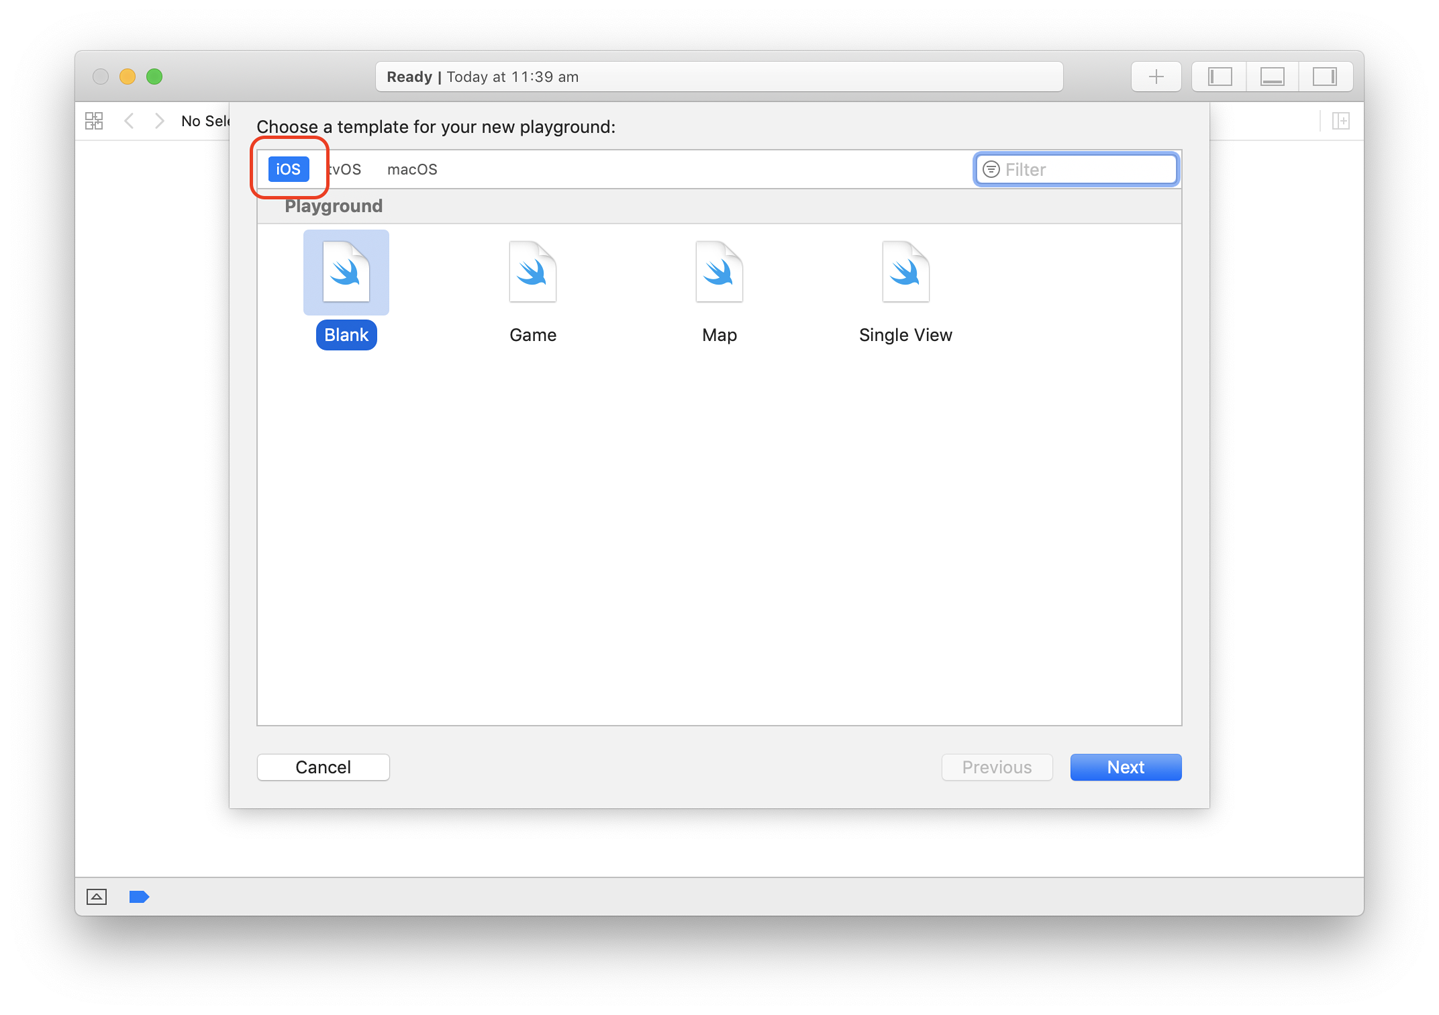
Figure 6-1. Creating a new iOS-flavor Playground in Xcode
-
Add the following
imports:importNaturalLanguageimportFoundationimportCoreML -
Add the following extension on
String:extensionString{funcpredictLanguage()->String{letlocale=Locale(identifier:"es")letrecognizer=NLLanguageRecognizer()recognizer.processString(self)letlanguage=recognizer.dominantLanguagereturnlocale.localizedString(forLanguageCode:language!.rawValue)??"unknown"}}This means that we can ask a
StringtopredictLanguage(), and we’ll get its language back. We do this by setting the locale to “en_US” (for US English), creating anNLLanguageRecognizer, processing theStringbeing used, and getting the dominant language for thatString. -
Add a
String(or in this case, an array of them) for us to identify the languages for the following sentences:lettext=["My hovercraft is full of eels","Mijn hovercraft zit vol palingen","我的氣墊船充滿了鰻魚","Mit luftpudefartøj er fyldt med ål","Το χόβερκραφτ μου είναι γεμάτο χέλια","제 호버크래프트가 장어로 가득해요","Mi aerodeslizador está lleno de anguilas","Mein Luftkissenfahrzeug ist voller Aale"] -
Test it by iterating through the
Strings in the array and callingpredictLanguage()on each:forstringintext{print("\(string)is in\(string.predictLanguage())")}You will see something like the screenshot in Figure 6-2.
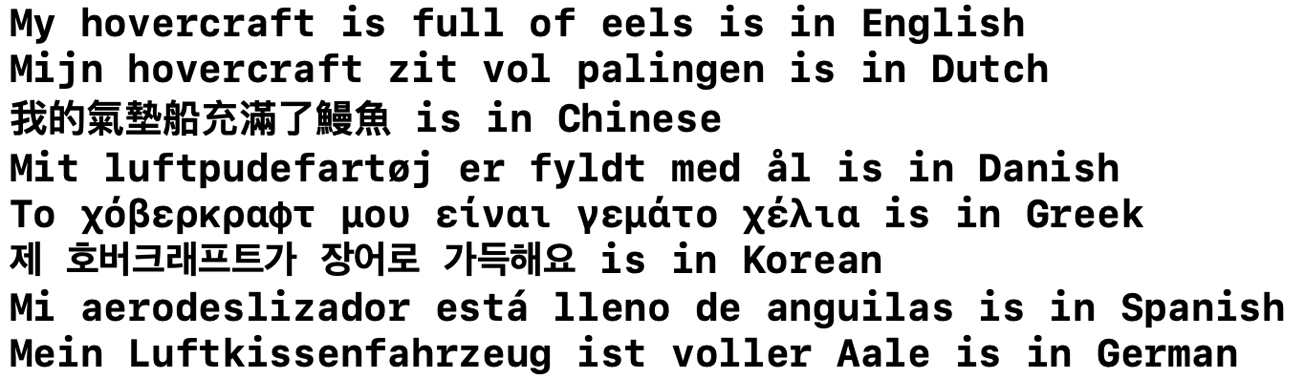
Figure 6-2. The language identification for our strings
-
We could change the locale to be somewhere else, for example “es” for Spain, and we’d get back the Spanish names for the various languages instead, as shown in Figure 6-3.
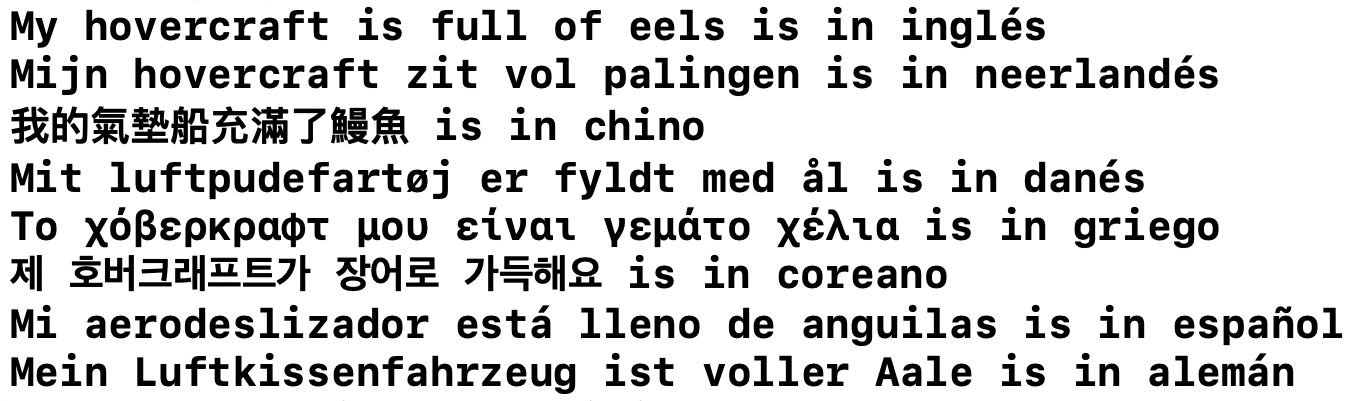
Figure 6-3. The output with our locale set to Spain
Task: Named Entity Recognition
Almost as simple as recognizing language is recognizing the entities in a string. As with language identification, this task relies on using Apple’s Natural Language framework to do the work for us. The Natural Language framework works on texts by assigning tag schemes.
Again, let’s get straight to it and do our work in a Playground:
-
Create another new iOS-flavor Playground in Xcode.
-
Add the following `import`s:
importNaturalLanguageimportFoundationimportCoreML -
Add the following
extensiononString:extensionString{funcprintNamedEntities(){lettagger=NSLinguisticTagger(tagSchemes:[.nameType],options:0)tagger.string=selfletrange=NSRange(location:0,length:self.utf16.count)letoptions:NSLinguisticTagger.Options=[.omitPunctuation,.omitWhitespace,.joinNames]lettags:[NSLinguisticTag]=[.personalName,.placeName,.organizationName]tagger.enumerateTags(in:range,unit:.word,scheme:.nameType,options:options){tag,tokenRange,stopiniflettag=tag,tags.contains(tag){letname=(selfasNSString).substring(with:tokenRange)print("\(name)is a\(tag.rawValue)")}}}}This means that we can ask a
StringtoprintNamedEntities(), and we’ll see it print its name entities. -
Add a
Stringon which we can perform named entity recognition:letsentence="Marina, Jon, and Tim write books for O'Reilly Media "+"and live in Tasmania, Australia." -
Test it by calling
printNamedEntities()on it:sentence.printNamedEntities()You will see something like the screenshot in Figure 6-4.
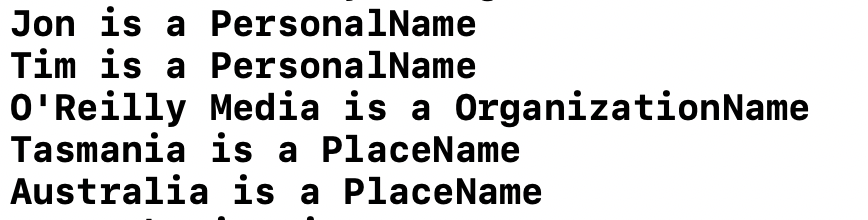
Figure 6-4. The language identification for our strings
Task: Lemmatization, Tagging, and Tokenization
Lemmatization is one of those things that you’ve probably heard of but aren’t quite sure what it is. But it’s useful for all manner of things.
Lemmatization is a linguistics term that refers to the process of grouping all the forms of a single word so that they can be identified as a single thing. The single thing that identifies them is the lemma.
For example, take the term (a verb) “to walk.” “To walk” can appear as “walk,” “walked,” “walks,” “walking.” To look up any of those in a dictionary, you’d look up “walk.” Not every word has an obvious lemma; for example, the lemma of “better” is “good.”
Lemmatization is useful for things like search tools in your apps: if a user searches for “good,” you probably want to identify things that are also marked “better,” or if your app, for example, deals with photos, and you’ve performed machine-learning classification to establish what’s in each photo, you’d want the search term “mouse” to also present results for “mice,” and vice versa.
Again, let’s dispense with the usual structure and get straight to it:
-
Create a new iOS-flavor Playground in Xcode.
-
Add the following
imports:importNaturalLanguageimportFoundationimportCoreML -
Add a sentence on which we can perform lemmatization:
letspeech="""Space, the final frontier. These are the voyages of theStarship Enterprise. Its continuing mission to explore strange new worlds,to seek out new life and new civilization, to boldly go where no one hasgone before!"""In this case, we’ve used the opening monologue to Star Trek. The Jean-Luc Picard version, naturally.
-
Add an extension on
String:extensionString{funcprintLemmas(){lettagger=NSLinguisticTagger(tagSchemes:[.lemma],options:0)letoptions:NSLinguisticTagger.Options=[.omitPunctuation,.omitWhitespace,.joinNames]tagger.string=selfletrange=NSRange(location:0,length:self.utf16.count)tagger.enumerateTags(in:range,unit:.word,scheme:.lemma,options:options){tag,tokenRange,stopinifletlemma=tag?.rawValue{print(lemma)}}}}With this
extension, we can ask aStringtoprintLemmas()and get a console output showing the lemmas of theString. Within theprintLemmas()function, we create anNSLinguisticTagger, set its scheme to.lemma, and then run it on theString(which isselfin this context, because it’s an extension onString). -
To test our
extensionandprintLemmas()function, we can call it on theStringspeech. See Figure 6-5 for the result:speech.printLemmas()
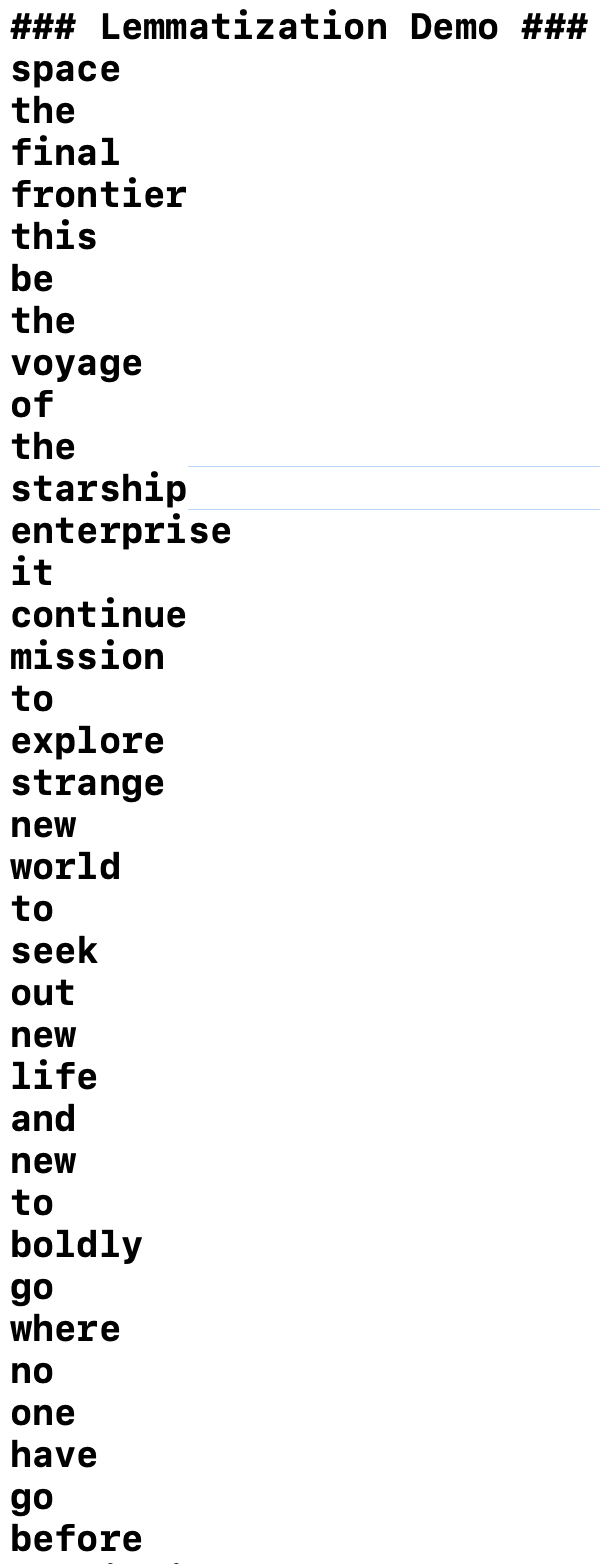
Figure 6-5. Lemmatization running on our speech
Note
If you start researching lemmatization—which you should because it’s interesting—you might see it referred to as “stemming.” They’re basically the same thing, as far as their usefulness matters, but in reality, stemming actually just involves stripping plurals and “ings” from words, and lemmatization involves understanding the language in question, and how the vocabulary works.
Parts of Speech
But, what if we want to find the parts of speech in a sentence instead? So instead of finding the lemmas, we identify whether each component of a string is a verb, a noun, or so on.
That’s also doable:
-
Add another
functo ourStringextension:funcprintPartsOfSpeech(){}This function is used, much like we did earlier, to print the parts of speech for the string to which it’s attached.
-
First, we need the usual
NSLinguisticTagger, its options, and a range, so add that in theprintPartsOfSpeech()function:lettagger=NSLinguisticTagger(tagSchemes:[.lexicalClass],options:0)letoptions:NSLinguisticTagger.Options=[.omitPunctuation,.omitWhitespace,.joinNames]tagger.string=selfletrange=NSRange(location:0,length:self.utf16.count) -
Run the
taggerand print out each part of speech:tagger.enumerateTags(in:range,unit:.word,scheme:.lexicalClass,options:options){tag,tokenRange,_iniflettag=tag{letword=(selfasNSString).substring(with:tokenRange)print("\(word)is a\(tag.rawValue)")}} -
Call our new
funcon the speechStringthat we created:speech.printPartsOfSpeech()You will see some output just like the screenshot in Figure 6-6, showing you what part of speech each word in the sentence is.
Tokenizing a Sentence
But what if we just want to split the sentence up by words and don’t really care what the lemma of each word is or what part of speech it is? We can do that too:
-
Add another function,
printWords()to theStringextension:funcprintWords(){lettagger=NSLinguisticTagger(tagSchemes:[.tokenType],options:0)letoptions:NSLinguisticTagger.Options=[.omitPunctuation,.omitWhitespace,.joinNames]tagger.string=selfletrange=NSRange(location:0,length:self.utf16.count)tagger.enumerateTags(in:range,unit:.word,scheme:.tokenType,options:options){tag,tokenRange,stopinletword=(selfasNSString).substring(with:tokenRange)print(word)}} -
Run it on the monologue:
speech.printWords()You’ll see something like the screenshot in Figure 6-7.
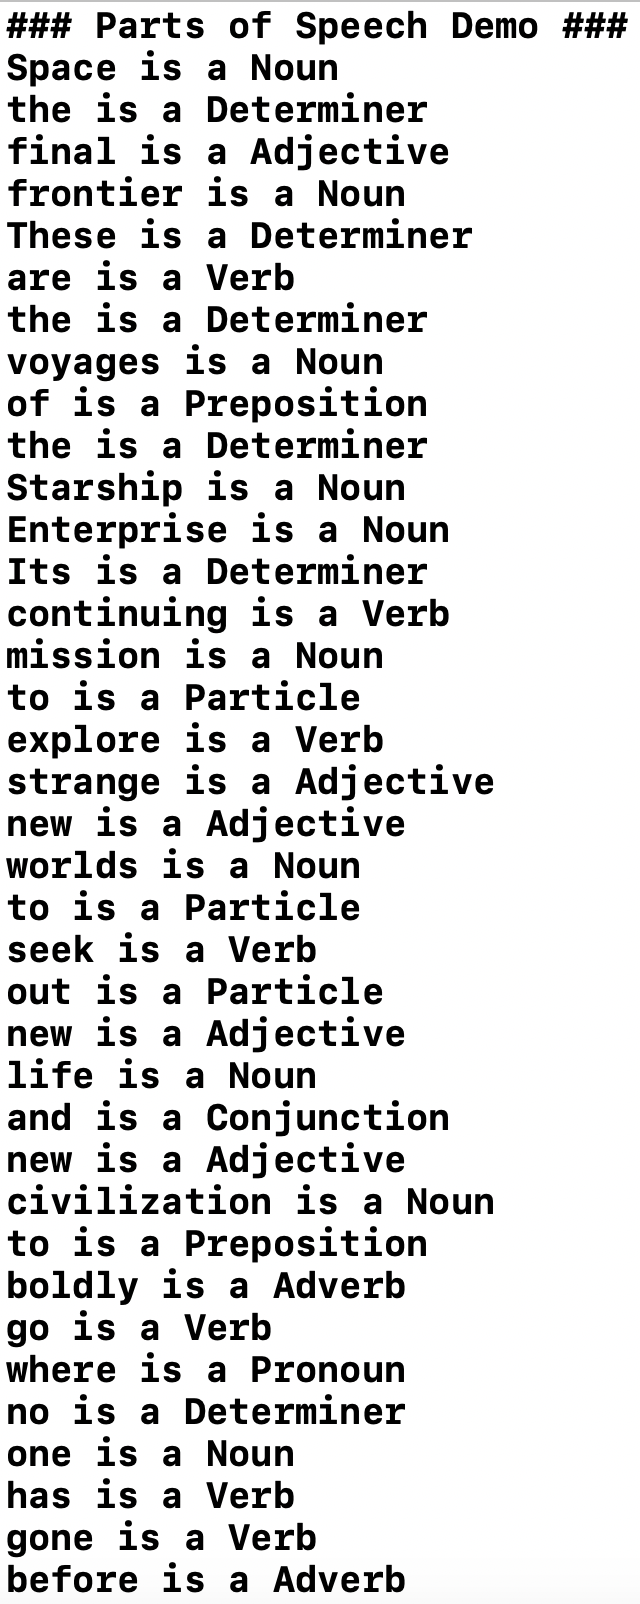
Figure 6-6. The parts of speech of the Star Trek opening monologue
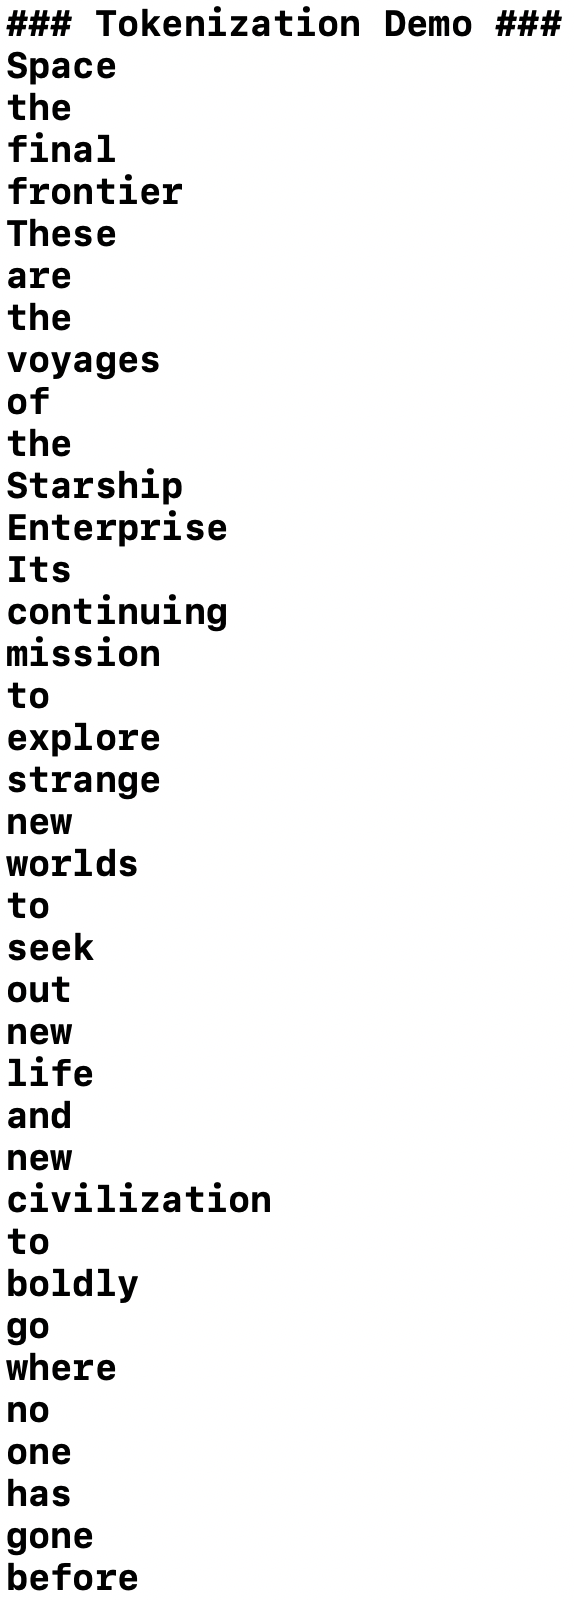
Figure 6-7. Printing the words in the Star Trek opening monologue
Note
The process of identifying and printing words is called tokenization.
You might be wondering why we can’t just use a regular expression to split up the sentence by punctuation and spaces. The short answer is that this doesn’t guarantee you’ll end up with every word, and many languages don’t behave the same way that English does in this respect. It’s better to rely on the Apple framework’s understanding the semantics of the language you want to work with wherever possible.
Note
In Chapter 8, as part of a Sentence Generation task (“Task: Sentence Generation”), we manually perform tokenization using regular expressions. We did this to highlight the differences.
Task: Sentiment Analysis
Sometimes, it’s really useful to be able to determine whether something your users said is positive or negative, or generally to be able to derive some kind of organized data from unstructured, unorganized information. IBM estimates that 80% of the world’s data is unstructured (and you’d expect IBM to know what it’s talking about—it has a company song!).
Humans generate vast quantities of unstructured, unorganized text, and our apps and products often need to know what the text is about, what the text means, or the general flavor of the text in order to do something useful with it or provide useful options to the user.
Put simply, performing text classification in order to derive sentiment—sentiment analysis—is a way to bring order to the chaos of human-generated text.
For this task, we look at how we might build a model that allows us to determine the sentiment of some text. This isn’t something that Apple’s provided frameworks can do out of the box, so we’ll actually need to train our own model to do it and then build an app around it.
Problem and Approach
For this task, we’re going to explore the practical side of text classification to perform sentiment analysis by doing the following:
-
Making an app that can inform us as to whether some user input has a positive or negative sentiment
-
Laying out our app with a text field, a display for the sentiment, and a way to ask for a sentiment analysis
-
Selecting a toolkit for creating the sentiment analysis model and assembling a dataset for the problem
-
Building and training our sentiment analysis model
-
Incorporating the model into our app
-
Improving our app
After that, we’ll quickly touch on the theory of how sentiment analysis works, and point to some further resources for improvements and changes that you can make on your own.
Building the App
We’re going to start simple here. We need an app that can detect whether what the user has typed in is positive or negative. We all live high-pressure lives, and often act in the spur of the moment. Having an app that lets us check whether that tweet we’re about to send is positive enough might be a good idea. (“Computer! Send Tweet!”)
The app we’re going to build will look something like Figure 6-8 when we’re done.
Note
This book is here to teach you the practical side of using AI and machine-learning features with Swift and on Apple’s platforms. Because of this, we don’t explain the fine details of how to build apps; we assume that you mostly know that (although if you don’t, we think you’ll be able to follow along just fine if you pay attention). If you want to learn Swift, we recommend picking up Learning Swift (also by us!) from the lovely folks at O’Reilly.
The starting point iOS app that we’re going to build, which will ultimately house our sentiment analysis system, has the following components (see Figure 6-9):
-
A
UITextView, for a user to type text that will be analyzed for sentiment -
A
UIButtonfor the user to press when they want to type text in the aforementioned field to be analyzed for sentiment -
A
UIViewthat will be set to a color that dictates the sentiment we’ve detected in the text (e.g., red or green, for negative and positive, respectively), twoUILabelsto display a relevant emoji, and a string describing the sentiment
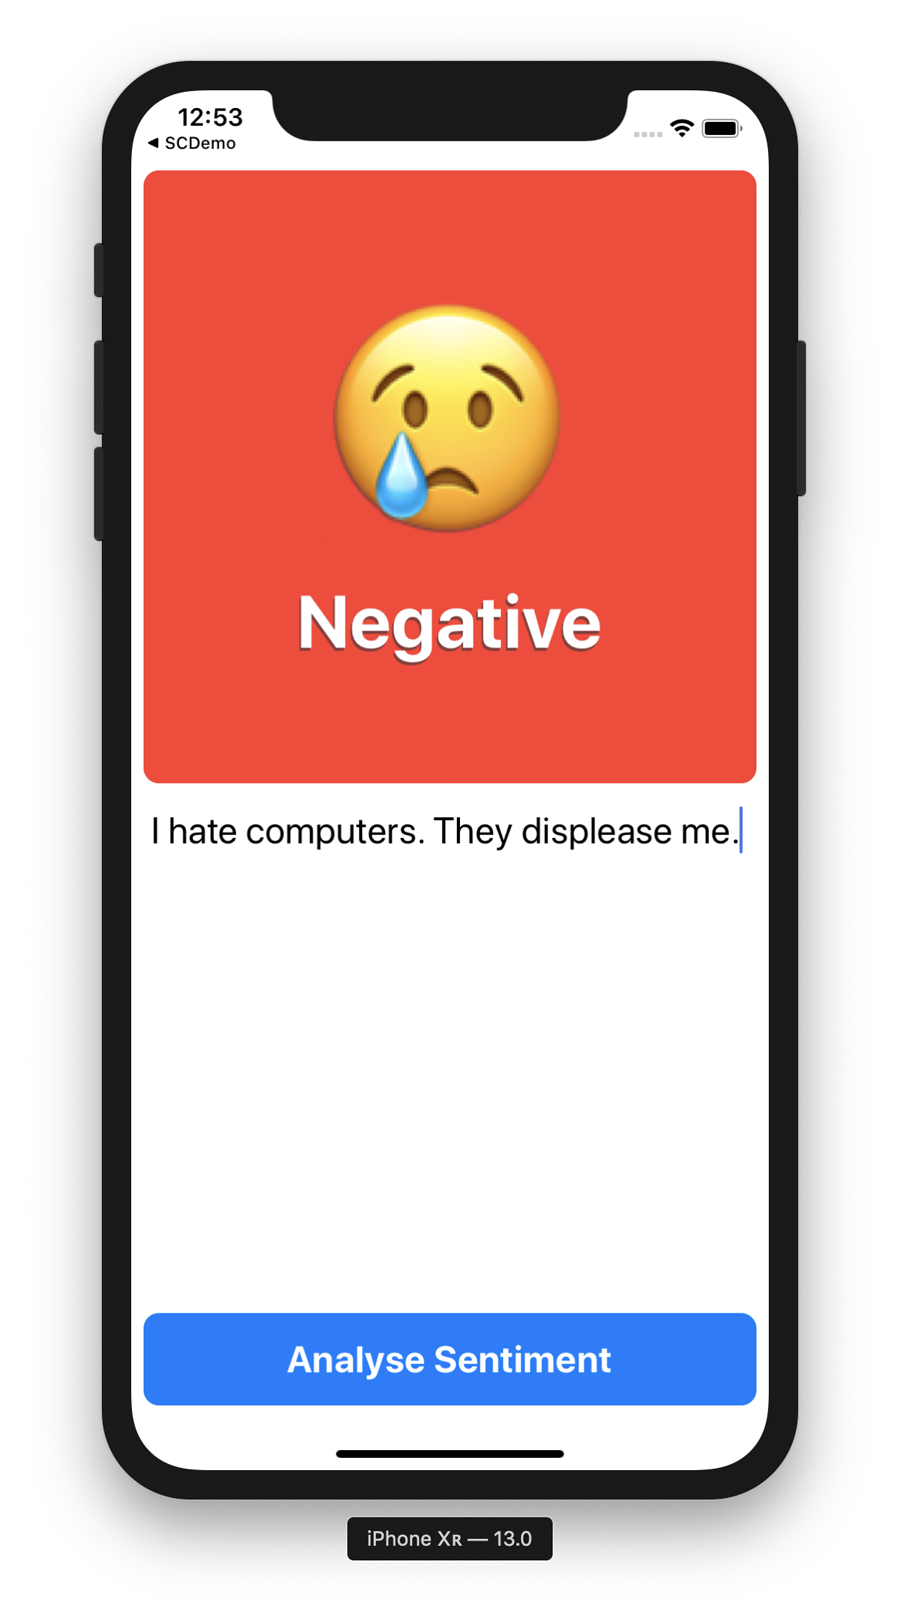
Figure 6-8. Our sentiment classification app, in all its finished glory
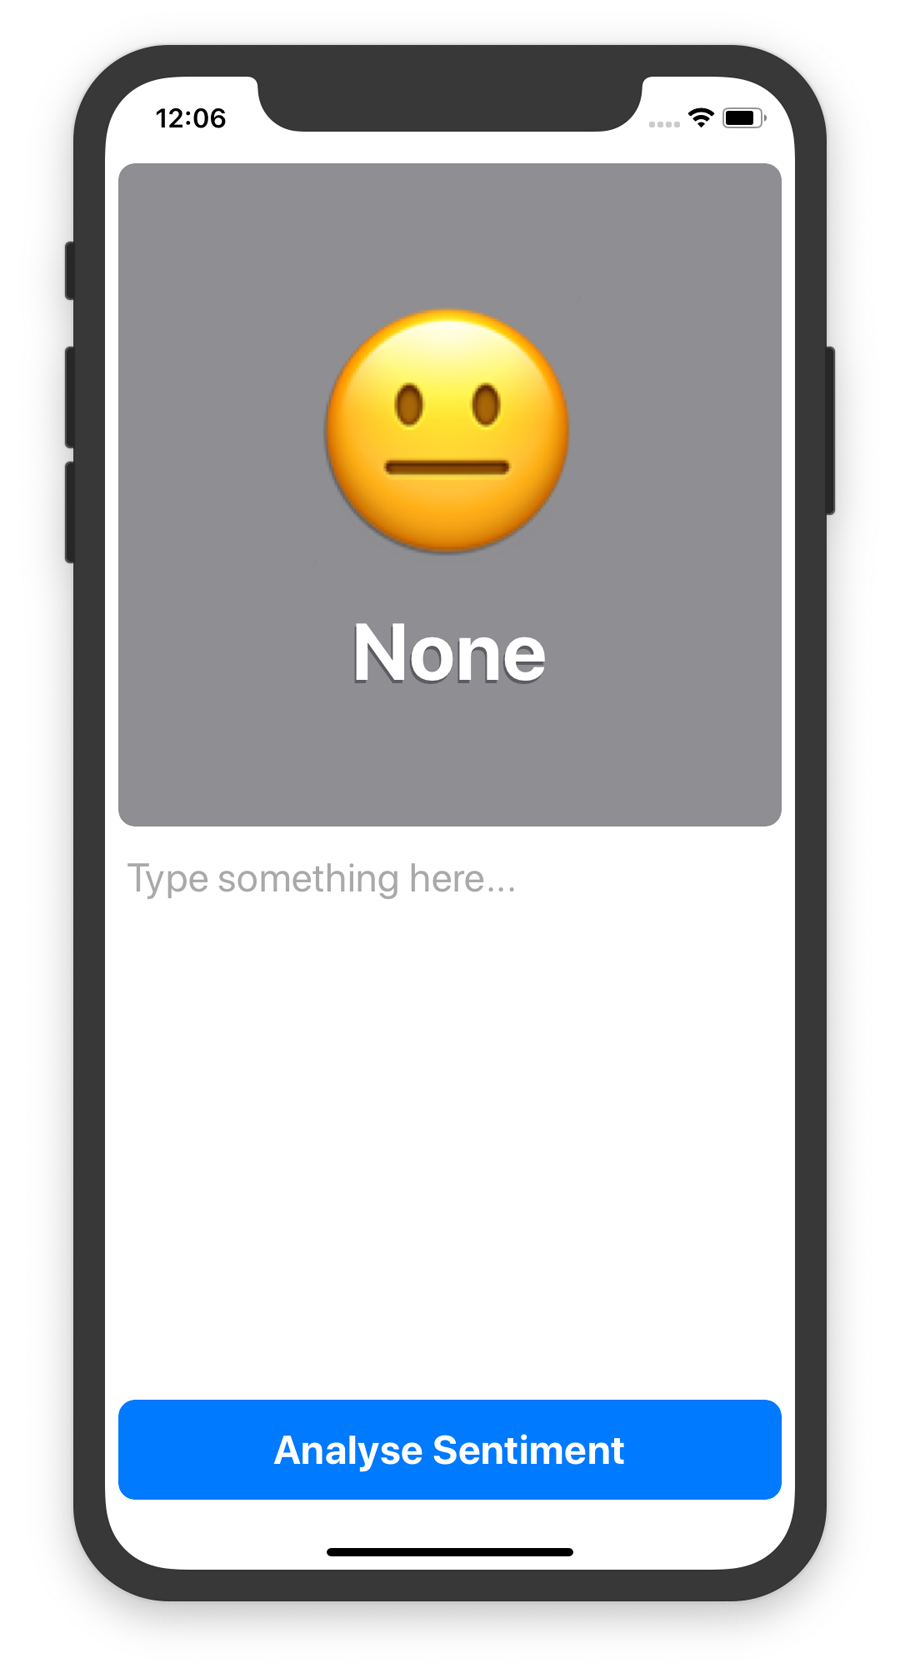
Figure 6-9. The starting point for the sentiment analysing app
Tip
If you don’t want to manually build the starting point iOS app, you can download the code from our website and find the project named NLPDemo-Starter. After you have that, skim through the rest of this section and then meet us at “AI Toolkit and Dataset”.
To make the starting point yourself, you’ll need to do the following:
-
Create an iOS app project in Xcode, choosing the “Single View App” template. Do not select any of the checkboxes below the Language drop-down (which are, as per usual, set to “Swift”).
-
After the project is created, open the Main.storyboard file and create a user interface with the following components:
-
A
UIButtonwith its title text set to “Analyse Sentiment”. -
A large, editable, scrollable
UITextView. -
A generic
UIView(which will be used to show a color), with twoUILabelviews within it: one with its title set to “None” or similar, and the other with a neutral emoji, such as ߘஊYou can see an example of our storyboard for the app in Figure 6-10.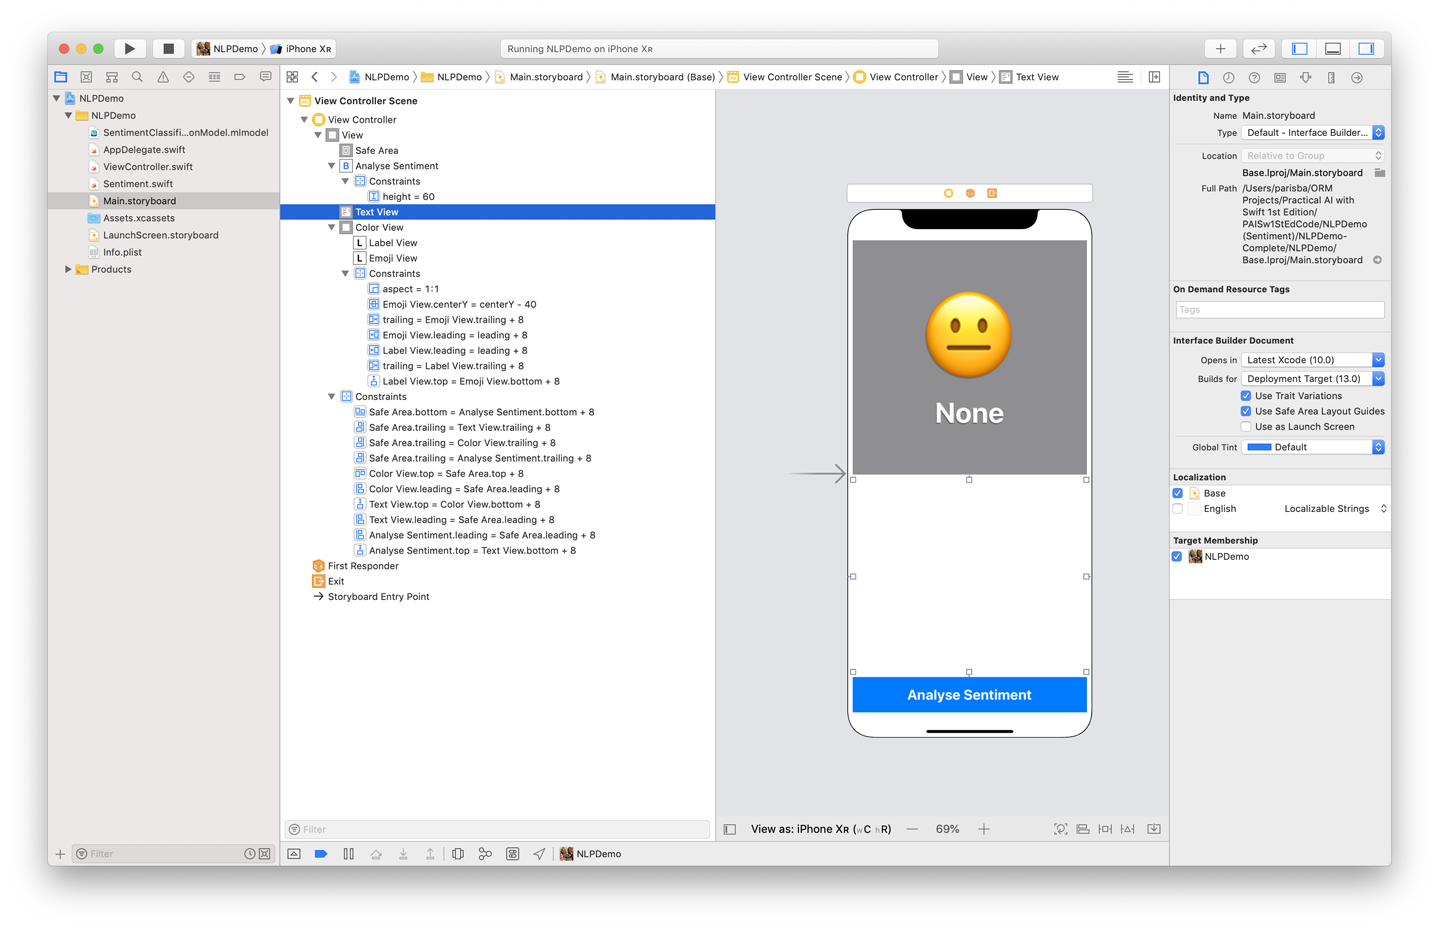
Figure 6-10. Our storyboard for the sentiment classifier
After you have the necessary elements laid out, make sure that you add the proper constraints.
-
-
Connect the outlets for the user interface (UI) objects, as follows:
@IBOutletweakvaremojiView:UILabel!@IBOutletweakvarlabelView:UILabel!@IBOutletweakvarcolorView:UIView!@IBOutletweakvartextView:UITextView! -
Connect an action for the
UIButton, as follows:@IBActionfuncanalyseSentimentButtonPressed(_sender:Any){performSentimentAnalysis()} -
Declare an attribute for some placeholder text to go in the
UITextView:privateletplaceholderText="Type something here..." -
Modify the
viewDidLoad()function, making it look as follows:overridefuncviewDidLoad(){textView.text=placeholderTexttextView.textColor=UIColor.lightGraytextView.delegate=selfsuper.viewDidLoad()} -
Add the following function, which is used to actually ask for a sentiment analysis later, after we add the model:
privatefuncperformSentimentAnalysis(){emojiView.text=sentimentClass.iconlabelView.text=sentimentClass.descriptioncolorView.backgroundColor=sentimentClass.color} -
Add an extension to the end of the ViewController.swift file, as follows (it’s a fairly large block of code, as per our previous examples, but as usual we’ll explain it in a moment):
extensionViewController:UITextViewDelegate{functextViewDidBeginEditing(_textView:UITextView){iftextView.textColor==UIColor.lightGray{textView.text=niltextView.textColor=UIColor.black}}functextViewDidEndEditing(_textView:UITextView){iftextView.text.isEmpty{textView.text=placeholderTexttextView.textColor=UIColor.lightGray}}}This extension makes
ViewControllerconform toUITextViewDelegate, which lets us manage the beginning and ending of someone editing aUITextView. We implement two functions that map to that, and change the color of the text when each happens. -
Add a new Swift file to the project named Sentiment.swift, and then place the following code in it:
importUIKitextensionString{funcpredictSentiment()->Sentiment{return[Sentiment.positive,Sentiment.negative].randomElement()!}}This code adds an extension on the
Stringclass (which comes with Swift) to add a function namedpredictSentiment(), so we can just ask any object of typeStringfor its sentiment by calling that function.At the moment, we just return a random choice between the negative or positive sentiment.
-
Add an
enumbelow this, in the same Sentiment.swift file:enumSentiment:String,CustomStringConvertible{casepositive="Positive"casenegative="Negative"vardescription:String{returnself.rawValue}varicon:String{switchself{case.positive:return"ߘ䢊 case .negative: return "ߘ⢊}}varcolor:UIColor{switchself{case.positive:returnUIColor.systemGreencase.negative:returnUIColor.systemRed}}}This
enumcreates a new type calledSentimentthat has two cases: Positive and Negative. For each case, we define an icon (which returns an emoji) and a color (which returns a color). -
Add a launch screen and an icon, if you’d like to (as usual, our starter project has some you can use), and then launch the app in the simulator. You should see something that looks like the image we showed you earlier, in Figure 6-9.
You can type some text into the text field and then tap the button. The color view, emoji, and text label will update with either positive or negative sentiment. Remember that for the moment this is random (because of the code in our extension on the String class, in Sentiment.swift).
AI Toolkit and Dataset
As usual with our practical AI tasks, we need to assemble a toolkit with which to tackle the problem. The primary tools that we use in this case are CreateML, CoreML, and Xcode’s Playgrounds feature.
As we’ve done before, we use Apple’s task-based tool, CreateML, to build a model for our sentiment analysis. Instead of using the CreateML application, we’ll be using CreateML from an Xcode Playground, using it as a Swift framework. It’s a less visual but more flexible approach to building models.
As with the previous practical AI tasks, we use CoreML to implement the model within our Swift application.
To make an app that can determine whether text is positive or negative, we need a dataset with lots of both sentiments. For that, we turn to internet product reviews. Internet product reviews are a great place to find people being very, very negative, and very, very positive about all manner of things. For this dataset, we turn to the boffins at Carnegie Mellon University, who have done the yeoman’s work of acquiring 691 posts that are positive about a certain brand of automobile, and 691 posts that are negative about a certain brand of automobile. You can see some examples of this data in Figure 6-11.
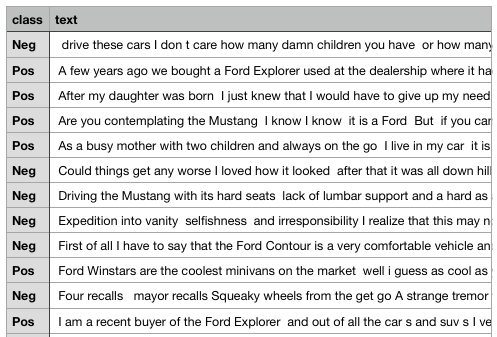
Figure 6-11. A snapshot of the sentiment data that we use in this task
Head over to Carnegie Mellon’s website and download the epinions3.zip file. Unzip the file and then put the output (a file, quite creatively named epinions3.csv) in a safe place.
If you open this file, you’ll see that it’s just a comma-separated list of classes (Neg or Pos) and text (the text of the review of an automobile), as shown in the snapshot in Figure 6-12.
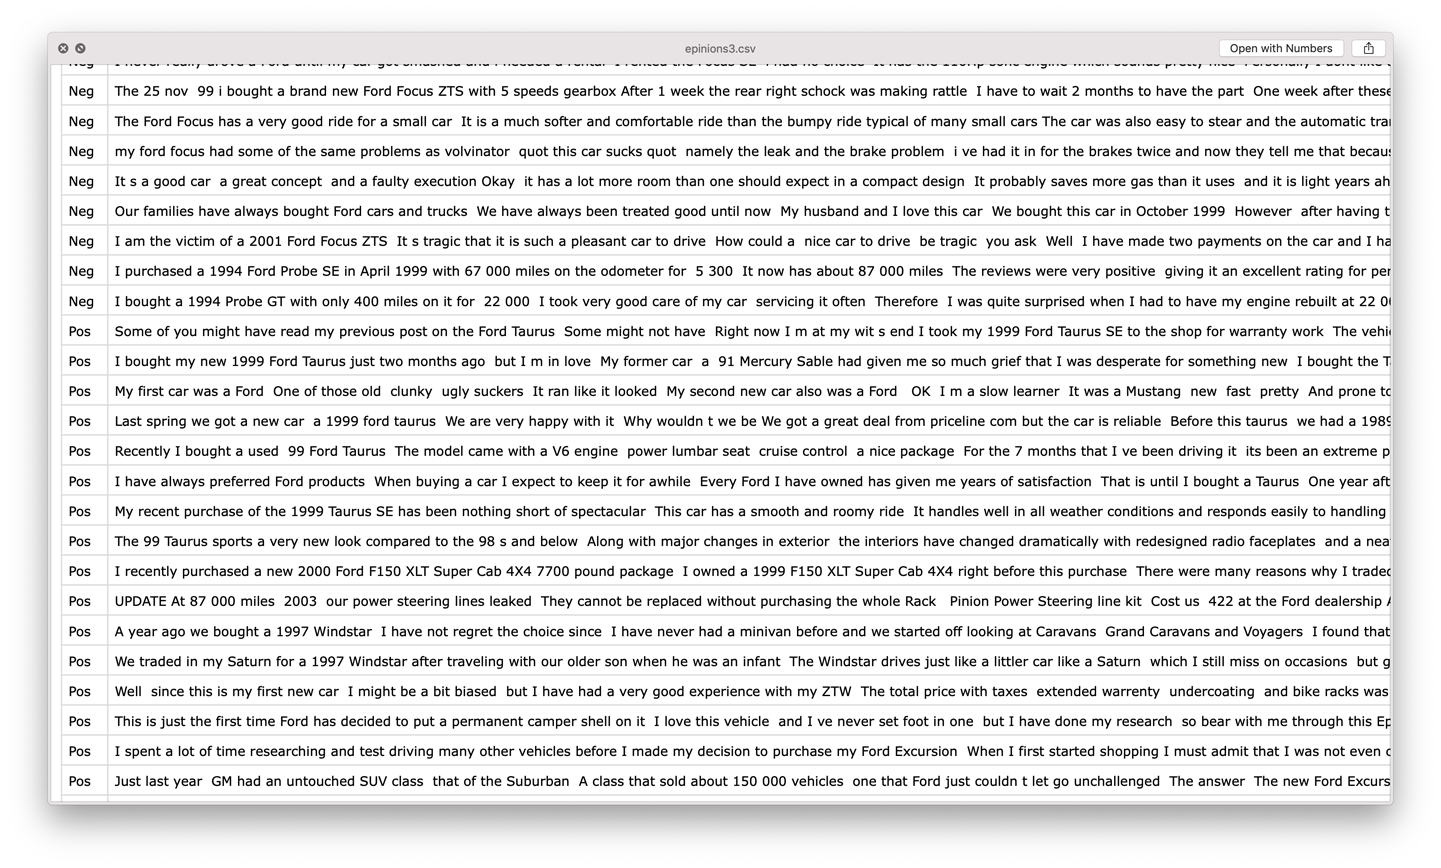
Figure 6-12. Example of the sentiment data
Tip
You’re not restricted to two categories; you could classify as many categories of text as you want. We’re just starting here with two because it makes the app a little simpler to show.
Creating a Model
Now that we have a useful dataset ready to create a model, we turn to Apple’s CreateML to perform the training. In Chapter 7 we use Apple’s Python library, TuriCreate, to train our model, and in Chapters 4 and 5 we use Apple’s CreateML application. But for this task, we use Apple’s CreateML framework directly from a Playground in Xcode.
Tip
We recommend saving the training Playground alongside the projects you create that will consume the model. This will make it easier to re-create and modify your project in the future or work with a different model.
To do this we need to create a new Xcode Playground:
-
Fire up Xcode and create a new Playground, as shown in Figure 6-13. The Playground needs to be a macOS Playground, not an iOS Playground, because we’re using the macOS-only framework, CreateML.
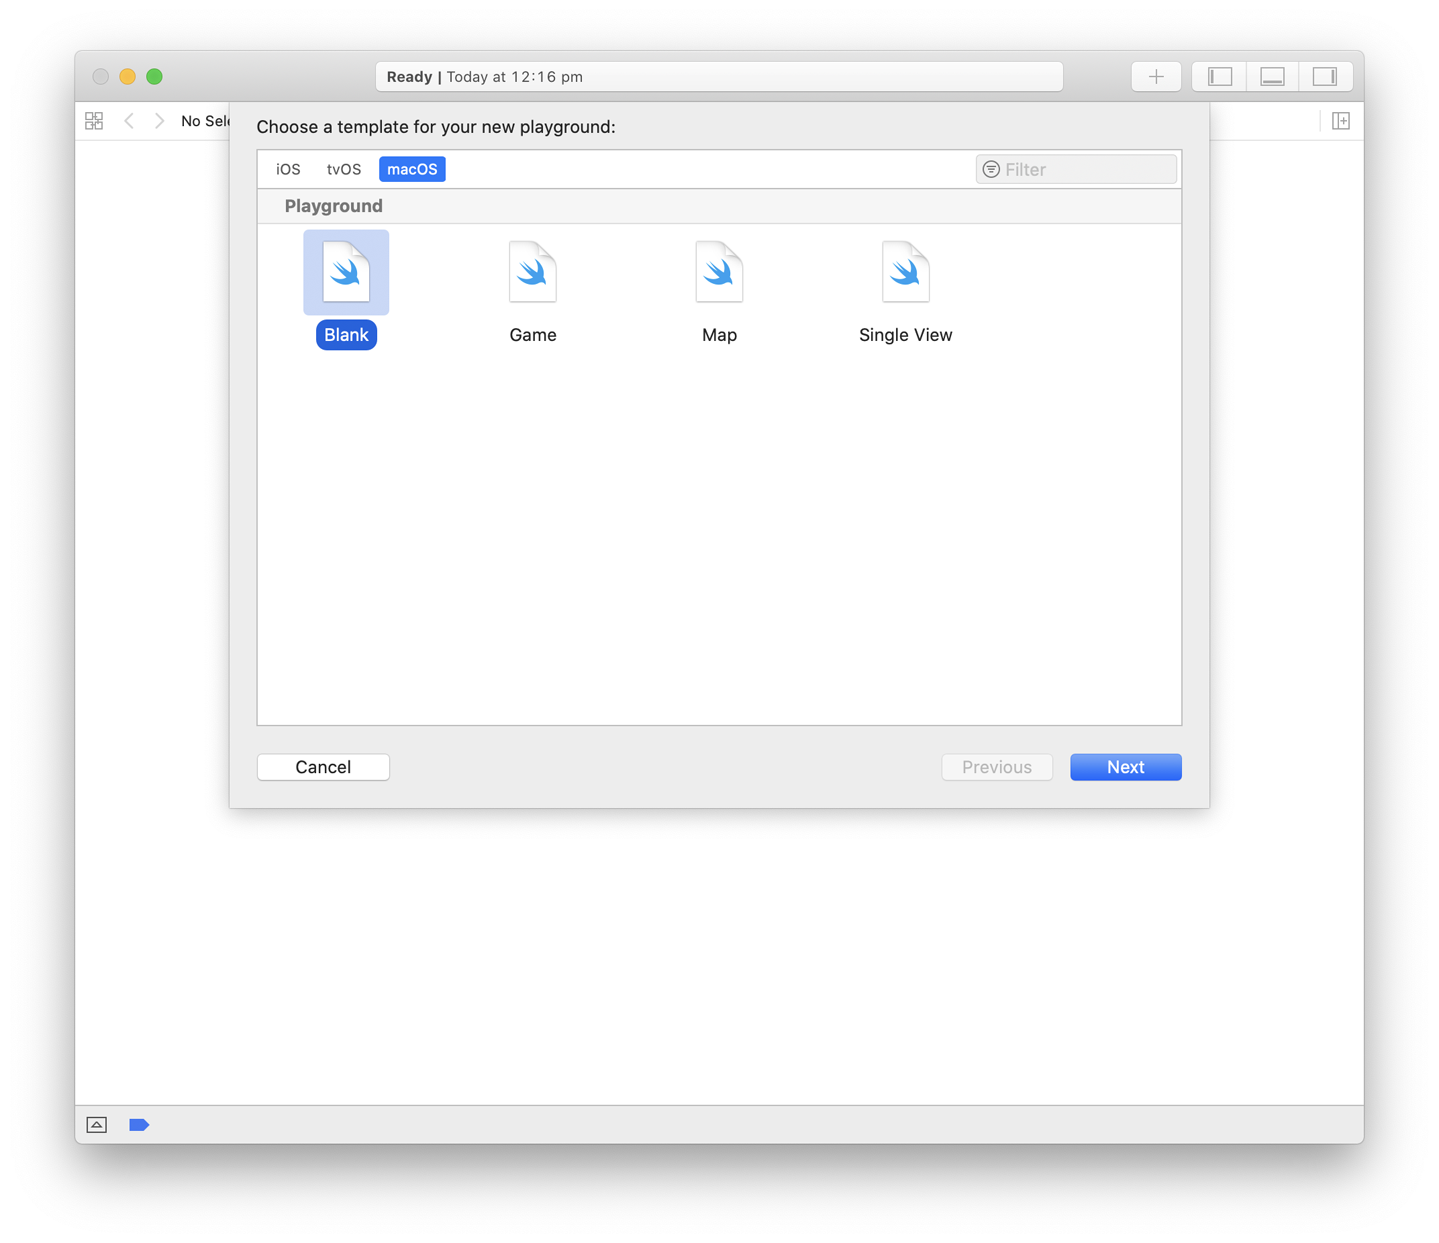
Figure 6-13. Making a new macOS Playground in Xcode
-
Add the following code to the Playground:
importCreateMLimportFoundation// Configure as requiredletinputFilepath="/Users/mars/Desktop/"letinputFilename="epinions3"letoutputFilename="SentimentClassificationModel"letdataURL=URL(fileURLWithPath:inputFilepath+inputFilename+".csv")letdata=tryMLDataTable(contentsOf:dataURL)let(trainingData,testingData)=data.randomSplit(by:0.8,seed:5)This code imports the CreateML and Foundation frameworks, and sets up some working variables:
-
inputFilepathstores the path to the datafile we’ll be using. Update this to point to wherever you’ve saved the dataset we were working with in “AI Toolkit and Dataset”. -
inputFilenamestores the name of the file. If you didn’t modify the downloaded file, this should already be correct. -
outputFilenamesets a name for the model that we’d like CreateML to output. -
datastores anMLDataTableof the data, based on theinputFilepathandinputFilename.MLDataTableis a type provided by CreateML, which is basically like a spreadsheet for data with which you want to train a model. Each row in anMLDataTableis an entity, and each column is a feature of that entity that your training might be interested in. You can learn more aboutMLDataTablein Apple’s documentation, but we unpack it a little more as we work on practical AI tasks throughout this book. -
trainingDataandtestingDatastores a split of the data we’ve read in, taking 80% of it for training, and 20% of it for testing.
-
-
In this step, we actually do the training. Add the following code below the variables:
print("Begin training...")do{// Final training accuracy as percentages}catch{print("Error:\(error)")}It’s within this
do-catchis that we’ll actually perform the training. -
Inside the
do-catch, add the following:letsentimentClassifier=tryMLTextClassifier(trainingData:trainingData,textColumn:"text",labelColumn:"class")This creates an
MLTextClassifier, which is a type provided by the CreateML framework.The
MLTextClassifierallows us to create a text classifier based on associated labels in the input text. You can learn more about theMLTextClassifierin Apple’s documentation, but we also explain it a little more, later on in this chapter.In this case, we’re creating an
MLTextClassifiercalledsentimentClassifier, passing in thetrainingData(which is 80% of the data we downloaded) in the form of anMLDataTable. We instruct theMLTextClassifierthat we want it to look at the column named “text” for the text source, and the column named “class” for the label source. If you look back to the snapshot of the data we showed in Figure 6-12, you’ll notice these column names match the data we imported here.This line of code actually creates and trains the model. You could, kind of, stop here. But we’re not going to.
-
Immediately below this, add the following code:
lettrainingAccuracy=(1.0-sentimentClassifier.trainingMetrics.classificationError)*100letvalidationAccuracy=(1.0-sentimentClassifier.validationMetrics.classificationError)*100print("Training evaluation:\(trainingAccuracy), "+"\(validationAccuracy)")This defines some accuracy variables for us to store some information about the model we just trained in. Specifically, we store both the training accuracy as well as the validation accuracy as percentages and then print them out.
-
Add the following code immediately below this:
// Testing accuracy as a percentage// let evaluationMetrics =// sentimentClassifier.evaluation(on: testingData) // MojaveletevaluationMetrics=sentimentClassifier.evaluation(on:testingData,textColumn:"text",labelColumn:"class")// CatalinaletevaluationAccuracy=(1.0-evaluationMetrics.classificationError)*100print("Testing evaluation:\(evaluationAccuracy)")letmetadata=MLModelMetadata(author:"Mars Geldard",shortDescription:"Sentiment analysis model",version:"1.0")trysentimentClassifier.write(to:URL(fileURLWithPath:inputFilepath+outputFilename+".mlmodel"),metadata:metadata)This evaluates the model, using the 20% segment of the data we separated earlier, stores, and then prints some evaluation metrics. It also sets the model metadata, such as the author, a short description, and version number, and then writes out an .mlmodel file for use with CoreML.
Note
This model won’t take nearly as long to train as the models in the earlier chapters, because it’s a much simpler operation than image classification, sound classification, and the like. It could take a few minutes, but not much longer. No time for Person of Interest here, sorry.
If you run the Playground, you should end up with some text output about the model in the console, as well as a new SentimentClassificationModel.mlmodel file (if you didn’t change our filenames).
Incorporating the Model in the App
As usual, at this juncture we have both a starting point app and a trained model. It’s time to combine them to make an app that can actually perform sentiment analysis on text that a user has entered.
Tip
You need to either build the starting point yourself, following the instructions in “Building the App”, or download the code from our website finding the project named NLPDemo-Starter. We’ll be progressing from that point in this section. If you don’t want to follow along and manually work with the app’s code to add the sentiment analysis features, you can also work with the project named NLPDemo-Complete.
As usual, we’re going to need to change a few things to get the app working with our model.
Note
We recommend working through the next section even if you download our code. Just read along and compare what we did in the code to the book so that you get an understanding of how it’s working.
First, let’s make some changes to the enum for Sentiment.swifts, Sentiment:
-
Add an extra case at the beginning of the
Sentimentenum, with the extra line covering a lack of sentiment:casepositive="Positive"casenegative="Negative"caseneutral="None" -
Similarly, add a
defaultcase to theswitchstatement in theiconvariable, to account for a lack of sentiment:varicon:String{switchself{case.positive:return"
"case.negative:return"
"default:return"
"}} -
For the
color, return gray if there’s no sentiment found:varcolor:UIColor{switchself{case.positive:returnUIColor.systemGreencase.negative:returnUIColor.systemReddefault:returnUIColor.systemGray}} -
Add an initializer to the
Sentimentenum, where the raw value must precisely match the class labels from the training data (so in this case, “Pos” and “Neg”):init(rawValue:String){// initialising RawValues must match class labels in training filesswitchrawValue{case"Pos":self=.positivecase"Neg":self=.negativedefault:self=.neutral}}Next, we need to update the
predictSentiment()function, near the top of the Sentiment.swift file, to actually make use of a model. -
Below the
importstatement, add the following to bring in Apple’s natural language framework:importNaturalLanguage -
Change the
predictSentiment()function to look like the following:funcpredictSentiment(withnlModel:NLModel)->Sentiment{ifself.isEmpty{return.neutral}letclassString=nlModel.predictedLabel(for:self)??""returnSentiment(rawValue:classString)}This new function takes an
NLModelas a parameter (we, creatively, call itnlModel), returns aSentiment(which is our ownenumtype) and checks whethernlModelis empty (returningSentiment.neutralif it is). Otherwise, it asksnlModelfor a prediction based on its contents (remember thepredictSentiment()function is an extension ofString) and returns that prediction asSentimentby initializing a newSentimentusing the initializer we just made.
At this point you can drag the SentimentClassificationModel.mlmodel file into the project’s root, letting Xcode copy it in as needed.
We also need to make some changes to ViewController.swift in order to make this work:
-
Add a new import below the existing one, to bring in Apple’s language framework (as we did for Sentiment.swift):
importNaturalLanguage -
Add the following new attribute below
placeholderText:privatelazyvarmodel:NLModel?={returntry?NLModel(mlModel:SentimentClassificationModel().model)}()This attribute,
model, stores a reference to our actual model. If your model is not called SentimentClassificationModel.mlmodel, you’ll need to change this as appropriate here.
-
Change the following code in the
performSentimentAnalysis()function, removing thislettext=textView.text??""letsentimentClass=text.predictSentiment()and replacing it with this:
varsentimentClass=Sentiment.neutraliflettext=textView.text,letnlModel=self.model{sentimentClass=text.predictSentiment(with:nlModel)}This code creates a new
Sentiment(our custom type, from Sentiment.swift), setting it to neutral, and then gets the text from ourtextView, uses themodelattribute we created a moment ago (which is a reference to our model). It then requests a sentiment (using thepredictSentiment()function with which we’ve extendedString, within Sentiment.swift) and stores the result in the newSentimentwe just created.
The rest of the code, which is unchanged, reads the properties of the Sentiment sentimentClass we just created (and hopefully stored a predicted sentiment in) and updates the relevant UI elements to match the predicted sentiment.
Everything should be ready to go now. Launch the app in the simulator and try it out. Figure 6-14 shows the results from our app.
Figure 6-14. The final sentiment classifier
Task: Custom Text Classifiers
In the previous section, we trained our own custom sentiment classifier and implemented it from scratch in an iOS app.
There’s another way to do something similar. In this task, we make a custom text classifier that works with the text system we’ve been using in the earlier tasks. We use CreateML’s MLTextClassifier to train a model again, as we did in “Task: Sentiment Analysis”, but, here, we show you a different way to use the model.
Instead of using the trained MLTextClassifier model as a more generic CoreML, use it with NLTagger and NLTagScheme, which lets us call our custom model as if it were one of Apple’s provided models (such as those we used earlier for “Task: Language Identification”, “Task: Named Entity Recognition”, and “Task: Lemmatization, Tagging, and Tokenization”).
AI Toolkit and Dataset
As usual with our practical AI tasks, we need to assemble a toolkit with which to tackle the problem. The primary tools that we use in this case are CreateML, CoreML, and Xcode’s Playgrounds. As with the “Task: Sentiment Analysis”, we’re using Apple’s task-based tool, CreateML, via an Xcode Playground, to train a model.
We use the Kaggle restaurant review dataset, which is similar to the one we used earlier in “Task: Sentiment Analysis”.
We’ve converted it to JSON for ease of parsing, as shown in Figure 6-15. You can find the Reviews.json file in the NaturalLanguage-Demos folder, which is available in our resource download on our website.
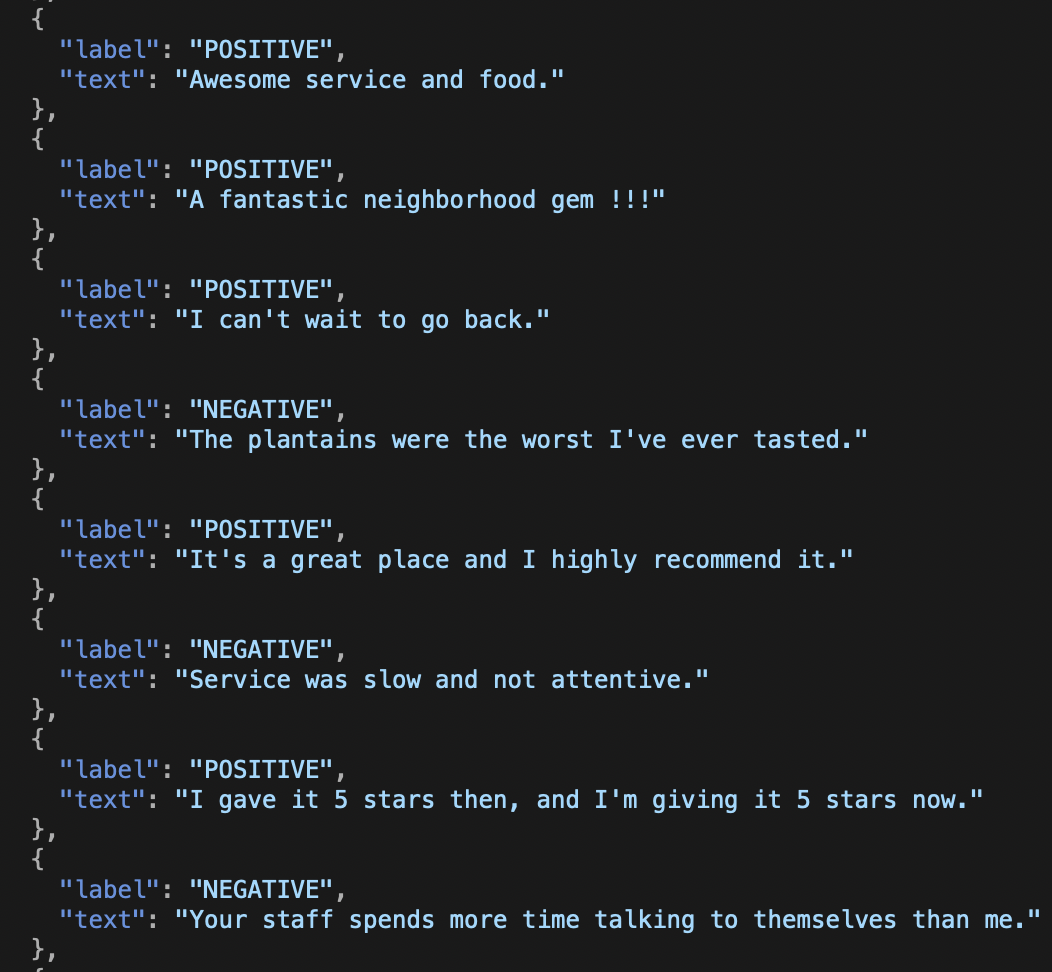
Figure 6-15. A sample of the review data, in JSON
Creating a model
With our dataset chosen, let’s fire up CreateML in a Playground to do some training. This process is very similar to the process we used earlier in “Creating a Model”:
-
Create a new macOS Playground in Xcode named TrainCustomTagger. Ours is shown in Figure 6-16.
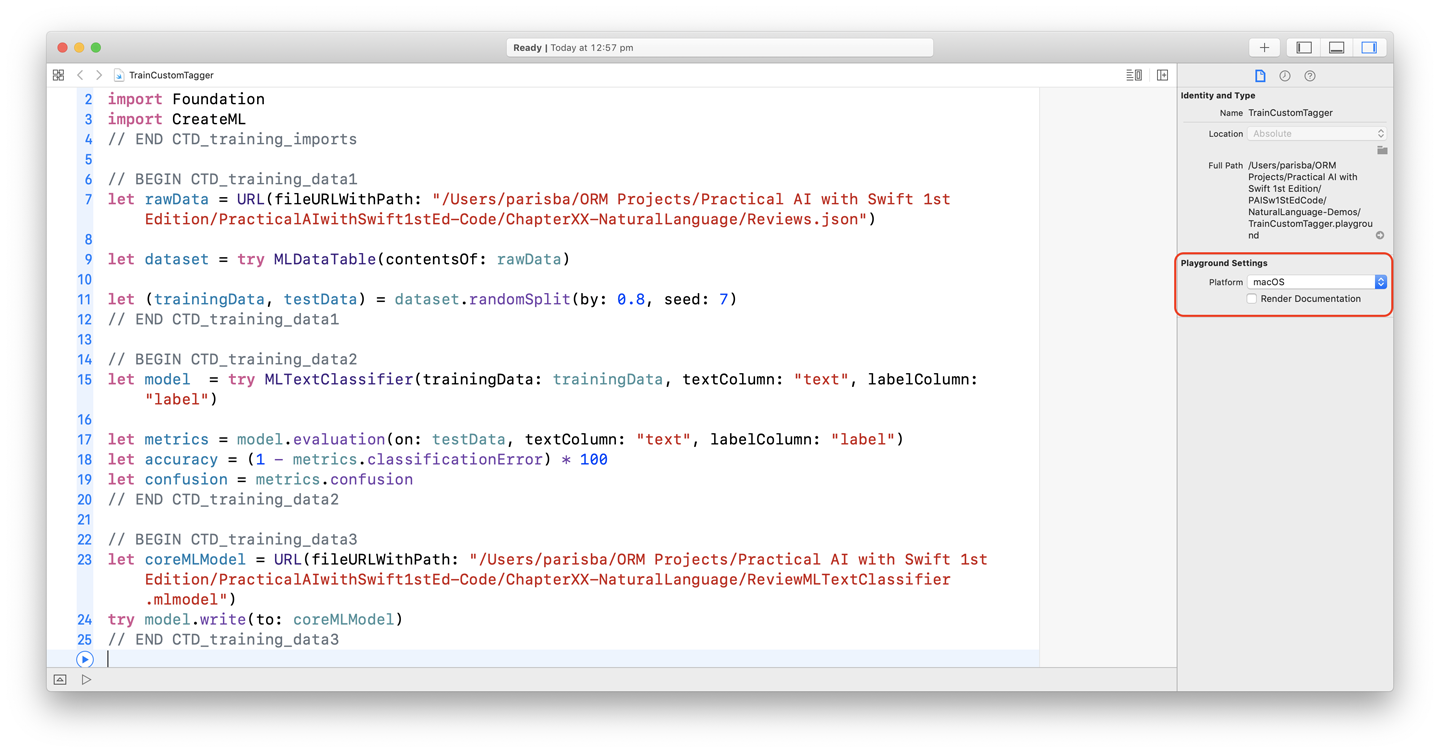
Figure 6-16. Our Playground for training a tagger
-
Add the following
imports:importFoundationimportCreateML -
Add some code to load the raw data, create an
MLDataTable, and split the data into training and test sets:letdataPath="/Users/parisba/ORM Projects/Practical AI with Swift "+"1st Edition/PracticalAIwithSwift1stEd-Code/ChapterXX-"+"NaturalLanguage/Reviews.json"letrawData=URL(fileURLWithPath:dataPath)letdataset=tryMLDataTable(contentsOf:rawData)let(trainingData,testData)=dataset.randomSplit(by:0.8,seed:7) -
Create an
MLTextClassifiermodel, and set up the evaluations:letmodel=tryMLTextClassifier(trainingData:trainingData,textColumn:"text",labelColumn:"label")letmetrics=model.evaluation(on:testData,textColumn:"text",labelColumn:"label")letaccuracy=(1-metrics.classificationError)*100letconfusion=metrics.confusion -
letmodelPath="/Users/parisba/ORM Projects/Practical AI with Swift"+"1st Edition/PracticalAIwithSwift1stEd-Code/ChapterXX-"+"NaturalLanguage/ReviewMLTextClassifier.mlmodel"letcoreMLModel=URL(fileURLWithPath:modelPath)trymodel.write(to:coreMLModel)
Run the Playground. The output should show the training progress, the accuracy from testing, and a confirmation that the file was written out successfully, as shown in Figure 6-17.
Tip
We recommend saving the training Playground alongside the projects you create that will consume the model. This will make it easier to re-create and modify your project in the future, or work with a different model.
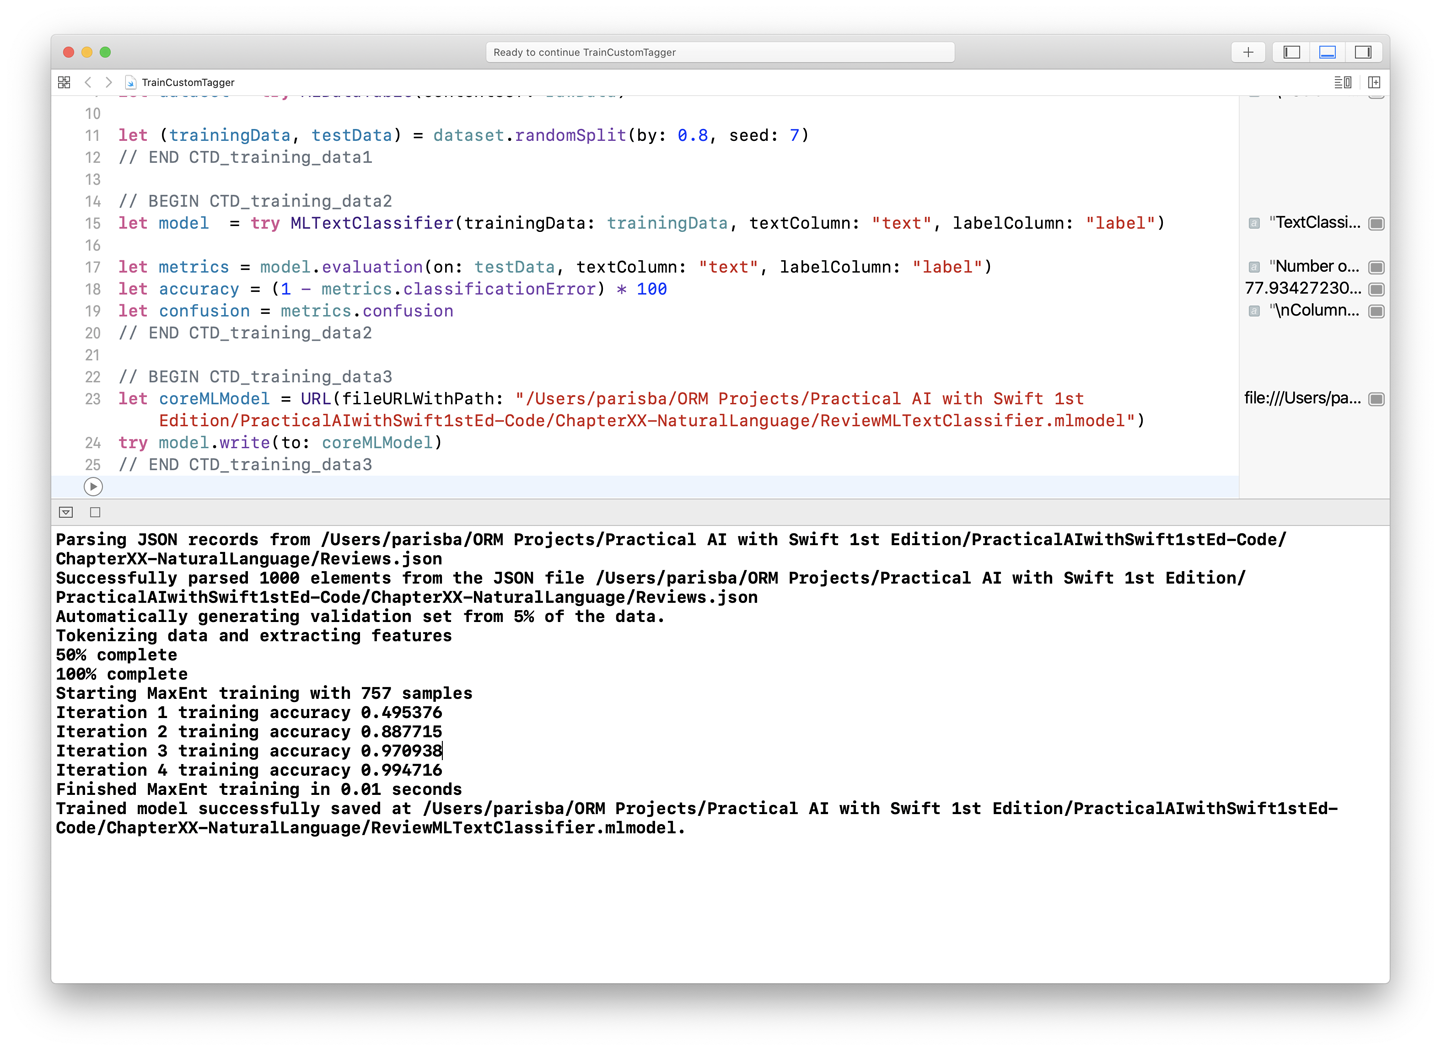
Figure 6-17. The custom tagger training
Using the model
We’re not going to step through the creation of a full app for this task, because it’s derivative of our sentiment analyzer from “Task: Sentiment Analysis”.
Tip
We did actually build an app for this, just in case you want to look at it. To see our app for this task, look for CTDemo in the resources available on our website.
To use the custom NLTagger model we’ve trained using MLTextClassifier, create a new Swift file in the project you want to use it in (ours is called ReviewTagger.swift) and then do the following:
-
importthe necessary frameworks:importFoundationimportNaturalLanguageimportCoreMLWe’re specifically after
NaturalLanguageandCoreML, so we can useCoreMLto work with models, andNaturalLanguageto work with language-specific features. -
Drag the trained model into the project in question and allow Xcode to copy as necessary.
-
Create a
classto represent your tagger:finalclassReviewTagger{} -
Add some useful variables:
privatestaticletshared=ReviewTagger()privateletscheme=NLTagScheme("Review")privateletoptions:NLTagger.Options=[.omitPunctuation]
Note
Make sure the line where you define the modelFile points to the name of your classifier model. It might be different from ours (ReviewMLTextClassifier).
-
Create an
NLTagger:privatelazyvartagger:NLTagger?={do{letmodelFile=Bundle.main.url(forResource:"ReviewMLTextClassifier",withExtension:"mlmodelc")!// make the ML model an NL modelletmodel=tryNLModel(contentsOf:modelFile)// connect model to (custom) scheme namelettagger=NLTagger(tagSchemes:[scheme])tagger.setModels([model],forTagScheme:scheme)print("Success loading model")returntagger}catch{returnnil}}() -
Stub out the necessary
init()function:privateinit(){} -
Create a function to call for a prediction:
staticfuncprediction(fortext:String)->String?{guardlettagger=ReviewTagger.shared.taggerelse{returnnil}print("Prediction requested for:\(text)")tagger.string=textletrange=text.startIndex..<text.endIndextagger.setLanguage(.english,range:range)returntagger.tags(in:range,unit:.document,scheme:ReviewTagger.shared.scheme,options:ReviewTagger.shared.options).compactMap{tag,_->String?inprint(tag?.rawValue)returntag?.rawValue}.first} -
Create an
extensiononString, allowing you to request a prediction using theReviewTaggerclasswe just made:extensionString{funcpredictSentiment()->Sentiment{ifself.isEmpty{return.neutral}letclassString=ReviewTagger.prediction(for:self)??""returnSentiment(rawValue:classString)}}Here, we use the
Sentimentenumthat we created for “Task: Sentiment Analysis” to return an emoji for the sentiment. -
You could also directly use our
ReviewTagger:lettagger=ReviewTagger()lettestReviews=["I loved this place and it served amazing food","I did not like this food, and my steak was off","The staff were attentive and the view was lovely.","Everything was great and the service was excellent"]testReviews.forEach{reviewinguardletprediction=tagger.prediction(for:review)else{return}print("\(review)-\(prediction)")}
Instead of using MLTextClassifier to train a model, you could also use MLWordTagger to train a model using CreateML. MLWordTagger models can be used exactly as we did here (with a custom tag scheme), but they’re designed to be used for recognizing words relevant to your app, like product names or unique points of interest.
Tip
You can learn more about MLWordTagger in Apple’s documentation.
For example, using MLWordTagger, you could build an AI-powered system that understood which bits of a String were, for example, alien races in a sci-fi universe that your app (or perhaps game) was dealing with:
-
If you had a dataset that outlined some example sentences, identifying which bits were aliens, such as this:
{"tokens":["The","Vorlons","existed","long","before","humanity!"],"labels":["other","alien","other","other","other","other"]},{"tokens":["The","Vorlons","are","much","older","than","the","Minbari."],"labels":["other","alien","other","other","other","other","other","alien"]}
Tip
As you might have gathered from our use of it, JSON is an excellent way to work with text in machine learning.
-
You could then load it into an
MLDataTable, as we did earlier, and train anMLWordTaggeron it. With the resulting model, you could define a tag scheme:varalienScheme=NLTagScheme("Alien") -
And the
NLTagyou want it to look for:varalienTag=NLTag("alien")
Then, you could run the MLWordTagger on sentences, and if you had sufficient training data, it would be able to flag which parts of a sentence were alien races, based on the training.
Next Steps
That’s everything for our text and language chapter. We’ve covered some common text- and language-related practical AI tasks that you might want to accomplish with Swift, and we used a variety of tools to do so.
We performed five practical AI tasks:
- Language Identification
-
Determining what language some text might be in using Apple’s Natural Language framework.
- Named Entity Recognition
-
Identifying the elements of text that are people, places, or organizations, again using Apple’s Natural Language framework.
- Lemmatization, tagging, tokenization
-
Identifying the lemma of every word in a string, finding the parts of speech (verbs, nouns, and so on), and splitting a string up by words, still using Apple’s Natural Language framework.
- Sentiment Analysis
-
Figuring out if some text has a positive or negative sentiment.
Custom Text Classifiers:: Building our own text classifier on top of Apple’s Natural Language framework.
In Chapter 11, we look at what happened under the hood, algorithm-wise, for each of the tasks that we explored in this chapter (“Text and Language”).
If you want to take language and text a step further with practical AI, we recommend taking a look at BERT. BERT stands for Bidirectional Encoder Representations from Transformers, and is the cutting-edge of pretraining languages for NLP AI tasks. BERT is a project of Google Research, and you can learn more about it on the BERT project page. To bring this diversion back to practical AI terms: BERT opens up all sorts of useful, practical NLP tasks, performed in an efficient manner that’s doable on a mobile device (e.g., the sort of device for which you might use Swift to write).
Tip
The academic paper that introduced BERT to the world, BERT: Pre-training of Deep Bidirectional Transformers for Language Understanding, is also a great place to start learning about BERT.
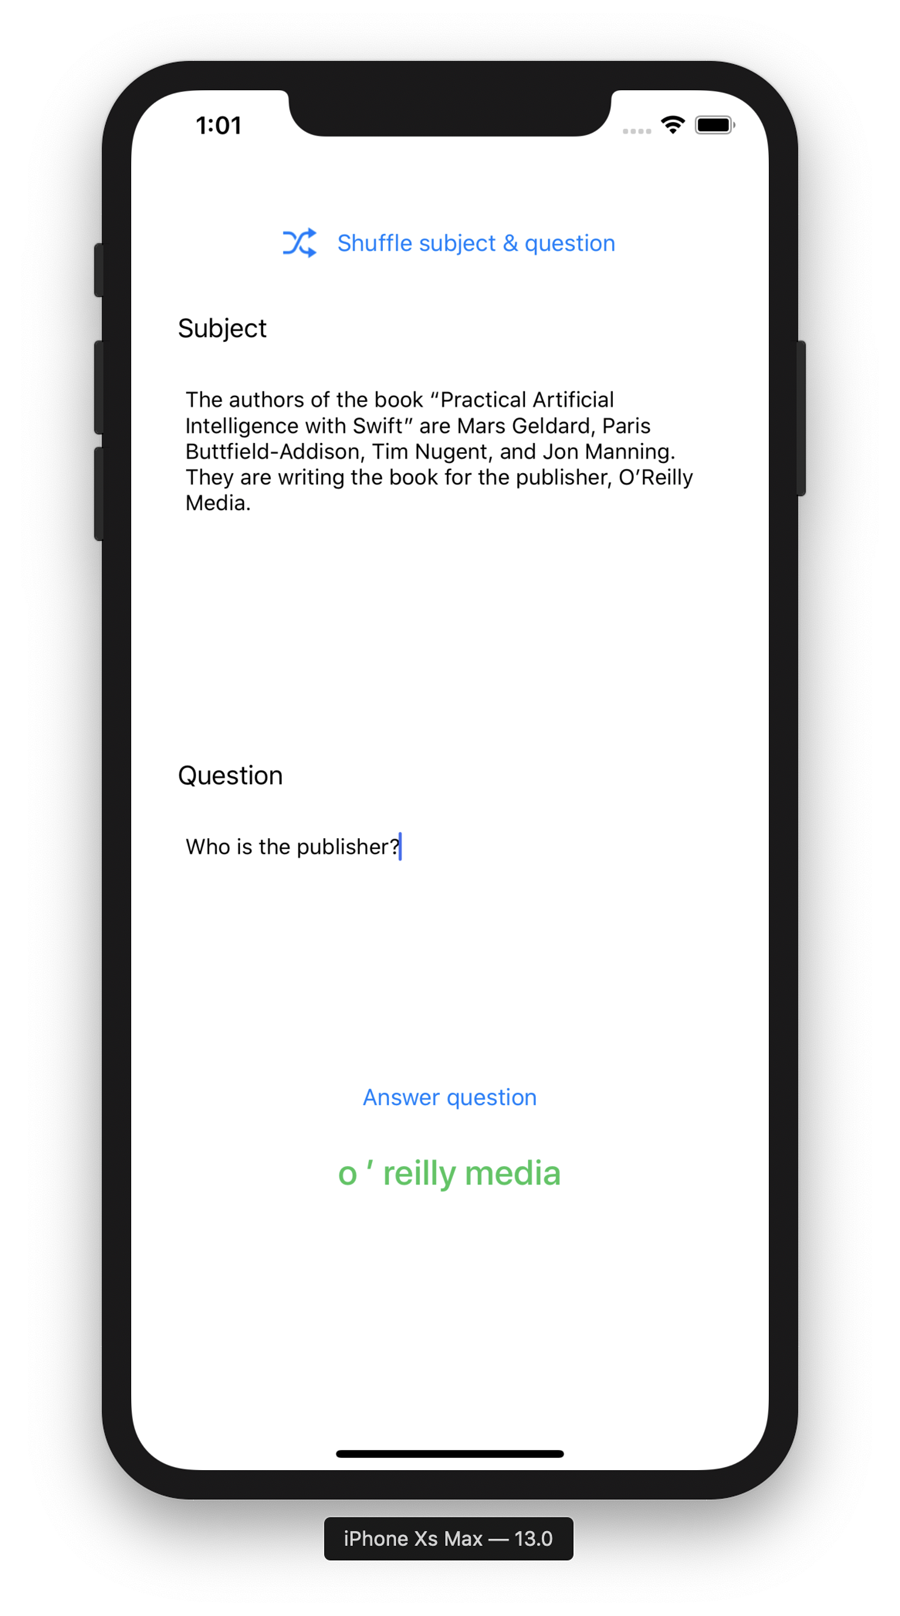
The most accessible, useful, practical NLP task that we recommend starting your exploration of BERT with is question answering. There’s a great dataset that you can pair with BERT in order to explore this: the Stanford Question Answering Dataset (SQuAD). It’s full of things like this:
-
TEXT: Seismologists can use the arrival times of seismic waves in reverse to image the interior of the Earth. Early advances in this field showed the existence of a liquid outer core (where shear waves were not able to propagate) and a dense solid inner core. These advances led to the development of a layered model of the Earth, with a crust and lithosphere on top, the mantle below (separated within itself by seismic discontinuities at 410 and 660 kilometers), and the outer core and inner core below that. More recently, seismologists have been able to create detailed images of wave speeds inside the earth in the same way a doctor images a body in a CT scan. These images have led to a much more detailed view of the interior of the Earth, and have replaced the simplified layered model with a much more dynamic model.
-
QUESTION: What types of waves do seismologists use to image the interior of the Earth?
-
ANSWER: Seismic waves.
Apple actually makes BERT available for download as a CoreML model from its models site. Check it out and see what you can do with it!
Additionally, Apple has released a demo app that makes use of the BERT CoreML model, which you can download the source code to and try out.
A team from a “social artificial intelligence” startup (with which we have zero affiliation) has also done the hard work of making BERT work with iOS and CoreML (and appears to be the source of Apple’s provided CoreML version of BERT). You can find their work on GitHub. You can see an example of BERT working in a Swift iOS app using CoreML in Figures 6-18 and 6-19.
You might also be interested in generating text, which we introduce in our “Task: Sentence Generation”. In the next chapter we’ll look at motion.
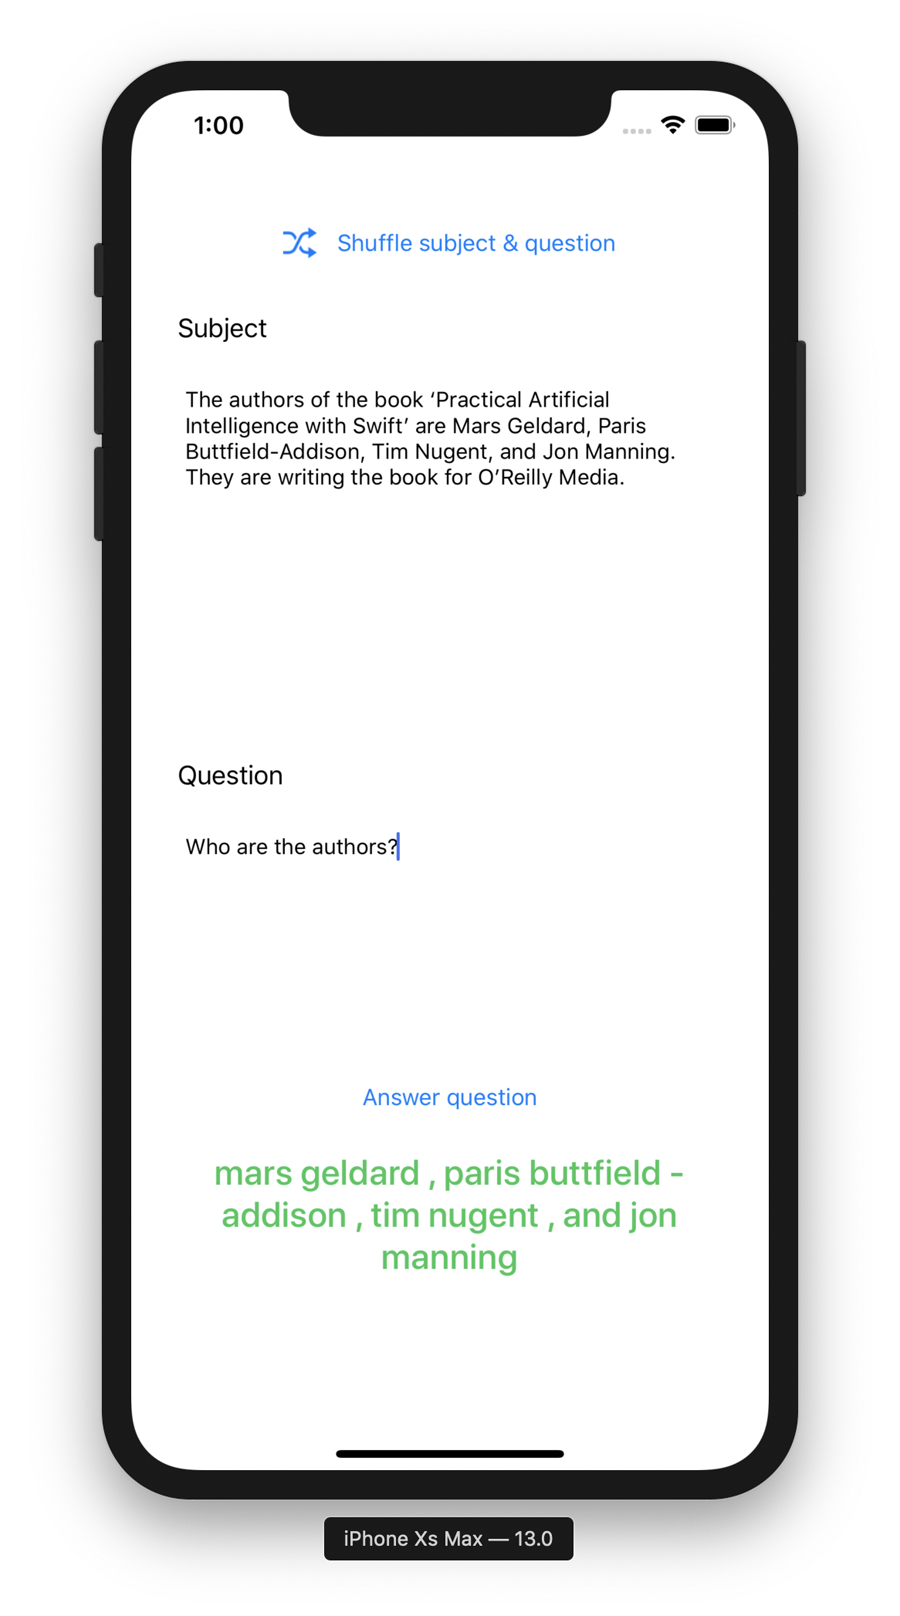
Figure 6-18. BERT, working on iOS, using Swift and CoreML