Chapter 5. Audio
This chapter explores the practical side of implementing audio-related AI features in your Swift apps. Taking a top-down approach, we explore two audio tasks and how to implement them using Swift and various AI tools.
Audio and Practical AI
Here are the two audio-related practical AI tasks that we explore in this chapter:
- Speech Recognition
-
Making a computer understand human words is incredibly useful. You can take dictation or order a computer around.
- Sound Classification
-
Classification is going to crop up repeatedly in this book. We build a sound classifier app that can tell us what animal sound we’re listening to.
Images might be the trendy hot topic that triggered an explosion of deep learning, machine learning, and artificial intelligence (AI) features in products, and activity classification might be a novel way of using the myriad sensors in a modern iOS device, but sound is one of the real stars of practical applications of machine learning. Almost everyone has used sound at least once on their mobile device (like the music identification service, Shazam), even before AI was (yet again) a buzzword.
Task: Speech Recognition
Speech recognition is one of those touchpoints of AI that most people have used at some point or another: whether it’s on a phone call with an irritating phone robot that’s trying to understand your voice, or actively using your computer with assistive and accessibility technologies, speech recognition has been pervasive a lot longer than many other forms of practical AI in consumer applications.
For the first of our two practical AI audio tasks, we’re going to explore how you can add speech-recognition capabilities to your Swift applications quickly, easily, and without any model training involved.
As with the face-detection task we covered in “Task: Face Detection”, speech recognition is a little easier than many of the others in this book in that the toolkit for performing speech recognition is largely provided by Apple (“Apple’s Other Frameworks”).
You could train a model that understands human speech for each of the languages you want to support in your project, but Apple has done the work for you, for lots and lots of languages. So why would you?
This task, therefore, takes a similar approach to “Task: Image Similarity”, in which we covered checking images for similarity, and “Task: Face Detection”, in which we looked at face detection.
Problem and Approach
For this task, we’re going to explore the practical side of speech recognition by doing the following:
-
Making an app that can recognize human speech and display it on screen
-
Building an app that allows us to listen to some speech and display it as text
-
Using Apple’s tools for doing this without training a model
-
Exploring the potential next steps for speech recognition
Speech recognition is absolutely everywhere. There’s not much more to say. It’s pervasive, widely understood, and doesn’t require much explanation to users. You can use it for everything from allowing the user to dictate text (although there are other, more appropriate ways to do that), to controlling an app with voice (again, there are other more appropriate ways to do that), to voice-driven features that revolve around understanding what the user is saying.
We’re going to build the Speech Recognizer app shown in Figure 5-1.

Figure 5-1. The final look of the Speech Recognizer app
Building the App
As we did in for many of the tasks in Chapter 4, we’re going to be using Apple’s newest user interface (UI) framework, SwiftUI, to build the app for exploring speech recognition.
The final form of the app we’re going to build for this task was shown earlier, in Figure 5-1, and consists the following SwiftUI components:
-
A
NavigationViewin which to display the title of the app -
Some
Buttoncomponents to start and stop the listening process for speech recognition -
A
Textcomponent for the result of the speech recognition to be displayed (and for instructions prior to the app being used)
Note
This book is here to teach you the practical side of using AI and machine learning features with Swift and on Apple’s platforms. Because of this, we don’t explain the fine details of how to build apps; we assume you mostly know that (although if you don’t, we think you’ll be able to follow along just fine if you pay attention). If you want to learn Swift, we recommend picking up Learning Swift (also by us!) from the lovely folks at O’Reilly Media.
Tip
If you don’t want to manually build the iOS app, you can download the code from our website and find the project named SRDemo. After you have that, we strongly recommend that you still proceed through this section, comparing the notes here with the code you downloaded.
To make the app yourself, you’ll need to do the following:
-
Create an iOS app project in Xcode, choosing the “Single View App” template, and selecting the SwiftUI checkbox.
-
After your project is created, add a new Swift file called Speech.swift to the project. In that file, add a new
classcalledSpeechRecognizer:classSpeechRecognizer{} -
Add some attributes, covering all the necessary components you need to recognize speech:
privateletaudioEngine:AVAudioEngineprivateletsession:AVAudioSessionprivateletrecognizer:SFSpeechRecognizerprivateletinputBus:AVAudioNodeBusprivateletinputNode:AVAudioInputNodeprivatevarrequest:SFSpeechAudioBufferRecognitionRequest?privatevartask:SFSpeechRecognitionTask?privatevarpermissions:Bool=falseWe’re creating an
AVAudioEngine, which is used to perform audio input or output; anAVAudioSession, which is used to help you specify to the operating system (OS) what kind of audio you’ll be working with; and anAVAudioNodeBusandAVAudioInputNode, which are used to establish connections with the input hardware on an iOS device (i.e., the microphones).We also create an
SFSpeechRecognizer, which allows us to initiate speech recognition and is part of Apple’s provided Speech Framework. We also useSFSpeechAudioBufferRecognitionRequestto capture audio from a live buffer (i.e., a device’s microphone) in order to recognize speech.Tip
An alternative to
SFSpeechAudioBufferRecognitionRequestisSFSpeechURLRecognitionRequest, which allows you to perform speech recognition on a preexisting recorded audio file, instead.We also create a
SFSpeechRecognitionTask, which represents an ongoing speech recognition task. We can use this to see when the task is done or cancel it. -
Add an initializer:
init?(inputBus:AVAudioNodeBus=0){self.audioEngine=AVAudioEngine()self.session=AVAudioSession.sharedInstance()guardletrecognizer=SFSpeechRecognizer()else{returnnil}self.recognizer=recognizerself.inputBus=inputBusself.inputNode=audioEngine.inputNode}Our initializer creates the necessary audio capture components and assigns the bits and pieces we created a moment ago appropriately.
-
Add a function to check that we have the appropriate permissions to listen on the microphone (in order to do speech recognition):
funccheckSessionPermissions(_session:AVAudioSession,completion:@escaping(Bool)->()){ifsession.responds(to:#selector(AVAudioSession.requestRecordPermission(_:))){session.requestRecordPermission(completion)}} -
Add a function to the start the recording, and some setup at the top:
funcstartRecording(completion:@escaping(String?)->()){audioEngine.prepare()request=SFSpeechAudioBufferRecognitionRequest()request?.shouldReportPartialResults=true} -
Within this function, below the setup, check for audio and microphone access permissions:
// audio/microphone access permissionscheckSessionPermissions(session){successinself.permissions=success}guardlet_=try?session.setCategory(.record,mode:.measurement,options:.duckOthers),let_=try?session.setActive(true,options:.notifyOthersOnDeactivation),let_=try?audioEngine.start(),letrequest=self.requestelse{returncompletion(nil)} -
Set the recording format and create the necessary buffer:
letrecordingFormat=inputNode.outputFormat(forBus:inputBus)inputNode.installTap(onBus:inputBus,bufferSize:1024,format:recordingFormat){(buffer:AVAudioPCMBuffer,when:AVAudioTime)inself.request?.append(buffer)} -
Print out a message (to the console, not visually in the app) that recording (listening) has started:
print("Started recording...")Tip
You can display the console in Xcode by going to the View menu → Debug Area → Activate Console.
-
Begin the recognition:
task=recognizer.recognitionTask(with:request){result,errorinifletresult=result{lettranscript=result.bestTranscription.formattedStringprint("Heard:\"\(transcript)\"")completion(transcript)}iferror!=nil||result?.isFinal==true{self.stopRecording()completion(nil)}} -
In the Speech.swift file, add a function to stop recording:
funcstopRecording(){print("...stopped recording.")request?.endAudio()audioEngine.stop()inputNode.removeTap(onBus:0)request=niltask=nil}
Because we’re going to access the microphone, you’ll need to add the NSMicrophoneUsageDescription key to the Info.plist file, along with an explanation for why we’re using the microphone.
You’ll also need to add NSSpeechRecognitionUsageDescription for speech recognition. The messages will be be displayed to the user. Figure 5-2 shows our messages.

Figure 5-2. NSMicrophoneUsageDescription in the Info.plist
Next, we need to start working with the view file, ContentView.swift:
-
At the top of the file, update the
imports:importSpeechimportSwiftUIimportAVFoundationIn this, we bring in
Speechfor speech recognition,SwiftUIfor SwiftUI, andAVFoundationfor audio capabilities. -
Create a SwiftUI
Viewto use within aButton, to make it a bit fancier looking. Let’s name itButtonLabel:structButtonLabel:View{privatelettitle:Stringprivateletbackground:Colorvarbody:someView{HStack{Spacer()Text(title).font(.title).bold().foregroundColor(.white)Spacer()}.padding().background(background).cornerRadius(10)}init(_title:String,background:Color){self.title=titleself.background=background}}This view basically allows us to style some text in a reusable fashion. It’s a
Textview, wrapped in anHStackwith an initializer that allows us to provide a titleStringand aColor, for convenience. -
We move now to the bulk of the code in the
View, theContentView. Much of this came with the project template, but we’ll be starting with something that looks like this (it’s probably already there):structContentView:View{} -
Into this
View, we need to add some@Statevariables:@Statevarrecording:Bool=false@Statevarspeech:String=""recordingis aBoolthat reflects the current state of recording, andspeechis aStringthat will store the recognized text. -
Move down below
bodyView(still within theContentViewstruct) and add a variable namedrecognizerto store aSpeechRecognizer:privateletrecognizer:SpeechRecognizer -
init(){guardletrecognizer=SpeechRecognizer()else{fatalError("Something went wrong...")}self.recognizer=recognizer}In this, we initialize a new
SpeechRecognizer(the class defined in Speech.swift) and store it inrecognizer, which we defined a moment ago. -
Add a function named
startRecording(), which will start listening:privatefuncstartRecording(){self.recording=trueself.speech=""recognizer.startRecording{resultiniflettext=result{self.speech=text}else{self.stopRecording()}}}This function sets the
recordingstate variable to true and thespeechstate variable to an emptyStringand then uses ourSpeechRecognizer(recognizer) to start recording, storing the result inspeech, if there is one. -
Add a function to stop recording, creatively called
stopRecording():privatefuncstopRecording(){self.recording=falserecognizer.stopRecording()}This function sets the
recordingstate variable to false and instructs theSpeechRecognizerinrecognizerto stop recording.We don’t need to touch the
ContentView_Previewsstructin this case.
You can now run the app. Tap the button and speak, and you should see the words you say appear in the Text component.
What Just Happened? How Does This Work?
As we did back in Chapter 4, we used one of Apple’s provided frameworks to do literally all the AI work for this practical example. SFSpeechRecognizer is Apple’s provided speech recognition framework, and as of macOS Catalina (10.15), it’s available to both iOS apps and macOS apps.
Tip
You can also do speech recognition on watchOS and tvOS, but it’s a little bit different and beyond the scope of this book. To learn more about speech recognition on Apple platforms in general, head to https://apple.co/33Hry2t.
SFSpeechRecognizer supports offline speech recognition for many languages, but also might (i.e., does) rely on Apple’s server support (which is not something you need to configure), as needed. Apple’s documentation is vague about which languages support offline recognition, and under what conditions the server is contacted, but it strongly emphasizes that speech recognition via SFSpeechRecognizer should always be assumed to require connectivity.
Warning
It’s very important to always follow Apple’s guidelines for asking permission. When using SFSpeechRecognizer, Apple requests that you always ask permission from the user to perform speech recognition because it might be cloud-based. Awareness of privacy implications is very important. Do pay attention 007…
There are possibly some limits (e.g., per device, per day, and so on) to how much speech recognition you can perform. Apple isn’t clear on this just yet, and implies that it will evolve and crystallize with time.
What’s Next?
Answering “What’s next?” is a complex question for this topic. If you want to add speech recognition to your iOS or macOS apps, this is everything you need. You’re ready to go.
Note
Because this book is about the practical side of AI, and we want to approach things from the top down, we think that this is everything you really need right now.
However, if you’re curious, you can go further by exploring how you might train a model to recognize speech. We’re not going to step through this, because it’s definitely beyond the scope of this book, but the toolkit and data that we’d be exploring for doing this from scratch would resemble the following:
-
The Speech Commands Dataset, available from Google Brain (this is a very large file!)
-
The Common Voice Dataset, available from Mozilla
-
The Python version of TensorFlow
Alternatively, if you get a copy of the TensorFlow source tree, build anything necessary for you to run TensorFlow, and want to try building your own very small speech recognition model, you could do the following:
-
Execute the Python script train.py, located in the examples/speech_commands directory of the TensorFlow tree. This downloads the aforementioned Speech Commands Dataset (this might take a while) and begins training.
-
You will see the training occur, step by step, and occasionally a confusion matrix will be displayed that shows you what mistakes the model is making at the time.
-
You will also see some validation measures output, showing the validation accuracy of the model on the validation dataset (which is a 10% split that is done automatically by the train.py script).
-
Eventually, after what could be many hours, you will have a model. You will need to freeze the model, which compacts it for use on mobile devices, using the freeze.py script located in the same directory.
-
You can use the label_wav.py script, also in the same directory, to pass audio files into the model to test it.
There’s a full tutorial for a process similar to the one we just outlined available in the TensorFlow documentation.
Tip
The simple model that can be trained using TensorFlow that we outline here is based on the paper “Convolutional Neural Networks for Small-footprint Keyword Spotting.” If you’re interested in going beyond practical AI, it’s definitely one of the more readable “proper” AI papers.
You can also use the TensorFlow to CoreML Converter, which is a project from both Apple and Google, to convert the model from TensorFlow’s format to an .mlmodel file. This would allow you to use it with CoreML and use it in an iOS app.
Tip
Check back to Chapter 2 for details on how to use Apple’s CoreMLTools and the TensorFlow to CoreML Converter. Later in this book, in both Chapter 8 and Chapter 9, we use CoreML Tools to convert models for use with CoreML.
Exploring this in its entirety is beyond the scope of this book, but it is the next step if you’re curious. Visit out our website for articles and links that explore this sort of thing.
Task: Sound Classification
For our next audio task, we want you to imagine that you’re building an app for a zoo. One of the features that you’ve been asked to create is a system in which users can open up the app when they hear animals in the distance making a noise, and the app can identify and inform the users what kind of animal they’re hearing. This is a sound classification problem.
Problem and Approach
Sound classifiers, given a sound, will assign it to one of a predetermined collection of labels. They’re classifiers, so they work like any other classifiers. (We discuss how they work under the hood in “Sound Classification”.)
Note
None of the sound classification features provided by Apple’s machine-learning tools are designed to be used with human speech. You can use them on weird noises that you might want to make, but they’re not designed around speech recognition.
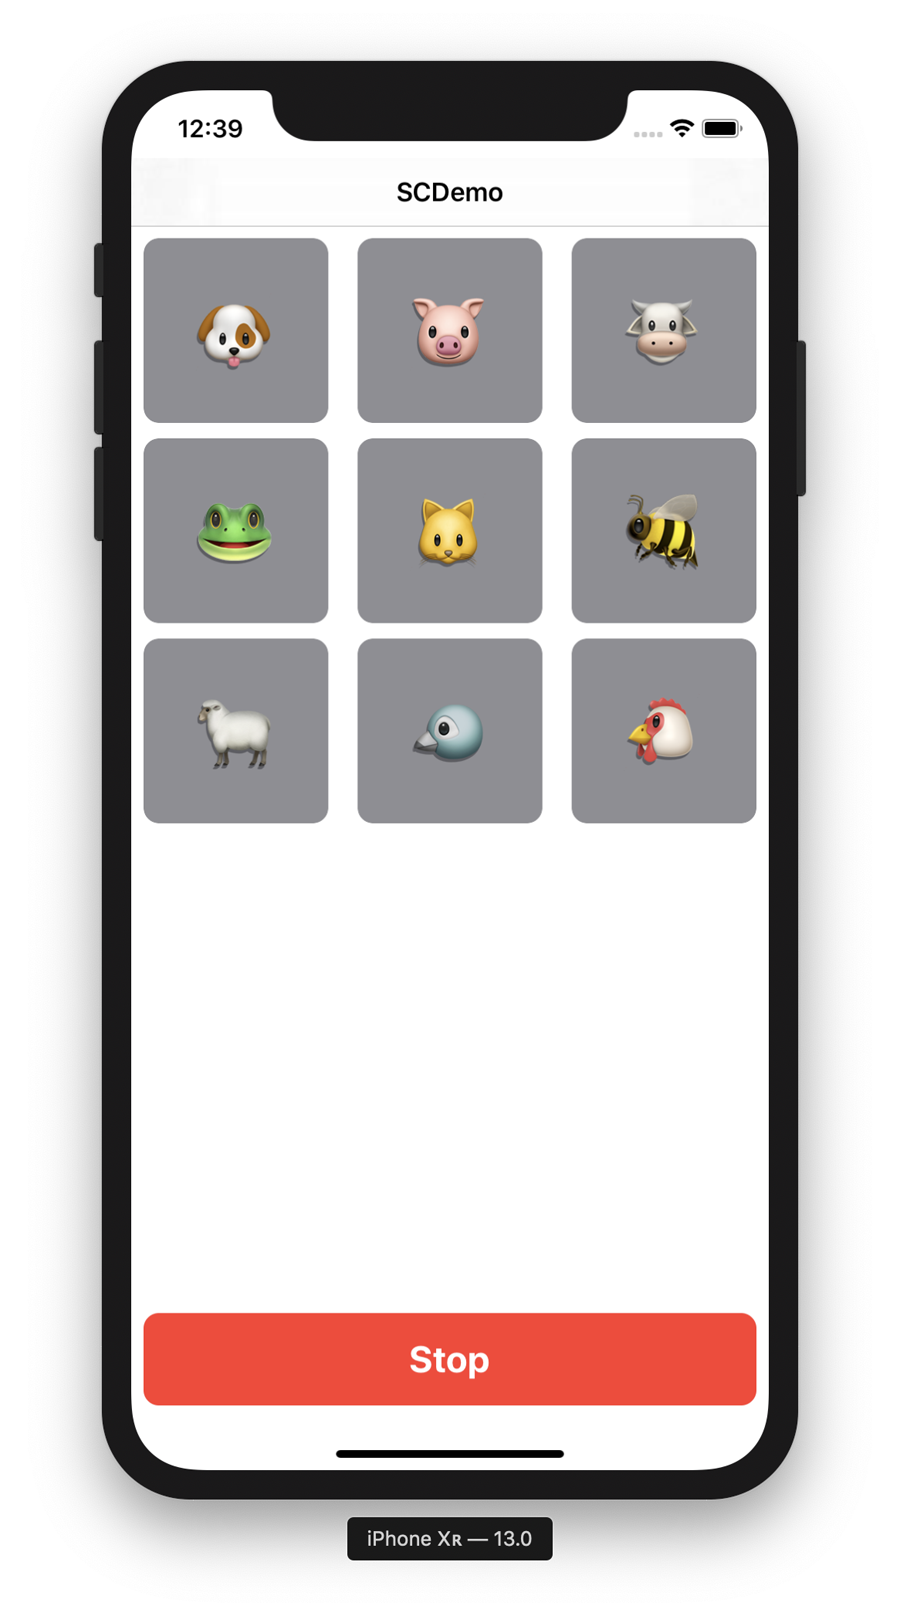
In this chapter, we build an app, the final version of which is shown in Figure 5-3, that can assign a sound it hears to one of nine different buckets.

Figure 5-3. The final version of our sound classifier app
For this task, we explore the practical side of sound classification by doing the following:
-
Building an app that can record some audio, perform a sound classification on the recording, and inform us as to what animal made the noise
-
Selecting a toolkit for creating the sound classification model and assembling a dataset for the problem
-
Building and training our sound classification model
-
Incorporating the sound classification model into our app
-
Improving our app
After that, we’ll quickly touch on the theory of how sound classification works and point to some further resources for improvements and changes you can make on your own. Let’s get started.
Building the App
Our sound classification app is going to use UIKit, Apple’s older UI framework for iOS. This app makes slightly more advanced use of native iOS views, including a UICollectionView and a UIProgressView, so if you’re unfamiliar with those, this app might look a little scary.
Never fear. We explain them as we go in a little more detail than other iOS views that we’ve been using.
Note
This book is here to teach you the practical side of using AI and machine learning features with Swift and on Apple’s platforms. Because of this, we don’t explain the fine details of how to build apps; we assume you mostly know that (although if you don’t, we think you’ll be able to follow along just fine if you pay attention). If you want to learn Swift, we recommend picking up Learning Swift (also by us!) from the lovely folks at O’Reilly Media:
The general look of the app we’re going to build here, even in its starting point form, is shown in Figure 5-3. The starting point will have the following components:
-
A
UIButtonto trigger the recording (and later the automatic classification of) a sound -
A
UICollectionView, showing a collection of different animals (each in aUICollectionViewCell) in emoji form, which will light up depending on what type of animal sound is heard -
A
UIProgressViewto indicate how far through its recording (listening) process the app is -
An
AVAudioRecorder(and its associatedAVAudioRecorderDelegate) to record audio
Tip
If you don’t want to manually build the starting point iOS app, you can download the code from our our website and find the project named SCDemo-Starter. After you have that, skim through the rest of this section (don’t skip it!) and then meet us at “AI Toolkit and Dataset”.
To make the sound classification starting point yourself, follow these steps:
-
Create an iOS app project in Xcode, choosing the “Single View App” template. Don’t select any of the checkboxes below the Language drop-down (which are, as usual, set to “Swift”).
Note
We’re going to start with code instead of the storyboard. That’s because we’re creating some custom classes that inherit from standard UI objects.
-
Add a new Swift file to the project and name it Animals.swift. In that file, add the following
enum:enumAnimal:String,CaseIterable{}We’re going to use this
enumtype to represent the animal sounds that the app can detect. Note that theenumwe created, which is calledAnimal, conforms to bothStringandCaseIterable. WhatStringmeans should be obvious: this is an enumeration of Strings, but conforming toCaseIterableallows us to access a collection of all of the cases ofAnimalby using the.allCasesproperty.Tip
You can read more about the
CaseIteratbleprotocol in Apple’s documentation. -
With our
Animaltype in place, we need to add some cases. Add the following to the top, within theAnimaltype:casedog,pig,cow,frog,cat,insects,sheep,crow,chickenThese are the nine different animal cases for which we’ll be able to classify the sounds.
-
Add an initializer so that the right case can be assigned when an
Animalis needed:init?(rawValue:String){ifletmatch=Self.allCases.first(where:{$0.rawValue==rawValue}){self=match}elseifrawValue=="rooster"||rawValue=="hen"{self=.chicken}else{returnnil}}This matches the incoming raw value to one of the cases, except in the case of the incoming raw value being either the string “rooster” or the string “hen,” which are both also matched to the
chickencase because they’re varieties of chicken (for the purposes of this app, just in case there are any chickenologists out there who disagree…) -
We want to return a nice icon (which will just be an emoji) for each case:
varicon:String{switchself{case.dog:"<img src="images/twemoji/dog.svg" />"case.pig:return"<img src="images/twemoji/pig.svg" />"case.cow:return"<img src="images/twemoji/cow.svg" />"case.frog:return"<img src="images/twemoji/frog.svg" />"case.cat:return"<img src="images/twemoji/cat.svg" />"case.insects:return"<img src="images/twemoji/insects.svg" />"case.sheep:return"<img src="images/twemoji/sheep.svg" />"case.crow:return"<img src="images/twemoji/crow.svg" />"case.chicken:return"<img src="images/twemoji/chicken.svg" />"}} -
Assign a color to each animal so that the views that we ultimately display them in look nice:
varcolor:UIColor{switchself{case.dog:return.systemRedcase.pig:return.systemBluecase.cow:return.systemOrangecase.frog:return.systemYellowcase.cat:return.systemTealcase.insects:return.systemPinkcase.sheep:return.systemPurplecase.crow:return.systemGreencase.chicken:return.systemIndigo}}We’ve just arbitrarily picked some colors here, so go nuts if you have any better ideas than we did. We definitely feel that insects are pink, though.
That’s everything we need to do in Animals.swift, so make sure that you save the file, and then let’s move on to the ViewController.swift file. There’s a fair bit of work to do there.
The first thing we need to do in ViewController.swift is create a button that can move between three different states. We’re going to use this button to allow users to record a sound, which will ultimately be classified.
The button needs to be able to switch from being a nice, friendly button inviting users to trigger a recording, to showing that recording is in progress. We also want to set up a state in which it’s disabled in case something prevents a recording from being made or the app is busy classifying the recording (which could take some time).
Note
We could perform all these state changes manually on a standard UIButton, but we want to make sure the code that connects to the AI features later on is as clean and simple as possible, so we’re abstracting a few bits and pieces out in ways that make that code more obvious. Also, it’s good practice to do it like this!
-
Add a new
classto the ViewController.swift file:classThreeStateButton:UIButton{}This is just a new class called
ThreeStateButtonthat inherits fromUIButton. At this point, we could implement someThreeStateButtons, and they’d just beUIButtons. -
Add an
enumto represent the different states of the button:enumButtonState{caseenabled(title:String,color:UIColor)caseinProgress(title:String,color:UIColor)casedisabled(title:String,color:UIColor)} -
Add a function to change the state of the button:
funcchangeState(tostate:ThreeStateButton.ButtonState){switchstate{case.enabled(lettitle,letcolor):self.setTitle(title,for:.normal)self.backgroundColor=colorself.isEnabled=truecase.inProgress(lettitle,letcolor):self.setTitle(title,for:.disabled)self.backgroundColor=colorself.isEnabled=falsecase.disabled(lettitle,letcolor):self.setTitle(title,for:.disabled)self.backgroundColor=colorself.isEnabled=false}}This function takes a state (which is the
ButtonStateenum we created a moment ago) and changes theThreeStateButtonto that state. Each state involves a change of title (which is provided when this is called; it is not predefined), a new background color (also provided when this is called), and an actual enabling or disabling of the button.The time has come to build our UI storyboard, but we need one more thing. Because we’re going to use a
UICollectionView, which is made up of a collection (bet you’d never have guessed!) of cells, we’re going to subclassUICollectionViewCelland use it to display each of the animal types for which the app can detect the sound. -
Add the following code to the ViewController.swift file, outside of any existing classes or definitions (we recommend adding it to the very bottom):
classAnimalCell:UICollectionViewCell{staticletidentifier="AnimalCollectionViewCell"}This creates a subclass of
UICollectionViewCellnamedAnimalCelland provides an identifier by which we can refer to it within our storyboard (which we make next. We promise!)Now, you can open the Main.storyboard file, and create a UI:
-
Add the following components to your storyboard:
-
A
UIButton, to trigger the sound recording (and show that a recording is in progress) -
A
UIProgressView, which shows the length of the recording -
A
UICollectionView, which holds cells to show each animal type for which the app can detect the sound -
Within the
UICollectionView, a prototypeUICollectionViewCell, which displays each animal. You can see an image of our storyboard in Figure 5-4. Make sure you add the necessary constraints!
-
-
We need to change the class of some of these components to the custom types we created in code earlier. Select the
UICollectionViewCellinside theUICollectionViewand then, with the Identity Inspector open, change its class toAnimalCell(it should autocomplete for you), as shown in Figure 5-5.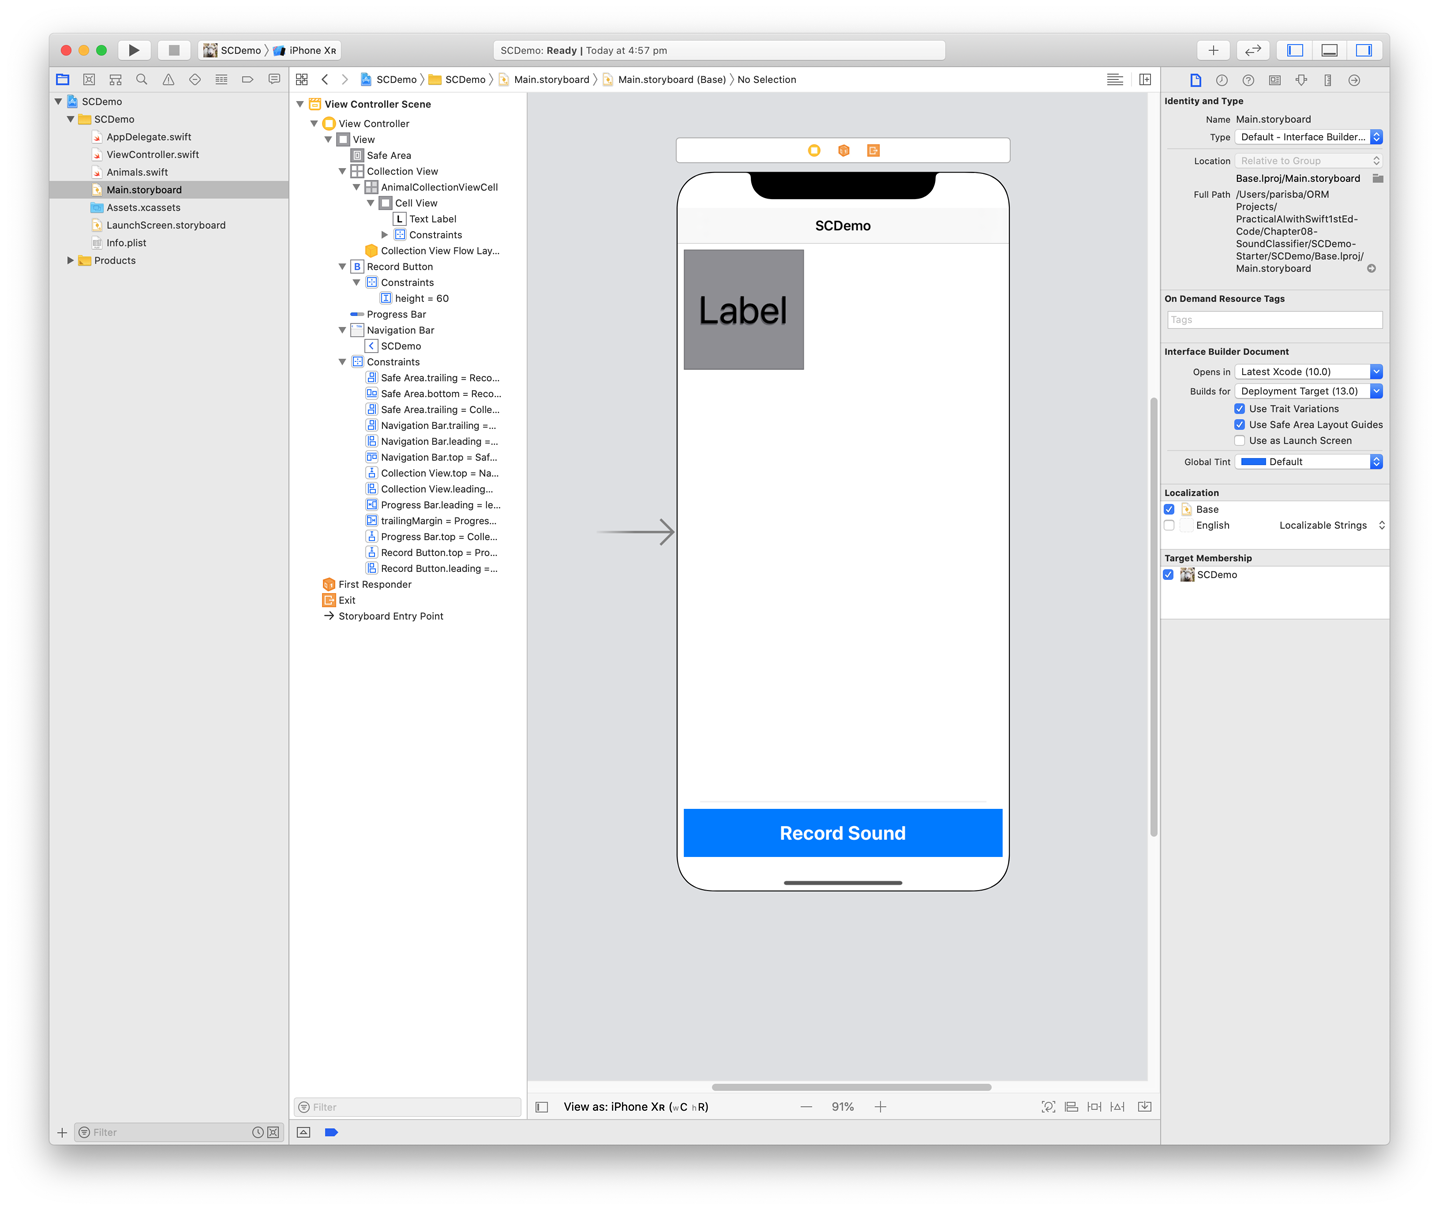
Figure 5-4. Our storyboard for the sound classification app
-
Within the cell’s view, in the storyboard, add a large
UILabeland center it appropriately using constraints. -
We need to add some outlets for the
AnimalCell. Add the following outlets within theAnimalCellclass definition in ViewController.swift, connecting them to the “Cell View” (aUIView, which came premade in the cell) and theUILabelyou created, respectively:@IBOutletweakvarcellView:UIView!@IBOutletweakvartextLabel:UILabel!
Figure 5-5. Changing the class of the
UICollectionViewCell -
Select the
UIButtonyou created when we first started working with this Storyboard and change its class toThreeStateButtonin its identity inspector (just as we did for theUICollectionViewCell/AnimalCell). -
Connect some outlets to the
ViewControllerclass itself:@IBOutletweakvarcollectionView:UICollectionView!@IBOutletweakvarprogressBar:UIProgressView!@IBOutletweakvarrecordButton:ThreeStateButton!These outlets are for the
UICollectionViewitself, theUIProgressView, and theUIButtonfor which we just changed the class toThreeStateButton. -
Add an action, connected to the
ThreeStateButton:@IBActionfuncrecordButtonPressed(_sender:Any){// start audio recordingrecordAudio()} -
Add the following attributes to the
ViewControllerclass:privatevarrecordingLength:Double=5.0privatevarclassification:Animal?privatelazyvaraudioRecorder:AVAudioRecorder?={returninitialiseAudioRecorder()}()privatelazyvarrecordedAudioFilename:URL={letdirectory=FileManager.default.urls(for:.documentDirectory,in:.userDomainMask)[0]returndirectory.appendingPathComponent("recording.m4a")}()These attributes define a recording length, a variable in which to store the ultimate classification of a sound, an
AVAudioRecorder, and a filename for the file in which we’ll store the recording. -
Update the
viewDidLoad()function to look like the following:overridefuncviewDidLoad(){super.viewDidLoad()collectionView.dataSource=self} -
Add a function to start the audio recording, using the attribute we created earlier to access
AVAudioRecorder:privatefuncrecordAudio(){guardletaudioRecorder=audioRecorderelse{return}classification=nilcollectionView.reloadData()recordButton.changeState(to:.inProgress(title:"Recording...",color:.systemRed))progressBar.isHidden=falseaudioRecorder.record(forDuration:TimeInterval(recordingLength))UIView.animate(withDuration:recordingLength){self.progressBar.setProgress(Float(self.recordingLength),animated:true)}} -
You’ll also need a function to finish recording, taking a
Boolas a parameter to indicate whether the recording was successful, just in case it wasn’t (it defaults totrue):privatefuncfinishRecording(success:Bool=true){progressBar.isHidden=trueprogressBar.progress=0ifsuccess,letaudioFile=try?AVAudioFile(forReading:recordedAudioFilename){recordButton.changeState(to:.disabled(title:"Record Sound",color:.systemGray))classifySound(file:audioFile)}else{summonAlertView()classify(nil)}} -
Add a method to update the
UICollectionViewto show which animal we think the sound is. This function takes anAnimalas input:privatefuncclassify(_animal:Animal?){classification=animalrecordButton.changeState(to:.enabled(title:"Record Sound",color:.systemBlue))collectionView.reloadData()} -
In the
ViewControllerclass (but not in the ViewController.swift file), add a function to anAVAudioFile(the result of our recording) and do something with it (it will do a lot more after we add the AI features):privatefuncclassifySound(file:AVAudioFile){classify(Animal.allCases.randomElement()!)}
We’re done with the ViewController class for the moment. Now, we need to add an extension or three to the class:
-
Below the end of the
ViewControllerclass, but still within the ViewController.swift file, add the following extension, which will allow us to present an alert view (a pop up) in case of a problem:extensionViewController{privatefuncsummonAlertView(message:String?=nil){letalertController=UIAlertController(title:"Error",message:message??"Action could not be completed.",preferredStyle:.alert)alertController.addAction(UIAlertAction(title:"OK",style:.default))present(alertController,animated:true)}} -
Below that, add another extension, allowing us to conform to the
AVAudioRecorderDelegatein order to work with theAVAudioRecorder:extensionViewController:AVAudioRecorderDelegate{funcaudioRecorderDidFinishRecording(_recorder:AVAudioRecorder,successfullyflag:Bool){finishRecording(success:flag)}privatefuncinitialiseAudioRecorder()->AVAudioRecorder?{letsettings=[AVFormatIDKey:Int(kAudioFormatMPEG4AAC),AVSampleRateKey:12000,AVNumberOfChannelsKey:1,AVEncoderAudioQualityKey:AVAudioQuality.high.rawValue]letrecorder=try?AVAudioRecorder(url:recordedAudioFilename,settings:settings)recorder?.delegate=selfreturnrecorder}} -
Again, below that, add one final extension to allow us to conform to the
UICollectionViewDataSource, which provides the ability to populate aUICollectionView(we’re going to fill it withAnimalCells):extensionViewController:UICollectionViewDataSource{funccollectionView(_collectionView:UICollectionView,numberOfItemsInSectionsection:Int)->Int{returnAnimal.allCases.count}funccollectionView(_collectionView:UICollectionView,cellForItemAtindexPath:IndexPath)->UICollectionViewCell{guardletcell=collectionView.dequeueReusableCell(withReuseIdentifier:AnimalCell.identifier,for:indexPath)as?AnimalCellelse{returnUICollectionViewCell()}letanimal=Animal.allCases[indexPath.item]cell.textLabel.text=animal.iconcell.backgroundColor=(animal==self.classification)?animal.color:.systemGrayreturncell}} -
Add a launch screen and an icon, if you’d like to (as with the previous practical tasks, we’ve provided some in the downloadable resources), and launch the app in the simulator. You should see something that looks like the figure from earlier, Figure 5-3.
This app actually does record audio, but it doesn’t do anything with it. There’s no way to play it back, and it’s obviously not yet connected to any form of machine-learning model. Back in the classifySound() function that we wrote, we just randomly pick one of the animals each time.
AI Toolkit and Dataset
As usual with our practical AI tasks, we need to assemble a toolkit with which to tackle the problem. The primary tools that we use in this case are Python to prepare the data for training, the CreateML application for training, and CoreML to read the model in our app.
To make a model that will power our app’s ability to classify animal sounds, we’ll need a dataset full of animal sounds. As is often the case (you might have noticed a pattern) with machine learning and AI datasets, the boffins have us covered.
The Dataset for Environmental Sound Classification (ESC) is a collection of short environmental recordings of a variety of sounds spanning five major categories, as shown in Figure 5-6.
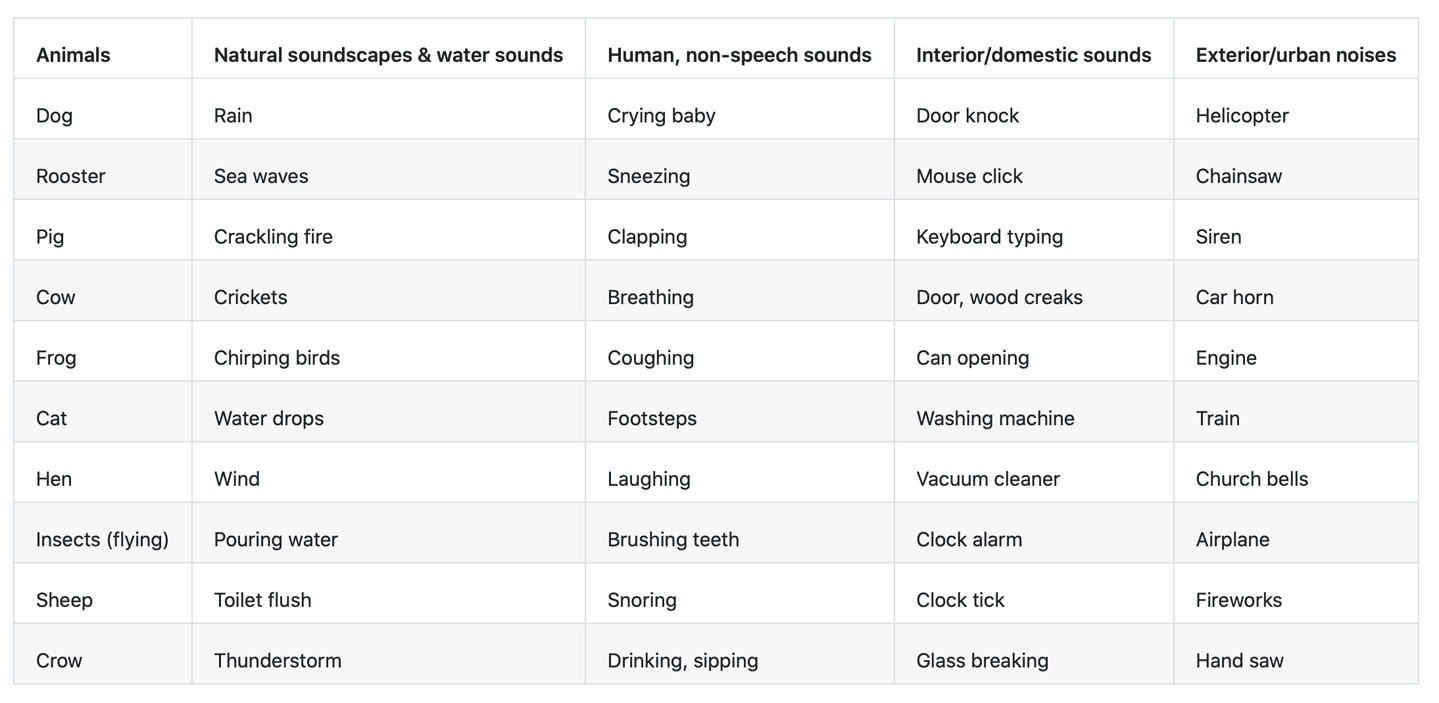
Figure 5-6. The major categories of the ESC
Head over to the ESC-50 GitHub repository and download a copy of the dataset. Save it somewhere safe.
Tip
You could do everything that our Python script does manually by yourself, but it would probably take longer than doing it with a script. It’s always good practice to make things repeatable when you’re working on machine-learning problems.
Fire up a new Python environment, following the instructions in “Python”, and then do the following:
-
Create the following Python script (ours is called preparation.py) using your favorite text editor (we like Visual Studio Code and BBEdit, but anything works):
importosimportshutilimportpandasaspd# Make output directorytry:os.makedirs(output_directory)exceptOSError:ifnotos.path.isdir(output_directory):raise# Make class directories within itforclass_nameinclasses_to_include:class_directory=output_directory+class_name+'/'try:os.makedirs(class_directory)exceptOSError:ifnotos.path.isdir(class_directory):raise# Go through CSV to sort audio into class directoriesclasses_file=pd.read_csv(input_classes_filename,encoding='utf-8',header='infer')# format: filename, fold, target, category, esc10, src_file, takeforlineinclasses_file.itertuples(index=False):ifinclude_unlicensedorline[4]==True:file_class=line[3]iffile_classinclasses_to_include:file_name=line[0]file_src=sounds_directory+file_namefile_dst=output_directory+file_class+'/'+file_nametry:shutil.copy2(file_src,file_dst)exceptIOError:raiseThis script
imports Pandas (as shown in Figure 2-18), makes an output folder that contains subfolders for each class, and then parses the comma-separated values (CSV) file and writes out files in a new format.Note
We use the Pandas framework here to access its CSV-reading capabilities. Very useful stuff.
-
To point the script to the appropriate classes and input files, at the top of your Python script, add the following configuration variables, after the
importstatements but before the actual script starts:# Configure as requiredinput_classes_filename='/Users/mars/Desktop/ESC-50-master/meta/esc50.csv'sounds_directory='/Users/mars/Desktop/ESC-50-master/audio/'output_directory='/Users/mars/Desktop/ESC-50-master/classes/'classes_to_include=['dog','rooster','pig','cow','frog','cat','hen','insects','sheep','crow']# whether to use whole ESC-50 dataset or lesser-restricted ESC-10 subsetinclude_unlicensed=False
Update each of the paths to point to the proper place on your system: input_classes_filename should point to the esc50.csv file that came with your copy of the dataset; sounds_directory to the /audio/ folder; and output_directory to wherever you want the script to place the subset of files it will need for training (we made a folder called /classes/ in the dataset download).
The classes_to_include list includes all of the animals for which we’re going to be allowing our app to classify the sound (which is not all of the animal sounds present in the dataset).
Run the preparation Python script by executing it on the command line (python preparation.py). Your data should now be prepared, and you should have it in a folder structure that looks like Figure 5-7.
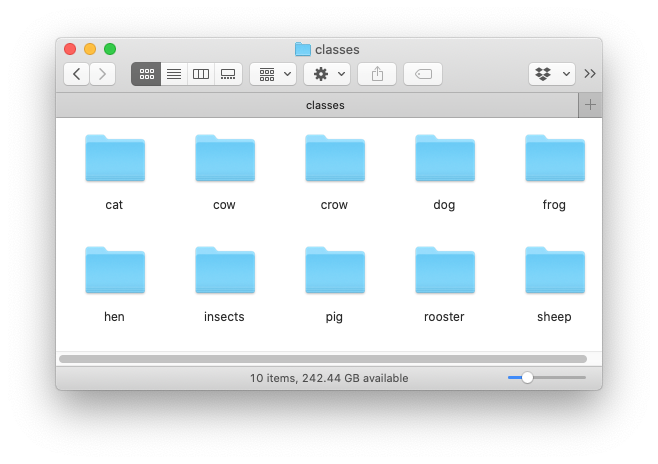
Figure 5-7. The prepared data for training our sound classifier
Creating a Model
With our animal sound dataset ready to go, let’s turn to Apple’s CreateML application, just as we did in Chapter 4, to build a sound classification model.
Tip
To learn more about the various incarnations of CreateML, check back to “CreateML”.
Let’s build our animal sound classifier model:
-
Fire up CreateML and create a new Sound Classifier project by selecting the appropriate template, as shown in Figure 5-8.
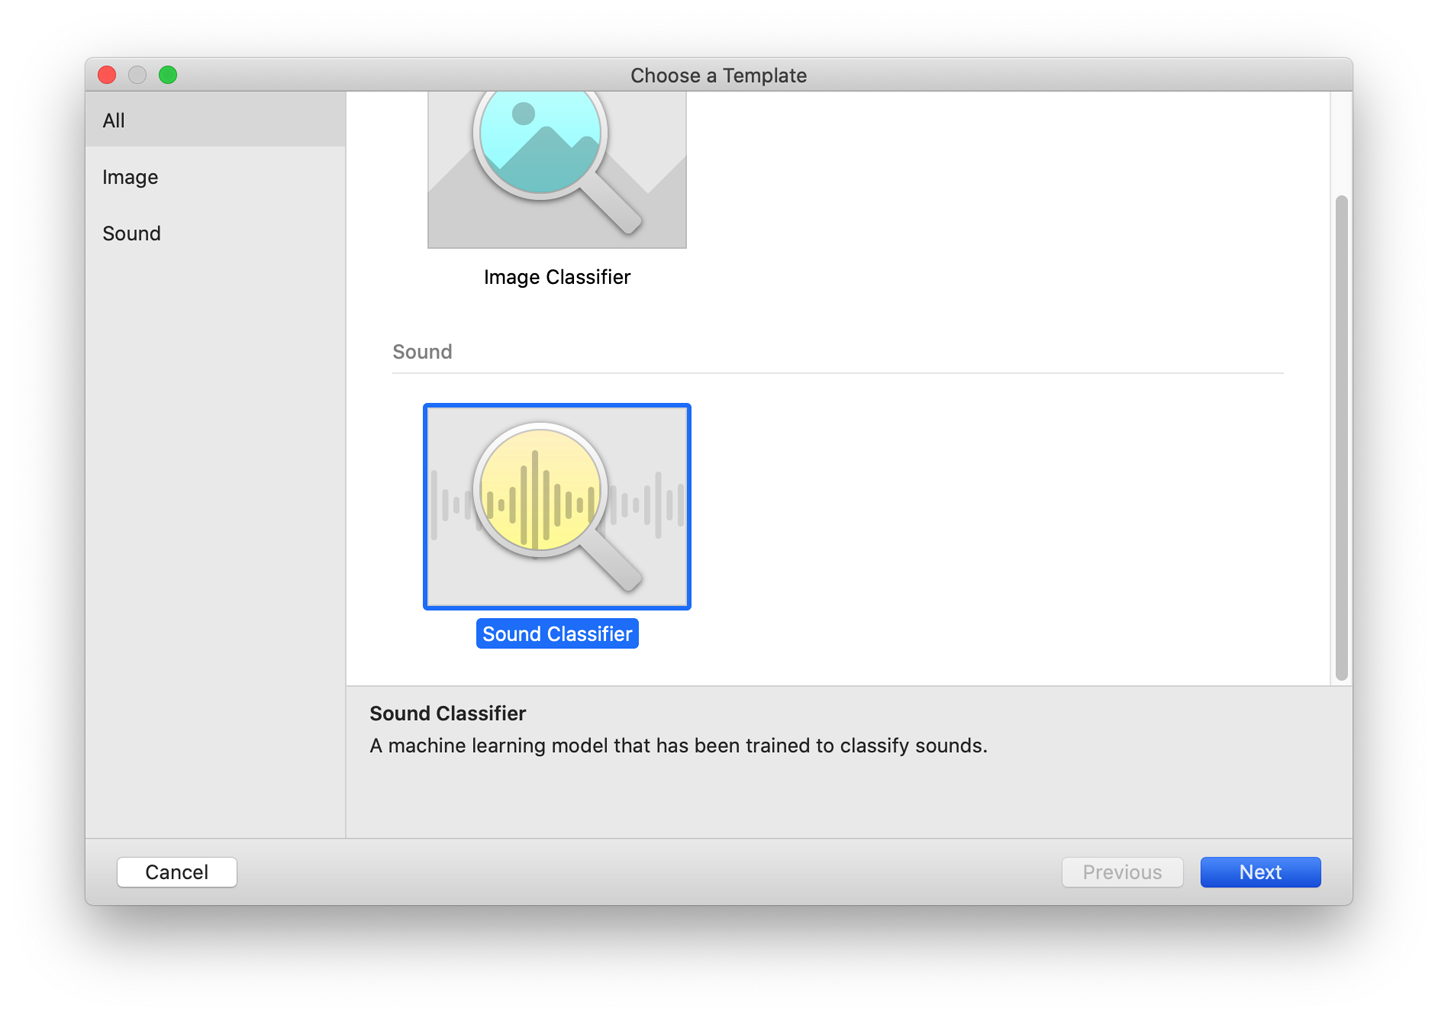
Figure 5-8. The sound classifier in the CreateML template picker
-
After giving your project some details, you’ll see a new empty Sound Classifier project, as shown in Figure 5-9.
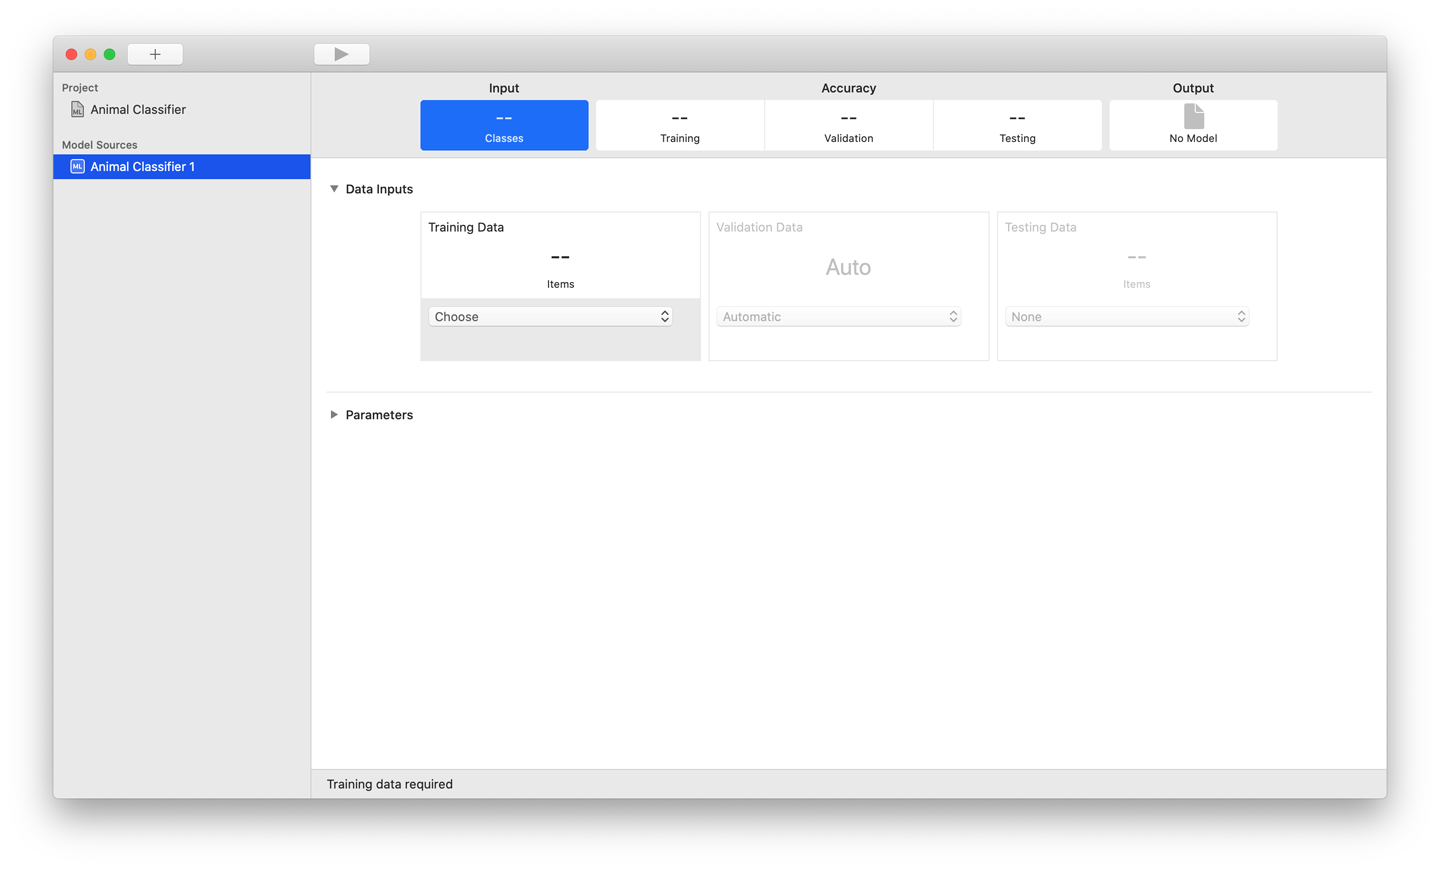
Figure 5-9. Your CreateML project is ready to take some sound
-
In the Training Data section, click the drop-down box and browse to the folder where you put the prepared data earlier (it should have 10 different animal-themed folders in it). Select this folder and then, in the top bar of the CreateML app, click the Play button (the right-facing triangle.)
Tip
Training the sound classifier won’t take as long as the image classifier back in “Task: Image Classification” did. But it might take a few minutes. (Watch five minutes of an episode of Person of Interest.)
When the training is done, you’ll see something resembling Figure 5-10. You’ll be able to drag the model file out from the Output box in the upper-right corner of the window. Drag this file somewhere safe.
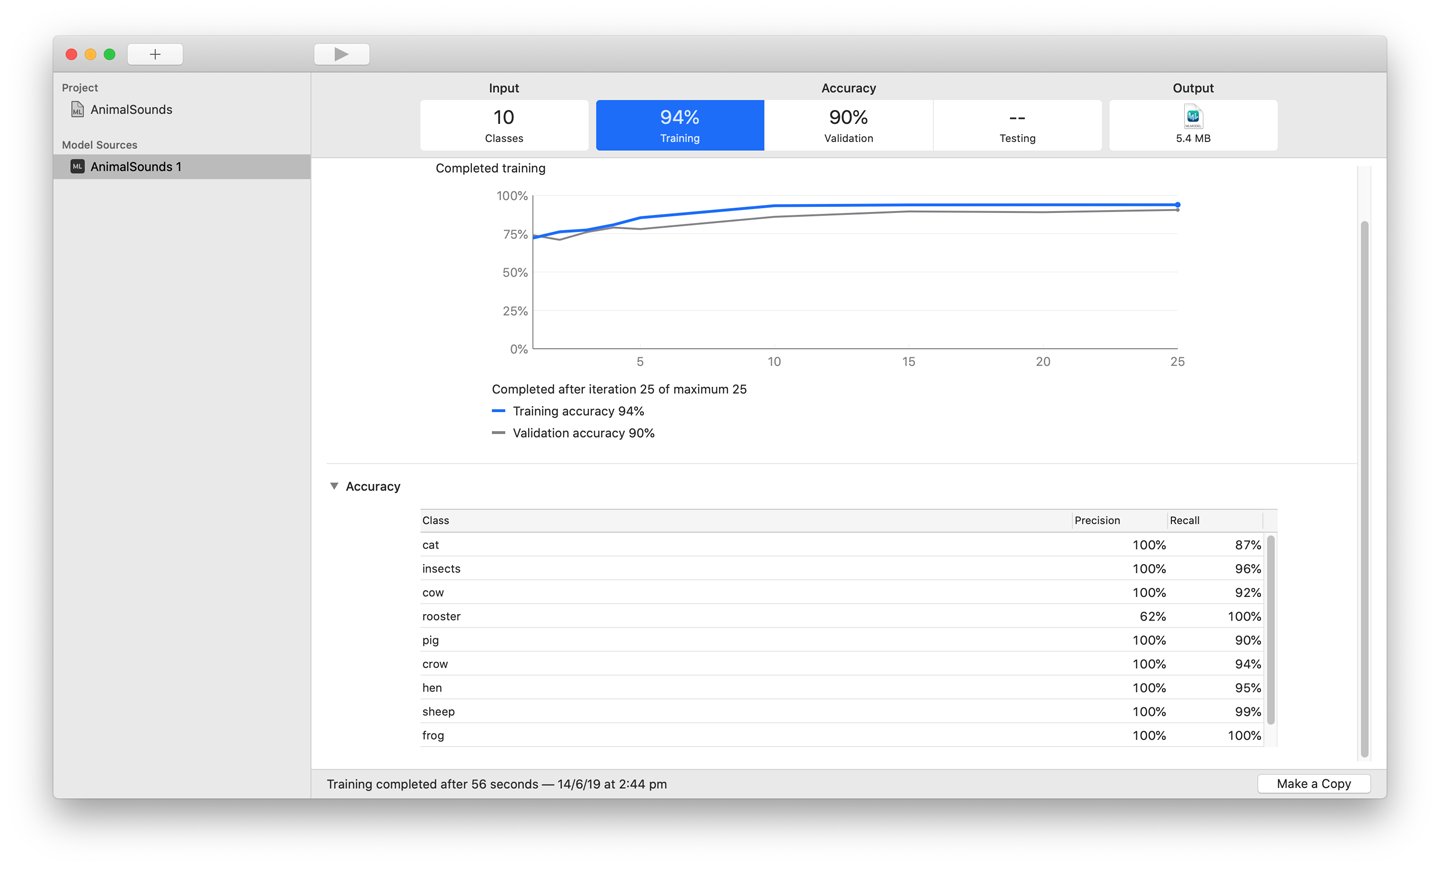
Figure 5-10. The CreateML application after a successful sound classifier training run
With our CoreML model trained by CreateML, we’re ready to put it to work in our app.
Note
You could have also trained the sound classification model using the CreateML framework and the MLSoundClassifier structure. You can learn more about it in Apple’s documentation.
Incorporating the Model in the App
At this point, if you’ve been following along, you have a starter iOS app written in Swift, and a trained sound classifier model built using the CreateML application all ready to go. Let’s combine them and make the iOS app capable of sound classification.
Tip
If you didn’t build the starting point yourself (following the instructions in “Building the App”), you can download the code from our website and find the project named SCDemo-Starter. We’ll be progressing from that point in this section.
You’ll also find a trained sound classifier model in the same folder as the demo project folder, as shown in Figure 5-11.
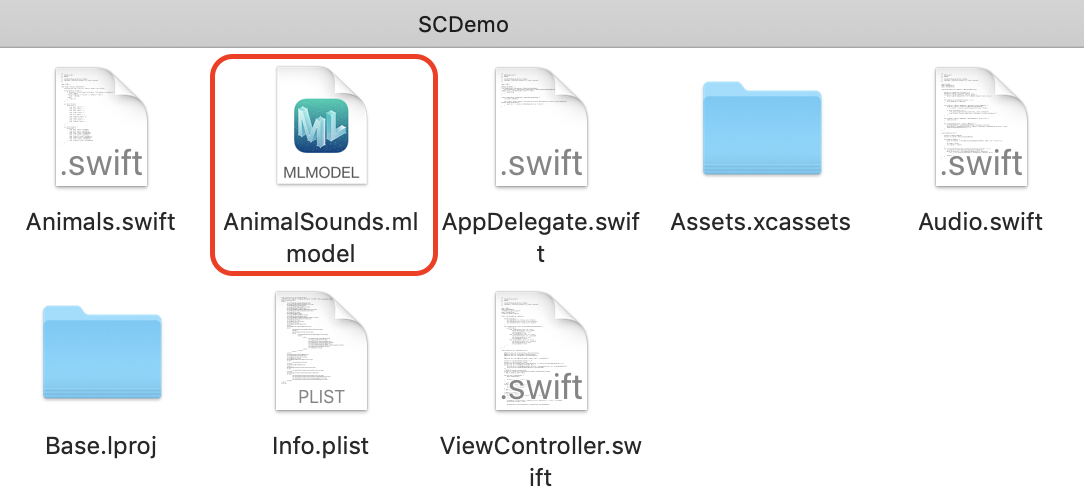
Figure 5-11. Trained sound classifier model
Tip
If you don’t want to follow along and manually work with the iOS app’s code to add the AI features via the sound classification model that we trained, you can also download the project named SCDemo-Complete. If you choose to download the SCDemo-Complete project instead of stepping through this section, we still urge you to read this section and look at the relevant bits of the SCDemo-Complete project.
As usual, we’re going to need to change quite a few things to get the app working with our sound classification model:
-
Drag the .mlmodel file you created earlier into the project’s root, allowing Xcode to copy as needed.
-
Add the
SoundAnalysisframework to the imports in ViewController.swift:importSoundAnalysisSoundAnalysisis a framework provided by Apple that lets you analyze audio and classify it.SoundAnalysisworks with a model trained using CreateML’sMLSoundClassifier(which is what you end up with whether you used the CreateML app, like we did, or the CreateML framework).
-
Add an attribute for the
classifier, pointing to our model file:privateletclassifier=AudioClassifier(model:AnimalSounds().model)Make sure to change the name from
AnimalSounds().modelto that of your model if your model is named something else (for example, if your model is named MyAnimalClassifier.mlmodel, set this toMyAnimalClassifier().model). -
Add a new function,
refresh(), after theviewDidLoad()function:privatefuncrefresh(clear:Bool=false){ifclear{classification=nil}collectionView.reloadData()}This function is so that we can ask the
UICollectionViewto refresh as needed. -
Change the
recordAudio()function to be as follows:privatefuncrecordAudio(){guardletaudioRecorder=audioRecorderelse{return}refresh(clear:true)recordButton.changeState(to:.inProgress(title:"Recording...",color:.systemRed))progressBar.isHidden=falseaudioRecorder.record(forDuration:TimeInterval(recordingLength))UIView.animate(withDuration:recordingLength){self.progressBar.setProgress(Float(self.recordingLength),animated:true)}}This sets it up so that instead of performing the refresh itself, the function calls our new
refresh()function (which we created a moment ago).
-
Update the
finishRecording()function to be as follows:privatefuncfinishRecording(success:Bool=true){progressBar.isHidden=trueprogressBar.progress=0ifsuccess{recordButton.changeState(to:.disabled(title:"Record Sound",color:.systemGray))classifySound(file:recordedAudioFilename)}else{classify(nil)}}This function is called when recording is finished. If the
successBoolis true, it disables the record button and callsclassifySound(), passing therecordedAudioFilename. -
Replace the call to
collectionView.reloadData()in theclassify()function with the following:refresh()ifclassification==nil{summonAlertView()} -
Update the
classifySound()function, as follows:privatefuncclassifySound(file:URL){classifier?.classify(audioFile:file){resultinself.classify(Animal(rawValue:result??""))}}
This removes the random animal that we used as a placeholder in the starter app, and actually uses our model to perform a classification. You can now launch the app. You should see something that looks exactly like it always did, as shown in Figure 5-12.
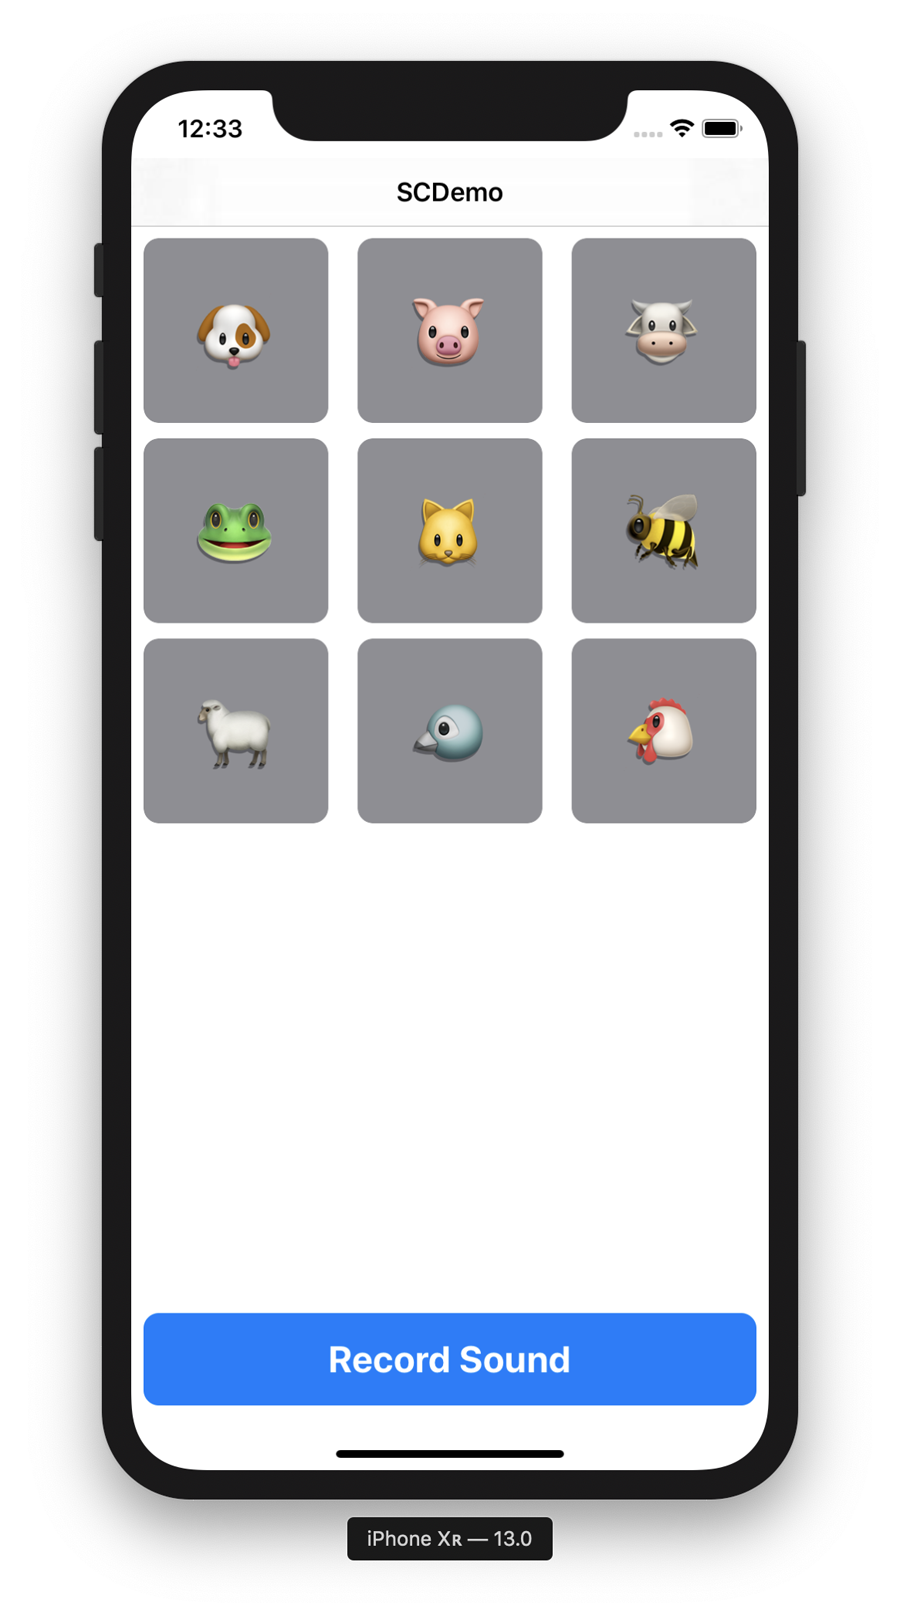
Figure 5-12. The sound classifier
You can now tap the Record Sound, record some noises, and the app should light up the animal relating to the sound that it thinks it heard. Amazing!
Note
You’ll need to add the NSMicrophoneUsageDescription key to your Info.plist file, as we did for the “Task: Speech Recognition”, as shown in Figure 5-13.
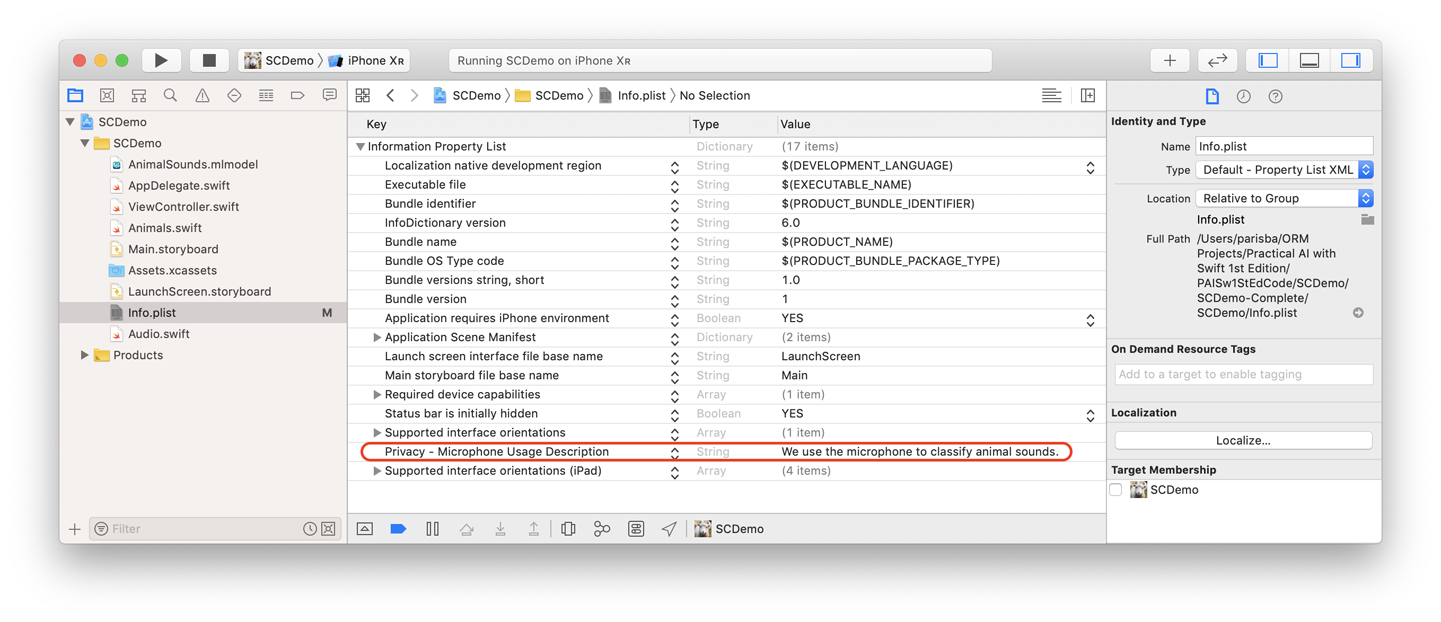
Figure 5-13. Our Info.plist
Improving the App
At this point, we have an iOS application, written in Swift and using UIKit and integrated with a CoreML model generated using CreateML, that can, with a reasonable degree of reliability, record some audio and then perform a classification on it, using the Sound Analysis framework, and tell us which of nine possible animals the sound in the audio recording might belong to. What’s the next step?
In this section, we improve the sound classification app, making it capable of performing real-time sound classification instead of having to record an audio file and then classify it.
You’ll need to have completed all the steps presented prior to this section to follow from here.
Tip
If you don’t want to do that or you need a clean starting point, you can download the resources for this book from our website and find the project SCDemo-Complete. We’ll be building on the app from there. If you don’t want to follow the instructions in this section, you can also find the project SCDemo-Improved, which is the end result of this section. If you go down that route, we strongly recommend reading the code as we discuss it in this section and comparing it with the code in SCDemo-Improved.
There are a lot of code changes required here, so take your time. To begin, create a new Swift file, named Audio.swift, in the project:
-
Add the following
imports:importCoreMLimportAVFoundationimportSoundAnalysis -
Add the following class to it:
classResultsObserver:NSObject,SNResultsObserving{privatevarcompletion:(String?)->()init(completion:@escaping(String?)->()){self.completion=completion}funcrequest(_request:SNRequest,didProduceresult:SNResult){guardletresults=resultas?SNClassificationResult,letresult=results.classifications.firstelse{return}letlabel=result.confidence>0.7?result.identifier:nilDispatchQueue.main.async{self.completion(label)}}funcrequest(_request:SNRequest,didFailWithErrorerror:Error){completion(nil)}}This class implements the
SNResultsObservingprotocol, which is part of theSoundAnalysisframework that we imported. It allows us to create an interface with which to receive the results of a sound analysis request. -
Create a class to represent the process of classifying audio. Let’s call it
AudioClassifier(we’re incredibly creative). Add the following class to the Audio.swift file:classAudioClassifier{} -
Add the following attributes:
privateletmodel:MLModelprivateletrequest:SNClassifySoundRequestprivateletaudioEngine=AVAudioEngine()privateletanalysisQueue=DispatchQueue(label:"com.apple.AnalysisQueue")privateletinputFormat:AVAudioFormatprivateletanalyzer:SNAudioStreamAnalyzerprivateletinputBus:AVAudioNodeBusprivatevarobserver:ResultsObserver?Each of these attributes should be fairly self-explanatory. If you’d like to know more, you can check Apple’s documentation.
-
Add an initializer:
init?(model:MLModel,inputBus:AVAudioNodeBus=0){guardletrequest=try?SNClassifySoundRequest(mlModel:model)else{returnnil}self.model=modelself.request=requestself.inputBus=inputBusself.inputFormat=audioEngine.inputNode.inputFormat(forBus:inputBus)self.analyzer=SNAudioStreamAnalyzer(format:inputFormat)}The initializer should also be fairly self-explanatory: it sets the various attributes appropriately.
-
Add a function to begin the analysis to perform a classification:
funcbeginAnalysis(completion:@escaping(String?)->()){guardlet_=try?audioEngine.start()else{return}print("Begin recording...")letobserver=ResultsObserver(completion:completion)guardlet_=try?analyzer.add(request,withObserver:observer)else{return}self.observer=observeraudioEngine.inputNode.installTap(onBus:inputBus,bufferSize:8192,format:inputFormat){buffer,timeinself.analysisQueue.async{self.analyzer.analyze(buffer,atAudioFramePosition:time.sampleTime)}}}This code starts the analysis. It first attempts to fire up the audio system and then, effectively, just waits for results.
-
Add a function to stop the analysis:
funcstopAnalysis(){print("End recording...")analyzer.completeAnalysis()analyzer.remove(request)audioEngine.inputNode.removeTap(onBus:inputBus)audioEngine.stop()}
That’s it for the Audio.swift file. Make sure that you save it and then open ViewController.swift:
-
Replace the entire set of attributes in the
ViewControllerclass, as follows:@IBOutletweakvarcollectionView:UICollectionView!@IBOutletweakvarprogressBar:UIProgressView!@IBOutletweakvarrecordButton:ThreeStateButton!@IBActionfuncrecordButtonPressed(_sender:Any){toggleRecording()}privatevarrecording:Bool=falseprivatevarclassification:Animal?privateletclassifier=AudioClassifier(model:AnimalSounds().model)Because we’re doing some of the work in our new
AudioClassifierclass (which we just created in Audio.swift), we no longer need quite so much code here. Make sure theIBOutletandIBActionattributes are still connected or reconnected to the correct place in the storyboard (which should remain unmodified). -
Comment out the
recordAudio()function and add a new function,toggleRecording(), as follows:privatefunctoggleRecording(){recording=!recordingifrecording{refresh(clear:true)recordButton.changeState(to:.inProgress(title:"Stop",color:.systemRed))classifier?.beginAnalysis{resultinself.classify(Animal(rawValue:result??""))}}else{refresh()recordButton.changeState(to:.enabled(title:"Record Sound",color:.systemBlue))classifier?.stopAnalysis()}} -
Comment out the entire
classifySound()function, and then update theclassify()function to look as follows:privatefuncclassify(_animal:Animal?){classification=animalrefresh()} -
You can also comment out the entire extension of
ViewControllerthat conforms toAVAudioRecorderDelegate(we’ve moved out the audio functionality and changed how it works). -
For a cleaner UI, update the
.inProgresscase of theswitchstatement in thechangeState()function of theThreeStateButtonclass, as follows:case.inProgress(lettitle,letcolor):self.setTitle(title,for:.normal)self.backgroundColor=colorself.isEnabled=true -
Launch the improved app in the simulator. You should be able to tap the button and the app will perform live classification on the sounds it hears, lighting up the associated animal emoji.
Figure 5-14 shows our finished sound classifier.
Next Steps
That’s all for the audio chapter. We’ve covered some common audio-related practical AI tasks that you might want to accomplish with Swift, and we used a variety of tools to do so. We built two apps, exploring two practical AI tasks related to audio:
- Speech Recognition
-
Using Apple’s new SwiftUI for the interface and Apple’s provided speech recognition framework, we built an app that can turn human speech into text. We didn’t need to train our own model.
- Sound Classification
-
We used Apple’s UIKit framework for the interface, some Python scripting to prepare the data (a whole bunch of animal sounds), and Apple’s CreateML application to train the model. We also used CoreML in the app, to work with our trained model.
Later, in Chapter 11, we’ll look at what happened under the hood, algorithm-wise, for each of the tasks we explored in this chapter (“Audio”). In the next chapter we look at text and language.
For more audio-related practical AI tasks, check out our website.