Chapter 5. Mastering Laboratory Skills
Measurement Resolution and Significant Figures
Measurements are a key part of chemistry, so it’s important to understand them and their limitations. Some measurements, called counts, are exact. For example, if you have a bag of apples, you can count the apples and state definitively that the bag contains exactly eight apples. But most measurements are inexact. For example, although the label on a bag of rice may state that it contains two kilograms of rice, this is only an approximation of its mass. Depending on the resolution of the scale used to weigh the rice (and on truth-in-labeling laws), a particular bag may contain as little as 1.999 kg, 1.99 kg, or even 1.9 kg of rice, or it may contain as much 2.001 kg, 2.01 kg, or even 2.1 kg of rice. That variability (or uncertainty) is common to most measurements made in a chemistry lab.
The degree of uncertainty depends on the resolution of the measuring instrument and the degree of skill used to make the measurement. For example, if you use a ruler graduated in centimeters (cm) to measure the length of a piece of wire, you might find that the wire is between 2 cm and 3 cm long. Because the ruler is graduated in centimeters, the most you can say with certainty is that the wire is longer than 2 cm and shorter than 3 cm, because these are the two known values between which the length of the wire falls.
However, you can estimate (interpolate) the length of the wire to some value between the known values. For example, if the end of the wire extends almost but not quite halfway from the 2 cm marking to the 3 cm marking, you might estimate the length of the wire as 2.4 cm. That value has two significant figures (usually spoken as sig figs), which comprise the one known value and the interpolated value you added. For example, Figure 5-10 (later in this chapter) shows a burette that is graduated to (has resolution of) 0.1 mL, but allows values to be interpolated to about 0.01 mL.
If you use a ruler with millimeter (mm) graduations, you can obtain a better value for the length of the wire. For example, if the wire extends past the 23 mm line but does not reach the 24 mm line, you can state with certainty that the length of the wire is between 23 mm and 24 mm. By interpolation, you may estimate that the actual length of the wire is 23.8 mm. That value has three sig figs, two known and one interpolated. By using a better instrument, you have increased the accuracy of your measurement by a factor of ten.
If you use a caliper with 0.1 mm graduations, you can obtain an even better value for the length of the wire. For example, you may find that the length of the wire falls between 23.7 mm and 23.8 mm. Once again, you may add another significant figure by interpolation and estimate the length of the wire as 23.74 mm, a value with four sig figs. But, although you now know the length of the wire with much greater accuracy than before, you still don’t know the exact length of the wire. You can continue using better and better measuring instruments, but even the best possible instrument can still provide only an approximation of the wire’s length. Some approximations are better than others, obviously, and one common way to quantify the quality of an approximation is to specify the number of significant figures.
Any calculation that uses measured data must take the uncertainly of the measuring instruments, as quantified by significant figures, into account. When you’re making a calculation using measurements from more than one instrument, the least accurate instrument determines the level of certainty of the results. For example, you might want to determine a runner’s average speed over a 1 km course. To get accurate results, you might use a laser rangefinder accurate to 1 m to set the start and finish lines and a stopwatch accurate to 0.01 second to time the run. The accuracy of these measuring instruments is high, and the result will have a correspondingly high number of sig figs. Conversely, if you measure the length of the course with your car’s odometer, you know the distance only to within 0.1 kilometer (which can be interpolated to one further sig fig), so even using the most accurate stopwatch available cannot increase the accuracy of your result. Similarly, if you use a sundial to time the run, the high accuracy of the laser rangefinder is wasted because the elapsed time for the run is not known accurately.
That brings up another important point. Mathematical operations cannot increase the degree of accuracy. If you add, subtract, multiply, or divide values, the number of significant figures remains the same. For example, if you multiply the two values 4.03 and 1.16, the mathematical result is 4.6748, but that result ignores sig figs. Each of the two initial values is known to three sig figs, so the result can have no more than three sig figs and should therefore be recorded as 4.67. Similarly, if you multiply the values 4.0 and 1.17, the mathematical result is 4.68. But because one of the initial values had only two sig figs, you must round the result to two sig figs, or 4.7.
Handling Chemicals Properly
Aside from safety, the most important goal of proper chemical handling is to avoid contamination. To minimize the risk of contamination, use the following guidelines:
Always store chemicals away from your work area, ideally in cupboards or covered storage containers.
Never store chemicals in unlabeled bottles. In addition to being unsafe, the risk of contamination is high, because one chemical could easily be confused with another.
Have only one chemical bottle open at a time.
Measure and transfer chemicals in an area that is remote from any experimental procedures that are in progress. Otherwise, even a small accident might contaminate the entire bottle.
Always read the label, twice, before you open the bottle. Make certain that you’re actually using the chemical you think you’re using.
Before you open the bottle, wipe the exterior with a clean paper towel to remove any accumulated dust or other contamination.
If a chemical bottle becomes grossly contaminated—for example, by leakage from another chemical bottle—either rinse the bottle thoroughly to remove all traces of the contamination or discard the chemical and obtain a new supply.
Never return unused chemicals to their original containers. Doing so risks contaminating the entire bottle. Take only as much as you need from the original bottle, and safely discard any excess.
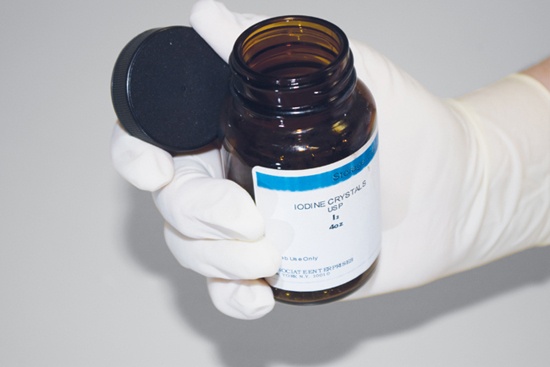
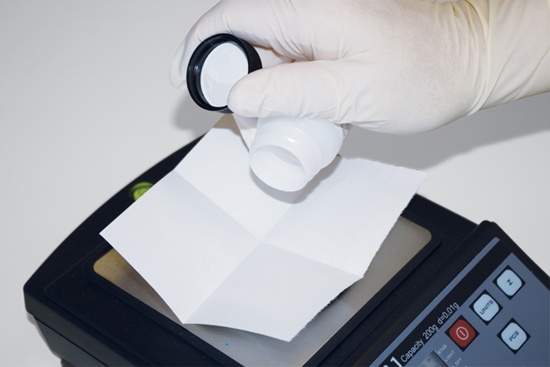
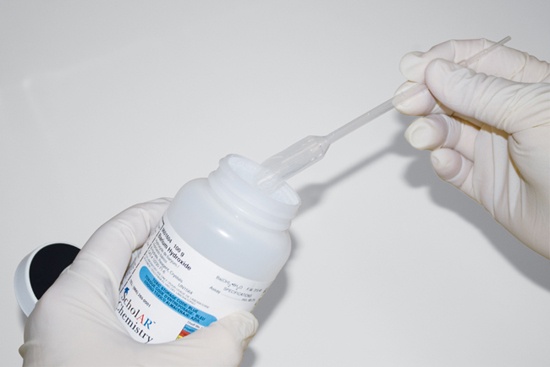
Never place the bottle cap on the counter, where it may become contaminated or switched with a cap from a different chemical (which is another good reason to have only one chemical bottle open at a time). Instead, hold the cap and chemical bottle in the same hand. Depending on the size of the bottle and cap, you may find it easier to hold the cap between your thumb and forefinger, as shown in Figure 5-1 and Figure 5-2, or between your little finger and ring finger, as shown in Figure 5-3. If the cap and bottle are too large to handle with one hand, either hold the cap in your other hand or, if absolutely necessary, place the cap flat with the inside surface up on a clean surface away from your immediate work area.
When possible, avoid touching a solid chemical in the storage bottle with a scoop, spatula, or similar tool. Many solid chemicals are free-flowing crystals or powders. Transfer such chemicals directly to the weighing paper by rotating and gently tapping the bottle to dispense only as much as you need, as shown in Figure 5-2. Avoid letting the mouth of the bottle come into contact with the weighing paper or any other object.
Note
Safety is always the primary consideration in proper chemical handling. For detailed information about storing and handling chemicals safely, see Chapter 4.
Some solid chemicals are not free-flowing or tend to form clumps. If you are using such a chemical, there is sometimes no alternative but to scoop it out of the bottle. In such cases, the best way to avoid contamination is to use a disposable scoop and discard it immediately after use. Disposable plastic spoons are excellent and inexpensive one-use scoops. You can also modify a disposable Beral pipette by cutting diagonally across the bulb portion to form a disposable scoop, as shown in Figure 5-3.
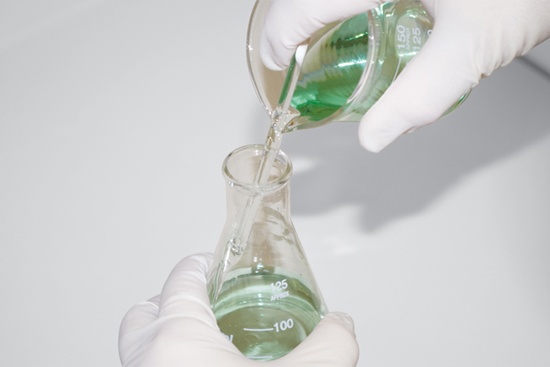
Liquid chemicals may be transferred by using a funnel or by pouring directly from one container to another. When you transfer a liquid directly, use a clean stirring rod to prevent splashing or dripping, as shown in Figure 5-4.
For concentrated acids and other hazardous liquid chemicals, safety trumps the risk of contamination. Rather than risk pouring such hazardous chemicals into a measuring container, uncap the bottle and use a clean (ideally new) pipette to draw out as much of the liquid as you need. Recap the bottle and transfer the liquid from the pipette directly to the measuring, mixing, or storage container or directly to the reaction vessel.
Always recap the bottle immediately and replace the bottle in its assigned storage location.
If a chemical does become contaminated, do not attempt to salvage it. Dispose of it properly and buy a new supply.
Using a Balance
An accurate balance is essential for doing good science in a home lab, but even the best balance must be used and maintained properly if it is to provide reliable results. Here are some guidelines for using and maintaining your balance:
Always read and follow the instructions supplied with your balance. Balances are delicate instruments that can be damaged easily if you use or maintain them improperly.
Make sure that the balance is level. Many balances read inaccurately if they are even slightly out of level.
Set up the balance on the “dry” side of your lab or workbench. Although you may sometimes use the balance to weigh liquids, it should be kept well away from the sink and other areas where large quantities of liquids are used and spills are likely.
Know the maximum capacity of your balance and do not exceed it. Most electronic and mechanical balances are relatively well protected against small overloads, but it’s easy to damage or destroy some balances by placing a gross overload on the balance pan.
Cover the balance when it is not in use. If no dust cover was supplied with the balance, purchase a dust cover separately or use a plastic bag or a cardboard box of the appropriate size.
Calibrate the balance periodically by using it to weigh a known mass. Many balances are supplied with calibration weights. If yours was not, purchase an inexpensive set of calibration weights that covers the range of the balance. Such sets are available from most laboratory equipment vendors.
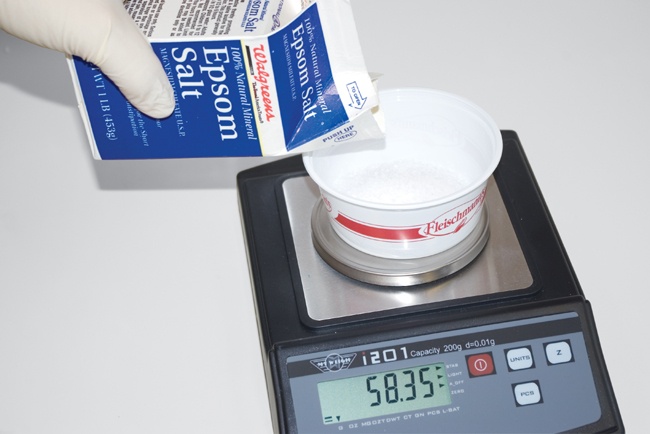
Never place the sample directly on the balance pan. Use a weighing paper for small samples or a weighing boat for larger or bulky samples. Although you can buy weighing papers, a 10 centimeter square of ordinary waxed paper works just as well. A plastic cup or similar container works well as a weighing boat, as shown in Figure 5-5.
If you have an electronic balance, learn to use the tare function (rhymes with air), which zeros out the display when the balance pan already has some mass on it. For example, placing a weighing boat on the balance pan may cause the balance to read 8.47 g. Pressing the tare button (sometimes labeled 0.00, zero, Z, or T) resets the display to read 0.00 g, which means that the subsequent reading reflects only the mass of the sample that you add to the weighing boat.
Measuring Liquids by Volume
Liquids are usually measured volumetrically, using glassware that is graduated to indicate the volume that it contains. In general, volumetric accuracy varies inversely with the capacity of the glassware. For example, a 100 mL graduated cylinder may be accurate to ± 1.0 mL, and a 10 mL graduated cylinder may be accurate to ± 0.1 mL. Similarly, volumetric glassware with a small bore is more accurate than glassware with a larger bore. For example, a beaker or flask may be accurate to ± 5%, a graduated cylinder to ± 1%, and a pipette to ± 0.1%. (Remember that these percentages refer to full capacity, so if you use a 10 mL graduated cylinder to measure 1.0 mL of liquid, for example, your measurement is accurate to 0.1 mL, or 10%, rather than the 1% full-scale accuracy.)
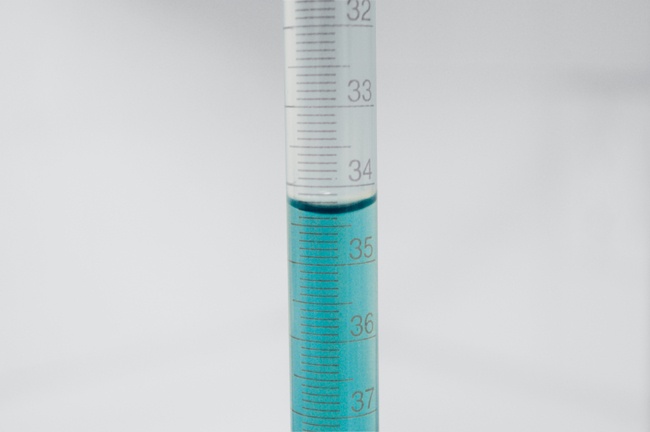
Unfortunately, the surface of a liquid in a glass container is not flat, because the glass attracts or repels the liquid. This attraction or repulsion causes the surface of the liquid to assume a curved shape called a meniscus. Water and aqueous solutions are attracted to glass and therefore exhibit a concave meniscus, with the center of the column of fluid lower than the edges. Figure 5-10 shows an example of a concave meniscus. (Mercury and a few other fluids are repelled by glass, and therefore form a convex meniscus, with the center of the column of fluid higher than the edges, but convex menisci are seldom seen in a home lab.)
For accurate volumetric measurements, you must take the meniscus into account. Take the measurement with the meniscus at eye level, recording the reading at the center (bottom) of the meniscus. One advantage of plasticware for volumetric measurements is that it neither attracts nor repels water or aqueous solutions, so there is no meniscus to complicate readings.
Using a Volumetric Flask
Using a volumetric flask allows you to make up fixed quantities of solutions with very high accuracy. For example, a 100 mL volumetric flask allows you to make up exactly (within stated error) 100 mL of a solution, and a 500 mL volumetric flask allows you to make up exactly 500 mL of a solution. To make up solutions with a volumetric flask, take the following steps:
Fill the flask half to three-quarters full with distilled or deionized water.
Carefully weigh or measure the solid or liquid solute and transfer it to the volumetric flask using a funnel. Make sure to do a quantitative transfer, which is a fancy way of saying you should ensure that all of the chemical is transferred to the flask. For example, tap the weighing paper against the funnel to make sure none of the chemical adheres to the weighing paper, and rinse the inside of the funnel two or three times with several mL of distilled water from a wash bottle.
Using distilled water from a wash bottle, fill the flask until the liquid level reaches the neck of the flask, within a few centimeters of the index line on the neck.
Stopper the flask and swirl or invert it until the chemical dissolves completely.
When the solute appears to be fully dissolved, invert the flask several times to ensure that the solution is reasonably homogeneous. Allow a moment or two for the solution adhering to the upper part of the flask to drain into the body of the flask.
Rinse the stopper, directing the rinse water into the flask to make sure that any chemical adhering to the stopper is not lost.
Carefully fill the flask until the bottom of the meniscus just touches the index line. Use an eyedropper or Beral pipette to add the last mL or so of liquid.
Stopper the flask and again invert it repeatedly until the solution is thoroughly mixed. Allow the solution to drain from the neck, and verify that the bottom of the meniscus is just touching the index line.
Transfer the solution to a labeled storage bottle or other container.
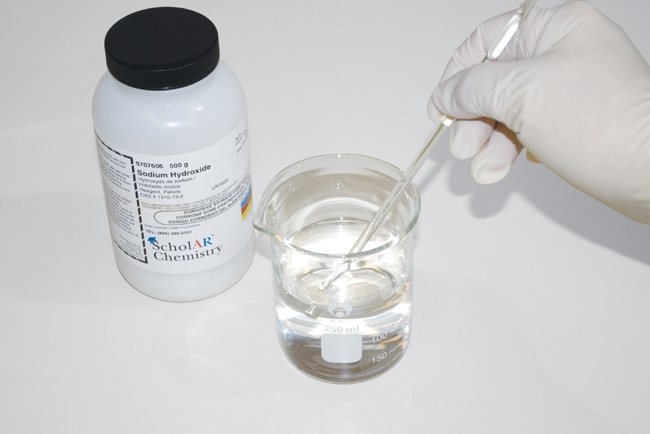
Dissolving some chemicals such as concentrated acids and strong bases is extremely exothermic (heat-producing), sometimes producing enough heat to cause a volumetric flask made of ordinary glass to crack. Although most volumetric flasks are made of Pyrex or similar glass, there’s no reason to risk your volumetric flask. For an accurate measurement, you need to allow the solution to cool to room temperature anyway, so you might as well make up the solution in a separate container, as shown in Figure 5-6, and do a quantitative transfer to the volumetric flask once the solution has cooled.
To do so, fill the volumetric flask with distilled water to about 75% of its capacity (depending on the solubility of the chemical) and transfer that water to a beaker. Dissolve the chemical in the beaker, allow the solution to cool to room temperature, and use a funnel to pour the solution into the volumetric flask. Rinse the beaker several times with a few mL of distilled water, and transfer the rinse water to the flask, rinsing the funnel as you do so. Add distilled water to the volumetric flask until the bottom of the meniscus matches the index line on the flask.
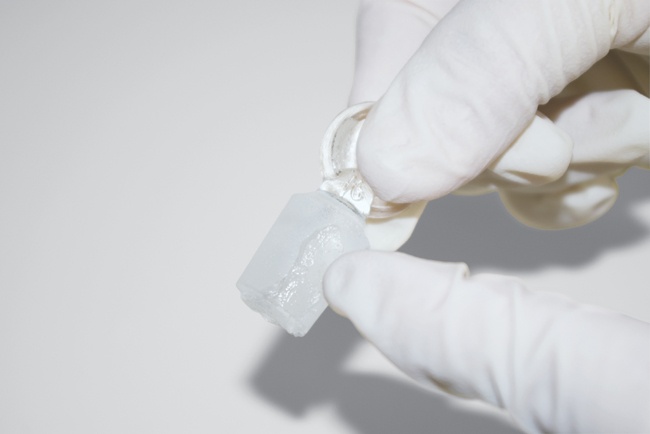
Inexpensive volumetric flasks (and some professional-grade models) come with a plastic snap-on cap. Most professional-grade volumetric flasks come with a ground-glass stopper. If your volumetric flask has a ground-glass stopper, be very careful using it. If you don’t lubricate the stopper properly, it may weld itself to the flask, rendering the flask useless. This is particularly likely to happen when you are making up concentrated solutions of sodium hydroxide, potassium hydroxide, or other strong bases that can etch glass, but it can happen with any solution. To avoid problems, always apply a small amount of silicone-based lubricant to the ground-glass part of the stopper and spread it evenly, as shown in Figure 5-7. Apply just enough lubricant to cause the ground glass to clear, and no more. When you finish using the volumetric flask, wash thoroughly and set it aside to dry. Store the stopper separately.
Using a Pipette
A Mohr pipette, which is also called a serological pipette or a graduated pipette, has graduations that you can use to measure and dispense small quantities of liquids accurately. For example, a 1 mL Mohr pipette has 0.01 mL graduations and can be interpolated to 0.001 mL, and a 10 mL Mohr pipette has 0.1 mL graduations and can be interpolated to 0.01 mL. Pipettes are indispensable for dealing accurately with small quantities of liquids.
To transfer an accurately measured quantity of fluid with a Mohr pipette, take the following steps:
Obtain a suitable amount of the liquid to be measured in a beaker. Pipetting directly from the reagent bottle risks contaminating the entire contents of the bottle.
Draw a small amount of the liquid into the pipette and use it to rinse the inside of the pipette thoroughly. Discard the rinse liquid in the appropriate container.
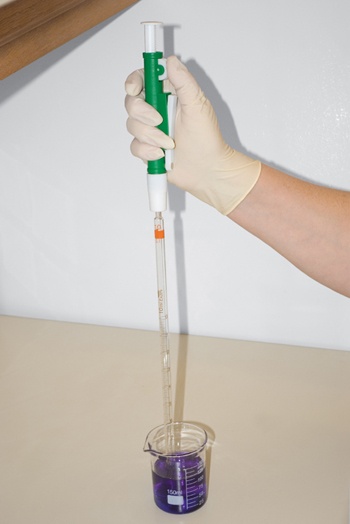
Use a pipette pump or pipette bulb, as shown in Figure 5-8, to draw liquid from the container until the meniscus is well above the zero index graduation on the pipette.
Remove the pipette pump or pipette bulb, and quickly place your index finger over the top end of the pipette.
Wipe the outside of the pipette with a paper towel or rinse it with distilled water into the sink or a waste container. Make sure that the partial drop suspended from the tip of the pipette is removed.
Reduce the pressure of your index finger enough to allow the liquid to drain slowly into the beaker or a waste container, watching the level closely until it falls to the 0.00 index mark. Make sure to read the meniscus at eye level.
By altering the pressure of your fingertip, transfer the desired volume of the liquid to the reaction vessel and discard the excess.
Cleaning a Pipette
The very small bore makes it difficult to clean a pipette thoroughly. Formal laboratories either use disposable one-use pipettes or have a pipette cleaner that repeatedly draws cleaning solution through pipettes to clean them. You can accomplish the same thing manually by using your pipette pump or pipette bulb. To clean a pipette, take the following steps:
The first rule is to clean a pipette immediately after you use it, or at least rinse it thoroughly. If you allow the pipette to dry, the solute may crystallize out inside the bore of the pipette, making it difficult or impossible to clean properly.
To begin, rinse the pipette inside and out with a thin stream of warm tap water.
Put a few drops of dishwashing liquid in a beaker and fill the beaker with warm tap water.
Use your pipette pump or pipette bulb to draw the sudsy water through the pipette repeatedly, making sure to clean the outside surface as well.
Rinse the pipette thoroughly with tap water, inside and out.
Fill a beaker with distilled water, and use your pipette pump or pipette bulb to draw the distilled water repeatedly through the pipette.
Use the pipette pump or pipette bulb to blow out as much of the final distilled water rinse as possible, and then set the pipette vertically in a rack to drain and dry.
Calibrating a Disposable Plastic Pipette
Disposable one-piece soft plastic pipettes, usually called Beral pipettes, have many uses around the lab. I buy them in bags of 100 or 500 at a time. At a few cents each, they’re cheap enough to treat as one-use items. But they’re also accurate enough to substitute for a Mohr pipette when you need to measure small quantities of liquids.
Although some Beral pipettes are roughly calibrated, typically to 0.5 mL, that’s insufficient for critical work. Fortunately, Beral pipettes are very consistent from one to another, and all of them deliver consistent and repeatable drop sizes. For example, if you know that a particular type of Beral pipette consistently delivers 40 drops per mL, you also know that one drop from that pipette is 0.025 mL. If you need, say, 0.50 mL of a solution, you can use that Beral pipette to transfer 20 drops.
Different models of disposable plastic pipettes are rated to deliver anything from 20 drops/mL to 50 drops/mL, but those values are nominal. Just as you can accurately calibrate a volumetric flask with a balance, you can do the same to calibrate Beral pipettes. To do so, place a small beaker or similar container on the balance pan and tare the balance to read 0.00 g. Fill the Beral pipette completely with distilled water, and then count the drops as you empty all but the last few drops from the Beral pipette into the beaker. (Make sure to deliver drops consistently. Hold the pipette vertically. Don’t squirt drops into the beaker, but allow each drop to form slowly and fall from gravity alone.)
For example, one Beral pipette that I tested was rated to deliver 23 drops/mL. I dispensed 75 drops of water and then set the pipette aside. The balance told me the mass of those 75 drops of distilled water was 3.26 g. At room temperature, the density of distilled water can be taken as 1.00 g/mL for the small quantity I used, so 3.26 g equals 3.26 mL. Dividing 75 drops by 3.26 mL gives about 23.01 drops/mL, which is certainly close enough.
I wasn’t so lucky with another pipette, which was rated to deliver 43 drops/mL but in fact delivered closer to 44 drops/mL, at least using my dropping technique. Still, once the actual delivery rate is known, the nominal delivery rate is immaterial. Because I’ve calibrated them, I can use those pipettes to deliver accurately known small amounts of liquid reliably.
The number of drops per mL depends on the viscosity of the liquid. For example, if you calibrate the number of drops per mL using distilled water, that number is not valid for a more viscous liquid such as olive oil or concentrated sulfuric acid, nor for a less viscous liquid such as acetone or methanol. Fortunately, the viscosity of the dilute aqueous solutions commonly used in labs does not significantly differ from the viscosity of pure water.
Using a Burette
A burette is used to transfer solutions while measuring the volume transferred with high accuracy. Although burettes are sometimes used to measure and transfer nominal fixed volumes (called aliquots) of a solution, for example, by transferring 5.0 mL of a solution to each of several beakers that are to be used in a subsequent procedure, that function is ordinarily better done using a volumetric or Mohr pipette.
By far the most common use of a burette is for titration, a procedure in which a solution (called the titrant) whose concentration is known very accurately is dispensed by a burette and reacted with a known volume of another solution of unknown concentration (called the analyte). By measuring the amount of titrant needed to neutralize the analyte, you can determine the concentration of the analyte accurately.
Here is the proper way to use a burette:
Rinse the inside of a clean burette thoroughly with the solution it will contain. Allow the solution to run out through the stopcock. Drain the burette completely. Repeat the rinse at least once.
Make sure that the outside of the burette is clean and dry, and then mount it securely to a laboratory stand using a burette clamp of the proper size.
Fill the burette to above the zero mark, using a graduated cylinder, small beaker, or other container. Use a funnel if necessary to prevent spillage.
Run some solution through the stopcock to fill the burette tip completely, making sure that there are no air bubbles and that the level of the solution falls to or below the zero mark. (It’s not necessary to hit the 0.00 mark exactly.)
Record the starting volume. When you complete the titration, you’ll subtract this starting volume from the final volume to determine the amount of solution you’ve added. Read the value by placing your eye at the level of the solution and reading the value at the bottom of the meniscus, as shown in Figure 5-10 (which indicates a reading of about 34.37 mL).
When you complete the titration, empty any remaining solution into a waste container (using the proper disposal method for waste solutions) and remove the burette from the clamp. Rinse the burette thoroughly inside and out with tap water, making sure to run the rinse water through the tip. If the burette uses a pinchcock, remove the pinchcock and rubber tubing. If it uses a ground glass stopcock, remove the stopcock. If it uses a Teflon stopcock, release the tension on the stopcock and/or remove the stopcock, depending on the design of the burette. Rinse the burette, tip, and stopcock assemblies thoroughly with tap water and then with distilled water and place them aside to dry thoroughly.
Performing Titrations without a Burette
If you don’t have a burette, you can use one of the methods described in the following sections to perform titrations with differing levels of convenience and accuracy.
Titrate Using a Graduated Cylinder
If your only volumetric glassware is a graduated cylinder, you can use it to perform quick-and-dirty titrations with fair accuracy. To titrate using your graduated cylinder, take the following steps:
If possible, calculate the approximate amount of titrant you expect to be required to complete the titration.
Fill the graduated cylinder with titrant until the titrant reaches the top graduation mark as closely as possible. Use a Beral pipette to add the final few drops to bring the level of the meniscus as close as possible to the line.
Use the Beral pipette to withdraw about 2 mL of titrant, and set the pipette aside. Invert the pipette to make sure that none of the titrant is lost.
Slowly trickle titrant from the graduated cylinder into the titration vessel with swirling until you have nearly reached the equivalence point. You’re approaching the equivalence point when the indicator changes color where the titrant is being added, but that color change disappears as you swirl the titration vessel.
When you are near the equivalence point, stop adding titrant from the graduated cylinder, and begin adding titrant drop-by-drop from the Beral pipette. Continue adding titrant dropwise from the Beral pipette until you reach the equivalence point, which is indicated by a color change that persists for at least 10 or 15 seconds as you continue to swirl the titration vessel.
Transfer the remaining titrant from the Beral pipette back into the graduated cylinder. Read the final volume on the graduated cylinder and determine the volume used by subtraction.
Titrate Using a Mohr Pipette
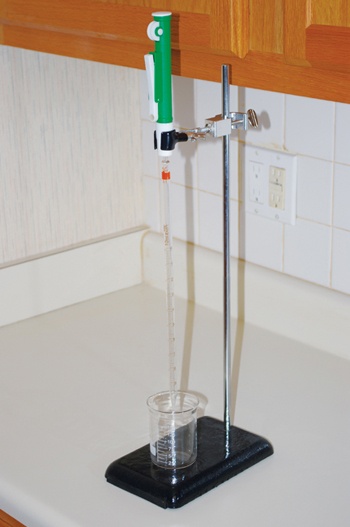
You can use a Mohr pipette with a pipette pump or pipette bulb, as shown in Figure 5-11, to perform titrations with high accuracy. There are a few tricks to getting good results when titrating with a pipette:
Use a high-capacity Mohr pipette. Most Mohr pipettes contain from 0.2 mL to 2.0 mL, but 10.0 mL models are readily available. (One inexpensive source is http://www.indigo.com.) I use a 10.0 mL model with 0.1 mL graduations that allow interpolation to 0.02 mL or better.
Estimate as closely as possible the volume of titrant that will be needed, and make sure it falls well within the capacity of the pipette.
Practice using the pipette pump or pipette bulb until you get the hang of releasing one drop at a time.
For finer dispensing control, you can use a short length of flexible tubing, a pinchcock clamp, and a short piece of glass tubing drawn to a point to convert the pipette to an actual burette. If you use this method, fill the pipette/burette by releasing the pinchcock clamp and using a pipette bulb or pipette pump to draw titrant up into the pipette/burette through the tip. When the pipette/burette is full, clamp the tubing and remove the pipette bulb or pump.
Perform titrations using this setup just as you would if you were using an actual burette. Titration by mass difference takes advantage of the fact that a laboratory balance can measure masses very accurately. If your balance has at least centigram (0.01 g) resolution and you have a volumetric flask, your results with this method will be at least as accurate as those you obtain with a burette.
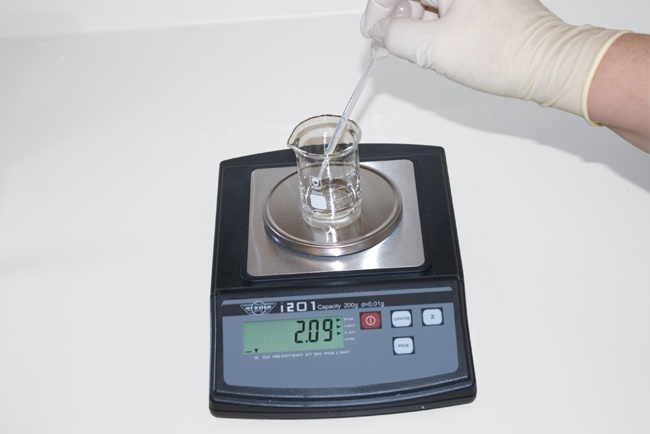
Determining the mass of an accurately known volume of titrant allows us to calculate the mass per unit volume (or density) of the titrant with high accuracy. If we subsequently run a titration starting with a known initial mass of titrant, we can determine the mass of the titrant remaining when the titration is complete. By subtracting the final mass of titrant from the initial mass, we can determine what mass of titrant was required to complete the titration. Knowing the density of the titrant, we can convert that mass to volume by dividing the mass of titrant required by the density of the titrant. Table 5-2 shows example values for a titration I completed using the mass difference method.
To titrate by mass difference, take the following steps, modifying them as necessary to account for the capacity of your balance and the volumetric glassware you have available.
Weigh an empty 100 mL graduated cylinder or (better) a 100 mL volumetric flask. Record the mass as accurately as possible.
Carefully fill the graduated cylinder or volumetric flask to the 100.0 mL line. Reweigh the container and record the mass as accurately as possible.
Subtract the mass of the container when empty from the mass of the container when filled and record that value as the mass of 100.0 mL of the titrant.
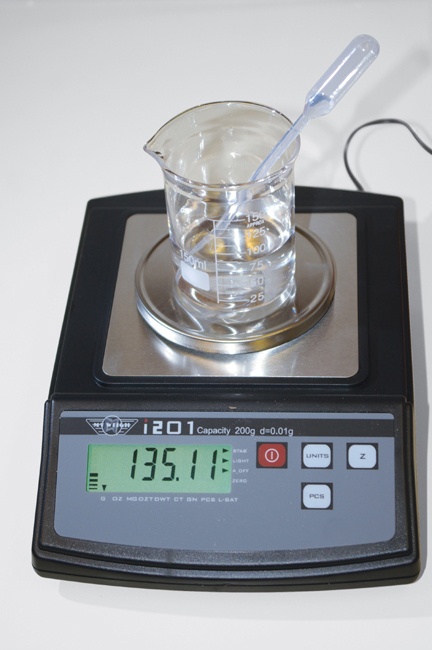
Transfer sufficient titrant to complete the titration to a small beaker or similar container. Add a Beral pipette to the beaker, determine the combined mass of the beaker, titrant, and Beral pipette as shown in Figure 5-12, and record the combined mass as accurately as possible.
Complete the titration and return the Beral pipette to the beaker.
Again determine the combined mass of the beaker, remaining titrant, and Beral pipette, and record that combined mass as accurately as possible.
Subtract the final combined mass from the initial combined mass to determine how many grams of titrant were required to complete the titration.
Convert grams of titrant to mL of titrant by multiplying the number of grams of titrant required to complete the titration by 100 and then dividing that result by mass of 100.0 mL of titrant to determine the number of mL of titrant that were needed to complete the titration.
Item | Value |
A. Mass of empty 100 mL volumetric flask | 69.94 g |
B. Mass of filled 100 mL volumetric flask | 189.47 g |
C. Mass of 100.0 mL of titrant (B – A) | 119.53 g |
D. Mass of beaker, titrant, and Beral pipette (initial) | 135.11 g |
E. Mass of beaker, titrant, and Beral pipette (final) | 106.87 g |
F. Mass of titrant used (D – E) | 28.24 g |
G. Volume of titrant used (E·100/C) | 23.63 mL |
Filtration
Filtration is a method used to separate a solid, called the filtrand or residue, from a liquid, called the filtrate or supernatant fluid. To filter a solid-liquid mixture, you pour it into a funnel that contains a barrier—typically a piece of filter paper or a similar membrane—that passes the liquid and stops the solid. The liquid is caught by a beaker, flask, or other receiving vessel and the solid remains on the filter. Depending on the process, you may retain the solid and discard the liquid or vice versa. In some processes, the solid and liquid are both retained for further processing.
To use gravity filtration to separate a solid-liquid mixture, take the following steps:
Set up your filtering funnel, which can be any standard funnel. You can rest the funnel inside a support ring on a ring stand with a beaker or flask underneath it as the receiving vessel, or simply rest the funnel on top of an Erlenmeyer flask.
If you are doing a quantitative procedure (where the mass of the filtrand matters), weigh a piece of filter paper and record its mass to 0.01 g or better, depending on the resolution of your balance.
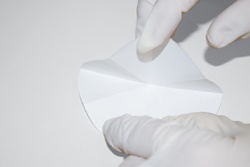
Fold the circular filter paper in half, creasing it at the fold.
Fold the filter paper in half again to form pie-shaped quarters.
Open up the folded filter paper, and lay it flat on the work surface.
Fold each quarter in half to form eighths, with all of the folds pointing up. Make sure all folds come to the same point at the center of the paper.
Turn over the filter paper, so that the folds you’ve just made are pointed down, and fold each eighth into sixteenths, with the folds pointing up. Again, make sure that all folds come to the same point at the center of the paper.
Expand the fan-folded filter paper into a cone, as shown in Figure 5-13, and place it in the funnel.
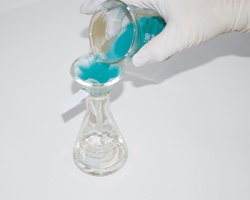
Place the receiving vessel in position under the funnel. If you’re using a beaker, put the stem of the funnel against the side of the beaker to prevent splashing. If you’re supporting the funnel on top of an Erlenmeyer flask or similar small-mouth container and the funnel has a smooth exterior, place a folded piece of paper or similar small object between the funnel and the mouth of the container, as shown in Figure 5-14. Otherwise, the funnel may form a seal with the mouth of the container, preventing the liquid from running through the funnel.
Swirl or stir the solid-liquid mixture that is to be filtered to make sure that the solid is suspended in the liquid, and pour the mixture into the funnel, making sure that the level of the liquid does not rise higher than the top of the filter paper cone. If necessary, use a stirring rod to transfer the mixture without splashing or loss.
Wait for the liquid to drain into the receiving vessel. If necessary, continue pouring more of the original mixture into the funnel until all of it has been transferred.
Using distilled water from a wash bottle, rinse the original container and the stirring rod several times with a few mL of water each time and pour the rinse water into the funnel. Make sure that all of the solid and liquid is transferred into the funnel.
When all of the liquid has drained through the filter paper, rinse the solid filtrand several times with a few mL of water to make sure that all of the soluble material has been rinsed into the receiving vessel.
If the filtrand is waste material, remove the funnel and dispose of the filter paper and filtrand properly.
If the filtrand is your product, carefully remove the filter paper and filtrand from the funnel and transfer them to a Petri dish or similar container for drying. Once the filter paper and filtrand are thoroughly dry, you can determine their combined mass and subtract the mass of the filter paper to determine the mass of the filtrand.
Wash and dry the funnel and any other vessels you used and put them away.
Separations
In a laboratory sense, separation means physically dividing two or more immiscible liquid layers, usually an aqueous layer and an organic layer. A separation most commonly follows an extraction, in which a substance dissolved or suspended in one solvent is extracted from that solvent by agitating the solution with a quantity of a second, immiscible solvent. If the solute is more soluble in the second solvent than in the first, it is preferentially extracted into the second solvent. Because the two liquids are immiscible, they separate upon standing into two physical layers, which can subsequently be divided and isolated from each other.
For example, in one of the laboratory sessions later in this book, we produce an aqueous solution that contains elemental iodine. Iodine is relatively insoluble in water, but is very soluble in many organic solvents. Adding a quantity of an organic solvent to the reaction vessel and agitating the mixture allows the iodine to migrate from the aqueous solution to the organic solvent. Upon standing, the solvent layers separate, with the less dense organic layer—which now contains nearly all of the iodine—floating on top of the aqueous layer, which still contains nearly all of the other reaction products. By drawing off and later evaporating the organic layer, we can isolate nearly all of the iodine in relatively pure form.
In formal laboratories, most separations are done with a separatory flask, usually called a sep flask. If you don’t own a sep flask, you can still do a good separation using inexpensive standard glassware and a disposable plastic pipette. In the following example, assume that you begin with two layers, each of about 100 mL, in a 250 mL flask or beaker. If the actual quantities differ significantly, you can modify this procedure accordingly.
First, make absolutely certain that you know which layer contains your product and which layer is waste. Many novice chemists have embarrassed themselves by pouring the product layer down the drain and saving the waste layer. In this example, we’ll assume that the top layer is the product layer.
After allowing the two layers to separate completely, carefully pour the top layer into your 100 mL graduated cylinder. Make sure to get all of the top layer, and as little as possible of the bottom layer—at most, a few mL.
Allow the layers to separate completely again, and then pour as much as possible of the top layer into a receiving beaker or flask, making sure that none of the bottom layer is transferred. At this point, a few mL at most should remain in the 100 mL graduated cylinder.
Pour the entire remaining contents of the 100 mL graduated cylinder into your 10 mL graduated cylinder and allow the layers to separate.
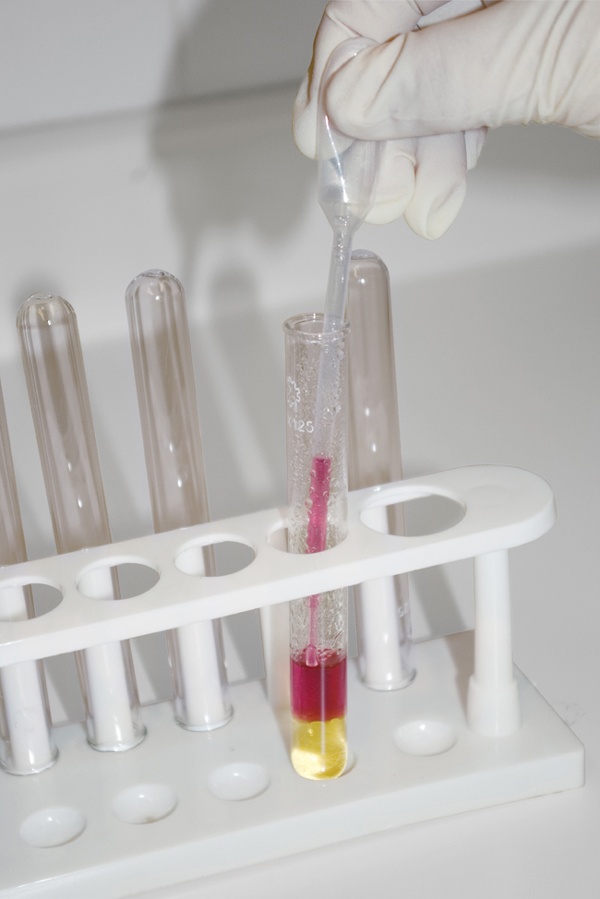
Use the disposable plastic pipette carefully to draw up as much as possible of the top layer, as shown in Figure 5-15, and transfer that liquid to the receiving beaker or flask.
Avoid Superheating
As strange as it sounds, it’s possible for a liquid to be heated above its boiling point without boiling. A liquid in that unstable state is superheated, and is extremely dangerous. A superheated liquid can begin boiling spontaneously and explosively, ejecting large amounts of boiling liquid from the container. Microwave ovens are notorious for superheating liquids, but it is also possible to superheat a liquid with an alcohol or gas burner, particularly if the heat is focused on a small part of the bottom of the container.
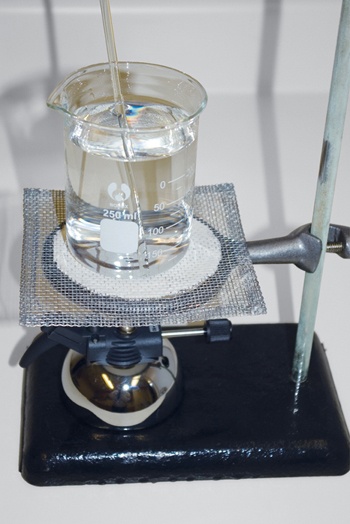
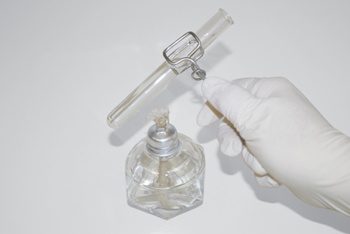
To avoid superheating, add a boiling chip to the liquid before you begin heating it, particularly if you are heating it in a microwave oven. A boiling chip is simply a pebble of limestone or a similar porous material that prevents superheating from occuring by providing a locus for boiling to begin. If you are boiling a liquid in a beaker or flask over an alcohol or gas burner, use a ceramic wire gauze to spread the heat and place a stirring rod in the beaker or flask so that the tip of the stirring rod is in contact with the bottom of the container at the point where the heat is most intense, as shown in Figure 5-16. Like a boiling chip, the stirring rod provides a locus for boiling to begin, preventing superheating from occurring. Avoid superheating when you heat a test tube by directing the flame toward the middle of the solution rather than the bottom, as shown in Figure 5-17, and keep the tube moving constantly to distribute the heat.
Using Heat Sources
Heat sources are essential in any chemistry laboratory, but you risk being burned any time you use a heat source. Heat sources that use open flame add the risk of fire. Use the following guidelines for safe use of heat sources.
To minimize the danger of fire, use a hotplate rather than an alcohol lamp or gas burner whenever possible.
When you use flame, always have a fire extinguisher handy. Know how to use it.
Before you light a burner, make absolutely certain that there are no flammable substances nearby, including burner fuel that is not in the burner.
Never use open flame to heat a container that contains a flammable substance.
When you finish using a heat source, turn it off or extinguish it immediately.
Remember that hot glass looks exactly like cold glass. Always use tongs or insulated gloves to handle glassware unless you are certain that it has cooled.
Know how to treat minor burns, and always have a first-aid kit immediately available.
Know how to identify burns that require professional treatment. (Any burn that is more severe than reddened skin and very minor blistering should be examined by a physician.)
Using an Alcohol Lamp
For more than 100 years, alcohol lamps have been the traditional heat source in home chemistry labs. Alcohol lamps are inexpensive, easy to use, and provide a gentle heat suitable for heating test tubes and other small containers. Follow these guidelines when using an alcohol lamp:
Use only alcohol in the lamp—either ethanol (ethyl alcohol) or isopropanol (isopropyl alcohol) from the drug store. The 70% solutions can be used, but the 91% or higher solutions provide a cleaner, hotter flame. Never use acetone, gasoline, kerosene, or other flammable solvents.
Make sure that the alcohol lamp has cooled completely before you refill it.
After a refill, allow the wick to become completely saturated with alcohol before you light the lamp. Otherwise, you’re burning the wick instead of alcohol.
Adjust the exposed length of the wick to control the size of the flame. Exposing more wick makes the flame larger.
When the wick becomes severely frayed, trim it off. Always keep a spare wick or two on hand.
Extinguish the lamp by placing the cap (also called the snuffer) over the wick.
Store the lamp with the cap in place to prevent evaporation.
If you need a higher temperature than the lamp provides, use a blowpipe to force more oxygen into the flame, allowing it to burn hotter. Place the tip of the pipe near the hottest part of the flame (near the tip of the flame) and blow gently and steadily through the blowpipe, directing the tip of the flame at the object you want to heat. For most purposes, a length of ordinary glass tubing makes a good blowpipe. If you need an even hotter (but smaller) flame, draw the glass tubing (see “Working with Glass Tubing,” later in this chapter) to provide a smaller tip.
Using a Gas Burner
Gas burners provide a much hotter, more intense flame than alcohol lamps. Because they deliver more heat, gas burners are better for heating larger volumes of liquids (although a hot plate is usually an even better choice). Because the flame is very hot—how hot exactly depends on the type of gas used and how the burner is adjusted—gas burners are the best choice when you need to heat a solid sample to a very high temperature.
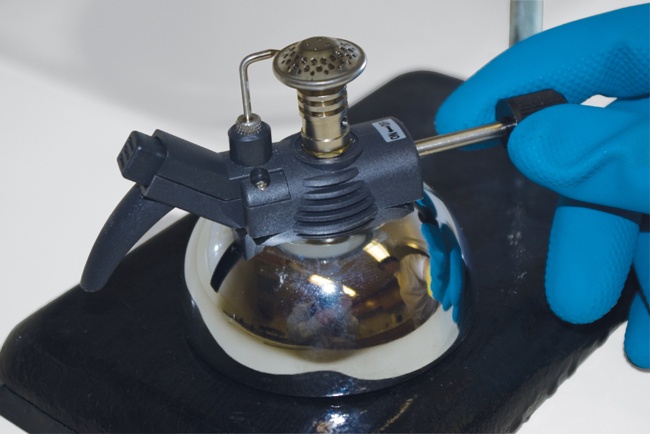
Formal laboratories use Bunsen or Tyrell burners connected directly to natural gas taps, which is not practical for a home laboratory. Fortunately, there are good and inexpensive alternatives to having natural gas installed in your home lab. One of the most convenient is a portable butane burner, shown in Figure 5-18.
These burners have internal fuel storage, and are filled from inexpensive disposable butane canisters sold by drugstores and tobacconists. Most run for an hour or more at their highest setting on a full tank of fuel. Because they are not tethered to a natural gas tap, you can move these burners around the lab as needed. Flame spreaders and other accessories are often available for such burners, either included with the burner or as options.
The only drawback to these portable butane burners is their relatively high price—$35 to $50 or so. One reasonable substitute is a propane torch from the hardware store. These torches, sold under the Bernz-o-Matic and other tradenames, are inexpensive; use cheap, disposable propane cannisters; and have a wide variety of accessories available, including flame spreaders and wire stands. The flame is adjustable from a tiny point to one larger than you should ever need in a home lab. Although propane contains less heat per unit volume than butane, propane burns at almost exactly the same temperature as butane—just under 2,000°C—so a propane torch can substitute for a butane burner in any application.
Follow these guidelines when using a gas burner:
Never heat glass directly with the burner flame, particularly the tip of the flame. The gas burner flame is hot enough to damage even Pyrex glass. Use a ceramic-filled wire gauze between the flame and the glassware.
Do not use a gas burner to heat a test tube or other small container directly. The hot gas flame can rapidly superheat a small part of the solution, which may instantaneously flash to steam, forcefully ejecting very hot liquid from the container. This dangerous phenomenon, called bumping, can be avoided by using a less-intense source of heat (or a flame spreader on the gas burner) and by using a boiling chip or stirring rod to prevent superheating. The possibility of bumping also means that it’s imperative to keep the mouth of the container pointed away from you and anyone else present.
Allow the burner to cool completely before you refill the reservoir or replace the gas cylinder.
Follow the instructions in the manual to adjust the burner or torch to provide the most efficient flame. Some burners allow you to adjust both gas flow and air flow, and it’s important to have both properly adjusted.
Clean the burner regularly, as recommended by the manual.
Evaporating and Drying
It’s frequently necessary to remove water from samples that you have prepared. For example, if your product is an aqueous solution of a salt, you may need to determine the mass of the dry salt to determine your percent yield. Or you may have a precipitate on filter paper that is still damp with solvent. In either case, you need to remove all of the liquid before you can determine an accurate mass for the solid.
The best container for drying liquid samples is a porcelain evaporating dish, although you can substitute a Pyrex Petri dish, Pyrex saucer, or similar container that exposes the surface of the solution over as large an area as possible to speed evaporation. To dry a solid sample on filter paper, place the filter paper in an evaporating dish, Petri dish, or saucer.
Follow these steps to dry a sample:
Weigh the empty container or filter paper before you begin, and record its mass. That way, once the sample has been dried, you can determine its mass accurately by weighing the combined mass of the sample in the container or filter paper and then subtracting the mass of the empty container or filter paper. In particular, if the sample is on filter paper, make sure to weigh the filter paper and record its mass before using it, because it’s often impossible to remove all of the product from the filter paper.
If your product is a dilute solution, you need to remove a great deal of water, ideally as quickly as possible. To do so, transfer the solution to a porcelain evaporating dish and boil the solution gently to evaporate most of the water. The idea is to remove most of the water, but not to boil it to dryness. (Heating a dry solid strongly may cause it to decompose.) If the evaporating dish is not large enough to contain all of the solution at once, continue adding more of the original solution to the evaporating dish as the liquid level falls.
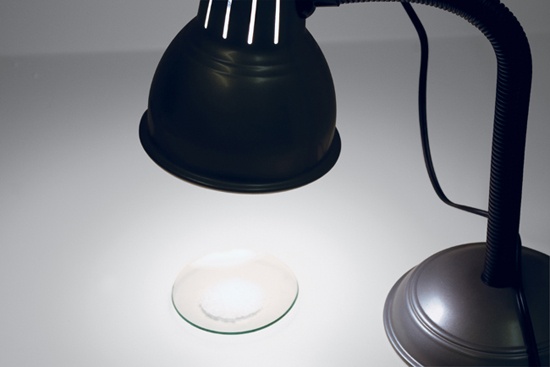
When most of the water has been removed (or if you start with a product that is only moist, such as a solid precipitate in filter paper), move the container to a drying oven or place it under a heat lamp, as shown in Figure 5-19, and heat the sample until the last traces of water are gone. If you are using a drying oven, set the temperature to at least 150°C to ensure that all of the water vaporizes. If you do not have a heat lamp, you can use an ordinary gooseneck lamp with an incandescent bulb placed as near as possible to the sample. (Take care not to splash water on the hot bulb, or it will shatter.)
Depending on the amount of water remaining, you may need to heat the sample for anywhere from a few minutes to several hours. If the sample crusts over, use the tip of a clean stirring rod to break up the mass as much as possible to make sure that there are no puddles of liquid concealed by the encrustation. Continue heating until all of the water appears to have been driven off.
When the sample appears to be completely dry, allow it to cool, weigh it, and record the mass.
Return the sample to the oven or replace it under the heat lamp, and heat it strongly for at least another 15 minutes.
Reweigh the sample, record the mass, and compare that mass with the mass you previously recorded. If the new mass is lower, not all of the water was extracted from the sample when you made the previous weighing.
Repeat steps 5 and 6 until the mass no longer changes. At that point, you can be sure that the sample is completely dry.
Working with Glass Tubing
Glass tubing is used in conjunction with flexible rubber or plastic tubing and holed stoppers to route liquids and gases between containers. Glass tubing is available in various outside and inside diameters, wall thicknesses, types of glass, and lengths. The most important characteristic is the outside diameter, which should be chosen to fit your stoppers and flexible tubing. Tubing with an outside diameter (OD) of 5 mm is most common, but verify the proper OD before you order.
Most glass tubing is made of ordinary flint glass, which softens at the relatively low temperature provided by an alcohol lamp. By heating the tubing until it softens, you can bend it, stretch it, and otherwise manipulate it into the shapes needed to construct distillation setups, gas-generating bottles, and similar apparatus.
For high-temperature use, glass tubing is available made from Pyrex or similar heat-resistant borosilicate glasses. Such high-temperature tubing is seldom needed, if ever, in a home lab, but it costs little more than flint-glass tubing and is often stocked by laboratory supply vendors. If you find that heating a piece of glass tubing with an alcohol lamp doesn’t soften it, that glass tubing is almost certainly made of heat-resistant glass. You can still manipulate and shape such tubing, but you’ll need the hotter flame of a gas burner to do so.
Cutting Glass Tubing
Glass tubing is supplied in standard lengths, typically 6” (~150 mm), 12” (~300 mm), and longer. You’ll often need shorter lengths, which are easy enough to cut from the stock tubing. To do so, take the following steps:
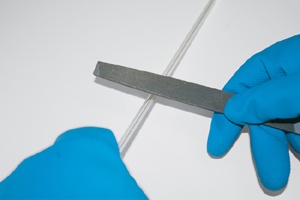
Use the edge of a steel file to score the glass once, perpendicular to its length, as shown in Figure 5-20. Do not saw away at the glass or attempt to cut deeply into it. Just a slight notch suffices.
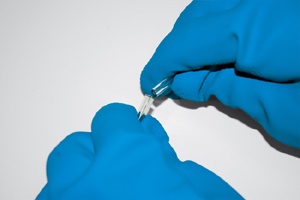
Place both thumbs near the notch, as shown in Figure 5-21, with the notch on the other side of the tubing from your thumbs, and apply gentle pressure until the tubing snaps in two. Wear eye protection, and use heavy gloves or wrap the tubing in a towel to prevent cuts.
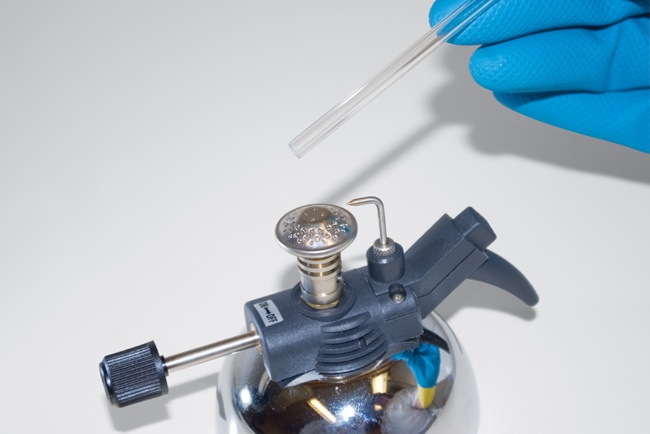
The two fresh ends of the tubing are quite sharp, and need to be fire-polished before use. To fire polish the tubing, hold the sharp end in the flame of an alcohol lamp or gas burner, as shown in Figure 5-22, and rotate the tubing slowly until the sharp end is smoothed. Don’t overdo the fire-polishing or you’ll melt the end of the tubing enough to block it. An alcohol lamp isn’t hot enough to fire-polish Pyrex tubing, which requires a gas burner.
Bending and Drawing Glass Tubing
Bending and drawing glass tubing is easy enough, but requires a bit of practice. (Drawing is the process of stretching tubing to reduce its diameter—for example, to make a nozzle for a wash bottle.) To bend glass tubing, perform the following steps:
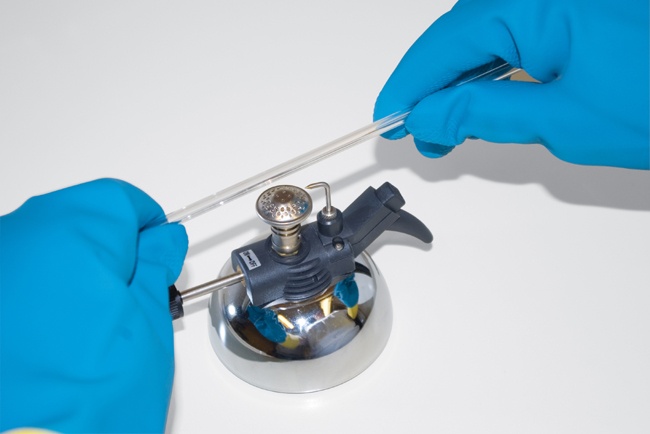
Hold the tubing horizontally in the hottest (blue) part of the flame of an alcohol lamp or gas burner, as shown in Figure 5-23. Heat the tubing at the point you want to make the bend and for a centimeter or so on either side. (If you use a gas burner, a flame spreader is very helpful in distributing the heat evenly.) Rotate the tubing continuously to make sure that it’s heated around its full circumference.
As you heat the tubing, apply extremely gentle bending pressure on it continuously. When you feel that the tubing is near the point that it can be bent, stop applying pressure. Continue rotating and heating the tubing for few seconds longer. (If you heat the tubing to the point where it begins to sag under its own weight, you’ve gone much too far.)
Remove the tubing from the flame and allow it to cool for a couple of seconds, keeping it straight.
Using one smooth motion, quickly bend the tubing gently to the desired angle. Hold the tubing in position for several more seconds until it hardens and then set it aside on a heat-resistant surface to cool completely.
A good bend is one in which the tubing assumes the desired angle smoothly with no internal crimping or constriction. If you haven’t heated the tubing sufficiently, the bend will be uneven. If you’ve overheated the tubing, the bend may be too sharp and there may be a constriction or blockage at the most extreme part of the bend.
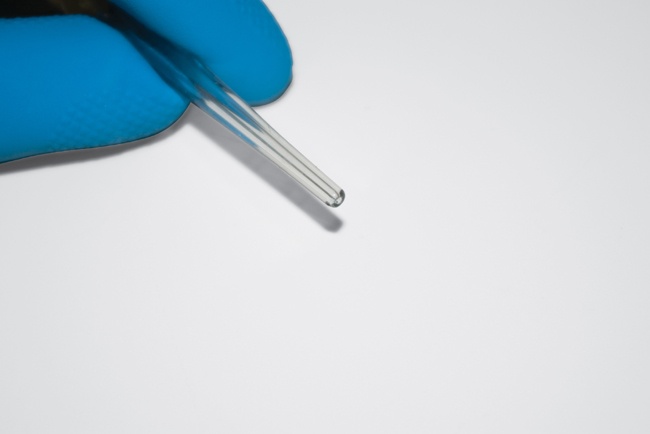
Drawing glass tubing requires the same initial steps as bending it. To draw tubing, heat the tubing until it is pliable and then pull the two ends straight away from each other until the heated section of the tubing is drawn down to the desired size. Cut the tubing in the middle of the drawn section and fire-polish the ends. Figure 5-24 shows a section of tubing that has been drawn to a fine point.
Inserting Glass Tubing into Corks and Stoppers Safely
Trying to force glass tubing into a cork or stopper is one of the most frequent causes of injury in home labs. If you apply pressure even slightly off-axis, the glass tubing may snap and impale you. Fortunately, it’s easy to avoid such accidents. Proceed as follows:
First, make absolutely certain that the glass tubing is of the proper size to fit the hole in the stopper. If you try to force 5 mm tubing into a stopper drilled for 4 mm tubing, for example, things are sure to end badly.
Lubricate the tubing with glycerol, mineral oil, or a similar substance. (Many chemists use water, but I recommend something slipperier.)
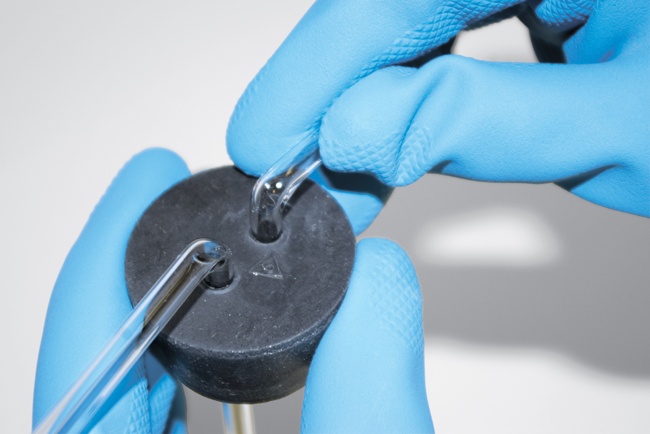
Using heavy gloves or a towel to protect your fingers, align the tubing with the hole in the stopper, and slide it into the hole, rotating the tubing constantly as you do so. Apply only as much pressure as needed to cause the tubing to slide into the stopper, and apply that pressure as close as possible to the face of the stopper, as shown in Figure 5-25.
Cleaning Glassware
Dirty glassware is one sure sign of a sloppy chemist. Use the following guidelines to keep your glassware in like-new condition.
Always do at least a preliminary cleaning as soon as possible after you finish using the glassware. Contamination that rinses away easily when fresh may harden overnight into a deposit that’s difficult or impossible to remove.
Before you clean glassware, always examine it for cracks, starring, chipping, or other damage. Dispose of damaged glassware by rinsing it to remove as much contamination as possible, wrapping it in several layers of newspaper, and discarding it with the household trash.
For small-bore items such as glass tubing, pipettes, and so on, force or draw clean tap water through the glassware several times to rinse out most of the contamination. Then draw clean sudsy water through the glassware several times, followed by drawing several rinses of tap water through the glassware, and finally by drawing distilled or deionized water through the glassware several times. Use a rubber bulb or zero-residue canned “air” (not your mouth) to blow out any remaining rinse water and set the glassware aside to dry. No further cleaning is needed.
For glassware with accessible inside surfaces—such as beakers, flasks, and test tubes—as soon as you finish using the glassware, let it cool (if applicable), dispose of the contents properly, rinse the glassware thoroughly under running hot tap water, and then sit it aside inverted to dry. Make sure that it’s in an area devoted to dirty glassware or is otherwise marked as requiring thorough cleaning.
If the glassware is very dirty—such as a test tube or flask that contains a precipitate that won’t rinse away—use a brush and hot sudsy water to remove as much of the contamination as possible. If the glassware still looks dirty, submerge it in a sink or plastic tub that contains hot sudsy water, allow it to soak for several hours or overnight, and again use a brush and hot sudsy water to scrub it out. If the glassware still looks dirty, try soaking it overnight in a 1 M solution of hydrochloric acid (hardware store muriatic acid diluted one part acid to ten parts water is fine for this purpose) and then scrubbing it out again. If the glassware then appears clean, rinse it with tap water and set it aside to drain until you are ready to do a final cleaning. Otherwise, discard the glassware.
Glassware that has undergone preliminary cleaning may appear clean to the eye, but it’s not clean enough for lab use. A good preliminary cleaning removes nearly all of the contamination, but a final cleaning is necessary to ensure the glassware is really clean. Begin by filling a sink or tub with hot sudsy water. Using an appropriate brush or brushes, scrub the entire surface of the glassware, inside and out. Rinse the glassware thoroughly under hot running tap water and then examine it to ensure it is pristine. Invert the glassware on a drying rack and allow it to drain completely. Finally, rinse the glassware, particularly the inside, with distilled water and invert it on the drying rack to allow the final rinse to drain. Although it no doubt horrifies our friends who do quantitative analyses, I add one drop (literally) of dishwashing liquid (actually, I use Kodak Photo-Flo) per liter of distilled rinse water. The dishwashing liquid or Photo-Flo breaks the surface tension and allows the remaining water to sheet cleanly off the glassware rather than beading, leaving the glassware dry to the touch almost immediately.
Once the glassware is completely dry, return it to its storage location.
