Chapter 8. Clientless Remote Access SSLVPNs on the ASA
This chapter covers the following topics:
• Clientless SSLVPN Overview: This section covers the basics of clientless SSLVPNs and how they compare to client-based AnyConnect VPNs.
• Clientless SSLVPN Prerequisites: This section covers the licensing, operating system, browser, and other software required to implement clientless SSLVPNs with the ASA.
• Basic Clientless SSLVPN Configuration: This section describes the basic steps involved in configuring a basic clientless SSLVPN, including certificates, group policies, connection profiles, and authentication.
• Extended Clientless SSLVPN Configuration Options: This section describes how to configure optional, but common, features of clientless SSLVPNs, including bookmarks, web ACLs, port forwarding, smart tunnels, and client/server plug-ins.
“Details make perfection, and perfection is not a detail.”
—Leonardo Da Vinci
This chapter covers the following objective:
• 2.0 Remote access VPNs
• 2.3 Implement Clientless SSLVPN on ASA
• 4.0 Secure Communication Architectures
• 4.2 Describe functional components of FlexVPN, IPsec, and Clientless SSL for remote access VPN solutions
• 4.4 Recognize VPN technology based on configuration output for remote access VPN solutions
• 4.7 Design remote access VPN solutions
• 4.7.c Clientless SSL browser and client considerations and requirements
Chapter 7, “Remote Access VPNs,” explored remote access VPNs at a conceptual level. Now that you have the remote access VPN foundational concepts under your belt, it is time to dig deeper into key learning objectives for the SVPN exam regarding remote access VPN technology. This chapter looks at the basic steps to configure a clientless SSLVPN on the ASA in addition to key features available with clientless SSLVPNs, such as bookmarks, web ACLs, port forwarding, smart tunnels, and client/server plug-ins.
Learning beyond the SVPN concepts:
• Clientless VPN Overview
• VPN Licensing
“Do I Know This Already?” Quiz
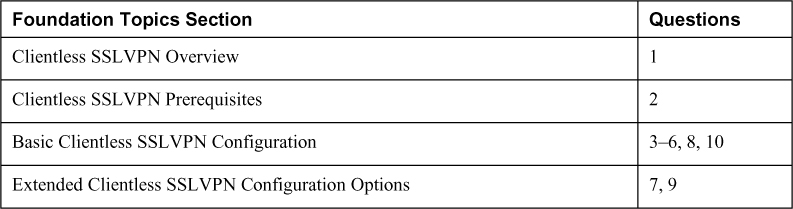
The “Do I Know This Already?” quiz enables you to assess whether you should read the entire chapter. If you miss no more than one of these self-assessment questions, you might want to move ahead to the “Exam Preparation Tasks” section of the chapter. Table 8-1 lists the major headings in this chapter and the “Do I Know This Already?” quiz questions related to the material in each of those sections to help you assess your knowledge of these specific areas. The answers to the “Do I Know This Already?” quiz appear in Appendix A, “Answers to the ‘Do I Know This Already?’ Quizzes.”
Table 8-1 “Do I Know This Already?” Foundation Topics Section-to-Question Mapping
1. A clientless SSLVPN uses which of the following protocols?
a. SSL
b. TLS
c. IKEv2
d. IPsec
2. Which of the following licenses does not support clientless SSLVPNs?
a. AnyConnect Base
b. AnyConnect Plus
c. AnyConnect Apex
d. AnyConnect VPN Only
3. What is the recommended minimum RSA key size for certificates from a publicly trust CA?
a. 512 bits
b. 1024 bits
c. 2048 bits
d. 4096 bits
4. What type of VPN is not allowed by the default in the default group policy (DfltGrpPolicy)?
a. Clientless SSLVPN
b. IPsec/IKEv2
c. L2TP/IPsec
d. SSLVPN client
5. Which of the following is required when configuring a connection profile?
a. Tunnel group
b. Domain name
c. DNS server
d. Aliases
6. Which attributes take precedence over all others?
a. Dynamic access policy (DAP) attributes
b. User attributes
c. Group policy attributes
d. Connection profile default group policy attributes
7. Which of the following requires Java to function?
a. Clientless SSLVPN
b. Port forwarding
c. Smart tunnel
d. AnyConnect SSLVPN
8. Which of the following bookmark types is not supported by Cisco ASA by default?
a. CIFS
b. RDP
c. HTTP
d. DNS
9. Which of the following is an optional configuration parameter for smart tunnels?
a. Application ID
b. Operating system
c. Process name
d. Hash
10. Which of the following is not an available client/server plug-in?
a. RDP
b. VNC
c. CIFS
d. SSH
Foundation Topics
Our first remote access deep dive topic is clientless remote access SSLVPNs on the Cisco ASA. Why do organizations care about clientless SSL? Remote access VPN technology is used to secure data transferred between a client and a server. The client might not want to install a VPN client, for many reasons:
• The host user might not have administration rights to install software on a host system
• An end user might be leveraging a shared computer
• The user might be operating from a terminal or publicly used computer
• There is a policy against hosts having direct access to internal resources
• Security tools that prevent a client VPN from functioning might exist
• Contractors or other temporary users might not want to install VPN software
• Various host types exist that could make it difficult to ensure that a client is available to match their system requirements
• Some users might have challenges installing VPN software
An alternative to using a VPN client is using the host’s web browser and built-in SSL/TLS capabilities to protect traffic, which is one form of clientless VPN. Most modern web browsers include SSL/TLS capabilities, allowing for a VPN experience without the need to install any software or require special privileges. Clientless VPN opens the door for supporting use cases such as not having administration rights on the host system or having users who don’t want to install software.
As with client-based VPN, once the user authenticates with the VPN gateway, preconfigured network resources can be made available but the host does not have direct access to the internal network, meaning the VPN concentrator acts as a proxy to the provisioned resources. It is common for organizations to leverage both client and clientless VPN technologies, for which different levels of sensitive data and connection types are permitted based on which option is used. For example, users might be able to access unclassified but sensitive resources using a clientless VPN; however, classified data is held within a more secured part of the network and requires a client-based VPN. Part of this sample configuration can include different assessment features that are enabled, such as ensuring host systems have antivirus installed, evaluating the version of web browser being used, and many other characteristics that make up a security policy that can be applied to a VPN deployment.
You learn how to build the previous example VPN deployment using the concepts covered in this and the next chapter. This chapter focuses on clientless VPN concepts and the next chapter dives deep into the Cisco flagship VPN client AnyConnect.
Let’s start off by reviewing the general concepts associated with a clientless SSLVPN technology.
Clientless SSLVPN Overview
Clientless SSLVPN creates a secure remote access VPN tunnel to an ASA using a web browser without requiring a software or hardware client. It provides secure and easy access to a broad range of web resources, including both web-enabled and legacy applications from almost any device that can connect to the Internet via HTTPS. The previous section provided an example of clientless VPN based on using an Internet browser. There are other ways SSL VPN technology can be applied.
The following are some of the applications that can use a clientless SSLVPN:
• Internal websites
• Web-enabled applications
• Windows file shares
• Other TCP applications (via port forwarding)
Think ASA as a Proxy
The Cisco ASA allows users to access internal resources by acting as a proxy. In a traditional VPN, application TCP connections are directed and established directly from the client device to the internal server being accessed and are forwarded by the ASA unmodified after decryption/encryption. Unless NAT is used, the internal server being accessed sees the IP address assigned to the client tunnel. With a clientless SSLVPN, the application TCP connections from the client device are directed to the ASA, and they are then proxied with a second TCP connection created to the internal server. The internal server being accessed sees the IP address of the ASA interface. As a result, users using a clientless SSLVPN having no direct access to resources on the internal network. For users who need to be kept at an arm’s distance, such as contractors, this can be ideal.
Note
Despite its name, a clientless SSLVPN no longer uses the Secure Sockets Layer (SSL) protocol. As of ASA Release 9.4(1), a clientless SSLVPN instead uses the successor to SSL, Transport Layer Security (TLS), to provide a secure connection between remote users and specific supported internal resources that you configure.
Cisco VPN Options
Before deploying a clientless SSLVPN, you should consider the needs of your users to determine the type of clientless SSLVPN connectivity that will best suite them or whether a client-based solution, such as the AnyConnect Secure Mobility Client, would be a better fit:
• Clientless SSLVPN: A clientless SSLVPN enables end users to securely access resources on the corporate network from anywhere by using a TLS-enabled web browser. The user first authenticates with the ASA, which then allows the user to access preconfigured network resources. The user does not have network layer access; instead, all connections are proxied by the ASA. Web browser–enabled applications using protocols such as HTTP, HTTPS, CIFS, and FTP can be supported with only the browser on the user’s device. More complex applications and protocols, such as POP3, SMTP, IMAP, SSH, and Telnet, can be supported with port forwarding, smart tunnels, and plug-ins.
• AnyConnect VPN (TLS, DTLS, or IKEv2): An AnyConnect VPN provides users highly secure access to the enterprise network, from any device, at any time, in any location. In contrast to clientless SSLVPNs, AnyConnect VPNs require the installation of the AnyConnect client before a user can obtain access. AnyConnect VPNs support a much broader range of applications, including almost any application that uses TCP, UDP, or ICMP, and provide network layer access to resources without the ASA serving as a proxy. To protect communications over the Internet, AnyConnect can be configured to encapsulate traffic in either TLS, DTLS, or IKEv2 tunnels. Table 8-2 summarizes the key differences between the clientless SSLVPN solution and the AnyConnect client solution.

Table 8-2 Comparison Between a Clientless SSLVPN and an AnyConnect VPN
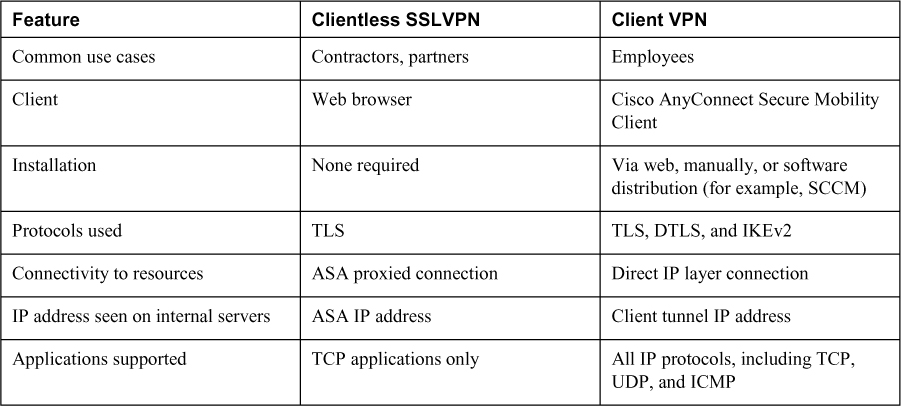
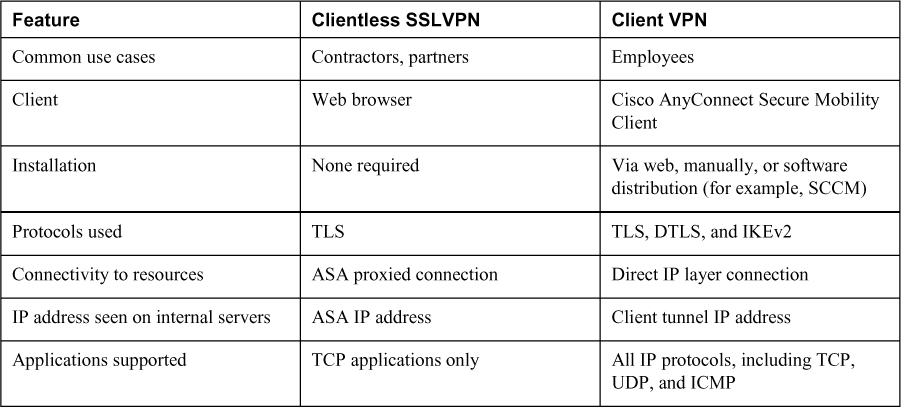
Clientless SSLVPN solutions are most often used when users are accessing a limited set of resources (for example, contractors) or accessing resources from untrusted systems (such as kiosks). AnyConnect is most often used when users need access to a large array of applications, such as from a corporate PC.
This chapter focuses on the clientless SSLVPN options, and Chapter 9, “AnyConnect VPNs on the ASA and IOS,” covers client-based VPNs using the AnyConnect. You will need to know both options for the SVPN exam.
Clientless SSLVPN Prerequisites
Before deploying a clientless SSLVPN in your environment, you need to meet a number of prerequisites, such as those related to licensing, operating system, browser, and other supporting software. The following sections describe the details of each of these prerequisites.
Note
Cisco uses the term SSLVPN and WebVPN interchangeably.
First, let’s review software license requirements for SSL VPN deployments.
Software Licenses
For VPN capabilities to function on the ASA, the ASA requires the appropriate licenses. For a lab and very small deployments, the ASA includes a two-user complimentary license. For deployments larger than two concurrent users, additional licenses are needed.
Note
If more than two users attempt to access an ASA without the necessary additional licenses, users receive the error message “AnyConnect was not able to establish a connection to the specified secure gateway. Please try connecting again.” Know this error message not only for troubleshooting questions on the exam, but also for real support problems with world deployments. We have encountered tickets with this error message when the administrator has not applied licensing to the ASA, licensing on the ASA has expired, and other situations where the administrator believes the ASA is properly licensed when it is not.
License Options
Chapter 7 introduced the possible VPN license options for a Cisco ASA. The license options were simplified into two categories, Apex and Plus. Chapter 7 also pointed out that there are two flavors of these license options, purchasing the licenses as a subscription or as a perpetual license. This means the following are ways organizations can purchase VPN licenses for their ASAs:
• AnyConnect Apex subscription
• AnyConnect Plus subscription
• AnyConnect Plus perpetual
• AnyConnect VPN Only perpetual
Let’s further define what each of these license options offers.
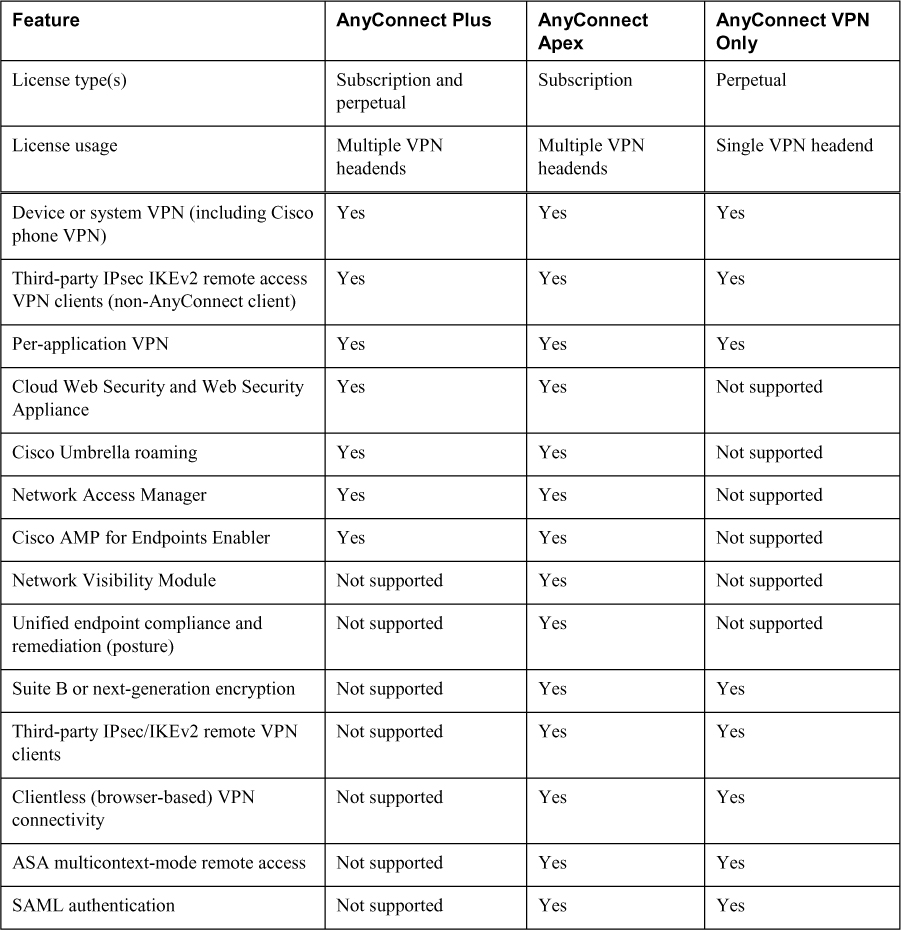
AnyConnect Plus Subscription and Perpetual
AnyConnect Plus includes basic VPN services, such as device and per-application VPN services (including third-party IKEv2 remote access VPN headend support), trusted network detection, basic device context collection, and Federal Information Processing Standards (FIPS) compliance. AnyConnect Plus also includes other non-VPN services, such as the AnyConnect Network Access Manager 802.1X supplicant, the Cloud Web Security module, and the Cisco Umbrella roaming module.
AnyConnect Plus is licensed based on the total number of unique users and can be purchased as a subscription license or as a perpetual license. The license is delivered with a multiuse product activation key (PAK), which allows for the activation of AnyConnect Plus functionality on all VPN headends in the organization.
AnyConnect Apex Subscription
AnyConnect Apex includes more advanced services, such as endpoint posture checks (HostScan via ASA VPN or ISE Posture via the Cisco Identity Services Engine), network visibility, next-generation VPN encryption (including Suite B), and clientless remote access VPN services, as well as all the capabilities of AnyConnect Plus.
Like AnyConnect Plus, AnyConnect Apex is licensed based on the total number of unique users. However, it differs in that it can only be purchased as a subscription license. The AnyConnect Apex license is similarly delivered with a multiuse PAK for the activation of AnyConnect Apex functionality on all VPN head ends in the organization.
AnyConnect VPN Only Perpetual License
AnyConnect VPN Only includes basic VPN services such as device and per-application VPN services (including third-party IKEv2 remote access VPN headend support), trusted network detection, basic device context collection, and FIPS compliance. It also includes more advanced VPN services, such as endpoint posture checks (HostScan via ASA VPN), next- generation VPN encryption (including Suite B), and clientless remote access VPN services. No other AnyConnect function or service (such as the Web Security Module, Cisco Umbrella roaming, ISE Posture, Network Visibility, or Network Access Manager) is available with the AnyConnect VPN Only licenses.
AnyConnect VPN Only is licensed based on the number of simultaneous connections (rather than unique users) for a single headend device. The license is delivered as a single-use PAK for activation of AnyConnect VPN Only functionality on a single VPN headend.
License Option Summary
Table 8-3 compares the AnyConnect Plus, AnyConnect Apex, and AnyConnect VPN Only license options. You will not have to know how Cisco licenses an ASA for the SVPN; however, it is important to understand licensing options when designing a real-world deployment. Also know that in order of cost, Apex is the highest cost, followed by Plus, which is less expensive than Apex but a higher cost than VPN only. The price you pay can vary due to different factors, including using a subscription versus perpetual licensing, bundling technologies, or using discounts that might be available depending on where you purchase the licenses.
Table 8-3 Supported Features by License Type
SSLVPN Support Requirements
When planning an SSLVPN deployment, you must consider what type of hosts will be using the VPN. We have pointed out that SSVPN is clientless, which means one benefit is not needing to install VPN software. There are still specific technologies that must exist in order for a clientless VPN to function properly. Many of these requirements should exist within the native operating system used by the clients leveraging the VPN; however, there can be situations where a key technology is not functioning or available, leading to a failure in VPN service.
Successful and reliable use of the clientless SSLVPN functionality depends on the use of supported operating systems, browsers, and supporting software. Without these, the client will not be able to successfully connect to the VPN. The following list explains these requirements in more detail:
• OS: Clientless SSLVPN from Cisco is tested and supported on macOS and Windows. Apple iOS and Android are not supported except for Citrix Receiver for Mobile at the time of publication.
• Browser: The client must use a TLS-enabled browser, such as Microsoft Edge, Firefox, or Chrome. Table 8-4 provides a list of operating systems and browsers supported as of ASA Release 9.14. Non supported browsers could still possibly work but are not recommended or supported by Cisco TAC.
• Java: The browser must be enabled with Java Runtime Environment (JRE) Version 6u151 b10, 7u141 b11, 8u131 b11, or later for SSLVPN features such as port forwarding and smart tunnels. On macOS X, Apple’s JRE is supported.
• ActiveX: When using Internet Explorer on Windows operating systems, the browser must be enabled with ActiveX for SSLVPN features such as smart tunnels.
The SVPN exam could include host troubleshooting SSLVPN concepts. For example, a user could find attempting to connect to an SSLVPN fails because Java or ActiveX is not available. You will not be tested on the specific versions of OS or browsers that are or are not supported by Cisco VPN technology, but Table 8-4 does outline which are supported.
Table 8-4 Supported Operating Systems and Browsers for Clientless SSLVPN

SSL VPN Prerequisites Summary
To summarize what is required for a Cisco ASA SSLVPN deployment, you need an ASA that is licensed for the SSLVPN features that meet your technical goals. If you are working in a lab, you can use the two licenses that are available by default. If you are supporting more than two users, you will need to choose either a Plus or an Apex version of license. Next, you must validate whether the host system support meets the requirements to support an SSLVPN, which are a supported OS and browser as well as a browser with Java and ActiveX enabled. With the requirements covered, we are ready to move into our first basic clientless SSLVPN configuration example.
Basic Clientless SSLVPN Configuration
Now that you understand the prerequisites for deploying SSLVPN on a Cisco ASA, you are ready to configure a basic clientless remote access VPN. Doing so involves the following steps, which are explained in detail in the following sections:
Step 1. Install an identity certificate.
Step 2. Apply an identity certificate to the interface(s).
Step 3. Enable clientless SSLVPN access.
Step 4. Configure group policies.
Step 5. Configure connection profiles.
Step 6. Configure user authentication.
The examples in this chapter use the lab environment shown in Figure 8-1, which uses the following software and hardware versions:
• Adaptive Security Virtual Appliance (ASAv) Release 9.12(4)
• Adaptive Security Device Manager (ASDM) Release 7.12(2)
• AnyConnect Security Mobility Client Release 4.8.03052 running on Windows 10

Figure 8-1 Clientless SSLVPN on ASA Lab Diagram
Step 1: Installing an Identity Certificate
For an SSLVPN to function, the ASA must have a digital certificate to identify it to connecting clients. This can be accomplished with a self-signed certificate or a certificate from a certificate authority (CA). For basic testing, the self-signed certificate generated by the ASA upon startup may suffice. For production deployments, the use of a certificate from a publicly trusted CA is the preferred approach. The process to obtain and install a certificate from a CA is called enrollment and can be broken into three steps:
Step 1. Generate a new RSA key pair.
Step 2. Create an identity certificate request.
Step 3. Install a signed identity certificate.
Generating a New RSA Key Pair Using ASDM
Before requesting an identity certificate, you must generate an RSA key pair via ASDM or via the CLI. If you are requesting an identity certificate from a publicly trusted CA, the RSA key pair should have a size of at least 2048 bits, as this is the minimum acceptable size as of the press time of this book. Alternatively, you can use an existing key pair if it meets the requirements.
To generate a new RSA key pair via ASDM, follow these steps:
Step 1. Navigate to Configuration > Remote Access VPN > Certificate Management > Identity Certificates.
Step 2. Click Add to open the Add Identity Certificate dialog box.
Step 3. Select Add a new identity certificate.
Step 4. Click New to open the Add Key Pair dialog box.
Step 5. Select Enter a new key pair name and specify a name for the key pair.
Step 6. Select the desired Size for the key pair, in bits.
Step 7. Click Generate Now to generate the new RSA key pair and close the Add Key Pair dialog box.
Figure 8-2 shows the creation of a new RSA key pair with the name EXAMPLE_KEY_PAIR and the key size 2048 bits.
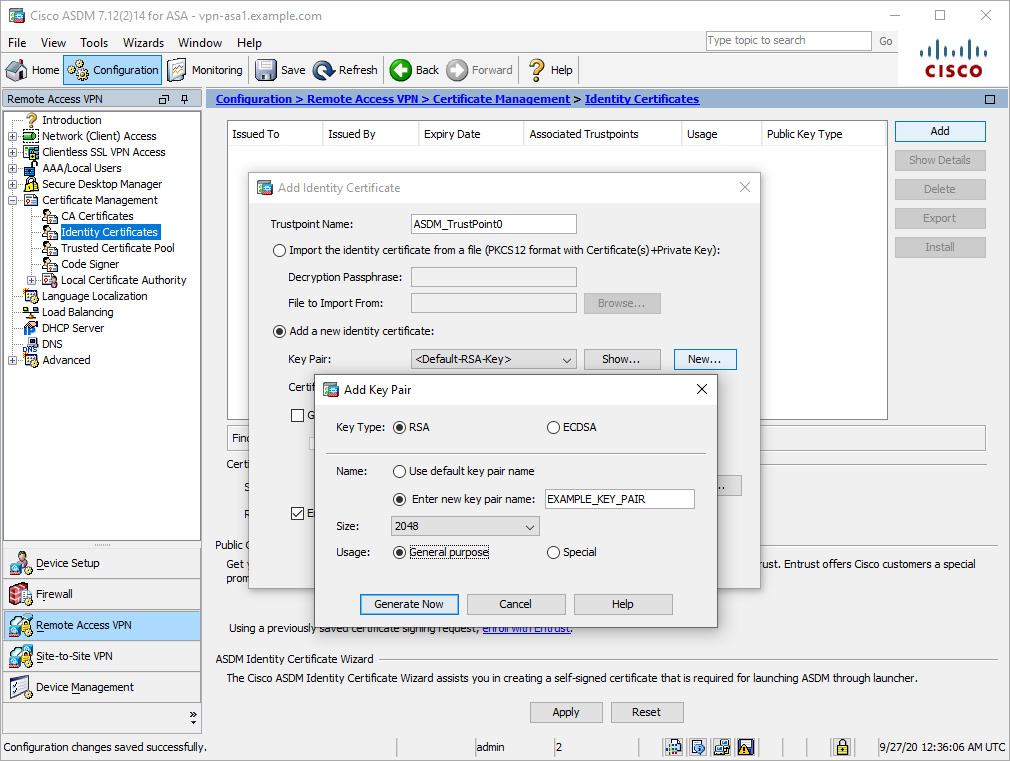
Figure 8-2 Generating a New RSA Key Pair via ASDM
Generating a New RSA Key Pair Using CLI
To generate a new RSA key pair via the CLI, use the crypto key generate rsa command. Example 8-1 shows an example of generating a new RSA key pair via the CLI that mirrors the configuration in Figure 8-2.
Example 8-1 Generating a New RSA Key and Creating an Identity Certificate Request via the CLI
VPN-ASA1(config)# crypto key generate rsa label EXAMPLE_KEY_PAIR modulus 2048
INFO: The name for the keys will be: EXAMPLE_KEY_PAIR
Keypair generation process begin. Please wait...
Creating an Identity Certificate Request Using ASDM
With the RSA key pair generated, you can now create a certificate signing request (CSR) for the identity certificate.
To create an identity certificate request via ASDM, follow these steps:
Step 1. Navigate to Configuration > Remote Access VPN > Certificate Management > Identity Certificates.
Step 2. Click Add to open the Add Identity Certificate dialog box.
Step 3. Specify a trustpoint name.
Step 4. Select Add a new identity certificate.
Step 5. Select the desired key pair.
Step 6. Specify the certificate subject DN, which is typically the fully qualified domain name (FQDN) of the ASA, in the form CN=<FQDN>.
Step 7. Click Add Certificate to generate the CSR and open the Identity Certificate Request dialog box.
Step 8. Click Browse to open the Save As dialog box.
Step 9. Specify a filename and click Save As to close the Save As dialog box.
Step 10. Click OK to save the CSR to the specified file and close the Identity Certificate Request dialog box.
Figure 8-3 shows the creation of a new identity certificate named EXAMPLE_IDENTITY_CERT. The identity certificate will use the key pair named EXAMPLE_KEY_PAIR and will contain the FQDN VPN-ASA1.EXAMPLE.COM in the CSR. The generated CSR will be stored in C:\Example_CSR.csr.

Figure 8-3 Creating an Identity Certificate Request via ASDM
Creating an Identity Certificate Request Using CLI
To create an identity certificate request via the CLI, you first use the crypto ca trustpoint command to create a new trustpoint and then use the crypto ca enroll command to create the CSR. Example 8-2 shows an example of generating a new RSA key pair and creating an identity certificate request via the CLI. It mirrors the configuration in Figure 8-3.
Example 8-2 Generating a New RSA Key and Creating an Identity Certificate Request via the CLI
VPN-ASA1(config)# crypto ca trustpoint EXAMPLE_IDENTITY_CERT
VPN-ASA1(config-ca-trustpoint)# keypair EXAMPLE_KEY_PAIR
VPN-ASA1(config-ca-trustpoint)# subject-name CN=VPN-ASA1.EXAMPLE.COM
VPN-ASA1(config-ca-trustpoint)# no fqdn
VPN-ASA1(config-ca-trustpoint)# enrollment terminal
VPN-ASA1(config-ca-trustpoint)# exit
VPN-ASA1(config)# crypto ca enroll EXAMPLE_IDENTITY_CERT
% Start certificate enrollment ..
% The subject name in the certificate will be: CN=VPN-ASA1.EXAMPLE.COM

% Include the device serial number in the subject name? [yes/no]: no

Display Certificate Request to terminal? [yes/no]: yes
Certificate Request follows:
-----BEGIN CERTIFICATE REQUEST-----
MIICszCCAZsCAQAwODEdMBsGA1UEAxMUVlBOLUFTQTEuRVhBTVBMRS5DT00xFzAV
BgkqhkiG9w0BCQIWCFZQTi1BU0ExMIIBIjANBgkqhkiG9w0BAQEFAAOCAQ8AMIIB
CgKCAQEAoyPeBeusNbdUh/NVZ1c0drOdsXCpShz6GbrUyp0teMns5M1+UahWFSw5
PXtVP88d09QS/E9wWyWW0RSgFT6DG8B3nfjUUbPfDrpFFkwX8Ft3OfH00K8oSVue
e5uiJgFAAa+XmmcogbzA7+HpVhyWO/y9JpTYu9Belqgv0eQ3ijy00n0rC/8XG3jD
lRQ+1xBmrYTbR8FWfgqeGILlm2aAftvTgqyB7FrwZWRT/+v+7q9HEU71N8e/Nm7S
1Q3QV/r724wUx91LFBWTi9SQF2c/TDYrYJmj15R//Wvv32KA8Gpp3Omxi6g8PGuk
/IJcQ67if+80WhAP4Eij7y5ZV8jl+QIDAQABoDYwNAYJKoZIhvcNAQkOMScwJTAO
BgNVHQ8BAf8EBAMCBaAwEwYDVR0RBAwwCoIIVlBOLUFTQTEwDQYJKoZIhvcNAQEF
BQADggEBAHzW6KZOI0oVsOToq1yV65/7KwYh6DdHfg6v2uCf/XUAhW22ocwraJkO
WwGYSQsnzLazqpuj2P3qrfld63ulnOzYrZ8dFT+aE1lR4KFmjm4JJiy0m4u2NFdt
Xghu8Rj/yd0APg3spfdcThu46fe/bZDc/Uc0vkEsXIh+zibsaxjF0VTn0EvQRQd0
mcPiF0iMJ82+Li0lK5y3y2KBjRN3TX0i3WvnJgLZlZRe2BJ1G9HxYVSzdE0Oo9c1
ZqeTU0Fe2a/k3ndqg9yFi1dfNBHqZb9B5wV+KTZtpTLD2URTYxleCbVn4B8es62B
DCtMS6q2BLyf0ysYvPyRFIkWEztoh/o=
-----END CERTIFICATE REQUEST-----

Redisplay enrollment request? [yes/no]: no
After generating the CSR for the identity certificate, you need to submit the certificate request to the CA. How this is done varies by CA, but it typically involves uploading or pasting the CSR into a web form.
Installing a Signed Identity Certificate Using ASDM
Once the CSR for the identity certificate has been approved by the CA administrator, you need to download the signed certificate in base-64 format for installation on the ASA.
To install the signed identity certificate via ASDM, follow these steps:
Step 1. Navigate to Configuration > Remote Access VPN > Certificate Management > Identity Certificates.
Step 2. Select the certificate with the associated trustpoint name specified earlier.
Step 3. Click Install to open the Install Identity Certificate dialog box.
Step 4. Click Browse to browse to the Install ID Certificate File dialog box.
Step 5. Select the signed certificate file.
Step 6. Click Install ID certificate file to close the Install ID Certificate File dialog box.
Step 7. Click Install Certificate to install the signed certificate and close the Install Identity Certificate dialog box.
Figure 8-4 shows the installation of a signed identity certificate for the trustpoint named EXAMPLE_IDENTITY_CERT. The signed identity certificate will be installed from the file C:\ VPN-ASA1.EXAMPLE.COM_cert.pem.
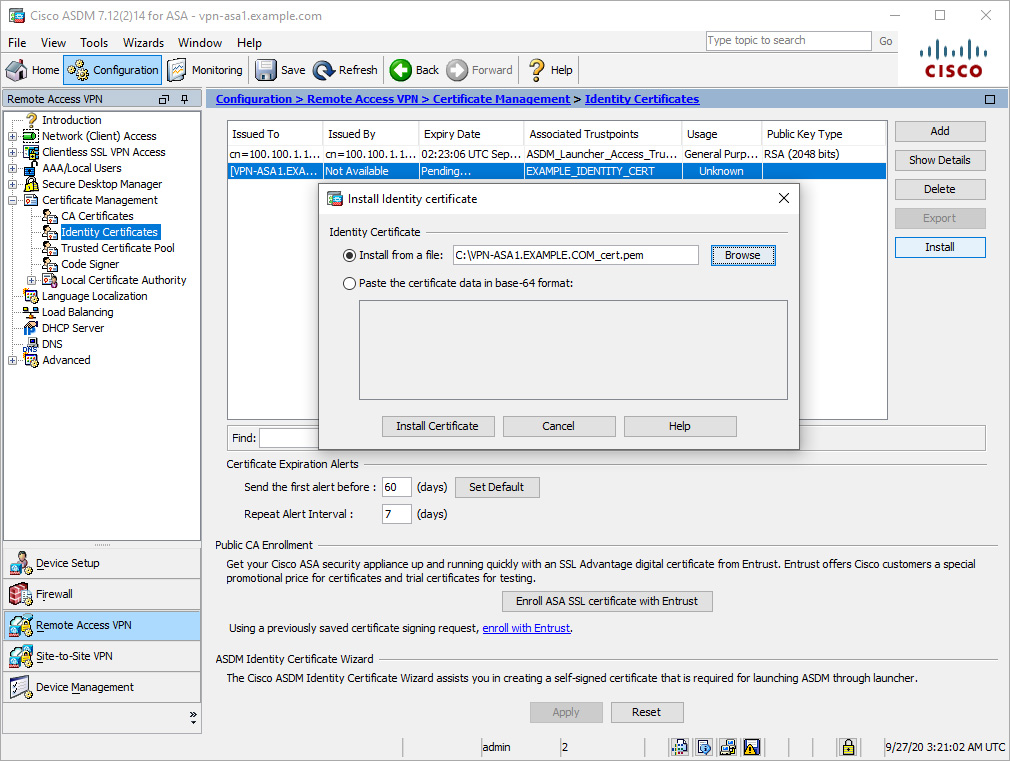
Figure 8-4 Installing a Signed Identity Certificate via ASDM
Installing a Signed Identity Certificate Using CLI
To install a signed identity certificate via the CLI, use the crypto ca import command to import the base-64-encoded certificate. Example 8-3 shows an example of installing a signed identity certificate via the CLI that mirrors the configuration in Figure 8-4.
Example 8-3 Installing a Signed Identity Certificate via the CLI
VPN-ASA1(config)# crypto ca import EXAMPLE_IDENTITY_CERT certificate

% The fully-qualified domain name in the certificate will be: VPN-ASA1


Enter the base 64 encoded certificate.
End with the word “quit” on a line by itself

MIIDODCCAiCgAwIBAgIGAXTNj66hMA0GCSqGSIb3DQEBCwUAMCcxCzAJBgNVBAYT
AlVTMRgwFgYDVQQDDA9FeGFtcGxlIFJvb3QgQ0EwHhcNMjAwOTI3MDMxNjE5WhcN
MjEwOTI3MDMxNjIwWjAfMR0wGwYDVQQDDBRWUE4tQVNBMS5FWEFNUExFLkNPTTCC
ASIwDQYJKoZIhvcNAQEBBQADggEPADCCAQoCggEBAKMj3gXrrDW3VIfzVWdXNHaz
nbFwqUoc+hm61MqdLXjJ7OTNflGoVhUsOT17VT/PHdPUEvxPcFslltEUoBU+gxvA
d5341FGz3w66RRZMF/Bbdznx9NCvKElbnnuboiYBQAGvl5pnKIG8wO/h6VYcljv8
vSaU2LvQXpaoL9HkN4o8tNJ9Kwv/Fxt4w5UUPtcQZq2E20fBVn4KnhiC5ZtmgH7b
04Ksgexa8GVkU//r/u6vRxFO9TfHvzZu0tUN0Ff6+9uMFMfdSxQVk4vUkBdnP0w2
K2CZo9eUf/1r799igPBqadzpsYuoPDxrpPyCXEOu4n/vNFoQD+BIo+8uWVfI5fkC
AwEAAaNyMHAwHwYDVR0jBBgwFoAUgxKw2Q3vg/G4gxwZ3Nr+3JsJyxkwCQYDVR0T
BAIwADATBgNVHREEDDAKgghWUE4tQVNBMTAOBgNVHQ8BAf8EBAMCBaAwHQYDVR0O
BBYEFIzXjLDM23Fxfyo1Xsdsbvv8WI5XMA0GCSqGSIb3DQEBCwUAA4IBAQC8X2vc
edrb4MsSuliFmX+yPGJ/iHxgcR1hTYpbc/PhP2fBZ6C4uptbEPQ7UPIqz4V799z/
wpdbaC8dJ1ZF4VZa6WG8rSO4x+LcgkICcZp5eoAElZK7tBsXriskjdwls28pHiHC
dDrVD+YRUs4H8pCdPO4uXZOZhkYdYIp9HHTF8J4fiLS0NTLf8+b+pHXCsOfPdML9
SDu0UvKolNONVZGk9uFHTuHAicrvfGw4Jj2tWehZFujebg6UN93LVYGghQInMHOg
NiKdLiFmOUcdvoUVseMrexydfj7JkdFCDG2b8hg+xON4qioEyN1iWmvbZ8KCi5Kd
yFrBv9mAQtl41sXT
quit
INFO: Certificate successfully imported
Step 2: Applying an Identity Certificate to the Interface(s)
After the identity certificate is imported, it needs to be associated with the interfaces that will be used to terminate SSLVPN connections to become active. The method shown here assigns the certificate to all interfaces of the ASA.
Applying the Identity Certificate Using ASDM
To apply the identity certificate to all interfaces via ASDM, follow these steps:
Step 1. Navigate to Configuration > Clientless SSLVPN Access > Connection Profiles.
Step 2. Click Device Certificate to open the Specify Device Certificate dialog box.
Step 3. Select the desired device certificate.
Step 4. Click OK to apply the identity certificate to all interfaces and close the Specify Device Certificate dialog box.
Figure 8-5 shows the application of the identity certificate from the trustpoint name EXAMPLE_IDENTITY_CERT to all interfaces.
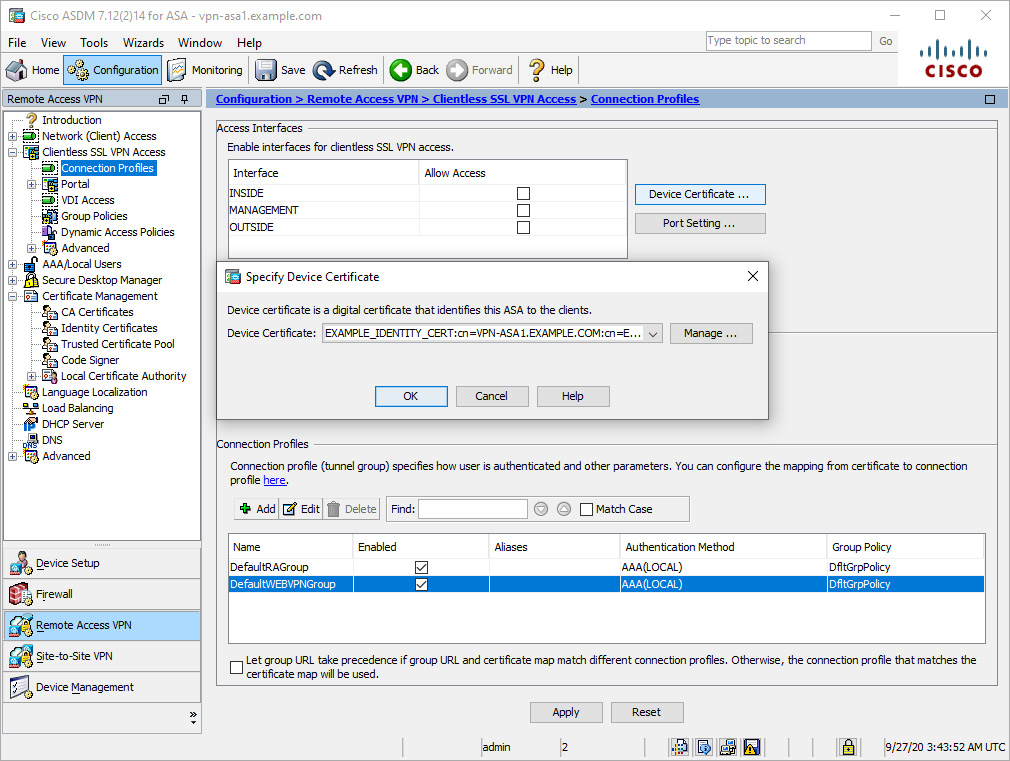
Figure 8-5 Applying an Identity Certificate to All Interfaces via the CLI
Applying the Identity Certificate Using CLI
To apply an identity certificate via the CLI, use the ssl trust-point command to associate the identity certificate with each desired interface. Example 8-4 shows an example of applying the identity certificate EXAMPLE_IDENTITY_CERT to the INSIDE, MANAGEMENT, and OUTSIDE interfaces. It mirrors the configuration in Figure 8-5.
Example 8-4 Applying an Identity Certificate to All Interfaces via the CLI
VPN-ASA1(config)# ssl trust-point EXAMPLE_IDENTITY_CERT MANAGEMENT
VPN-ASA1(config)# ssl trust-point EXAMPLE_IDENTITY_CERT OUTSIDE
VPN-ASA1(config)# ssl trust-point EXAMPLE_IDENTITY_CERT INSIDE
Step 3: Enabling Clientless SSLVPN on an Interface
With the identity certificate successfully enabled on the client interfaces, the next step in setting up a clientless SSLVPN is to enable SSLVPN on the interface that will terminate the user traffic. If SSLVPN is not enabled on the interface, the security appliance does not accept any connections, even if SSLVPN is globally enabled.
Enable Clientless SSLVPN Interface using ASDM
To enable a clientless SSLVPN on an interface via ASDM, follow these steps:
Step 1. Navigate to Configuration > Remote Access VPN > Clientless SSLVPN Access > Connection Profiles.
Step 2. Check Allow Access for the interface on which you want to enable clientless SSLVPN.
Figure 8-6 shows an example of enabling a clientless SSLVPN on the OUTSIDE interface. The clientless SSLVPN remains disabled on the INSIDE and MANAGEMENT interfaces.
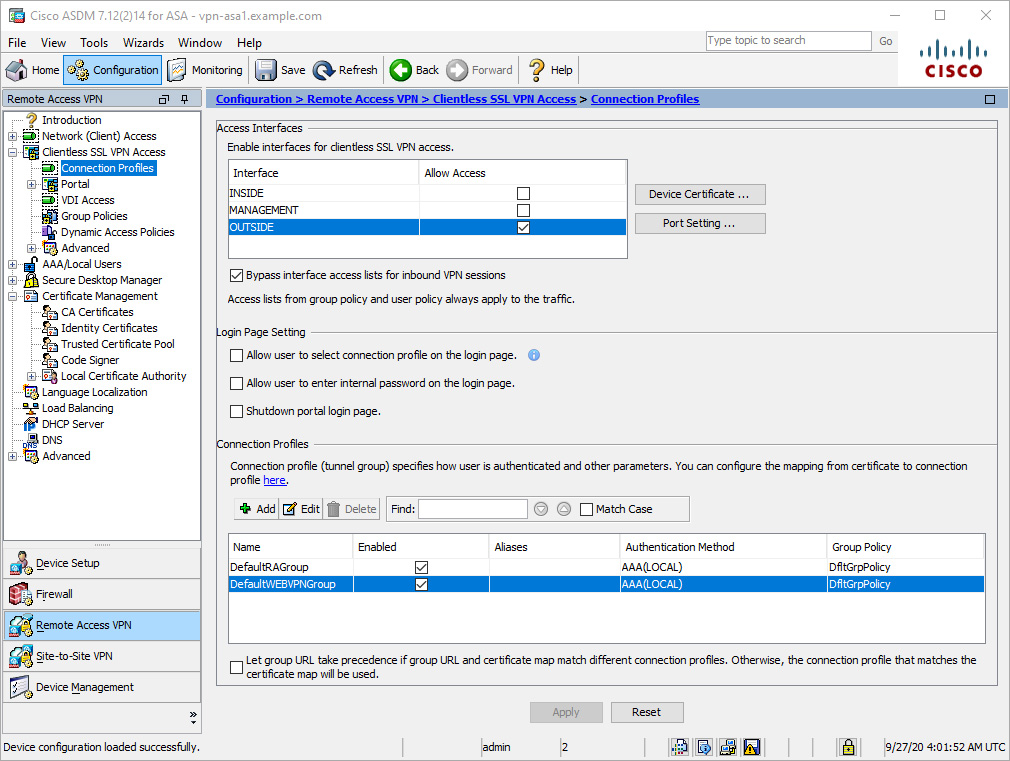
Figure 8-6 Enabling a Clientless SSLVPN on the OUTSIDE Interface via ASDM
Enable Clientless SSLVPN Interface using CLI
To enable a clientless SSLVPN via the CLI, use the enable command in webvpn configuration mode. Example 8-5 shows and example of enabling a clientless SSLVPN on the OUTSIDE interface. It mirrors the configuration in Figure 8-6.
Example 8-5 Enabling a Clientless SSLVPN on the OUTSIDE Interface via the CLI
VPN-ASA1(config)# webvpn
VPN-ASA1(config-webvpn)# enable OUTSIDE
INFO: WebVPN and DTLS are enabled on 'OUTSIDE'.
After you enable a clientless SSLVPN on an interface and click Apply to push the configuration to the device, the security appliance accepts clientless SSLVPN connection requests. The next step is to configure user authentication.
Step 4: Configuring Group Policies
Groups and users are core concepts in managing the security of VPNs and in configuring the ASA. They specify attributes that determine user access to and use of the VPN. A group is a collection of users treated as a single entity. Users get their attributes from group policies. If you do not assign a particular group policy to a user, the default group policy for the connection applies.
Group policies simplify system management. To streamline configuration, the ASA provides the default group policy DfltGrpPolicy. The default group policy provides settings that are likely to be common for many users. As you add users, you can specify that they inherit parameters from a group policy. Thus, you can quickly configure VPN access for large numbers of users.
Group Policy Selection
This capability to inherit parameters enables the ASA to accommodate the complex and dynamic nature of VPN environments. If the ASA receives attributes from multiple sources, the attributes are evaluated, merged, and applied to the user policy. If there are conflicts between attributes, an ordered ranking determines which attribute takes precedence (see Figure 8-7).
Figure 8-7 Attribute Inheritance
The following breaks down how precedence is determined for a group policy:
1. Dynamic access policy (DAP) attributes: These attributes take precedence over all others. If you set a bookmark or URL list in DAP, it overrides a bookmark or URL list set in the group policy.
2. User attributes: These are user-specific attributes.
3. Group policy attributes: These are group policy–specific attributes that are associated with a user’s group policy.
4. Connection profile default group policy attributes: A default group policy is applied to the connection profile. All users connecting to the ASA initially belong to this group, which provides any attributes that are missing from the DAP, user attributes, or the group policy assigned to the user.
5. Default group policy assigned by the ASA (DfltGrpPolicy): System default attributes provide any values that are missing from the DAP, user attributes, group policy, or connection profile.
Creating Group Policies Using ASDM
If you decide to grant identical rights to all VPN users, you do not need to configure specific group policies. However, VPNs seldom work that way. For example, you might allow a finance group to access one part of a private network, a customer support group to access another part, and a sales group to access other parts. In addition, you might allow specific users within sales to access systems that other sales users cannot access. Connection profiles and group policies provide the flexibility to do grant rights in this way.
To create and modify a group policy via ASDM, follow these steps:
Step 1. Navigate to Configuration > Remote Access VPN > Clientless SSLVPN Access > Group Policies.
Step 2. Click Add to open the Add Internal Group Policy dialog box.
Step 3. Specify a name for the group policy.
Step 4. Uncheck Inherit next to the attributes you wish to modify and specify a non-inherited value for each of these attributes.
Step 5. Click OK to close the Add Internal Group Policy dialog box.
Figure 8-8 shows an example of creating a clientless SSLVPN only group policy named CONTRACTOR_GROUP. Inheritance for the tunneling protocols attribute has been disabled, and only clientless SSLVPN connections are allowed. For users or connections mapped to this group policy, all other connection types will be denied.
Note
The default group policy DfltGrpPolicy allows clientless SSLVPNs as well as IPsec/IKEv1, IPsec/IKEv2. and L2TP/IPsec by default. It does not allow SSLVPN client connections by default.

Figure 8-8 Creating a Clientless SSLVPN Group Policy via ASDM
Creating Group Policies Using CLI
To create and modify a group policy via the CLI, you first use the group-policy name internal command to create the group policy. Then you use the group policy name attributes command to enter group-policy configuration mode. Finally, you use the commands listed in Table 8-5 modify the desired attribute(s) or use the webvpn command to enter group policy webvpn configuration mode and use the commands in Table 8-6 to modify the desired attributes(s). Example 8-6 shows an example of creating a clientless SSLVPN group policy via the CLI; it mirrors the configuration in Figure 8-8.
Example 8-6 Creating a Clientless SSL Group Policy via the CLI
VPN-ASA1(config)# group-policy CONTRACTOR_GROUP internal
VPN-ASA1(config)# group-policy CONTRACTOR_GROUP attributes
VPN-ASA1(config-group-policy)# vpn-tunnel-protocol ssl-clientless
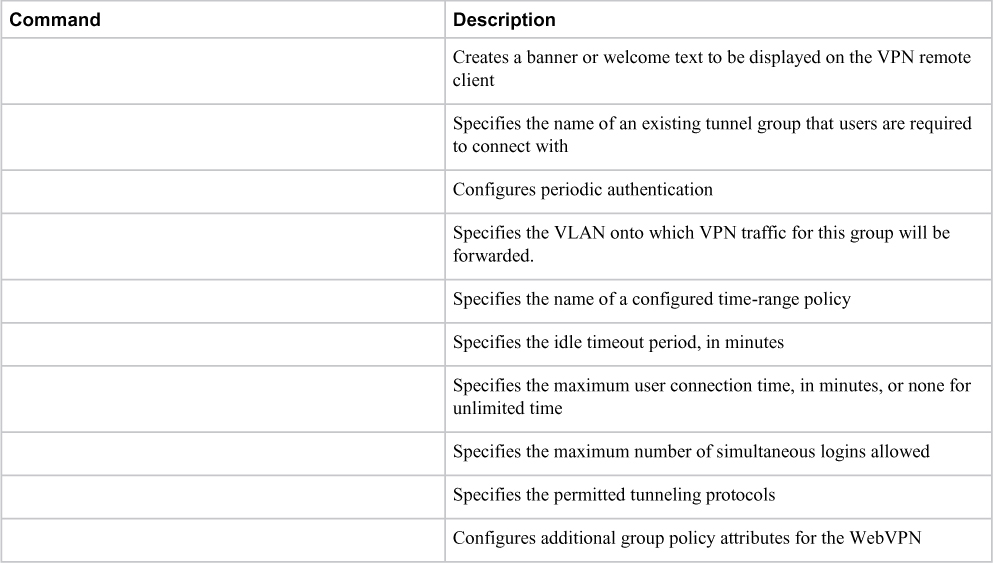
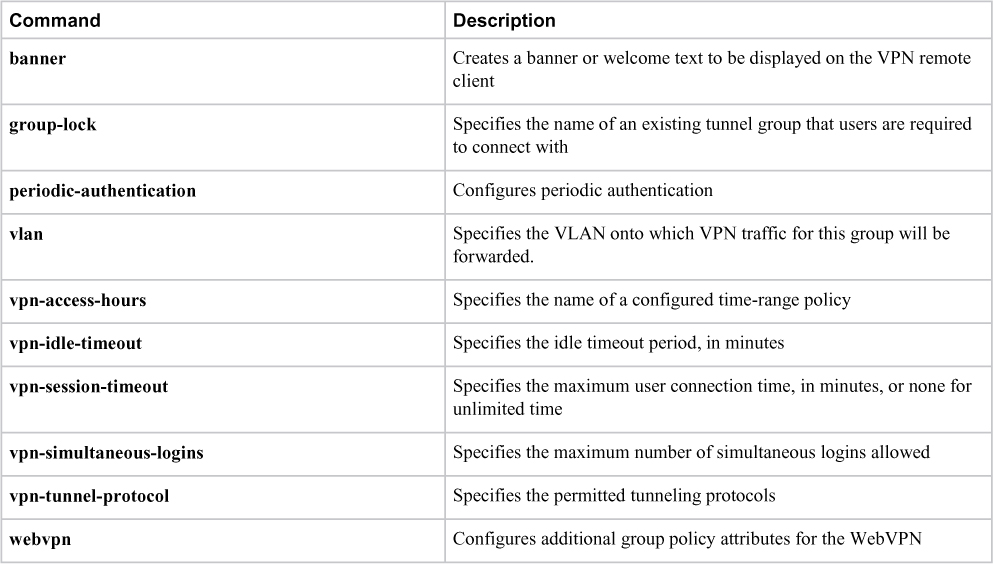
Group Policy Attributes for Clientless SSLVPNs
Group policy attributes are parameters you can apply to group of hosts leveraging the VPN technology. This can make things easier regarding standardizing the user experience across large groups of people. This also enables you to create templates to speed up configuring new groups of users. For example, you could copy one user group, tweak a few attributes, and call it a new user group rather than building a new user group from scratch. It is important to know what parameters are available, which are shown in Table 8-5.
Table 8-5 Group Policy Attributes for Clientless SSLVPNs
WebVPN Group Policy Attributes
In group policy WebVPN configuration mode, you can specify whether to inherit or customize the parameters as shown Table 8-6. This is similar to the concept covered in Table 8-5, meaning you are creating parameters that will be applied to anybody within the group policy.
Table 8-6 WebVPN Group Policy Attributes for Clientless SSLVPNs


WebVPN Group Policy vs. Group Policy Attributes
Know that for WebVPN group policy and group policy attributes the concepts behind how they work are the same. The difference between WebVPN group policies and group policies is where you apply the commands, meaning the commands are located in different places as you configure your VPN. You use the commands listed in Table 8-5 to modify the desired attribute(s) or use the webvpn command to enter group policy webvpn configuration mode, and use the commands in Table 8-6 to modify the desired attributes(s).
Know that the user, group, and default group policies can be applied to clientless, AnyConnect, and IPsec-based remote access VPN tunnels. Some of the most commonly used clientless SSLVPN-specific attributes are discussed in detail in the next few sections of this chapter.
Step 5: Configuring Connection Profiles
A connection profile, also known as a tunnel group, consists of a set of records that determines tunnel connection policies. These records identify the servers to which the user is authenticated, as well as the accounting servers, if any, to which connection information is sent. They also identify a default group policy for the connection, and they contain protocol-specific connection parameters. Connection profiles include a small number of attributes that pertain to creating a tunnel. A connection profile includes a pointer to a group policy that defines user-oriented attributes.
Default Connect Profiles
The ASA provides the following default connection profiles: DefaultL2Lgroup for LAN-to-LAN connections, DefaultRAgroup for IPsec remote access connections, and DefaultWEBVPNGroup for SSLVPN (browser-based and AnyConnect-based) connections. You can modify these default connection profiles, but you cannot delete them. You can also create one or more connection profiles specific to your environment. Connection profiles are local to the ASA and are not configurable on external servers.
Creating a Connection Profile Using ASDM
To create and modify a connection profile via ASDM, follow these steps:
Step 1. Navigate to Configuration > Remote Access VPN > Clientless SSL VPN Access > Connection Profiles.
Step 2. Click Add to open the Add Clientless SSL VPN Connection Profile dialog box.
Step 3. Specify a name for the connection policy.
Step 4. Specify one or more servers for DNS, if not already configured.
Step 5. Specify a domain name, if not already configured.
Step 6. Make any other desired changes.
Step 7. Click OK to create the clientless SSLVPN connection profile and close the Add Clientless SSL VPN Connection Profile dialog box.
While not strictly required, you must configure the Domain Name System (DNS) server(s) if:
• Users will be allowed to browse and access internal websites by using FQDNs
• Administrators configure bookmarks that use FQDNs
Figure 8-9 shows an example of creating a simple connection profile for contractors named CONTRACTOR_CONNECTION. The alias CONTRACTORS has been configured to allow users to select this connection group via a drop-down on the login page (if enabled). After a user connects, the ASA will use the DNS server 172.20.1.50 to resolve FQDNs and will append the domain example.com to unqualified names. The attributes from the group policy of CONTRACTORS will be applied to users connecting with this connection; the attributes enable the clientless SSLVPN protocol that has been selected. Users will be authenticated to the local database.
Note
To enable users to select their desired connection profile on the login page, check the Allow user to select connection profile on the login page option on the Connection Profiles page.

Figure 8-9 Creating a Simple Connection Profile for Contractors via ASDM
Creating a Connection Profile Using CLI
To create and modify a connection profile via the CLI, use the tunnel-group name type remote-access command to create the tunnel group. Then use the tunnel-group name general-attributes command to enter the tunnel-group general-attributes configuration mode. Finally, configure the attributes shown in Table 8-7 or use the tunnel-group name webvpn-attributes command to enter the tunnel-group webvpn-attributes configuration mode to configure the attributes shown in Table 8-8. Example 8-7 shows an example of creating a simple connection profile for contractors, setting the alias attribute to CONTRACTORS, and setting the default group policy to CONTRACTOR_GROUP. Example 8-8 shows an example of setting the domain name and name server for the device if they were not already configured. The configuration in Example 8-7 and Example 8-8 mirrors the configuration in Figure 8-9.
Example 8-7 Creating a Simple Connection Profile for Contractors via the CLI
vpn-asa1(config)# tunnel-group CONTRACTOR_CONNECTION type remote-access
vpn-asa1(config)# tunnel-group CONTRACTOR_CONNECTION general-attributes
vpn-asa1(config-tunnel-general)# default-group-policy CONTRACTOR_GROUP
vpn-asa1(config-tunnel-general)# tunnel-group CONTRACTOR_CONNECTION webvpn-attributes
vpn-asa1(config-tunnel-webvpn)# group-alias CONTRACTORS enable
vpn-asa1(config-tunnel-webvpn)# exit
Example 8-8 Setting DefaultDNS Settings if Not Already Configured
vpn-asa1(config)# dns server-group DefaultDNS
vpn-asa1(config-dns-server-group)# domain-name example.com
vpn-asa1(config-dns-server-group)# name-server 172.20.1.50
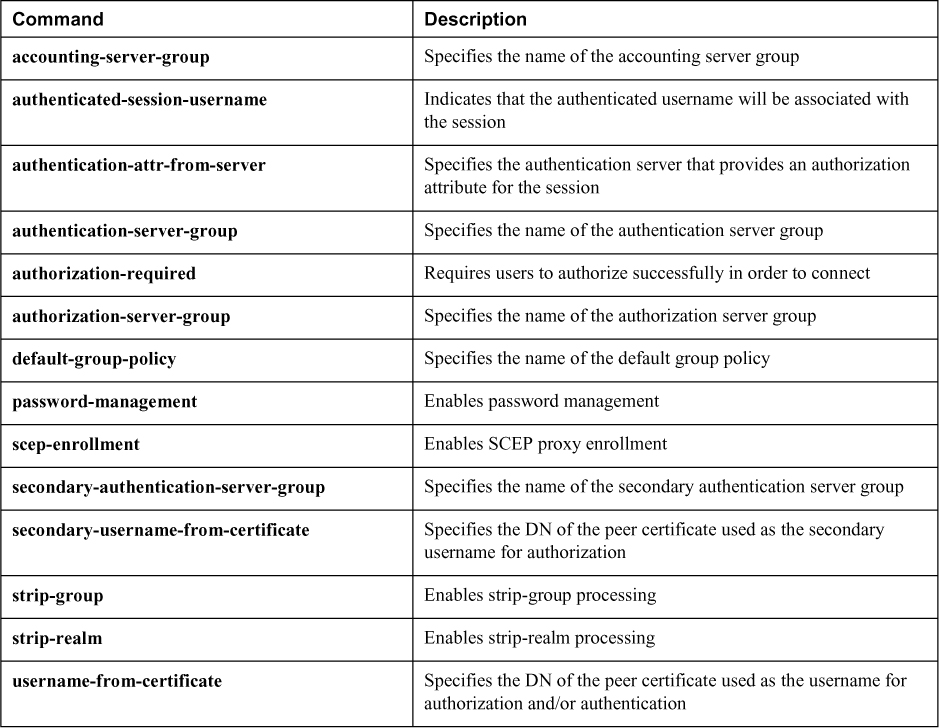
Connection Profile General Attributes
There are a handful of options you can choose for a connection profile. Table 8-7 provides a summary of those options. Think of a connection profile as the security guard at an airport who is responsible for moving passengers to the proper checkpoint line. Attributes can be used to determine how the client will be authenticated, which policies you want to apply to the user upon authentication, and other connection parameters. Just as we explained earlier in this chapter, attributes are a powerful way to group users into a specific experience. We recommend being familiar with the general attributes available for a connection profile for the SVPN exam.
Table 8-7 Connection Profile General Attributes for Clientless SSLVPNs


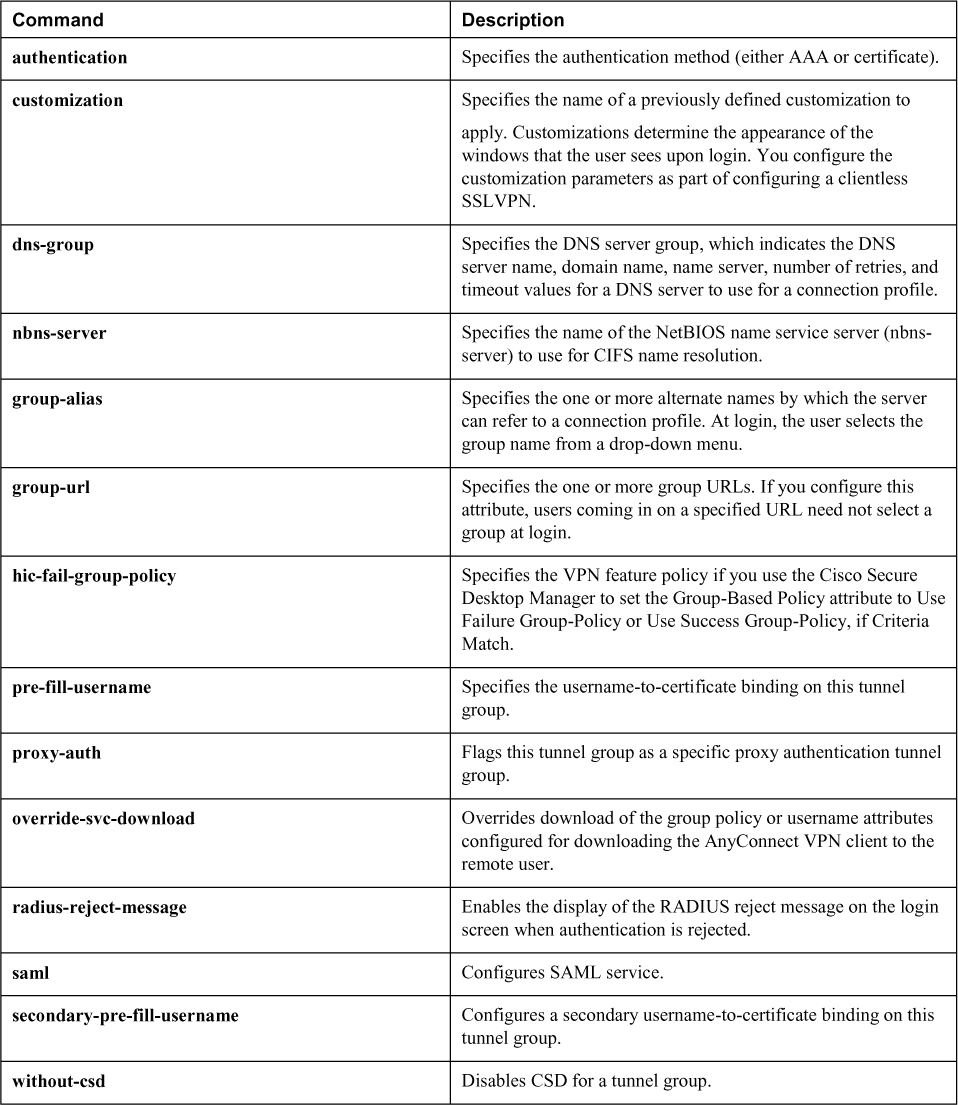
Connection Profile WebVPN Attributes
Another group of attributes you can configure for a connection profile are the WebVPN attributes. These attributes are more specific to the SSLVPN experience, meaning they are options for this point of building your WebVPN solution. Know that the difference between general attributes and WebVPN attributes is where you configure them. Both are essentially the same thing but are configuration options located at different places. Table 8-8 shows the WebVPN attribute options.
Table 8-8 Connection Profile WebVPN Attributes for Clientless SSLVPNs

Step 6: Configuring User Authentication
Authentication is a critical component of a VPN technology. Industry best practice is leveraging multifactor authentication based on a combination of something you know, something you have, and something you are. Best practice also includes using a centralized database to manage all user login details versus creating accounts for individual systems. For example, it is common to create a separate policy for administrators and employees in which employees have less privileges than administrators. It is also common to require employees to use a combination of a password and token to prove their identity.
The ASA supports a number of different authentication protocols and databases to meet the requirements of the previous example as well as many other use cases. The following are options you can use to meet your authentication requirements:
• RADIUS (Remote Authentication Dial-In User Service)
• NT domain
• Kerberos
• SDI (RSA SecureID)
• LDAP (Lightweight Directory Access Protocol)
• Digital certificates
• Smart cards
• Local database
• SAML 2.0 (Security Assertion Markup Language)
Authentication Servers
For small organizations, a local database can be set up for user authentication. This is fine for supporting a few users; however, as an organization grows, so will its users and resources that need to be secured. There will be a point where the administration overhead of creating individual user accounts on separate systems will overwhelm an administration team, and a centralized solution will be needed.
For medium to large SSLVPN deployments, it is highly recommended that you use an external authentication server, such as a RADIUS, LDAP, or Kerberos server, as the user authentication database. The value of using a centralization authentication system includes the following:
• Having one database that all systems reference for authentication
• Having one place to provision and disable accounts
• Having simplified monitoring and logging of authentication behavior
• Being able to group users with similar policies into categories such as Employees and Contractors
• Having standardized authentication across the organization
While you prepare for the SVPN exam, you might be able to access an ASA or ASA emulator. For a lab environment, you can practice creating a local account for user authentication purposes. Next, we work through how to do that using both ASDM and CLI.
Configuring Authentication Using ASDM
To create a VPN-only local user via ASDM, follow these steps:
Step 1. Navigate to Configuration > Remote Access VPN > AAA/Local Users > Local Users.
Step 2. Click Add to open the Add User Account dialog box.
Step 3. Specify a username.
Step 4. Specify a password and confirm the password.
Step 5. Select No ASDM, SSH, Telnet or Console access to block admin access.
Step 6. Click OK to create the user account and close the Add User Account dialog box.
Figure 8-10 shows an example of creating a VPN only local user with the username vpnuser2. No ADSM, SSH, Telnet, or console access has been selected, which will result in the user only being able to log in to the VPN. There were two users accounts, admin and vpnuser, previously configured on the ASA. The admin account can both administer the ASA via ASDM/CLI and log in to the VPN; vpnuser can only log in to the VPN.

Figure 8-10 Creating a VPN Only Local User via ASDM
Configuring Local Authentication Using CLI
To create a VPN only local user via the CLI, use the username command to create the user. Then use the username name attributes command to enter username configuration mode and use the service-type command to specify the allowed service type(s) for the user. Example 8-9 shows an example of creating a VPN only user with the service-type remote-access that mirrors the configuration in Figure 8-10.
Example 8-9 Creating a VPN Only Local User via the CLI
vpn-asa1(config)# username vpnuser2 password cisco123 privilege 2
vpn-asa1(config)# username vpnuser2 attributes
vpn-asa1(config-username)# service-type remote-access
With authentication configured, users can now log in to the VPN by navigating to https://vpn-asa1.example.com/ from any standard web browser. Upon doing so, they will be greeted by the login page. While the VPN is now functional and will provide users access to browse internal resources via the explorer bar, the next section discusses how the functionality of the clientless SSLVPN can be extended beyond the default configuration and functionality.
The majority of organizations we work with have some form of centralized authentication system. For this reason, you will need to know how to configure a VPN solution to work with an external authentication solution. This chapter gave you an example of using local authentication. In Chapter 9, you see how to use an external authentication solution. Make sure you know how to use both local and external authentication options.
That wraps up configuring a basic SSLVPN using both ASDM and CLI. Now that you can build a basic SSLVPN, we will look at configuration options that impact the users who successfully connect through the VPN solution.
Extended Clientless SSLVPN Configuration Options
The previous section discusses the basic steps required to enable a clientless SSLVPN on the ASA. With users able to successfully access the clientless SSLVPN, we turn our focus to enabling their access to specific applications and controlling which applications they can access. To accomplish that goal, we explore the following topics:
• Configuring bookmarks
• Configuring web ACLs
• Configuring application access via port forwarding
• Configuring application access via smart tunnels
• Configuring client/server plug-ins
Configuring Bookmarks
By default, users can browse for resources by using the explorer bar within the clientless SSLVPN portal. Administrators can also define bookmarks to provide users with predefined servers to access. Both of these options are illustrated in Figure 8-11.
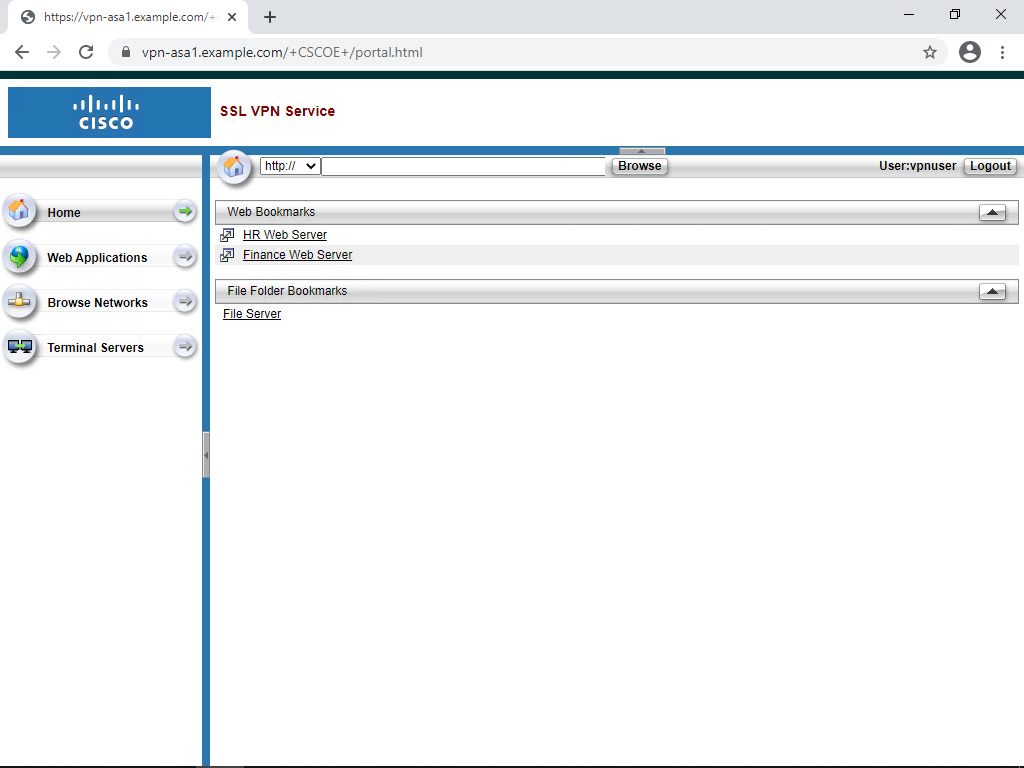
Figure 8-11 Clientless SSLVPN Portal with Explorer Bar and Bookmarks
Defining bookmarks serves two primary purposes. If the explorer bar remains enabled, bookmarks make it easy for users to access commonly used resources. If the administrator chooses to disable the explorer bar, bookmarks serve as a way to restrict the resources users can easily access.
Bookmark Support
Bookmarks are supported for multiple different application types and protocols, including these:
• Websites (HTTP and HTTPS)
• File servers (CIFS and FTP)
• RDP (Remote Desktop Protocol)
• VNC (Virtual Network Computing)
• SSH and Telnet
Note
You will not see an option for RDP, VNC, SSH, and/or Telnet unless the appropriate client/server plug-in has been installed first. Installing client/server plug-ins is covered later in this chapter.
Configuring a bookmark is a two-step process:
Step 1. Create a bookmark list.
Step 2. Apply the bookmark list (for example, via a group policy).
Creating a Bookmark List
To create a simple bookmark via ASDM, follow these steps:
Step 1. Navigate to Configuration > Remote Access VPN > Clientless SSL VPN Access > Portal > Bookmarks.
Step 2. Click Add to open the Add Bookmark List dialog box.
Step 3. Specify a bookmark list name that will later be referenced in a group policy.
Step 4. Click Add to open the Select Bookmark Type dialog box.
Step 5. Select URL with a GET or POST method.
Step 6. Click OK to close the Select Bookmark Type dialog box and open the Add Bookmark dialog box.
Step 7. Specify a bookmark title that will be the name for the bookmark that is visible to the user.
Step 8. Specify URL for the bookmark.
Step 9. Click OK to add the bookmark and close the Add Bookmark dialog box.
Step 10. Click OK to add the bookmark list close the Add Bookmark List dialog box.
Figure 8-12 shows an example of creating a simple bookmark list for contractors called CONTRACTOR_BOOKMARKS. There is a single bookmark named HR Web Server that points to the URL http://hr.example.com.
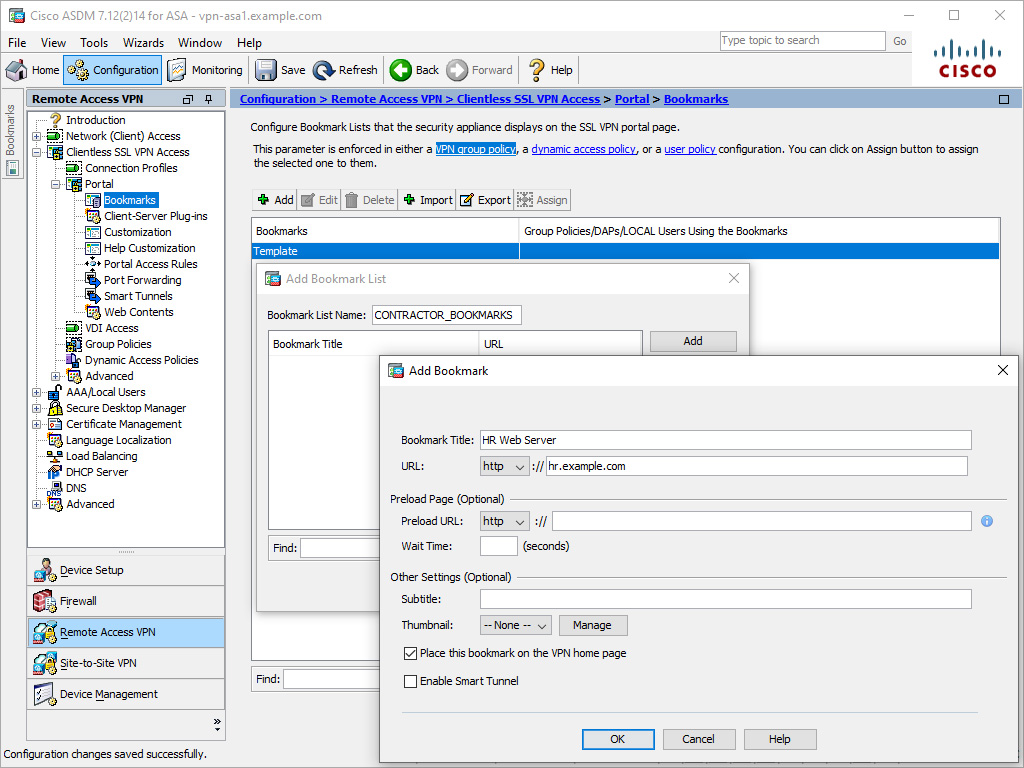
Figure 8-12 Configuring a Simple Bookmark List for Contractors via ASDM
Note
You must use ASDM to create bookmarks. Creating bookmarks via the CLI is not currently supported.
Applying the Bookmark List to a Group Policy Using ASDM
To apply a bookmark list to a group policy via ASDM, follow these steps:
Step 1. Navigate to Configuration > Remote Access VPN > Clientless SSL VPN Access > Group Policies.
Step 2. Select a group policy and click Edit to open the Edit Internal Group Policy dialog box.
Step 3. Click Portal.
Step 4. Uncheck the Inherit next to Bookmark List and select the desired bookmark list in the drop-down.
Step 5. Click OK to close the Edit Internal Group Policy dialog box.
Figure 8-13 shows an example of setting the bookmark list attribute to CONTRACTOR_BOOKMARKS for the group policy CONTRACTOR_GROUP.

Figure 8-13 Setting the Bookmark List Attribute for a Group Policy via ASDM
Applying the Bookmark List to a Group Policy Using CLI
To set the bookmark list attribute in a group policy via the CLI, use the url-list command in group policy webvpn configuration mode. Example 8-10 shows an example of setting the bookmark list attribute to CONTRACTOR_BOOKMARKS in the group policy CONTRACTOR_GROUP. It mirrors the configuration in Figure 8-12 and Figure 8-13.
Example 8-10 Setting the Bookmark List Attribute in a Group Policy via the CLI
vpn-asa1(config)# group-policy CONTRACTOR_GROUP attributes
vpn-asa1(config-group-policy)# webvpn
vpn-asa1(config-group-webvpn)# url-list value CONTRACTOR_BOOKMARKS
Configuring Web ACLs
Web ACLs allow administrators to control the resources users are able to access when making access requests through a clientless SSLVPN. Unlike network ACLs, though, web ACLs only affect clientless SSLVPN traffic.
Web ACL Support
The ASA supports the following types of web ACLs:
• CIFS, FTP, and NFS
• Citrix and Citrixs
• HTTP and HTTPS
• IMAP4, POP3, and SMTP
• SSH and Telnet
• RDP and VNC
• Smart tunnel
• Any type of traffic
Note
You must import the RDP, VNC, and SSH/Telnet plug-ins to be able to filter those protocols via a web ACL. Plug-ins are discussed later in this chapter.
By default, there is no web ACL applied to group policies, and all traffic is allowed through a clientless SSLVPN. Once an ACL is defined and applied to the group policy, the behavior changes: If traffic is not explicitly allowed, it will be blocked.
Configuring a web ACL is a two-step process:
Step 1. Create a web ACL.
Step 2. Apply the web ACL list (for example, via a group policy).
Creating a Web ACL Using ASDM
To create a web ACL via ASDM, follow these steps:
Step 1. Navigate to Configuration > Remote Access VPN > Clientless SSL VPN Access > Advanced > Web ACLs.
Step 2. Click Add > Add ACL to open the Add ACL dialog box.
Step 3. Specify an ACL name, and click OK to create the web ACL and close the Add ACL dialog box.
Step 4. Select the previously created web ACL.
Step 5. Click Add > Add ACE to open the Add ACE dialog box.
Step 6. In the Filter section, select one of the following:
• Filter on URL: To filter based on the application layer URL
• Filter on Address and Service: To filter based on TCP layer information
Step 7. Click OK to create the ACE and close the Add ACE dialog box.
Figure 8-14 shows the creation of a web ACL named CONTRACTOR_WEBACL. The ACL will have a single ACE that permits traffic to http://hr.example.com.

Figure 8-14 Creating a Web ACL via ASDM
Creating a Web ACL Using CLI
To create a web ACL via the CLI, use the access-list name webtype command to create the ACL and ACE. Example 8-11 shows an example of creating the web ACL CONTRACTOR_WEBACL. It mirrors the configuration in Figure 8-14.
Example 8-11 Creating a Web ACL via the CLI
vpn-asa1(config)# access-list CONTRACTOR_WEBACL webtype permit url http://hr.example.com
Applying a Web ACL to a Group Policy Using ASDM
To apply a web ACL to a group policy, follow these steps:
Step 1. Navigate to Configuration > Remote Access VPN > Clientless SSL VPN Access > Group Policies.
Step 2. Select a group policy and click Edit to open the Edit Internal Group Policy dialog box.
Step 3. Click General.
Step 4. Click More Options.
Step 5. Uncheck the Inherit check box next to Web ACL.
Step 6. Select the desired web ACL from the drop-down to apply to the group policy.
Step 7. Click OK to close the Edit Internal Group Policy dialog box.
Figure 8-15 shows an example of setting the web ACL attribute to CONTRACTOR_WEBACL for the group policy CONTRACTOR_GROUP.
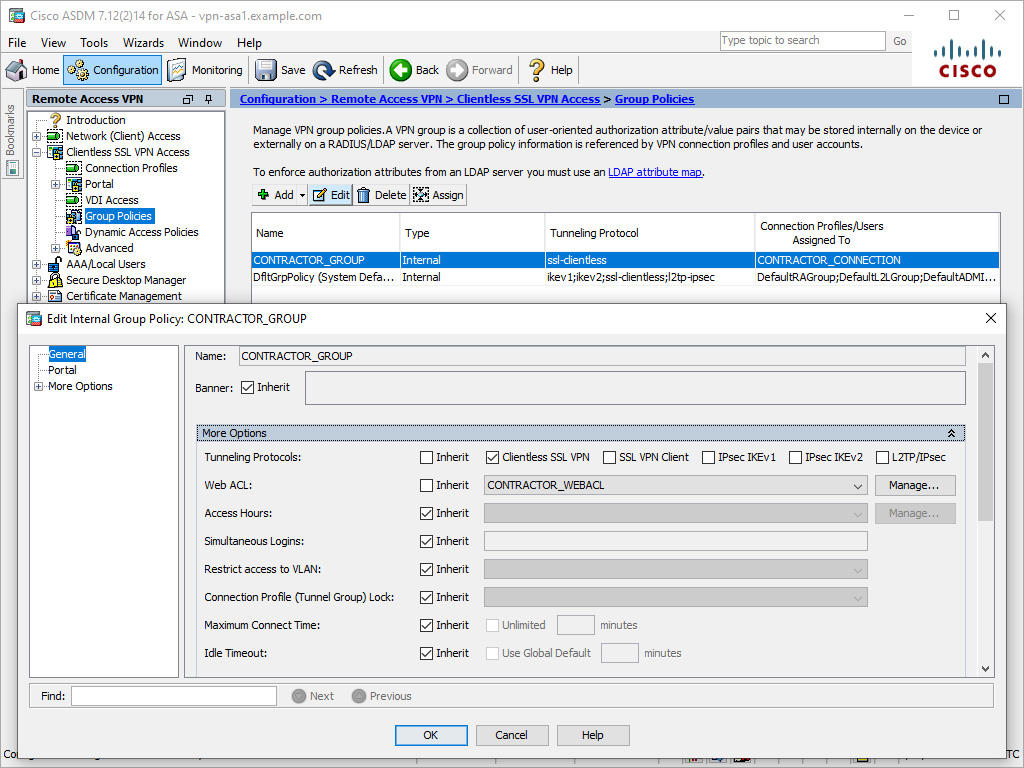
Figure 8-15 Setting the Web ACL Attribute for a Group Policy via ASDM
Applying a Web ACL to a Group Policy Using CLI
To apply a web ACL to a group policy via the CLI, use the filter value command in group policy webvpn configuration mode to set the attribute for a group policy. Example 8-12 shows an example of applying the web ACL CONTRACTOR_WEBACL to the group policy CONTRACTOR_GROUP. It mirrors the configuration in Figure 8-15.
Example 8-12 Applying a Web ACL to a Group Policy via the CLI
vpn-asa1(config)# group-policy CONTRACTOR_GROUP attributes
vpn-asa1(config-group-policy)# webvpn
vpn-asa1(config-group-webvpn)# filter value CONTRACTOR_WEBACL
Configuring Application Access via Port Forwarding
Port forwarding allows users to access TCP-based applications over a clientless SSLVPN connection. Such applications include Secure FTP (FTP over SSH), SSH, Telnet, and Windows Terminal Service.
Port forwarding only works with applications that use a single TCP port. Applications that use UDP, dynamic TCP ports (for example, Active FTP) or multiple TCP ports are not supported. Due to these limitations, port forwarding is primarily a legacy technology for supporting simple TCP applications over a clientless SSLVPN connection. New implementations should use smart tunnels, which are discussed in the next section.
Port forwarding involves using a Java applet to redirect traffic destined to a local IP address and port across the clientless SSLVPN. In Figure 8-16, RDP traffic destined to 127.0.0.1 on port 12345 will be directed across the clientless SSLVPN and forwarded to the server hr.example.com on port 3389. On the RDP client, the user directs the client to connect to 127.0.0.1:12345 rather than hr.example.com.

Figure 8-16 Port Forwarding of RDP Traffic
Configuring a port forwarding list is a two-step process:
Step 1. Create a port forwarding list.
Step 2. Apply the port forwarding list (for example, via a group policy).
Creating a Port Forwarding List Using ASDM
To create a port forwarding list via ASDM, follow these steps:
Step 1. Navigate to Configuration > Clientless SSL VPN Access > Portal > Port Forwarding.
Step 2. Click Add to open the Add Port Forwarding List dialog box.
Step 3. Specify a list name for the port forwarding list.
Step 4. Click Add to bring up the Add Port Forwarding Entry dialog box.
Step 5. Specify the local TCP port for the client connection.
Step 6. Specify the remote server the connection should be redirected to.
Step 7. Specify the remote TCP port to which the connections should be redirected.
Step 8. Specify an optional user-visible description for the port forwarding entry.
Step 9. Click OK to create the port forwarding entry and close the Add Port Forwarding Entry dialog box.
Step 10. Click OK to create the port forwarding list and close the Add Port Forwarding List dialog box.
Figure 8-17 shows an example of configuring the port forwarding entry that matches Figure 8-16. Traffic travels from the local TCP port 12345 to the remote server hr.example.com on port 3389. The user sees the description of hr.example.com RDP in the port forwarding applet. The forwarding entry is added to the port forwarding list CONTRACTOR_PORTFORWARDING.
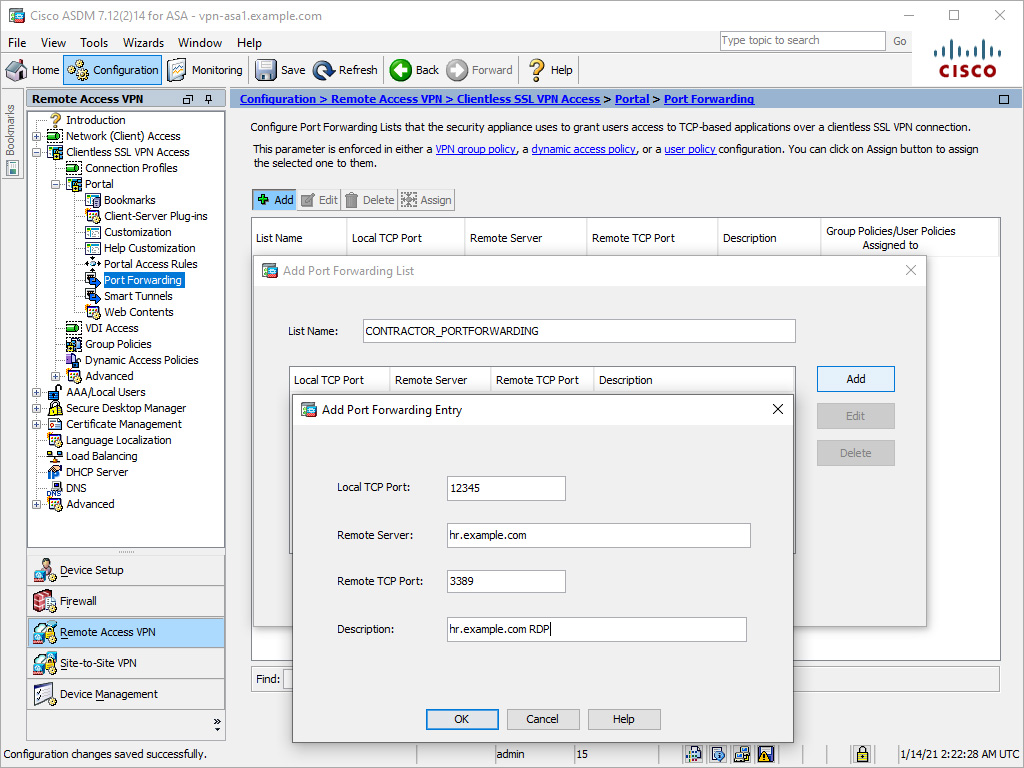
Figure 8-17 Defining a Port Forwarding List
Creating a Port Forwarding List Using CLI
To create a port forwarding list via the CLI, use the port-forward command in the webvpn configuration mode. Example 8-13 shows an example of creating a port forwarding list. It mirrors the configuration in Figure 8-17.
Example 8-13 Creating a Port Forwarding List via the CLI
vpn-asa1(config)# webvpn
vpn-asa1(config-webvpn)# port-forward CONTRACTOR_PORTFORWARDING 12345 hr.example.com
Applying a Port Forwarding List to a Group Policy Using ASDM
To apply a port forwarding list to a group policy via ASDM, follow these steps:
Step 1. Navigate to Configuration > Remote Access VPN > Clientless SSLVPN Access > Group Policies and select the desired group policy.
Step 2. Click Edit to bring up the Edit Internal Group Policy dialog box.
Step 3. Click Portal.
Step 4. Uncheck the Inherit check box next to Port Forwarding List and select the previously created port forwarding in the drop down.
Step 5. Click OK to close the Edit Internal Group Policy dialog box.
Figure 8-18 shows the port forwarding list CONTRACTOR_PORTFORWARDING applied to the group policy CONTRACTOR_GROUP.

Figure 8-18 Applying a Port Forwarding List to a Group Policy via ASDM
Applying a Port Forwarding List to a Group Policy Using ASDM
To apply a port forwarding list to a group policy via the CLI, use the port-forward command in the group policy webvpn configuration mode. Example 8-14 shows applying a port forwarding list to a group policy. It mirrors the configuration in Figure 8-18.
Example 8-14 Applying a Port Forwarding List to a Group Policy via the CLI
vpn-asa1(config-config)# group-policy CONTRACTOR_GROUP attributes
vpn-asa1(config-group-policy)# webvpn
vpn-asa1(config-group-webvpn)# port-forward enable CONTRACTOR_PORTFORWARDING
Configuring Application Access via Smart Tunnels
A smart tunnel is a connection between a TCP-based application and a private site, using a clientless (browser-based) SSLVPN session with the security appliance as the pathway and the security appliance as a proxy server. You can identify applications to which you want to grant smart tunnel access and specify the local path to each application. For applications that run on Microsoft Windows, you can also require a match of the SHA-1 hash of the checksum as a condition for granting smart tunnel access.
Smart Tunnel Requirements
Depending on whether the application is a client or a web-enabled application, smart tunnel configuration requires one of these procedures:
• Create one or more smart tunnel lists of the client applications and then assign the list to the group policies or local user policies for which you want to provide smart tunnel access.
• Create one or more bookmark list entries that specify the URLs of the web-enabled applications eligible for smart tunnel access and then assign the list to the DAPs, group policies, or local user policies for which you want to provide smart tunnel access
You can also list web-enabled applications for which to automate the submission of login credentials in smart tunnel connections over clientless SSLVPN sessions.
A smart tunnel table displays the smart tunnel lists, each of which identifies one or more applications eligible for smart tunnel access and its associated operating system. Because each group policy or local user policy supports one smart tunnel list, you must group the non-browser-based applications to be supported into a smart tunnel list. Following the configuration of a list, you can assign it to one or more group polices or local user policies.
Smart Tunnel Benefits
Smart tunnel access offers the following advantages to users:
• A smart tunnel offers better performance than plug-ins.
• Unlike port forwarding, a smart tunnel simplifies the user experience by not requiring the user connection of the local application to the local port.
• Unlike port forwarding, a smart tunnel does not require users to have administrator privileges.
• Unlike port forwarding and smart tunnel access, a plug-in does not require the client application to be installed on the remote computer.
Configuring a smart tunnel list is another two-step process:
Step 1. Create a smart tunnel list.
Step 2. Apply the smart tunnel list (for example, via a group policy).
Creating a Smart Tunnel List Using ASDM
To create a smart tunnel application list via ASDM, follow these steps:
Step 1. Navigate to Configuration > Remote Access VPN > Clientless SSLVPN Access > Portal > Smart Tunnels.
Step 2. In the Smart Tunnel Application List section, click Add bring up the Add Smart Tunnel List dialog box.
Step 3. Specify a list name for the new smart tunnel list.
Step 4. Click Add to bring up the Add Smart Tunnel Entry dialog box.
Step 5. Specify an application ID for the new smart tunnel entry.
Step 6. Select the operating system that the smart tunnel entry will apply to.
Step 7. Specify the name of the process that will be tunneled (for example, word.exe).
Step 8. Optionally, specify the hash of the process to further identify the correct process.
Step 9. Click OK to create the smart tunnel entry and close the Add Smart Tunnel Entry dialog box.
Step 10. Click OK to create the smart tunnel and close the Add Smart Tunnel List dialog box.
Figure 8-19 shows a new smart tunnel entry named PUTTY to tunnel traffic from the Windows process putty.exe. The smart tunnel entry is being added to the smart tunnel list named CONTRACTOR_SMARTTUNNEL.
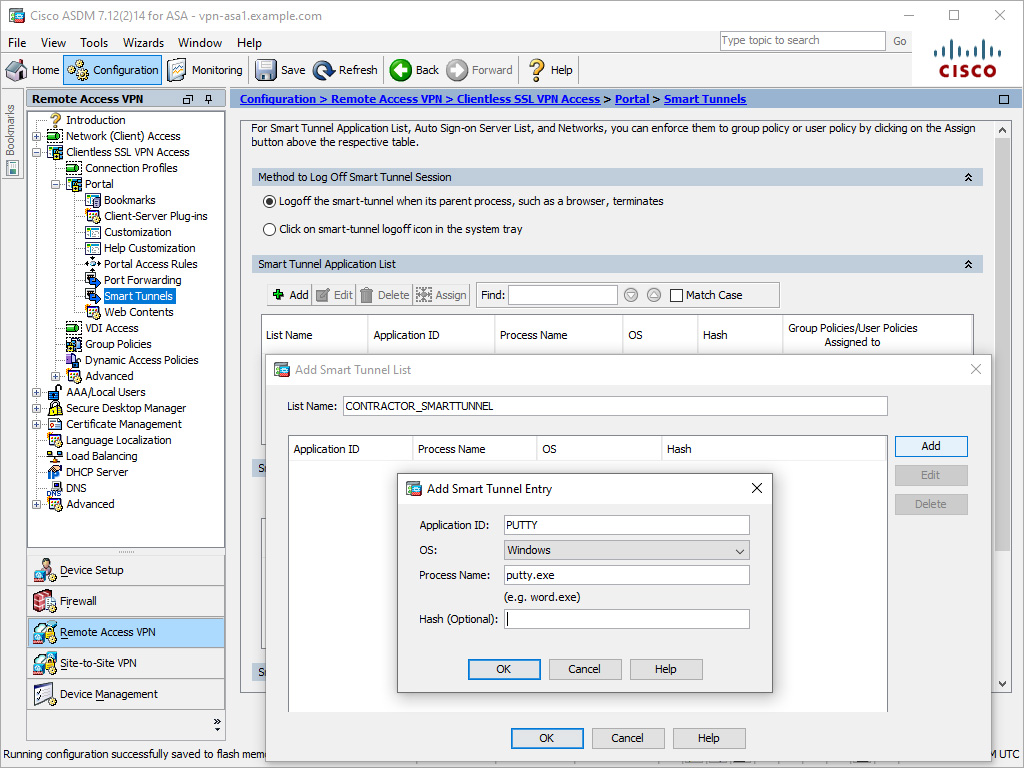
Figure 8-19 Creating a Smart Tunnel Application List via ASDM
Creating a Smart Tunnel List Using ASDM
To create a smart tunnel application list via the CLI, use the smart-tunnel list command. Example 8-15 shows an example of creating the smart tunnel application list CONTRACTOR_SMARTTUNNEL for the process putty.exe. It mirrors the configuration in Figure 8-19.
Example 8-15 Defining Smart Tunnel via the CLI
vpn-asa1(config)# webvpn
vpn-asa1(config-webvpn)# smart-tunnel list CONTRACTOR_SMARTTUNNEL PUTTY putty.exe platform windows
Applying the Smart Tunnel List to a Group Policy Using ASDM
To apply the smart tunnel application list to a group policy via ASDM, follow these steps:
Step 1. Navigate to Configuration > Remote Access VPN > Clientless SSLVPN Access > Group Policies and select the desired group policy.
Step 2. Click Edit to bring up the Edit Internal Group Policy dialog box.
Step 3. Click Portal.
Step 4. Uncheck the Inherit check box next to Smart Tunnel Application and select the desired smart tunnel application list from the drop-down.
Step 5. Click OK to close the Edit Internal Group Policy dialog box.
Applying the Smart Tunnel List to a Group Policy Using CLI
To apply a smart tunnel list to a group policy via the CLI, use the smart-tunnel command in the group policy webvpn configuration mode. Example 8-16 shows an example of applying the smart tunnel application list CONTRACTOR_SMARTTUNNEL to the group policy CONTRACTOR_GROUP. It mirrors the configuration in Figure 8-20.

Figure 8-20 Applying a Smart Tunnel List to a Group Policy via ASDM
Example 8-16 Applying a Smart Tunnel List to a Group Policy via the CLI
vpn-asa1(config)# group-policy CONTRACTOR_GROUP attributes
vpn-asa1(config-group-policy)# webvpn
vpn-asa1(config-group-webvpn)# smart-tunnel enable CONTRACTOR_SMARTTUNNEL
After the applet is loaded on the client, the user can launch an SSH client, such as putty.exe, to establish a connection to any server that offers SSH service as they would normally do.
Configuring Client/Server Plug-ins
Client/server plug-ins allow administrators to extend the applications supported by a clientless SSLVPN to includes applications such as RDP, VNC, Telnet, and SSH. Through the use of plug-ins, users can access resources that use these applications via the web browser without the use of port forwarding or smart tunnels. Administrators can also enable and control the use of these applications via native protocol support in bookmarks and web ACLs.
Obtaining Plug-ins
Plug-ins for RDP, VNC, Telnet, and SSH are available for download from the Cisco website and are packaged in the .jar file format. Once a plug-in has been imported, the ASA adds the appropriate protocol to the list of protocols available for browsing, bookmarks, and web ACLs. For example, installing the RDP plug-in adds rdp:// as selectable protocol, and installing the VNC plug-in adds vnc:// as a selectable protocol—similar to http:// or cifs://, which are supported without plug-ins.
To import a client/server plug-in via ASDM, follow these steps:
Step 1. Navigate to Configuration > Remote Access VPN > Clientless SSLVPN Access > Portal > Client/server Plug-ins.
Step 2. Click Import to bring up the Import Client-Server Plug-in dialog box.
Step 3. Select the appropriate plug-in name (protocol) from the drop-down for the plug-in being imported.
Step 4. Click Browse Local Files to browse and select the plug-in file from the local computer and click OK.
Step 5. Click Import Now to import the plug-in and close the Import Client-Server Plug-in dialog box.
Figure 8-21 shows the SSH and Telnet plug-in file ssh-plugin.1.30918.jar being imported from the local computer.
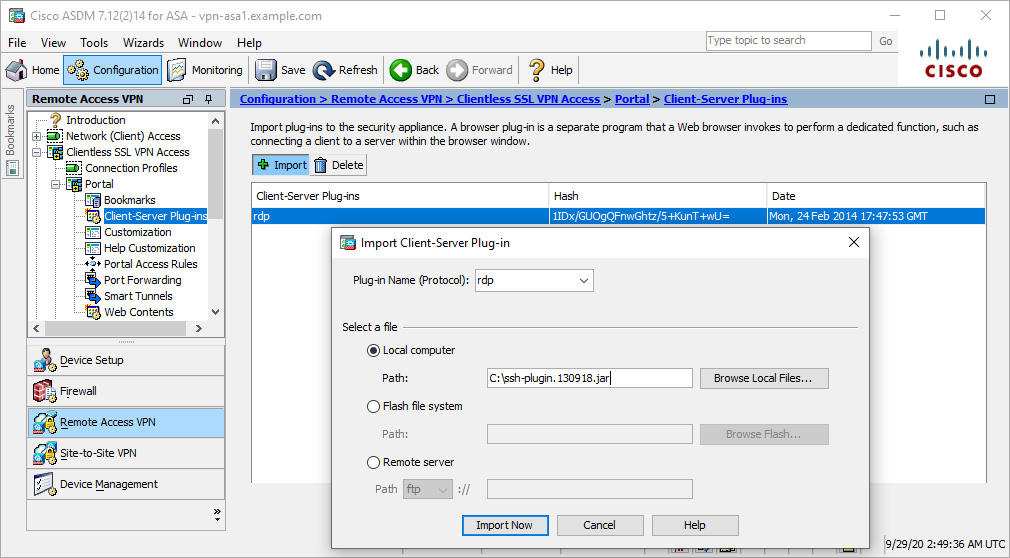
Figure 8-21 Importing Client/Server Plug-ins via ASDM
Note
You must use ASDM to import client/server plug-ins. Importing client/server plug-ins via the CLI is not currently supported.
Summary
This chapter reviewed the differences between clientless SSLVPN and client VPN technologies. It also reviewed the OS, browser, and software requirements for deploying clientless SSLVPN functionality as well as the licensing options available for AnyConnect and the ASA. This chapter presented the steps necessary to configure a basic SSLVPN, including certificate enrollment, group policy creation, connection profile creation, and user authentication. The chapter also explored different features that can be used to enable and control application access, including bookmarks, web ACLs, port forwarding, smart tunnels, and client/server plug-ins.
Now that we have covered clientless VPN, next up we dive into the Cisco flagship client-based VPN using Cisco AnyConnect.
References
ASDM Book 3: Cisco ASA Series VPN ASDM Configuration Guide, 7.14. Retrieved from https://www.cisco.com/c/en/us/td/docs/security/asa/asa914/asdm714/vpn/asdm-714-vpn-config.html
CLI Book 3: Cisco ASA Series VPN CLI Configuration Guide, 9.14. Retrieved from https://www.cisco.com/c/en/us/td/docs/security/asa/asa914/configuration/vpn/asa-914-vpn-config.html
Exam Preparation Tasks
As mentioned in the section “How to Use This Book” in the Introduction, you have a couple of choices for exam preparation: the exercises here, Chapter 11, “Final Preparation,” and the exam simulation questions in the Pearson Test Prep software online.
Review All Key Topics
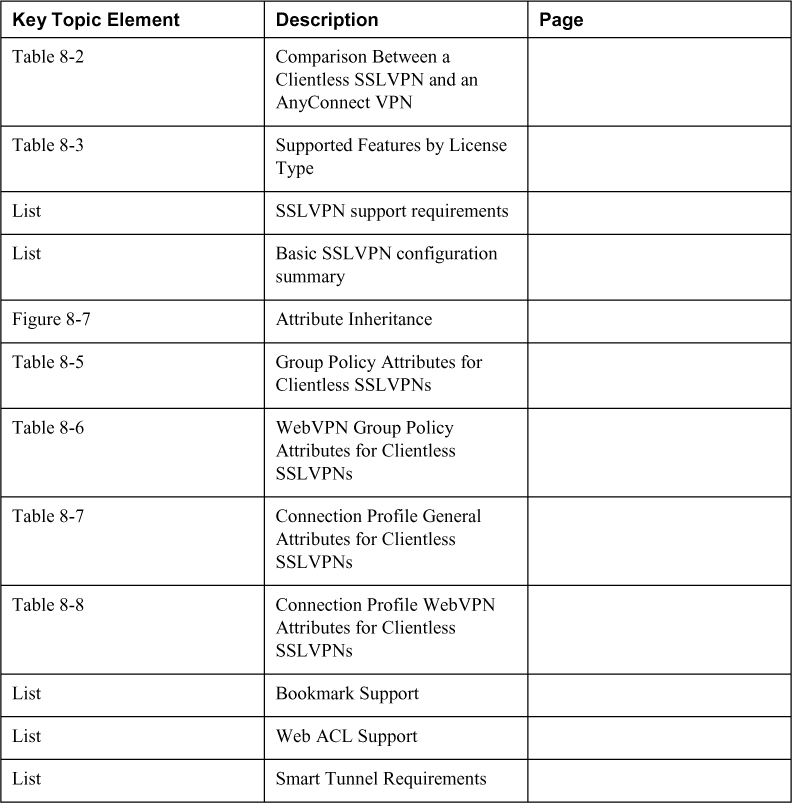
Review the most important topics in the chapter, noted with the key topics icon in the outer margin of the page. Table 8-9 lists these key topics and the page number on which each is found.
Table 8-9 Key Topics for Chapter 8
Complete Tables and Lists from Memory
Print a copy of Appendix C, “Memory Tables” (found on the companion website), or at least the section for this chapter, and complete the tables and lists from memory. Appendix D, “Memory Tables Answer Key” (also on the companion website), includes completed tables and lists to check your work.
Define Key Terms
There are no key terms for this chapter.
Use the Command Reference to Check Your Memory
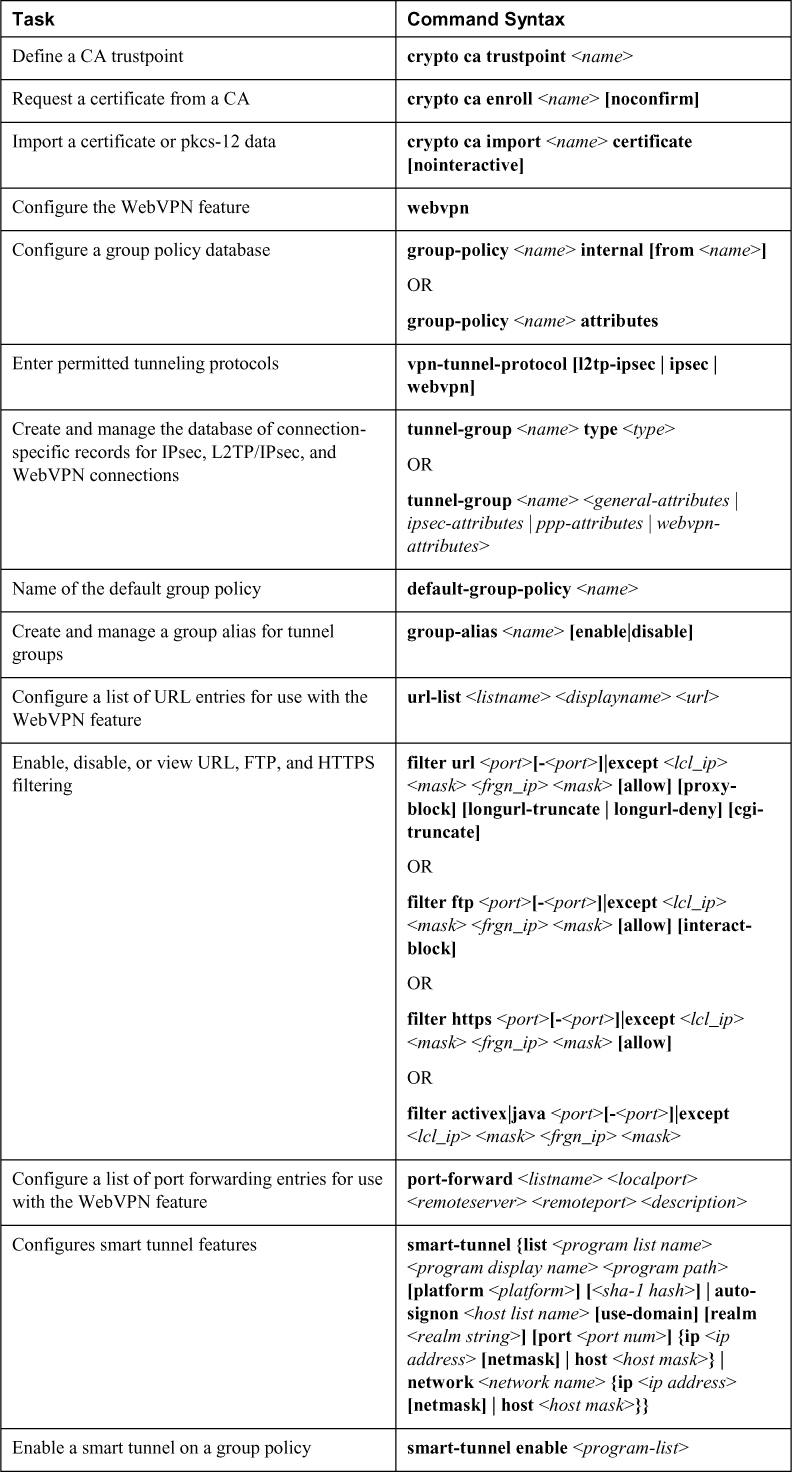
Table 8-10 lists the important commands from this chapter. To test your memory, cover the right side of the table with a piece of paper, read the description on the left side, and see how much of the command you can remember.
Table 8-10 Command Reference