Chapter 9. AnyConnect VPNs on the ASA and IOS
This chapter covers the following topics:
• AnyConnect VPN Review: This section provides a brief review of AnyConnect VPNs, including the different types of AnyConnect VPNs that are configured in this chapter.
• AnyConnect VPN Prerequisites on ASA: This section covers the OS, browsers, and licensing required to implement AnyConnect VPNs on ASA.
• Basic AnyConnect SSLVPN Configuration on ASA: This section describes the basics steps needed to configure an AnyConnect SSLVPN on ASA, including certificates, group policy, connection policy, and authentication.
• Extended AnyConnect SSLVPN Configuration on ASA: This section describes how to configure split tunneling, name resolution, and filters on ASA.
• AnyConnect IKEv2 VPN on ASA: This section covers how to configure IKEv2 AnyConnect on ASA, including the necessary AnyConnect profile.
• AnyConnect IKEv2 VPN on Routers: This section covers how to configure an IKEv2 AnyConnect on an IOS router, including certificates, authentication, and the necessary AnyConnect profile.
“I can’t work with idiots. That’s why I work from home and got rid of all of the mirrors.”
—Anthony T. Hincks
This chapter covers the following exam objectives:
• 2.0 Remote access VPNs
• 2.1 Implement AnyConnect IKEv2 VPNs on ASA and routers
• 2.2 Implement AnyConnect SSLVPN on ASA
• 4.0 Secure Communications Architectures
• 4.2 Describe functional components of FlexVPN, IPsec, and Clientless SSL for remote access VPN solutions
• 4.4 Recognize VPN technology based on configuration output for remote access VPN solutions
• 4.5 Describe split tunneling requirements for remote access VPN solutions
• 4.7 Design remote access VPN solutions
• 4.7.c Clientless SSL browser and client considerations and requirements
With the clientless SSLVPN deployment complete, we now turn our attention to AnyConnect VPN deployments, which are by far the most common Cisco remote access deployment type today. There are many reasons why a client-based VPN is the preferred option, and we cover everything you need to know for the SVPN along with what is important to know for real-world deployments.
This chapter explores the basic steps to deploy both SSL and IKEv2 AnyConnect VPNs on the ASA as well as IKEv2 AnyConnect VPNs on IOS. It also explores optional, but extremely common, VPN features on the ASA, such as split tunneling, name resolution, and filters. Once you master the concepts in this chapter, you will be ready for the final chapter of this book, which covers troubleshooting remote access VPN technology.
Learning beyond the SVPN concepts:
• AnyConnect VPN Prerequisites on ASA
“Do I Know This Already?” Quiz
The “Do I Know This Already?” quiz enables you to assess whether you should read the entire chapter. If you miss no more than one of these self-assessment questions, you might want to move ahead to the “Exam Preparation Tasks” section of the chapter. Table 9-1 lists the major headings in this chapter and the “Do I Know This Already?” quiz questions related to the material in each of those sections to help you assess your knowledge of these specific areas. The answers to the “Do I Know This Already?” quiz appear in Appendix A, “Answers to the ‘Do I Know This Already?’ Quizzes.”
Table 9-1 “Do I Know This Already?” Foundation Topics Section-to-Question Mapping

1. Which of the following types of AnyConnect VPNs typically provides better performance than TLS but does not rely on IPsec?
a. IKEv2
b. DTLS
c. L2TP
d. PPTP
2. Administrative privileges on the endpoint are required for which of the following actions?
a. Installation
b. Updates
c. Connecting
d. Disconnecting
3. On the ASA, which command must be configured before you can enable AnyConnect VPN access?
a. anyconnect image
b. vpn-tunnel-protocol
c. group-policy
d. tunnel-group
4. On the ASA, which configuration option automatically maps an AnyConnect connection to a connection profile based on the URL used?
a. Certificate Mapping
b. Connection Alias
c. Group URL
d. Group URL Alias
5. Which VPN protocol uses UDP 443 by default?
a. TLS
b. DTLS
c. IKEv2
d. IKEv2 with NAT-T
6. On the ASA, which of the following is not a supported protocol when configuring a AAA server group?
a. Kerberos
b. SAML
c. EAP
d. SDI
7. On the ASA, which of the following is not a method of assigning IP addresses to AnyConnect clients?
a. Using a DHCP server
b. Using a local address pool
c. Using a RADIUS server
d. Manually
8. On the ASA, which split tunneling option in ASDM selects traffic by IP address and sends the selected traffic over the tunnel?
a. Tunnel Network List Below
b. Exclude Network Below
c. Dynamic Split Tunneling
d. Manual Split Tunneling
9. On the ASA, when configuring a server list in the AnyConnect profile editor for an IKEv2 VPN, which of the following is not required to be configured?
a. FQDN or IP Address
b. IKE Identity
c. User Group
d. Primary Protocol
10. What is the default identity for AnyConnect?
a. *$AnyConnectClient$*
b. AnyConnectClient
c. *$AnyConnect$*
d. AnyConnect
11. On IOS, which of the following is not supported with self-signed certificates?
a. AnyConnect IKEv2 VPN
b. Certificate authentication
c. Local user authentication with EAP
d. Third-party IKEv2 VPN
Foundation Topics
Traditional VPN technology leverages a client. The concept simply uses a software client that forces traffic through an encrypted tunnel to a trust resource. Older versions of client-based VPN technology have had huge challenges that modern client-based VPN technology has overcome. One challenge is the requirement of a fat client, meaning software that eats up a lot of processing power on the host system. Another challenge is that the VPN required an on-premises appliance that limited the number of users who could use it. Older VPN technology was limited to certain ports, which most firewall deployments would block by default. All of these challenges led to administrative problems.
The good news regarding modern client-based VPN technology is that many of the challenges encountered by older versions of VPN technology have been solved. The software clients have become much thinner or included with a larger security-related package that includes multiple capabilities beyond VPN. Common ports such as 443 can be used by modern VPN technology and are less likely to be blocked by a firewall. VPN concentrators can exist in different formats, including virtual software run from the cloud. To accommodate large user counts, different load balancing and clustering techniques can be used, allowing for much larger user support. To battle the increase in compute power, encryption can be enhanced, reducing the risk of an attacker compromising the VPN’s encryption.
A lot of innovation has occurred, enabling modern VPN technology to offer a lot of value while not impacting normal work operations. VPN technology can support the demands of today’s modern workforce, which needs access to specific resources from anywhere in the world. Cisco AnyConnect is the largest deployed VPN client and a focus topic for the SVPN exam. Let’s start off our deeper look at AnyConnect by reviewing what we have covered about AnyConnect in previous chapters.
AnyConnect VPN Review
As discussed in Chapters 7, “Remote Access VPNs,” and 8, “Clientless Remote Access SSLVPNs on the ASA,” AnyConnect VPNs create a secure, remote access VPN tunnel to an ASA security appliance or IOS router by using the AnyConnect software client. The use of a client enables full network connectivity to remote applications and allows for remote access of any TCP-, UDP-, or ICMP-based applications. As a Cisco VPN administrator, you will have to choose which VPN technology you want to use for each of your VPN projects. To keep things simple regarding preparing for the SVPN, we break down the decision of which version of AnyConnect you can deploy into two options: SSLVPN or IKEv2.

SSLVPN Versus IKEv2
For the purposes of the SVPN 300-730 exam, AnyConnect VPNs on ASA and IOS come in two flavors: SSLVPN and IKEv2. AnyConnect SSLVPNs use Transport Layer Security (TLS) over TCP and Datagram Transport Layer Security (DTLS) over UDP for negotiation and transport. DTLS typically provides better performance than TLS and is the preferred protocol, when allowed. As an alternative to TLS and DTLS, an AnyConnect VPN can also be configured to use IKEv2, which uses IKEv2 for negotiation and IPsec for transport. For the SVPN 300-730 exam, make sure you know what is supported by AnyConnect as well as what is the best option for different situations. For example, DTLS is a better choice than TLS when video and voice support is a requirement.
Note
SSLVPNs are only supported with the AnyConnect client. From ASA Release 9.3.2 and onward, Cisco added interoperability with standards-based, third-party, IKEv2 remote access clients (in addition to AnyConnect). Authentication support includes pre-shared keys, certificates, and user authentication via Extensible Authentication Protocol (EAP).
For the SVPN 300-730 exam, you need to know how to configure three different types of AnyConnect-based VPNs, as described in this chapter:
• AnyConnect SSLVPN terminating on an ASA
• AnyConnect IKEv2 VPN terminating on an ASA
• AnyConnect IKEv2 VPN terminating on an IOS router
Before we get into configuring these three options, we first must review all the prerequisites for running an AnyConnect-based VPN.
AnyConnect SSLVPN VPN Prerequisites on ASA
As with the clientless SSLVPNs covered in Chapter 8, you must meet a number of prerequisites before implementing AnyConnect SSL or IKEv2 VPN on the ASA. This includes having the required licensing, client operating system, and supported browsers. There is overlap between the prerequisites for clientless and client-based VPN technology. To avoid being repetitive, we will summarize the prerequisites in this section and reference Chapter 8 for more detail.
AnyConnect Licenses
Any Cisco VPN deployment must first consider license requirements. The license requirements for SSL and AnyConnect are similar, and the section “Software Licenses” in Chapter 8 covers the different licensing options available for the Cisco ASA and the specific VPN capabilities enabled with each license. For the purposes of the example in this chapter, an AnyConnect Plus, Apex, or VPN Only license will suffice. Review Chapter 8’s “Software Licenses” section to see details about license requirements for an AnyConnect deployment.
Supported Operating Systems
The next prerequisite to consider is whether the host operating system supports AnyConnect. You will not be tested on system support on the SVPN exam, but it is important to validate host system support for a real-world deployment. AnyConnect is supported on the following operating systems:
• Windows 7, 8, 8.1, and 10 (x86, x64, and ARM64)
• macOS 10.13, 10.14, and 10.15
• Linux Red Hat 6, 7, and 8.1
• Ubuntu 16.04 (LTS), 18.04 (LTS), and 20.04 (LTS)
• Android 4.0 and later
• Apple iOS 10.3 and later
Note
For the latest operating system and system requirements information, visit http://www.cisco.com/en/US/products/ps10884/prod_release_notes_list.html. The SVPN 300-730 exam will not test you on the versions of AnyConnect that are and are not supported on a host system, but you will need to know this for a real-world deployment.
Compatible Browsers
Another prerequisite to think about beyond the host operating system is the host’s Internet browser. There are different needs for the browser regarding SSL versus client-based VPN technology. For SSL, the host system browser must support the VPN technology for the VPN to work. For this chapter, we look to the browser to provide the capability to download AnyConnect to the host. To download AnyConnect from the security appliance, you must use a TLS-enabled browser such as Google Chrome, Microsoft Edge, Firefox, or Safari.
Administrative Privileges
The final prerequisite to consider is whether AnyConnect can be installed and run on the host system. AnyConnect requires administrative rights for the initial installation. The client does not require administrative rights after installation. It is common for administrators to push AnyConnect to host systems or include it as part of a system template to enable it to be installed on systems that the users do not have administrative access rights.
That summarizes the prerequisites you need to consider for an AnyConnect VPN deployment. Prerequisites likely will not be on the SVPN exam, but they are critical for the success of a real-world deployment.
Basic SSLVPN AnyConnect Configuration on ASA
With the prerequisites in place, you are now ready to configure a basic AnyConnect-based remote access VPN. To do so, you need to perform the following steps, which are detailed in the following sections:
Step 1. Install an identity certificate.
Step 2. Load an AnyConnect package.
Step 3. Enable AnyConnect VPN client SSL access.
Step 4. Configure a group policy.
Step 5. Configure an AnyConnect connection profile.
Step 6. Configure user authentication.
Step 7. Configure an address pool.
The examples in this section use the lab environment shown in Figure 9-1, which uses the following software and hardware versions:
• Cisco Adaptive Security Virtual Appliance (ASAv) Release 9.12(4)
• Cisco Adaptive Security Device Manager (ASDM) Release 7.12(2)
• Cisco AnyConnect Security Mobility Client Release 4.8.03052 running on Windows 10

Figure 9-1 Client SSLVPN on ASA Lab Diagram
Step 1: Installing an Identity Certificate
For SSLVPN to function, the ASA must have a digital certificate to identify itself to connecting clients. This can be accomplished with a self-signed certificate as well as with a certificate from a certificate authority (CA). For production deployments, the use of a certificate from a publicly trusted CA is the preferred approach. Chapter 8 covers the steps necessary to obtain and install an identity certificate. To avoid being repetitive, we will skip walking through those steps.
Step 2: Loading an AnyConnect Package
Before enabling AnyConnect access on the interfaces of the security appliance, you must upload and install the AnyConnect package on the security appliance. It is important to know that there are different versions of AnyConnect based on the systems you plan to support. For example, if you plan to support both Windows and Mac, you will need to download two different AnyConnect packages. If a system connects that does not have a version of AnyConnect available, the host will not be offered a package they can install, leading to a failure in providing VPN services. We recommend you evaluate which host systems you plan to support as part of your prerequisite planning to avoid not including an AnyConnect package needed to support your end users.
Loading an AnyConnect Package Using ASDM
To upload and install the AnyConnect client package via ASDM, follow these steps:
Step 1. Navigate to Configuration > Remote Access VPN > Network (Client) Access > AnyConnect Client Software.
Step 2. Click Add to open the Add AnyConnect Client Image dialog box.
Step 3. Click Upload to open the Upload Image dialog box.
Step 4. Click Browse Local Files to open the Select dialog box.
Step 5. Select the AnyConnect package file and click Select.
Step 6. Click Upload File to upload the AnyConnect package to flash.
Step 7. When the upload completes, click OK on each of the remaining dialog boxes to add the AnyConnect package to the ASA configuration.
Note
You can download the AnyConnect package from the Cisco website. Look for the product name AnyConnect Secure Mobility Client.
Note
You can upload multiple AnyConnect packages to a security appliance. If multiple files are uploaded, the order in which the files are listed within ASDM is the same order in which they will be presented to a user for download. It is common practice to offer multiple AnyConnect packages.
Caution
Do not rename the AnyConnect package files. The hash verification includes the filename. Changing the filename will cause the hash verification to fail.
Figure 9-2 shows an example of uploading the AnyConnect package anyconnect-win-4.8.03052-webdeploy-k9.pkg from the local C:\ drive to the local flash of the security appliance. When the upload completes, the path of the uploaded file is automatically populated in the Add AnyConnect Client Image dialog box.

Figure 9-2 Uploading and Adding the AnyConnect Package via ASDM
Loading an AnyConnect Package Using CLI
To upload and install the AnyConnect package via the CLI, first use the copy command to upload the AnyConnect package to the security appliance. Then use the anyconnect image command from webvpn configuration mode to install the AnyConnect package. Example 9-1 shows an example of uploading the AnyConnect client package anyconnect-win-4.8.03052-webdeploy-k9.pkg via TFTP and then installing the same package on the security appliance. It mirrors the configuration shown in Figure 9-2.
Example 9-1 Uploading and Adding the AnyConnect Package via the CLI
vpn-asa1# copy tftp flash

Address or name of remote host [172.20.1.50]?

Source filename [anyconnect-win-4.8.03052-webdeploy-k9.pkg]?

Destination filename [anyconnect-win-4.8.03052-webdeploy-k9.pkg]?

Accessing tftp://172.20.1.50/anyconnect-win-4.8.03052-webdeploy-
k9.pkg…!!!!!!!!!!!!!!!!!!!!!!!!!!!!!!!!!!!!!!!!!!!!!!!!!!!!!!!!!!!!!!!!!!!!!!!!
Writing file disk0:/anyconnect-win-4.8.03052-webdeploy-k9.pkg...
!!!!!!!!!!!!!!!!!!!!!!!!!!!!!!!!!!!!!!!!!!!!!!!!!!!!!!!!!!!!!!!!!!!!!!
72771616 bytes copied in 60.570 secs (1212860 bytes/sec)
vpn-asa1# configure terminal
vpn-asa1(config)# webvpn
vpn-asa1(config-webvpn)# anyconnect image disk0:/ anyconnect-win-4.8.03052-webdeploy-k9.pkg
Step 3: Enabling AnyConnect VPN Client SSL Access
After the AnyConnect package is uploaded to flash, AnyConnect VPN client access must be enabled on the interface that terminates the connection. Keep this in mind as a potential troubleshooting issue if users are not able to connect to the VPN you manage. You might also find test questions that don’t have this interface enabled or errors appear and you must predict potential problems.
Enabling AnyConnect VPN Using ASDM
To enable AnyConnect VPN client access, follow these steps:
Step 1. Navigate to Configuration > Remote Access VPN > Network (Client) Access > AnyConnect Connection Profiles.
Step 2. Check Enable Cisco AnyConnect VPN Client access on the interfaces selected in the table below.
Step 3. Check Allow Access and Enable DTLS for the desired interfaces in the SSL Access section of the table.
Figure 9-3 shows an example of enabling AnyConnect connections via TLS and DTLS on the OUTSIDE interface. By default, TLS connections terminate on port 443, and DTLS connections terminate on UDP port 443.

Figure 9-3 Enabling AnyConnect Client Access via ASDM
Enabling AnyConnect VPN Using CLI
To enable AnyConnect VPN client access via the CLI, use the enable command in webvpn configuration mode. Example 9-2 shows an example of enabling AnyConnect VPN client access on the OUTSIDE interface and mirrors the configuration shown in Figure 9-3.
Example 9-2 Enabling AnyConnect on an Interface via the CLI
vpn-asa1(config)# webvpn
vpn-asa1(config-webvpn)# enable OUTSIDE
INFO: WebVPN and DTLS are enabled on 'OUTSIDE'.
Step 4: Configuring a Group Policy
As with clientless SSLVPN, with a client VPN, group policies specify attributes that determine user access and use of the VPN. They can be defined at the user level, connection profile level, or appliance level (default group policy), with each level inheriting any undefined attributes from the parent level. Any attributes that are not defined in the user policy are inherited from the connection profile policy, and any attributes that are not defined in the connection profile policy are inherited from the default group policy.
Note
The default group policy is always named DfltGrpPolicy. It can’t be deleted, but it can be modified.
Note
For a more complete discussion of group policies, review Chapter 8. We recommend you are familiar with group policies as well as the default group policy for the SVPN exam.
Configure Group Policy Using ASDM
To create and modify a group policy via ASDM, follow these steps:
Step 1. Navigate to Configuration > Remote Access VPN > Network (Client) Access > Group Policies.
Step 2. Click Add to open the Add Internal Group Policy dialog box.
Step 3. Specify a name for the group policy.
Step 4. Uncheck Inherit next to the attributes you would like to modify and make the desired changes.
Step 5. Click OK to create the group policy.
Figure 9-4 shows the simple group policy EMPLOYEE_GROUP with the Tunneling Protocols attribute set to only allow SSLVPN client connections. For users or connections mapped to this group policy, all other connection types will be denied.
Note
The default group policy allows clientless SSLVPN, IPsec IKEv1, IPsec/IKEv2, and L2TP/IPsec connections. A newly created group policy also allows all these connection types unless inheritance is disabled for tunneling protocols and specific connection types are selected.

Figure 9-4 Creating and Modifying a Group Policy
Configure Group Policy Using CLI
To create and modify a group policy via the CLI, first use the group-policy name internal command to create the group policy. Then use the group-policy name attributes command to enter the group-policy configuration mode and use the commands from Table 9-2 to modify the desired attribute(s). Example 9-3 shows an example of creating the group policy EMPLOYEE_GROUP, which only allows AnyConnect connections. It is equivalent to the configuration shown in Figure 9-4.
Table 9-2 Group Policy Attributes for AnyConnect VPNs


Example 9-3 Creating an SSLVPN Client Only Group Policy via the CLI
vpn-asa1(config)# group-policy EMPLOYEE_GROUP internal
vpn-asa1(config)# group-policy EMPLOYEE_GROUP attributes
vpn-asa1(config-group-policy)# vpn-tunnel-protocol ssl-client
Step 5: Configuring an AnyConnect Connection Profile
After a group policy is defined, it must be bound to a connection profile to take effect. All connections made using that connection profile will then use the attributes defined in that group policy to determine user access.
Configuring an AnyConnect Connection Profile Using ASDM
To create an AnyConnect connection profile via ASDM, follow these steps:
Step 1. Navigate to Configuration > Remote Access VPN > Network (Client) > AnyConnect Connection Profiles.
Step 2. Click Add to open the Add AnyConnect Connection Profile dialog box.
Step 3. Specify the name for the connection policy.
Step 4. Select the desired group policy.
Step 5. Make any other desired changes.
Step 6. Click OK to save the group policy and close the Add AnyConnect Connection Profile dialog box.
Figure 9-5 shows the AnyConnect connection profile named EMPLOYEE_CONNECTION, which is configured to use the default group policy EMPLOYEE_GROUP. SSLVPN client connections are enabled via the Enable SSL VPN Client Protocol check box.
Note
Later in this chapter, you will see how to configure DNS servers and client address assignment. At this point, you can safely ignore any warnings regarding these items.

Figure 9-5 Configuring a Connection Profile
Configuring an AnyConnect Connection Profile Using CLI
To configure a connection profile via the CLI, use the tunnel-group name type remote-access command to create the tunnel group. Then use the tunnel-group name general-attributes command to enter the general-attributes configuration mode and configure attributes shown in Table 9-3 or use the tunnel-group name webvpn-attributes command to enter the webvpn-attributes configuration mode and configure attributes shown in Table 9-4. Example 9-4 shows the CLI commands to create a new connection profile and set the default group policy to EMPLOYEE_GROUP. It mirrors the configuration shown in Figure 9-5.
Table 9-3 Connection Profile General Attributes for AnyConnect VPNs


Table 9-4 Connection Profile General Attributes for AnyConnect VPNs


Example 9-4 Configuring a Connection Profile via the CLI
vpn-asa1(config)# tunnel-group EMPLOYEE_CONNECTION type remote-access
vpn-asa1(config)# tunnel-group EMPLOYEE_CONNECTION general-attributes
vpn-asa1(config-tunnel-general)# default-group-policy EMPLOYEE_GROUP
Configuring a Group URL for an AnyConnect Connection Profile Using ASDM
In Chapter 8, you saw how to configure an alias to allow users to select the proper connection profile. The downside of this approach is that a security appliance may have many connection profiles and require a user to make the proper selection, which can make connecting to the VPN overwhelming for users.
As an alternative, connection profiles support group URLs, which automatically select the associated connection profile without the need for user selection. By defining one or more group URLs and selectively distributing the URLs, administrators can eliminate the need for users to make the proper selection.
To specify a group URL for an AnyConnect connection profile via ASDM, follow these steps:
Step 1. Navigate to Configuration > Remote Access VPN > Network (Client) > AnyConnect Connection Profiles.
Step 2. Select the desired connection profile.
Step 3. Click Edit to open the Edit AnyConnect Connection Profile dialog box.
Step 4. Navigate to Advanced > Group Alias/Group URL.
Step 5. In the Group URLs section, click Add to open the Add Group URL dialog box.
Step 6. Specify the URL in the form https://<ASA FQDN>/<PATH>.
Step 7. Click OK to add the group URL to the connection profile.
Step 8. Click OK to close the Edit AnyConnect Connection Profile dialog box.
Figure 9-6 shows the group URL https://vpn-asa1.example.com/employees defined for the AnyConnect connection profile EMPLOYEE_CONNECTION.

Figure 9-6 Defining an AnyConnect Connection Profile URL via ASDM
Configuring a Group URL for an AnyConnect Connection Profile Using CLI
To specify a group URL via the CLI, use the tunnel-group name webvpn-attributes command to enter the webvpn configuration mode and then use the group-url command to define the desired URL for the connection profile. Example 9-5 shows an example of creating the group URL https://vpn-asa1.example.com/employees for the connection profile EMPLOYEE_CONNECTION. It is equivalent to the configuration shown in Figure 9-6.
Example 9-5 Defining a Connection Profile URL via the CLI
vpn-asa1(config)# tunnel-group EMPLOYEE_CONNECTION webvpn-attributes
vpn-asa1(config-tunnel-webvpn)# group-url https://vpn-asa1.example.com/employeesenable
Step 6: Configuring User Authentication
As discussed in Chapter 8, the Cisco ASA supports a number of differing authentication protocols and databases, including the following:
• RADIUS (Remote Authentication Dial-In User Service)
• NT domain
• Kerberos
• SDI (RSA SecureID)
• LDAP (Lightweight Directory Access Protocol)
• Digital certificates
• Smart cards
• Local database
• SAML 2.0 (Security Assertion Markup Language)
In Chapter 8, we walked you through how to use local user authentication for the VPN configuration example. For labs and small networks local user authentication works, however, real-world deployments will use an external, centralized authentication solution. You must know both so you can stand up labs and deploy in real environments, which is why in this section we cover how to leverage RADIUS for authentication. RADIUS is just one possible option, and the process of leveraging any external authentication solution will use similar steps.
Configuring RADIUS for authentication is a three-step process:
Step 1. Create a AAA server group.
Step 2. Add the RADIUS servers(s) to the AAA server group.
Step 3. Configure a connection profile to use the RADIUS server group.
Creating a AAA Server Group Using ASDM
To create a AAA server group via ASDM, follow these steps:
Step 1. Navigate to Configuration > Remote Access VPN > AAA/Local User > AAA Server Groups.
Step 2. Click Add in the AAA Server Groups section to open the Add AAA Server Group dialog box.
Step 3. Specify a name for the AAA server group.
Step 4. Select the desired protocol.
Step 5. Click OK to create the server group.
Figure 9-7 shows an example of creating the server group RADIUS_GROUP with the protocol RADIUS.

Figure 9-7 Creating a AAA Server Group via ASDM
Creating a AAA Server Group Using CL
To create a AAA server group via the CLI, use the aaa-server name protocol command. Example 9-6 shows an example of creating the AAA server-group RADIUS_GROUP with the protocol RADIUS. It mirrors the configuration shown in Figure 9-7.
Example 9-6 Creating a AAA Server Group via the CLI
vpn-asa1(config)# aaa-server RADIUS_GROUP protocol radius
Adding RADIUS Servers to a AAA Server Group Using ASDM
After the AAA server group is defined, it is possible to add one or more RADIUS servers to the AAA server group. If more than one RADIUS server is defined, the security appliance uses round-robin to the select the active RADIUS server. When the security appliance finds a RADIUS server that is reachable, it continues to use that RADIUS server for all requests until a failure occurs. Upon failure, the security appliance selects the next available RADIUS server.
To add a RADIUS server to a AAA server group via ASDM, follow these steps:
Step 1. Select the desired server group.
Step 2. In the Servers in the Selected Group section, click Add to open the Add AAA Server dialog box.
Step 3. Select the interface.
Step 4. Specify the server name or IP address.
Step 5. Specify the server secret key.
Step 6. Click OK to add the RADIUS server.
Figure 9-8 shows an example of adding the RADIUS server 171.20.1.50 to the server group RADIUS_GROUP. Traffic to the RADIUS server will be initiated through the INSIDE interface and will use the RADIUS secret key cisco123 (obfuscated).
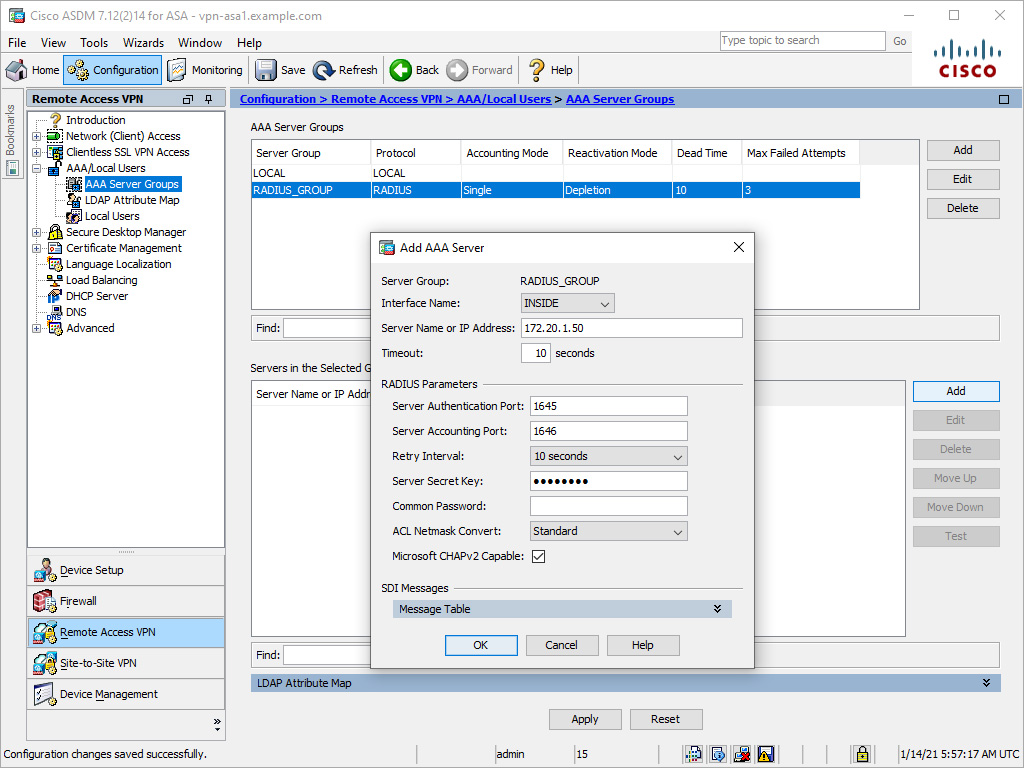
Figure 9-8 Adding a RADIUS Server to a Server Group via ASDM
Adding RADIUS Servers to a AAA Server Group Using CLI
To add a RADIUS server to a server via the CLI, use the aaa-server name (interface) host x.x.x.x command. Example 9-7 shows an example of adding the RADIUS server 172.20.1.50 on the INSIDE interface to the server group RADIUS_GROUP. It mirrors the configuration shown in Figure 9-8.
Example 9-7 Configuring RADIUS Authentication via the CLI
vpn-asa1(config-aaa-server-group)# aaa-server RADIUS_GROUP (INSIDE) host 172.20.1.50
vpn-asa1(config-aaa-server-host)# key cisco123
Configuring a Connection Profile to Use the RADIUS Server Group Using ASDM
The final step after defining the authentication servers is to configure the connection profile to use the RADIUS group for authentication.
To configure a connection profile to use RADIUS for authentication via ASDM, follow these steps:
Step 1. Navigate to Configuration > Network (Client) Access > AnyConnect Connection Profiles.
Step 2. Select the desired connection profile.
Step 3. Click Edit to open the Edit AnyConnect Connection Profile dialog box.
Step 4. Select the desired AAA server group.
Step 5. Click OK to close the Edit AnyConnect Connection Profile dialog box.
Figure 9-9 shows an example of configuring the connection profile EMPLOYEE_CONNECTION to use the AAA server group RADIUS_GROUP for authentication.

Figure 9-9 Configuring a Connection Profile to Use the AAA Server Group for Authentication via ASDM
Configuring a Connection Profile to Use the RADIUS Server Group Using CLI
To configure the connection profile to use the AAA server group via the CLI, use the authentication-server-group command in group policy configuration mode. Example 9-8 shows an example of configuring the connection profile EMPLOYEE_CONNECTION to use the server group RADIUS_GROUP for authentication. It mirrors the configuration shown in Figure 9-9.
Example 9-8 Configuring RADIUS Authentication via the CLI
vpn-asa1(config)# tunnel-group EMPLOYEE_CONNECTION general-attributes
vpn-asa1(config-tunnel-general)# authentication-server-group RADIUS_GROUP
Step 7: Defining an Address Pool
When a connection is made to the VPN, AnyConnect receives an IP address to assign to the VPN interface. This IP address is used as the source IP address when accessing protected resources on the other side of the VPN tunnel.
The Cisco ASA supports three methods of assigning IP addresses:
• Local address pools
• DHCP server
• RADIUS server
If multiple methods for IP address assignment are configured, the Cisco ASA uses the IP address obtained through RADIUS. If no IP address is obtained through RADIUS and DHCP is configured, the Cisco ASA attempts to obtain an IP address from the DHCP server. If IP assignment through DHCP fails or is not configured, the Cisco ASA attempts to obtain an IP address from the local address pool.
The method organizations most commonly use to assign IP addresses is through a local address pool. Assigning IP addresses through a local address pool is a two-step process:
Step 1. Create an address pool.
Step 2. Associate the address pool to a policy group (for example, a group policy).
Creating an Address Pool Using ASDM
To create an address pool via ASDM, follow these steps:
Step 1. Navigate to Configuration > Remote Access VPN > Network (Client) Access > Address Assignment > Address Pools.
Step 2. Click Add to open the Add IPv4 Pool dialog box.
Step 3. Specify a name for the address pool.
Step 4. Specify a starting IP address for the address pool.
Step 5. Specify an ending IP address for the address pool.
Step 6. Select a subnet mask for the address pool.
Step 7. Click OK to add the address pool.
Figure 9-10 shows an example of creating the new address pool EMPLOYEE_POOL. The first IP address assigned to clients will be 172.16.30.1, and the last IP address assigned to clients will be 172.16.30.254. All clients will receive the subnet mask 255.255.255.0.

Figure 9-10 Creating an Address Pool via ASDM
Creating an Address Pool Using CLI
To create an address pool via the CLI, use the ip local pool command. Example 9-9 shows an example of creating the new address pool EMPLOYEE_POOL. The first IP address assigned to clients will be 172.16.30.1, and the last IP address assigned to clients will be 172.16.30.254. All clients will receive the subnet mask 255.255.255.0. It mirrors the configuration shown in Figure 9-10.
Example 9-9 Creating an Address Pool via the CLI
vpn-asa1(config)# ip local pool EMPLOYEE_POOL 172.16.30.1-172.16.30.254 mask 255.255.255.0
Applying the Address Pool to a Group Policy Using ASDM
To apply an address pool to a group policy via ASDM, follow these steps:
Step 1. Navigate to Configuration > Remote Access VPN > Network (Client) Access > Group Policies.
Step 2. Select the desired group policy, and click Edit to open the Edit Internal Group Policy dialog box.
Step 3. Uncheck the Inherit check box for Address Pools.
Step 4. Click Select to open the Select Address Pools dialog box.
Step 5. Select the desired address pool(s) and click Assign.
Step 6. Click OK to add the address pools to the group policy.
Step 7. Click OK to close the Edit Internal Group Policy dialog box.
Figure 9-11 shows an example of associating the address pool EMPLOYEE_POOL with the group policy EMPLOYEE_GROUP.

Figure 9-11 Associating an Address Pool to a Group Policy via ASDM
Applying the Address Pool to a Group Policy Using CLI
To associate an address pool to a group policy via the CLI, use the address pools value command in group-policy configuration mode. Example 9-10 shows an example of associating the address pool EMPLOYEE_POOL with the group policy EMPLOYEE_GROUP and mirrors the configuration shown in Figure 9-11.
Example 9-10 Associating an Address Pool to a Group Policy via the CLI
vpn-asa1(config)# group-policy EMPLOYEE_GROUP attributes
vpn-asa1(config-group-policy)# address-pools value EMPLOYEE_POOL
AnyConnect Installation
Earlier in this chapter we covered prerequisites for deploying an AnyConnect VPN solution. One of those is having the ability to deploy AnyConnect, meaning host rights and support for the AnyConnect software. Another prerequisite is considering how to deliver the package to the end users. This includes considerations for the types of user systems. Remember that it is common practice to have multiple versions of AnyConnect available, such as one for Windows and another for Mac-based hosts. Know that if a host attempts to connect and a version of AnyConnect they can support is not available, it will cause a failure in delivering your VPN solution.
Once you meet these prerequisites, you must choose how to give the end users the AnyConnect software. There are two methods to install AnyConnect on a user’s computer that is running a desktop operating system:
• Predeployment: New installations and upgrades are done either by the end user or by using an enterprise software management system (SMS).
• Web deployment: The user connects to the clientless portal on the Cisco ASA and selects the option to download AnyConnect. The browser downloads the AnyConnect Downloader. The AnyConnect Downloader downloads the client, installs the client, and starts a VPN connection. This option requires that the user have local administrative rights to the workstation.
A user using a mobile device (iPhone, iPad, or Android device) can download AnyConnect from the Apple App Store for iOS devices or Google Play for Android devices.
It is important to know that users who download a generic version of AnyConnect might still need to download the version of AnyConnect that is pushed to their systems before the VPN can work. We highly recommend you test different user types similar to what you expect to support before going live with your VPN deployment.
Connecting from the AnyConnect Client
When the basic AnyConnect client configuration is complete, it is possible to establish a connection to the VPN headend. After installing the VPN client, either via a predeployment package or web deployment, the user can enter the URL to connect. For the earlier example, the user would browse to https://vpn-asa1.example.com/employees to authenticate and download the web deployment package. Once AnyConnect is installed, the user would enter the same URL in the AnyConnect connection bar.
That is a summary of how to deliver a generic AnyConnect SSL VPN deployment. Next, let’s look at other common features that are deployed along with an AnyConnect SSL VPN deployment.
Extended AnyConnect SSLVPN Configuration on ASA
After setting up basic full tunnel client parameters, you can configure some of the optional, but very common, features to enhance the SSLVPN implementation in your network. These important features are discussed in the following sections:
• DNS and WINS assignment
• Split tunneling
• Traffic filters
It is important to also know these features for the SVPN exam. You may find questions regarding how to deploy and troubleshoot these key features.
Configuring DNS and WINS Using ASDM
While an AnyConnect VPN can be technically functional without DNS or WINS configured, it wouldn’t be very user friendly. Users and applications are accustomed to name resolution via DNS and WINS being ubiquities, even in VPNs. For AnyConnect, you can assign internal DNS and WINS server IP addresses so that after their SSL tunnel is established, users can browse and access internal sites using the names they are already accustomed to using.
It is also common practice to use a security-based DNS tool such as Cisco Umbrella as the DNS provider, allowing for additional security capabilities to be enforced post VPN connection. This same concept is one possible option for delivering cloud-based security coined by the industry as Secure Access Service Edge (SASE), meaning forcing VPN traffic through a cloud delivery security structure. If you have never heard about SASE, we highly recommend researching this topic as many industry experts such as Gartner have stated that SASE is the future of cybersecurity architectures. Also know that SASE will not be on the SVPN exam today but could appear in future versions of the exam.
To configure DNS and WINS via ASDM, follow these steps:
Step 1. Navigate to Configuration > Remote Access VPN > Network (Client) Access > Group Policies.
Step 2. Select the desired group policy and click Edit to open the Edit Internal Group Policy dialog box.
Step 3. Navigate to Servers.
Step 4. Specify the DNS servers, separating entries with commas.
Step 5. If desired, specify the WINS servers, separating entries with commas.
Step 6. Expand More Options.
Step 7. If desired, specify the default domain to push to clients.
Step 8. Click OK to close the Edit Internal Group Policy dialog box.
Figure 9-12 shows the group policy EMPLOYEE_GROUP with the DNS servers 172.20.1.50 and 172.20.1.51 with a default domain example.com.

Figure 9-12 Configuring DNS via ASDM
Configuring DNS and WINS Using CLI
To configure DNS via the CLI, use the dns-server value command to specify the DNS servers for clients, the win-server value command to specify the WINS, and the default-domain value command to set the default domain. All commands are entered in group-policy configuration mode. Example 9-11 shows the CLI equivalent of Figure 9-12.
Example 9-11 Configuring Name Resolution via the CLI
vpn-asa1(config)# group-policy EMPLOYEE_GROUP attributes
vpn-asa1(config-group-policy)# dns-server value 172.20.1.50 172.20.1.51
vpn-asa1(config-group-policy)# default-domain value example.com
Configuring Split Tunneling Using ASDM
After a VPN tunnel is established, the default behavior of AnyConnect is to direct all traffic through the VPN tunnel (encrypted), including traffic destined for the Internet. For some organizations, this can be desirable as they have sophisticated Internet monitoring and filtering technology that they want all users to egress through, regardless of whether they are in the office or remote. Other organizations may prefer users only send specific traffic through the VPN.
Note
During the COVID-19 pandemic, some organizations ran into problems in which their VPN solution was slowing down the network for end users. This occurred when everybody started working from home and the VPN solution was stretched to its maximum level support. To reduce the throughput, organizations were forced to use split tunneling to remove nonbusiness-related traffic. However, this put those organizations at risk of attack because nonbusiness-related traffic was no longer protected by their security investments. Split tunneling can be a temporary fix to this problem, but industry best practice is to either properly size your VPN solution and network for expected throughput or include cloud-based security such as SASE to ensure that all traffic is protected.
To accomplish this, the Cisco ASA and AnyConnect support two types of split tunneling:
• Split tunneling: This type of tunneling uses an access list to define which subnets should or should not be sent across the tunnel. If the option Exclude Network Below is selected, subnets contained within the ACL are sent in plaintext and are not sent across the tunnel. If the option Tunnel Network List Below is selected, only the subnets contained within the ACL are sent across the tunnel.
• Dynamic split tunneling: This type of tunneling expands on split tunneling by allowing traffic to be included or excluded from the VPN tunnel, based on DNS names rather than IP addresses or subnets. For example, office.com can be configured for exclusion from the tunnel regardless of the many IP addresses office.com may resolve to.
Note
For more information on dynamic split tunneling, see the “About Dynamic Split Tunneling” section of the Cisco AnyConnect Secure Mobility Client Administrator Guide.
To configure split tunneling via ASDM, follow these steps:
Step 1. Navigate to Configuration > Remote Access VPN > Network (Client) Access > Group Policies.
Step 2. Select the desired group policy, and click Edit to open the Edit Internal Group Policy dialog box.
Step 3. Navigate to Advanced > Split Tunneling.
Step 4. Uncheck the Inherit check box for Policy.
Step 5. Select the desired policy.
Step 6. Uncheck the Inherit check box for Network List.
Step 7. Click Manage to open the ACL Manager dialog box.
Step 8. Navigate to Add > Add ACL to open the Add ACL dialog box.
Step 9. Specify an ACL name.
Step 10. Click OK to close the Add ACL dialog box.
Step 11. Select the ACL that you just created.
Step 12. Navigate to Add > Add ACE to open the Add ACE dialog box.
Step 13. Specify the subnet address.
Step 14. Click OK to close the Add ACE dialog box.
Figure 9-13 shows the split tunneling policy for EMPLOYEE_GROUP. This policy is set to only tunnel the subnets in SPLIT_TUNNEL_LIST, and the ACE 172.20.1.0/24 is in the process of being added to SPLIT_TUNNEL_LIST.

Figure 9-13 Configuring Split Tunneling via ASDM
Configuring Split Tunneling Using CLI
To configure split tunneling via the CLI, first use the access-list command to create the split-tunnel ACL. Then use the split-tunnel-policy command in group-policy configuration mode to specify the split tunneling policy. Finally, use the split-tunnel-network-list value command in group-policy configuration mode to specify the split tunneling ACL. Example 9-12 mirrors the configuration shown in Figure 9-13.
Example 9-12 Configuring Split Tunneling via the CLI
vpn-asa1(config)# access-list SPLIT_TUNNEL_LIST standard permit 172.20.1.0 255.255.255.0
vpn-asa1(config)# group-policy EMPLOYEE_GROUP attributes
vpn-asa1(config-group-policy)# split-tunnel-policy tunnelspecified
vpn-asa1(config-group-policy)# split-tunnel-network-list value SPLIT_TUNNEL_LIST
Configuring a Traffic Filter Using ASDM
One of the most common group policy settings to configure is filters, which specify which access control list to use for an IPv4 or IPv6 connection. A filter consists of rules that determine whether to allow or reject tunneled data packets coming through the ASA, based on criteria such as source address, destination address, and protocol.
Note
You will need to understand traffic filters for the SVPN exam. There could be questions related to the wrong traffic being blocked, and you must recognize that a traffic filter is the root cause for the problem.
To create and configure a traffic filter via ASDM, follow these steps:
Step 1. Navigate to Configuration > Remote Access VPN > Network (Client) Access > Group Policies.
Step 2. Select the desired group policy and click Edit to open the Edit Internal Group Policy dialog box.
Step 3. Expand More Options.
Step 4. Uncheck the Inherit check box for Filter.
Step 5. Click Manage to open the ACL Manager dialog box.
Step 6. Click the Extended ACL tab.
Step 7. Navigate to Add > Add ACL to open the Add ACL dialog box.
Step 8. Specify an ACL name.
Step 9. Click OK to close the Add ACL dialog box.
Step 10. Select the ACL you just created.
Step 11. Navigate to Add > Add ACE to open the Add ACE dialog box.
Step 12. Specify the source criteria and/or destination criteria, and click OK to close the Add ACE dialog box.
Figure 9-14 shows the group policy EMPLOYEE-GROUP with a new filter list named FILTER_LIST. An ACE that will only allow traffic to the IP address 172.20.1.50 on port 80 (HTTP) is being added.

Figure 9-14 Adding a Filter List via ASDM
Configuring a Traffic Filter Using CLI
To create and configure a filter list via the CLI, first use the access-list command to create an access list of the traffic you want to allow and/or block. Then use the vpn-filter command in group-policy configuration mode to apply the filter to the group policy. Example 9-13 shows the same configuration as Figure 9-14.
Example 9-13 Adding a Filter List via the CLI
vpn-asa1(config)# access-list FILTER_LIST extended permit tcp any host 172.20.1.50 eq http
vpn-asa1(config)# group-policy EMPLOYEE_GROUP attributes
vpn-asa1(config-group-policy)# vpn-filter value FILTER_LIST
That wraps up three foundational features that are commonly deployed with an AnyConnect VPN offering. There are other options you can consider, and other options could appear on the SVPN exam. We focused on these three because we know you will run into them in real-world deployments, and we highly recommend that you know them because they can appear on the SVPN exam.
Next up, let’s switch focus to AnyConnect IKEv2 VPN on a Cisco ASA.
AnyConnect IKEv2 VPN on ASA
IKEv2 is an alternative transport to SSL that supports both AnyConnect and standards-based (third-party) endpoint clients. You will need to know both IKEv2 and SSL for the SVPN exam. Both are also common options used for real-world deployments.
Configuration of an AnyConnect IKEv2 VPN on ASA consists of two steps in addition to the steps completed previously for the AnyConnect SSLVPN on ASA:
Step 1. Enable IPsec (IKEv2).
Step 2. Configure an AnyConnect client profile for IKEv2.
Step 1: Enabling IPsec (IKEv2)
The first step in deploying IKEv2 is to enable IPsec. Don’t forget to do this, and know you could find a troubleshooting question related to users being unable to connect to your VPN and one possible issue is that IPsec is not enabled.
Configuring IPsec (IKEv2) Using ASDM
To enable IPsec (IKEv2) via ASDM, follow these steps:
Step 1. Navigate to Configuration > Network (Client) Access > AnyConnect Connection Profiles.
Step 2. In the IPsec (IKEv2) Access section, check Allow Access and Enable Client Services for the desired interfaces.
Step 3. In the Connection Profiles section, check IPsec Enabled for the desired connection profiles.
Figure 9-15 shows an example of enabling IPsec (IKEv2) access on the OUTSIDE interface and enabling IPsec for the EMPLOYEE_CONNECTION connection profile.

Figure 9-15 Enabling IPsec (IKEv2) via ASDM
Configuring IPsec (IKEv2) Using CLI
To enable IPsec (IKEv2) via the CLI, the configuration is slightly more involved than it appears in ASDM because ASDM automatically generates a lot of the basic IKEv2 configuration for you. Therefore, we split the configuration for IPsec (IKEv2) via the CLI into two sections for clarity. The first section covers only the specific configuration changes made in ASDM. The second section covers the configuration changes automatically generated by ASDM.
To make the specific configuration changes made in ASDM via the CLI, use the crypto ikev2 enable command to allow IKEv2 on the desired interfaces. Then use the vpn-tunnel-protocol command in group-policy configuration mode to enable IKEv2 for the desired group policies. The first section of Example 9-14 shows an example of enabling IKEv2 on the OUTSIDE interface and enabling IKEv2 for the EMPLOYEE_GROUP group policy. It mirrors the specific configuration changes shown in Figure 9-15.
To make the configuration changes automatically generated by ASDM, use the following commands via the CLI:
• Use the crypto ikev2 policy command to create one or more IKEv2 policies. Then use the group command and the encryption command in ikev2 policy configuration mode to set the acceptable Diffie–Hellman (DH) group(s) and encryption algorithm(s) for each IKEv2 policy. These transforms will be used for the IKE SAs and to secure the negotiation.
• Use the crypto ikev2 remote-access trustpoint command to select a trustpoint to use to identify the ASA during session setup.
• Use the crypto ipsec ikev2 ipsec-proposal command to create one or more IPsec proposals. Then use the protocol esp encryption command and the protocol esp integrity command in ipsec proposal configuration mode to set the acceptable encryption algorithm(s) and integrity algorithms for each IPsec proposal. These transforms will be used for the child SAs and to secure the tunnel data.
• Use the crypto dynamic-map command to create a dynamic crypto map and associate the IPsec proposals with the dynamic crypto map.
• Use the crypto map command to create a crypto map and add a dynamic map entry referencing the previously created dynamic crypto map. Then use the crypto map command again to associate the crypto map with the desired interface.
The second section of Example 9-14 shows the commands automatically generated by ASDM.
Example 9-14 Enabling IPsec (IKEv2) via the CLI
vpn-asa1(config)# crypto ikev2 enable OUTSIDE client-services port 443
vpn-asa1(config)# group-policy EMPLOYEE_GROUP attributes
vpn-asa1(config-group-policy)# vpn-tunnel-protocol ssl-client ikev2

!!!The commands below are automatically generated by ASDM!!!
vpn-asa1(config)# crypto ikev2 policy 1
vpn-asa1(config-ikev2-policy)# group 2 5
vpn-asa1(config-ikev2-policy)# encryption aes-256
vpn-asa1(config-ikev2-policy)# crypto ikev2 policy 10
vpn-asa1(config-ikev2-policy)# group 2 5
vpn-asa1(config-ikev2-policy)# encryption aes-192
vpn-asa1(config-ikev2-policy)# crypto ikev2 policy 20
vpn-asa1(config-ikev2-policy)# group 2 5
vpn-asa1(config-ikev2-policy)# encryption aes
vpn-asa1(config-ikev2-policy)# crypto ikev2 policy 30
vpn-asa1(config-ikev2-policy)# group 2 5
vpn-asa1(config-ikev2-policy)# crypto ikev2 policy 40
vpn-asa1(config-ikev2-policy)# group 2 5
vpn-asa1(config-ikev2-policy)# encryption des
vpn-asa1(config)# crypto ikev2 remote-access trustpoint EXAMPLE_IDENTITY_CERT
vpn-asa1(config)# crypto ipsec ikev2 ipsec-proposal AES256
vpn-asa1(config-ipsec-proposal)# protocol esp encryption aes-256
vpn-asa1(config-ipsec-proposal)# protocol esp integrity md5 sha-1
vpn-asa1(config-ipsec-proposal)# crypto ipsec ikev2 ipsec-proposal AES192
vpn-asa1(config-ipsec-proposal)# protocol esp encryption aes-192
vpn-asa1(config-ipsec-proposal)# protocol esp integrity md5 sha-1
vpn-asa1(config-ipsec-proposal)# crypto ipsec ikev2 ipsec-proposal AES
vpn-asa1(config-ipsec-proposal)# protocol esp encryption aes
vpn-asa1(config-ipsec-proposal)# protocol esp integrity md5 sha-1
vpn-asa1(config-ipsec-proposal)# crypto ipsec ikev2 ipsec-proposal 3DES
vpn-asa1(config-ipsec-proposal)# protocol esp encryption 3des
vpn-asa1(config-ipsec-proposal)# protocol esp integrity md5 sha-1
vpn-asa1(config-ipsec-proposal)# crypto ipsec ikev2 ipsec-proposal DES
vpn-asa1(config-ipsec-proposal)# protocol esp encryption des
vpn-asa1(config-ipsec-proposal)# protocol esp integrity md5 sha-1
vpn-asa1(config-ipsec-proposal)# crypto dynamic-map SYSTEM_DEFAULT_CRYPTO_MAP 65535 set ikev2
ipsec-proposal AES256 AES192 AES 3DES DES
vpn-asa1(config)# crypto map OUTSIDE_map 65535 ipsec-isakmp dynamic SYSTEM_DEFAULT_CRYPTO_MAP
vpn-asa1(config)# crypto map OUTSIDE_map interface OUTSIDE
We recommend that you be familiar with how to enable IPsec using CLI as well as how the code that is generated by ASDM looks when you enable IPsec using ASDM. You could see questions regarding recognizing this code, identifying errors in the code, or other use cases requiring you to be familiar with the CLI involved with enabling IPsec.
Step 2: Configuring an AnyConnect Client Profile for IKEv2
Configuration of AnyConnect is accomplished via AnyConnect client profiles. These profiles contain configuration settings for the core client VPN functionality and for the optional client modules, such as Network Access Manager, ISE Posture, Customer Experience Feedback, and Web Security. The ASA deploys the profiles during AnyConnect installation and updates. Users cannot manage or modify profiles.
You can configure the ASA to deploy profiles globally for all AnyConnect users or to users based on their group policy. Usually, a user has a single profile file for each AnyConnect module installed. In some cases, you might want to provide more than one VPN profile for a user. Someone who works from multiple locations might need more than one VPN profile.
Profile Storage
Some profile settings are stored locally on the user’s computer in a user preferences file or a global preferences file. The user file has information the AnyConnect client needs to display user-controllable settings in the Preferences tab of the client GUI and information about the last connection, such as the user, the group, and the host.
The profiles are stored in the locations listed in Table 9-5.
Table 9-5 Storage Locations for AnyConnect Client Profiles


While manually editing the XML file via a text editor is possible, ASDM includes a built-in profile editor, and using this editor is the preferred method for editing the AnyConnect client profiles.
Creating AnyConnect Client Profile for IKEv2 Using ASDM
To create an AnyConnect client profile for IKEv2 via ASDM, follow these steps:
Step 1. Navigate to Configuration > Remote Access VPN > AnyConnect Client Profile.
Step 2. Click Add to open the Add AnyConnect Client Profile dialog box.
Step 3. Specify a profile name.
Step 4. Select the desired group policy.
Step 5. Click OK.
Step 6. Click Edit to open the AnyConnect Client Profile Editor dialog box.
Step 7. Navigate to VPN > Server List.
Step 8. Click Add to open the Server List Entry dialog box.
Step 9. Specify a display name.
Step 10. Specify a FQDN.
Step 11. Specify a user group.
Step 12. Change the primary protocol from SSL to IPsec.
Step 13. Click OK to close the Server List Entry dialog box.
Step 14. Click OK to close the AnyConnect Client Profile Edit dialog box.
Figure 9-16 shows an example of creating the server list named EMPLOYEE IKEV2 CONNECTION, the FQDN of the ASA (which is vpn-asa1.example.com), and the user group EMPLOYEE_CONNECTION. The primary protocol has been set to IPsec, and the ASA Gateway check box is checked.

Figure 9-16 Creating an AnyConnect Client Profile for IKEv2 via ASDM
Note
The User Group name must be the same as the name of the connection profile on the ASA; otherwise, the error message “Invalid Host Entry. Please re-enter” appears in the AnyConnect client.
Note
There is no CLI interface for the profile editor.
That concludes how to deploy both IKEv2 and SSLVPN using a Cisco ASA. Next, we look at how to deliver an AnyConnect IKEv2 VPN on Cisco routers.
AnyConnect IKEv2 VPN on Routers
Like the Cisco ASA, Cisco routers running IOS or IOS XE can terminate IKEv2 VPN remote access connections. Terminating IKEv2 VPN remote access connections involves using the same FlexVPN framework discussed in earlier chapters, providing IP layer connectivity via IKEv2 and IPsec for both AnyConnect and third-party clients. Refer to the prerequisites section of this chapter to prepare for a router-based IKEv2 VPN deployment. The same license and host requirements apply.
This section discusses how to implement an AnyConnect IKEv2 VPN on a Cisco routers, specifically IOS XE. Figure 9-17 shows the lab environment used in this section, which includes the following software and hardware versions:
• Cisco Cloud Services Router (CSR) running IOS XE 17.03.01a
• AnyConnect client Version 4.8.03052 running on Windows 10
Figure 9-17 AnyConnect IKE VPN on Routers Lab Diagram
Configuring a Cisco router to terminate AnyConnect IKEv2 remote access connections is a six-step process:
Step 1. Configure PKI.
Step 2. Disable the HTTP and HTTPS servers on the router.
Step 3. Configure AAA.
Step 4. Create an IKEv2 authorization policy.
Step 5. Create an IKEv2 profile.
Step 6. Create a virtual template.
Step 1: Configuring PKI
While it is not uncommon to use self-signed certificates when testing technologies in the lab, it is highly recommended to avoid doing so when dealing with AnyConnect IKEv2 VPN configurations. Some AnyConnect IKEv2 VPN configurations do not work if a self-signed certificate is used. One example is local user authentication when EAP is used between the AnyConnect client and router. EAP requires a proper certificate chain consisting of a server certificate signed by a separate CA certificate. If this is not in place, the EAP exchange fails.
This happens to be a common AnyConnect IKEv2 VPN configuration and the one that will be configured in the examples in this section. This example uses an external CA rather than a self-signed certificate.
To install a signed certificate from an external CA, perform the following steps:
Step 1. Generate a key pair with the crypto key generate rsa command.
Step 2. Create a trustpoint with the crypto pki trustpoint command.
Step 3. Import the root CA certificate with the crypto pki authenticate command.
Step 4. Generate a certificate signing request (CSR) with the crypto pki enroll command.
Step 5. Import the signed server certificate with the crypto pki import command.
Generating a Key Pair
An RSA key pair, also known as an asymmetric key pair, consists of a public key and a private key. When setting up a PKI trustpoint, you must include the public key of the key pair in the certificate enrollment request. After the certificate has been granted, the public key is included in the certificate so that peers can use it to securely exchange data with the router during session setup. The private key is kept on the router and can be used both to decrypt data sent by peers and to digitally sign transactions when negotiating with peers.
An RSA key pair contains a key modulus value. The modulus determines the size of the RSA key. The larger the modulus, the more secure the RSA key. However, keys with large modulus values take longer to generate, and encryption and decryption operations take longer with larger keys.
To generate a key pair, use the crypto key generate rsa command. Example 9-15 shows an example of creating the key pair named RSA_KEY with a modulus of 2048 bits. A modulus of 2048 bits has been chosen as that is the minimum key length required by public CAs for signing certificates and is the generally accepted minimum key length as of the publication date of this book. On many versions of IOS and IOS XE code, the default modulus is less than 2048 bits. A certificate request using a key with a modulus less than 2048 bits would most likely be rejected by a public CA as keys less than 2048 bits are vulnerable to cryptographic attacks.
Example 9-15 Generating a Key Pair
VPN-ROUTER(config)# crypto key generate rsa label RSA_KEY modulus 2048
The name for the keys will be: RSA_KEY

% The key modulus size is 2048 bits
% Generating 2048 bit RSA keys, keys will be non-exportable...
[OK] (elapsed time was 2 seconds)
Creating a Trustpoint
A trustpoint is an abstract container used to hold a certificate in IOS. A single trustpoint is capable of storing two active certificates at any given time:
• A CA certificate: Loading a CA certificate into a given trustpoint is known as the trustpoint authentication process.
• An ID certificate issued by the CA: Loading or importing an ID certificate into a given trustpoint is known as the trustpoint enrollment process.
Trust Point Policy
A trustpoint configuration is known as a trust policy, and it defines the following:
• Which CA certificate is loaded in the trustpoint
• Which CA the trustpoint enrolls to
• How the IOS enrolls the trustpoint
• How a certificate issued by the given CA is validated
Configuring a Trustpoint
To create a trustpoint, use the crypto pki trustpoint command. Then use the rsakeypair command to specify the key pair the trustpoint should use. Example 9-16 shows an example of creating the trustpoint named RSA_CERT and configuring the trustpoint to use the previously generated RSA_KEY key pair.
Define Trust Policy
The next step in configuring the trustpoint is to define the trust policy. To output the CSR to the terminal, use the enrollment terminal command to instruct the router to display the CSR during the enrollment process.
Disable FQDN
To ensure the CSR is well formed and accepted by the CA, disable the insertion of the FQDN via the fqdn none command, which uses a nonstandard distinguished name field. Instead, provide the FQDN using the standard common name (CN) distinguished name (DN) field via the subject-name command and manually specify the distinguished name in the form CN=<FQDN> (see Example 9-16).
Example 9-16 Creating a Trustpoint
VPN-ROUTER(config)# crypto pki trustpoint RSA_CERT
VPN-ROUTER(ca-trustpoint)# rsakeypair RSA_KEY
VPN-ROUTER(ca-trustpoint)# enrollment terminal
VPN-ROUTER(ca-trustpoint)# fqdn none
VPN-ROUTER(ca-trustpoint)# subject-name CN=VPN-ROUTER.EXAMPLE.COM
Importing the Root CA Certificate
With the trustpoint defined, the next step is to load the root certificate of the chosen CA. To load a CA certificate, use the crypto pki authenticate command. Example 9-17 shows an example of loading a root certificate into the RSA_CERT trustpoint.
When using terminal enrollment, the crypto pki authenticate command requires a base-64-encoded CA certificate. This can be obtained from the CA and is often referred to as Privacy-Enhanced Mail (PEM) format. After you paste the certificate, the router displays the MD5 and SHA-1 hashes of the certificate. This allows you as the administrator to confirm whether the right certificate has been loaded and choose whether to accept or reject the certificate.
Example 9-17 Importing the Root CA Certificate
VPN-ROUTER(ca-trustpoint)# crypto pki authenticate RSA_CERT

Enter the base 64 encoded CA certificate.
End with a blank line or the word “quit” on a line by itself

-----BEGIN CERTIFICATE-----
MIIDLjCCAhagAwIBAgIGAXTMiaEAMA0GCSqGSIb3DQEBCwUAMCcxCzAJBgNVBAYT
AlVTMRgwFgYDVQQDDA9FeGFtcGxlIFJvb3QgQ0EwHhcNMjAwOTI2MjIzMDA1WhcN
MzAwOTI3MjIzMDE5WjAnMQswCQYDVQQGEwJVUzEYMBYGA1UEAwwPRXhhbXBsZSBS
b290IENBMIIBIjANBgkqhkiG9w0BAQEFAAOCAQ8AMIIBCgKCAQEAvw4xs1LPKfjY
tubLGZZNU5vttMqXzK5HbnN4H9bl66QZuSPwc9/3sFlRgUlOWXnZXp1oj8C7/mDF
BD87SdMAgGhWlR43m3FAVghwtd/kVcMhPj19wgxh95l0FxfMC3ryqM232Ts27V+4
a/M572C6lsL7rCAKZVP5UHkwKlvXVGdGTOE1bBLMMmy6wW+ReMILHFOJ3StxHEgt
MKlsHrBrYKKHrUFk89y7w9bCau1oBNEWFaptvtprv2/MoFUbCM/1iDjk5i2FJIYW
VYbLEspkCqx43I24cIEBX6obIOvMMdi2dcl9cFHZNZLvWlP+Eboj0skeEanXBLk8
5zNH1c+vlQIDAQABo2AwXjAfBgNVHSMEGDAWgBSDErDZDe+D8biDHBnc2v7cmwnL
GTAMBgNVHRMEBTADAQH/MA4GA1UdDwEB/wQEAwIBhjAdBgNVHQ4EFgQUgxKw2Q3v
g/G4gxwZ3Nr+3JsJyxkwDQYJKoZIhvcNAQELBQADggEBAGU6l464oU225qNSq6oF
I2m5n39L9V6g3L/QzhMzAQEDnG3NzbPtp0/GrXQdoA4QS+JgzKClgeVPn9D726xZ
nflVF/WWilX//9wIY5W8PyIoAny1/8m6ej+WbcwdJHRNDyf8Dtw4OMdYG23ZNT/1
UmCZH376JxkagkCKCKLO2yOVvvnETiaD+g5zI7wuMP+zL1ofdGhzThLMbuykyOMK
cdxA93wZmkXki9Uqq9QTAWqUdDS1xXxGdECfJSPxRgNqGFsCLQ58sumBMXGdFwc2
VeV0eJ2+H+RjMJbnBK0KiOsvk2YIZhlmaqLQsilZm92WkDH/TvbYPD6lWjRsqNEv
iY4=
-----END CERTIFICATE-----

Certificate has the following attributes:
       Fingerprint MD5: 9546B887 B143A4D7 FAB3AACA BA69281D
      Fingerprint SHA1: C615CF85 9441B99E 5E217B68 4D7E3983 467B9425

% Do you accept this certificate? [yes/no]: yes
Trustpoint CA certificate accepted.
% Certificate successfully imported
Generating a Certificate Signing Request (CSR)
With the root CA certificate successfully loaded, the next step is to obtain a certificate for the router itself. To generate a CSR, use the crypto pki enroll command. To display the CSR to the terminal, answer yes to the appropriate question. Example 9-18 shows an example of generating a CSR for the RSA_CERT trustpoint. In this example, the router serial number or IP address is not needed in the CSR.
Example 9-18 Generating a Certificate Signing Request (CSR)
VPN-ROUTER(config)# crypto pki enroll RSA_CERT
% Start certificate enrollment ..

% The subject name in the certificate will include: CN=VPN-ROUTER.EXAMPLE.COM
% The fully-qualified domain name will not be included in the certificate
% Include the router serial number in the subject name? [yes/no]: no
% Include an IP address in the subject name? [no]: no
Display Certificate Request to terminal? [yes/no]: yes
Certificate Request follows:

MIIChzCCAW8CAQAwITEfMB0GA1UEAxMWVlBOLVJPVVRFUi5FWEFNUExFLkNPTTCC
ASIwDQYJKoZIhvcNAQEBBQADggEPADCCAQoCggEBALZ1y4VzbbfyzmBuyPVsRs4d
0aqpB1eEj7t5fGTnqVP3jPjdD56fKEQToW26xgAwhWpUnJnMjjrXR/LBv5poc2oU
9Vdi/mNAZhaAj61JkWS3frozoQVPBR+3U5Vq1YXpQrA75/P6zcz7hvk4X67b2rRl
s7psoN/LPGOdPPe9T8w277BvOD2uX9fNWk1KyOnidFdSe1OoLea9MQ6DCN6EMj/i
PzdXdgX1LLchrVtaS2eSe3kEs6//GZFkd8fLn4OUyMm4jqqOcL6Ufu31s1q3xJC1
sRO7HajBucsB97F5T6FcoUttzZpCbwtNqCk4hjxVt5FUvF94WEypPjg7MRldaFUC
AwEAAaAhMB8GCSqGSIb3DQEJDjESMBAwDgYDVR0PAQH/BAQDAgWgMA0GCSqGSIb3
DQEBBQUAA4IBAQBMu9341alZSUeoCFdRE4Qhk4zHqA6DEFvSgSIoblLjhUdRh6zr
v7Hra8spqvy7WaA93vvLhCZkHJhrQk9CNwAYP6MyBrs8LmehBSEi8eTCoCKqPMNC
fTC0kgyq5VZ0myn7G/aY0dEIXfMo3J1DrFth0JOWiYcoUIf0FACWBJ8vKqTkOUng
8qxstPOsZaDcErcFCl8WuvkCUqhzS19JcVW2Ljnb8mc/1/RL6QHx94jDGnpkBMoY
GB58gXLrTFDML++2KfFUsJK3NtsN2yuVYIAT2MfQmPHq08cBJj6cvdI2+4jCBoLv
zMkyhgQpCBFwJQYSDfPIeVFjjyECxYOdFPfa

---End - This line not part of the certificate request---

Redisplay enrollment request? [yes/no]: no
This example does not show the submission of the CSR (labeled Certificate Request in Example 9-18) to the chosen CA. The process for this varies by CA, but it typically involves copying/pasting the text displayed into a web form or submitting the text in a plaintext file. When the request is completed and approved, the CA returns a signed certificate.
Importing the Signed Server Certificate
To import the signed certificate into the router, use the crypto pki import command. To import the certificate via the CLI (by copying and pasting), the certificate must be obtained from the CA in PEM format or must be converted to PEM format by using a tool such as OpenSSL. Example 9-19 shows an example of importing the signed certificate using the trustpoint RSA_CERT created previously.
Example 9-19 Importing the Signed Server Certificate
VPN-ROUTER(config)# crypto pki import RSA_CERT certificate
% The fully-qualified domain name will not be included in the certificate

Enter the base 64 encoded certificate.
End with a blank line or the word “quit” on a line by itself

-----BEGIN CERTIFICATE-----
MIIDJTCCAg2gAwIBAgIGAXbwIYOtMA0GCSqGSIb3DQEBCwUAMCcxCzAJBgNVBAYT
AlVTMRgwFgYDVQQDDA9FeGFtcGxlIFJvb3QgQ0EwHhcNMjEwMTExMDYyODE2WhcN
MjIwMTExMDYyODE3WjAhMR8wHQYDVQQDExZWUE4tUk9VVEVSLkVYQU1QTEUuQ09N
MIIBIjANBgkqhkiG9w0BAQEFAAOCAQ8AMIIBCgKCAQEAtnXLhXNtt/LOYG7I9WxG
zh3RqqkHV4SPu3l8ZOepU/eM+N0Pnp8oRBOhbbrGADCFalScmcyOOtdH8sG/mmhz
ahT1V2L+Y0BmFoCPrUmRZLd+ujOhBU8FH7dTlWrVhelCsDvn8/rNzPuG+Thfrtva
tGWzumyg38s8Y508971PzDbvsG84Pa5f181aTUrI6eJ0V1J7U6gt5r0xDoMI3oQy
P+I/N1d2BfUstyGtW1pLZ5J7eQSzr/8ZkWR3x8ufg5TIybiOqo5wvpR+7fWzWrfE
kLWxE7sdqMG5ywH3sXlPoVyhS23NmkJvC02oKTiGPFW3kVS8X3hYTKk+ODsxGV1o
VQIDAQABo10wWzAfBgNVHSMEGDAWgBSDErDZDe+D8biDHBnc2v7cmwnLGTAJBgNV
HRMEAjAAMA4GA1UdDwEB/wQEAwIFoDAdBgNVHQ4EFgQUgnWNDpF3SSxC9hoqAWjk
/2jUujIwDQYJKoZIhvcNAQELBQADggEBAI/2iivi4rD9De06ep/LkhuzDWxFIBcm
kaaCUfZFU60iAXNKuvFi1rxR3ZlfbyFhJ1L5jskZr523C3OeKWvNNwHgBUMUyd0d
DPO1VdIEX8cmD2CkBVwwKR6WnLWIWcGneI5aPmj0KyllOd9fjuV20Od/3zxkZfhR
MxA9hefdwp7ZnLiXq+pSVIAxMdmxmzjZcNCzHthS4wB3FBxSVqZYDHM8rltc/v86
CctneOXA3BZk7ICtvAEZ5FtO1FRfjV+m8hmWyc9ga1NKnjFpcRUmxQSrxjgLh+m5
WycYh508gn2sNBZor9C4HuNQ5UYRFE8ccmMrY1OKCrXmU0JDgAu9Jxk=
-----END CERTIFICATE-----

% Router Certificate successfully imported
To verify that the root CA and identity certificate have been installed correctly, use the show crypto pki trustpoints command. Example 9-20 shows the output of this command when both the root CA and identity certificate have been successfully installed.
Example 9-20 Verifying the Root CA and Identity Certificate Installation
VPN-ROUTER# show crypto pki trustpoints RSA_CERT status
*Jan 11 06:29:45.480: %SYS-5-CONFIG_I: Configured from console by admin on vty0 (100.100.1.254)
Trustpoint RSA_CERT:
  Issuing CA certificate configured:
    Subject Name:
     cn=Example Root CA,c=US
    Fingerprint MD5: 9546B887 B143A4D7 FAB3AACA BA69281D
    Fingerprint SHA1: C615CF85 9441B99E 5E217B68 4D7E3983 467B9425
  Router General Purpose certificate configured:
    Subject Name:
     cn=VPN-ROUTER.EXAMPLE.COM
    Fingerprint MD5: 219DFA6B 420C2F94 7F994E18 C850B935
    Fingerprint SHA1: 4B857419 BBA20413 931FF128 565BC70E 2C87EBAE
  State:
    Keys generated ............. Yes (General Purpose, non-exportable)
    Issuing CA authenticated ....... Yes
    Certificate request(s) ..... Yes
With the trustpoint on the router configured properly, the next step is to disable the HTTP server on the router.
Step 2: Disabling the HTTP and HTTPS Servers on the Router
When a user attempts an IKEv2 connection to a Cisco router with the HTTP or HTTPS server enabled, the AnyConnect client receives a reply that is not expected, triggering the detection of a captive portal and preventing connections to the headend. To avoid this issue, there are two options:
• Disable AnyConnect captive portal detection via an AnyConnect client profile
• Disable the HTTP and HTTPS servers on the Cisco router
Because AnyConnect captive portal detection is a generally useful feature, the preferred option is to disable the HTTP and HTTPS server on the Cisco router via the no http server and no http server-server commands, as shown in Example 9-21.
Example 9-21 Disabling the HTTP and HTTPS Servers on the Router
VPN-ROUTER(config)# no ip http server
VPN-ROUTER(config)# no ip http secure-server
Step 3: Configuring AAA
Next, you need to enable AAA with the aaa new-model command and configure the necessary authentication and authorization for our users. For users connecting remotely, this is broken into two components. The first components is the aaa authentication login command with the list named LOCAL_USER_AUTHC, which directs user authentication to use the local database. The second components is the aaa authorization network command with the list named LOCAL_GROUP_AUTHZ, which directs group authorization to also use the local database. Example 9-22 shows all of these commands.
Example 9-22 Configuring AAA
VPN-ROUTER(config)# aaa new-model
VPN-ROUTER(config)# aaa authentication login LOCAL_USER_AUTHC local
VPN-ROUTER(config)# aaa authorization network LOCAL_GROUP_AUTHZ local
With the authentication and authorization lists defined, you now need to populate the local database with users and groups. To define a user, use the username command. Example 9-23 shows an example of creating the user vpnuser.
Example 9-23 Creating a User
VPN-ROUTER(config)# username vpnuser password cisco123
WARNING: Command has been added to the configuration using a type 0 password. However, type 0
passwords will soon be deprecated. Migrate to a supported password type
Step 4: Creating an IKEv2 Authorization Policy
The next step is to create a group for authorization via an IKEv2 authorization policy. This group, which will be used for local group authorization, defines various configuration attributes that will be pushed to the AnyConnect client upon connection. To create an IKEv2 authorization policy, use the crypto ikev2 authorization policy command. Example 9-24 shows an example of creating an IKEv2 authorization policy. EMPLOYEES is both the name of the policy and the group name that will be used during authorization.
To ensure that the connecting user has connectivity, you also define various attributes that will be returned to the AnyConnect client, which determines how the client connects to the network (see Example 9-24):
• pool defines the IP addresses that are assigned to the client. This example uses a dedicated subnet pool of IP addresses named EMPLOYEE_POOL with the range 172.16.2.1 to 172.16.2.254, using the ip local pool command.
• netmask defines the IP subnet mask used by the AnyConnect client.
• dns defines the DNS servers used by the AnyConnect client.
Example 9-24 Creating an IKEv2 Authorization Policy
VPN-ROUTER(config)# ip local pool EMPLOYEE_POOL 172.16.2.1 172.16.2.254
VPN-ROUTER(config)# crypto ikev2 authorization policy EMPLOYEES
VPN-ROUTER(config-ikev2-author-policy)# pool EMPLOYEE_POOL
VPN-ROUTER(config-ikev2-author-policy)# netmask 255.255.255.0
VPN-ROUTER(config-ikev2-author-policy)# dns 172.20.1.50
Note
Although it is not shown, the DMZ-ROUTER must also have a route for 172.16.2.0/24 pointing to the internal interface of the VPN-ROUTER.
Step 5: Creating an IKEv2 Profile
An IKEv2 profile is a repository of nonnegotiable parameters of the IKE SA, such as local or remote identities and authentication methods and services that are available to authenticated peers that match the profile. For a remote access VPN, an IKEv2 profile contains the bulk of the configuration.
Create New IKEv2 Profile
To create a new IKEv2 profile, use the crypto ikev2 profile command. Example 9-25 shows an example of creating a new profile named LOCAL_USER_IKEV2_PROFILE.
Identifying Match Criteria
In Example 9-25, the match identity remote key-id *$AnyConnectClient$* command identifies the match criteria to select the profile LOCAL_USER_IKEV2_PROFILE. Put another way, the IKE identity of type key-id sent by the client is used as the selection criteria to select this IKEv2 profile. The string *$AnyConnectClient$* is the default key ID provided by the AnyConnect client. With this match criteria, any AnyConnect client that is using the default key ID will be matched to this profile.
RSA Certificate Authentication
The next command in Example 9-25, authentication local rsa-sig, tells the router to use an RSA certificate to authenticate itself to the remote client, and the pki trustpoint RSA_CERT command identifies the RSA_CERT trustpoint certificate as the certificate that should be used for this authentication.
Authenticating Remote Users
To authenticate remote users, the authentication remote anyconnect-eap aggregate command identifies that the proprietary method AnyConnect-EAP (also known as aggregate authentication) will be used to perform authentication of the remote users. It is important to note that the authentication remote command only identifies the method used for authentication. It does not specify what database will be used to authenticate users. You will define that in the next step.
Authentication List
To specify the authentication list used for authenticating users, use the aaa authentication anyconnect-eap command. In Example 9-25, the aaa authentication anyconnect-eap LOCAL_USER_AUTHC command points authentication to the LOCAL_USER_AUTHC list previously configured.
To specify the authorization list used for authorizing groups, use the aaa authorization group anyconnect-eap command. In Example 9-25, the authorization group anyconnect-eap list LOCAL_GROUP_AUTHZ EMPLOYEES tells the router to use the authorization list LOCAL_GROUP_AUTHZ and the group name EMPLOYEES for authorization. LOCAL_GROUP_AUTHZ is the authorization list previously configured with the aaa authorization network command and points to the local database on the router. EMPLOYEES references the IKEv2 authorization policy previously configured with the crypto ikev2 authorization policy command.
Virtual Template
As the second-to-last step, specify a virtual template that will be used by the profile via the virtual-template command. The virtual template will be defined later.
AnyConnect Client Profile
Finally, specify an AnyConnect client profile that will be pushed to connecting clients via the anyconnect profile command. The AnyConnect client profile will be defined later as well.
Configuration Summary
Putting all of these pieces together, we end up with the complete configuration for the IKEv2 profile shown in Example 9-25.
Example 9-25 Creating an IKEv2 Profile
VPN-ROUTER(config)# crypto ikev2 profile LOCAL_USER_IKEV2_PROFILE
IKEv2 profile MUST have:
   1. A local and a remote authentication method.
   2. A match identity or a match certificate or match any statement.
VPN-ROUTER(config-ikev2-profile)# match identity remote key-id *$AnyConnectClient$*
VPN-ROUTER(config-ikev2-profile)# authentication local rsa-sig
VPN-ROUTER(config-ikev2-profile)# pki trustpoint RSA_CERT
VPN-ROUTER(config-ikev2-profile)# authentication remote anyconnect-eap aggregate
VPN-ROUTER(config-ikev2-profile)# aaa authentication anyconnect-eap LOCAL_USER_AUTHC
VPN-ROUTER(config-ikev2-profile)# aaa authorization group anyconnect-eap list LOCAL_GROUP_AUTHZ
EMPLOYEES
VPN-ROUTER(config-ikev2-profile)# virtual-template 1
VPN-ROUTER(config-ikev2-profile)# anyconnect profile acvpn
Step 6: Creating a Virtual Template
Example 9-26 shows how to create the virtual template via the interface virtual-template command with interface number 1, a type of tunnel, and the following commands:
• ip unnumbered gigabitEthernet 2 enables IP on the interfaces without assigning a specific IP address on the interface. In this case, you are piggybacking on the interface gigabitEthernet 2, but this could be any interface with an IP address, such as a loopback.
• ip mtu 1400 configures the largest packet size/maximum transmission unit (MTU) for the tunnel interface. It is customary to set this to a conservative 1400 bytes to prevent fragmentation and performance degradation.
• tunnel mode ipsec ipv4 configures the virtual template to use IPsec tunnel encapsulation over IPv4.
• tunnel protection ipsec profile default configures the virtual template to use the smart defaults IPsec profile named default. Alternatively, a custom IPsec profile could be referenced that was previously created with the crypto ipsec profile command.
Example 9-26 Creating the Virtual Template
VPN-ROUTER(config)# interface Virtual-Template1 type tunnel
VPN-ROUTER(config-if)# ip unnumbered gigabitEthernet 2
VPN-ROUTER(config-if)# ip mtu 1400
VPN-ROUTER(config-if)# tunnel mode ipsec ipv4
VPN-ROUTER(config-if)# tunnel protection ipsec profile default
With the virtual template configured, you now have a working configuration that provides full tunnel connectivity via AnyConnect. The configuration you have built so far is shown in Example 9-27.
Example 9-27 Full AnyConnect IKEv2 Configuration
aaa new-model
aaa authentication login LOCAL_USER_AUTHC local
aaa authorization network LOCAL_GROUP_AUTHZ local

username vpnuser password cisco123

ip local pool EMPLOYEE_POOL 172.16.2.1 172.16.2.254

crypto ikev2 authorization policy EMPLOYEES
 pool EMPLOYEE_POOL
 netmask 255.255.255.0
 dns 172.20.1.50

crypto ikev2 profile LOCAL_USER_IKEV2_PROFILE
 match identity remote key-id *$AnyConnectClient$*
 authentication local rsa-sig
 pki trustpoint RSA_CERT
 authentication remote anyconnect-eap aggregate
 aaa authentication anyconnect-eap LOCAL_USER_AUTHC
 aaa authorization group anyconnect-eap list LOCAL_GROUP_AUTHZ EMPLOYEES
 virtual-template 1
 anyconnect profile acvpn

interface virtual-template 1 type tunnel
 ip unnumbered vlan 3
 ip mtu 1400
 tunnel mode ipsec ipv4
 tunnel protection ipsec profile default
Creating the AnyConnect Client Profile
To complete the configuration, you need to build an AnyConnect client profile to allow the clients to connect. The reason for this is threefold:
• By default, AnyConnect uses SSL/TLS as the primary protocol for connections. Because the FlexVPN server in this case only supports IKEv2, AnyConnect will fail to connect if there is no profile configured to use IPsec as the primary protocol.
• By default, AnyConnect assumes that it is connecting to an ASA gateway. The FlexVPN server in this case is running IOS XE.
• By default, the AnyConnect client tries to download the AnyConnect profile after successful login. If the profile is not available, the connection fails. Only newer versions of IOS XE (16.9.1 or higher) support the downloading of the AnyConnect profile after successful login.
AnyConnect Profile Editor
To configure the AnyConnect client profile, you can use the AnyConnect profile editor running on Windows. As Figure 9-18 shows, the Windows AnyConnect profile editor looks identical to the AnyConnect profile editor in ASDM.

Figure 9-18 AnyConnect Profile Editor Server List
To create an AnyConnect client profile for IKEv2 terminating on a Cisco router via the Windows AnyConnect Profile Editor, follow these steps:
Step 1. Navigate to VPN > Server List.
Step 2. Click Add to open the Server List Entry dialog box.
Step 3. Specify a display name.
Step 4. Specify a FQDN.
Step 5. Specify a user group.
Step 6. Change Primary Protocol from SSL to IPsec.
Step 7. Uncheck ASA Gateway.
Step 8. Click OK to close the Server List Entry dialog box.
Step 9. Navigate to File > Save As.
Step 10. Specify a location to save the profile.
Step 11. Click Save.
Figure 9-19 shows an example of creating the server list named IOS IKEV2 LOCAL. Connections using this server list entry will be made to the FQDN vpn-router.example.com. The primary protocol has been changed from SSL to IPsec because the connection uses IKEv2. Finally, the ASA gateway has been unselected because the VPN will terminate on a Cisco router.
Note
The display name is a friendly name shown to users in the AnyConnect client and does not have to match any portion of the configuration.

Figure 9-19 Creating an AnyConnect Client Profile for IKEv2 VPN to a Router
Copying to the Router
You can now copy the file to the router and use the crypto vpn anyconnect profile command to define the profile to push down to clients upon connection. The name of the profile on the Cisco router must be acvpn.xml.
Note
Cisco routers running IOS XE releases older than 16.9.1 do not have the capability to push down a profile to AnyConnect. With those routers, you must disable the profile download capability by changing the text <BypassDownloader>true</BypassDownloader> to <BypassDownloader>false</BypassDownloader> in the AnyConnectLocalPolicy.xml. On Windows, this file is stored in the %ProgramData%\Cisco\Cisco AnyConnect Secure Mobility Client\Profile folder, and on macOS and Linux, it is stored in the /opt/cisco/anyconnect/profile folder.
Example 9-28 shows an example of uploading the profile via TFTP and defining the profile in the configuration.
Example 9-28 Defining an AnyConnect Client Profile on a Cisco Router
VPN-ROUTER(config)# crypto vpn anyconnect profile acvpn bootflash:/acvpn.xml
The final step is to install and load the AnyConnect client profile on the endpoint in the appropriate folder. Assuming that AnyConnect is already installed, you can transfer the file to the profile location for the operating system being used, as shown in Table 9-6.
Table 9-6 Storage Locations for AnyConnect Client Profiles

Reboot
To load the new profiles, the AnyConnect client needs to be restarted. You can restart the client by right-clicking the AnyConnect icon in the Windows tray and selecting the Quit option. One restarted, AnyConnect should show the profile IOS IKEV2 LOCAL USER in the drop-down. After you click Connect, enter the username vpnuser and the password cisco123, the VPN connection should be successful, as shown in Figure 9-20.

Figure 9-20 Successful AnyConnect IKEv2 Connection to a Cisco Router
Configuring Split Tunneling
By default, AnyConnect provides a full tunnel connection; all traffic, regardless of destination, is sent across the tunnel. You can modify this behavior by configuring a split tunnel list to only tunnel specific traffic across the tunnel. An example of this is shown in Example 9-29, which involves the configuration of two items:
• A standard access list named SPLIT_TUNNEL_ACL is created via the ip access-list standard command. You add a permit access control entry (ACE) for the subnet 172.20.1.0/24 via the permit command. Note the wildcard mask.
• Within the EMPLOYEES IKEv2 authorization policy you previously configured, you add SPLIT_TUNNEL_ACL via the route set access-list command.
Example 9-29 Configuring Split Tunneling
VPN-ROUTER(config)# ip access-list extended SPLIT_TUNNEL_ACL
VPN-ROUTER(config-std-nacl)# permit 172.20.1.0 0.0.0.255
VPN-ROUTER(config-std-nacl)#
VPN-ROUTER(config-std-nacl)# crypto ikev2 authorization policy EMPLOYEES
VPN-ROUTER(config-ikev2-author-policy)# route set access-list SPLIT_TUNNEL_ACL
With this configuration, future connections to the VPN headend will only tunnel traffic destined to the subnet 172.20.1.0/24, and all other traffic will use the default gateway of the local PC.
That wraps up our last configuration example. Make sure you understand all three versions of AnyConnect VPN technology deployments covered in this chapter. Once you master this and the previous clientless VPN concepts you are ready to move into the last chapter, which is troubleshooting all remote access VPN concepts.
Summary
This chapter provides an overview of the AnyConnect SSLVPN functionality on the ASA, including both basic configuration and more advanced configuration. This chapter also covers AnyConnect IKEv2-based VPNs on ASA and introduces the AnyConnect profile editor. Finally, this chapter also discusses how to deploy AnyConnect IKEv2-based VPNs on IOS. You will need to know all three of these versions of AnyConnect deployments for the SVPN exam. All are also widely used by organizations around the world.
AnyConnect is one of the most widely deployed software applications and is a critical topic to know for the SVPN 300-730 exam. Make sure you know how to configure AnyConnect both from the command line and using ASDM as both methods are sure to come up on the exam. This includes understanding what could go wrong with a deployment, because troubleshooting is a large part of the SVPN exam. The next chapter brings together concepts from both this and the last chapter with a focus on troubleshooting. You must first understand how things work before you can learn how to fix them. We highly recommend you master the concepts of both Chapter 8 and Chapter 9 before moving into Chapter 10.
We want to remind you that although this book focuses on the VPN benefits of AnyConnect, AnyConnect is more than a VPN client. You will get a taste of some of these additional benefits in Chapter 10, “Troubleshooting Remote Access VPNs.” You can also learn more about the full power of AnyConnect by visiting the Cisco AnyConnect Mobility Client web page. VPN is also a huge part of the industry movement toward cloud-based security commonly called Secure Access Service Edge or SASE (pronounced sassy). SASE will not be on the current version of the SVPN but it is a topic we highly recommend you become familiar with because it is the future of cybersecurity.
References
ASDM Book 3: Cisco ASA Series VPN ASDM Configuration Guide, 7.14. Retrieved from https://www.cisco.com/c/en/us/td/docs/security/asa/asa914/asdm714/vpn/asdm-714-vpn-config.html
CLI Book 3: Cisco ASA Series VPN CLI Configuration Guide, 9.14. Retrieved from https://www.cisco.com/c/en/us/td/docs/security/asa/asa914/configuration/vpn/asa-914-vpn-config.html
FlexVPN: AnyConnect IKEv2 Remote Access with Local User Database. Retrieved from https://www.cisco.com/c/en/us/support/docs/security/flexvpn/200555-FlexVPN-AnyConnect-IKEv2-Remote-Access.html
Exam Preparation Tasks
As mentioned in the section “How to Use This Book” in the Introduction, you have a couple of choices for exam preparation: the exercises here, Chapter 11, “Final Preparation,” and the exam simulation questions in the Pearson Test Prep software online.
Review All Key Topics
Review the most important topics in the chapter, noted with the key topics icon in the outer margin of the page. Table 9-7 lists these key topics and the page number on which each is found.
Table 9-7 Key Topics for Chapter 9

Complete Tables and Lists from Memory
Print a copy of Appendix C, “Memory Tables” (found on the companion website), or at least the section for this chapter, and complete the tables and lists from memory. Appendix D, “Memory Tables Answer Key” (also on the companion website), includes completed tables and lists to check your work.
Define Key Terms
There are no key terms for this chapter
Use the Command References to Check Your Memory
Tables 9-8 and 9-9 list the important commands from this chapter. To test your memory, cover the right side of the table with a piece of paper, read the description on the left side, then see how much of the command you can remember.
Table 9-8 Command Reference on ASA

Table 9-9 Command Reference on IOS
