If you have never used casting resin before, then this book is a great place to start. When I first started using resin, I was immediately hooked, and you will be too.
Resins occur frequently in nature and have played a part in human history as well, so it’s basically in our DNA to enjoy them! Think of the tree sap that you might have seen on the outside of a tree; it’s a sticky substance that hardens with time. You might already be familiar with amber and frankincense, too—they are also resins. Amber has been documented in jewelry since the Neolithic times, more than 12,000 years ago. The fossilized resin that becomes amber (also called resinite) is from coniferous (pine) trees and other tree species. Resins from the cones from the cedar trees of Lebanon were used in the mummification of Egyptian pharaohs. And if you have ever used turpentine, you guessed it—it’s distilled from pine tree resin. Isn’t it fun to realize how much history resin has behind it?
Resin is a way to make glass-like objects and effects without having to work with actual glass. Items can be encased in resin like little stories frozen in time. It can reinvent a classic look when you drop in small cameos, trinkets, gems, fossils, and pearls. Finding a pleasing composition and color palette that will forever be encased in “glass” is a jewelry maker’s dream. It also gives substantial weight to an object by making the item look bigger and more noticeable when wearing it. Resins can transform a small charm into a work of art.

Casting resin requires mixing two chemicals, but it is surprisingly easy to use.
Gay Isber
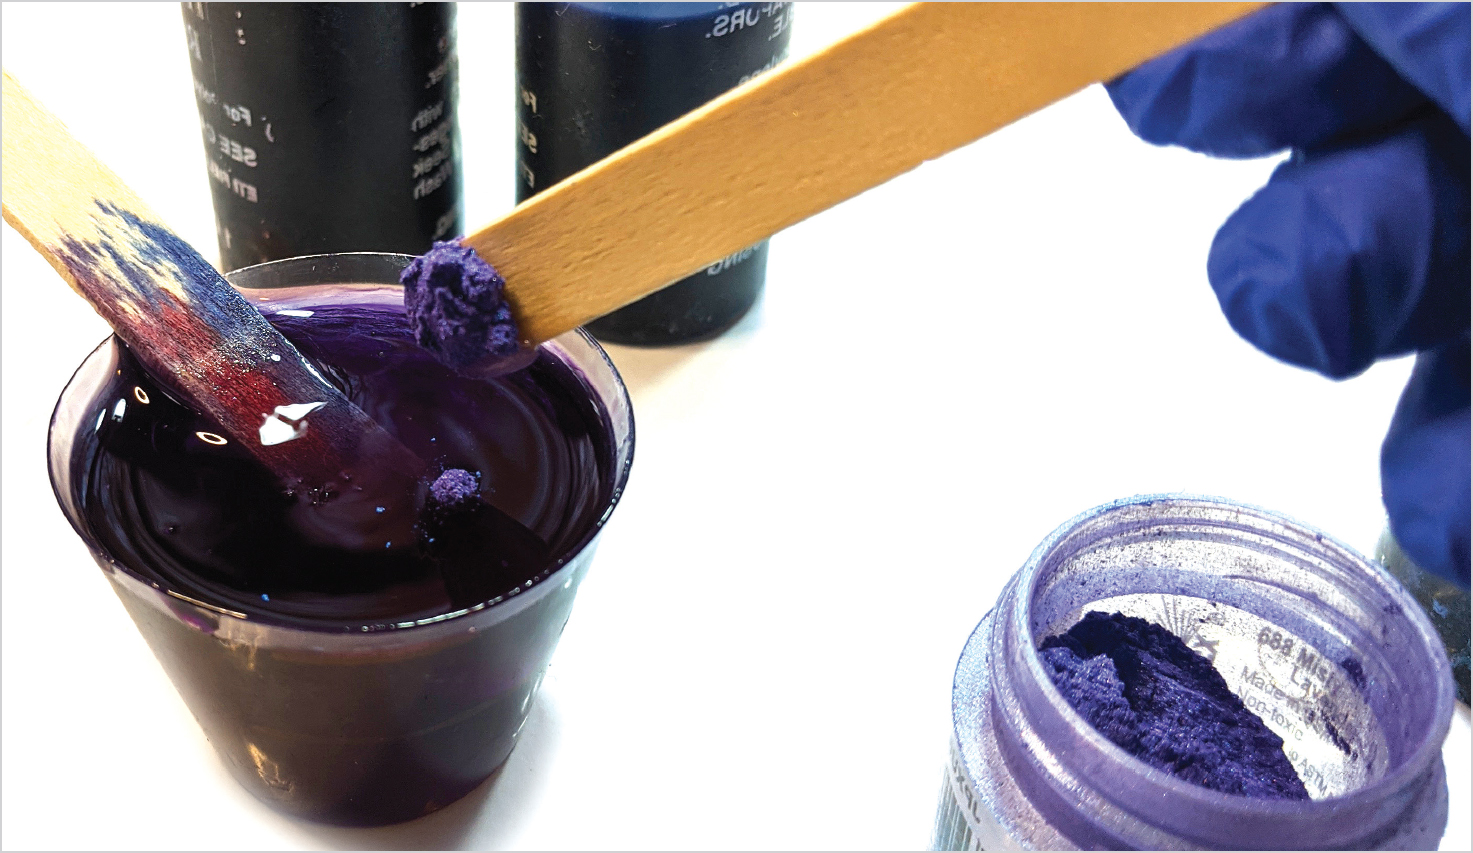
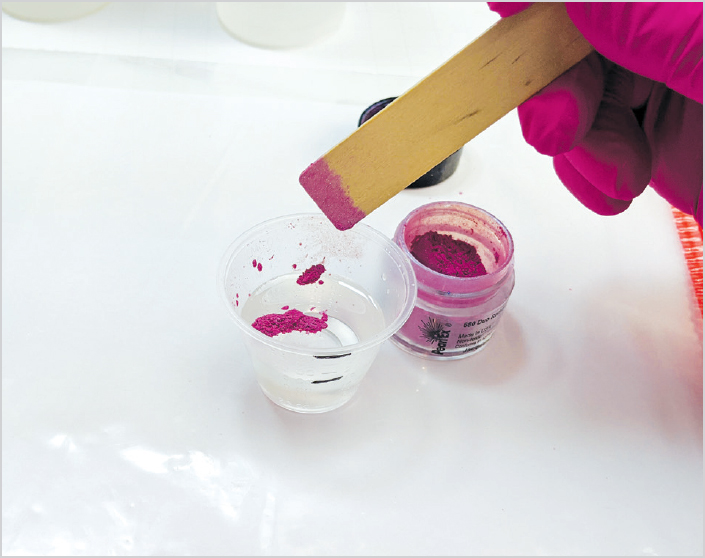
Mix colors and pigment powders into resin to make it shimmery and turn it different shades.
Gay Isber
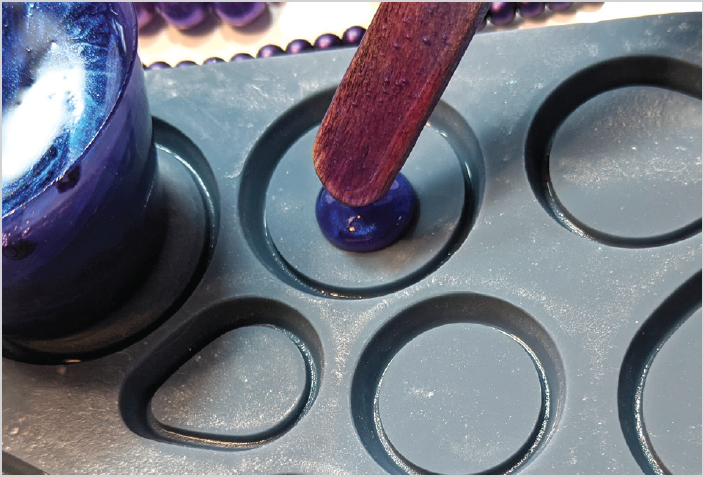
The resin acts like glue in a mold alongside beads and the like and will harden into a finished product.
Gay Isber
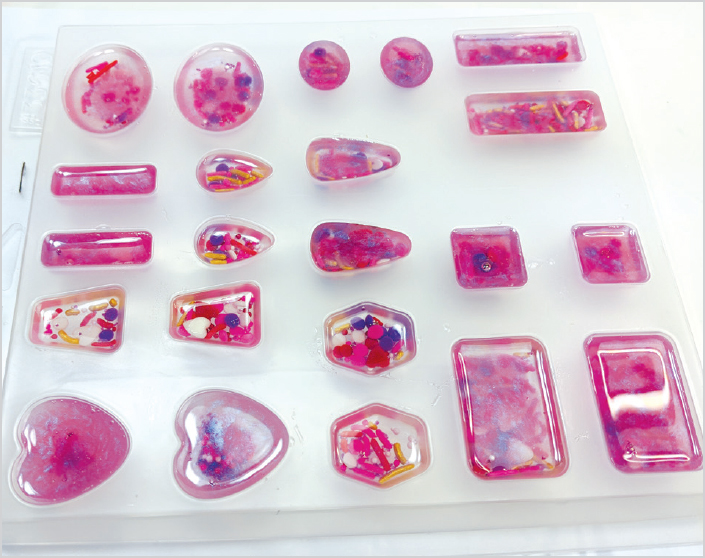
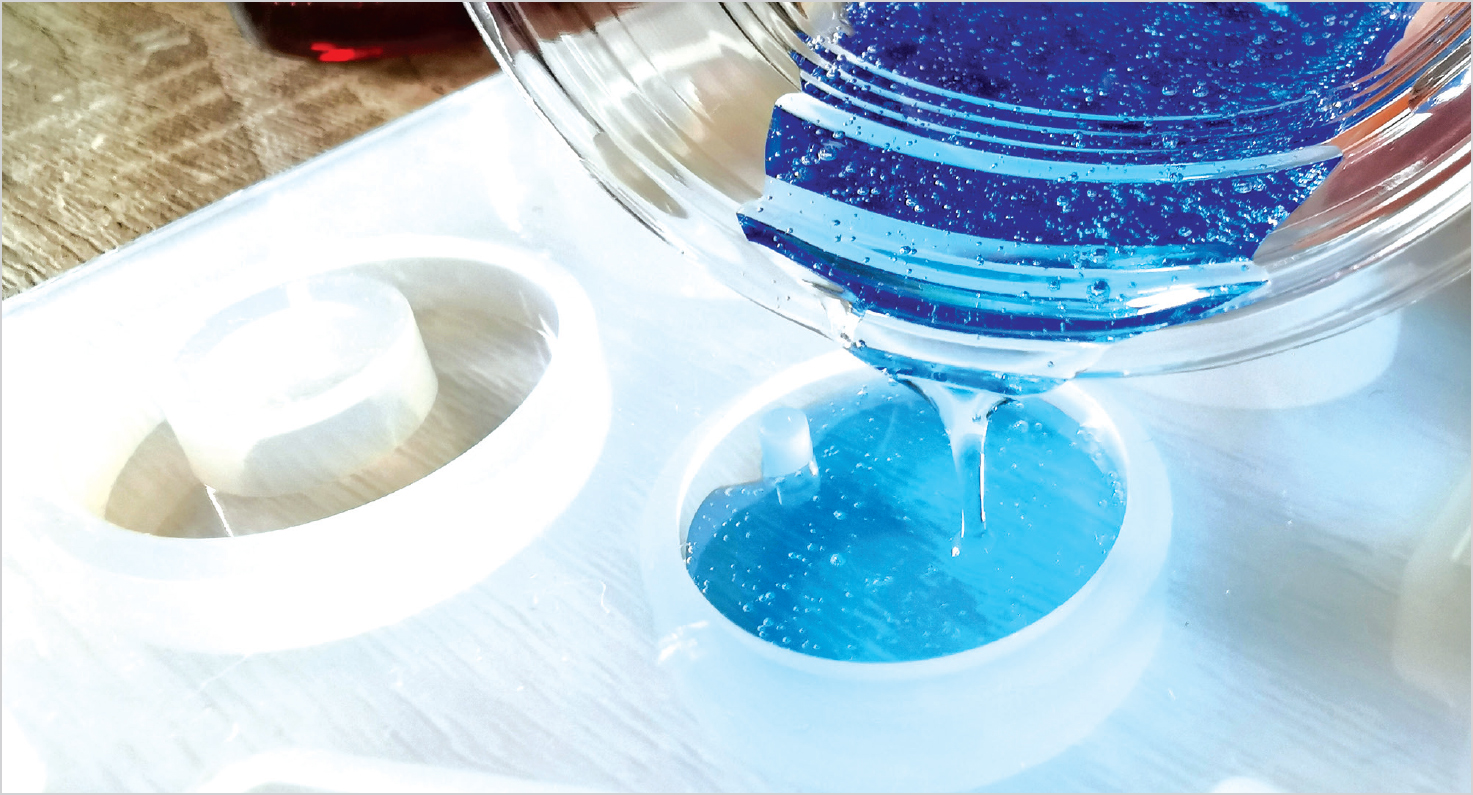
You can also colorize resin in a rainbow of custom colors. You never know exactly how a color combination will work, and the surprise is part of the fun. A drop of blue, a few drops of red, a few drops of purple—it’s easy to experiment with colors in this artist’s dream medium.

Chursina Viktoriia
TIP: If your makeup bag is exploding with eye shadows that you don’t use, grind them up, make sure that they are dry, and use them in your resins. That will give you a story to tell about your jewelry!
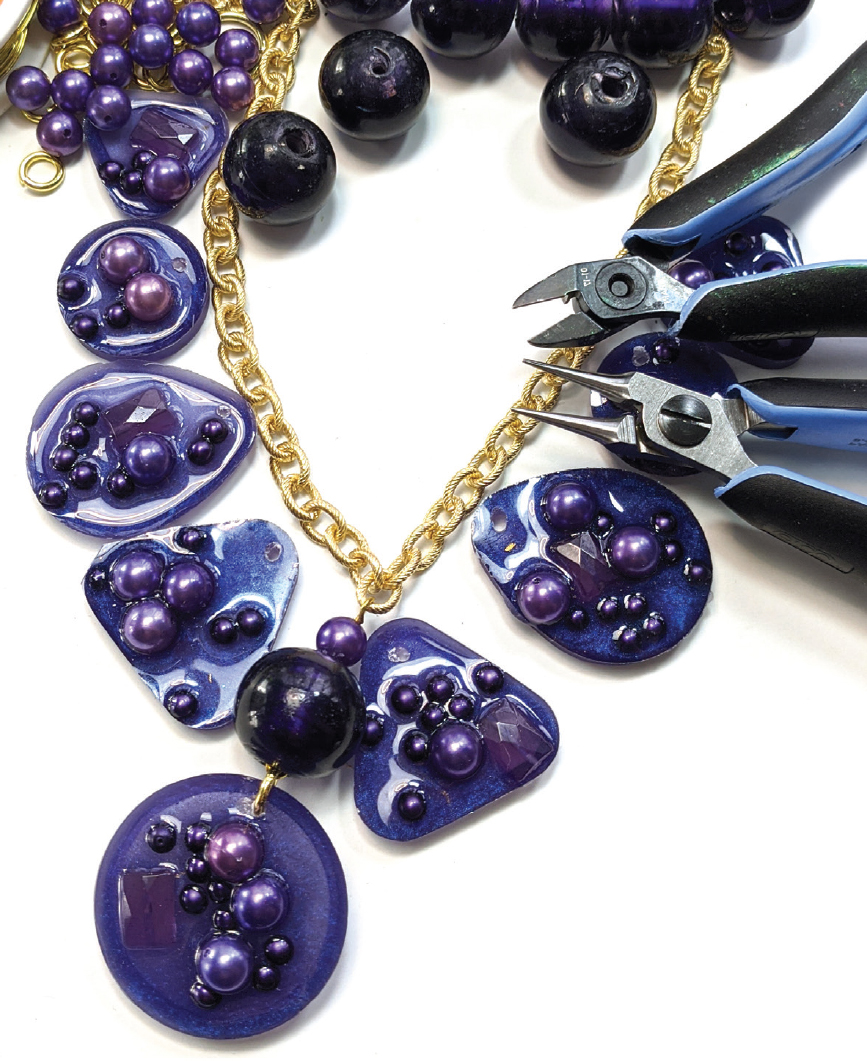
Assemble your resulting work in any way you can imagine!
Gay Isber
Pigment powders are a magical way to add color and shine to resin; it’s well worth buying a giant pack with thirty or more colors in it. They are usually made with mica, which gives them a metallic shine, and sometimes sold as “mica powder.” Adding a bit of powder into resin can colorize it if you have not added any coloring dyes already, or it can add a gloriously glamorous depth of sparkle and make your piece come to life. Pigment powders can make resin mimic gems, minerals, and even butterfly wings. That brilliant flash that only nature creates? You can recreate it in your jewelry. Plus, pigment powders won’t rub off when added to resin.
Keep in mind that almost any liquid substance that hardens with time into a hard lacquer or enamel-like finish—including nail polish—is a resin. You might have been using resin already and didn’t know it! So don’t be scared. Buy a small amount to start, then let your heart point you in the direction of becoming a resin-savvy jewelry artist. Resin just makes me happy, and I know you will love it too.
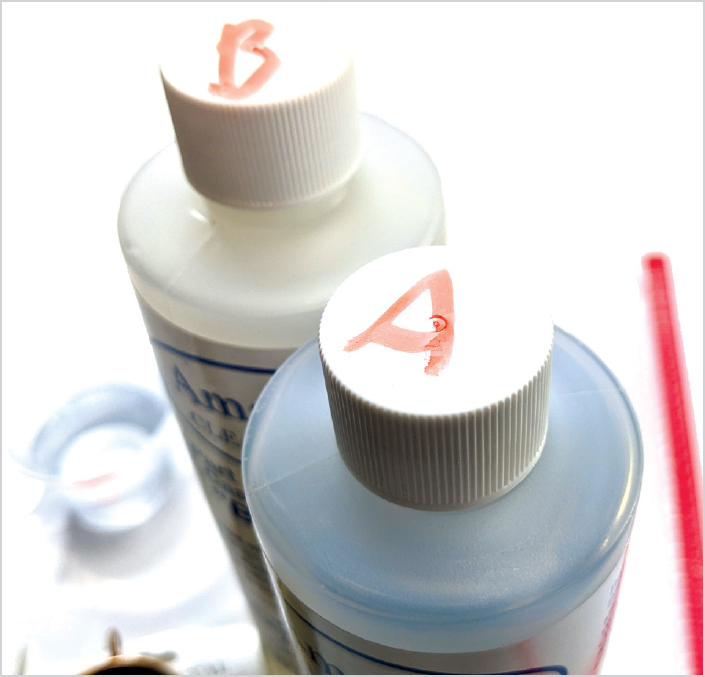
The kinds of resin we’ll use to make jewelry all follow the same basic concept: you must mix two chemicals (casting resin and a catalyst/hardener) to create a reaction that causes the resin to harden to form your finished resin cast. In jewelry making, luckily, you don’t have to wait years for something to cure or dry. Modern-day chemicals combine in many formulas that allow for a super fast curing time (under ten minutes for certain fast-curing brands or various UV resins) or somewhat slower curing times, usually under 24 hours. From the moment you mix the two chemicals together, you will have a limited “working time” in which the resin is completely liquid and can be poured and adjusted in your mold and on your project. After the working time is over, which can be anywhere from two to ten to fifteen minutes, depending on the product, the resin will start to get cloudy and gel up. At that point, you must stop working with it and leave it to cure.
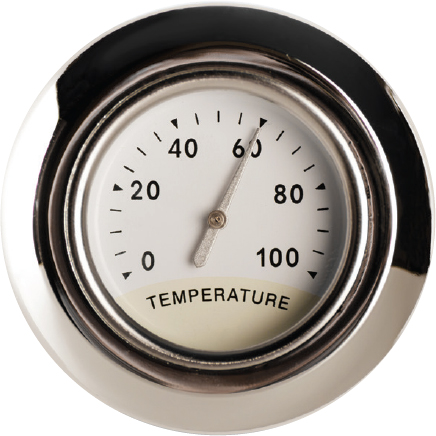
All curing times depend on temperature. In scientific terms, you are kicking off an exothermic reaction when the two chemicals combine, which is what causes the resin to start to cure. You can’t just rely on the chemicals alone to create the reaction, though: air temperature plays an important role, too. See the sidebar on page 16 for more details.
CURING TIMES AND TEMPERATURES
Adding heat decreases the curing time of your projects.
• 70°F (21°C) is the minimum temperature for a good cure.
• 88°F (31°C) will cut the cure time in half.
• To increase the temperature, place a lamp with an incandescent light bulb (the old kind that throws off heat, not the newer LED types) over your resin projects.
• In winter, cure in a warm kitchen.
• In summer, cure in a sunny room.
• If your house is very cold, preheat an oven to about 90°F (32°C), turn the oven off, and place the resin items inside on a cookie sheet.
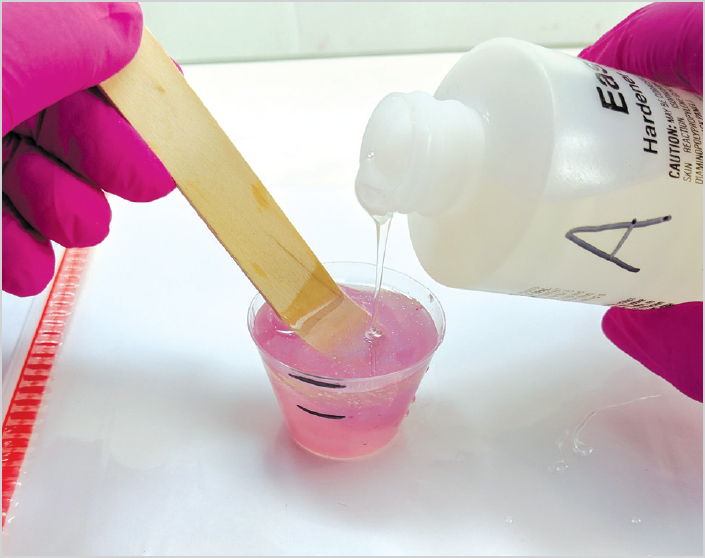
The resin starts off as two parts, which you mix together to create a chemical reaction that will cause the resin to cure hard.
Gay Isber

Mix in a disposable measuring cup like this one to ensure fast cleanup and precise mixing.
Gay Isber

The gluey resin has a limited working time of about two to fifteen minutes in which it is completely fluid. Use it to fill up molds, join items together, and more.
Gay Isber
All materials have to be room temperature before beginning. Pre-warm the bottles in a bowl of hot or warm water if they are cold (such as if you left them in a very cool room of your house or in your car on a cold day). Close the lids extra well, as water will ruin the chemicals. Resin can also be too warm and therefore cure too quickly after you mix it, so if you have left the bottles in a hot place or in direct sunlight, let them reduce down to room temperature before attempting to use them.
Heating resin over and over is not a good plan. The catalyst/hardener will turn yellow (amberfication) if you heat it too high. To minimize this risk, buy a small amount of resin and use it up quickly instead of trying to make a giant bottle last a long time.
TIP: Cold resin is a no-no; bring it to room temperature to reduce bubbles and make it pourable.
• Warmer = Faster
• Colder = Slower
aperturesound
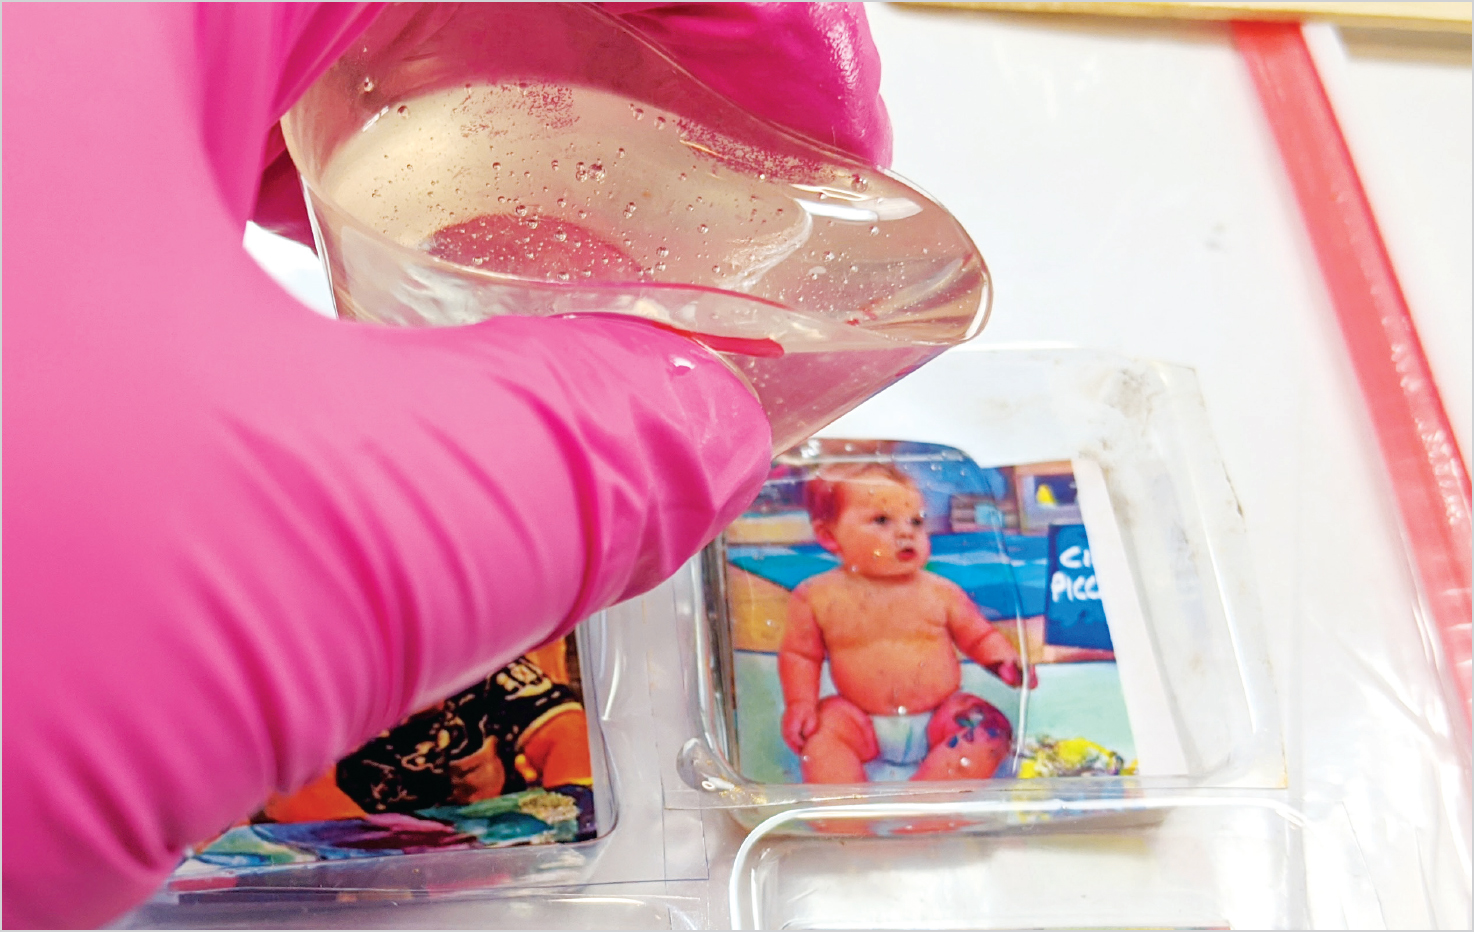
You can use molds to make clear or colorized resin casts in any shape. Resin is especially great for “preserving” items, as it essentially surrounds things in clear “plastic,” which tends to look like glass. You can put thousands of things inside resin. Anything you want to add to resin needs to be dried first. You can put tiny dried flowers in resin, but they might lose their color and turn brown. Experiment with dried flowers first so you can push the boundaries later. You can press them, colorize them with markers to add to their brilliance, and then add them to resin. They will be glorious forever.
Reduce photos to fit your projects using a printer and regular printer paper. Try using apps or programs that supersaturate or recolor photos, or use black and white copies of photos, for vivid, impressive results.
Here is a long list of other items, in no particular order, that you can set into resin. Some are also great to cast into a mold into which you can then pour resin to make a resin cast of the item (see info on mold making on page 44). Your imagination is the limit!

Annari
TIP: Don’t put anything juicy or wet in resin, like a fresh flower or a small grape, because water ruins resin.

Gay Isber

The Fly Butterfly necklace is made with butterflies printed on transparency film. The butterflies that I used were ones I printed off more than a dozen years ago for an art installation in my studio. I repurposed them instead of throwing them away!
Gay Isber


Cure UV resin in a sunny place. This is my workspace at home, where I cure mine.
Gay Isber
UV RESIN
UV resin is a special kind of resin that works a little differently than the normal casting resins discussed in this chapter and used throughout this book. It cures in direct sunlight in a few minutes.
When you are getting ready to cure something with UV resin in it, think it through: if the sun can’t get to even a small part of your piece, because you have resin underneath something, for example, then that part will not cure. You can work around this by curing your pieces in layers. I love UV resin, but I don’t make big things with it. I tend to use it for small projects and touch-ups like repairing a scratch. Gel nail polish works in a similar way to UV resin. For days when there isn’t much sunlight, use a small UV light made for curing nail polish. Many of these cost less than $20, and you can get a lot of use out of one.
UV resin is great for adding a dome effect to flat pieces of resin. You can put UV resin on top of a cured resin item and allow it to pool. Do it drop by drop.
Buy UV resin in totally opaque black bottles so that the sun can’t reach the liquid and cure it inside the bottle. This happened to me when I bought some very expensive resin in a dark brown bottle. The bottle was quite dark, but I left it sitting on my worktable while the sun was shining brightly, and it cured the resin—a costly mistake!
MUST-HAVE ITEMS
♦ Disposable gloves. Buy them sized correctly so you won’t be as tempted to take them off. Do not work without them.

Always wear disposable gloves when working with resin.
Gay Isber
♦ Safety goggles or glasses. This will ensure that chemicals don’t splash accidentally into your eyes. I wear glasses all the time, so my eyes are protected.
♦ Wet wipes. Use these for all cleanups before, during, and after using resin. Though alcohol-based wipes work better for both resin and epoxy clay (you can improvise by adding drops of hand sanitizer to your wet wipe), they might irritate your hands. Baby wipes are less effective as a cleaner but are safer for your skin. Wet paper towels are not a replacement. Don’t flush the wipes down the toilet—just throw them in the trash. Denatured alcohol, not acetone, should be used for cleaning big messes like a spill. Always wash your hands with warm water and soap after working with resin.
Sarah2
♦ Heavy-duty plastic freezer bags. These are so useful; resin doesn’t stick to them. Keep a box of them handy. You can use both sides. A swatch of a thick, clear shower curtain or other vinyl will also work.
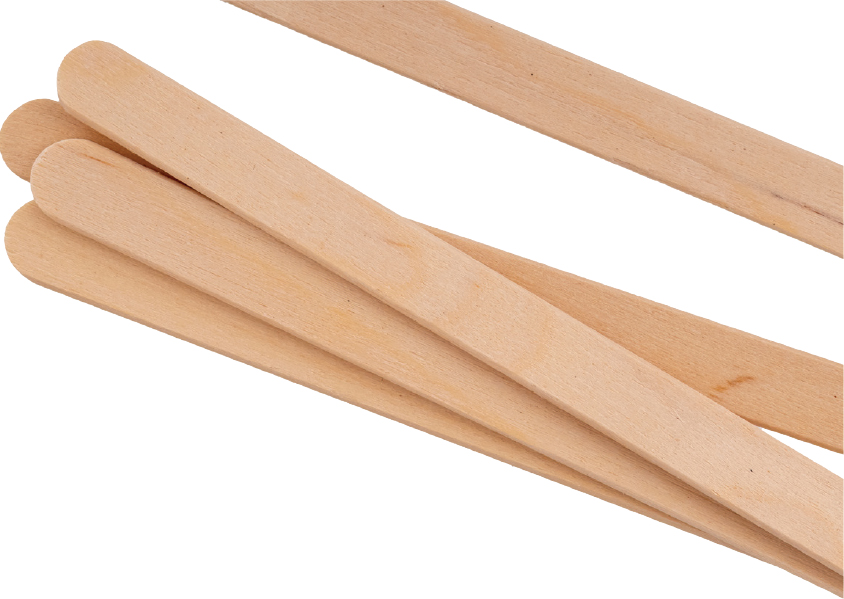
♦ Wooden stir sticks (popsicle sticks). This is what you will use to mix the resin. You can throw them away after each use or reuse them once the resin on them cures.
♦ Plastic disposable 1-ounce (30ml) measuring cups. Make sure these are marked with graduated measuring lines, like the kind included with liquid medicines. Use a permanent marker to accent the lines on the cups so they are more visible. Don’t skip this step, as measuring accurately is essential to successful resin casting.

Kimberly Hall

AlenKadr

Charles Brutlag

Nail Bikbaev
GOOD TO HAVE
♦ Permanent marker. This is for marking the lines on the measuring cups before you pour.
♦ White surface. You can see your colors more clearly if you work on white. Silicone mats work, too, but cover your area so it is as white as possible (e.g., with white paper), then cover with a cheap plastic drop cloth. Also, protect the floor with a flattened cardboard box or a big tarp.
♦ Level surface. You want the resin to cure evenly.
♦ Toothpicks. These are super for mixing in a tiny bit of color and for popping resin bubbles.
♦ Colorants. There are specially designed resin dyes that are recommended, but colorants can also include acrylic paints, alcohol dyes, and pigment powders.
♦ Molds. You can pour your resin into or onto molds.
♦ Heavy-duty multi-surface adhesive. This can be a craft glue, such as E6000®; just make sure it’s not an instant glue.

Shown here are the two parts of the resin (in the bottles), the measuring cup and wooden stir stick, and a plastic-protected cookie tray that has been well marked as for use in jewelry making only.
Gay Isber

Shutter B Photo
♦ Green floral foam. This is super for objects that are not flat—embed them in the foam to keep them level while they cure.
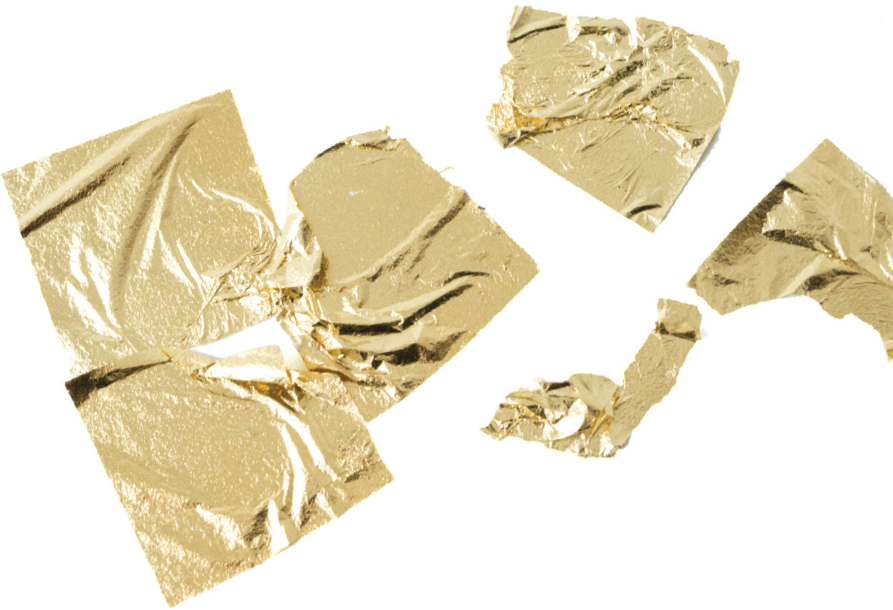
♦ Foils and cellophane. Gold, silver, and copper foils or leaf, cellophane, and creative films like those used for fingernail art can all be used in your projects.
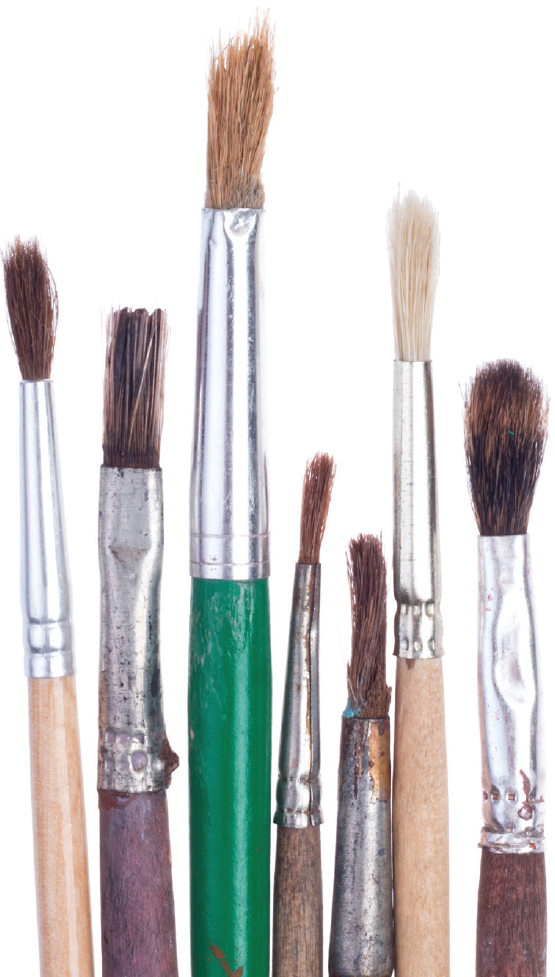
♦ Old paintbrush. Use this with pigment powders.
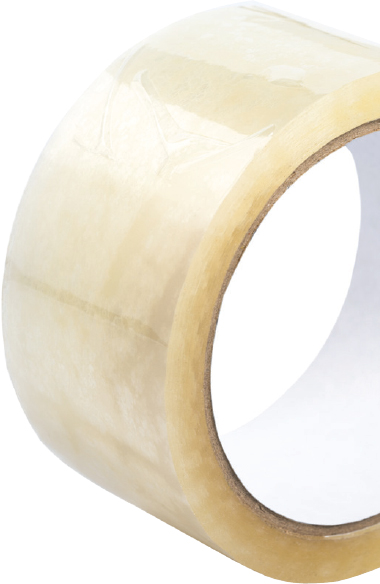
♦ Tape. Use heavy-duty clear packing tape.
♦ Embellishments. Use whatever you want to embed in your resin, like beads, rhinestones, findings, trinkets, pearls, etc. See a huge list of possibilities on page 18.
Andrenko Tatiana
NOT ESSENTIAL, BUT HANDY
♦ Lamp. A bright light with any kind of bulb is great to use to help you see colors and bubbles easily. A downward-facing or bendable lamp with an incandescent light bulb will speed up curing time and make air bubbles rise faster so that you can easily blow on them to pop them or poke them with a toothpick.
♦ Silicone pad. Resin won’t stick to silicone. Find a pad for cooking or sold specifically for resin and epoxy clays. I use a white one I found online for resin work and an orange one from my favorite epoxy clay manufacturer for epoxy clay work.
♦ Mold release. Use a spray mold release in your molds to keep them from getting tiny tears when you pull out the resin casts; such tears will ruin the molds if you use them a lot. Spray coconut oil is a good alternative.
Peter Kotoff
♦ Clear sealant. You can seal finished resin casts with nail polish, UV nail polish, sealing sprays, spray resin, or a clear-drying glue.
♦ Mask-type respirator. Ventilation is a must (see info on safety on page 28), so if you don’t have good ventilation, then use a respirator to filter the chemical fumes.
Baby_Sun
The step-by-step instructions for using resin are straightforward, although they can vary depending on the product and the manufacturer. Some resins, for example, don’t use the half-and-half parts A and B ratio that is used throughout most of this book. Always read and follow the manufacturer’s instructions. The following instructions are for general reference only.

Gay Isber
1. Gather all the supplies you will need.
Gay Isber
2. Wearing gloves, mark a measuring cup for the two equal amounts of the resin you need. Pour in part B, which is clear, and add dyes. Stir well with a wooden stick.
Gay Isber
3. When you are completely ready to start filling in a mold, mix in part A.

Gay Isber
4. Carefully pour the resin into the mold, making sure to fill it to the desired level. Include items to embed in the resin if desired.

Gay Isber
5. Deal with bubbles (see below) and clean up any excess resin or spills.
Gay Isber
6. Allow the resin to cure. Once it has cured, remove the finished cast(s) from the mold.
BUBBLES
Once you have poured your resin into your mold, you’ll probably have to deal with bubbles. For some projects, you want the result to be as clear and glass-like as possible, so you don’t want any bubbles. The thicker the resin, the harder it is for bubbles to rise. Different products produce and deal with bubbles differently; review the manufacturer’s recommendations for the product you are using.
After you pour the resin, bubbles will typically immediately start to rise. They rise faster and quicker with warmth. There are many ways to bring bubbles up. One is to use your warm breath (just slowly blow) or a lamp that throws off heat. The heat will help the bubbles come to the top so that you can then poke them with a toothpick or use your wooden stir stick to break them. I do not recommend using a flame to help the bubbles rise, as some resins, the polyester types especially, are extremely flammable. If you added a dye and/or pigment powders at the very beginning and then mix the resin, you will see almost no bubbles, as the add-ins keep bubbles from forming.
BUBBLE-BEATING BASICS
♦ Stir the resin slowly to mix it, rather than whipping it around too vigorously.
♦ Allow the poured resin to sit in the mold for about five minutes (for non-fast-curing types).
♦ Blow or poke any bubbles as they rise to the top.

Deeply colored resin means you don’t have to worry about bubbles.
Gay Isber
Gay Isber
TIP: If the resin doesn’t cure while in a mold, put the whole thing in the freezer. Once it’s frozen, pop the sticky mess out into a bag and then dump the bag into the trash. Don’t put the mess straight into the trash, though, because when it thaws, it could leak.
Bubbles tend to be more likely on fast-curing resin products, which can be a cool effect. In two-part resin that cures over 24 hours, you’ll still need to deal with bubbles, but you won’t see them popping up quite like this.
PRJ
TOP FIVE REASONS WHY YOUR RESIN WON’T CURE
1. It wasn’t mixed as directed. Read the manufacturer’s instructions. If it states “mix for two minutes,” do so.
2. Water is in the mix somehow. Did the mold release you added dry completely? You can spray mold release after each time you use a mold so that when you are ready to use it again, it is definitely dry. Or use a hairdryer. Just don’t ever use a wet or damp mold.
3. The resin is too old. Only buy what you will use up in about six months.
4. The temperature is too cold. You can pre-warm the bottles or move your work to a warmer location to cure. It must be at least 70°F (21°C).
5. There is too much pigment. Shift to using more pigment powders and a smaller amount of liquid dye.
CLEANING
Buy a few packs of wet wipes and keep them handy. The alcohol in the wipes cuts through the resin and is also perfect for epoxy clay (see page 37 in the epoxy clay chapter for more info on this). Clean your tools after every use—don’t wait until the product cures. Be vigilant! Protecting your workspace with plastic as described in the tools section (page 21) will save you headaches if you spill or drop.
STORAGE
Keep all of your resin supplies together so the boxes are easy to grab. Keep molds in separate containers marked with their subject type, or, if they are flat, put them into a big zip bag or a box. Try to store the original item that you used to create a mold inside the mold, so that if you need to make another one, you still have it. Figure out a storage scheme that works for you, your space, and your crafting habits.
Try grouping things together in large zip bags. For example, powders and dyes are in their own bags or bowls on my workbench so I can easily grab them. You can sort things as you like, but here are my categories:
♦ Dyes, pigment powders, metallic foils, toothpicks, and paintbrushes: this is my colorant box.
♦ Resins, mold-making supplies, mold release, sealants, my most frequently used molds, measuring cups, spray resin, and stir sticks: this is a bigger, heavier box of essentials.
♦ Gloves, wet wipes, respirator, plastic bags, green floral foam, and tape: these are the smaller essentials.

Stand flat molds up like this in a box to maximize storage space.
Gay Isber
Mixing chemicals in our studios or homes can be toxic to our health. I have learned from years of experience to take it seriously. When working with resin or epoxy clay, always double or triple the ventilation in the area by turning on a fan or fans, opening a window and a door for a cross-breeze, and/or turning on the exhaust vent on the oven or microwave. Think about your plan to ventilate the off-gases before you start working with chemicals. Take your health seriously and add as much air movement to your working area as possible.
If you enjoy mixing resin and think you’ll use it often, I highly recommend that you buy a face mask ventilator/respirator that filters chemical fumes. I found mine in the paint department at my local home improvement store.
Please take every precaution to protect your body from harm. Always wear gloves, always wear safety goggles or glasses, and wear a respirator if needed.

Gavran333
TIP: Don’t wear your nice clothes when making art. My husband can cook all day making spaghetti sauce wearing his favorite white shirt without the tiniest speck on him, but not me. I have several art “uniforms”—old dresses that I can throw on or large shirts to cover what I am wearing. I have a large wardrobe of paint-splattered clothes and shoes!
Also, keep certain utensils for cooking and others for jewelry, marking them clearly and storing them separately so you don’t ever mix them up. Once something has been used for jewelry making, it cannot be used for cooking ever again.
VENTILATION IS KEY!

agsaz

ND700
Always pour resin slowly, adding a little at a time, so that it flows into all of the nooks and crannies of the mold but doesn’t overflow. It’s hard to remove resin once you’ve overfilled! Go slow and be patient. When you pour too fast, you end up with messes.
If I could design a disposable measuring container to mix and pour resin, it would look more like a gravy pitcher than a cup—short, squat, and with a handle and a spout. Resin jewelry makers have adapted the medicine measuring cup to resin making because it’s disposable and marked for measuring, but it’s not perfect. Squeeze the measuring cup so it acts more like a pitcher than a cup as you pour. You can even use your stir stick to slightly shovel the resin into the mold drop by drop, especially when you are nearing the fill line.
Here are some more miscellaneous helpful hints to make your resin projects smooth and successful.
♦ Think through your project to make sure you have everything ready to go before getting started.

When you add resin to an item, think about what other items (such as beads) you are planning to add to it. Understand that the resin level will rise the more items you add, so don’t overfill at the start.
Gay Isber
Always pour slowly, and try to make a spout as you pour so that you have greater control.
Gay Isber

Pour leftover resin onto a textured sheet. You can used that cured sheet in other projects later.
Gay Isber
♦ Don’t be tempted to touch your resin while it’s curing, as your fingerprints will imprint on it.
♦ Look for clear silicone molds so that you can see where you have placed things instead of working blind.
♦ Think about copyright laws before you just copy something, whether it’s a physical item for a mold or a printout from the Internet.
♦ If you have spots in your resin that have not cured, it may be because you didn’t mix the resin well enough. Allow two full minutes for stirring, and make sure you are stirring all the way to the bottom and mixing very well. The resin will be totally clear when it is totally mixed.
♦ If you overfill a mold or leave drips on it, clean up the excess once it has dried with a small craft knife or scissors. The extra bits will usually snap off.
♦ Be ready to use any extra resin you have mixed by pouring it onto a textured sheet (see the projects on pages 67 and 126) or into another mold. I hate wasting anything, so I am always happy when I get to fill one more mold.
♦ You can add too much colorant to resin. Resin cures through a chemical reaction, so if the mixture is more than ten percent dye or paint, it could cause the resin not to cure. Pigment powders won’t dilute the mixture as easily.
♦ Layering resin is easy and can create some super effects. Add a small amount and let it cure, and then pour again, repeating as needed. You can fix an under-pour this way, or you can create layers of different resin colors.
♦ If you want to enhance the color of your finished piece, you can paint the finding that the resin will be going into (such as a metal hoop, for example) with nail polish or paint, let it dry, and then add your resin.