Part One
On the Everglades Wilderness Waterway

MEET THE WATERWAY
Mapped in the mid-1960s, the Everglades Wilderness Waterway is a 99-mile-long trail of bays, channels, and rivers that makes it possible to travel inland by water from Everglades City, at the northwestern edge of the park, southeast to Flamingo on Florida Bay. Paddling this route delivers you back into the world of the people living in the Glades before the park was created in 1947. You will have a sense of what it was like for early Native Americans, the Calusa, who passed among shell mounds and middens, sustaining themselves with the bounty of the sea, and later, the Seminoles, who traveled to hide in the backcountry during the Seminole Wars. Paddling this inland route will also give you a feel for the lives of early pioneers who chose to avoid the open water of the Gulf during rough weather. More important, the interior offered them a place to hunt alligators for their hides, shoot birds for their plumes, and escape from the authorities as they made their living during hard times “moonshining” and carrying out other activities that were a shade below the law.
Think, for a moment, how it must have been for these Native Americans and early pioneers who could find the places you will learn of in this book without depending on charts or modern GPS. They could go to Sweetwater for freshwater, or to Smallwood’s store to trade; to Watson’s place to purchase corn syrup from the dreaded Mr. Watson (if they dared;); to Shark River to work in the tanning trade; or to the cistern at Lopez’s or Darwin’s if their own water was salted by storm tides. The Waterway was an early “highway” through the Glades. Those who traveled it knew the bays and creeks as well as you know the roads close to your own home. Taking this 99-mile trip will give you a feeling of being in their neighborhood, of reliving a part of history.
Expecting to navigate channels through sawgrass or passages in a cypress swamp, some may be surprised when heading out on the Waterway for the first time. The route winds through waters lined with mangroves—in wide or small bays, broad rivers, or narrow twisting channels—the red (Rizophora mangle), with their arching prop roots; the black (Avicennia germinans), with their pneumatophores; and the tall white (Laguncularia racemosa), rising above the canopy.
In the water or along the shore, posts with brown arrows and white numbers mark the Waterway. Whether you launch from Flamingo and count the letters up, or launch from Everglades City and count the numbers up, you are in for a fine adventure through wilderness and history.
HOW IT CAME TO BE
The idea of a marked waterway permitting small boats to make an inland passage from Everglades City to Flamingo was born in the 1950s. Daniel Beard, the first superintendent of Everglades National Park, included such a passage in his planning, but there was no known natural connector between the Broad River and the Shark River, and dredging would have damaged the ecosystem.
The idea lay dormant until the 1960s, when ranger Richard “Dick” Stokes began searching the charts for indications of a possible passage. In a December 12, 1996, open letter, he writes of his experiences laying out the route for the Waterway: “The first charts of this area were called T-Charts. They were in black and white with no depths on them. In studying these charts I found that there was a creek from Broad River into Broad Creek which went into the Harney River and thence to the Shark….” These charts “showed three small creeks off the main creek which would make the connection.”
Stokes began to plan for an attempt to locate these creeks, starting in August of 1966. Ranger Stokes, park superintendent Roger Allin, and chief ranger Bob Kerr searched for but failed to find a connecting channel. (For the story, see “The Nightmare,”.) Soon after, Stokes returned with a small party to try again. His letter continues, “[W]e took the same route through the main creek, but this time we took the fourth creek instead of the third. With a little effort we made it through to Broad Creek. This was the first trip through the waterway.”
“A little effort” is an understatement. The process of clearing this narrow, twisting channel that had filled up with storm debris would take months. Park archives indicate that in December 1967, five men spent four days cutting out Wood River Creek “with not much visible progress.” In April of the following year, rangers were still making trips to assess how much more clearing needed to be done, but by May 1968, the route was described in administrative reports as “newly-cleared,” although still with “submerged snags.”
With this critical connecting piece somewhat in place, the process of formally laying out the route from Everglades City to Flamingo was possible, and then in midsummer heat, the actual installation of the markers began.
THE FIRST WATERWAY GUIDEBOOK
On January 15, 1967, transferring from Shenandoah National Park, in Virginia, ranger William G. Truesdell reported for duty in the Everglades and soon participated in officially marking the Wilderness Waterway. In a March 15, 2010, e-mail to the authors, he wrote, “Art Johnson, district ranger at Everglades City; Larry Dale, park ranger at Everglades City; Johnny Galvin, maintenance employee; and I put in the posts… in the middle of summer.” He called up “memories of the flat barge loaded with 6-inch-by-6-inch-by-16-foot-long posts, using a water pressure pump to dig the posts in, and hot, humid days with lots of mosquitoes.”
The placing of posts, he explains, was “determined primarily by the need to have a marker close enough to the previous one so that the boater didn’t turn before the required turn. Not necessarily line-of-sight, but if two alternative routes came together at one point, a marker had to be placed on that point.” They would place the post “just around the edge of the turn, as opposed to right on the corner” and “just far enough out in the channel to be visible.” The positioning of the markers was completed by the middle of August 1968, when ranger Stokes and park superintendent Allin, who had made the first attempt to find a passage, completed a triumphant inspection run of the trail.
Meanwhile, Truesdell had begun drawing strip maps of the entire waterway, section by section, and writing text to accompany the maps in what he initially called a “handbook on the Mangrove Wilderness.” In the text, he described critical places in the route and sketched notes on natural and social history. The project occupied him for another full year, as he carried out his other duties. At the same time he worked on numbering the markers that had already been placed along the trail.
spring 1969, Truesdell reported that the Guide to the Wilderness Waterway had been “rewritten for the ‘umpteenth’ time and submitted to Miami Press” and that “every marker on the route has now been numbered.” In September, that first guidebook, spiral-bound, with a green-tinted cover, was done. Early in 1970, with all markers in place and numbered, and with a guidebook ready, the Everglades Wilderness Waterway, a continuous path from Everglades City to Flamingo, officially opened.
Since that time, countless boaters and paddlers have carried that vintage guidebook or its 1985 edition on their Waterway trips.
TRIP PREPARATION
Much of the following information is pertinent for any and all paddling in Everglades National Park. It applies to all the routes in this book—those for thru-paddling the 99-mile Waterway and for the day and overnight routes described in Parts Two and Three. However, as the main focus of our guide is to lead you on a thru-paddle, we have anchored the elements of trip planning and preparation here.
CAMPING ON WATER, LAND, & SHORE
As noted in the Introduction, you must make reservations to use any of the camping facilities provided by the National Park Service (NPS). (Also see “Planning, Reservations, & Permits,”.) Below, we elaborate on the three choices we touched on in the Introduction.
Chickees
Named after Native American Calusa and Seminole village structures, chickees are wooden platforms constructed on pilings to stand over the water. The standard-size chickee is 10 by 12 feet, so be sure to know your tent’s dimensions before you plan to pitch it on one of these shelters. Also, hammering nails or screwing hooks into chickee boards is not permitted, so a freestanding tent is a necessity.
Open-sided with a roof and with a boardwalk leading to a privy, some chickees have ladders attached to the side. Some are single, and others are double (two platforms connected by a boardwalk), allowing more than one party to camp at the same site. Because they are positioned out on the water, chickees are often less buggy than ground sites. Chickee boards are hard, so you need a sleeping pad to ensure a comfortable night’s sleep.
A word of caution: In areas with strong tidal fluctuations, a chickee whose platform is easily accessible at high tide might be out of reach at low tide. It is important to leave enough rope when you tie up at night so that if the tide falls, your boat isn’t left hanging in the air on too-short ropes.
Ground Sites
These mall, cleared areas on old Calusa shell mounds are sites of Seminole and pioneer settlement. The Watson Place and Darwin’s Place, for example, are locations where settlers in the Everglades eked out their living farming the land and trapping and fishing, many of them raising families. Ground sites have picnic tables and portable toilets, and some have docks. An advantage to a ground site is that you have easy access to your boat; disadvantages are that ground sites can be buggy because of the close vegetation, and raccoons can more easily reach your food and water supplies.
Beach Sites
Just as their name suggests, these campsites anchor you directly on the sandy shores of the Gulf of Mexico. Advantages are that you can swim, and you will have sea breezes and sunset views of the Gulf. If you are lucky, you might even see the green flash, that last green spark of light from the setting sun that can sometimes be seen on a clear evening. Disadvantages to beach sites are that raccoons can be a problem, but with food and water supplies well secured, we have never experienced difficulty beyond being awakened as raccoons attempted unsuccessfully to get into containers.
PLANNING, RESERVATIONS, & PERMITS
For use along with this guidebook, we urge you to get the free Wilderness Trip Planner from Everglades National Park by calling (305) 242-7700, or find it online at the park website, nps.gov/ever. (See “Navigation,” for information on additional maps and charts you should carry.)
Reservations are mandatory for camping along the Everglades Wilderness Waterway. You must make them in person at the Gulf Coast Visitor Center in Everglades City or the Flamingo Visitor Center within the 24-hour period prior to launch. Be aware that some older editions of the park’s Wilderness Trip Planner indicate incorrectly that reservations could be made only “up to” 24 hours before launch, and this error has been replicated in some guidebooks.
The Planner also alerts you that in summertime, due to insect conditions, few people thru-paddle the Waterway, and the permit-writing desks may not be staffed. In such cases, you must follow self-registration instructions at the Flamingo or Gulf Coast Visitor Centers. But you must register. At press time, there is a $10 fee for a camping permit, plus $2 per person per day.
ITINERARIES
With cooler days and fewer mosquitoes, November–April is the most popular time for paddling the Waterway. Also, this is the dry season, when hurricanes and afternoon thunderstorms are not as much of a concern. The week between Christmas and New Year’s Day is very busy, as are Presidents’ Day weekend in February and spring break in March.
For the full Waterway trip, we recommend avoiding the summer months. The relentless mosquitoes, along with the chance of daily afternoon thunderstorms, could make paddling uncomfortable and dangerous. If you decide to take this on, please read very carefully Part Four, Summer Paddling.
The Waterway can be paddled in 7–10 days. Your first decision will be whether to paddle north to south, or south to north. Create your itinerary, identifying your intended campsites before you go into the visitor center to make reservations. It’s likely, however, that some of your chosen campsites will already be reserved. If this occurs, the park staff is helpful in choosing alternative campsites, but it’s good to have substitutes already in mind. In high season, getting to the visitor center early may give you an advantage in securing your first choice of campsites. Starting mid-week might also improve your chances. Remember, however, that a second choice can often turn out to be better than the first. The first time we paddled the Waterway, we hadn’t intended to go to Highland Beach; it turned out to be a highlight of the trip.
However you construct an itinerary, just be sure that you consider your paddling experience, your tested capability, and the fact that the distances between campsites can be considerable. Pay particular attention to reservations around The Nightmare (between the Broad River and the Harney River). You must paddle this section on a rising or high tide, or you risk getting stuck.
Once the journey is under way, the only reason to stay at campsites you have not reserved is in case of an emergency. As the park staff says, being tired is not an emergency. Be aware, also, that you will paddle farther than the 99 miles of the marked Waterway because many campsites and chickees lie a few hundred yards to a few miles from the marked channel.
You will need to shuttle back to your car when you finish your Waterway trip at Flamingo (if you travel north to south), or at Everglades City (if you travel south to north). We each have a carrier on top of our cars and sets of tie-downs. We leave one vehicle at one end of the Waterway and drive the other car with the canoe 130 miles to our launch at the other end. Some outfitters offer shuttle service for a fee (see Appendix 2, Launch Sites, and Appendix 4, Resource Overview). Or you might ask a friend to shuttle you. There is no charge to leave your car for the week at either the Flamingo or the Everglades City visitor center.
NAVIGATION
Although we include GPS markings in this guidebook, we prefer the adventure and challenge of navigating with map and compass, paying attention to positions of sun and moon, light and shadow, feeling a closer relationship with the wilderness through which we move. This is a matter of preference for each paddler. You will decide what is right for you, but if you do choose GPS, be sure to take the appropriate NOAA (National Oceanic and Atmospheric Administration) chart or Waterproof Chart and a compass as a backup. Technology can fail and batteries die.
In constructing the north-to-south and south-to-north routes in this book, we have tried to be clear and detailed in our instructions. However, these paddling areas are complex, and you will be weaving among myriad mangrove islands. Often you cannot see from one Wilderness Waterway marker to the next, and sometimes there are miles between markers. In addition, some markers may be missing. Please do not rely on this guide alone or on free park maps and brochures or even the more detailed National Geographic Everglades Topo map for navigation. You will need navigational charts. We carry both NOAA and Waterproof charts (see below), and we enjoy having a set of maps for each paddler. This facilitates consultation when the navigation gets tricky.
| ► | NOAA navigational charts 11430, 11432, and 11433 collectively cover the extent of the Waterway. Call NOAA at (301) 436-6990, or visit nauticalcharts.noaa.gov. |
| ► | Waterproof Charts 39 and 41 also cover the Wilderness Waterway and can be ordered from Waterproof Charts, Inc. Call (800) 423-9026, or visit waterproofcharts.com. |
These charts are also for sale at local marinas and other outlets (see Appendix 3, Outfitters, Suppliers, & Canoe/Kayak Rentals). Each type of map has its advantages. Waterproof Charts are, as the name suggests, waterproof. The NOAA charts are paper, making it easy to mark your compass headings right on the map. The Waterproof Charts mark the GPS coordinates for campsites. NOAA charts do not.
Protect your charts in transparent, large, waterproof map cases, available from outdoor-supply stores.
In addition, you must have a compass. We recommend a canoe/kayak compass that you can attach to your boat for monitoring your direction during travel, as well as a handheld compass, the kind with the rotating dial, to plot compass headings if that becomes necessary.
Following a course while crossing bays can be tricky, especially since different mangrove shorelines look similar at a distance and openings between islands are usually not visible until you are near them. While paddling the Waterway, you will learn navigation tricks just by careful observation. For example, watch for powerboaters going in or out of otherwise invisible passages, and look for lighter-against-darker shades of the mangrove shorelines, which may indicate the channel you are seeking. A pair of binoculars will help you spot distant markers.
SAFETY
Never forget that you are embarking on a wilderness adventure. Paddling the full Wilderness Waterway is not for beginners. Although you are sometimes in sheltered creeks, the majority of the trip is through open bays, where winds regularly reach 15 knots (more than 17 mph), and higher winds are not unusual. Do not take chances. Below are some critical pointers:
| ► | Check the long-range weather conditions before you embark. Once you are a few days out on the Waterway (or on the long day paddles or overnight paddles in Parts Two and Three of this guide), it will be difficult to turn back if conditions suddenly worsen as a front comes through. |
| ► | If the wind is strong, hug the shore and take rest breaks on the leeward side of islands. You may need to tack to get across a bay to prevent waves from hitting you broadside. Turn the bow of your boat into the wake left by speeding motorboaters. |
| ► | Wear your spray skirt when kayaking, and bungee down a tarp to cover your gear if you are in a canoe. |
| ► | Wear your personal flotation device (PFD). We recommend those specifically designed for use while paddling. For lightweight comfort, you might consider the suspender type with a CO2 cartridge and pull cord for inflation. Women may note that some modern PFD designs are specifically tailored for a woman’s shape. |
| ► | Keep a whistle on a cord attached to your PFD, and remember the U.S. Coast Guard (USCG) boating regulations: five short blasts is the danger signal. |
| ► | Pack flares for emergencies. |
Tide Charts
Carry a tide chart for the area and the days when you will be out. Tide charts are available at both of the visitor centers, or you can download charts (which we have found easier to read) at saltwatertides.com. We have found their usefulness to be limited, however, in the inland channels where tides may vary from those listed for the Gulf. In most cases, by remaining attentive, you can figure out how the tides are moving and when they are likely to change. Although awareness of tides is more important in some areas than in others, it is obviously easier to paddle with a tide than against one, and all areas of the Waterway are under some tidal influence. Tidal awareness is particularly important when you are tackling The Nightmare route, as a low tide can leave you stranded for quite a while.
Communication
Depending upon the time of year, you may encounter many other people on your trip, or you may spend days without seeing another soul. You will not have cell phone service along most of the Waterway. To get weather reports, carry a waterproof handheld marine radio, which has a 5-mile range. The marine radio’s channel 16 provides access to the USCG emergency channel. You might consider purchasing or borrowing a satellite phone or a personal locator beacon (PLB), a safety device that “spots” your location in emergencies.
As soon as you have made your campsite reservations, contact a friend and share your float plan and expected arrival date. Give your friend the park emergency number, (305) 242-7740, in case you do not arrive by the designated date. Be responsible in keeping to your timetable, but never paddle into known danger just to arrive on time.
Lost?
If you become totally lost, follow the falling tide west to the Gulf. Once there, paddle north along the coastline until you get the attention of another boater or until you find a marked channel or another landmark (such as a marked NPS campsite). These markers will help you determine where you are on your navigation charts.
Weather Precautions
If you are paddling during the dry season, the likelihood of thunderstorms is low, but they can occur. If you are on the water and you hear thunder, paddle into a little side stream in the mangroves or hug the shore. Wear your PFD, and be sure to wait a half hour after a lightning storm before going back into open water. Consider taking a cardiopulmonary resuscitation (CPR) course before your trip; in case lightning strikes, a stunned victim can be resuscitated. You can’t call 911 when you are on the Waterway, although a marine radio is helpful in emergency situations. For considerably more information about thunderstorms, see Part Four, Summer Paddling.
To Your Health
Heatstroke and hypothermia are life-threatening. To prevent heatstroke, drink plenty of fluids and do not paddle to the point of exhaustion in direct sun. Wear a hat and take breaks to cool off in the shade at the side of the Waterway. Splash some water on yourself to cool down. The opposite extreme is hypothermia, a dangerous lowering of one’s body temperature. Hypothermia can be a risk in the winter season or when cold fronts come through in the fall and spring. To prevent hypothermia, stay dry and warm, and be alert to signs of hypothermia in your companions, such as shivering, poor coordination, and confusion. Take measures immediately to dry and warm up the victim.
Monitor your companions to be sure that they aren’t stressed by either the cold or the heat. People often do not recognize their own symptoms.
Sunburn can be painful and dangerous, so remember to stop paddling often to apply sunscreen and lip balm. Drink plenty of water to avoid dehydration. Drink regularly. Don’t wait until you’re thirsty. When you’re thirsty, you are already becoming dehydrated.
Critters
Regarding snakes and alligators—to expand for a moment on what we have already said in the Introduction—you probably won’t see a single snake, even on the full Waterway paddling expedition. They are shy and want as little to do with you as you do with them. But always use normal caution when exploring tall grass or walking around ground sites.
On a thru-paddle up or down the Waterway, you will see alligators and occasionally the endangered American crocodile. As noted previously, they will slip into the water if you paddle close to them sunning on the banks. But remember, never dump leftover food into the water, and watch for these reptiles as you near chickees and ground sites because previous campers may not have been as cautious as they should have been.
See for a reminder about the problems of insects and for a refresher on the dangers of oysters.
SANITATION
Do not assume that you can paddle to the shore, step out, and relieve yourself. The only sandy shores are on the Gulf; the rest of the Waterway is lined with interlacing mangrove roots, muck, or oyster beds. The Wilderness is not the place to be shy. You will need to urinate directly into the water. With a little finesse, both men and women can manage to do this.
The following suggestion works well for women in a canoe: paddle over to the mangroves and, while your paddling partner leans the opposite direction to steady the boat, turn sideways and hang your backside over the side of the canoe. Kayakers will need a different approach. Shelley Johnson, in her section “To Pee or Not to Pee” in Sea Kayaking: A Woman’s Guide, writes of a friend who “cuts the top of a dishwashing soap container at a handy angle” to funnel urine into a jar to pour over the edge. A similar device, called a Freshette, can be ordered from Campmor; visit campmor.com.
At campsites, use the portable toilets, which come equipped with toilet paper. Bring one roll just in case and for use on Highland Beach. If there is no portable toilet, make your cathole far from the campsite, back in the brush. Bring a hand trowel, dig a 6-inch hole, and bury your solid waste and toilet paper, or pack the paper out. Take your head net (see “Clothing,”) when you go into the woods, because once in the shade you will encounter mosquitoes.
There are few beaches, and there are alligators in the Waterway, so do not anticipate taking a bath during your trip. Premoistened towelettes are handy, but do not deposit them into the privy. Be sure to pack them out. If you bring sanitary supplies, pack them out too.
PADDLING GEAR
We use a canoe on our Wilderness Waterway trips, although many people travel in kayaks. You can rent both in the Everglades. (See Appendix 3, Outfitters, Suppliers, & Canoe/Kayak Rentals.) Rentals often do not have adequate rope for tying up, so when renting, be sure to bring extra rope.
If you’re canoeing, bring spare paddles tied to the struts so they don’t float away if your boat tips. Carry a water pump and a large marine sponge for bailing; a cut-off plastic jug also works just fine. To keep the waves or rain from splashing into your canoe, cover your entire load with a tarp secured with bungee cords stretched across the gunwales. Kayakers need a spray skirt and paddle tether.
We sometimes use foldable seats for back support as we paddle, and we find them useful for sitting in the tent or on the chickee at the end of the day. If you have space, you might bring small collapsible camp chairs for even more comfort at your campsite.
Be sure to have long ropes tied to each end of the boat to secure it to the chickee at night. Remember that the tide differential can be extreme on some of the chickees, so once you unload, keep a lot of slack in the ropes. Kayakers often bring their boats up onto the chickee at night.
To keep your canoe from floating away if you capsize, carry a small anchor attached by a 15-foot rope, and be sure it isn’t buried under your gear, where it will be of no use to you if your boat tips. Lay it on top so it will fall quickly to the bottom in the event of capsizing.
If you paddle at night, bow and stern lights are mandatory. A long-beam flashlight can be helpful when searching for markers at night.
Dry bags are essential for keeping clothing and supplies from getting wet. Using different colors for different types of supplies can be helpful—or use clear ones so you can determine contents at a glance.
CAMPING SUPPLIES
You will need a freestanding tent. Primarily this is for protection from mosquitoes, but it also provides shelter from rain on the nights that you do not stay on a chickee, and at times when the wind might blow rain under the chickee roof.
If conditions are windy, you should set up your tent immediately and stow your gear inside. That will anchor the tent on the chickee and will keep your lighter gear from flying away. At times the wind may blow so hard that you will want to secure your tent to the chickee posts with bungees or ropes.
Weather can vary, no matter the season. Unless you paddle in the middle of summer, you may have a warm evening followed by a chilly night. So bring a sleeping bag. You will appreciate being in the bag on cooler nights, and you can sleep on top of the bag if the weather is warm.
To assure some comfort in the wilderness, don’t forget these items: a sleeping pad, a camp pillow, and a headlamp to read and write by at night and for finding your way to the privy in the dark. Consider bringing a headlamp with a red-light feature that helps you keep your night vision. Be sure to pack spare lithium batteries, which, reportedly, last up to three times longer than regular batteries.
CLOTHING
Because of the intense sun, a hat with a brim is a necessity. Any hat that shades your eyes is fine, but your neck needs protection too. Many fishermen wear hats with a long bill in front and a flap to cover the back of the neck.
Bring a lightweight waterproof jacket to wear in case it rains. A jacket is preferable to a poncho, which can flap in the wind. Because you don’t want to hunt for your rain jacket when a squall develops, keep your raingear within easy reach in the top of a dry bag. Bring a fleece jacket for cool evenings and mornings. Fleece sheds water and is cozy. Keep your fleece handy at the top of a dry bag in case a chilly wind picks up while you paddle.
Take at least one pair of lightweight long pants for protection from the sun in the daytime and from mosquitoes and the chill in the evenings. We suggest at least one long-sleeved shirt for sun protection during the day and for mosquito protection in the evening and early morning. Cotton is cool but does not wick moisture. If it gets wet, it stays wet the whole trip. We recommend nylon or another quick-drying fabric, and many are impregnated with sunblock and mosquito repellent that lasts for dozens of washings; you can rinse out dirty clothes and bungee them on the boat to dry during the day. If you are paddling in the winter, pack a pair of polypropylene long underwear. Bring socks for buggy or chilly nights. Additional reminders:
| ► | water shoes or sneakers. If you step into the water, you must wear protective shoes because of the sharp oyster shells. |
| ► | Pack a head net to protect yourself from mosquitoes. You may never wear it, but it takes almost no space, and if you need it, you’ll be happy to have it. |
| ► | Wear paddling gloves. Lightweight, all-purpose exercise gloves will serve the purpose. Gloves protect your hands from blisters and prevent sunburn. |
| ► | Don’t forget to pack bandannas. They dry quickly and serve many purposes—pot holder, headband, tissue, washcloth, or towel. |
As food for thought, a kayak racer once stopped by briefly to chat when we were camping at Plate Creek Chickee and advised us to have a separate dry set of clothes saved for emergency situations.
COOKING SUPPLIES
Nothing that produces ash (including wood or charcoal fires) may be used on ground sites or on chickees. Campfires are permitted only on beach sites. So be sure to bring a campstove. We use one, or sometimes two, single-burner propane stoves; the stove element screws directly onto the top of the propane cartridge. We generally bring four full propane cartridges for two people. The propane required will vary according to what you cook and wind conditions. If you like to dine well out there, it is no fun to contemplate eating cold food toward the end of your trip. Worse yet not to have coffee on your final days. Don’t forget at least two butane lighters. They can be cranky, and sometimes when one won’t work, the other will. Always have a box of matches in a waterproof container, just in case.
If your vehicle is a kayak, you will need cooking equipment that’s very compact. You can get fuel canisters and a burner made specifically to fit through your hatches.

We use one cook kit with nested pots (the lids of which become frying pans) and a stirring spoon, paring knife, and spatula. Each of us uses a wide, shallow Corelle bowl, which serves well as both bowl and plate; each has a knife, fork, and spoon, and a thermal cup for coffee or tea.
Be aware that chickee boards are spaced far apart. We expect that many a knife, fork, and spoon have fallen between the boards over the years, and we confess that we contributed a spoon of our own. To prevent dropping things between the boards, we’ve learned to spread out a tarp before cooking. To wash your dishes, bring a scrubbie.
We like good coffee, and we use a Melita one-cup drip device to brew a cup at a time. (A funnel works just as well.) If you’re a coffee lover, bring filters and plenty of good ground java.
FOOD
Take care with the food you pack. A good cup of coffee at the start of the day, a granola bar after a hard stretch of paddling, a bowl of hot soup after setting up your tent in the evening, and a fine dinner can be rewards for hard work on the Waterway. The definition of good food is a very personal matter, however. For some, the best camp cooking is the quickest, easiest thing that will get calories into the stomach: open a can of beans and a loaf of bread and you’re happy. For others (we fall into this category), at the end of a day of hard paddling, you want something special, so here are some tips for the Waterway gourmet.
Snacks
Snacks matter. We burn a lot of energy out there, so we try to routinely have snacks midmorning and midafternoon, and occasionally another one along the way. Sometimes we rely almost entirely on granola bars and fruit-and-nut bars. Sometimes we’ve had cheese sticks and crackers or Babybel cheese with biscotti. Sometimes almonds and fresh fruit, either apples or oranges. Whatever you decide upon, don’t leave snacks to chance. Plan them as carefully as you plan meals. Pack them in a separate container, apart from other foodstuffs, and be sure that you can get to them easily when you need them. We stash ours under the canoe seats.
Breakfast
We’ve learned to make breakfast easy: coffee and oatmeal with walnuts and fruit. By varying the fruit, we have a sense of not having exactly the same thing every day. The only cooking that has to be done is to boil water. We use the water for making good, strong coffee and for pouring into our bowls waiting with oatmeal and raisins, nuts, dried fruit, or fresh blueberries. Our blueberries have stayed good for almost a week. For oatmeal, we use a mixture of about three-fourths quick oats and, for texture, about one-fourth old-fashioned oats. We measure carefully in advance to be sure that we will have the right number of servings (plus some extra just in case) and put all of the oats, along with a scoop, into a plastic container with a tightly fitting lid. We sprinkle the oats and fruit with a little dried milk before pouring on the hot water.
Lunch
We keep lunch simple too. Peanut butter sandwiches. No jelly. Just peanut butter. Following peanut butter sandwiches, we usually have fresh fruit and sometimes mint patties from the cooler. Occasionally we have tuna sandwiches made with seasoned tuna from a foil packet that needs no refrigeration. Whatever you choose for lunch fare, when you’ve been out there awhile, working hard, it’s great to tie up to a marker or a mangrove, stretch your legs out over the load, and enjoy grand, simple fare.
Dinner & Recipes
Ah, dinner! Now, for us, that’s another category of food altogether. The paragraphs below explain how canoeists can have delicious meals throughout the Waterway trip. Kayakers will need to have more of a backpacking mentality because of the limited space, but it is still possible to create savory meals with pasta, spices, foil-packaged tuna and chicken, fresh fruit, and vegetables. If you have the time and ambition, you can freeze-dry meals. Just be sure to bring more than you think you will need. Paddling all day will make you hungry.
For us, a favorite meal for the first night out is Cuban pork chops with black beans, a recipe we are happy to share here. This can be prepared well in advance and frozen. Many dishes lend themselves to a paddling journey—just start out with a pre-chilled cooler and be sure the food itself is frozen.
CUBAN PORK CHOPS
8 thin pork chops
salt
pepper
¼ teaspoon ground cumin
¼ teaspoon dried oregano
3–5 garlic cloves, crushed
¼ cup orange juice
1/8 cup fresh lime juice
1/8 cup fresh lemon juice
(If fresh sour oranges are available, use ½ cup of sour-orange juice instead of the orange, lime, and lemon juices.)
2 large onions, thinly sliced
3 tablespoons olive oil
½ cup dry sherry
At least a day or two before your departure—to allow time for freezing the cooked meat—rub the chops with salt and pepper, then with a paste you make of the cumin, oregano, and garlic. Place the chops in a glass bowl and add the juices (or sour-orange juice) and thinly sliced onions. Marinate in the refrigerator 3–4 hours.
Remove chops from the marinade, reserving the marinade. Pat the chops dry with paper towels. Heat the oil in a sauté pan, and quickly brown the chops on both sides. Add the reserved marinade and the sherry.
Reduce the heat, cover, and cook 18–22 minutes, until chops are tender. When cooled, place the chops and the cooked onions in plastic freezer bags, apportioning according to the servings you will need on the Waterway, and freeze until time to pack for travel.
WATERWAY BLACK BEANS
½ medium onion, chopped
2 garlic cloves, chopped
1 green bell pepper, chopped
¼ cup olive oil
1 large tomato, chopped
2 (16-ounce) cans black beans
Several dashes Tabasco sauce
1 tablespoon red wine vinegar
1 teaspoon ground cumin
Salt and pepper
½ cup broth or water
Cook onion, garlic, and bell pepper in the oil, over low heat, about 10 minutes, stirring often. Add the chopped tomato and cook another 5–7 minutes. Add beans (do not drain or rinse them), Tabasco, vinegar, cumin, salt and pepper to taste, and broth or water, stirring. Cover and simmer about 15–20 minutes. Cool. Spoon into plastic bags for freezing, apportioning according to how much you will need for one or two meals.
Food Freshness & Safety The night before departure, fill the cooler with ice so that it will be cold when you put food into it. Everything you put into the cooler should be cold or frozen so that nothing will immediately begin to bring down the temperature. The ice that was used for pre-chilling will be discarded, replaced with whatever you intend to use to keep the chill—blue ices, dry ice, or (our favorite) a large chunk of ice that you have pre-frozen in a half-gallon or gallon container. A large ice block will last longer and prolong chilling more effectively than ice cubes or crushed ice. Starting out this way, you can plan to have whatever you would like for dinner the first three nights out—either food prepared and frozen in advance or the materials that you will need for constructing the meal on-site.
After the third night, you can continue to have fresh vegetables. An avocado that’s hard when you set out will generally be perfect by the fourth night. Cauliflower florets, Brussels sprouts, and red and green peppers easily keep a week or longer, as will tomatoes if they are not too ripe when you set out. Potatoes, onions, and carrots are fine for 10 days or longer. Generally, if you select vegetables carefully, they hold up well. When you’re halfway through the trip and the cooler is no longer cool, just be sure to keep your veggies dry so they won’t mold.
With our veggies, we enjoy pasta concoctions, couscous, Stove Top stuffing, and rice. We no longer cook regular rice or brown rice from scratch, however, because it takes a long time and uses a lot of cooking fuel. We’ve found some quick rice mixes, including a wild rice mix, that we like well enough.
For seafood or meat, foil packets available in most supermarkets have been great: favorites include seasoned tuna, salmon, chicken chunks, and crab (we’ve made great crab cakes, improvising from the recipe on the packet). The packets take a minimum of space and are much lighter in weight than cans, giving us little to pack out.
We like to have soup several times on the trip, especially on chilly evenings. Soup is good as a main course and sometimes as a first course at dinnertime. Again, we avoid cans, taking instead boxed soups, for lighter packaging and easy packing out.
We bring and use the small touches that enhance the food—lemon or lime, cumin, bay leaf, thyme, salt, and fresh pepper.
We plan very carefully with established written menus for each night. Once we’re out there, we often vary these, but it’s a way of being sure that we will have sufficient supplies without hauling a lot more than we need. We have learned, however, that it is important to carry food for at least one more day than we anticipate being out. We’ve never been stranded without supplies, but once we came sufficiently close that we have become attentive to the possibility. We pack now for a day and a half beyond our anticipated trip time. Just in case.
WATER
You will have to carry your entire freshwater supply:
| ► | There are no sources of freshwater along the 99-mile Waterway. |
| ► | The water in this part of the Everglades is too brackish to filter and drink (though, in a pinch, you can consider cooking with brackish water). |
| ► | Standard recommendations note that you should carry 1 gallon of water per person per day. |
For a canoe, you can handle your water supply several different ways, but don’t head out with a bunch of loose plastic gallon jugs that raccoons can chew into. Use hard-sided water containers, 3–5 gallons each. Some people use 5-gallon Home Depot containers with snap-on lids. If you want the convenience of gallon jugs, you can put several jugs into hard-sided boxes and bungee the boxes tightly. We have done this, and although raccoons tried to get into the jugs, they didn’t succeed. Kayakers can buy specially designed water bags to tuck in their boats.
While 1 gallon of water per person per day is recommended, a little extra won’t hurt if you have room. You may not use all the water you bring, but we have learned that the weight of the water serves as good ballast on windy, wavy days.
One more note about water: Continuous hydration is important. Each paddler should carry a water bottle within easy reach in the boat. In a canoe, a water bottle holder that is attached to the seat with Velcro will make it easy for you to drink often. For kayakers, a hydration pack might be just the thing.
THRU-PADDLING THE EVERGLADES WILDERNESS WATERWAY
In this book, we have organized maps and text into 21 sections to cover the 99-mile Wilderness Waterway route. From north to south, the sections are numbered 1 to 21; from south to north, they are alphabetized A to U.
You may paddle the Waterway section by section in either direction. But to avoid duplicate maps, we have labeled each map by number/letter. You may use this book from for the north-to-south route; and backwards, from for the south-to-north route.
For example, note that Section 1/U, below, begins section 1 of the north-to-south route, in Everglades City. Conversely, the same map and somewhat varied text also represents section U, which completes the south-to-north paddle, in Everglades City. See the charts on the next pages for a quick reference to all the sections, in both directions, and for each section’s page number.
In addition to the 21 sections we describe in detail in this book, The Historical Route is another passage along part of the Wilderness Waterway. However, because this route crosses Whitewater Bay, it can be quite hazardous for paddlers and we do not recommend it. For more information, see Map 22 and brief text.
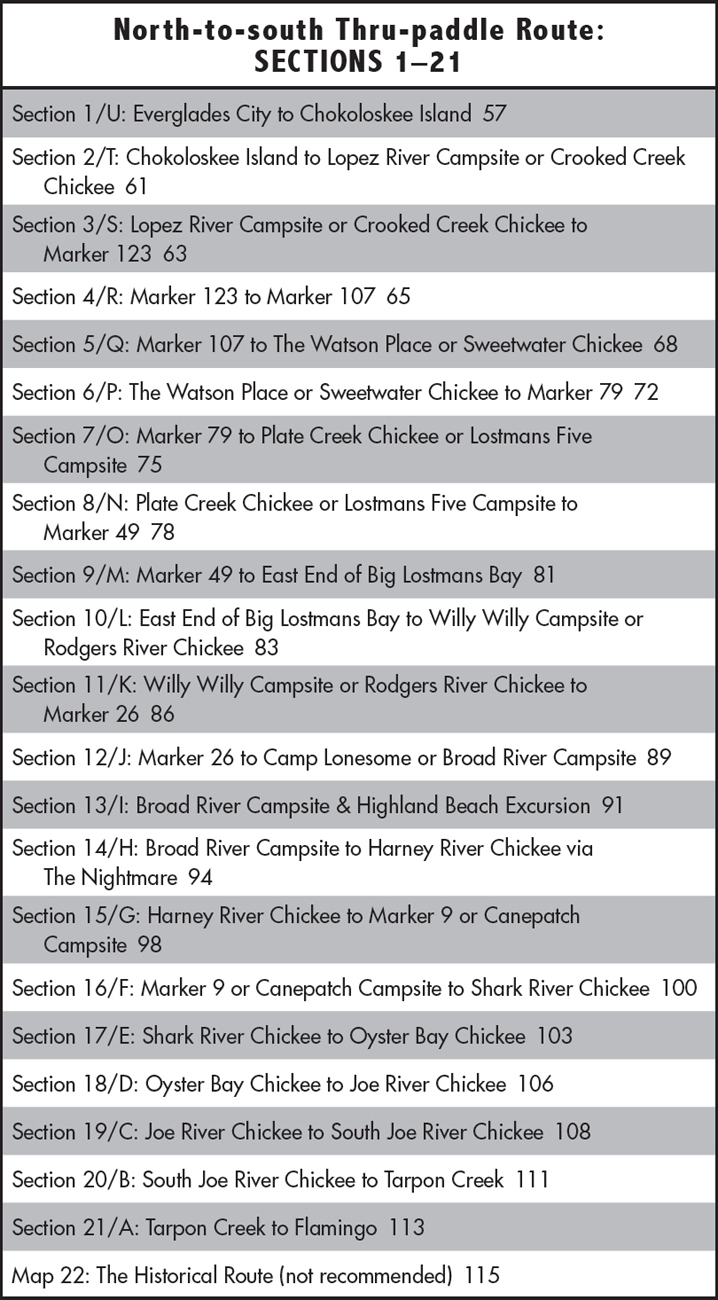

Whether you are heading north or south, you can expect to observe certain landmarks, flora, and fauna within each section that you paddle. We provide detailed descriptions primarily in the north-to-south text, but we include additional information—or the reverse perspective if pertinent—in the accompanying text for each section of the south-to-north route.
MARKERS
The historical Wilderness Waterway ran from marker 1 through marker 130, south to north. Currently there is no Wilderness Waterway marker 1 at Flamingo, and there are no markers 128, 129, or 130 in the Everglades City area.
Thus, currently, the Wilderness Waterway markers run from number 2, near Flamingo, to marker 127 at Chokoloskee Bay. As a general rule, even-numbered markers are to your left and odd-numbered markers are to your right as you travel north to south (from Everglades City to Flamingo) and even-numbered markers are to the right and odd-numbered markers to the left as you travel south to north (Flamingo to Everglades City). Wilderness Waterway markers are brown arrow shapes with white numbers. They are positioned on poles out in the water or near the shore. You will also see—and our route directions also reference—USCG markers; they are red triangles or green squares. The maps in this guide show triangles for Waterway markers and circles for USCG markers.
As you paddle, you will find that weather and time may have caused some Waterway markers to disappear. However, you can be certain that the NPS works hard to maintain these markers. Make note of missing markers and report them at the end of your trip. Use your map and compass skills to confirm your position if markers are missing.
Appendix 7, provides a handy list of the GPS coordinates for all Wilderness Waterway markers and campsites. (We also include relevant GPS coordinates in the introduction to each route description.)
SECTION 1/U:
EVERGLADES CITY (GULF COAST VISITOR CENTER)/ CHOKOLOSKEE ISLAND (SOUTH END)
Coast Visitor Center: N25° 50.730' W81° 23.234′
Island: N25° 48.537′ W81° 21.442′
paddling distance: 3.5 miles
NORTH TO SOUTH: Everglades City to Chokoloskee Island
Launch your canoe or kayak to the right of the Gulf Coast Visitor Center at Everglades National Park. The park provides a wheelbarrow to carry your gear from your car to the launch site on Chokoloskee Bay. Make every effort to launch near high tide because launching at low tide may necessitate pulling your craft through thigh-deep mud before you can climb into your boat and paddle off. (For alternative, fee-based launch sites, see Appendix 2, Launch Sites)
Just before you reach the bridge, you have two choices—the Causeway Canal route or the Chokoloskee Bay route.
Be aware that launching on an outgoing tide will make it difficult to paddle under the bridge if you are planning to take the Causeway Canal route. On the other hand, the advantage of the Causeway Canal route is that you avoid the waves and oyster beds of Chokoloskee Bay. For the canal route, turn left (east) and paddle under the causeway bridge and then turn right, heading southeast along the canal that follows the eastern side of the Chokoloskee Causeway. Be sure to stay to the far left (east) as you paddle the canal because the western (right) side can become too shallow to paddle.
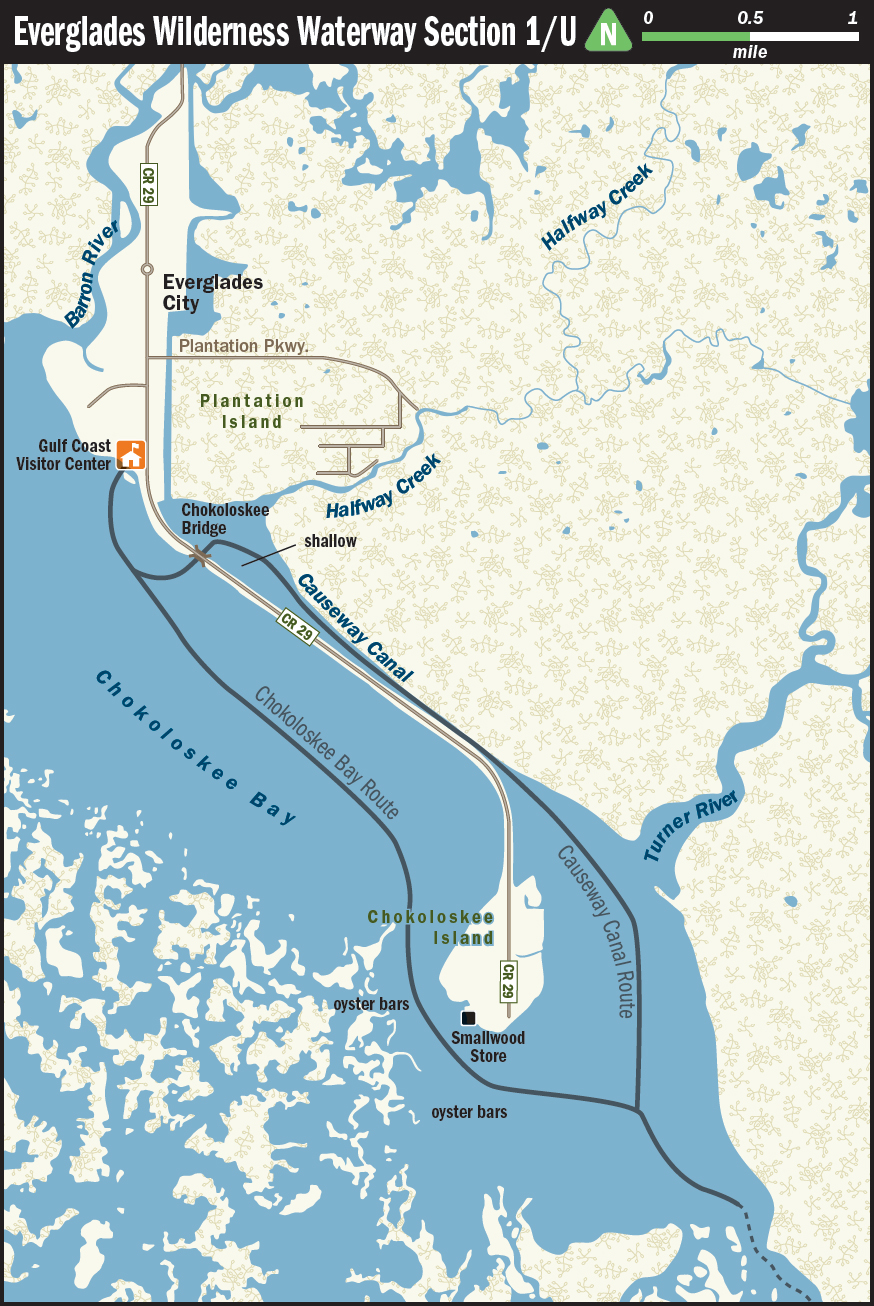
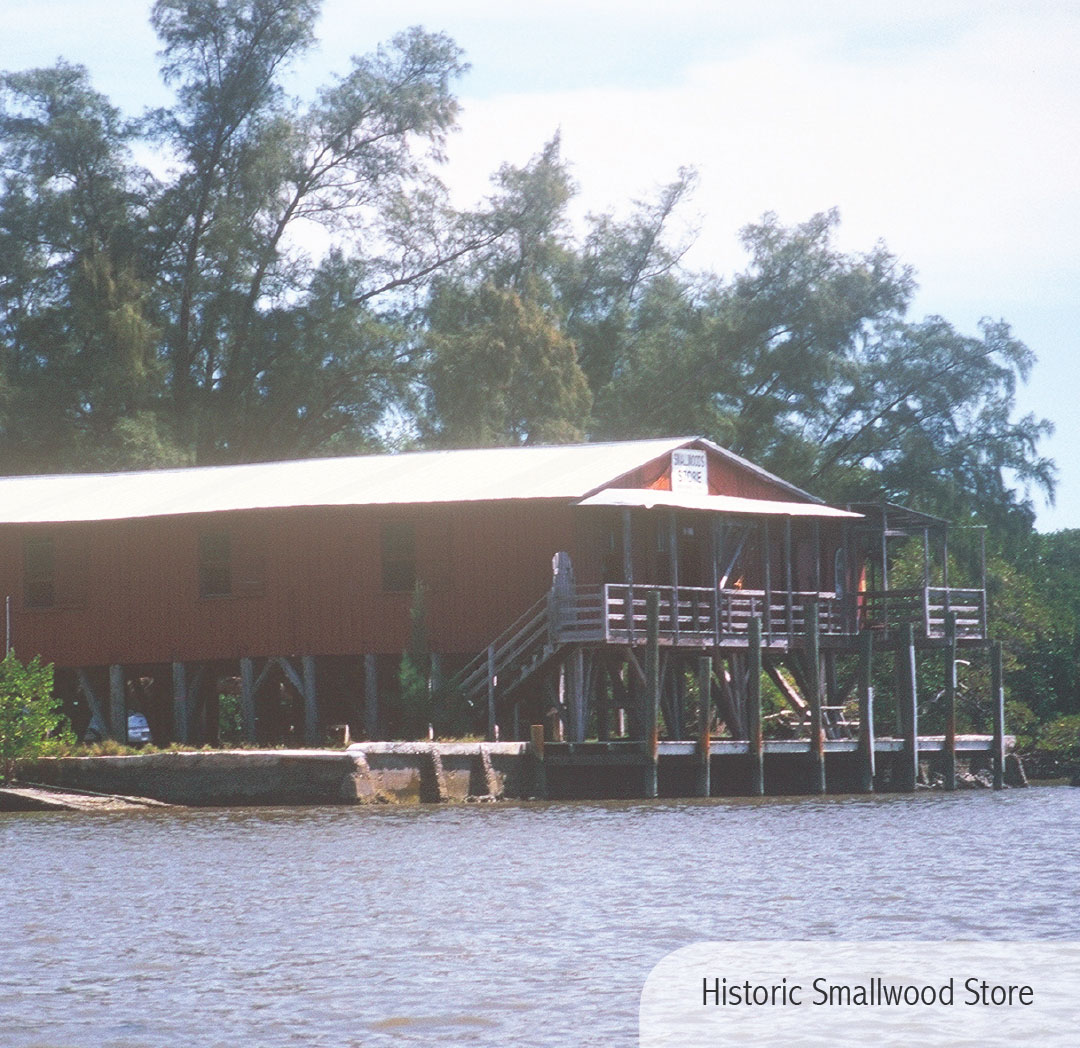
The advantage of the Chokoloskee Bay route is that it conveniently passes Historic Smallwood Store, and it makes a delightful place to stop for a break. If the tide is ripping out under the bridge and you find that you cannot paddle against the tide, take this route for sure. On the Chokoloskee Bay route, continue southeast down the bay and pass Chokoloskee Island on your left (east). Watch out for the oyster beds.
SOUTH TO NORTH: Chokoloskee Island to Everglades City
Heading for your takeout by way of the Causeway Canal route, pass Chokoloskee Island to your left (west) and the Turner River to your right (east). (See “Chokoloskee Island”.) You will be funneled into the canal that lies to the right of the Chokoloskee Causeway. The advantage of this route is that the canal itself offers a calm passage with great birding. The disadvantage is that you may face a ripping incoming tide as you paddle under the bridge.
Stay to the right in this canal, as the left side can become impassable at low tide. When you come to the bridge, turn left. Pass under the bridge, turn right, and head to your takeout point at Gulf Coast Visitor Center, Everglades National Park, in Everglades City.
If you are coming in via the Chokoloskee Bay route, paddle northwest across the bay, passing Chokoloskee Island to your right (east). This route is often wavier than the canal option, and the shallow bay is lined with oyster beds. The advantage is that you will pass Historic Smallwood Store on the west side of Chokoloskee Island. Now a museum, the store is worth a visit, particularly if you are waiting for the tide to come up for your takeout at Everglades City. You can purchase your first cold drink since you left Flamingo.
Leaving Smallwood Store, paddle northwest from the northern end of the island, passing the Chokoloskee Bridge on your right. Gulf Coast Visitor Center will appear shortly on your right. The takeout point lies immediately past the visitor center.
Make every effort to take out near high tide because there is no dock. Low tide may necessitate dragging your boat through thigh-deep mud. The park provides a cart to carry your gear to your vehicle.
SECTION 2/T:
CHOKOLOSKEE ISLAND/LOPEZ RIVER CAMPSITE OR CROOKED CREEK CHICKEE
Island: N25° 48.537′ W81° 21.442′
River Campsite: N25° 47.275′ W81° 18.374′
Creek Chickee: N25° 47.785′ W81° 17.922′
paddling distance, Chokoloskee Island/Lopez River Campsite: 4 miles
paddling distance, Chokoloskee Island/Crooked Creek Chickee: 5 miles
NORTH TO SOUTH: Chokoloskee Island to Lopez River Campsite or Crooked Creek Chickee
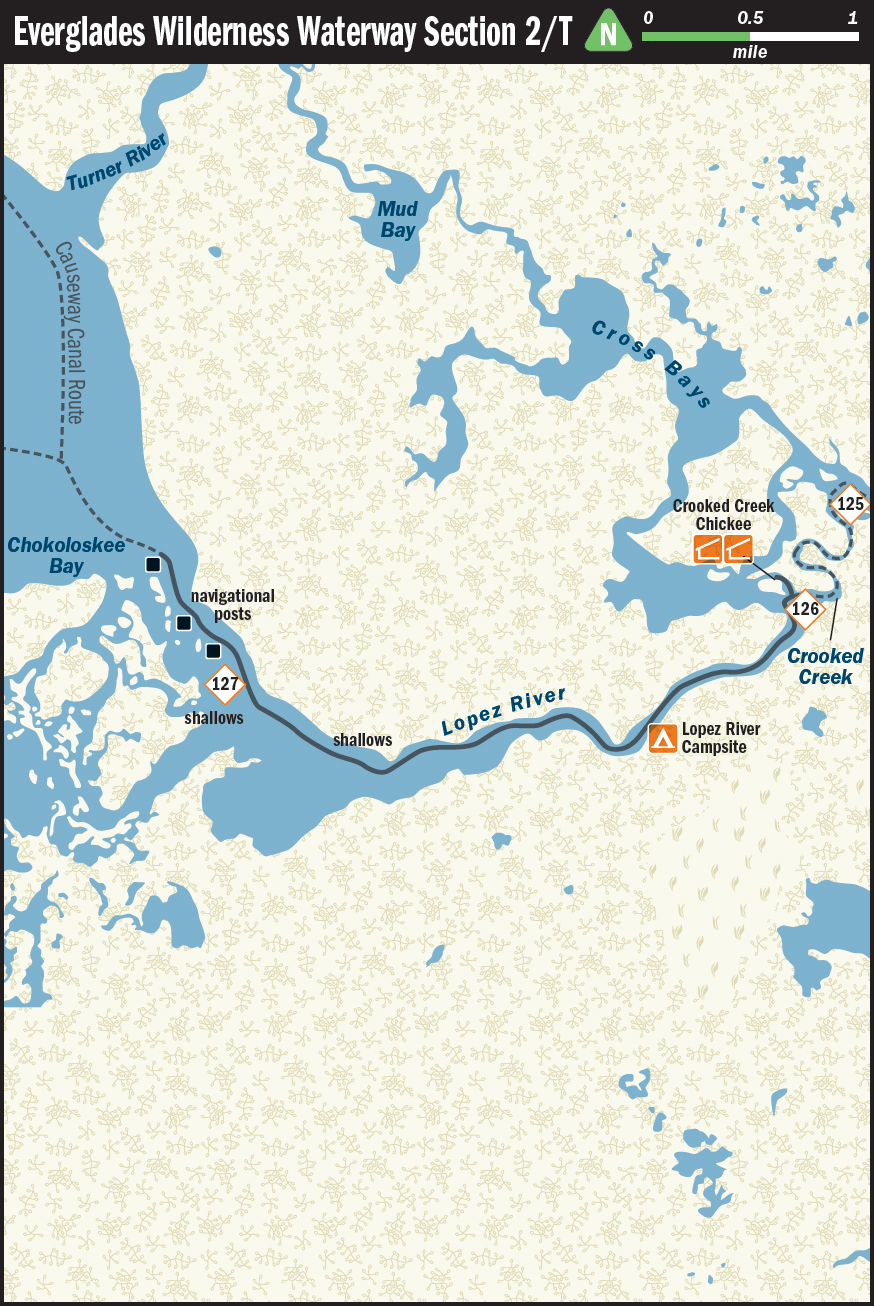
Passing Chokoloskee Island, paddle in a southeasterly direction down the bay to marker 127 and turn left (east) onto the Lopez River. Keep paddling in an easterly direction.
Motorboaters frequent this portion of the Waterway and, because this is not a no-wake zone, these boaters often travel fast; stay alert to the sound of motors.
Approximately 2 miles up the Lopez River, you will come to the Lopez River Campsite on your right with its old cistern and modern privy. If you are not staying here overnight, this is a good spot to have lunch in the shade and wander around the remains of Gregorio Lopez’s old 1890s homesite. You can understand why Lopez chose this fine spot on the river with its proximity to the Gulf of Mexico and to Chokoloskee. See if you can decipher the markings on the vault-shaped structures on the front of the cistern. If you are staying at Crooked Creek Chickee, continue northeast on the Lopez until it bends to the west. At this point, turn off the Lopez into Crooked Creek. This is the first stream branching off the Lopez to the right (east). As you turn, marker 126 will be on your right. The chickee is behind the mangrove island to your left.
SOUTH TO NORTH: Crooked Creek Chickee or Lopez River Campsite to Chokoloskee Island
From the Crooked Creek Chickee, return to the creek that shortly joins the Lopez River, and paddle southwest. Lopez River Campsite lies about 1 mile on the left. About 2 miles beyond the campsite, keep right through the bend, and you will enter Chokoloskee Bay at marker 127. Paddle northwest into Chokoloskee Bay, and determine which route you will take around the island to finish up your trip, either the Causeway Canal route or the Chokoloskee Bay route (see advantages and disadvantages in the north-to-south route description, above). You will likely see busy pelicans and cormorants fishing in the shallow bay.
SECTION 3/S
LOPEZ RIVER CAMPSITE OR CROOKED CREEK CHICKEE/MARKER 123
River Campsite: N25° 47.275′ W81° 18.374′
Creek Chickee: N25° 47.785′ W81° 17.922′
Marker 123: N25° 48.050′ W81° 17.363′
paddling distance, Lopez River Campsite/marker 123: 2.5 miles
paddling distance, Crooked Creek Chickee/marker 123: 1.5 miles
NORTH TO SOUTH: Lopez River Campsite or Crooked Creek Chickee to Marker 123
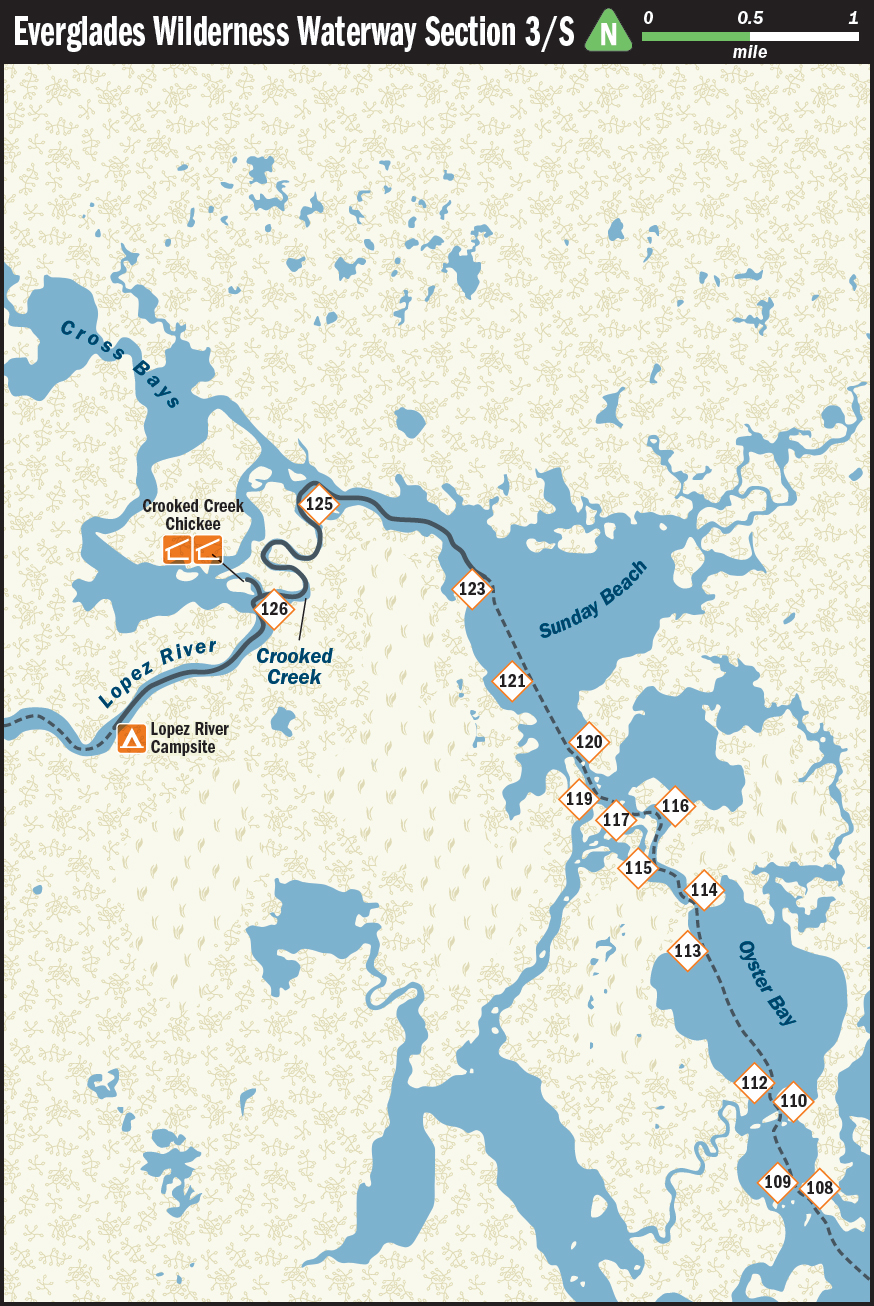
Leaving the Lopez River Campsite, follow the river, looking for the first channel to the right (east) and marker 126. Here, where the river bends west, turn right into Crooked Creek. If you stayed at Crooked Creek Chickee, paddle back to the creek and turn left (east) to follow this serpentine channel. Continue along Crooked Creek until it turns right (east) at marker 125 into Sunday Bay. Enter Sunday Bay and paddle south to marker 123.
SOUTH TO NORTH: Marker 123 to Crooked Creek Chickee or Lopez River Campsite
From marker 123, follow Sunday Bay as it curves northwest to marker 125, where you make a sharp left (south) into the serpentine channel called Crooked Creek. Follow this about 1 mile until you see the Lopez River. The Crooked Creek Chickee lies to your right behind the mangrove island at the mouth of Crooked Creek. If you plan to stay at the Lopez River Campsite, continue on Crooked Creek, which shortly intersects with the Lopez River. Turn left onto the Lopez and paddle about 1 mile downriver to the Lopez River Campsite on your left. This campsite is easy to spot, with its old cistern and NPS sign on the banks of the river. Even if you are not staying overnight at Lopez River Campsite, it is a good spot to have lunch, stretch your legs, explore, write in your journal, or pleasantly idle away some time, waiting for a high-tide landing in Everglades City. On occasion, we have stopped here to brew a second cup of coffee and simply relax.
SECTION 4/R
MARKER 123/MARKER 107
Marker 123: N25° 48.050′ W81° 17.363′
Marker 107: N25° 44.844′ W81° 14.987′
Estimated paddling distance: 4.5 miles
NORTH TO SOUTH: Marker 123 to Marker 107
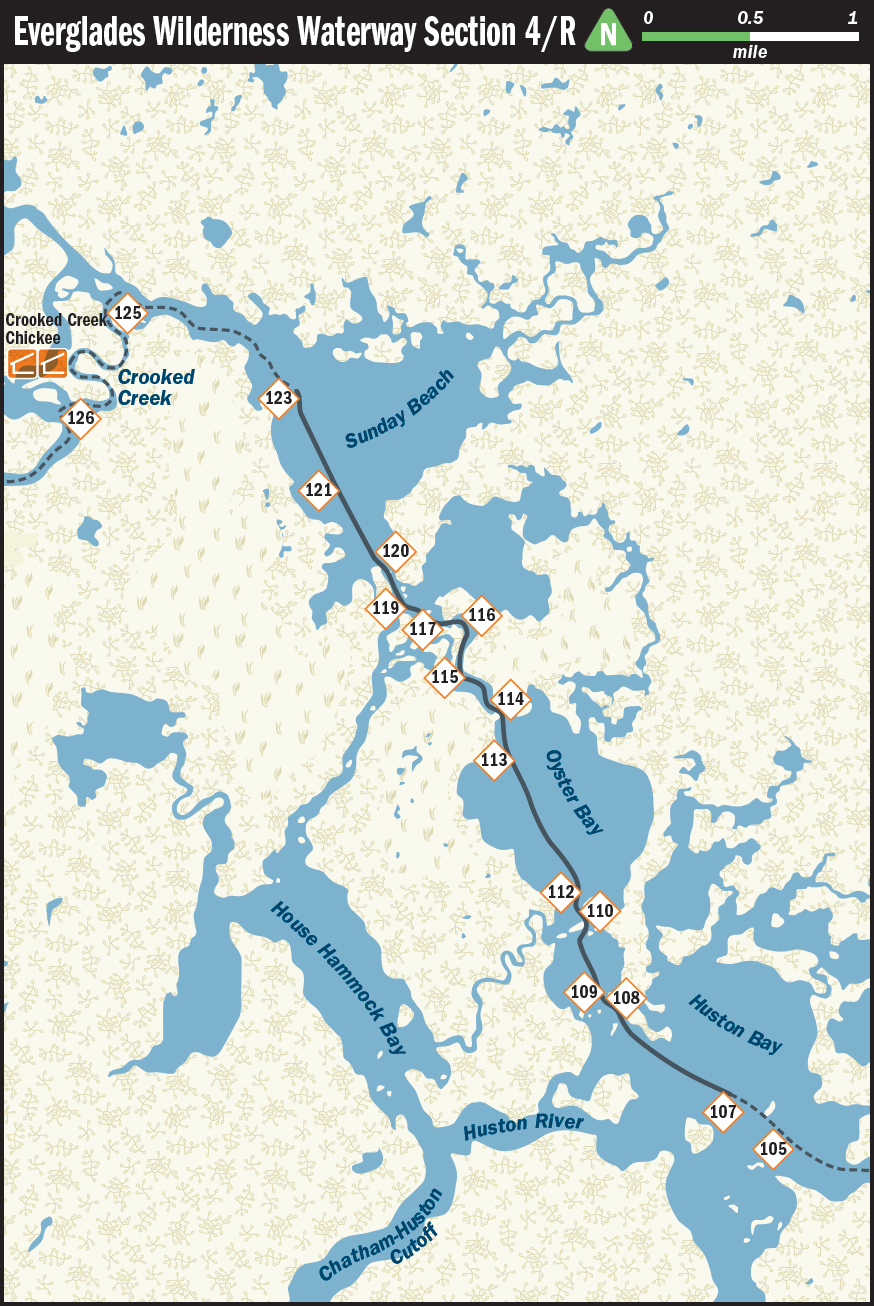
From marker 123 continue your paddle south down Sunday Bay. You will see marker 121 as the bay narrows toward its south end, and you will pass in quick succession markers 120, 119, 117, 116, 115, and 114, at which point you will enter Oyster Bay.
A word about mangroves: It’s impossible to differentiate one mangrove island from another when you are out on the water. (It would be easier if you were looking down from an airplane.) Actually, many mangrove islands look just like part of the shoreline until you get close to them and realize they are islands. (Also see “Mangrove,”.)
Pass marker 113 and head in a southeasterly direction across Oyster Bay, where you will see marker 112, followed by marker 110. Paddle south to marker 109 and then to 108 at the entrance to Huston Bay.
Continuing in a more easterly direction into Huston Bay, you will soon spot marker 107, located next to an island with a tidy red boathouse on stilts on the shore. This cabin, locally known as the Nauti Buoy, is the last private inholding in the park, and boaters are not allowed to land here.
SOUTH TO NORTH: Marker 107 to Marker 123
Paddle past marker 107, and you’ll see the barn-board red boathouse on stilts—the last private property in the park. You are not permitted to land here, so make a northerly curve to markers 108 and 109. Paddle the lower portion of Oyster Bay, passing markers 110 and 112.
Continue in a northerly direction across Oyster Bay to marker 113 and then 114, which marks the channel to Sunday Bay. Paddle north, west, and north again, passing easy-to-spot markers 115, 116, 117, and 119.
At marker 120, you will enter the south end of Sunday Bay. Paddle in a northerly direction, passing marker 121 and then 123.
SECTION 5/Q
MARKER 107/THE WATSON PLACE OR SWEETWATER CHICKEE
Marker 107: N25° 44.844′ W81° 14.987′
The Watson Place: N25° 42.551′ W81° 14.737′
Sweetwater Chickee: N25° 44.617′ W81° 12.685′
Estimated paddling distance, marker 107/The Watson Place: 4 miles
Estimated paddling distance, marker 107/Sweetwater Chickee: 4.5 miles
NORTH TO SOUTH: Marker 107 to The Watson Place or Sweetwater Chickee
Continue across Huston Bay to marker 105 and then to 103 at the entrance to Last Huston Bay. Last Huston Bay stretches out far to your left (east), so stay close to the west side of the bay, passing marker 102 that you will see out in the water.
As you leave Last Huston Bay, use caution. The Huston and Chatham rivers course from bays to the Gulf of Mexico, and if you hit the tides at the wrong time, the crosscurrents can be difficult to paddle, particularly in areas with narrow channels and shallow oyster beds. Often, we have paddled smoothly over this section, but once we had to step into the stream and pull our boat through the current until we reached a point at which we could paddle against it. Be sure to put on your water shoes if you must get into the water. This section of the Waterway has extensive oyster beds, and oyster shells are sharp—and can be dangerous, as noted in “Paddling Conditions,”.
If you intend to camp at The Watson Place, turn right (west) at marker 100 onto the Chatham River. The Watson Place is approximately 1.5 miles downriver on your right. Do not follow the channel that branches off to the right about 1 mile down the Chatham, as it will lead you back to Huston Bay. Instead, continue on to The Watson Place, 0.5 mile farther down the main channel of the Chatham on the right (west) bank. In the morning, backtrack northeast up the Chatham River to marker 100.
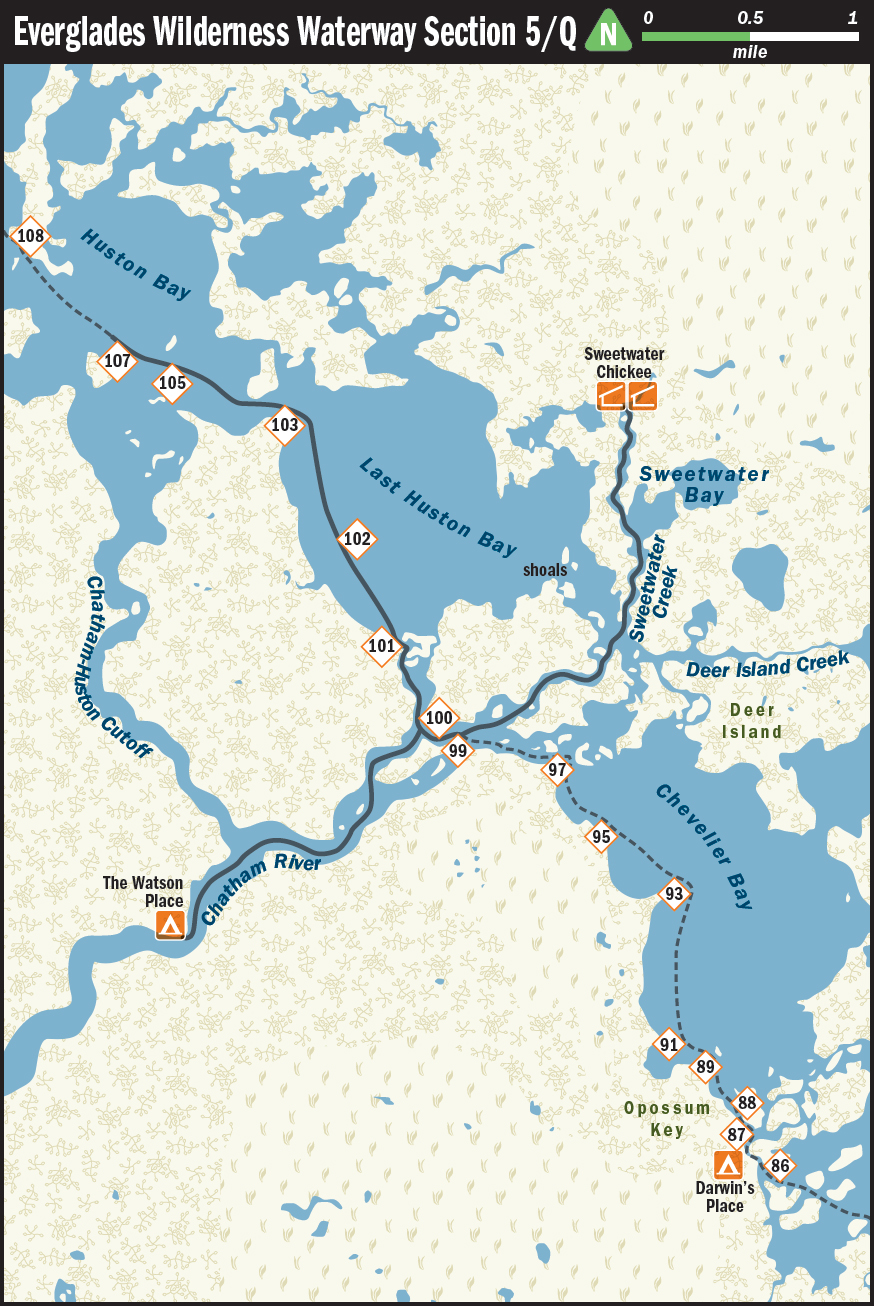
If you plan to camp at Sweetwater Chickee, turn left at marker 100, leave the marked Waterway, and head northeast. In about 1 mile you will come to a wide cross channel. Continue northeast across the channel to enter Sweetwater Creek. Follow Sweetwater Creek about a mile, staying consistently to your left, until you arrive at Sweetwater Chickee. Have patience, use your map and compass skills, and follow the map that accompanies this section. You’ll know you’re getting close when you begin to see a few cabbage palms.
Note: The location of the chickee can be a bit misleading on the NOAA chart. Look for the tiny line on the map that marks its spot.
SOUTH TO NORTH: Sweetwater Chickee or The Watson Place to Marker 107
From Sweetwater Chickee, paddle southwest to the Waterway and marker 100, turn right (north), and paddle into Last Huston Bay. If you stayed at The Watson Place, retrace your paddle up the Chatham to marker 100, turn left, and paddle north into Last Huston Bay. Use caution as you paddle the passage into Last Huston Bay. The Chatham and Huston rivers are strongly influenced by the tides from the Gulf of Mexico, and crosscurrents can be difficult to paddle, particularly where channels narrow. If you need to step into the water to pull your boat through the current, be sure to wear shoes to protect your feet from sharp oyster shells.
(An alternative route from The Watson Place into Huston Bay is to retrace your paddle northeast and take the Chatham-Huston Cutoff on your left. It is the channel that branched off the Chatham just before you arrived at The Watson Place. This route will take you to the south end of Huston Bay, where you will continue your journey northward, watching for marker 105.)

Continue on to markers (sitting out in the water) 102 and 103. At marker 103, round the bend to your left, heading northwest into Huston Bay toward marker 105 and then marker 107.
SECTION 6/P
THE WATSON PLACE OR SWEETWATER CHICKEE/MARKER 79
The Watson Place: N25° 42.551′ W81° 14.737′
Sweetwater Chickee: N25° 44.617′ W81° 12.685′
Marker 79: N25° 41.000′ W81° 11.459′
Estimated paddling distance, The Watson Place/marker 79: 5 miles
Estimated paddling distance, Sweetwater Chickee/marker 79: 5 miles
NORTH TO SOUTH: The Watson Place or Sweetwater Chickee to Marker 79
If you stayed at The Watson Place, backtrack northeastward up the Chatham River to marker 100 and turn east (right).
If you stayed at Sweetwater Chickee, paddle back along the passage you took when you came to the chickee to marker 100. Turn left and paddle easterly until you reach marker 97.
At marker 97 you will enter Chevelier Bay. Stay to the right (west) side of the bay, passing markers 95, 93, and 91. Close to the shore, you will pass some islands on your left (east) and come to marker 88, which marks the entrance to the channel that leads to marker 87 and passes Darwin’s Place, a ground campsite, on Opossum Key on your right. You will see the tabby remains of Darwin’s home (see “Tabby,”).
Continue southeast, crossing the western side of Cannon Bay and passing markers 86 and 85. At marker 83 you will turn right (south) and enter narrow Tarpon Bay and pass markers 81 and 79.
SOUTH TO NORTH: Marker 79 to Sweetwater Chickee or The Watson Place
Paddle north to pass markers 79 and 81, where the bay funnels north up a channel to marker 83 at the entrance to Cannon Bay. Paddle by a small island, keeping marker 85 on your left, and cross the southwestern part of Cannon Bay, leaving the bulk of the bay to your right. Travel between two pairs of islands to marker 86, and enter the channel that passes Darwin’s Place on Opossum Key to your left. Darwin’s Place is a ground site, easy to spot because of the NPS sign, the privy, and the homestead’s tabby foundations (see “Darwin’s Place,”, and “Tabby,”).
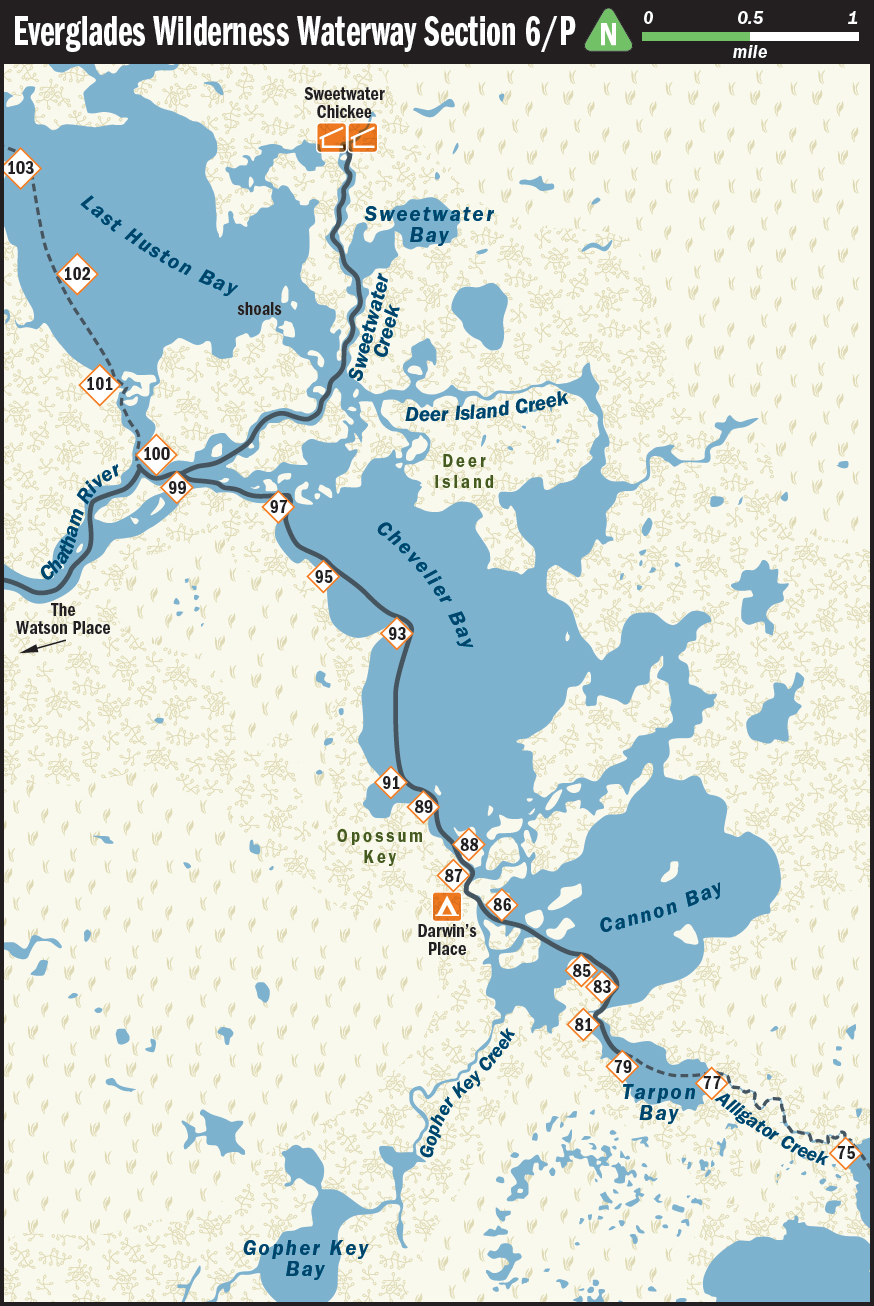
A short distance farther, pass markers 87, 88, and 89 as you head north into Chevelier Bay. Look for marker 91 on your left (west) and head north along the western shoreline of the bay. Again, the largest part of the bay is to your right. Marker 93 stands on a peninsula reaching out into the bay; when you pass this point, turn in a more westerly direction toward markers 95 and 97. As in all of the larger bays, conditions can be rough here if the wind is up. If this is the case, you might find some protection by staying near the shoreline. You may have to tack, paddling into the waves so that they don’t catch you broadside. At marker 97 head west and follow the left shoreline.
If you are heading for Sweetwater Chickee, turn right at marker 99, where the Chatham River comes in on the left (west). Follow the channel about 1 mile northeast until you come to a large cross-channel. Paddle to the other side where Sweetwater Creek opens directly to the northeast. Some paddlers report having difficulty locating Sweetwater Chickee. But if you just follow the creek about a mile, keeping left, you will arrive at the chickee.
If you are heading for The Watson Place, paddle north and turn left (west) at marker 100; paddle 1.5 miles down the Chatham River. A mile down, you will pass a channel branching off to your right, but stay on the main channel; after another 0.5 mile you will spot The Watson Place to your right.
SECTION 7/O
MARKER 79/PLATE CREEK CHICKEE OR LOSTMANS FIVE CAMPSITE
Marker 79: N25° 41.000′ W81° 11.459′
Plate Creek Chickee: N25° 38.459′ W81° 08.949′
Lostmans Five Campsite: N25° 38.039′ W81° 08.551′
Estimated paddling distance, marker 79/Plate Creek: 6 miles
Estimated paddling distance, marker 79/Lostmans Five Campsite: 7 miles
NORTH TO SOUTH: Marker 79 to Plate Creek Chickee or Lostmans Five Campsite
From marker 79 cross Tarpon Bay to the entrance to Alligator Creek. The last few times we paddled the Waterway, marker 77 was missing from the entrance to Alligator Creek. The creek is not difficult to find, however, as Tarpon Bay funnels into it. Alligator Creek is lovely, narrow, and winding. Pioneer Totch Brown, in his memoir, Totch: A Life in the Everglades, wrote of his dad’s claim that Gator Bay Creek got its name from an alligator nobody could kill. Before laws that prohibited alligator hunting were passed in the 1960s, many residents of the Everglades made their living by capturing these reptiles, skinning them, and profiting from the sale of the hides. Alligators were brought to the brink of extinction before these laws were passed, but the population has rebounded dramatically. You will likely see alligators here or elsewhere on your Waterway trip.
Alligator Creek opens into Alligator Bay at marker 75. Paddle in a southeasterly direction and pass marker 73 out in the water. Continue on a more easterly course, leaving the expanse of Alligator Bay to your right (southwest).
Look for marker 72, a bit difficult to see tucked near the mangrove shoreline, and then enter Dad’s Bay. Stay near the left (east) side of the bay, passing markers 70 and 68 and a No Wake sign that mark the entrance to Plate Creek. Plate Creek is narrow and lined with mangroves, palms, and air plants. The water is a clear amber color, and you can watch the fish swim by.

Markers 67 and 65 signal the entrance to Plate Creek Bay. Cross Plate Creek Bay in a southeasterly direction and you will spot Plate Creek Chickee to your right, at the end of an island west of marker 63.
If you are heading for Lostmans Five Campsite, paddle the channel between markers 63 and 62 and then south across Lostmans Five Bay to Lostmans Five Campsite near marker 60.
SOUTH TO NORTH: Lostmans Five Campsite or Plate Creek Chickee to Marker 79
If you stayed at Lostmans Five Campsite, travel north across the bay to marker 62 and enter the channel that leads into Plate Creek Bay and marker 63. Plate Creek Chickee lies west of marker 63, so if you stayed there, travel east to marker 63.
From either point of origin, paddle north across Plate Creek Bay, from marker 63 to 65, the main body of Plate Creek Bay to your left (west). With sharp eyes or binoculars, you can spot marker 65 from the Plate Creek Chickee. The marker stands at the entrance to Plate Creek, which is narrow, lined with mangroves, the occasional palm tree, and air plants. It flows clear and amber-colored, and you can look for fish swimming below your boat.
Follow this channel to Dad’s Bay, a No Wake sign, and marker 68. Again the body of the bay is to your left (west), so paddle along the eastern shore to marker 70. Dad’s Bay narrows soon after, and you will pass into Alligator Bay.
At the point where marker 72 appears on your right, head in a northwesterly direction across the northern part of Alligator Bay, paddling past marker 73 in the middle of the bay, and then marker 75 at the beginning of Alligator Creek. The creek is two boats wide; is winding; is lined with mangroves, buttonwoods, and air plants; and offers a good chance of seeing an alligator. The pioneer Totch Brown, in his memoir, Totch: A Life in the Everglades, suggested that the creek was named for an alligator nobody could kill. Travel the creek until you come out onto small and lovely Tarpon Bay. (The last times we’ve paddled, marker 77 has been missing from the exit from Alligator Creek. By the time you get there, it may have been replaced.) Paddle the length of the bay, passing marker 79.
SECTION 8/N
PLATE CREEK CHICKEE OR LOSTMANS FIVE CAMPSITE/MARKER 49
Plate Creek Chickee: N25° 38.459′ W81° 08.949′
Lostmans Five Campsite: N25° 38.039′ W81° 08.551′
Marker 49: N25° 34.561′ W81° 07.438′
Estimated paddling distance, Plate Creek Chickee/marker 49: 6.5 miles
Estimated paddling distance, Lostmans Five Campsite/marker 49: 5.5 miles
NORTH TO SOUTH: Plate Creek Chickee or Lostmans Five Campsite to Marker 49
Leave Plate Creek Chickee, paddle the channel between markers 63 and 62, and head south across Lostmans Five Bay to Lostmans Five Campsite, near marker 60. If leaving from Lostmans Five Campsite, you are already at your starting point.
At marker 60, enter the passage leading from Lostmans Five Bay south to Two Island Bay, where you pass marker 59. Head southeast across the bay to marker 58. Marker 58 can be a little tricky to find traveling north to south. Follow the right shoreline and you will come to the marker. On a sunny day you can also look for the change in coloration of the trees to help yourself see the passage. A contrast of dark and light will suggest a gap in the shoreline, which marks the channel to Onion Key Bay.
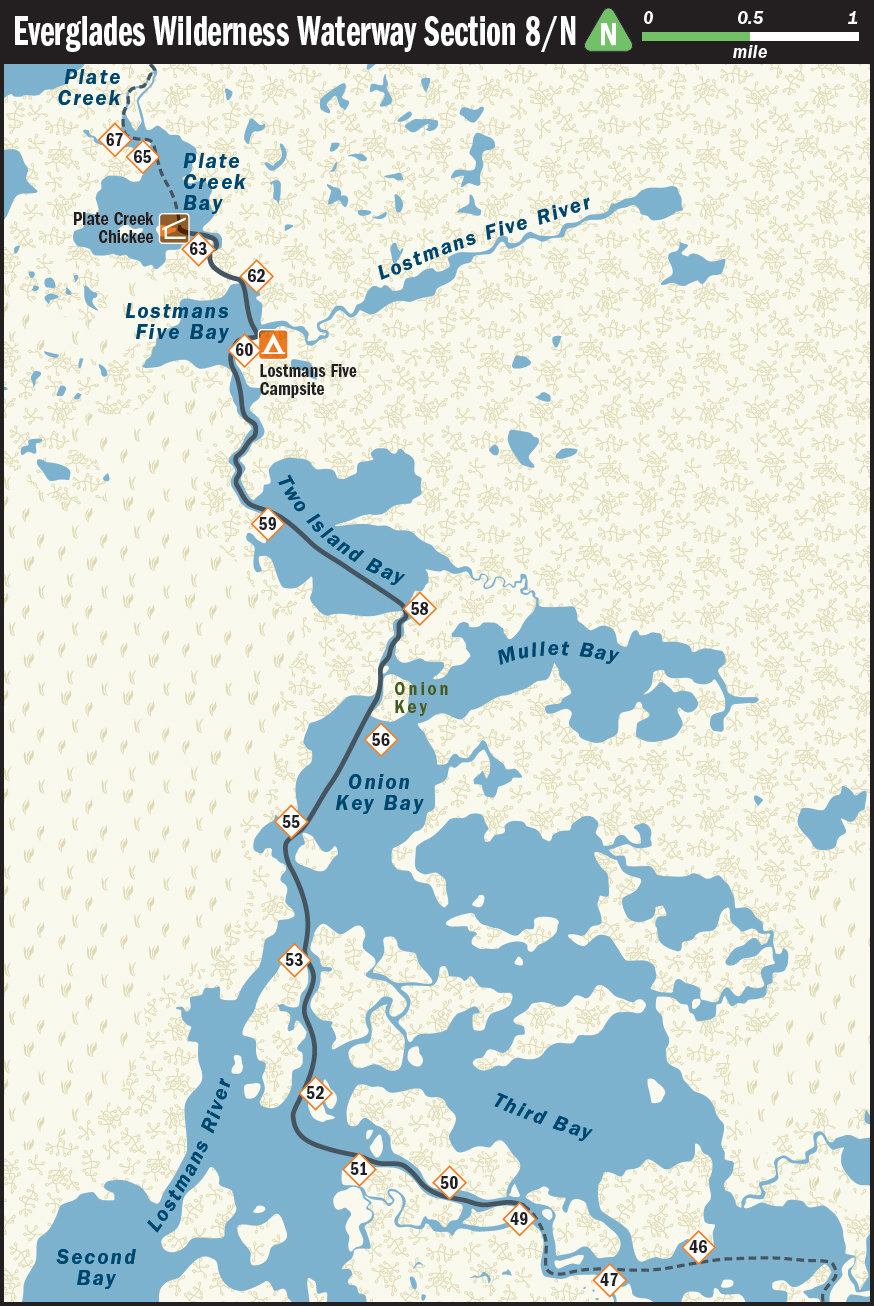
Pass Onion Key, which is a shell mound to your left (east). This spot used to be a campsite but is now closed to the public. Pass marker 56 on your left and cross Onion Key Bay, following the western shore. Paddle southwest past the island in the bay and then southeast to marker 53. Head south between mangrove islands and then southeast toward marker 51 and into a channel between large mangrove islands. Paddle in an easterly direction down the channel to marker 49.
SOUTH TO NORTH: Marker 49 to Lostmans Five Campsite or Plate Creek Chickee
Paddle northwest up the channel from marker 49, passing marker 50 and then 51 at the end of the channel. Continue traveling northwest to marker 52 and then north to 53. (Use your charts to help you through this area if markers are missing.)
You are now entering Onion Key Bay. Stay to the western shoreline of the bay, continuing northeast to marker 56 next to Onion Key, a little shell mound on your right. Pass the mound and enter the channel to reach Two Island Bay and marker 58.
Once in Two Island Bay, turn left and head across the bay in a northwesterly direction. You will pass a peninsula jutting out to your right and a smaller one to your left. You will pass marker 59 to your left as you approach the exit from Two Island Bay.
Pass marker 59 and enter the channel that leads to Lostmans Five Bay. If you are paddling to the Lostmans Five Campsite, look for marker 60 to the north; the campsite sits on the shore, just beyond the marker. In the morning, travel north across the bay to marker 62.
If you are paddling to the Plate Creek Chickee, head north across Lostmans Five Bay to marker 62, which indicates the channel to Plate Creek Bay. The chickee is visible inside the bay, west of marker 63.
SECTION 9/M
MARKER 49/EAST END OF BIG LOSTMANS BAY
Marker 49: N25° 34.561′ W81° 07.438′
East End of Big Lostmans Bay (marker 38): 25° 34.013′ W81° 04.174′
Estimated paddling distance: 3.5 miles
NORTH TO SOUTH: Marker 49 to East End of Big Lostmans Bay
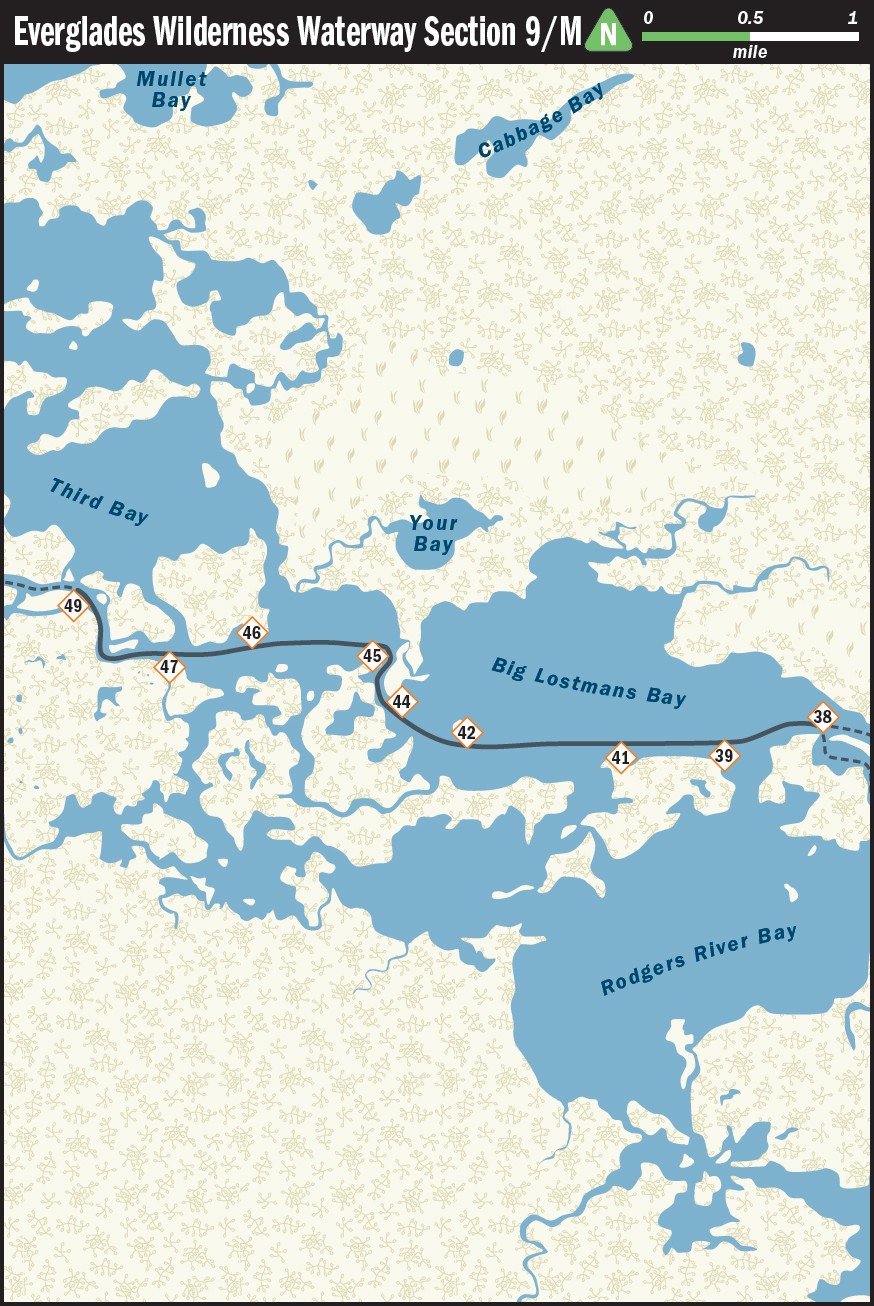
On this leg of your journey, you will be traveling more west to east than north to south. From marker 49, follow the channel as it turns south, then east into an unnamed bay, and pass markers 47 and 46. Be alert for marker 45, which is a little hard to spot on the mangrove shoreline. If the wind is out of the east, this can be a strenuous paddle.
At marker 45, the Waterway takes a sharp turn south to marker 44, which signals the entrance to Big Lostmans Bay. Continue southeast to marker 42 and keep east following the southern shore of Big Lostmans Bay, passing a couple of entrances to Rodgers River Bay on your right. You will pass markers 41 and 39 on your right. Cross the entrance to Rodgers River Bay at marker 39. Paddle northeast to the east end of Big Lostmans Bay (marker 38 on the charts). At this point you will either continue east into Lostmans Creek to go to Willy Willy Campsite, or turn right (southeast) and follow a channel across the easterly end of Rodgers River Bay to go to Rodgers River Chickee.
SOUTH TO NORTH: East End of Big Lostmans Bay to Marker 49
At the east end of Big Lostmans Bay (marker 38), head due west across the southern portion of the bay. You will pass marker 39 and then marker 41 on your left. Continue west until you pass marker 42, and then turn in a more northerly direction to marker 44. Paddle the channel to marker 45 and west across an unnamed bay to marker 47. Enter the channel and paddle west, then north, and then west again to marker 49, where you can see an opening to Third Bay on your right.
SECTION 10/L
EAST END OF BIG LOSTMANS BAY (MARKER 38)/WILLY WILLY CAMPSITE OR RODGERS RIVER CHICKEE
East End of Big Lostmans Bay: N25° 34.013′ W81° 04.174′
Willy Willy Campsite: N25° 34.840′ W81° 03.333′
Rodgers River Chickee: N25° 32.138′ W81° 03.742′
Estimated paddling distance, East End of Big Lostmans Bay/Willy Willy Campsite: 2.5 miles
Estimated paddling distance, East End of Big Lostmans Bay/Rodgers River Chickee: 3.5 miles
NORTH TO SOUTH: East End of Big Lostmans Bay to Willy Willy Campsite or Rodgers River Chickee
If you intend to camp at Willy Willy Campsite, continue east from the end of Big Lostmans Bay (marker 38) into Lostmans Creek.
Follow the left shore of Lostmans Creek and take the third channel left into Rocky Creek, paddle about 1 mile, and then take another left into Rocky Creek Bay. The Willy Willy Campsite will be to the right soon after you enter the bay. Retrace this route in the morning.
If you plan to camp at Rodgers River Chickee, turn right (southeast) at the east end of Big Lostmans Bay (marker 38) and head into the channel that skirts the eastern edge of Rodgers River Bay. Use your charts to navigate this tricky section. Look for marker 37 in the channel. This marker is not indicated on the NOAA or Waterproof navigational charts. You will cross the northeast end of Rodgers River Bay. Paddle southeast and then south when you see marker 35. Pass markers 35, 34, and 32.

At marker 32, turn right (west) into the southeastern portion of Rodgers River Bay.
Rodgers River Chickee will be past seven spits of land, on the right (northern) shore of this part of the bay, about a mile from marker 32. Note: Current navigational charts do not mark the location of this chickee accurately, as it is farther from marker 32 than indicated.
SOUTH TO NORTH: Rodgers River Chickee or Willy Willy Campsite to East End of Big Lostmans Bay
Leaving Rodgers River Chickee in the morning, head east into the sun, and paddle back to marker 32. Turn left (north) and pass markers 34 and 35. This is a tricky spot to navigate, and markers may be missing, so use your charts. At marker 35 you will skirt the eastern edge of Rodgers River Bay. Stay to the right (eastern) side of the channel and travel generally northwest, jogging west, north, west, and north. You will spot Big Lostmans Bay to your left (west) as you come out of this channel.
If you stayed at Willy Willy Campsite, retrace your route in the morning to Big Lostmans Bay, or continue west down Rocky Creek Bay and into the narrow channel that leads to Big Lostmans Bay. This shortcut will save you time and allows you to paddle past a short stretch on your right (north) that is lined with sawgrass. Because mangroves predominate along the Waterway, this is a real treat. When you enter Big Lostmans Bay, marker 41 will be south of your position, so be sure to look for marker 42 to the southwest and proceed northward from there.
SECTION 11/K
WILLY WILLY CAMPSITE OR RODGERS RIVER CHICKEE/MARKER 26
Willy Willy Campsite: N25° 34.840′ W81° 03.333′
Rodgers River Chickee: N25° 32.138′ W81° 03.742′
WW marker 26: N25° 30.097′ W81° 02.434′
Estimated paddling distance, Willy Willy Campsite/ marker 26: 7.5 miles
Estimated paddling distance, Rodgers River Chickee/ marker 26: 4.5 miles
NORTH TO SOUTH: Willy Willy Campsite or Rodgers River Chickee to Marker 26
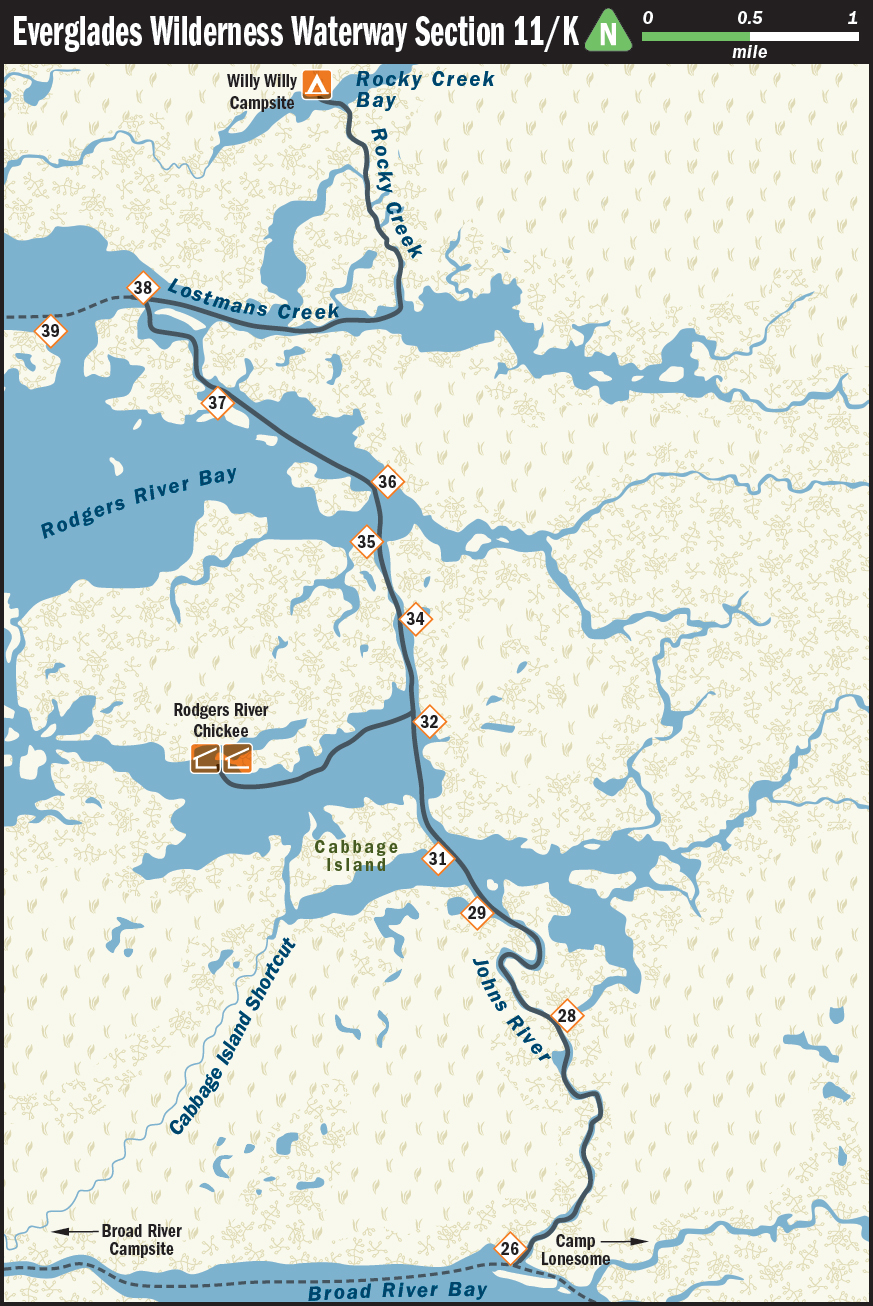
If you stayed at Willy Willy Campsite, return to the east end of Big Lostmans Bay and turn left (southeast), heading into the channel that skirts the eastern edge of Rodgers River Bay. Travel on the eastern side of the islands in the bay. When you pass the large last island, head south into the channel and pass markers 35, 34, and 32. This is a tricky spot to navigate, and some of the markers may be missing, so use your charts.
Note: We provide the GPS coordinates for both markers 36 and 37 in Appendix 7.
If you stayed at Rodgers River Chickee, travel east to return to marker 32. From marker 32 paddle south to marker 31. Cabbage Island will be on your right (west). Continue south past marker 29, along the passage (called Johns River on the Waterproof Charts, unnamed on the NOAA charts) to Broad River Bay, which is really a wide place in the Broad River, at marker 26.
SOUTH TO NORTH: Marker 26 to Rodgers River Chickee or Willy Willy Campsite
At marker 26, turn north leaving Broad River Bay through Johns River (not named on the NOAA charts). Stay to the left when the river branches. You will cross an unnamed bay at marker 29. Pass marker 31, and enter the channel with Cabbage Island to your left (west). As you pass Cabbage Island, continue north, staying close to the right (eastern) shoreline until you reach marker 32. (See for more on Cabbage Island.)
If you plan to stay at Rodgers River Chickee, turn left (west) at marker 32 and head into the bay. The Rodgers River Chickee will be about 1 mile down on the right (northern) shore of this part of the bay, past 7 small projections of land.
Note: The location of the Rodgers River Chickee is not marked accurately on the NOAA or Waterproof navigational charts; it is farther west into the bay than indicated.
If you plan to stay at Willy Willy Campsite, continue north past markers 32, 34, and 35. Continue north and then northwest along the channel that skirts the east side of Rodgers River Bay. Check your charts, as this section is tricky to navigate and markers have been missing. At the end of this channel you will see Big Lostmans Bay to your left. Turn right and enter Lostmans Creek. Take the third channel on your left (north), and paddle into Rocky Creek for about 1 mile until it opens onto Rocky Creek Bay. Turn left down Rocky Creek Bay and you will, after a short paddle, spot Willy Willy Campsite on your right.
SECTION 12/J
MARKER 26/CAMP LONESOME OR BROAD RIVER CAMPSITE
Marker 26: N25° 30.097′ W81° 02.434′
Camp Lonesome: N25° 29.292′ W80° 59.994′
Broad River Campsite: N25° 28.748′ W81° 08.534′
Estimated paddling distance, marker 26/Camp Lonesome: 3.5 miles
Estimated paddling distance, marker 26/Broad River Campsite: 6.5 miles
NORTH TO SOUTH: Marker 26 to Camp Lonesome or Broad River Campsite
If you plan to stay at Camp Lonesome, a ground site, turn left (east) at marker 26 and follow the Broad River east to the campsite. Stay to the right (south) side of the Broad River because a number of small channels enter into the river from the left (north). Just after you pass the Wood River on your right, the Broad River will branch. Turn into the left (northeast) branch and you will soon see Camp Lonesome on the left bank of the river. You won’t be able to see it until you’re practically in front of it. In the morning, retrace your route to marker 26 and paddle west, then southwest, to the Broad River Campsite.
If you are bypassing Camp Lonesome to stay at the Broad River Campsite, turn right (west) at marker 26 into Broad River Bay, which funnels into the Broad River.
As you paddle southwest down the Broad River, you will not pass any markers for approximately 5 miles until you reach marker 25. Just before the marker, however, you will see the Broad River Campsite on the southern (left) shore of the Broad River. This ground site is a good place from which to start paddling The Nightmare in the morning, if the tides allow.
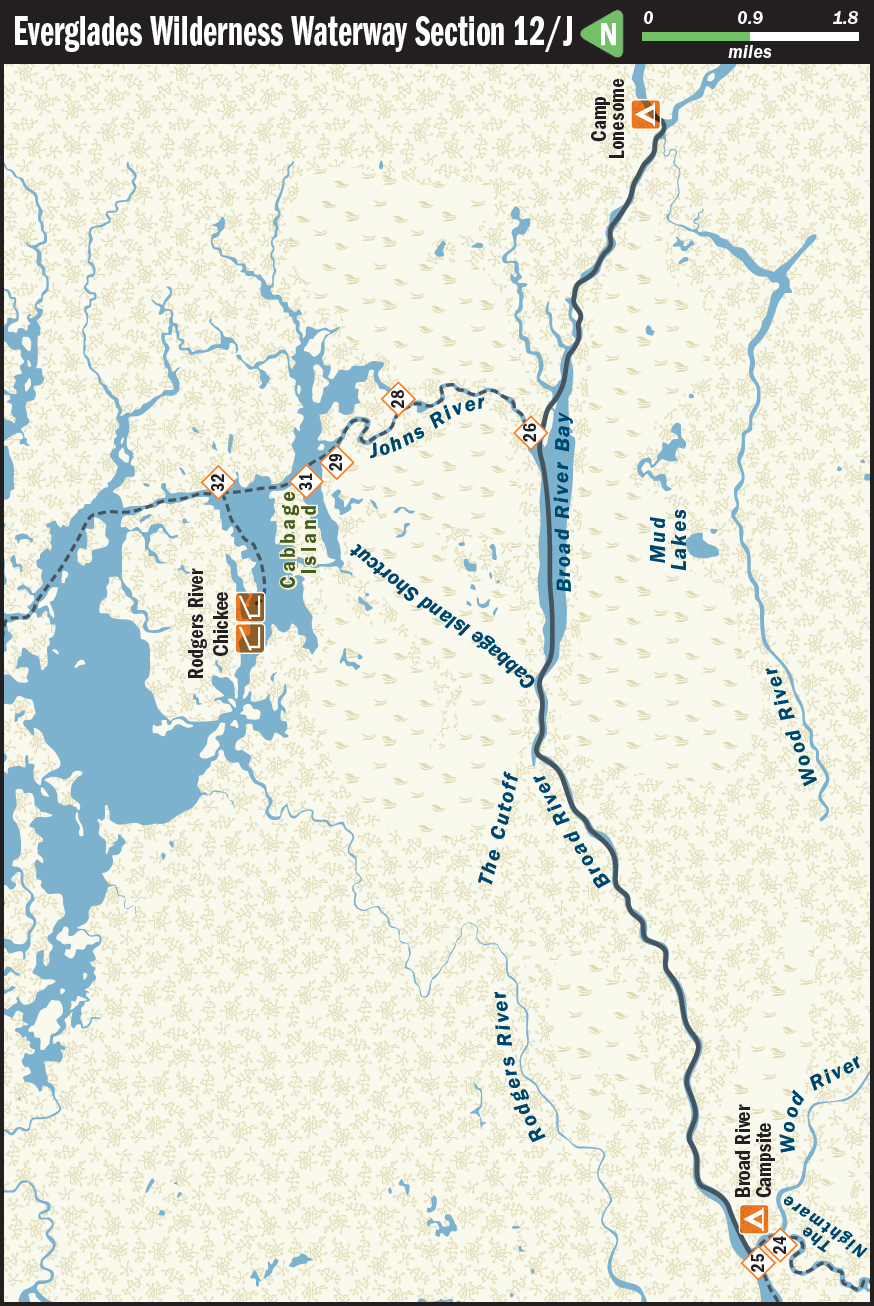
SOUTH TO NORTH: Broad River Campsite to Marker 26 or Camp Lonesome
From the Broad River Campsite, paddle northeast up the Broad River for approximately 4.5 miles, where the Broad River makes a sharp bend right (east) and in 0.5 mile widens into Broad River Bay. Travel about 1.5 miles along the bay, angling in a northeasterly direction to find marker 26 where you leave the bay. This channel is called Johns River on the Waterproof Charts; it is not named on the NOAA charts.
To Camp Lonesome, continue southeast for about 3 miles on the Broad beyond marker 26. Keep right, on the south side of the Broad River, to avoid being confused by small channels entering from the left (north). Immediately after the Wood River enters on the right, follow the left (northeast) branch of the Broad. Camp Lonesome will quickly appear on your left.
In the morning, follow the Broad River back the way you came and, once in Broad River Bay, look for marker 26 at the end of the island where the Broad River enters the bay. Turn right (north) into Johns River.
SECTION 13/I
BROAD RIVER CAMPSITE & HIGHLAND BEACH EXCURSION
Broad River Campsite: N25° 28.748′ W81° 08.534′
Highland Beach: N25° 28.677′ W81° 11.079′
Estimated paddling distance (round-trip): 8 miles
NORTH TO SOUTH and SOUTH TO NORTH: Broad River Campsite to Highland Beach to Broad River Campsite
The enticing option here is to spend time at Highland Beach. You may paddle over to it as an excursion from the Broad River Campsite (or from nearby marker 25). Or you may want to spend a night on this Gulf of Mexico shore before or after doing The Nightmare. Either way, paddle westward on the Broad River until you reach the Gulf, watching for navigation markers at the left (south) side of the mouth of the river. These markers alert you to the channel that leads through the islands at the mouth of the river, a passage that helps you avoid the oyster beds. Once in the Gulf and clear of the oysters, turn right (north) and paddle up the coast.

Continue until you find any spot on the beach that suits you for stretching your legs, some beachcombing, or simply lazing about. You might even consider spending an extra day and night at Highland Beach. You will have a choice spot for watching the sun set into the tranquil horizon in this part of the world.
In the morning, retrace your paddle south along the Gulf and then east into the Broad River, carefully following the channel markers.
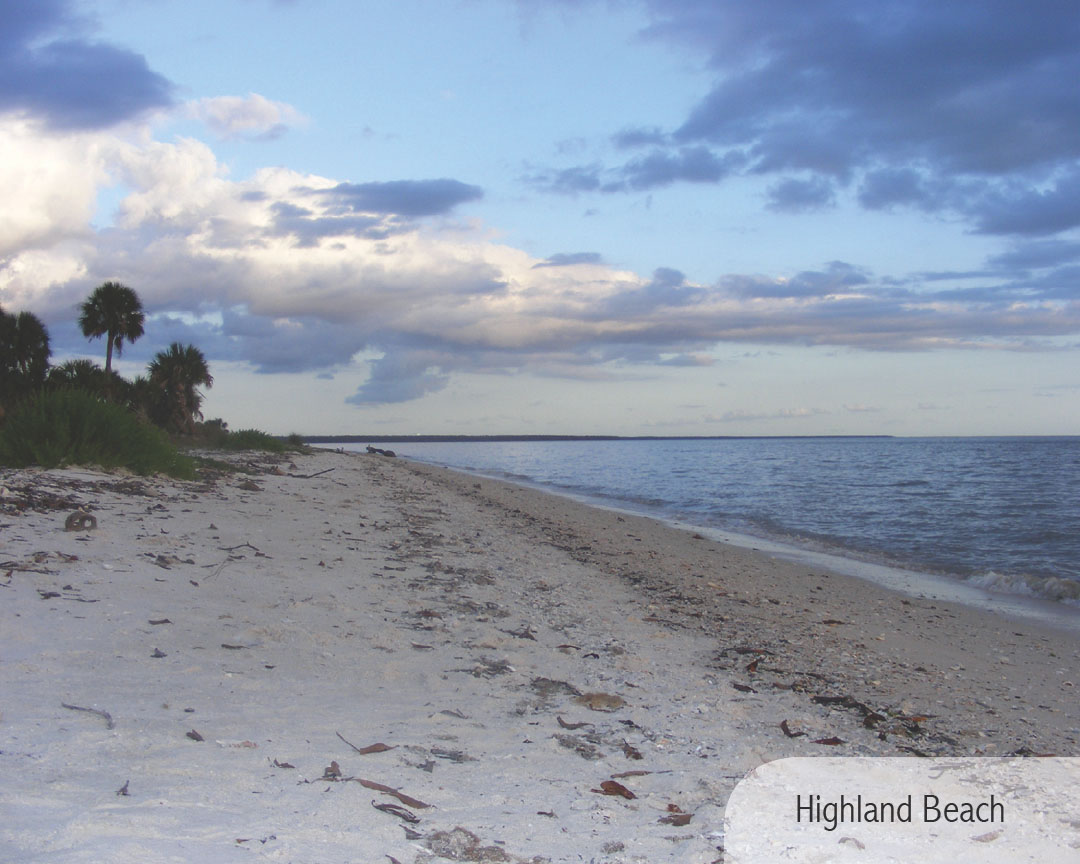
SECTION 14/H
BROAD RIVER CAMPSITE/HARNEY RIVER CHICKEE VIA THE NIGHTMARE
Broad River Campsite: N25° 28.748′ W81° 08.534′
Harney River Chickee (marker 12): N25° 25.953′ W81° 05.464′
Estimated paddling distance: 8.5 miles
NORTH TO SOUTH: Broad River Campsite to Harney River Chickee via The Nightmare
From the Broad River Campsite, paddle southwest on the Broad River a short distance to marker 25 on the left (south), indicating the entrance to the Wood River, which you will follow for a little more than 0.25 mile to its divergence at the entrance to The Nightmare.
Or, from Highland Beach, retrace your paddle south down the Gulf, and enter the Broad, heading eastward, where you will travel for about 1.5 miles to marker 25 on the right (south). Turn into the Wood River and you will shortly see marker 24 on your right (southwest), which indicates the start of The Nightmare.
Note: You cannot paddle The Nightmare at low tide. You will get stuck. If the tide is too low, either wait until the tide comes in or go out to the Gulf and paddle south to the Harney River, where you will turn left (east), continuing up the river to marker 12 and the Harney River Chickee.
With its narrow, twisting channel that is impossible to get through at low tide; confusing to navigate at extreme high tide; and crisscrossed by low mangrove branches, fallen trees, and spiderwebs at all tides and times, The Nightmare has certainly earned its name.
In spite of its challenges (and because of them), The Nightmare is lovely, with water the creamy color of café au lait and lush with vegetation and bird life. If you are the morning’s first traveler through this narrow, winding passage, you will have the honor of breaking all the spiderwebs.

There may be times when you will be uncertain if you are still on the main channel, so look for evidence of cut branches, which indicate that someone in the past may have worked to clear the passage. You won’t get lost if you remember to keep right, keep right, keep right, except where markers indicate passages to the Gulf. Pass those by.
A little more than halfway through The Nightmare you will see marker 23, which indicates the first passage out to the Gulf. Later 21 and 19 mark the second, and then 17 indicates the junction of The Nightmare with Broad Creek. Turn left (east) into Broad Creek. (A right turn would take you out to the Gulf.)
The creek starts out as an easier paddle than The Nightmare, but it soon narrows into a passage equally twisting and challenging. At least you won’t have to worry here about being stranded at low tides. The creek turns southwesterly at marker 16, and then southeasterly at marker 14, where the channel opens a bit. You will reach the Harney River and the Harney River Chickee at marker 12. The marker is nailed to the chickee.
SOUTH TO NORTH: Harney River Chickee to Broad River Campsite via The Nightmare
To paddle Broad Creek and The Nightmare, turn northwest into the channel on the back side of the Harney River Chickee. Follow this channel and turn right (northeast) at marker 14. Unlike paddling The Nightmare, you can paddle Broad Creek at any tide, but take care not to hit The Nightmare at low tide because it will be impassable.
At marker 16 turn left (west), following Broad Creek to marker 17, which marks the entrance to The Nightmare. If you are near low tide at this point, you could decide to continue west past marker 17 to the Gulf, and then head north up the Gulf Coast to the Broad River, rather than risk getting stuck.
To paddle The Nightmare, take the right (northwest) channel at marker 17. The Nightmare is a narrow, twisting passage that winds in a northerly direction. It has earned its name for the work you will have to do ducking under and passing over mangrove branches and roots, but the beauty of the foliage and company of waterbirds will be your reward.
There may be times when you will be uncertain if you are still on the main channel, especially when water is high and the channel has spread into the mangroves. You can look for weathered ends of cut branches, which indicate that at some time, someone cleared the passage. Generally, just keep left, keep left, keep left, bypassing markers 19, 21, and 23, which mark passages to the Gulf. Continue to marker 24 at The Nightmare’s end at the Wood River. Turn left (north) and you will arrive quickly at marker 25 and the Broad River.
Turn right (northeast) up the Broad, and the Broad River Campsite will soon appear on your right.
SECTION 15/G
HARNEY RIVER CHICKEE/MARKER 9 OR CANEPATCH CAMPSITE
Harney River Chickee (marker 12): N25° 25.953′ W81° 05.464′
Marker 9: N25° 24.903′ W81° 00.441′
Canepatch Campsite: N25° 25.317′ W80° 56.619′
Estimated paddling distance, Harney River Chickee/marker 9: 5.5 miles
Estimated paddling distance, Harney River Chickee/Canepatch Campsite: 9.5 miles
NORTH TO SOUTH: Harney River Chickee to Marker 9 or Canepatch Campsite
Leave the Harney River Chickee and turn left, traveling east along the Harney River. Navigating this river is relatively easy as you follow the course of the river for approximately 8 miles, but be aware that the Harney can be a challenge to paddle if the wind is out of the east and you face the headwind, the tide, and the river’s current. If the wind is from the west, however, the Harney is a breeze—but then the Shark River can be challenging.
You will soon see marker 11, which indicates where the North Harney River branches off to the left. Pass marker 11 and continue straight along the main course of the Harney. You will see several water-monitoring stations along the Harney’s banks.
About 5 miles after you leave the Harney River Chickee, you will come to marker 9 indicating the western end of Tarpon Bay. Turn right (south) onto the Shark River.
If you plan to stay at Canepatch Campsite, enter Tarpon Bay rather than turning south at marker 9. Paddle east across Tarpon Bay until it divides at a large island. Take the right (south) branch of the bay until you see ahead of you a peninsula that points toward you from the eastern end of the bay. Go left of the peninsula into Avocado Creek, very narrow and clear. Paddle a little over 1 mile up this creek until you come to a small lagoon. Canepatch Campsite sits on the left. In the morning, retrace your route to marker 9 and head south into the Shark River.
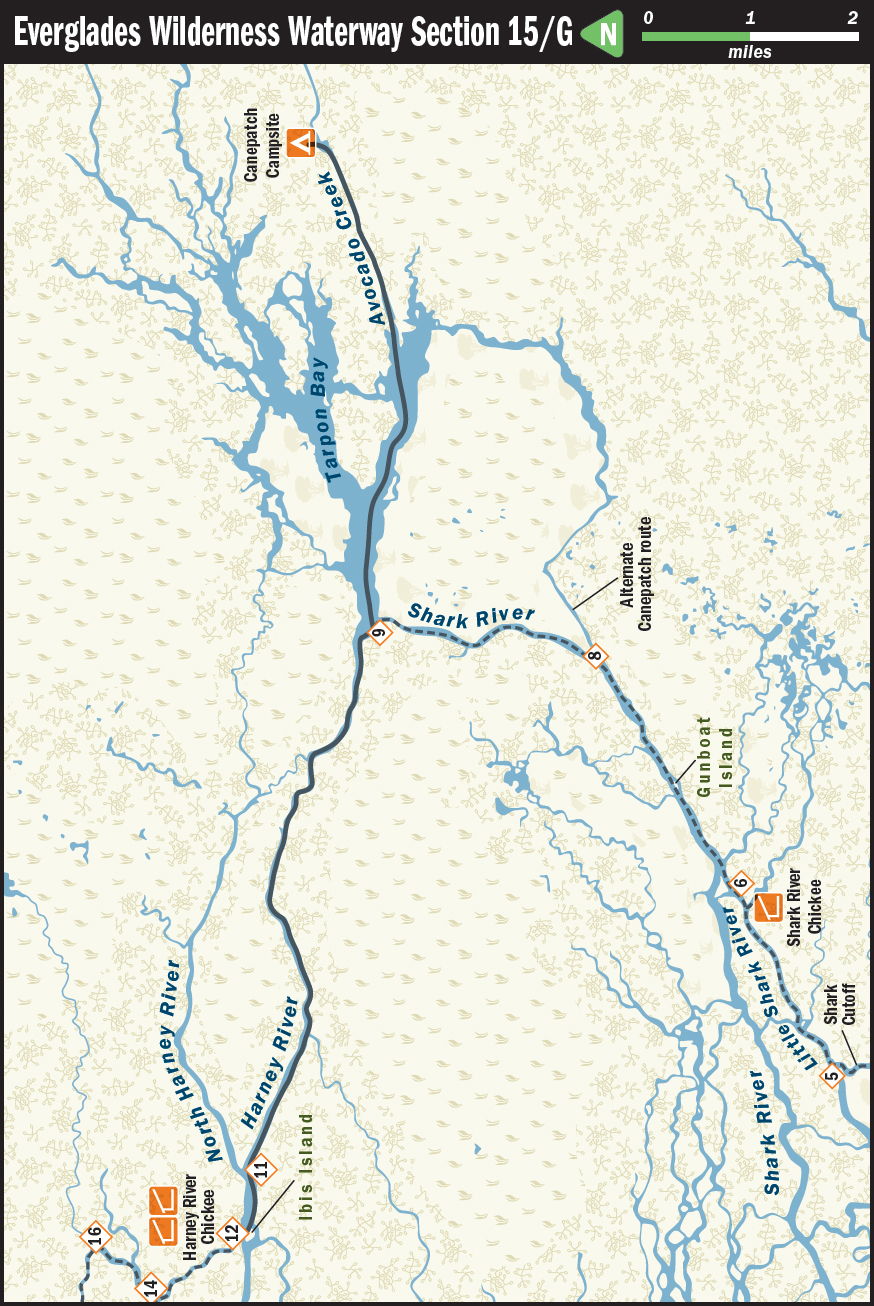
SOUTH TO NORTH: Canepatch Campsite or Marker 9 to Harney River Chickee
If you stayed at Canepatch Campsite, retrace your path in the morning, traveling west along Avocado Creek and Tarpon Bay to marker 9.
At marker 9 continue west along the Harney River for approximately 5.5 miles. Do not take the channels that branch off to the right, but stay in the main body of the Harney. You will finally see marker 11 and, 0.5 mile farther, marker 12 attached to the Harney River Chickee. Be sure to pass to the right of Ibis Island in the middle of the Harney, or you might miss the chickee and marker 12.
SECTION 16/F
MARKER 9 OR CANEPATCH CAMPSITE/ SHARK RIVER CHICKEE
Marker 9: N25° 24.903′ W81° 00.441′
Canepatch Campsite: N25° 25.317′ W80° 56.619′
Shark River Chickee: N25° 22.180′ W81° 02.804′
Estimated paddling distance, marker 9/Shark River Chickee: 4.5 miles
Estimated paddling distance, Canepatch Campsite/Shark River Chickee: 8.5 miles
NORTH TO SOUTH: Marker 9 or Canepatch Campsite to Shark River Chickee
From marker 9, paddle south to pass marker 8 on your left, and continue on to Gunboat Island in the middle of Shark River. The island’s shape suggests a boat heading upriver—thus its name. You can paddle either side of it, depending on which side gives you relief from the wind if that has been a problem. In another 1.5 miles the main branch of the Shark breaks off to the right, but stay to the left on the Little Shark River, passing marker 6.

Continue down the Little Shark a short way to the first side channel that branches to the left. Take this channel to the Shark River Chickee, which is quickly visible.
If you are traveling from Canepatch Campsite, paddle west back along Avocado Creek into Tarpon Bay and travel 2.5 miles across the bay to marker 9. Turn left (south) at marker 9 and paddle down the Shark River, passing marker 8 and Gunboat Island.
When the Shark River branches off to the right, continue straight down the Little Shark River. Pass marker 6 and take the next channel to the left. The Shark River Chickee lies just down this channel on the right shoreline.
SOUTH TO NORTH: Shark River Chickee to Marker 9 or Canepatch Campsite
When leaving the Shark River Chickee, rejoin the Little Shark River, turning right (northeast). Soon after marker 6, the Little Shark River joins the Shark River, which comes in on the left. You will be traveling in a northeasterly direction and will pass Gunboat Island and then, in a little more than 1 mile, marker 8, where the Shark River takes a more northerly turn to the left. You will pass water-monitoring stations as you continue to marker 9, where the Shark River meets the Harney River at Tarpon Bay.

As a northbound traveler, if you are heading to Canepatch Campsite to break up your journey before you paddle to marker 9, you may want to take the unnamed channel that branches to the right (northeast) at marker 8 (see Section 15/G map). This channel courses 1 mile northeast, turns right, and continues 1 mile southeast, then turns left (northeast, again) for a little more than a mile, and then left (north) for over another mile. You will enter Tarpon Bay close to the spot where Avocado Creek leads east to Canepatch. Check your charts. This route variation is not difficult to follow. Of course, you can always continue on the Shark directly to marker 9 and then turn right into Tarpon Bay and east to Avocado Creek and Canepatch Campsite.
SECTION 17/E
SHARK RIVER CHICKEE/OYSTER BAY CHICKEE
Shark River Chickee: N25° 22.180′ W81° 02.804′
Oyster Bay Chickee: N25° 19.410′ W81° 03.981′
Estimated paddling distance: 5 miles
NORTH TO SOUTH: Shark River Chickee to Oyster Bay Chickee
From Shark River Chickee, return to the main channel of the Little Shark River. Paddle left (southwest) to marker 5, where you turn left (south) into the Shark Cutoff. At marker 3 you enter the northeast end of Oyster Bay. Paddle in a southeasterly direction, watching for marker 2.

The historical Wilderness Waterway crosses Whitewater Bay at this point. We do not recommend this route, as it involves crossing approximately 12 miles of open water, where you will have to deal with motorboaters and the wind and waves. Whitewater Bay has earned its name.
Instead, head southwest from Wilderness Waterway marker 2 into Oyster Bay and pass between USCG marker 48 to the east and USCG marker 50 to the west. Tucked in behind mangroves, Oyster Bay Chickee sits in a cove on the west side of the island that lies 0.5 mile directly south of USCG marker 50. This chickee is hard to spot as it is hidden in a cluster of islands and not clearly marked on the NOAA charts or the Waterproof Charts. Look for the arrow on the NOAA chart 11433 to help locate this chickee.
SOUTH TO NORTH: Oyster Bay Chickee to Shark River Chickee
When leaving Oyster Bay Chickee, travel 0.5 mile farther north and you will see the USCG markers that indicate the route from the Gulf of Mexico east to Whitewater Bay. Pass between USCG marker 48 to your right (east) and USCG marker 50 to your left (west). Particularly on weekends, motorboaters follow these markers to and from Whitewater Bay.
Directly north of USCG marker 48 is Wilderness Waterway marker 2. Paddle northeast through this channel, and then maintain a northwest course as you cross the northern portion of Oyster Bay. Marker 3 indicates the entrance to the Shark River Cutoff.
Follow the cutoff until it merges with the Little Shark River at marker 5. Turn right (northeast) into the Little Shark. Continuing up the river you will pass a stream that crosses the Little Shark. Continue on the Little Shark until the second stream. Turning right (southeast) onto this channel, you will see the Shark River Chickee immediately on your right.
SECTION 18/D
OYSTER BAY CHICKEE/JOE RIVER CHICKEE
Oyster Bay Chickee: N25° 19.410′ W81° 03.981′
Joe River Chickee: N25° 16.789′ W81° 03.942′
Estimated paddling distance: 4 miles
NORTH TO SOUTH: Oyster Bay Chickee to Joe River Chickee
Paddle south down Oyster Bay, and keep heading south until you reach the southern end of this bay. Because this section is not identified by Wilderness Waterway markers, you will need to rely on your compass and charts. Conditions with winds and waves can pose obstacles in this section of your thru-paddle. If necessary, hug the shoreline to get some relief behind the islands. Generally, you’re more likely to get a calm paddle in the morning rather than later in the day.
At the south end of Oyster Bay, Mud Bay lies to the southwest and the Joe River to the southeast. Look for the Manatee Zone sign on your left, marking the entrance to the Joe River. Shortly, you will see the Joe River Chickee in a cove to your left (north).
SOUTH TO NORTH: Joe River Chickee to Oyster Bay Chickee
Paddle out of the Joe River Chickee’s little cove, turning right and rejoining the Joe River. Very soon at the mouth of the Joe River, which is marked by a MANATEE ZONE sign, Mud Bay opens to your left (southwest) and the expanse of Oyster Bay to your right (north).
In this unmarked area with many islands, use your compass and navigational charts to travel north up Oyster Bay and, if the winds and waves are strong, keep close to the shore to your right, getting some protection in the lee of the islands.
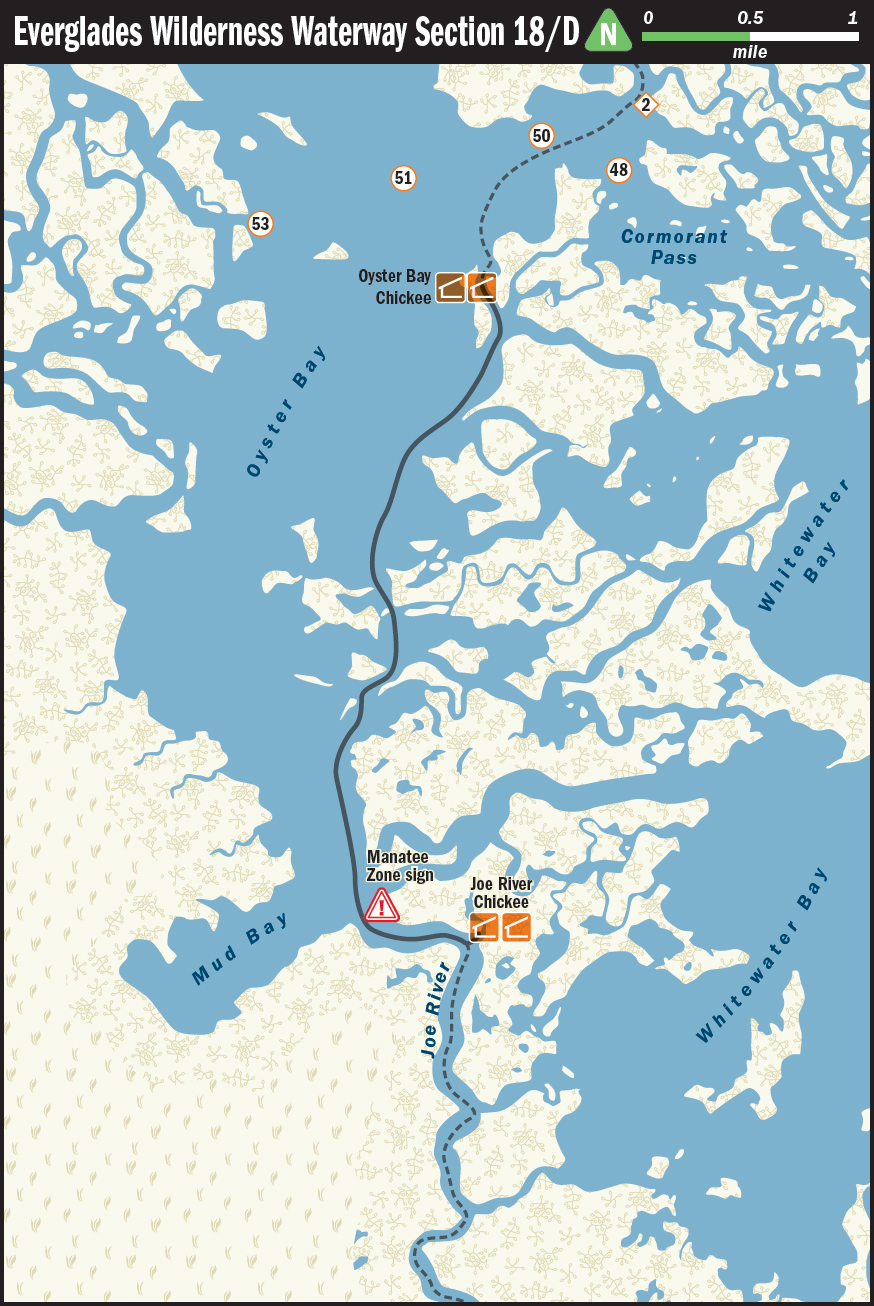
A note about mangroves: It’s hard to differentiate one mangrove island from another when you’re paddling because they often look just like the shoreline until you get close to them. (Also see “Mangrove,”.)
Approximately 3.5 miles north on Oyster Bay on the right, Oyster Bay Chickee is somewhat hidden among mangrove islands, and the NOAA charts and Waterproof Charts are a bit confusing as to its location. Note the location arrow on the NOAA Whitewater Bay Chart 11433. Note: If you reach USCG marker 50, you have passed the chickee. Turn around and head 0.5 mile directly south from the marker to the first island you come to. The chickee is tucked in a cove on the western side of that island.
SECTION 19/C
JOE RIVER CHICKEE/SOUTH JOE RIVER CHICKEE
Joe River Chickee: N25° 16.789′ W81° 03.942′
South Joe River Chickee: N25° 13.320′ W81° 00.641′
Estimated paddling distance: 6.5 miles
NORTH TO SOUTH: Joe River Chickee to South Joe River Chickee
From the Joe River Chickee, exit the cove and turn left, continuing down the Joe River traveling south-southeast. The Joe River is wide, and there is a good chance that you will pass motorboaters, so stay to the right. All of the cutoffs you encounter will be to the left (north); these are channels that connect the Joe River to Whitewater Bay. The potential difficulty of paddling this stretch is that you may encounter a headwind and/or experience strong crosscurrents and winds from Whitewater Bay as you pass the channels.
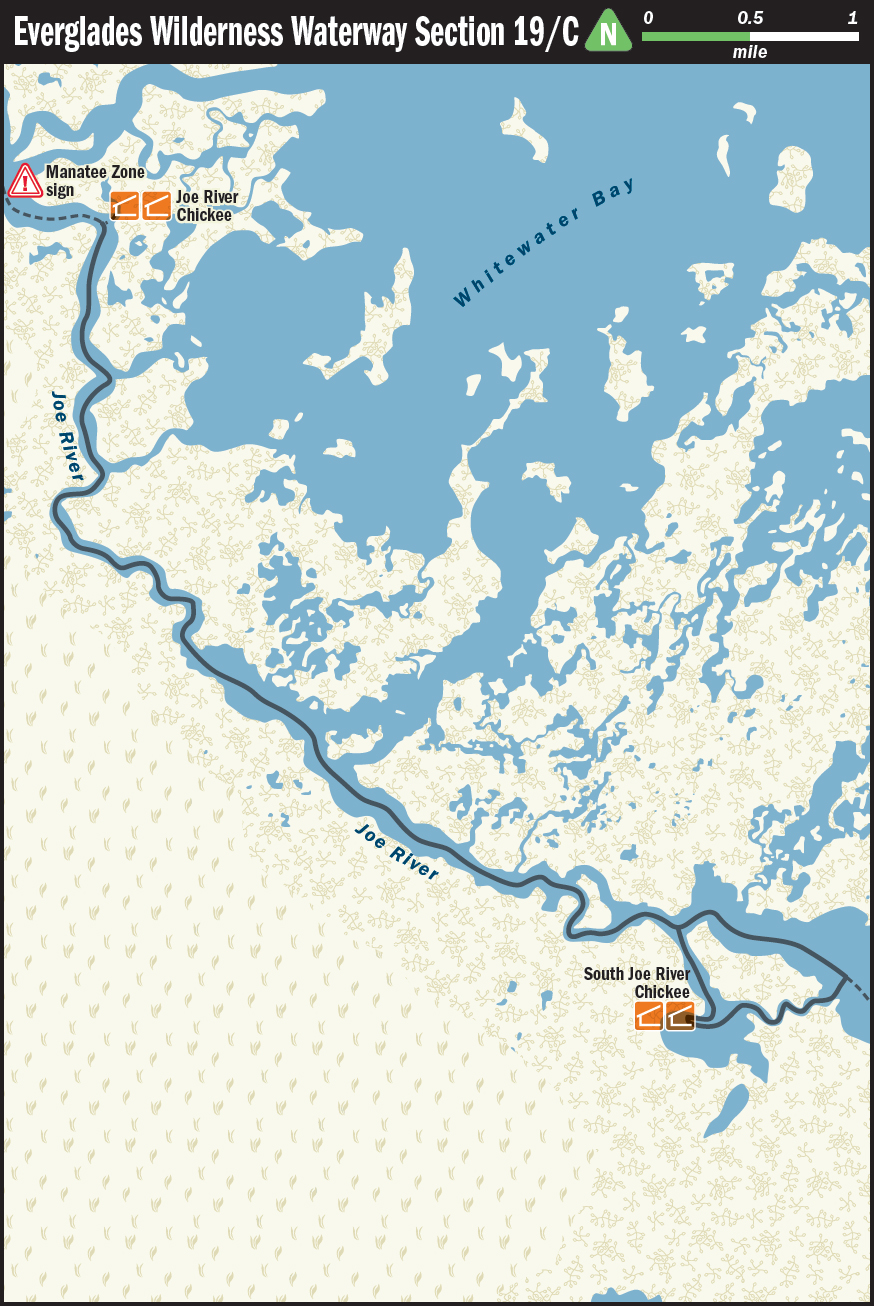
It is approximately 6.5 miles between the Joe River Chickee and the South Joe River Chickee. The only bit of tricky navigation before you reach the South Joe River Chickee is finding the entrance to the bay where the chickee is located. Watch for a channel that branches off to the right (south) and takes you behind a large mangrove island to the bay. Once inside the bay, you will see the chickee in the northwest corner.
If you miss the first channel, take the next right (south) turn. If you see a MANATEE ZONE sign on the left (north) side of the Joe, you have gone a bit too far. Turn back and take the first channel to the left. (Always keep in mind, however, that signs appear and disappear out here. They must not be your only indicators.)
SOUTH TO NORTH: South Joe River Chickee to Joe River Chickee
Leave the South Joe River Chickee via the left (northwest) channel to rejoin the Joe River. Turn left (northwest) and continue up the Joe, traveling approximately 6 miles before coming to the Joe River Chickee. Navigating is easy because all of the cutoffs—channels leading to Whitewater Bay—will be to the right (north). Nevertheless, depending on conditions, this can be a challenging paddle with high winds and crosscurrents at the inlets.
The Joe River Chickee is a double chickee, visible from the Joe, in a little cove on the right (north) side of the river.
SECTION 20/B
SOUTH JOE RIVER CHICKEE/TARPON CREEK
South Joe River Chickee: N25° 13.320′ W81° 00.641′
Tarpon Creek: N25° 12.708′ W80° 55.857′
Estimated paddling distance: 6.5 miles
NORTH TO SOUTH: South Joe River Chickee to Tarpon Creek
Return to the Joe River, turn right, and continue paddling southeast. When the Joe River turns east, it widens progressively until you reach the entrance to Tarpon Creek. If you paddle on a windy day, take care, especially if the wind is against you, as this is open water. We once had to paddle this section on a day with a small-craft advisory. It was a serious challenge. Watch for USCG marker 10 at the entrance to Tarpon Creek.
SOUTH TO NORTH: Tarpon Creek to South Joe River Chickee
At USCG marker 10, Tarpon Creek opens onto the Joe River to the left (west) and Whitewater Bay to the north.
Navigational charts show the Everglades Wilderness Waterway crossing the open waters of Whitewater Bay. We do not recommend paddling that route, which involves crossing approximately 12 miles of open water, where you will have to deal with motorboaters and often rough waters. The Seminole name wiwahatki combines wiwa, meaning “water,” with hatki, meaning “white.” The word whitewater aptly describes this often windy bay.
Instead, paddle directly west (left) from USCG marker 10 onto the Joe River, which is wide at this point. This may be a difficult, wavy paddle if the wind is up and against you.
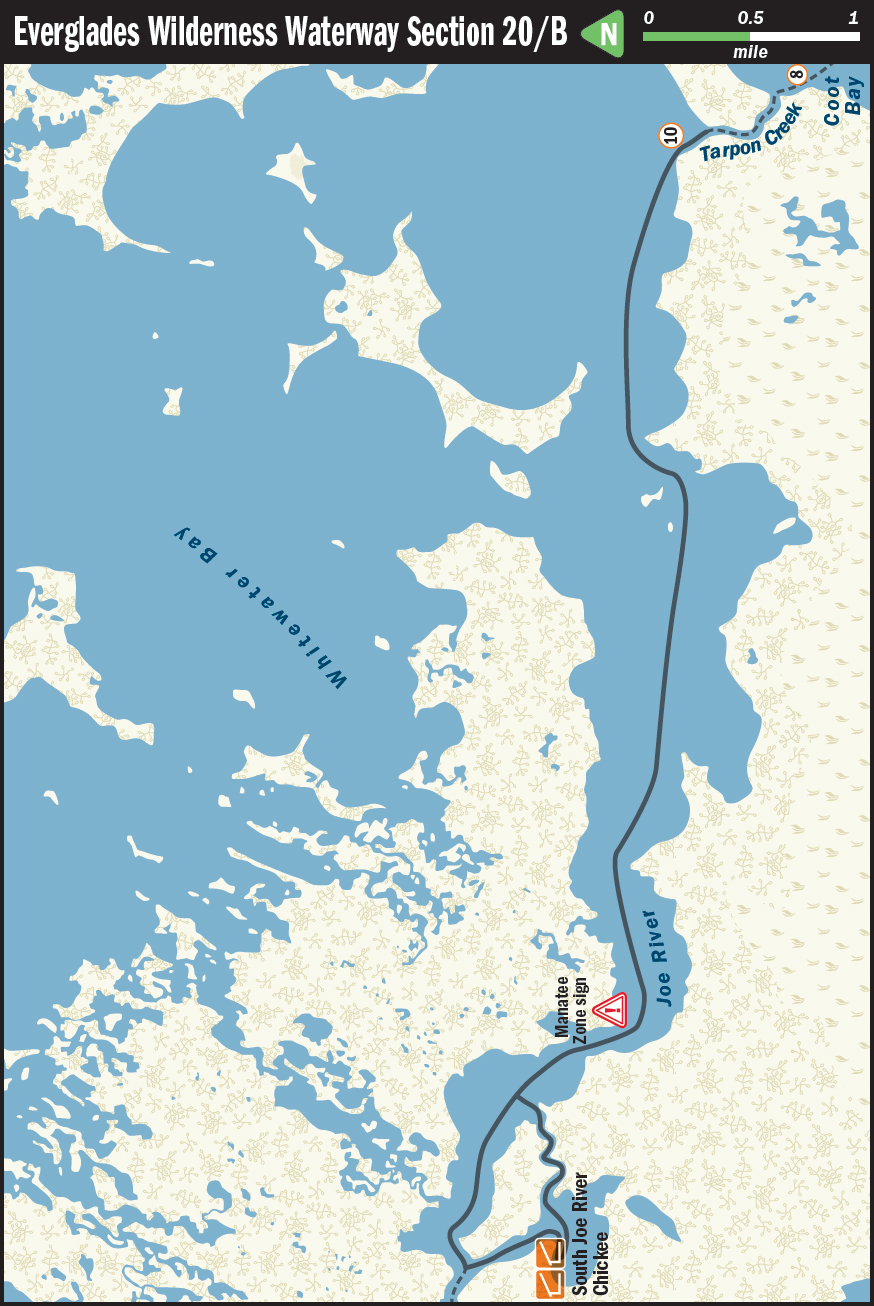
Monitor your navigational chart as you paddle approximately 6 miles on the Joe River. Take the channel that cuts off to the left (west) and leads behind a large mangrove island to the South Joe River Chickee. A MANATEE ZONE sign on the right (northern) shore of the Joe River indicates that your channel will shortly appear on your left. If you miss this channel, look for the next. You will loop behind the same mangrove island. The South Joe River Chickee is positioned on the northwest side of the small bay behind the island. You cannot see the chickee until you are in the bay.
SECTION 21/A
TARPON CREEK/FLAMINGO
Tarpon Creek: N25° 12.708′ W80° 55.857′
Flamingo: N25° 08.624′ W80° 55.354′
Estimated paddling distance: 5 miles
NORTH TO SOUTH: Tarpon Creek to Flamingo
Watch for USCG marker 10 at the entrance to Tarpon Creek. Paddle south down the creek to USCG marker 8, where the creek enters Coot Bay. USCG markers 6 to 3 lead southeast across the bay, and USCG markers 2 and 1 (a green floating barrel) indicate the entrance to the Buttonwood Canal.
Continue south through the canal. You may pass motorboaters, possibly a park service tour boat, and paddlers who have rented canoes from the concessionaire in Flamingo. Use caution and keep to the right. When you see these boaters out for a couple of easy hours, you will feel a sense of satisfaction in having spent more than a week paddling deep in the Everglades wilderness.
The Buttonwood Canal is a slow, easy paddle after what you’ve accomplished. Enjoy it. Admire the air plants. Notice the limestone to your right, the bedrock of the Everglades. Just before the Park Road Bridge, look for one of the resident American crocodiles that may be sunning on the bank to your right. (See more on limestone, and the American crocodile.)
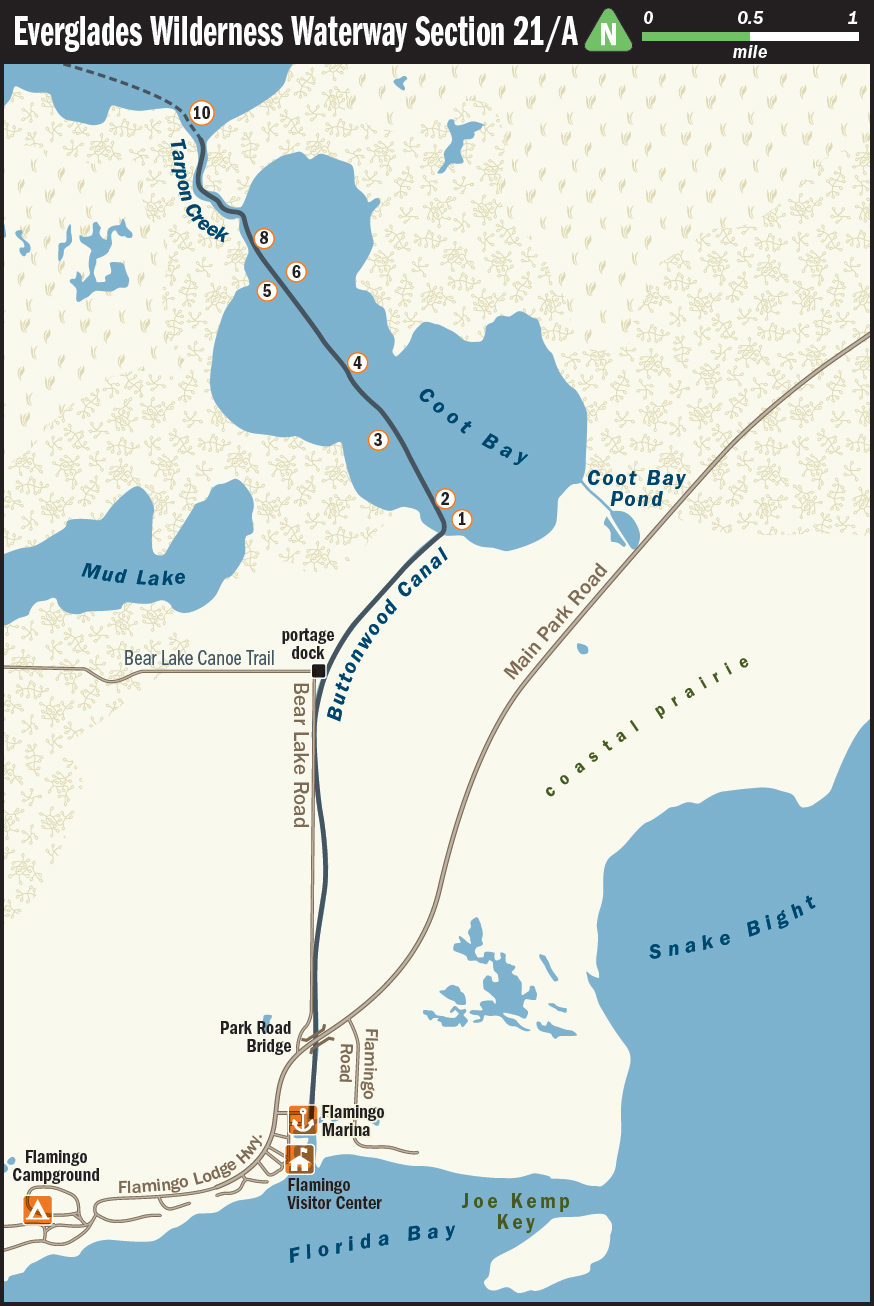
After paddling under the bridge, take out your boat at the Flamingo marina docks, the final point of your journey along the Everglades Wilderness Waterway.
SOUTH TO NORTH: Flamingo to Tarpon Creek
Launching at Flamingo, you will have the convenience of floating docks to facilitate loading. Be careful if you use the boat ramp, as it is slippery with algae.
As you leave the launch, head north, straight up the Buttonwood Canal. Stay to the right, as you may pass motorboaters, possibly a park service tour boat, and paddlers who have rented their boats from the Flamingo concessionaire. On your left, you will see limestone formations and possibly a resident American crocodile sunning itself on the left bank. (See more on limestone, and the American crocodile.)
When you exit the Buttonwood Canal onto Coot Bay you will see USCG marker 1 painted on a green floating barrel, as well as USCG marker 2. Paddle northwest across Coot Bay following USCG markers 3–6 to marker 8, which, along with a No WAKE/MANATEE ZONE sign, marks the entrance to Tarpon Creek.
Paddle Tarpon Creek north to USCG marker 10, where the creek opens onto the Joe River to the left (west) and Whitewater Bay to the north.
MAP 22: The Historical Route
At the southern end of the original 100-mile Wilderness Waterway route, northbound paddlers are directed to cross Whitewater Bay between USCG markers numbered from 10 to 48 to Wilderness Waterway marker 2. For southbound paddlers, it’s between USCG markers numbered from 48 to 10. The NOAA charts and Waterproof Charts, as well as the Truesdell guidebook, show this route. However, paddling across Whitewater Bay is not recommended: it involves crossing approximately 12 miles of wide and open water where the winds and waves can be hazardous and conditions can change rapidly. A safer trip that avoids Whitewater Bay, the Joe River route, is described in the text and maps for sections 18/D–20/B in this guidebook.

The Joe River and South Joe River chickees were constructed and placed with paddlers in mind (though they are also open to motorboaters). The intent was to locate the sites off the more heavily traveled route and provide some seclusion. We are including a map of the original route here for reference.
The first and second editions of William G. Truesdell’s guidebook