Now that you’ve walked through the SAP system, let’s turn our attention to the ABAP environment. In this chapter, we’ll introduce native IDE and the Eclipse IDE plug-in.
3 Introduction to the ABAP Environment
SAP provides an integrated development environment (IDE) called ABAP Workbench, a collection of tools used to develop, test, and run ABAP programs. After the release of SAP NetWeaver 7.31 SPS 4, SAP introduced the ABAP Development Tools (ADT) for SAP NetWeaver, also known as ABAP in Eclipse, which adds Eclipse capabilities to ABAP Workbench (Transaction SE80) functionality.
In this chapter, we will showcase SAP GUI and the Eclipse IDE and introduce the ABAP Workbench tools that we’ll to use to develop various ABAP programs throughout this book.
In Section 3.1, we’ll begin by looking at the SAP environment in general, including information on the ABAP programming environment and steps for logging onto the SAP system. We’ll also look at the different elements of an SAP screen and how to use transaction codes to get from point A to point B.
Section 3.2 will dig into the different ABAP tools found in ABAP Workbench. This includes the ABAP Editor, Function Builder, Class Builder, Screen Painter, Menu Painter, ABAP Data Dictionary, and Object Navigator. Each of these tools will be used and discussed throughout the remainder of the book, so it’s important to gain a good understanding of their functions and purpose.
We’ll end the chapter with an overview of the Eclipse IDE in Section 3.3, including steps for installation and setup.
3.1 SAP Environment
As discussed in earlier chapters, you can use SAP GUI or a web browser (SAP Web GUI for traditional applications or for Web Dynpro applications) to logon to an SAP system and run applications. However, ABAP Workbench tools are fully supported in a desktop environment for both SAP GUI and Eclipse IDE. To avoid confusion and to follow a consistent theme throughout the book, we will be using SAP GUI for Windows in this book for all examples. You should be able to use SAP GUI for Java or Eclipse IDE to follow the examples without any difficulty.
In this section, we’ll explain how to logon to an SAP system and navigate through the SAP screens. We’ll explore the different ways to run SAP applications and will look at various elements of an SAP screen.
3.1.1 ABAP Programming Environment
Unlike in other programming languages (Java, C/C++, etc.), ABAP source code is not stored in files; instead, all ABAP source code is saved in the underlying database of the SAP instance. There is no separate compiler for ABAP code; the ABAP runtime environment itself interprets and executes ABAP code.
The database interface in the work process communicates with the underlying database. The database interface converts Open SQL statements in the ABAP program to Native SQL statements (native to the underlying database). The ABAP runtime system ensures that the ABAP programs are operating system- and database-independent, making ABAP programs portable. In other words, you don’t have to worry about changing your program code if the underlying database or operating system environment changes.
In the next few sections, we’ll explore these environments and their on-screen elements in greater detail.
3.1.2 Logging On to the SAP Environment
The SAP logon screen shows four input fields, as shown in Figure 3.1. Along with username (User) and Password, you also enter the ID of the Client you wish to logon onto. SAP supports multiple languages, so you can choose a Logon Language from any of the installed languages in your SAP system.
To use a specific language, input its two-digit SAP language code on the logon screen—for example, “EN” for English, “DE” for German, and so on. The logon screen also includes a New Password button to change your password.
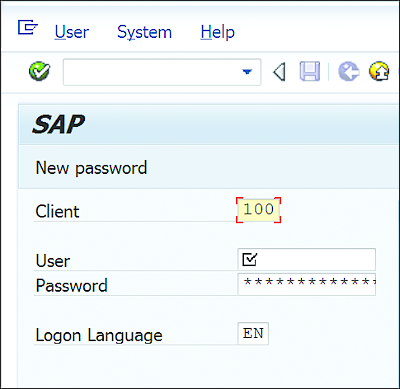
Figure 3.1 SAP Logon Screen
Once you fill in the details on the logon screen, press (Enter) to log on to the system.
3.1.3 Elements of the SAP Screen
Upon successful logon, you’ll see the default SAP Easy Access screen (see Figure 3.2); this entry screen is always displayed after logon and is used for opening various SAP applications. The SAP Easy Access screen includes a customizable SAP menu with a tree structure in which all the installed applications are organized into various folders.
The navigation area of the SAP Easy Access screen is divided into the SAP Menu, User Menu, and Favorites:
-
SAP Menu
The SAP Menu is delivered standard with SAP. -
User Menu
The User Menu can be customized to display user-specific applications based on the user’s role in the organization. For example, a finance user might see finance-related applications and a sales user may see sales-related applications by default in the SAP Menu. -
Favorites
Frequently accessed applications can be added as favorites under the Favorites folder for quick access.
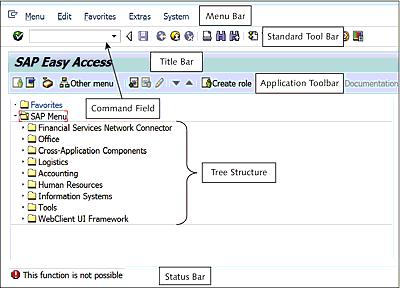
Figure 3.2 SAP Easy Access Screen with Screen Elements
Figure 3.2 shows the various screen elements of a standard SAP screen as accessed by the SAP GUI.
Now, let’s walk through each of the standard screen elements identified in Figure 3.2.
Menu Bar
The menu bar is where various menu items for applications are located. You can use the menu bar to carry out additional activities with the application. When developing your own ABAP applications, you can design the menu bar by using the Menu Painter tool (Transaction SE41). You’ll learn more about Menu Painter in Section 3.2.5 and how to use it in Chapter 12.
The menu bar consists of an application-specific menu, system menu, and help menu. The application-specific menu consists of menu items that are specific to each application and are created when developing the application. For example, if you want the user to download report output to a spreadsheet, you can add a menu item and related functionality to do so. The system menu and help menu are available by default and consist of standard system functions and links to help resources, respectively.
Standard Toolbar
The standard toolbar contains a standard set of icons for every application. The standard icons include Save, Back, Exit, Cancel, Print, Find, Find Next, and so on.
You can’t remove icons from or add icons to this toolbar. However, you can enable or disable certain icons for your application according to your business requirements. The standard toolbar is customized via the Menu Painter tool during application development.
Title Bar
The title bar displays the title of the application, allowing you to identify the application you’re running easily. Based on the type of program, the title is displayed either from the program attributes or from your program code, using the ABAP keyword SET TITLEBAR.
You’ll learn more about setting the application title and using the ABAP keyword SET TITLEBAR in Chapter 12.
Application Toolbar
The application toolbar displays all the application-specific icons. The application toolbar is located directly below the title bar. This area can be used to provide various icons that enhance the functionality of the application.
It’s standard design practice to use an application toolbar to duplicate functions from the menu bar. This allows for quick access to some of the most commonly used functions for the current screen and system task. The buttons available in the application toolbar change from application to application as per each application’s design.
You can display any of the available icons in the application toolbar by using the Menu Painter tool. To check the possible icons that can be displayed in the application toolbar, see table ICON. For example, you can display the PDF icon in the application toolbar of your report output to allow for downloading the report output quickly as a PDF file.
Status Bar
The status bar displays all status messages. This area is used to show various messages to the users while they run your application. For example, you can display an error message when an invalid entry is made in the input field of the screen, or you can show a status message to give the user a status update while your application runs.
The status bar also displays other information, such as the server you’re logged into, the client database you’re accessing, and the user ID with which you’re logged in.
You’ll learn more about the types of messages that can be displayed for the user in Chapter 6.
Command Field
The command field can be used to open applications (programs) quickly by using their transaction codes. Applications (also known as transactions) can be associated with a transaction code, and a user can directly enter the transaction code in the command field to run the application.
Certain commands, such as /n to terminate the application, /h to turn on the debugging, and others, can be entered in the command field to carry out different actions. Table 3.1 shows some of the popular commands. In the next section, we’ll look specifically at the transaction codes typically used in ABAP development.
3.1.4 Transaction Codes
To make it easy to open an application, each SAP application is associated with a transaction code. Applications are linked to a transaction code in Transaction SE93 (Maintain Transaction). Once a program is associated with a transaction code, the user can directly input the transaction code in the command field to run the program. Letters A to X are reserved for standard SAP applications; transaction codes for custom applications should be created in the customer namespace Y or Z.
SAP follows a standard naming convention for most of the standard SAP applications. Transaction codes ending with a 1 generally are used for creation, transaction codes ending with a 2 are for editing, and transaction codes ending with 3 are for displaying. The following are some example transaction codes that hold to this pattern:
- MM01 (Material Master Create)
- MM02 (Material Master Change)
- MM03 (Material Master Display)
- VF01 (Billing Document Create)
- VF02 (Billing Document Change)
- VF03 (Billing Document Display)
- ME21N (Purchase Order Create)
- ME22N (Purchase Order Change)
- ME23N (Purchase Order Display)
Transaction codes ending with N are called enjoy transactions. Enjoy transactions were released with the SAP ERP release, which was also known as the Enjoy release. These transactions implement the Control Framework elements, such as docking containers, custom containers, ALV grids, and picture controls. These transactions replaced older transactions. For example, Transaction ME21N is an SAP enjoy transaction for Transaction ME21.
Next, we’ll explain how transactions can be used to navigate within the system and how to open them.
3.1.5 Navigating and Opening Transactions
There are couple of ways to open a transaction (application). You can use the tree structure in the SAP Menu on the SAP Easy Access screen, or you can input the transaction code in the command field directly.
Each SAP window that you open is called a session, and each application runs in a session. Each session occupies memory in the application server, so to conserve system memory the SAP Basis administrator can restrict the maximum sessions that are allowed per user login. The maximum allowed is sixteen sessions per login, but the limit is usually set to six sessions per login.
Various transactions are organized into different folders in the SAP Menu on the SAP Easy Access screen (see Figure 3.3).
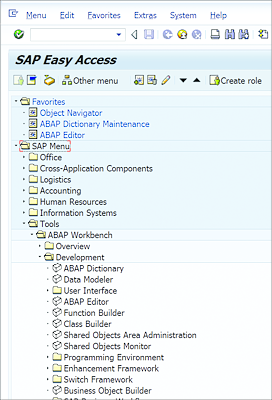
Figure 3.3 SAP Menu on SAP Easy Access Screen
The menu shown in Figure 3.3 can be customized based on a user’s role in the organization. System administrators usually assign role-specific menus to users while setting up user accounts in the SAP system. For example, a sales executive might see only sales-related transactions in his SAP menu.
A user can also add frequently used transactions to the Favorites folder for easy access. For example, as an ABAP consultant, you often use the ABAP Editor. To access the ABAP Editor, you can navigate to the menu path SAP Menu • Tools • ABAP Workbench • Development and double-click ABAP Editor (see Figure 3.3). This can be time-consuming each time you want to open the ABAP Editor. Instead, you can simply add ABAP Editor to your favorites by right-clicking the Favorites folder in the SAP Easy Access screen and selecting Insert Transaction from the context menu (see Figure 3.4).
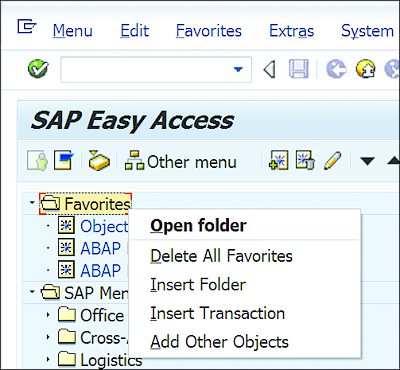
Figure 3.4 Adding Transactions to Favorites
Another, faster way to open transactions is to enter the transaction code directly into the command field. This is useful when you want to open another transaction from any session without having to open the SAP Easy Access screen.
If you’re on the SAP Easy Access screen, you can directly input the transaction code in the command field and then press (Enter) or click the green checkmark to the left of command field. However, if you’ve already opened a transaction and want to open a new transaction from the existing transaction screen, then you should preface the transaction code with /N or /O. Entering the transaction code alone will not open the application unless you’re on the SAP Easy Access screen.
/N and /O are used for the following purposes:
-
/N
Preface the transaction code with /N to terminate the current transaction and open the new transaction in the same session. -
/O
Preface the transaction code with /O to keep the current session intact and open the new transaction in a new session.
For example, on the SAP Easy Access screen, you can enter the transaction code “SE38” to open the ABAP Editor. This will terminate the SAP Easy Access screen and open the ABAP Editor in the same session.
Now, if you want to open Transaction SE11 (ABAP Data Dictionary) from the ABAP Editor, enter “/NSE11” or “/OSE11” in the command field, depending on whether you want to terminate ABAP Editor and open ABAP Data Dictionary in the same session or keep ABAP Editor intact and open ABAP Data Dictionary in a new session.
Table 3.1 lists some of the common command field formats that can be used. Please note the list in not exhaustive.
Table 3.1 Some Common Command Field Options
You can easily check the transaction code associated with each transaction by enabling a setting to display the technical name. On the SAP Easy Access screen, follow the menu path Extras • Settings, or press (Shift)+(F9), and select the Display Technical Names checkbox (see Figure 3.5).
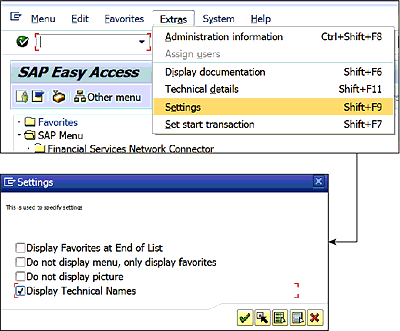
Figure 3.5 Enabling Technical Names
After this setting is enabled, when you open the tree structure in SAP Menu, you should see the transaction code displayed for each application (see Figure 3.6).
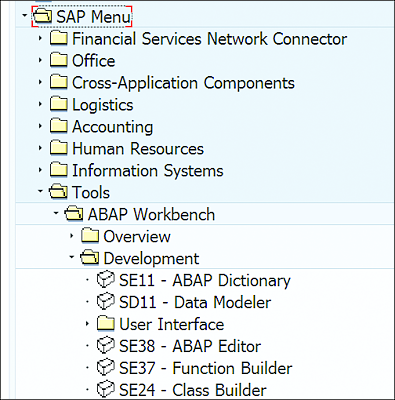
Figure 3.6 Transaction Code Displayed for Each Application