
This is an occasion when you’d like to pull out all the stops for special friends or family (or your boss), but without last-minute stress in the kitchen. Alternatively, have you at times felt guilty for not having reciprocated a dinner party? Perhaps you’re too intimidated to do so, particularly if one of your potential guests is a fabulous cook? This chapter will hold your hand through the process, allowing you to feel relaxed and at ease with your guests.

On the Menu
Spicy tomato soup with a swirl of coriander and cucumber raita, and crunchy croutons
Salmon and cucumber mousse, served with crackers or warm slices of baguette
Karoo lamb drizzled with honey and herbs, or fillet of beef with a mushroom and port reduction, served with Mediterranean roasted vegetables and polenta
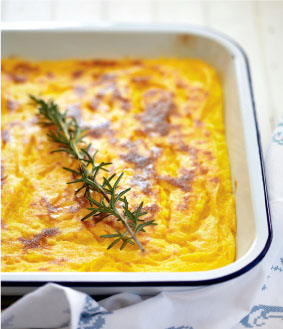
Cheesy potato gratin
Rösti with salmon and sour cream
Duo of Swiss chocolate mousse
Coffee cream gâteau
Menu A
Blue cheese crème brûlée, with slices of warm baguette
Fillet of beef with a mushroom and port reduction, served with polenta and Mediterranean roasted vegetables
Refreshing pineapple mousse
Menu B
Warm phyllo parcels with Brie and cranberry or fig preserve
Karoo lamb tagine, served with couscous with feta, peppers and fresh herbs
Coffee cream gâteau
Menu C
Rösti with salmon and sour cream
Fillet of beef (or roasted Karoo lamb) with a mushroom and port reduction, served with cheesy potato gratin and roasted vegetables
Chocolate fondue
Menu D
Cheese mousse with preserved figs, served with warm sliced baguette
Honey- and port-glazed gammon, served with Cheesy potato gratin and vegetables
Chocolate and cherry cream meringue gâteau
Menu E
Salmon and cucumber mousse, served with an assortment of savoury biscuits
Chicken and mushroom phyllo pie
Frozen meringue roulade
Menu F
Roasted red pepper roulade
Karoo lamb tagine, served with Couscous with feta, peppers and fresh herbs
Duo of Swiss chocolate mousse
Option of fourth course for each menu: Visually appealing cheese platter
With coffee: Mum’s never-go-wrong chocolate profiteroles, Macaroons/meringues, miniature cupcakes

The secret to a stress-free dinner is not to plan a menu that requires too much last-minute attention. Even for a more formal dinner, you don’t want to be roasting potatoes and cooking vegetables in your best dress!
For this type of entertaining, my rule is that 75% of the meal should be prepared in advance. It’s easy to choose starters and desserts that can be made the night before the party (with perhaps only some minor assembly and garnishing at the last minute). Choose accompaniments to your main course that can also be prepared ahead (for example, a potato bake) and later just popped into the oven. My mom has always emphasised to me that the most important rule when entertaining is to make your guests feel welcome and at ease. This is not always easy, particularly as people often have a habit of arriving just when things reach a crescendo in the kitchen. But it’s something to bear in mind. It’s also worth reminding yourself that there’s not much point in having a lavish meal if guests feel that their host is treating it as an ordeal.
Probably because of today’s rushed lifestyle (and our need for instant gratification, often translating into street food, unset tables, sauce dripping down chins!) an invitation to a formal dinner is a real treat. Television series such as Downton Abbey have reawakened an interest in good social etiquette and the art of fine dining, and while it’s not necessary to slavishly follow old rules, they can be used as a guide for making guests feel extra special (see the section on dining etiquette on page 82). My ultimate culinary destination has to be Italy where people live to eat, not eat to live. It’s interesting that in many Italian restaurants – and not necessarily the poshest – starched tablecloths and serviettes still grace the table, and waiters continue to dress immaculately for dinner. Such gestures help to turn even the simplest meal into a memorable and special occasion.

Refer to ‘General Guidelines for Any Type of Party’, on page 5.
| Up to 1 month before, make and freeze the following | |
|---|---|
| Spicy tomato soup (page 86), but without any accompaniments at this stage | |
| Coffee cream gâteau (page 95) | |
| 3–5 days before the dinner | |
|---|---|
| Purchase drinks for the party (and organise ice if required and where to store it). | |
| 2 days before the dinner | |
|---|---|
| Check that you have all the ingredients to decorate cakes and sweet items from your menu. | |
| Check that you have all the ingredients for the savoury items on the menu, including salads or herbs for garnishing. | |
| The day before the dinner | |
|---|---|
| Set the table for the party and put out various glasses, cups and saucers for tea and coffee, tea or coffee pots, milk jugs, cutlery, serviettes, etc. Fill and cover sugar pots and put out the teas and coffee that you will be offering. | |
| Arrange any flowers that you might be using. | |
| Make the Salmon and cucumber mousse (page 87). | |
| Make the Spicy tomato soup (if you have not made and frozen this in advance) and prepare the raita and croutons. (If you prefer the croutons warm, retoast them slightly before serving.) | |
| Make the Duo of Swiss chocolate mousse (page 94). | |
| On the day of the dinner | |
|---|---|
| Defrost any remaining sweet and savoury items for the dinner (this should be done at least 3 hours before the party), except the Coffee cream gâteau. | |
| Defrost the Spicy tomato soup in the morning. | |
| Prepare the Rösti with salmon and sour cream (page 93). Assemble just before serving. | |
| Purchase fresh baguettes/bread rolls to accompany the meal. | |
| Fry the fillets for the Fillet of beef with a mushroom and port reduction (page 90), just to sear them (final cooking in the oven to be done later). | |
| Prepare the lamb for the Karoo lamb drizzled with honey and herbs (page 88), ready for roasting (time this according to your intended serving time). | |
| Prepare the Cheesy potato gratin (page 92) and Polenta (page 89) if you intend to grill it. | |
| Prepare the roasting vegetables. | |
| Fill the milk jugs and put out drinks an hour or two before the dinner begins. | |
| Half an hour to an hour before the dinner | |
|---|---|
| Smaller savouries that you purchase, such as sausage rolls, etc., may be heated just before the dinner begins so they remain warm for the duration of the meal. | |
| Put out sweet items and decorate or dust with icing sugar. | |
| Cook the Polenta. | |
| Slowly heat up the Spicy tomato soup and garnish when ready to serve. | |
| Put out the salads and dressings. | |
| Assemble the Rösti with salmon and sour cream. | |
| Place the fillets in the preheated oven just before you intend to serve these. | |
| Bake the Cheesy potato gratin and roasting vegetables approximately an hour before you intend to serve them. | |
| Take the Coffee cream gâteau out of the freezer just before serving, and decorate. | |

For many people the following guidelines will be redundant. However, for those readers unfamiliar with Western etiquette, they may be useful.

The first basic ‘rule’ to bear in mind is that cutlery is always placed according to the order in which food will be served. In other words, you start from the outside and work your way inwards for each subsequent course. Thus the cutlery used for the starter course (if applicable) is furthest away from your place setting (or where the charger/underplate is). Place cutlery for the next course inward from that. If, for example, you plan on having the salad course first, followed by a fish course, place the cutlery for the salad outermost, followed by the fish knives and forks, and then the cutlery for the main course. Position the soup spoon outermost on the right-hand side of the place setting (i.e. with the knives). If soup is the first course (and the butter knife is not on the bread plate), place the butter knife outermost on the right-hand side. Note that the sharp or cutting edges of the knives face inwards (i.e. towards the dinner plate).
Place the dessertspoon and fork at the top of the place setting, with the fork below the dessertspoon. The dessert fork tines (prongs) face rightwards, and the spoon faces leftwards. According to British etiquette, place the bread plate on the left-hand side of each place setting, with a butter knife laid across it. Place drinking glasses on the right-hand side of each place setting, above the dessert cutlery. Range these in a line from left to right, diagonally or in a triangular shape and in the order in which they are to be used. There should be a water glass, a white and/or red wine glass, a champagne glass if applicable and a glass for a dessert wine (again if applicable), and so on.
Position a serviette (or napkin) to the left of each place setting (on the bread plate if you are using bread plates, with the butter knife on top) or in the centre of each place setting. Charger plates will be in place from the outset and the serviette can be placed on the charger plate. Upon being seated, you should place the serviette on your lap during the course of the meal and leave it unfolded on the table at the end of the meal. To indicate that you’re finished eating, place the knife and fork parallel together on the plate, with the fork tines facing upwards.
According to etiquette norms, keep the fork in the left hand while eating, and the knife in the right, preferably with the tines of the fork facing downwards. Hold a soup spoon in the right hand and tip the soup bowl slightly away from you while eating. Sip the soup from the side of the spoon. If the butter dish is passed to you, take some for your bread/bread roll and place it on your side plate (do not butter bread directly from the main butter dish). Bread is broken/torn at the table and not cut.
Do not reach over or stretch for items on the table; rather ask that they be passed to you. In the past, items were passed to the left. Guests typically wait for the host/ess to start eating before they do, unless the host/ess asks them to begin. Diners should never lick their fingers or cutlery (especially a knife) at the table or chew with their mouths open or while talking!
Serve food from the left and clear from the right (don’t stack or scrape plates in a formal dining setting). White wine and champagne glasses are held by their stem (to keep the wine chilled) while red wine or cognac glasses are cupped around the bulge of the glass (as this adds slight warmth to the liquid).
Nowadays, you don’t have to stick strictly to the placement of items. The above should rather be used as a guide depending on the degree of formality of the occasion (and the amount of cutlery you may or may not have).

Decide on a colour theme for your dinner party and tie in the table linen and flowers with this theme. For a formal setting it’s preferable to use starched linen table napkins rather than paper serviettes. Remember not to arrange flowers so that it’s difficult to see or converse with other guests at the table. Flowers don’t need to be formally arranged. A tied bunch in an elegant vase can be equally effective. A modern trend is to have a number of small containers (such as different glass or crystal vases, or old silver teapots/trophies/containers) filled with different flowers (either in a particular colour scheme or using various flowers that work well together). As an alternative to flowers, fruit (such as lemons) make attractive table décor. These can be stylishly arranged in either a large-stemmed glass vase, pudding bowl or basket. Don’t forget to include some leaves for additional flair.
Vegetables can also be used as table décor. Artichokes, pumpkins and aubergines are beautifully coloured and lend themselves to imaginative decorative settings, particularly for a French-inspired meal. Remember that herbs can be added to a flower arrangement – or could even replace flowers – and add a wonderful fragrance during the meal. These days faux flowers are also all the rage; you can even make your own from paper.
Place cards are not essential, but add a personal touch. They also allow you to think through the ideal placement of guests in order to get the conversation flowing. These cards can be handwritten and tied to the serviettes with twine or ribbon (depending on the setting) or else attached to an item of fruit, such as a pear. Edible place cards (such as a biscuit with a person’s name on it) add a special personal touch to the table.

Whenever I serve this soup, people beg me for the recipe. My husband was the first person to rave about it, and because he kept asking for it, I decided he should learn to make it too. Not only did he master the art, we now also enjoy it more often. With its wonderful aromatic and subtly spicy flavours, this soup is deliciously different from standard tomato soup. If you can get your hands on ripe organic tomatoes, the flavour of the soup is that much better. Another advantage is that it can be made a day or two in advance. The addition of the raita is a must!

Serves 4–6
This is a wonderfully light starter, served with a wedge of lemon, cracked black pepper and savoury crackers. It’s also perfect to take along to a picnic. Alternatively, serve it to friends as a light summery lunch accompanied by a fresh baguette and a glass of wine.

Serves 6–8
The beauty of roasting lamb for a dinner party is that it doesn’t require too much last-minute attention. My Aunt Joan’s faithful cook, Mary, once shared with us her secret for producing the perfect roast leg of lamb – to cook it in a shallow water bath. It produces a moist and succulent end result. This lamb can be served with either roasted vegetables and grilled polenta or, instead of polenta, potato gratin with a rosemary, mushroom and port reduction.

Serves 4–6
It is preferable to allow the lamb to rest before serving.
Not only do these roasted veggies complement the lamb beautifully, but another advantage is that they can be prepared ahead, then put in the oven to roast while you’re busy entertaining. No boiling or steaming required! Something to bear in mind, though, is that vegetables take longer to roast than most people think (at least an hour).
Serves 4–6
Polenta is a wonderful alternative to the usual mashed potatoes or rice as an accompaniment to many dishes. You can also set the polenta, then grill it in wedges. These wedges are delicious on their own, served with roasted vegetables and a drizzle of olive oil and balsamic glaze.
Serves 4–6
To grill the polenta
After adding the butter and Parmesan as per the instructions above (and omitting the crème fraîche), pour the mixture into a baking dish. Allow to cool completely and then cover with a sheet of baking paper. Preferably weight the mixture down with a plate and place in the fridge until it has set and you’re ready to grill it. Cut into wedges, brush with olive oil, and place under the grill or on a griddle pan or on a barbecue/braai. Char-grill each piece for a couple of minutes. Sprinkle over some coarse salt and freshly ground black pepper before serving.
Fillet is a real treat for a special dinner, yet many people shy away from cooking it because of the last-minute frying in the kitchen. The method in this recipe (often favoured by chefs) allows you to fry and prepare the steaks in advance, then pop them in the oven for final cooking just before serving. This way you avoid that last-minute mess and fuss.

* The steaks can be prepared to this point a day ahead. If you choose this option, store the browned steaks in the fridge in a covered container or on a plate covered with clingfilm.
Serves 4–6
To check that steak is done
Use your fingers to prod the meat. When it is rare, it will feel soft; medium-rare should feel slightly bouncy; well done will feel a lot firmer.
This is a perfect accompaniment to a meal or even a braai. It can be assembled in advance and popped into the oven closer to the time.

Serves 4–6
Another Swiss favourite is crispy rösti, used as a canvas for a variety of different toppings or to accompany and mop up delicious sauces. You can add spring onions, chopped bacon or ham, or even cheese to your rösti if you like. It is often served in Switzerland with a fried egg on top (spiegelei) and some melted cheese – real comfort food! In this recipe, the rösti is made into individual portions and garnished and can be served as a canapé or a replacement for the Salmon and cucumber mousse (page 87).
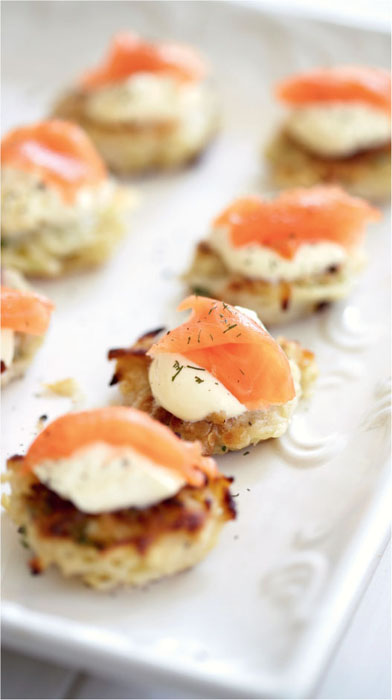
Makes ± 18 mini röstis
Note: The onions sometimes make it difficult for the rösti to stick together but they add lovely flavour.
I’m often asked what type of chocolate to use for various types of baking, icing or desserts. When it comes to chocolate mousse, you should use the best you can afford as the quality of the chocolate will be obvious in the final result. This mousse doesn’t contain any uncooked egg white, so it can be served to expectant mums. It can also be prepared in advance and refrigerated, simply to be decorated at serving time.

* You could substitute dark chocolate with milk chocolate, but the flavour will be milder. There isn’t a lot of sugar in this dark chocolate mousse, so choose a chocolate based on your taste preferences, or increase the amount of sugar if you use a very bitter chocolate.
Serves 4–6
This is such an easy dessert to make and yet so impressive! I came up with the recipe while on a weekend away in the Free State with close friends. We’d just returned to our idyllic farm accommodation after a most enjoyable visit to a quaint coffee shop called The Rose House where I had been paging through old recipe books hoping to find something that would inspire me for a dessert. What I eventually dreamed up bears little resemblance to the one I found, but I knew it would go down well with our friends, who are addicted to tiramisu-like desserts. After dinner I wrapped up what was left and put it in the fridge, intending to offer it again with coffee the following evening after we arrived home, and before we went our separate ways. It was only then that our friends sheepishly announced they’d found the leftover pudding in the fridge and demolished it! Needless to say I was delighted – don’t they say ‘the proof of the pudding is in the eating?’

* If children will be consuming this pudding you can use decaffeinated coffee.
** If you don’t have filtered coffee or espresso, use ± 15ml of instant espresso powder or coffee granules dissolved in boiling water.
*** If you like, you may freeze and serve semi-frozen.