Cakes and meringues
The following recipes are good basic stand-bys for a function. Both the moist vanilla and chocolate sponges are suitable for making ahead and freezing, and can be used as the basis for a cake to be decorated with the icing of your choice. The meringues can be coloured to tie in with your theme and can also be made ahead and frozen.
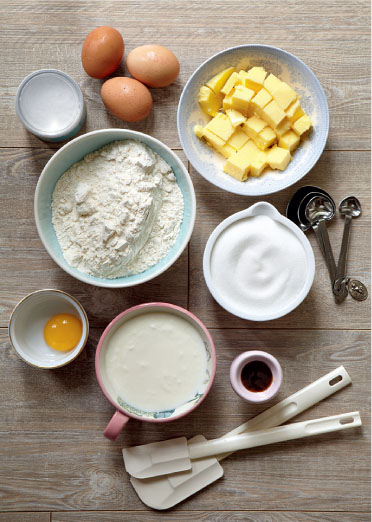
Buttermilk vanilla sponge
A basic vanilla sponge cake is the essential stand-by recipe: you can rely on it to remain moist, keep its shape and taste good. Despite having a choice when it comes to cakes for covering with fondant, vanilla sponge cake remains popular compared with the traditional fruit cake. In this recipe, buttermilk gives the sponge cake its delicious flavour.

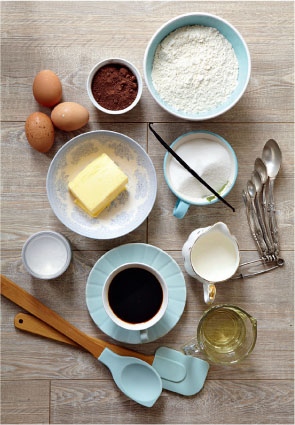
Chocolate and coffee cake
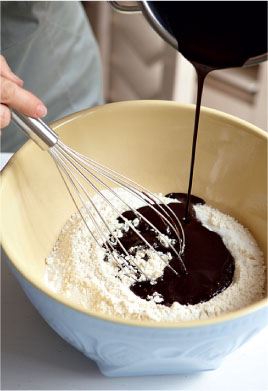
I experimented long and hard with chocolate sponge cake recipes to get to this one. It is delicious and moist, stores well (essential when it comes to making ahead for cake decorating), and you don’t need to take out an electric beater or mixer! The coffee enhances the chocolate flavour. As a bonus, it is also perfect fresh from the oven and smothered in a chocolate ganache. My young son describes it as ‘fudgey’, and that about sums it up.

TIP
This is quite a runny mixture but it produces a moist cake.
Chocolate cupcakes
The Chocolate and coffee cake recipe is sufficient for 24 cupcakes (pour about 60ml of the batter in each cupcake case). Bake at 170°C for about 20 minutes, depending on your oven. The cupcakes should be fairly flat for decorating purposes, provided your oven is not too hot.
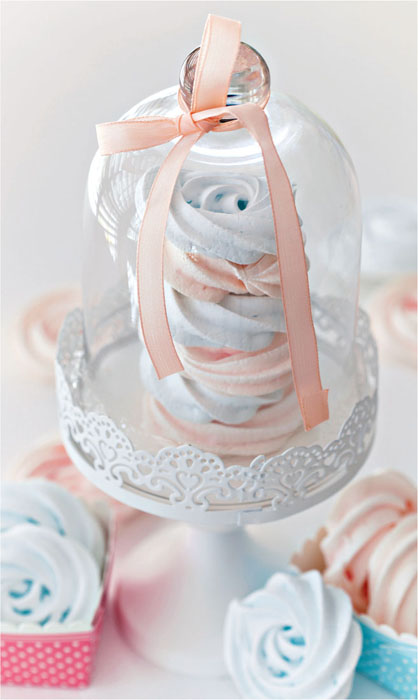
Romantic rose meringues
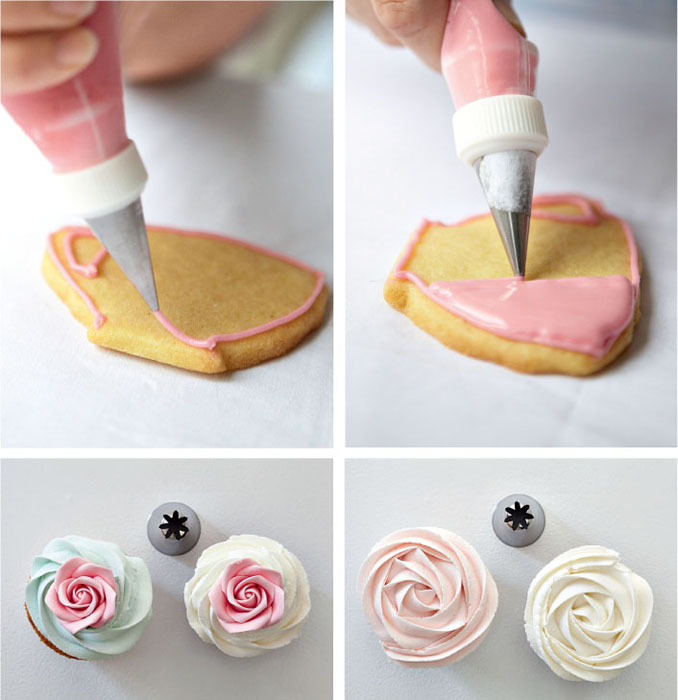
This basic recipe can be used for different types of meringues. These meringues have been piped into rose shapes using a large star nozzle (see pages 66 and 187 on how to pipe rose swirls). This recipe can easily be doubled.
* Vanilla extract may affect the final colour.
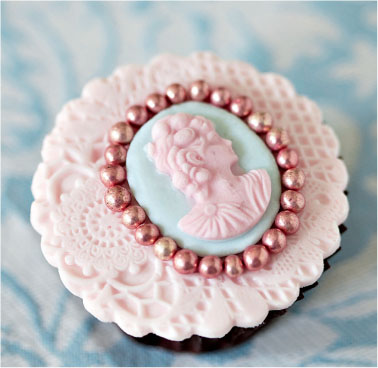
Icings
There are many different types of icing from which to choose, ranging from buttercream to sugar paste or fondant, not forgetting ganache and royal icing. Buttercream is suitable for piped work such as ruffles and swirls, and is extremely sweet. Rolled sugar paste is a traditional choice for wedding and Christmas cakes, and is typically placed on top of buttercream icing nowadays.
Basic buttercream icing
TIP
For the average novelty cake, I use roughly 500g butter to 1kg icing sugar, but obviously this depends on the cake in question. I always make a generous amount of buttercream icing so that I can use any surplus to ice other smaller cakes I might have at hand.
Storing buttercream icing
Leftover buttercream can be placed in the fridge for up to a week. Alternatively, you can freeze it for a month.
Cream cheese icing*
* This is also a buttercream icing.
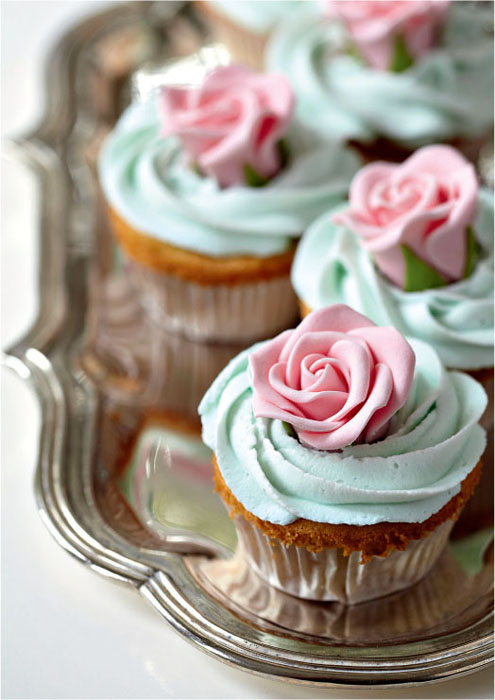
Swiss meringue buttercream icing
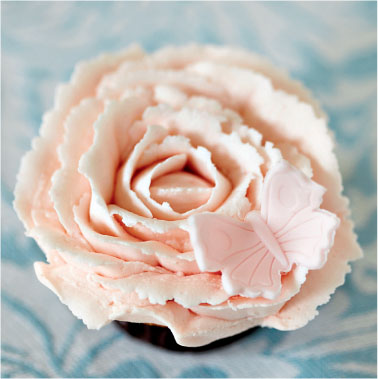
Having first tasted this years ago in Switzerland, I was impressed by the fact that it wasn’t as dense and sweet as normal buttercream icing. It really is not that difficult to produce – it’s rather like making meringue but, unlike meringue, has butter whipped into it (which means the colour will be creamy rather than white). This creates a light, fluffy, mousse-like icing that can be used for satiny-looking swirls and ruffles which, on cupcakes, resemble whirls of soft-serve ice cream.

Variations: chocolate, raspberry, lemon, etc. (see opposite)
TIP
Sometimes it may look as though the buttercream has curdled, but continue to beat, and it should combine to resemble the buttercream to the left. If the mixture is still too hot or too liquid, place it in the fridge for a while to cool and then continue to mix.
Storing Swiss meringue buttercream icing
Seal the icing well in a plastic container and keep in the fridge for up to a week; alternatively freeze for up to 1 month. On defrosting, once the icing reaches room temperature, re-whisk the buttercream until it returns to the right consistency.
For chocolate Swiss meringue buttercream: Add approximately 260g melted (and cooled) chocolate to the buttercream.
For lemon or orange curd Swiss meringue buttercream: Add approximately 80ml of flavoured curd to the buttercream.
For raspberry/blueberry/cherry Swiss meringue buttercream: Add approximately 80ml of fruit purée (or best quality fruit preserve/jam) to the buttercream.
Adding colour to buttercream icing
To colour buttercream icing it’s preferable to use gel colours (I prefer these for sugar paste icing and tylose, too), as liquid food colouring can make the icing curdle. Gel colouring generally gives a better colour, particularly if you require red or black icing, but take care to add the colour just one drop at a time, using a toothpick, because a little goes a long way.
Be aware that because yellow colorant is often added to butter and margarine, it may affect the final outcome of your icing colour. (If you consult a colour chart, you’ll see why adding blue colouring to this base may give you a slight greeny-blue shade.) However, because I feel that nothing can be a substitute for the flavour of butter, I’ve learned a way to get around this. If you leave the buttercream icing overnight, the colour is better able to develop so that, by the following day, it has generally reached the intensity of, say, the red or black you’re after, without incurring too much toxicity from added colorant.
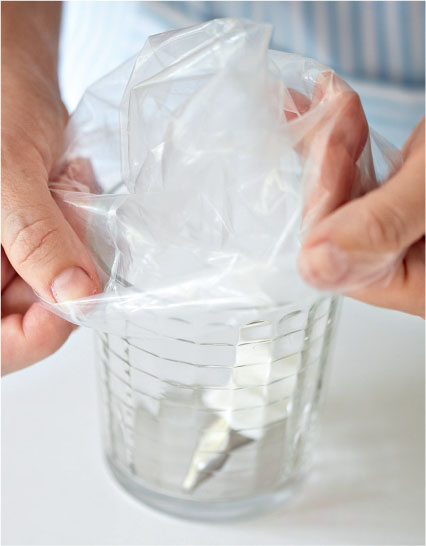
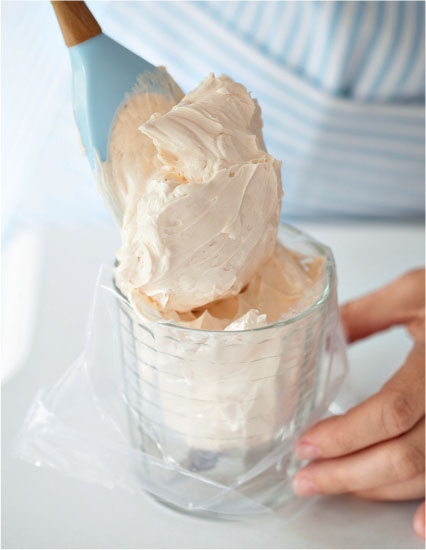
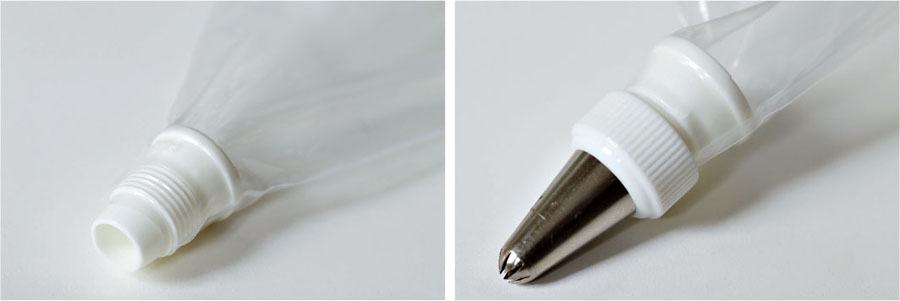
Loading icing bags
Place each of the icing bags in a jug or glass to make it easier to load the icing into the bag (see right). Twist the icing bag just above the top of the icing and use an elastic band or a clip to prevent the contents from oozing out and to prevent the icing from drying out.
Crumb-coating a cake with buttercream icing
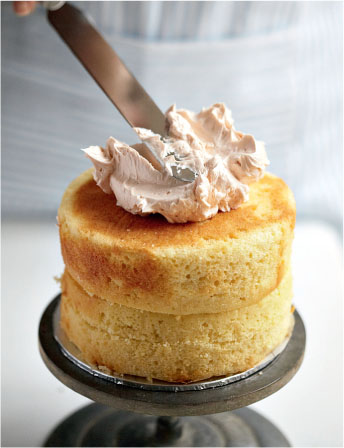
Step 1
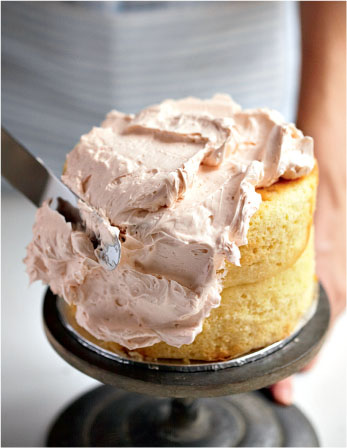
Step 2
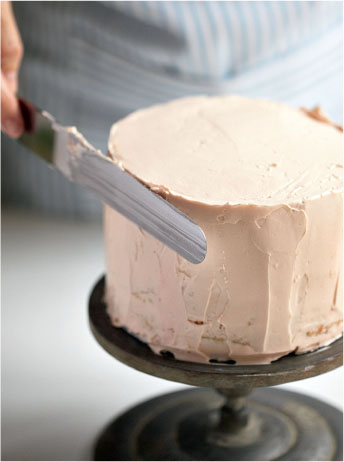
Step 3

Step 4
This term simply means coating the sides and/or background of the cake with, first, a layer of icing literally to hide or seal in the cake crumbs, then adding a second layer of icing (or sugar paste) over that. It is easiest to use an offset spatula for the purpose of covering a cake in buttercream.
Place a large mound of buttercream icing on the top of the cake (step 1) and smooth it from the middle of the cake outwards and then downwards (step 2). Use an offset spatula to smooth the icing as much as possible (step 3). A cake scraper is useful for getting the sides of the cake as smooth as possible. So is a turntable: rotate the turntable with one hand while holding the scraper steady and flush with the bottom of the cake with the other (step 4). Chill the cake to allow the icing to set.
TIP
Prior to icing a cake, I’ve found it best to chill or freeze the cake beforehand because then it is less crumbly or prone to breaking up during the icing process. This applies particularly to sponge cakes.
Royal icing
This is a popular choice for decorating biscuits, piping and ‘cementing’ heavier items together; it is very sweet and can set hard.

Stiff-peak consistency

The ten-second rule
* Meringue powder is made from dried pasteurised egg white. The quantity of powder will depend on the number of eggs required; average conversion: 1 egg white = 15ml meringue powder + 30ml water.
Icing consistency for piping details
Many cake decorators prefer runnier icing for outlining and floodwork. If you choose to use this consistency, apply the 10-second rule: put a knife about 5cm into the centre of the icing and count to 10 (or a couple of seconds more); remove the knife and the line should smooth over and close. If the line disappears in under 10 seconds, then the icing is too runny.
Experiment to find which consistency works best for you.
Storing royal icing
Keep Royal icing well covered, even while using it (cover with a damp tea-towel or a piece of clingfilm). Store it in the fridge in an airtight container for up to 2 weeks. If you are only using the icing after a couple of days, re-mix the royal icing in your electric mixer, checking its consistency, as it tends to separate. You can freeze royal icing in its airtight container.
Dark or milk chocolate ganache
For any chocolate lovers, the icing of choice may well be ganache, which can also provide a smooth coating for a cake or be piped into swirls and stars.
White chocolate ganache
Use the same recipe as above, but substitute good quality white chocolate and omit the coffee granules. You can add a drop of orange extract or Cointreau, if you like.
TIP
If you plan to use ganache as a decorative icing, double the amount of chocolate but keep the quantity of cream the same. Cool the mixture to room temperature before lightly whisking to soft peaks.
Nozzles
The following are what I consider to be the basic essential nozzles for cake and biscuit decorating (i.e. the ones I couldn’t live without).
Large round nozzle
Use Ateco numbers 804, 805 or 806 for smooth round swirls, large dots, for piping alternative colours of cake batter into a tin, or piping meringue discs.
Selection of small round nozzles
Ultra-small round nozzles (numbers 00, 0 and 1) are good for piping details onto biscuits using royal icing. Slightly larger sizes (2 and 3), are suitable for outlining and flooding with royal icing, using a 10-second (or more) consistency (see page 185 for a guide on royal icing consistencies). Number 5 is best for outlining and floodwork. Use these nozzles for lines, dots, beading on the bottom of a cake or for dragging a dot to create a tail.
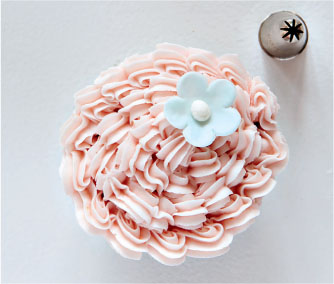
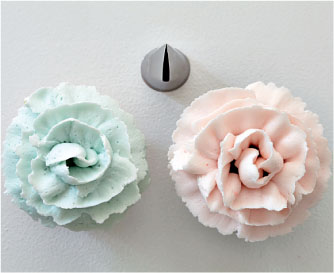
Large star nozzle
Use a closed nozzle (Ateco 844, 846 or 855) for shells or rose swirls (855 is good for these) or to pipe ascending, or classic, swirls on top of cupcakes. For classic swirls, you can also use an open star nozzle, such as an Ateco 824 or 825.
Small star nozzles
Ateco 16 and 18 (open star nozzles) are essential for piping lots of tiny stars onto novelty cakes covered in buttercream icing, or for small shells or tiny rose swirls.

Medium-size star nozzles
Ateco 30 is suitable for slightly larger stars or for piping shells or swirls.
Jagged-teeth nozzle for French swirls
Ateco 864, 865 or 866 will create classic swirls with a difference.

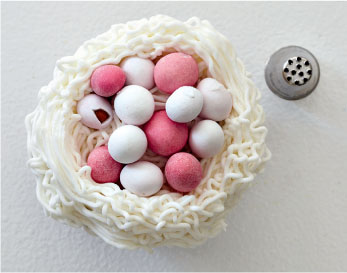
Grass nozzle
Ateco 133 is perfect for piping ‘grass’ on cakes or cupcakes, or for nests or animal fur.
Petal and ruffle nozzles
Teardrop-shaped nozzles, such as Ateco 125, 126 and 127 or Wilton 124 or 125, are suitable for piping petals (such as rose petals) or gorgeous ruffles on cakes and cupcakes. They come in a variety of sizes, so choose according to how big or small you want your ruffles or petals to be. Ateco 101, 102, 103 and 104 are good for small ruffles and petals.

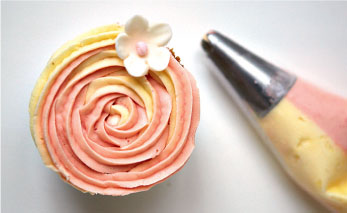
Piping two-toned icing
You can buy disposable icing bags with two divisions in them for two-toned icing. Or you can simply place a small icing bag inside a larger bag (each bag will contain a different coloured icing, or different shades of the same colour).

Couplers
A coupler allows you to change only the nozzle so that if, for example, you want to do some outlining in black icing using a round nozzle, then pipe stars using the star nozzle (and the same black icing), you can simply change the nozzle by unscrewing the top of the coupler. Normally, this would require two separate icing bags, but by placing a coupler in each icing bag you can finish all your piping in one colour, then just remove the nozzle and wash it before attaching the nozzle to a coupler placed in a bag with different colour icing. (Normally, you would need to insert an appropriate nozzle into each icing bag, but with the coupler you can use the same nozzle for as many different colours as you like; provided you have enough couplers.)
As a young girl, I was fascinated by cake decorating, but none of my friends shared the same enthusiasm. I resigned myself to the idea that it would have to become a hobby at a later stage of life. Once I’d had my children, and was desperately wanting to ice their birthday cakes myself, the time was finally right. Seeking the help of an expert, I found Di Edgcumbe, who lived close by. I rallied a few friends to join me in her classes and what fun we had! We were privileged to have Di as our teacher. She is a master icer who has won gold year after year at the Pietermaritzburg Show and subsequently scooped several golds at the Cake International show in Birmingham, England (the largest cake show in the world).
Di has a degree in Botany, and has an incredible eye for detail. She is an absolute perfectionist, and her icing is pure art. Di introduced us to the magical world of tylose and the edible art it can create. One of her many tips, for which I’m eternally grateful, is that modelling without a thickener in the fondant makes it too soft to work with and she shared this recipe for tylose paste.
Tylose paste
The addition of tylose powder (or CMC powder*) to fondant makes it possible to model edible items out of sugar paste by firming it slightly. It can also be used with silicone moulds (without the sugar paste sticking to the moulds).

Tylose (gum) paste
* CMC (carboxymethylcellulose) is a food additive used as a thickener and stabiliser.
Tips for using tylose paste
The cheat’s tylose paste
For this, you simply add tylose powder to the sugar paste/fondant. In cake decorating, the general ‘rule’ is 5–10ml per 450g ball of sugar paste, although you will soon develop a feel for how much tylose powder is sufficient.
Colouring and flavouring tylose paste
You can add flavouring (vanilla, almond, lemon, mint, etc.), to fondant or tylose paste, but be aware of how this might affect the final colour, especially if you want pure white icing. (For example, vanilla may leave small flecks of black, and so on.)
When using gel colour, add one small drop at a time, using a toothpick to ensure you do not add too much. You can always add more colour but it’s difficult to tone down once it has been added; the only possible solution is to add more tylose paste.
Cocoa powder adds colouring and a wonderful chocolate flavour to the sugar paste or fondant.
Making tylose glue
This edible ‘glue’ can be used to stick pieces of modelling paste together (e.g. to attach ears to a rabbit’s head). It can also be used to attach items to the sugar paste layer of your cake. (It is preferable to use royal icing to attach large pieces of edible art, such as figurines; see recipe on page 185.)
To make tylose glue: sprinkle about 2ml tylose powder over some previously boiled and cooled water (± 30ml) and simply leave it (no stirring is required). Allow the tylose to sponge overnight and become absorbed into the liquid. It is then ready for use. Store the glue in an airtight container or jar with a lid. When sealed, the glue should keep for 10–14 days. Tylose glue can be applied with your fingertips or a clean paintbrush.
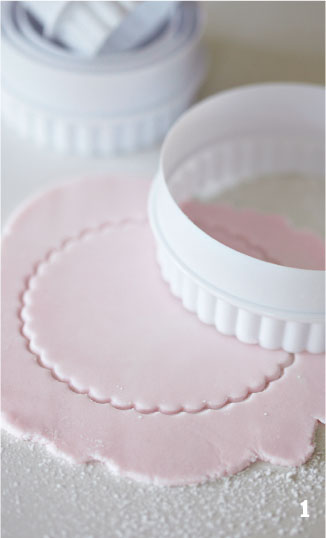
Simple tylose flowers
On a surface that has been lightly greased with vegetable shortening, roll out tylose paste very thinly (about 3–5mm). For flowers, the thinner the paste, the better).
Cut out the shape of your choice and allow the flower to dry. Use an empty egg box or plastic flower dryer to enable the flower to achieve a more natural shape.
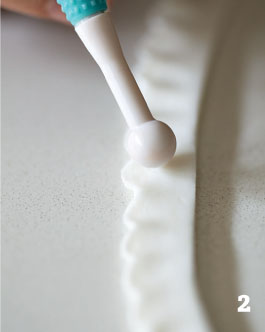
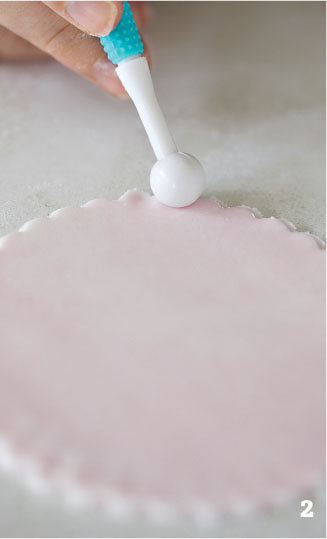
Roll small pieces of yellow (or other coloured) fondant to form the centre of the flower, or use edible pearls or dragées. You can give texture to the flower centre by pressing this tiny piece of paste against a sieve, for example. Alternatively, use a ball-roller tool to depress the centre of the cut-out flower so that the petals stand up a little. If you have a small cake decorator’s petal pad, you can thin out your flowers further using this and a ball tool. The back of a teaspoon will also do the job.
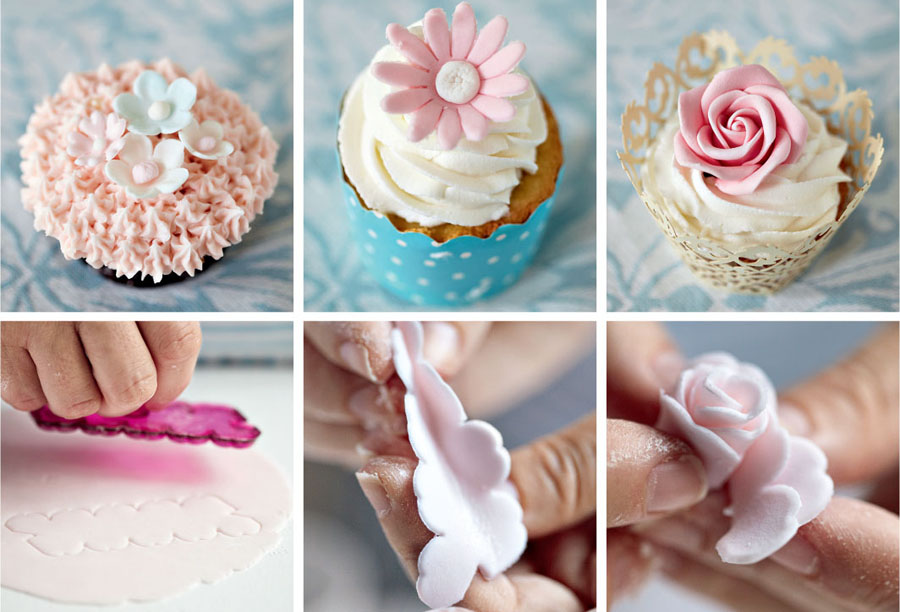
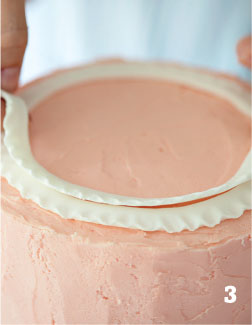
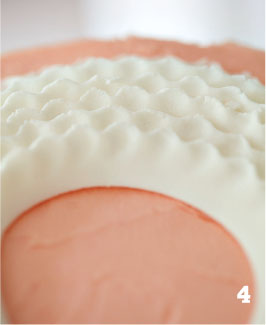
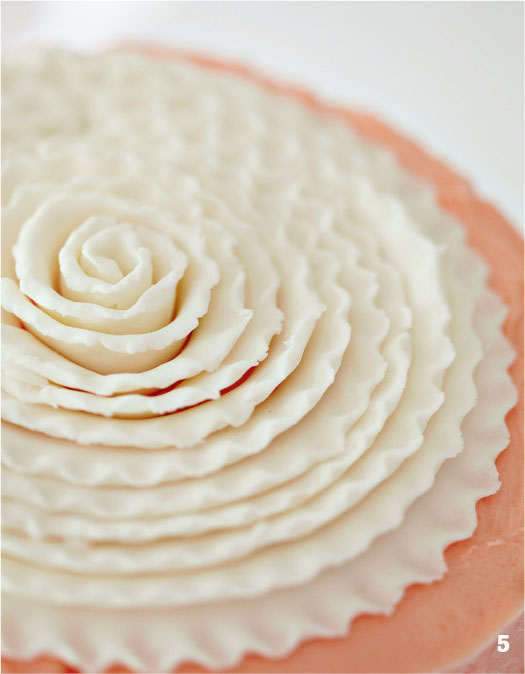
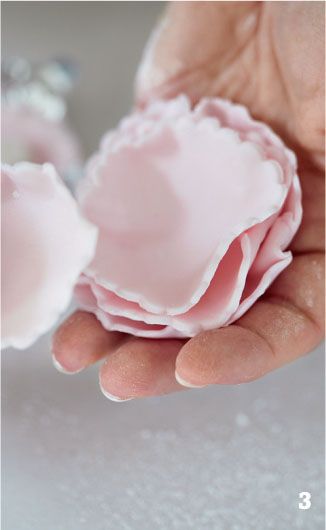
Ruffle flowers made with tylose paste
Ruffle flowers are very easy to make. They’re ideal for the novice cake decorator because they don’t need to be delicate or botanically accurate, yet they make a bold statement on a simply iced cake.
Ruffle flower A

Ruffle flower B