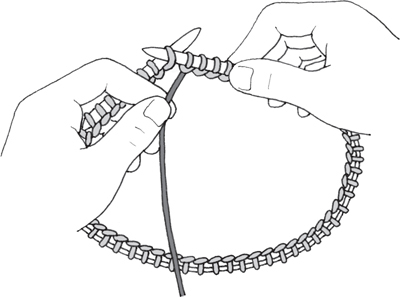
Step 1: To begin, hold the yarn strand to the front in your left hand and insert the right needle into the front of the stitch from the right to the left. I like to pinch the yarn in between my left thumb and pointer finger.
Intermediate Skills and Projects
Good job working through Chapter 2! You are now ready to move ahead with some slightly harder projects. This is your chance to learn the purl stitch, and then to use it along with the knit stitch to make different textures and stitch patterns in the knitted fabric. It can be really fun to see what happens when the knit and purl stitches are combined.
Many of the projects in this chapter are items you’ll want to knit again and again using different colors, embellishments, and types of yarns. Get creative with your knitting and show off your personal style!
• The Purl Stitch •
• Carrying Colors for Stripes •
• The Whipstitch •
• • • • •
What You’ll Make
• Toasty Headband •
• Hat with a Rib •
• Cuffed Basket •
The Purl Stitch
The purl stitch is the second most important stitch in knitting. The purl stitch is like doing the knit stitch backward.
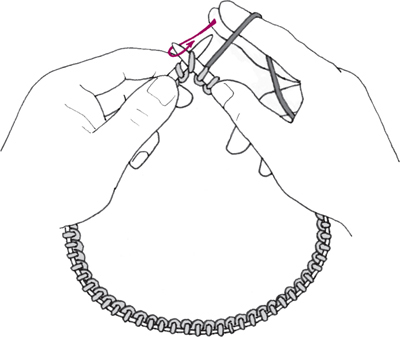
Just as with the knit stitch, some people hold the yarn in their left hand to do the purl stitch (Continental style), and some people hold the yarn in their right hand (English style, or throwing). I prefer to hold the yarn in my left hand. The illustrations on the opposite page show the way I hold the yarn, which is not traditional Continental-style knitting, but it is the easiest way I have found to do the purl stitch.
After you learn the purl stitch, you can start making stitch patterns and textures by using the purl stitch and the knit stitch together. You’ll learn more about this in Chapter 4.

Step 1: To begin, hold the yarn strand to the front in your left hand and insert the right needle into the front of the stitch from the right to the left. I like to pinch the yarn in between my left thumb and pointer finger.
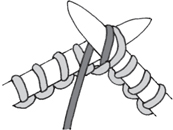
Step 2: Bring the yarn up and over the right needle. Hang on to the yarn to create tension.
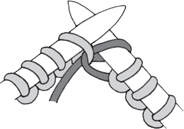
Step 3: Pull the loop on the right needle through the stitch on the left needle toward the back.
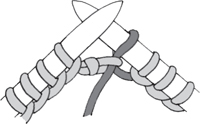
Step 4: Take the stitch off the left needle. You have completed a purl stitch!
ENGLISH-STYLE KNITTING, OR THROWING
Step 1: Drape the yarn over the right pointer finger. Squeeze the yarn in between the pointer and middle finger to create tension on the yarn. Insert the right needle into the front of the stitch from the right to the left. Bring the yarn up and over the right needle.
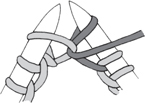
Step 2: Pull the new stitch through.

Step 3: Take the stitch off the left needle.
TIP
There are old, traditional rhymes for learning the purl stitch. Here is one that you might like:
Step 1: UNDER the fence
Step 2: CATCH the sheep
Step 3: BACK we come
Step 4: And OFF we leap.
It is important to be able to know what type of stitch you are looking at on your needles, especially when you are creating ribbing and other stitch patterns using the knit stitch and the purl stitch.

KNIT STITCHES: When you are doing stockinette stitch (knitting every stitch in the round), the knit side is usually the right side of the fabric, or the side that is seen when wearing the item: it’s the outside of all the projects we made in Chapter 2. The fabric is smooth, and when you look at a knit stitch on the needles, you will see a V-shape directly under the needles.
PURL STITCHES: The purl side is usually the wrong side of the fabric, or the side that isn’t seen when wearing the item, like the insides of the projects in Chapter 2. The purl side of the fabric isn’t as smooth as the knit side, and when you look at a purl stitch on the needles, you will see a loop or bump directly under the needles.
• • • • •
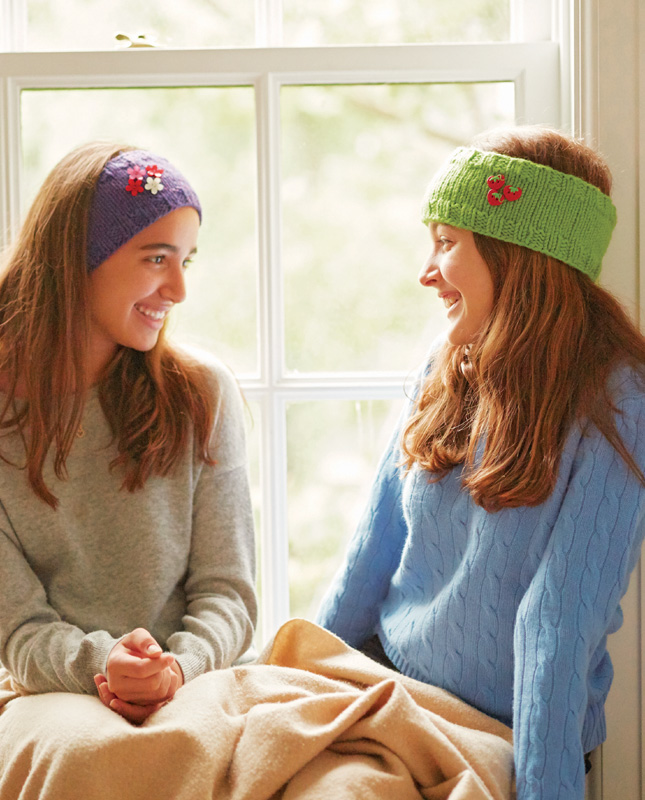
A headband is a great gift item because it is a small project and can be finished in a short period of time. You can personalize your headband with buttons or tiny pom-poms, or you can leave it plain. Have fun with this fast project that introduces you to the purl stitch!
SIZES
Small (Medium, Large), to fit a child (teen, adult). Note: Turn to Cowl for help following a pattern with different sizes.
YARN
 1 skein Bulky weight (about 100 yards for all sizes)
NEEDLES
US size 9 / 5.5 mm, 16-inch circular needles
GAUGE
4 stitches per inch in stockinette stitch
OTHER THINGS YOU’LL NEED
Stitch marker
Ruler or tape measure
Scissors
Yarn needle
Optional:
Pom-pom maker or cardboard
Sewing needle and thread
1-inch buttons (size can vary)
Before you begin, you’ll need to know how to:
START HERE!
Cast on 68 (72, 76) stitches. Make a butterfly with the end. Place a stitch marker on the first stitch.
Join to work in the round, being careful not to twist the stitches.
KNITTING THE RIBBED BOTTOM EDGE
Rounds 1, 2, 3, and 4: Knit 2 stitches, purl 2 stitches. Repeat to the end of the round. (See Tip.)
TIP
To rib, knit 2 stitches, bring the yarn to the front and in between the needles. Purl 2 stitches, then bring the yarn to the back and in between the needles. You are now ready to knit 2 stitches again.
KNITTING THE CENTER OF THE HEADBAND
Starting with Round 5, knit every stitch until the headband measures 2½ (2¾, 3) inches from the cast-on edge.
KNITTING THE RIBBED TOP EDGE
Rounds 1, 2, 3, and 4: Knit 2 stitches, purl 2 stitches. Repeat to the end of the round.
Bind off loosely using all knit stitches.
Cut the yarn, leaving a 6-inch end. Pull the end through the remaining stitch and gently tighten. Place this end on a yarn needle.
FINISHING THE HEADBAND
Weave in the end by pulling it through 5 or 6 stitch bumps on the wrong side of the fabric and trim, leaving a ¼-inch end.
Unwind the butterfly. Place the end on a yarn needle, weave in, and trim as described above.
ADDING EMBELLISHMENTS
To add pom-poms: Make three 1-inch pom-poms using a 1-inch piece of cardboard and attach to the front of the headband.
To add buttons: With a needle and thread, sew on a few fun buttons.
Buttons are a great way to embellish your projects and make them more interesting and fun! The Headband project uses buttons for decoration, and the Fox Pillow uses buttons for eyes.
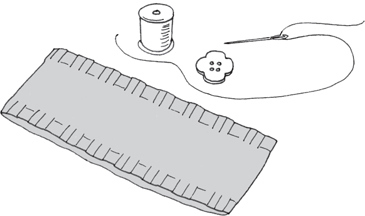
Step 1: Gather a sewing needle and matching thread. Cut a 12-inch length of thread. Place the needle onto the thread. Pull the end through to make a 3-inch tail so it doesn’t become unthreaded while you are working.
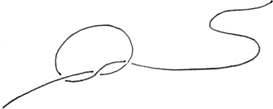
Step 2: Tie a knot at the end of the thread that’s not pulled through the needle by making a loop and pulling the end through the loop. Do this several times in the same place, so the knot becomes a little bigger and will catch when it is pulled through the knit fabric. Trim the end close to the knot.
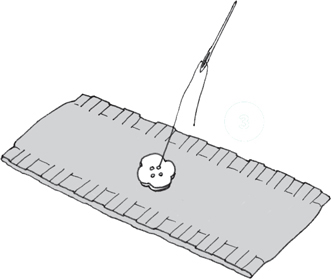
Step 3: Hold your button in the place you want to stitch it down. Pull the needle up from the wrong side of the fabric and go through the hole in the button.
Step 4: Buttons have two holes or four holes, or a shank on the back (a loop the thread can pass through without showing on the front). Go through the holes or the shank and through to the back of the knitted fabric many times until you feel like the button is securely fastened to the fabric.
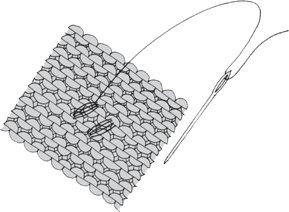
Step 5: When you have gone through the holes in the button or the shank many times and it is securely fastened to the fabric, pull the needle and thread to the wrong side of the fabric.
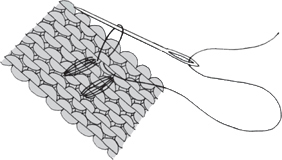
Step 6: Go through a stitch with the needle, but don’t pull the thread all the way through. Leave a small loop of thread. Pull the needle and thread through the loop and pull up tightly. This ties a knot in the thread. Repeat this a couple of times. Cut the thread, leaving a ¼-inch end.
• • • • •
Now let’s take the purl stitch and ribbed edging and make a hat. The ribbed edging will lie flat and will pull in a bit, instead of rolling up. This makes it a great edging for a hat, because it stays on your head and fits snugly to keep your ears warm.
SIZE
One size, to fit a large child, teen, or small adult
YARN
 1 skein of Super Bulky weight (about 100 yards)
NEEDLES
US size 13 / 9 mm, 16-inch circular needles
GAUGE
2¼ stitches per inch in stockinette stitch
OTHER THINGS YOU’LL NEED
Stitch marker
Ruler or tape measure
Scissors
Yarn needle
Faux Fur Pom-pom from Premier Yarns, or make your own
Before you begin, you’ll need to know how to:
Join stitches to work in the round
Knit two stitches together (decrease)
START HERE!
Cast on 44 stitches. Make a butterfly with the end. Place a stitch marker on the first stitch.
Join to work in the round, being careful not to twist the stitches.
KNITTING THE RIBBED EDGE OF THE HAT
Rounds 1, 2, 3, and 4: Knit 2 stitches, purl 2 stitches. Repeat to the end of the round. (See Tip for help on working the rib.)
KNITTING THE BODY OF THE HAT
Starting with Round 5, knit every stitch until the hat measures 6½ inches from the cast-on edge.
Decrease for the top of the hat:
Round 1: Knit 2 stitches, knit 2 stitches together. Repeat to the end of the round. There are now 33 stitches on the needles.
Round 2: Knit every stitch.
Round 3: Knit 1 stitch, knit 2 stitches together. Repeat to the end of the round. There are now 22 stitches on the needles.
Rounds 4 and 5: Knit every stitch.
Round 6: Knit 2 stitches together. Repeat to the end of the round. There are now 11 stitches on the needles.
Cut the yarn, leaving an 8-inch end. Place the end on a yarn needle. Pull the end through all the stitches, one at a time, and take each stitch off the knitting needles as you go.
When all of the stitches are on the end, pull the end up tightly to close the hole. To secure the hole more tightly, thread the needle through the gathered stitches again.
Pull the end through to the inside of the hat.
FINISHING THE HAT
Weave in the end by pulling it through 5 or 6 stitch bumps on the inside of the hat.
Unwind the butterfly. Place the end on a yarn needle and weave in as described above.
Trim the ends to a ¼ inch.
ATTACHING THE POM-POM
Place the end from the pom-pom on a yarn needle. Pull the end through at the top of the hat at the gathered center.
Pull the second end through to the inside, too, but not through the exact same spot.
Tie the ends in a tight knot to secure the pom-pom, and trim the ends to a ¼ inch.
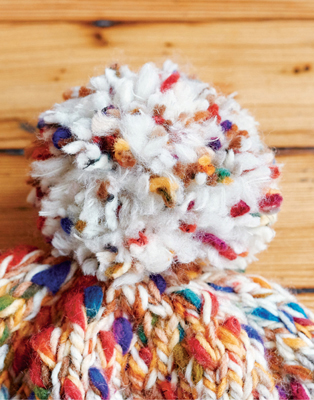
NOTE
The sample on page 88 has a store-bought pom-pom, but you could make your own 3-inch pom-pom like the one shown here with leftover yarn, using a 3-inch piece of cardboard or a large pom-pom maker. For variety, try using two different yarns together. (For the pom-pom shown here, I used 1 strand of white and 1 strand of colorful yarn—I just held them together when I wrapped them around the cardboard.)
• • • • •
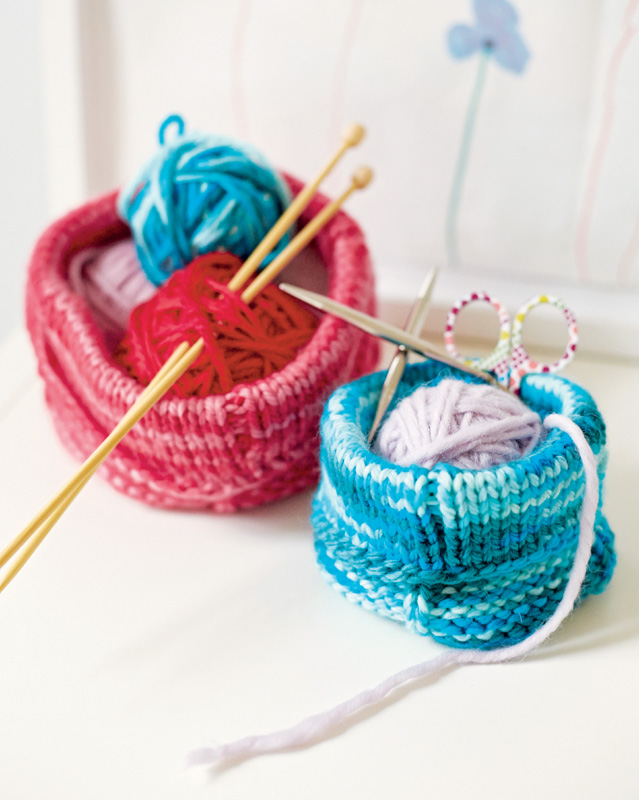
These baskets are fun to knit, and then you can store your treasures in something you made, which makes them even more special. There are two sizes to choose from: small or large. Remember, small-size directions are written first; large-size directions are in the parentheses, unless written out separately.
You will knit most of the stitches for this basket, but every once in a while you will put in a purl stitch, so you’ll need to do a little counting. At the end, you turn your basket inside out, so the purl side is on the outside.
SIZE
Small (Large)
YARN
 1 skein Bulky weight (about 100 yards for either size)
NEEDLES
US size 10½ / 6.5 mm, 16-inch circular needles
GAUGE
3½ stitches per inch in stockinette stitch
OTHER THINGS YOU’LL NEED
Stitch marker
Ruler or tape measure
Scissors
Yarn needle
Before you begin, you’ll need to know how to:
Join stitches to work in the round
Knit two stitches together (decrease)
START HERE!
You are starting at the open end of the basket. Cast on 44 (60) stitches. Make a butterfly with the end. Place a stitch marker on the first stitch.
Join to work in the round, being careful not to twist the stitches.
KNITTING THE BASKET
Round 1:
Small size: Knit 10 stitches, purl 1 stitch. Repeat to the end of the round.
Large size: Knit 14 stitches, purl 1 stitch. Repeat to the end of the round.
Both sizes: Repeat Round 1 until the basket measures 5 (7) inches from the cast-on edge.
Decrease rounds for the small basket:
Round 1: Knit 9 stitches, knit 2 stitches together. Repeat to the end of the round. There are now 40 stitches on the needles.
Rounds 2, 3, and 4: Knit all of the stitches.
Round 5: Knit 8 stitches, knit 2 stitches together. Repeat to the end of the round. There are now 36 stitches on the needles.
Rounds 6 and 7: Knit all of the stitches.
Round 8: Knit 2 stitches together. Repeat to the end of the round. There are now 18 stitches on the needles.
Decrease rounds for the large basket:
Round 1: Knit 4 stitches, knit 2 stitches together. Repeat to the end of the round. There are now 50 stitches on the needles.
Rounds 2, 3, and 4: Knit all of the stitches.
Round 5: Knit 3 stitches, knit 2 stitches together. Repeat to the end of the round. There are now 40 stitches on the needles.
Rounds 6 and 7: Knit all of the stitches.
Round 8: Knit 2 stitches together. Repeat to the end of the round. There are now 20 stitches on the needles.
Cut the yarn, leaving an 8-inch end. Place the end on a yarn needle.
Pull the end through all the stitches, one at a time, and take each stitch off the knitting needles as you go.
When all of the stitches are off the knitting needles and on the yarn end, pull the end up tightly to close the hole. To secure the hole more tightly, thread the needle through the gathered stitches again.
FINISHING THE BASKET
Weave in the end by pulling it through 5 or 6 stitch bumps on the wrong side of the fabric (which in this case is the side facing you).
Unwind the butterfly. Place the end on a yarn needle and weave in on the purl side of the fabric as described above.
Trim the ends to a ¼ inch.
Turn the basket inside out. You will see the ridges formed by the purl stitches in the fabric. Fold over the top edge to form a cuff.
Carrying Colors for Stripes
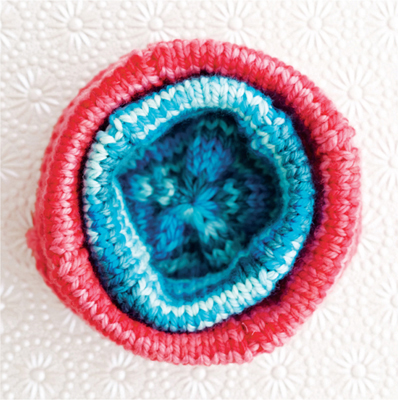
Carrying colors means you are working with more than one color at a time in your knitting, no cutting required! Carrying the yarn means bringing it along the wrong side of the work, without cutting it, until it is used again. Don’t pull too tightly as you are carrying the unused yarn. My rule for carrying the yarn colors up on the inside of the fabric is not to carry a strand of yarn up for more than 5 rounds. If you are carrying up for more than 5 rounds, you will want to cut the yarn and reattach it when it is needed again.
TIP
Before knitting with your second color of yarn, make sure you twist the strand once around the strand of the first color. This prevents a hole from appearing in the knit fabric you are making.
The Whipstitch
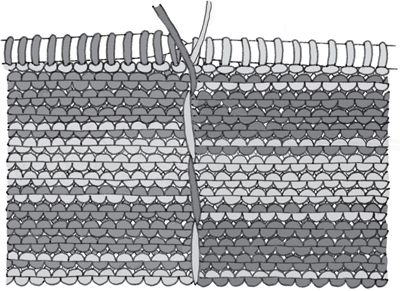
The whipstitch is a simple way to stitch two edges together when knitting in the round.
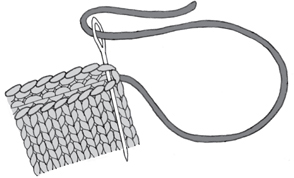
Step 1: Place the tail from your knitting (or an 8-inch cut length of yarn) on a yarn needle. Line up the two edges that you will whipstitch together. Starting at one end, place the yarn needle under and through one loop on the outside edge of one side, and then through the outside loop directly across on the other side.
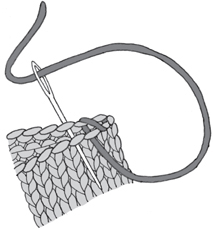
Step 2: Pull the yarn all the way through and move the yarn needle back to the first side, to the next set of stitches over. Repeat Step 1. Continue repeating Steps 1 and 2 until you are all the way to the end of the edges.
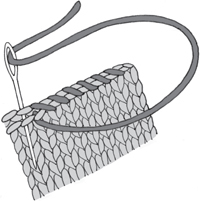
Step 3: Pull the ends through to the inside, weave them in, and trim.
• • • • •
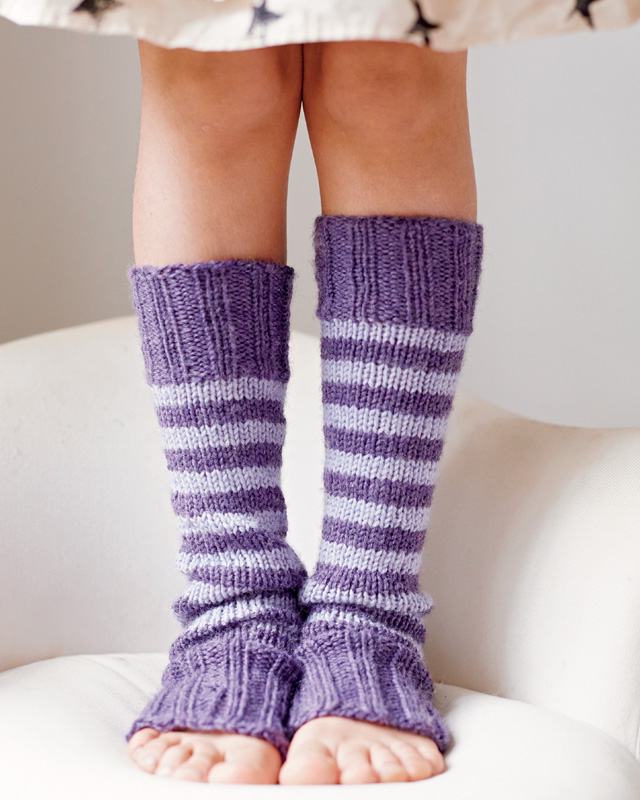
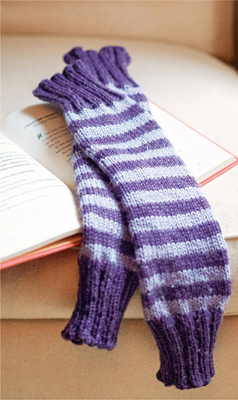
In this project, you will be using your knit and purl stitches to make ribbed fabric, and you’ll carry the colors up the wrong side, or inside, of the fabric as you stripe, which makes it easier to enjoy knitting stripes.
SIZE
Small (Medium, Large); 16 (17, 18) inches long, to fit an 8- (9-, 10-) inch leg circumference. Note: Turn to Cowl for help following a pattern with different sizes.
YARN
 2 skeins Worsted weight in two different colors (about 100 yards per skein of each color)
NEEDLES
US size 7 / 4.5 mm and US 8 / 5 mm, 12-inch circular needles. Note: This is the first project where two different needle sizes are used. We’ll be changing needle sizes to get parts of the leg warmers to be tighter and looser so they fit better.
GAUGE
4½ stitches per inch in stockinette stitch on larger-size needles
OTHER THINGS YOU’LL NEED
Stitch marker
Ruler or tape measure
Scissors
Yarn needle
Before you begin, you’ll need to know how to:
START HERE!
With the smaller-size needles and your first color, cast on 36 (40, 44) stitches. Make a butterfly with the end. Place a stitch marker on the first stitch.
Join to work in the round, being careful not to twist the stitches.
KNITTING THE BOTTOM RIBBED EDGE
Round 1: Knit 2 stitches, purl 2 stitches. Repeat to the end of the round. (See Tip for help on working the rib.)
Repeat Round 1 until the leg warmer measures 3 inches from the cast-on edge.
Knit 1 round onto the larger-size needles.
KNITTING THE STRIPED SECTION
Switch to your second color by tying a half-knot around the working yarn or using the more advanced method described (“Making Stripes”). Leave a 6-inch end of the second color to weave in later. Do not cut the first color’s strand. Slide the knot up to the needles and begin to knit with the second color.
Knit 4 rounds with the second color.
Carry the first color strand up to the start of the next round. Before knitting with the first color, remember to twist the strand once around the strand of the second color.
Knit 4 rounds with the first color.
Repeat the stripe pattern: 4 rounds of the second color, then 4 rounds of the first color. Be sure to twist the strands each time you change colors.
Continue with the stripes until the leg warmer measures close to 13 (14, 15) inches from the cast-on edge and end with a stripe of the second color.
Switch to the first color. This time you can cut the second color strand of yarn, leaving a 6-inch end.
Switch to the smaller-size needles by knitting the next round onto the new needles.
Round 1: Knit 2 stitches, purl 2 stitches. Repeat to the end of the round.
Repeat Round 1 until the ribbing measures 3 inches from the start of the ribbed edge.
Bind off very loosely. Do this by keeping your stitches very large and relaxed. This will make for a stretchier edge to fit over your foot and leg.
Cut the yarn, leaving a 6-inch end. Pull the end through the last stitch and gently tighten.
FINISHING THE LEG WARMER
Place each end on a yarn needle and weave in by pulling the end through 5 or 6 stitch bumps on the inside of the leg warmer.
Unwind the butterfly. Place the end on a yarn needle and weave in as described above.
Trim the ends to a ¼ inch.
Repeat to make a second leg warmer.
• • • • •

I love keeping a traditional paper notebook with me to take notes, sketch, and clip in photos and tickets as I travel. You might like to do these things, too, but if you are more into technology, you could knit this pocket to hold your e-reader or tablet. Make it your own! This is a great project for using up leftover yarn.
FINISHED MEASUREMENTS
7½ inches wide, 11 inches tall
YARN
 1 skein Worsted weight in main color, plus small amounts of Worsted weight in 7 other colors (about 150 yards total). Note: This is a great project to use up leftover yarns! Just make sure they are all Worsted weight.
NEEDLES
US size 8 / 5 mm, 16-inch circular needles
GAUGE
4½ stitches per inch in stockinette stitch
OTHER THINGS YOU’LL NEED
Stitch marker
Ruler or tape measure
Scissors
Yarn needle
Before you begin, you’ll need to know how to:
START HERE!
Starting at the bottom edge and using your first color, cast on 72 stitches, leaving a 12-inch end to use later. Make a butterfly with the end. Place a stitch marker on the first stitch.
Join work in the round, being careful not to twist the stitches.
KNITTING STRIPES
Step 1: Knit 4 rounds.
Step 2: Cut the yarn, leaving a 6-inch end. Then switch to the next color by tying the new color around the last color with a half-knot or using the more advanced method described (“Making Stripes”). Slide the knot up to the needle. Start to knit with the new color.
Repeat Steps 1 and 2 until there are 9 stripes, ending with your first color.
Switch to your final color, which will be the main color of your pocket, and knit every stitch until the pocket measures 9 inches from the cast-on edge.
KNITTING THE RIBBED EDGE
Round 1: Knit 2 stitches, purl 2 stitches. Repeat to the end of the round. (See Tip for help on working the rib.)
Repeat Round 1 until the pocket measures 11 inches from the cast-on edge.
Bind off loosely.
Cut the yarn, leaving a 6-inch end. Pull the end through the remaining stitch and gently tighten.
FINISHING THE POCKET
Place the end on a yarn needle. Weave in the end by pulling it through 5 or 6 stitch bumps on the wrong side of the fabric and trim, leaving a ¼-inch end.
Unwind the butterfly and place the end on a yarn needle. Use the whipstitch to close the bottom of the pocket.
Pull the end to the inside, weave it in, and trim, leaving a ¼-inch end.