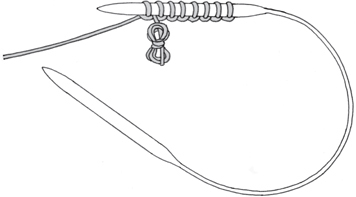
Step 1: Cast on the stitches just as you would for any project. After you cast on, the stitches are on the right needle. Make a butterfly with the end.
Advanced Skills and Projects
Now is the time for you to really take off with your knitting and try some more adventurous projects! You will wow your friends and family with your knitting progress when you share these designs with them. As always, there are lessons included for any new skills you will need along the way.
• Knitting in the Front and Back of the Same Stitch (Increasing) •
• Casting On a Small Number of Stitches Using Circular Needles •
• A Cable Stitch •
• Yarn Over •
• • • • •
What You’ll Make
• Snowman •
• Mason Jar Cozies •
• Fox Pillow •
• Puppy & Bunny Hand Puppets •
Working Back and Forth
There are two main ways to knit. So far, you have been knitting in the round. Another way to knit is back and forth, or flat. Good examples of projects you can make by knitting back and forth are a flat one-sided scarf or a blanket. We are going to use a circular needle to knit back and forth by turning your work around and going back in the other direction after you cast on, instead of joining to work in the round.

Step 1: Cast on the stitches just as you would for any project. After you cast on, the stitches are on the right needle. Make a butterfly with the end.
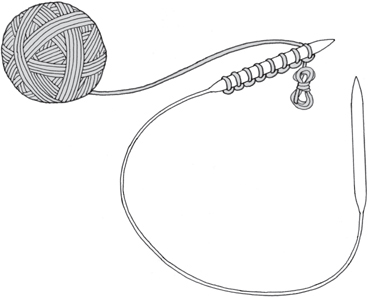
Step 2: Move the needle with the stitches to your left hand. Make sure the butterfly end is in the front and the yarn attached to the ball is behind the needle.
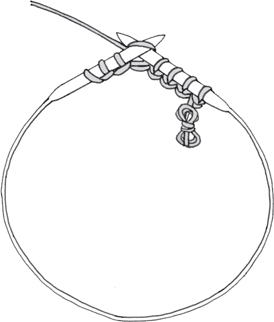
Step 3: Begin knitting the stitches. When you get to the end of the row (“row” is used instead of “round” when knitting back and forth), the stitches will be on the right needle.

Step 4: Move the needle with the stitches to your left hand.
Before you begin the next row, make sure the yarn is under the needle and held behind the needle. If you bring the yarn over the top of the needle, you will be adding unwanted stitches to the work. Begin working the next row.
Repeat Steps 3 and 4.
NOTE
If you knit every row, it is called garter stitch.
If you knit 1 row and purl 1 row and then repeat those 2 rows, it is called stockinette stitch.
When you are working back and forth, stitch patterns like stockinette stitch are made differently from how they are made in the round.
Knitting in the Front and Back of the Same Stitch (Increasing)
There are many times in knitting where you will need to increase the number of stitches on your needles. This is called shaping. One of the most common increase methods is knitting in the front and back of the same stitch. This is often abbreviated kfb.
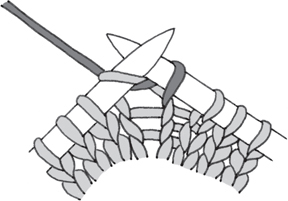
Step 1: Knit the stitch as usual, but do not take the stitch off the left needle.
Step 2: Bring the right needle behind the left needle and knit a stitch through the back loop of the same stitch.
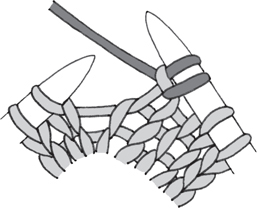
Step 3: Take the stitch off the left needle. You have increased 1 stitch (you have 2 stitches on the right needle made from 1 stitch).
Casting On a Small Number of Stitches Using Circular Needles
For some of the toy patterns using 12-inch circular needles, you will need to cast on a small number of stitches to get started. You have to get enough length with the cast-on stitches so that they will reach all the way around the circular needles. Then you can join the yarn to work in the round without it stretching out too much.

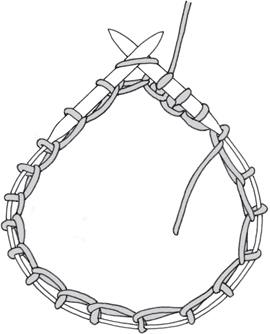
Step 1: Cast on as you would for any project, but leave extra space between each stitch, about a ½ inch or so.
Step 2: As you cast on, spread the stitches apart. You can see that the cast-on stitches have space in between them, making it possible for the stitches to reach all the way around the needles so you can join to work in the round.
TIP
The stitches may become even more stretched out when you join to work in the round, and this may be a bit awkward at first. After you work the first few rounds, the stitches will become much more relaxed and easier for you to move around the needles.
• • • • •
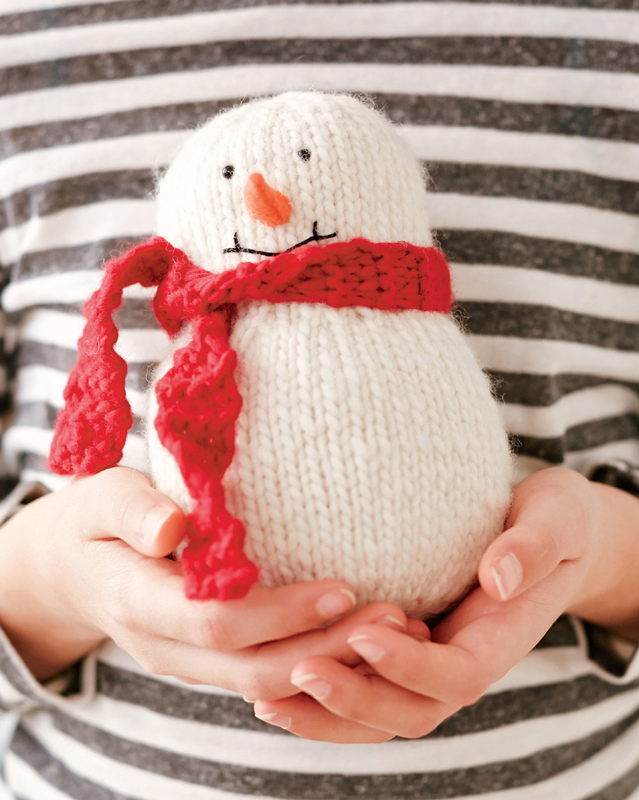
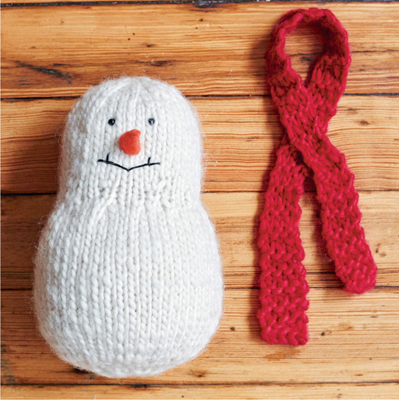
Toys are among my favorite things to knit. For a new knitter, the snowman is the perfect starting point. The shape is simple to knit, and by adding eyes and a carrot nose, you have an instant snowman!
MEASUREMENTS
6¾ inches tall, about 4½ inches wide
YARN
 1 skein white Bulky weight for the snowman (about 100 yards); small amount of Bulky weight for the scarf
NEEDLES
Snowman: US size 9 / 5.5 mm, 12-inch circular needles. Scarf: US size 10 / 6 mm, 24-inch circular needles
GAUGE
Snowman: 4 stitches per inch in stockinette stitch. Scarf: 3 stitches per inch in garter stitch
OTHER THINGS YOU’LL NEED
Stitch marker
Ruler or tape measure
Yarn needle
Scissors
Poly-pellets (optional; see Note)
Fiberfill
Two 4.5 mm safety eyes
Paper and pencil
Sewing pins
A small piece of orange felt
Sewing needle and matching thread
Embroidery needle (optional)
Black embroidery floss
Before you begin, you’ll need to know how to:
Cast on a small number of stitches using circular needles
Join stitches to work in the round
Knit in the front and back of the same stitch (increase)
Knit two stitches together (decrease)
START HERE!
Starting at the bottom of the snowman with the white yarn and the smaller needle, loosely cast on 24 stitches, leaving an 8-inch end. You will use the end to close up the hole later. Make a butterfly with the end. Place a stitch marker on the first stitch.
Join to work in the round, being careful not to twist the stitches.
KNITTING THE BODY
Round 1: Knit every stitch.
Round 2: Knit 1 stitch, knit in the front and back of the next stitch. Repeat to the end of the round. There are now 36 stitches on the needles.
Rounds 3 and 4: Knit every stitch.
Round 5: Knit 2 stitches, knit in the front and back of the next stitch. Repeat to the end of the round. There are now 48 stitches on the needles.
Move the stitch marker under the first stitch on Round 5. Leave it there. Continue to knit every stitch until the snowman measures 3½ inches above the stitch marker left on Round 5.
KNITTING THE HEAD
Round 1: Knit 2 stitches, knit 2 stitches together. Repeat to the end of the round. There are now 36 stitches on the needles.
Round 2: Knit 2 stitches, knit 2 stitches together. Repeat to the end of the round. There are now 27 stitches on the needles.
Round 3: Knit every stitch.
Round 4: Knit 2 stitches, knit in the front and back of the next stitch. Repeat to the end of the round. There are now 36 stitches on the needles.
Round 5: Knit every stitch.
Round 6: Knit 8 stitches, knit in the front and back of the next stitch. Repeat to the end of the round. There are now 40 stitches on the needles.
Move the stitch marker under the first stitch on Round 6. Leave it there. Continue to knit every stitch until the head measures 2 inches above the stitch marker left on Round 6.
Decrease for the top of the head:
Round 1: Knit 2 stitches, knit 2 stitches together. Repeat to the end of the round. There are now 30 stitches on the needles.
Rounds 2 and 3: Knit.
Round 4: Knit 1 stitch, knit 2 stitches together. Repeat to the end of the round. There are now 20 stitches on the needles.
Round 5: Knit 2 stitches together. Repeat to the end of the round. There are now 10 stitches on the needles.
Cut the yarn, leaving an 8-inch end. Pull the end through the remaining stitches one at a time and take each stitch off the needle as you go around. Do not pull the hole closed yet.
CLOSING THE BOTTOM OF THE TOY
Unwind the butterfly and place the end on a yarn needle. Pull the end through the stitches going around the hole. Pull the end up tight as you gather the hole closed. Take any further stitches needed to completely close the hole. Pull the end to the inside and pop the needle back out to the outside of the toy, then trim the end so it goes inside the toy.
ATTACHING THE EYES
See the next page for instructions on attaching the snowman’s eyes.
How to Attach the Snowman’s Eyes
Safety eyes are great for using on toys or other items when you are making faces. Safety eyes are considered a choking hazard, so when you are making something for a young child or toddler or baby, you will need to embroider eyes onto your item (for an example of how to embroider an eye).

Safety eyes come in many different styles, but all of the styles have an eye piece and a backing. The backing has a hole in it. The eye piece has a stem with ridges on it.
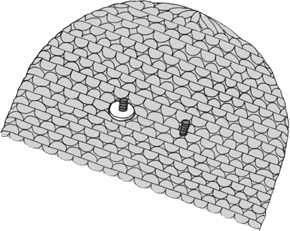
To place and lock in the safety eyes:
Push the eye pieces through the fabric about 1½ inches below the top of the snowman’s head, with 3 knit stitches between the eyes. Snap the back onto the stem, going over a couple of the ridges. This is really difficult to do: it takes a lot of hard pushing to get the back to snap on.
TIP
Remember that once the eye piece and the back are snapped together, it is basically permanent and you can’t redo it.
If you are using poly-pellets, fill 1 inch of the bottom of the snowman. Stuff with the fiberfill up to the top of the head until firm. Do not overstuff.
NOTE
Poly-pellets are tiny plastic beads that are used in stuffed toys to give them weight and to make them feel like a beanbag. These pellets are considered a choking hazard, so don’t use them in toys for babies and children up to five years old.
CLOSING THE TOP OF THE TOY
Place the end on a yarn needle and pull up tight to close the hole. Pull the end through to the inside and pop the needle back to the outside, then trim so it goes back inside the toy.
FINISHING THE SNOWMAN
Carrot Nose
Instructions on creating the snowman’s nose.
Mouth
Instructions on embroidering the snowman’s smile.
KNITTING THE SCARF
With the scarf yarn and the larger needles to knit back and forth, cast on 4 stitches. Make a butterfly with the end. Turn the work around, making sure the working yarn is under the needles.
Knit 4 stitches. Turn the work around, making sure the working yarn is under the needles. Knit 4 stitches.
Continue knitting 4 stitches on each row in this way until the scarf measures 18 inches in length.
Bind off. Cut the yarn, leaving a 6-inch end. Pull the end through the remaining stitch and gently tighten. Place the end on a yarn needle. Weave in the end through 5 or 6 stitch bumps on one side. Unwind the butterfly, place the end on a yarn needle, and weave in as described above. Trim the ends to a ¼ inch.
Tie the scarf around the snowman’s neck.
How to Make the Snowman’s Carrot Nose
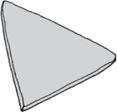
Step 1: Trace the triangle template onto a piece of paper and cut it out. Pin the nose pattern on the orange felt and cut it out—it doesn’t have to be exact. Every snowman can have a slightly different-shaped nose, just like they do in your neighborhood in the winter.
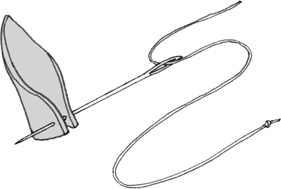
Step 2: Thread a sewing needle with matching orange thread. Pinch the corners of the triangle on the bottom edge together and use the whipstitch to sew the side edges together.
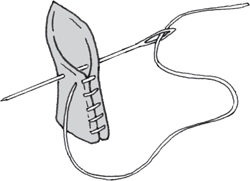
Step 3: Continue to whipstitch the edges together to the point of the triangle. Tie a knot in the thread, pull the end to the inside of the carrot, and trim.
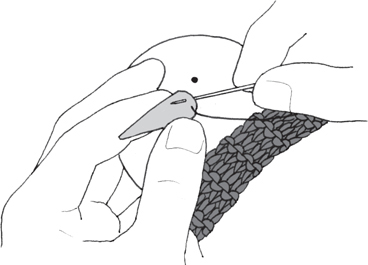
Step 5: With the sewing needle and matching orange thread, whipstitch the nose onto the face of the snowman. Tie a knot in the thread to secure and pull the end to the inside of the toy and pop the needle back out to the outside of the toy, then trim the end so it goes back inside the toy.
How to Embroider the Snowman’s Smile
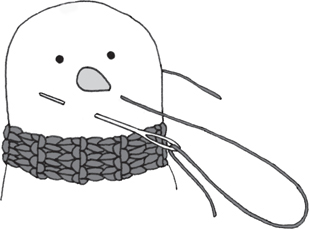
Step 1: Place a 10-inch cut length of embroidery floss on an embroidery or a yarn needle. Insert the needle on the right side of the snowman’s head (as you are looking at the toy’s face) and have the needle come out at the right side of the smile. Pull the needle and embroidery floss through, leaving a 2-inch end sticking out on the side.
Insert the needle down 2 rows and 2 stitches to the left from where it came out. Turn the needle so the tip comes out up 2 rows and 2 stitches to the left of where you inserted it. Pull the needle and floss through. Do not pull too tightly.

Step 2: Insert the needle back into the bottom center stitch, and then turn the needle to come out the same far left stitch again. Pull the needle and floss through.
Step 3: To make the lines at the ends of the smile, first insert the needle up a couple of stitches from the left side of the smile and turn the needle to come back through, 2 stitches down from the left corner of the mouth.

Step 4: Insert the needle in the left corner of the mouth and then come out at the other end of the smile, on the right side.

Step 5: Repeat Steps 3 and 4 on the right side of the smile, then pull the needle out off to the right side of the snowman’s head, near where you began Step 1.
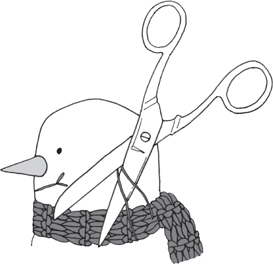
Step 6: Take your scissors and carefully cut the ends close to the surface of the toy, so they will sink back inside the toy.
• • • • •
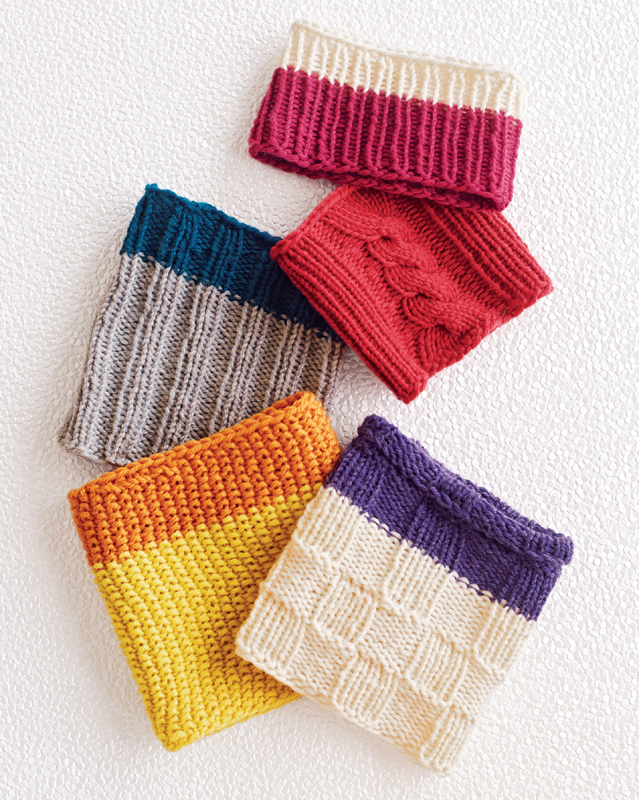
These little cozies will help you learn new stitch patterns and even how to turn a cable. In the end, you will have an adorable cozied jar that can be used as a glass for drinking water, a container for pencils or knitting needles, a vase, or a place to store your button collection.
SIZE
To fit 12-inch- and 10-inch-circumference Mason jars
YARN
 About 100 yards Worsted weight (for each cozy)
NEEDLES
For a 12-inch Mason jar: US size 7 / 4.5 mm, 16-inch circular needles
For a 10-inch Mason jar: US size 8 / 5 mm, 12-inch circular needles
GAUGE
For a 12-inch Mason jar: 5 stitches per inch in stockinette stitch
For a 10-inch Mason jar: 4½ stitches per inch in stockinette stitch
OTHER THINGS YOU’LL NEED
Stitch marker
Ruler or tape measure
Scissors
Yarn needle
Cable needle (for Cable Stitch Cozy only)
Before you begin, you’ll need to know how to:
Cast on a small number of stitches using circular needles
From left to right Cable Stitch Cozy, 2-by-2 Rib Stitch Cozy, Basketweave Stitch Cozy, Seed Stitch Cozy, 1-by-1 Rib Stitch Cozy
NOTE
This cozy will fit a 12-inch-circumference Mason jar.
START HERE!
With the first color of your choice, and the 16-inch circular needles, loosely cast on 42 stitches. Make a butterfly with the end. Place a stitch marker on the first stitch.
Join to work in the round, being careful not to twist the stitches.
Round 1: Knit 1 stitch, purl 1 stitch. Repeat to the end of the round. The last stitch will be a knit stitch.
Round 2: Purl 1 stitch, knit 1 stitch. Repeat to the end of the round. The last stitch will be a purl stitch.
Repeat Rounds 1 and 2 (this is called seed stitch) until the cozy measures 4½ inches from the cast-on edge. Cut the yarn, leaving a 6-inch end.
Attach the new color by tying a half-knot with the new color around the old color or using the more advanced method described (“Making Stripes”). Slide the knot up to the needle. Continue to work in seed stitch (repeat Rounds 1 and 2) in the new color until the cozy measures 6½ inches from the cast-on edge.
Bind off loosely.
Cut the yarn, leaving a 6-inch end. Pull the end through the remaining stitch and gently tighten.
FINISHING THE COZY
Place the end on a yarn needle. Weave in the end by pulling it through 5 or 6 stitch bumps on the inside of the fabric.
Unwind the butterfly. Weave in the remaining ends as described above.
Trim the ends to a ¼ inch.
START HERE!
With the first color of your choice and the 16-inch circular needles, loosely cast on 44 stitches. Make a butterfly with the end. Place a stitch marker on the first stitch.
Join to work in the round, being careful not to twist the stitches.
KNITTING THE COZY
Round 1: Knit 2 stitches, purl 2 stitches. Repeat to the end of the round.
Repeat Round 1 (this is called 2-by-2 rib stitch) until the cozy measures 4½ inches from the cast-on edge.
Attach the new color by tying a half-knot with the new color around the old color or using the more advanced method described (“Making Stripes”). Slide the knot up to the needle.
Continue to work in rib stitch (repeat Round 1) in the new color until the cozy measures 6½ inches from the cast-on edge.
Bind off loosely.
Cut the yarn, leaving a 6-inch end. Pull the end through the remaining stitch and gently tighten.
FINISHING THE COZY
Place the end on a yarn needle. Weave in the end by pulling it through 5 or 6 stitch bumps on the inside of the fabric.
Unwind the butterfly. Weave in the remaining ends as described above.
Trim the ends to a ¼ inch.
NOTE
This cozy will fit a short 12-inch-circumference Mason jar.
NOTE
This cozy will fit a 12-inch-circumference Mason jar.
START HERE!
With the first color of your choice and the 16-inch circular needles, loosely cast on 40 stitches. Make a butterfly with the end. Place a stitch marker on the first stitch.
Join to work in the round, being careful not to twist the stitches.
KNITTING THE COZY
Rounds 1: Knit 2 stitches, purl 2 stitches. Repeat to the end of the round.
Repeat Round 1 (this is called 2-by-2 rib stitch) until the cozy measures 4½ inches from the cast-on edge.
Attach the new color by tying a half-knot with the new color around the old color or using the more advanced method described (“Making Stripes”). Slide the knot up to the needle.
Continue to work in rib stitch (repeat Round 1) in the new color until the cozy measures 6½ inches from the cast-on edge.
Bind off loosely.
Cut the yarn, leaving a 6-inch end. Pull the end through the remaining stitch and gently tighten.
FINISHING THE COZY
Place the end on a yarn needle. Weave in the end by pulling it through 5 or 6 stitch bumps on the inside of the fabric.
Unwind the butterfly. Weave in the remaining ends as described above.
Trim the ends to a ¼ inch.
NOTE
This cozy will fit a 12-inch-circumference Mason jar.
START HERE!
With the first color of your choice and the 12-inch circular needles, loosely cast on 44 stitches. Make a butterfly with the end. Place a stitch marker on the first stitch.
Join to work in the round, being careful not to twist the stitches.
KNITTING THE COZY
Rounds 1 to 10: Knit 4 stitches, purl 4 stitches. Repeat to the end of the round.
Rounds 11 to 20: Purl 4 stitches, knit 4 stitches. Repeat to the end of the round. (Rounds 1 to 20 are called basketweave stitch.)
Repeat Rounds 1 to 10 one more time, for a total of 30 rounds.
Cut the yarn, leaving a 6-inch end.
Attach the new color by tying a half-knot with the new color around the old color or using the more advanced method described (“Making Stripes”). Slide the knot up to the needle.
Continue to work Rounds 1 to 20 in basketweave stitch in the new color.
Bind off loosely.
Cut the yarn, leaving a 6-inch end. Pull the end through the remaining stitch and gently tighten.
FINISHING THE COZY
Place the end on a yarn needle. Weave in the end by pulling it through 5 or 6 stitch bumps on the inside of the fabric.
Unwind the butterfly. Weave in the remaining ends as described above.
Trim the ends to a ¼ inch.
A Cable Stitch
Have you seen cabled sweaters or hats? Not only are they pretty, but making cables is really fun. The Mason Jar Cozy is a great small-size project on which to try twisting a cable. Knitting a cable is often called “turning a cable.” Once you understand how cables are made, you may want to add them to lots of your projects!

cable needle
To turn a cable, you will need a cable needle. A cable needle is a small needle that has a slight bend in the center with points on either end. Cable needles come in different shapes and sizes: some are shaped more like a hook. All of these work fine, but you will want a cable needle that is a similar size to your knitting needle size in circumference, or a little smaller.
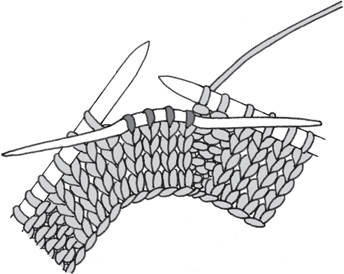
Step 1: Work to the spot where you are placing the cable twist. For the Cable Stitch Cozy, you slip the next 4 stitches onto the cable needle and hold it to the front of the work. These are half the stitches that make up the cable twist.
Step 2: Continue to knit the next 4 stitches on the left needle (these stitches are the other half of the cable twist), while keeping the cable needle in the front of the work.
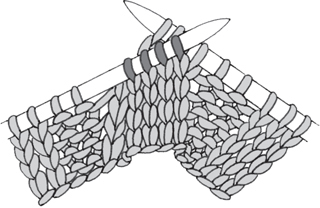
Step 3: Slip the stitches from the cable needle back onto the left needle, and knit all 4 of them. Some people just knit the stitches directly from the cable needle and don’t slide them back onto the left needle. See what works best for you.
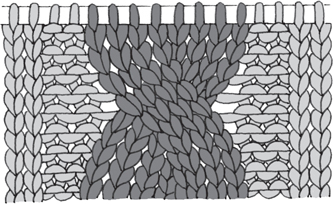
Step 4: You have made a cable! Continue working the rest of the round as directed in the pattern.
START HERE!
With the 12-inch circular needles, loosely cast on 36 stitches. Make a butterfly with the end. Place a stitch marker on the first stitch.
Join to work in the round, being careful not to twist the stitches.
KNITTING THE COZY
Rounds 1 to 7: Knit 12 stitches, purl 2 stitches, knit 8 stitches, purl 2 stitches, knit 12 stitches.
Round 8 (cable round): Knit 12 stitches, purl 2 stitches, place 4 stitches on the cable needle and hold the cable needle to the front (see cable stitch), knit the next 4 stitches, place the 4 stitches being held on the cable needle back on the left needle, knit 4 stitches, purl 2 stitches, knit 12 stitches.
Repeat Rounds 1 to 8 three more times, for a total of 32 rounds.
Work Rounds 1 to 7 one more time.
Bind off loosely.
Cut the yarn, leaving a 6-inch end. Pull the end through the remaining stitch and gently tighten.
FINISHING THE COZY
Place the end on a yarn needle. Weave in the end by pulling it through 5 or 6 stitch bumps on the inside of the fabric.
Unwind the butterfly. Weave in the remaining ends as described above.
Trim the ends to a ¼ inch.
NOTE
This cozy will fit a 10-inch-circumference Mason jar.
Yarn Over
A yarn over is a technique that is used to put a hole in the knit fabric on purpose. It is used for things like lace and to make buttonholes. Note: We are using a yarn over along with knitting two stitches together. A yarn over can also be used on its own as a way to increase one stitch.
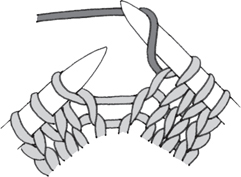
Step 1: To do a yarn over while using the knit stitch, bring the yarn in front of the right needle and then over the needle. The yarn is now in the back again. You have now added an extra stitch to your stitch count.
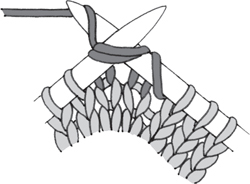
Step 2: After the yarn over, the pattern will tell you what to do on the next stitch. Since you have added an extra stitch on the right needle, the pattern will often tell you to knit 2 together to keep the stitch count the same as before.
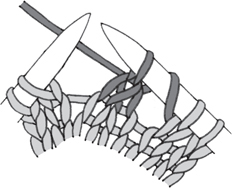
Step 3: Continue to work the rest of the stitches. When you come back to the yarn over on the next row or round, just work it like a regular stitch unless otherwise instructed.
• • • • •
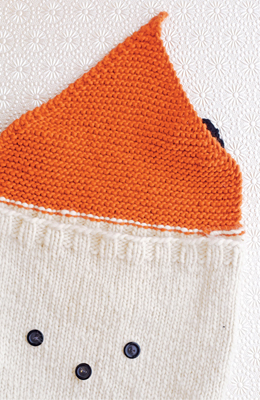
Every home needs a fox pillow! This is a good project for learning a few new tricks such as how to make a buttonhole using a yarn over. You will also knit back and forth while doing some shaping at the same time. These are important skills to learn to improve your knitting and continue making more challenging projects. Don’t worry, though: I’ll take you through the new skills step-by-step!
FINISHED MEASUREMENT
12-inch square
YARN
 2 skeins white Bulky Weight (about 240 yards); 1 skein orange Bulky Weight (about 120 yards); small amount of black Bulky Weight for the ears
NEEDLES
US size 10 / 6 mm, 24-inch circular needles
GAUGE
3½ stitches per inch in stockinette stitch
OTHER THINGS YOU NEED
Stitch marker
Ruler or tape measure
Scissors
Yarn needle
12-inch pillow form
Sewing pins
Sewing needle and black thread
Three ¾-inch black buttons
Before you begin, you’ll need to know how to:
Join stitches to work in the round
START HERE!
Starting with your white yarn, cast on 88 stitches, leaving an 18-inch end to use later. Make a butterfly with the end. Place a stitch marker on the first stitch.
Join to work in the round, being careful not to twist the stitches.
KNITTING THE PILLOW
Knit every stitch until the pillow measures 11 inches from the cast-on edge.
KNITTING THE TOP RIBBED EDGE
Rounds 1, 2, 3, and 4: Knit 2 stitches, purl 2 stitches. Repeat to the end of the round.
Bind off the first 44 stitches. (You will have 43 stitches on the left needle and 1 stitch on the right needle.) Knit 1 stitch.
Continue with purl 2 stitches, knit 2 stitches. Repeat to the end of the round. There are now 44 stitches on the needles.
Cut the white yarn, leaving a 6-inch end.
KNITTING THE NOSE FLAP
Attach the orange yarn by tying it in a half-knot and sliding the knot up to the needles or using the more advanced method described (“Making Stripes”). Now you will be working back and forth in rows.
Knit with orange yarn to the end of the row. Turn the work around, making sure the yarn is under the needle before you knit the first stitch. Knit back to the other end.
Knit every row for 18 more rows.
Decrease rows for the nose flap:
Row 1: Knit 1 stitch, knit 2 stitches together, knit to the last 3 stitches, knit 2 stitches together, knit 1 stitch.
Row 2: Knit every stitch.
Repeat Rows 1 and 2 until you have 4 stitches left on the needles.
KNITTING THE BUTTONHOLE
Next row: Knit 2 stitches together, do a yarn over, knit 2 stitches together. There are 3 stitches left on the needles.
Next row: Knit 3 stitches together. (This is done the same way as knitting 2 stitches together.) There is now 1 stitch on the needles.
Cut the yarn, leaving a 6-inch end. Pull the end through the remaining stitch.
Weave in the end on wrong side of the nose flap.
CLOSING THE PILLOW
Unwind the butterfly and place the 18-inch end on a yarn needle. Use the whipstitch to close the pillow along the bottom edge. Pull the end to the inside, weave in, and trim, leaving a ¼-inch end. Weave in all of the ends on the inside and trim.
KNITTING THE EARS
With the black yarn, cast on 10 stitches, leaving an 8-inch end to use later. Make a butterfly with the end. You are working back and forth in rows for the ear.
Rows 1 to 6: Knit every stitch.
Row 7: Knit 1 stitch, knit 2 stitches together, knit 4 stitches, knit 2 stitches together, knit 1 stitch. There are now 8 stitches on the needles.
Row 8: Knit every stitch.
Row 9: Knit 1 stitch, knit 2 stitches together, knit 2 stitches, knit 2 stitches together, knit 1 stitch. There are now 6 stitches on the needles.
Row 10: Knit every stitch.
Row 11: Knit 1 stitch, knit 2 stitches together twice, knit 1 stitch. There are now 4 stitches on the needles.
Row 12: Knit every stitch.
Row 13: Knit 2 stitches together twice. There are now 2 stitches on the needles.
Row 14: Knit every stitch.
Row 15: Knit 2 stitches together. There is now 1 stitch on the needles.
Cut the yarn, leaving a 6-inch end, pull the end through the remaining stitch, and gently tighten. Place the end on a yarn needle, weave in by pulling it through 5 or 6 stitch bumps, and trim, leaving a ¼-inch end.
Repeat the ear instructions to make a second ear.
FINISHING THE PILLOW
Button Nose and Eyes
Place the pillow form inside the pillow. Pull the nose flap to the front of the pillow. With a pin, mark the spot for the nose button so it will line up with the buttonhole.
With the sewing needle and thread, sew the nose button into place (Learn how to sew on a button).
Button the nose flap in place.
Sew the buttons for the eyes on either side of the nose.
Ears
Pin the ears in place about 3½ inches from the start of the orange section on the pillow.
Unwind the butterfly from the ear cast on and place on a yarn needle. Use the end to whipstitch the ears to the nose flap.
Weave in the ends of the ears and trim, leaving a ¼-inch end.
• • • • •

These puppy and bunny puppets can be used as toys or thumbless mittens. Here’s another fun idea: if you knit the puppets in 100 percent cotton yarn, they can be used in the bathtub, sort of like a mitten-washcloth combo! Use your imagination.
FINISHED MEASUREMENT
6 inches long
YARN
 1 skein Worsted weight (about 100 yards for either puppet); small amount of Worsted weight in another color for the Puppy’s ears
NEEDLES
US size 7 / 4.5 mm, 12-inch circular needles
GAUGE
5 stitches per inch in stockinette stitch
OTHER THINGS YOU’LL NEED
Stitch marker
Ruler or tape measure
Scissors
Yarn needle
2 safety pins
Pom-pom maker or cardboard (for Bunny)
Embroidery needle (optional)
Small amount of black yarn or embroidery floss
Before you begin, you’ll need to know how to:
Join stitches to work in the round
Knit two stitches together (decrease)
START HERE!
With the color of yarn you’d like to use for the puppy’s body, cast on 36 stitches. Make a butterfly with the end. Place a stitch marker on the first stitch.
Join to work in the round, being careful not to twist the stitches.
KNITTING THE BOTTOM RIBBED EDGE
Round 1: Knit 2 stitches, purl 2 stitches. Repeat to the end of the round.
Repeat Round 1 until the body measures 1½ inches from the cast-on edge.
KNITTING THE BODY
Now knit every stitch in each round until the body measures 6 inches from the cast-on edge.
Decrease rounds for the top of the body:
Round 1: Knit 4 stitches, knit 2 stitches together. Repeat to the end of the round. There are now 30 stitches on the needles.
Round 2: Knit every stitch.
Round 3: Knit 2 stitches together. Repeat to the end of the round. There are now 15 stitches on the needles.
Cut the yarn, leaving a 6-inch end. Place the end on a yarn needle. Pull the end through the stitches on the needle, one at a time, and take the stitches off the knitting needle as you go. Pull the end up tightly to close the hole. To secure more tightly, thread the needle through the gathered stitches again. Pull the end to the inside of the body. Turn the body inside out.
FINISHING THE BODY
Weave in the end by pulling it through 5 or 6 stitch bumps on the inside.
Unwind the butterfly. Place the end on a yarn needle and weave in as described above.
Trim the ends to a ¼ inch.
KNITTING THE EARS
With the selected ear color, cast on 6 stitches, leaving a 6-inch end to use later. Wind the end into a butterfly. You are working back and forth in rows for the ears.
Row 1: Knit all the stitches. Turn the work around.
Repeat until the ear measures 2 inches from the cast-on edge.
Next row: Knit 2 stitches together. Repeat to the end of the row. There are now 3 stitches on the needles.
Next row: Knit 3 stitches together. There is now 1 stitch on the needles.
Cut the yarn, leaving a 6-inch end. Place the end on a yarn needle, pull the yarn through the remaining stitch, and gently tighten. Weave in the end by pulling it through 5 or 6 stitch bumps and trim, leaving a ¼-inch end.
Repeat the ear instructions to make a second ear.
To attach the ears, first put your hand in the body of the puppy. Place the ears about 1½ inches back from the end of the body and to the sides about 1 inch apart. Use the safety pins to hold the ears in place.
Follow the instructions on the next page to sew the ears onto the puppet.
EMBROIDERING THE FACE
Instructions on embroidering the puppy’s nose, eyes, and mouth.
When you’re finished, you will have yarn ends on the inside of your puppet. Follow the instructions to tie off the ends.
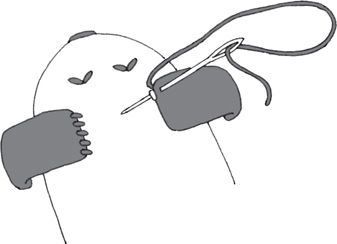
Step 1: After you have pinned the ears in place (see Attaching the Ears), unwind the butterfly and place the end onto a yarn needle. With the yarn needle, go through a stitch on the edge of the ear and then through a stitch on the puppet. Pull the yarn through.
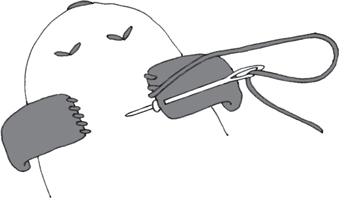
Step 2: Repeat pulling the yarn needle and yarn through a stitch on the edge of the ear and then a stitch on the puppet until you have stitched across the end of the ear. Hold the ear piece up, weave the end through a few stitches on the underside of the ear, and trim, leaving a ¼-inch end.
How to Embroider the Puppy’s Nose
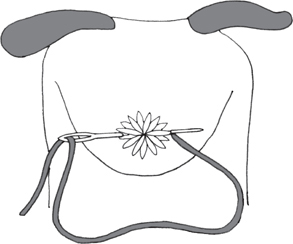
Step 1: Stitch the nose on the gathered stitches at the top of the puppet as follows: place a 10-inch cut length of yarn or embroidery floss on a yarn or an embroidery needle. Insert the needle from the inside of the puppet to come out on the right side of the gathered stitches. Pull the needle and yarn through, leaving a 3-inch end on the inside of the puppet.
Insert the needle on the left side of the gathered stitches, and turn the needle so it comes back out in the same spot that you started.
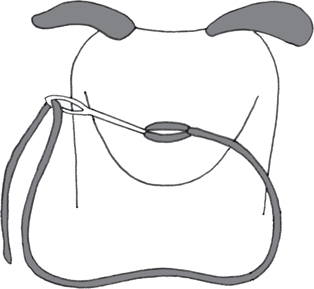
Step 2: Repeat this 3 or 4 times until the gathered stitches are covered. Pull the end to the inside of the puppet and cut it, leaving a 3-inch end. Leave the ends for now and we’ll come back to them later.
How to Embroider the Puppy’s Eyes
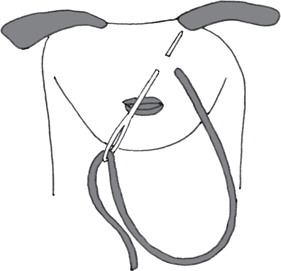
Step 1: Place a 10-inch cut length of yarn or embroidery floss on a yarn or an embroidery needle. Insert the needle from the inside of the puppet to come out where you want to start the right eye (as you are looking at the puppet). Pull the needle and floss through, leaving a 3-inch end on the inside of the puppet. Insert the needle a couple of stitches to the left and turn the needle so it pops out between the two spots, above and in the middle of the stitch you are making. Pull the needle and floss through. Make sure not to pull too tightly.
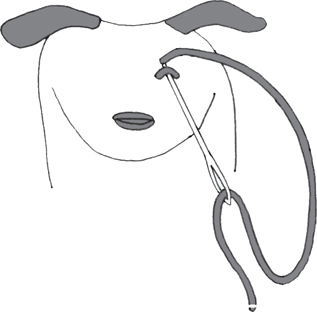
Step 2: With the tip of the needle, catch the straight stitch and bring it up to form an upside-down “V”, then insert the needle back into the same place it came up.
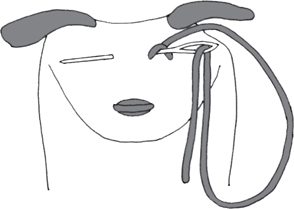
Step 3: Pop the needle back out to start the left eye (as you are looking at the puppet). Repeat Steps 2 and 3 to make the second eye.
How to Embroider the Puppy’s Mouth
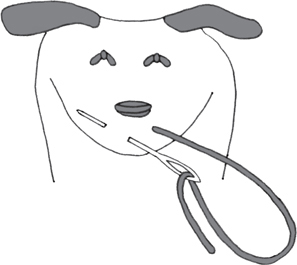
Step 1: With a 10-inch cut length of yarn or embroidery floss on a yarn or an embroidery needle, insert the needle under the nose on the right side of where the mouth will start (as you’re looking at the toy). Insert the needle over a couple of stitches to the left and down a couple of stitches, turning your needle to come out at the left side of the mouth. Pull the needle and yarn through (but don’t pull too tightly!).
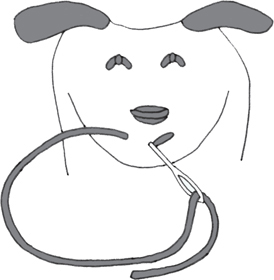
Step 2: Insert the needle back into the center stitch, and pull the needle and yarn to the inside of the puppet. Cut the yarn, leaving a 3-inch length. You will now have ends on the inside of the puppet from the nose, eyes, and mouth. Follow the instructions on the opposite page to finish the puppet.
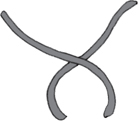
Step 1: Turn the puppet inside out. Take the two ends from the eyes and cross them so they form an “X”, with the right end on top. Take the end on the right and bring it under the other end.
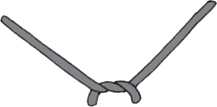
Step 2: Gently pull the ends so the first part of the knot is resting on the fabric.

Step 3: Repeat Steps 1 and 2, pulling gently to tighten the two knots together. You now have a secure knot.
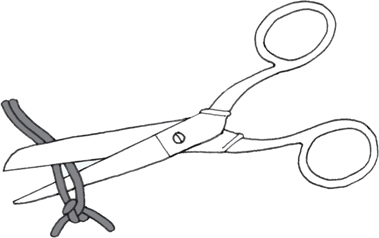
Step 4: Trim the ends, leaving about a ½ inch of yarn.
Repeat with the ends from the nose and mouth.
START HERE!
Cast on 36 stitches. Make a butterfly with the end. Place a stitch marker on the first stitch.
Join to work in the round, being careful not to twist the stitches.
KNITTING THE BOTTOM RIBBED EDGE
Round 1: Knit 2 stitches, purl 2 stitches. Repeat to the end of the round.
Repeat Round 1 until the body measures 1½ inches from the cast-on edge.
KNITTING THE BODY
Now knit every stitch in each round until the body measures 6 inches from the cast-on edge.
Decrease rounds for the top of the body:
Round 1: Knit 4 stitches, knit 2 stitches together. Repeat to the end of the round. There are now 30 stitches on the needles.
Round 2: Knit every stitch.
Round 3: Knit 2 stitches together. Repeat to the end of the round. There are now 15 stitches on the needles.
Cut the yarn, leaving a 6-inch end. Place the end on a yarn needle. Pull the end through the stitches on the needle, one at a time, and take the stitches off the knitting needles as you go. Pull the end up tightly to close the hole. To secure more tightly, thread the needle through the gathered stitches again. Pull the end to the inside of the body. Turn the body inside out.
FINISHING THE BODY
Weave in the end by pulling it through 5 or 6 stitch bumps on the inside.
Unwind the butterfly. Place the end on a yarn needle and weave in as described above.
Trim the ends to a ¼ inch.

Cast on 6 stitches, leaving a 6-inch end to use later. Wind the end into a butterfly. You are working back and forth in rows for the ears.
Row 1: Knit all the stitches. Turn the work around.
Repeat until the ear measures 5 inches from the cast-on edge.
Next row: Knit 2 stitches together. Repeat to the end of the row. There are now 3 stitches on the needles.
Next row: Knit 3 stitches together. (This is done the same way as knitting 2 stitches together.) There is now 1 stitch on the needles.
Cut the yarn, leaving a 6-inch end, and pull the yarn through the remaining stitch and gently tighten. Place the end on a yarn needle. Weave in the end by pulling it through 5 or 6 stitch bumps and trim, leaving a ¼-inch end.
Repeat the ear instructions to make a second ear.
To attach the ears, first put your hand in the body of the bunny. Place the ears near the top of the body where the hole is located. Use safety pins to hold the ears in place.
Follow the instructions to sew the ears onto the puppet.
MAKING AND ATTACHING THE TAIL
Make a 1-inch pom-pom using a 1-inch-wide piece of cardboard with the selected tail yarn (Learn how to make your own pom-pom). When tying off the pom-pom, be sure to leave long ends to attach the pom-pom to the body.
To attach the tail, place one end from the pom-pom tie on a yarn needle.
Place the pom-pom on the lower back of the body in the center. Pull the end to the inside.
Do the same with the second end. Tie the ends in a tight knot.
Trim the ends to a ¼ inch.
EMBROIDERING THE FACE
Instructions on embroidering the bunny’s eyes, nose, and mouth.
When you’re finished, you will have yarn ends on the inside of your puppet from the nose, eyes, and mouth. Turn the puppet inside out and follow the instructions to tie off the ends.
How to Embroider the Bunny’s Eyes
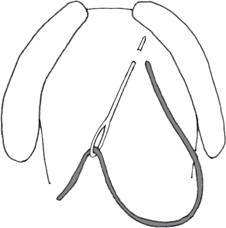
Step 1: Place a 10-inch cut length of yarn or embroidery floss on a yarn or an embroidery needle. Insert the needle into the inside of the puppet and bring the needle up through the stitch where you want to start the right eye. Pull the needle and floss through, leaving a 3-inch end on the inside of the puppet.
Insert the needle a couple of stitches to the left, and turn the needle so it pops out between the two spots, above and in the middle of the stitch you are making. Pull the needle and floss through. Make sure not to pull too tightly.
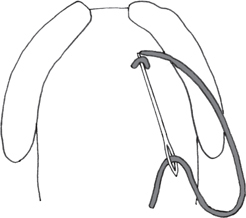
Step 2: With the tip of the needle, catch the straight stitch and bring the stitch up to form an upside-down “V”, then insert the needle back into the same place it came up.
Step 3: Pop the needle back out through the stitch to start the left eye (as you are looking at the puppet).
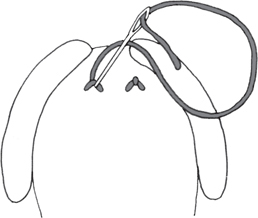
Step 4: Repeat Steps 2 and 3 to make the second eye.
When you are finished with the second eye, insert the needle back into the top point in the left eye, pull it through the puppet, and cut it, leaving a 3-inch end. Leave the ends for now, and we’ll come back to them later.
How to Embroider the Bunny’s Nose and Mouth
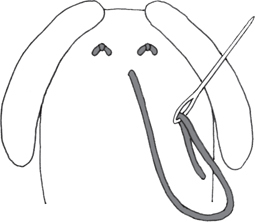
Step 1: Place a 10-inch cut length of yarn or embroidery floss on a yarn or an embroidery needle. Insert the needle from the inside of the puppet to come out where you’d like the right side of the nose to start. Pull the needle and yarn through, leaving a 3-inch end on the inside of the puppet.
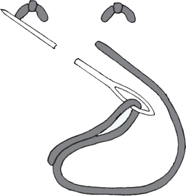
Step 2: Insert the needle 2 rows down and 2 columns of stitches to the left, and turn the needle to come out up 2 rows and 2 columns of stitches to the left of that. Pull the needle and yarn through. Do not pull too tightly. You are making a “V” shape.
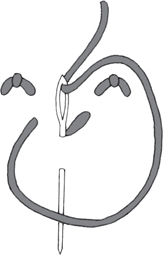
Step 3: Insert the needle back in the same stitch at the point of the “V”, and turn the needle to come out 2 stitches below this point. Pull the needle and yarn through, being careful not to pull too tightly.
Step 4: Insert the needle back in the same stitch at the point of the “V” again, and turn the needle to come out to the left side of the stitch, 2 stitches over and 2 stitches down (this is where you’ll start the left side of the mouth). Gently pull the needle and yarn through.
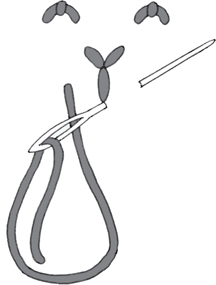
Step 5: Insert the needle in the stitch at the bottom of the line going down from the “V” and turn the needle to come out on the right side of the center line, aligned with where it came out on the left side. Gently pull the needle and yarn through.
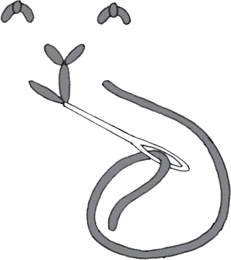
Step 6: Insert the needle at the bottom of the center line again, pull the needle and yarn through to the inside of the puppet, and cut it, leaving a 3-inch end. Follow the instructions to tie off the ends.
• • • • •

The shape of this pint-size toy makes for either a sweet little owl or a lovable tiny kitten. You don’t need much yarn, and you could even add stripes to your toy if you’d like. Felt eyes and ears are stitched on with a needle and thread after the toy is knit, to bring your character to life!
FINISHED MEASUREMENTS
4 inches tall, 4½ inches wide
YARN
 1 skein Bulky weight (less than 100 yards needed for each toy)
NEEDLES
US size 9 / 5.5 mm, 12-inch circular needles
GAUGE
4 stitches per inch in stockinette stitch
OTHER THINGS YOU’LL NEED
Stitch marker
Ruler or tape measure
Scissors
Yarn needle
Poly-pellets (optional)
Fiberfill stuffing
Paper and pencil
Small amounts of felt
Embroidery needle
Black embroidery floss
Sewing pins
Fabric glue or sewing needle and matching thread
Before you begin, you’ll need to know how to:
Cast on a small number of stitches using circular needles
Join stitches to work in the round
Knit in the front and back of the same stitch (increase)
Owl Toy
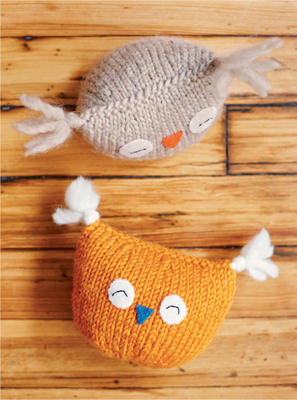
START HERE!
Cast on 24 stitches very loosely and leave an 8-inch end to use later. Make a butterfly with the end. Place a stitch marker on the first stitch.
Join to work in the round, being careful not to twist the stitches.
KNITTING THE BODY
Round 1: Knit every stitch.
Round 2: Knit 1 stitch, knit in the front and back of the next stitch. Repeat to the end of the round. There are now 36 stitches on the needles.
Rounds 3 and 4: Knit every stitch.
Repeat until the body measures 5 inches from the cast-on edge.
Unwind the butterfly and place the end on a yarn needle. Take stitches going around the hole to gather up and close the hole. Pull gently as you go through the stitches to close. If there is still an opening, take some stitches to close up the hole.
Pull the yarn end to the inside, weave in and trim, leaving a ¼-inch end.
Next round: Knit 4 stitches, knit 2 stitches together. Repeat to the end of the round. There are now 30 stitches on the needles.
Knit all the stitches for 1 more round.
Bind off.
Cut the yarn, leaving a 12-inch end. Pull the end through the remaining stitch and gently tighten.
FILLING THE BODY
If you are using poly-pellets (see Note), pour in the pellets until they cover the bottom of the toy and come up the sides about 1 inch. Then add the fiberfill stuffing to the top.
If you are only using fiberfill, stuff the body up to the top until firm. Do not overstuff.
CLOSING THE TOP OF THE TOY
To close the top, place the 12-inch end on a yarn needle.
Use the whipstitch to close the top of the toy.
Pull the end to the inside of the toy and pop the needle back out to the outside of the toy, then trim the end so it goes back inside the toy.
FINISHING THE OWL
Ear Tufts
Cut three 8-inch-long strands of the yarn. Hold the 3 strands together and place them on a yarn needle. Pull the strands halfway through at the corner at the top of the toy. Tie a half-knot close to the corner of the toy. Trim the ends to 2 inches.
Repeat on the other side for the second ear tuft.
Eyes
Turn the page for instructions on creating the owl’s eyes.
Trace the beak template onto a piece of paper. Cut out the triangle.
Pin the triangle to a piece of felt. Cut out the beak.
Follow the instructions to sew the beak onto your toy.
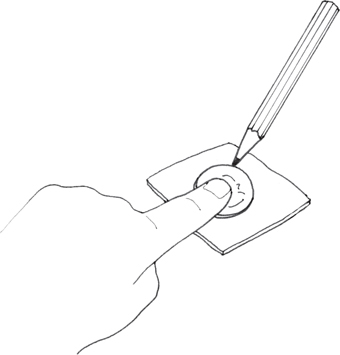
Step 1: Hold a quarter down on a piece of white felt with your pointer finger. Using a pencil, trace around the quarter.
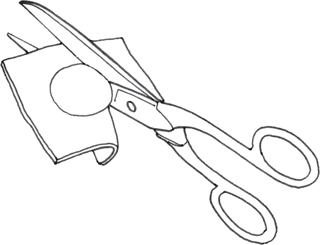
Step 2: Using the pencil line as a guide, cut the circle out.

Step 3: Take a 10-inch cut length of embroidery floss and make a knot in one end. Start by making a loop, and put the end through the loop.
Pull the knot tight and trim the end close to the knot. Place the other end of the floss on an embroidery needle. Note that the needle has to be sharp enough to go through the felt.
Step 4: Insert the needle from the back to the front of the felt on the right side of the circle through the number 1 spot. Pull the needle and floss through until the knot is pulled up to the felt on the back side.
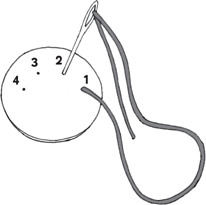
Step 5: Insert the needle to the left (the number 2 spot). Pull the needle and floss all the way through.
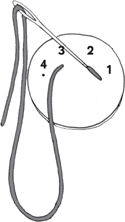
Step 6: Insert the needle from the back to the front through the number 3 spot. Pull the floss all the way through, then go straight across to the right and down through the number 2 spot. Again pull the needle and floss all the way through.
Step 7: Insert the needle again from the back to the front through the number 4 spot. Pull the needle and floss all the way through, then go back into the number 3 spot. Pull the needle and floss all the way through.

Step 8: Tie a knot on the back side of the felt by putting the needle under one of the threads on the back side and pulling through until there is a small loop.
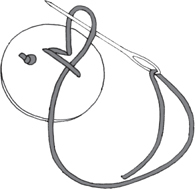
Step 9: Insert the needle through the loop and gently pull the floss through the loop until a knot forms.
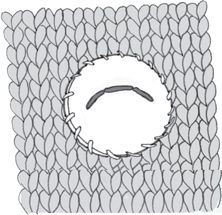
Step 10: With either fabric glue or a needle and thread, glue or whipstitch the eyes to the owl’s face. (See the opposite page to learn how to sew on the felt.)
Repeat Steps 1 to 10 to make the second eye.
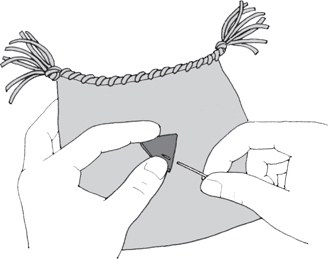
Step 1: Place your piece of cut felt onto the toy where you’d like to attach it (for the owl’s beak, roughly in the center of the front of the toy). You could use a sewing pin or safety pin if you need extra help holding it in place. With a sewing needle and matching thread that has a knot on the end, begin the whipstitch to sew the piece of felt onto the toy. Push the needle through a stitch on the knitted fabric and then through the edge of the felt piece and pull the thread through.
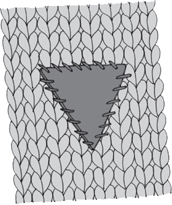
Step 2: Continue going through the knit fabric and then through the edge of the felt piece to whipstitch all the way around the felt piece. Tie a knot, pull the end to the inside of the toy, pop the needle back out to the outside of the toy, then trim the thread so it goes back inside the toy.
Kitten Toy
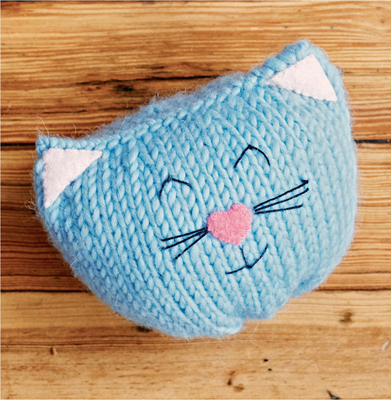
START HERE!
Cast on 24 stitches very loosely and leave an 8-inch end to use later. Make a butterfly with the end. Place a stitch marker on the first stitch.
Join to work in the round, being careful not to twist the stitches.
KNITTING THE BODY
Round 1: Knit every stitch.
Round 2: Knit 1 stitch, knit in the front and back of the next stitch. Repeat to the end of the round. There are now 36 stitches on the needles.
Rounds 3 and 4: Knit every stitch.
Now knit every stitch until the body measures 5 inches from the cast-on edge.
Unwind the butterfly and place the end on a yarn needle. Take stitches going around the hole to gather up and close the hole. Pull gently as you go through the stitches to close. If there is still an opening, take some stitches to close up the hole.
Pull the end to the inside, weave in, and trim, leaving a ¼-inch end.
Next round: Knit 4 stitches, knit 2 stitches together. Repeat to the end of the round. There are now 30 stitches on the needles.
Knit all the stitches for 1 more round.
Bind off.
Cut the yarn, leaving a 12-inch end. Pull the end through the remaining stitch and gently tighten.
FILLING THE BODY
If you are using poly-pellets (see Note), pour in the pellets until they cover the bottom of the toy and come up the sides about 1 inch. Then add the fiberfill stuffing to the top.
If you are only using fiberfill, stuff the body up to the top until firm. Do not overstuff.
CLOSING THE TOP OF THE TOY
To close the top, place the 12-inch end on a yarn needle.
Use a whipstitch to close the top of the toy.
Pull the end to the inside of the toy and pop the needle back out to the outside of the toy, then trim the end so it goes back inside the toy.
FINISHING THE KITTEN
Trace the ear template onto a piece of paper. Cut out the triangle. Repeat to make the second ear.
Pin the triangles to a piece of light pink felt and cut them out.
Trace the heart nose template onto a piece of paper. Cut it out.
Pin the heart nose to a piece of dark pink felt and cut it out.
Follow the instructions on How to Sew on Felt Pieces to sew the ears and nose onto your toy (or attach using fabric glue).
Eyes, Mouth, and Whiskers
Instructions on embroidering the kitten’s face.
How to Embroider the Kitten’s Eyes

Step 1: After the felt nose is stitched or glued on, place a 10-inch cut length of embroidery floss on an embroidery or a yarn needle. Insert the needle into the right side of the kitten and bring the needle up through the stitch where you want to start the right eye (as you are looking at the toy). Pull the needle and floss through, leaving a 2-inch end sticking out on the side.
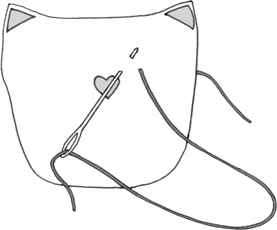
Step 2: Insert the needle a couple of stitches to the left and turn the needle so it pops out between the two spots, above and in the middle of the stitch you are making. Pull the needle and floss through. Make sure not to pull too tightly.
Step 3: With the tip of the needle, catch the straight stitch and bring it up to form an upside-down “V”, then insert the needle back into the same place it came up.
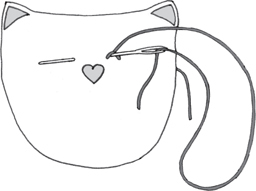
Step 4: Pop the needle back out to start the left eye (as you are looking at the toy). Repeat Steps 2 and 3 to make the second eye.

Step 5: When you are finished with the second eye, insert the needle, pull it through the toy, and pop the needle out on the left side of the toy.
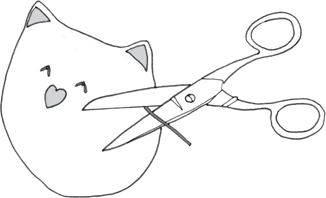
Step 6: Carefully cut both ends close to the surface so they sink back inside the toy.
How to Embroider the Kitten’s Mouth
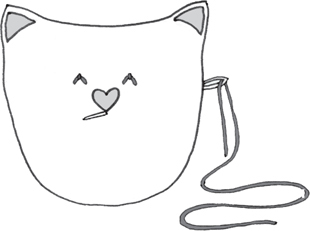
Step 1: Place a 10-inch cut length of embroidery floss on an embroidery or a yarn needle. Insert the needle into the right side of the toy and have the tip of the needle come out under the point of the heart-shaped nose. Insert the needle about 3 stitches straight down.
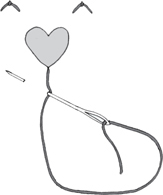
Step 2: Turn the needle and come up 2 stitches over to the left and up a couple of stitches. Gently pull the needle and floss through. Insert the needle back at the bottom of the center line.
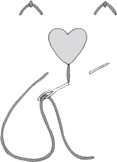
Step 3: Repeat Step 2 on the right side of the toy (turning the needle to come up 2 stitches over to the right and up a couple of stitches).

Step 4: Pop the tip of the needle out the left side of the toy. Pull the floss through. Cut both ends so they sink back inside the toy.
How to Embroider the Kitten’s Whiskers
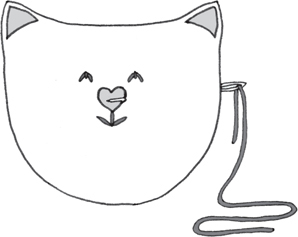
Step 1: Insert an embroidery or a yarn needle with a 10-inch cut length of embroidery floss into the right side of the toy, and bring the needle up on the right side of the nose. Pull the needle and floss through, leaving a 2-inch end on the outside of the toy.

Step 2: Insert the needle about 3 stitches over to the right of the nose and turn the needle so it pops back out in the same place where you started. Repeat this three times, moving down a stitch each time.
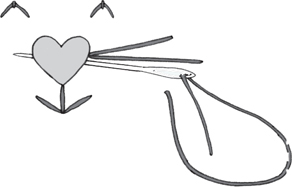
Step 3: After the third time, insert the needle to go under the nose and come out at the left side of the nose. Repeat Step 2 on the other side of the nose. Pull the needle through to the left side of the toy. Carefully cut both ends close to the surface so they sink back inside the toy.