Chapter 1. You Will Go to Space Today
In this chapter, we’ll get things started by first getting you set up with your copy of Kerbal Space Program. Once that’s sorted out, we’ll jump right into the whole business of space flight by designing, building, flying, and landing your very first rocket. If you’re lucky, not everything will explode!
Getting Kerbal Space Program
If you haven’t already purchased a copy of Kerbal Space Program, fear not — there are many ways of acquiring it:
- You can buy Kerbal Space Program directly from the developers .
- You can get it for your Steam account .
- If you prefer, you can get it for your GOG.com account .
- You can buy it on the Humble Store .
- You can buy it for the PlayStation 4 .
- You can buy it for the Xbox One .
Regardless of how you wish to buy it (or the platform you’ll play it on), you will end up with the same game, so go ahead and get yourself a copy. We’ll wait right here for you.
Note
This book focuses on the PC, Mac, and Linux versions of Kerbal Space Program. The game is practically identical on the Xbox One and PlayStation 4, though the keyboard and mouse controls are adapted for the console controls.
Going to Space
Once you’ve got Kerbal Space Program installed and set up, it’s time to start exploring space.
In this chapter, we’ll start a new game of Kerbal Space Program, take a tour of the Space Center, and launch something into the sky. It won’t be much, but it will be your something.
To start, we’ll take you on a tour of the Kerbal Space Center and talk about the various buildings and facilities available to you. We’ll then go inside the Vehicle Assembly Building, one of the most important locations in KSP, and start constructing your first rocket. Finally, we’ll launch it, and you’ll learn the basics of flying rockets.
Getting Started
Let’s begin by starting a new game of Kerbal Space Program. Launch the game, and you’ll be treated to a view of the main menu, shown in Figure 1-1 . Click Start Game, then click Start New. You’ll be prompted to choose what type of game you want to play. There are three options:
- Sandbox games allow free play. There are no funding restrictions, and all parts start unlocked.
- In Career games, you must purchase your rocket parts with funds you’ll earn by accepting contracts, and accrue science points to research technologies that unlock new parts. In addition, your Space Center will begin at a very rudimentary point, and you’ll need to upgrade it to enable your crew and spacecraft to perform certain tasks. You will also need to earn reputation points in order to get access to more complex and rewarding contracts.
- Science games are a halfway point between Career mode and Sandbox mode. There are no funds, contracts, or reputation, but you do need to earn science points to unlock parts.
In this chapter, we’ll be playing in Career mode. This mode offers a fun challenge, because it gives you a number of constraints to push against.
Note
You can have multiple games of KSP active at the same time. If, while you’re reading this book, you want to attempt a complex mission but don’t have the technology or funds to do it, you can always start a Sandbox mode game.
That said, it’s really rewarding to do complex missions after slowly building up your Career mode game.
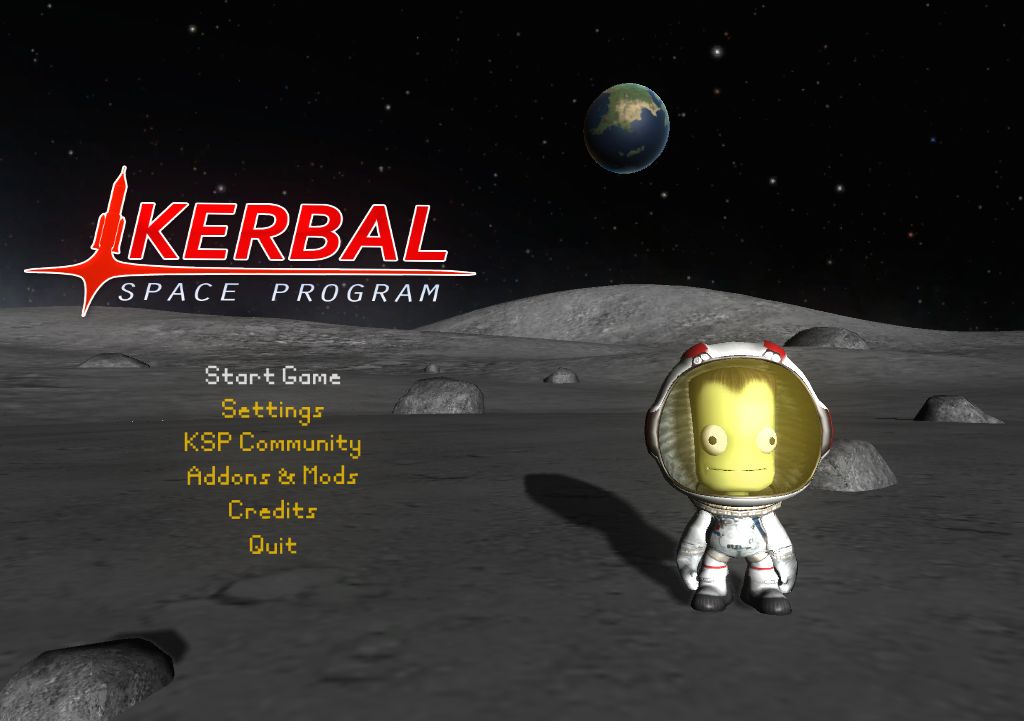
Figure 1-1. The main menu of Kerbal Space Program
Start a new Career mode game in Normal difficulty. You’ll be taken to the Kerbal Space Center.
Accepting a Mission
To get started, you should first accept a couple of contracts, which will get you a little money to use on your first mission. Early contracts in the game are very simple, involving tasks like “launch a vessel,” “gather some scientific data,” and “get into orbit.” They’re perfect for getting started in the game.
Click on the Mission Control building. The Mission Control building is the small structure next to the runway. You can see a map of the center in Figure 1-2 . The mission controller, Gene Kerman, will offer you a selection of contracts that you can accept. Until you upgrade the Mission Control building, you can only accept two contracts at a time.
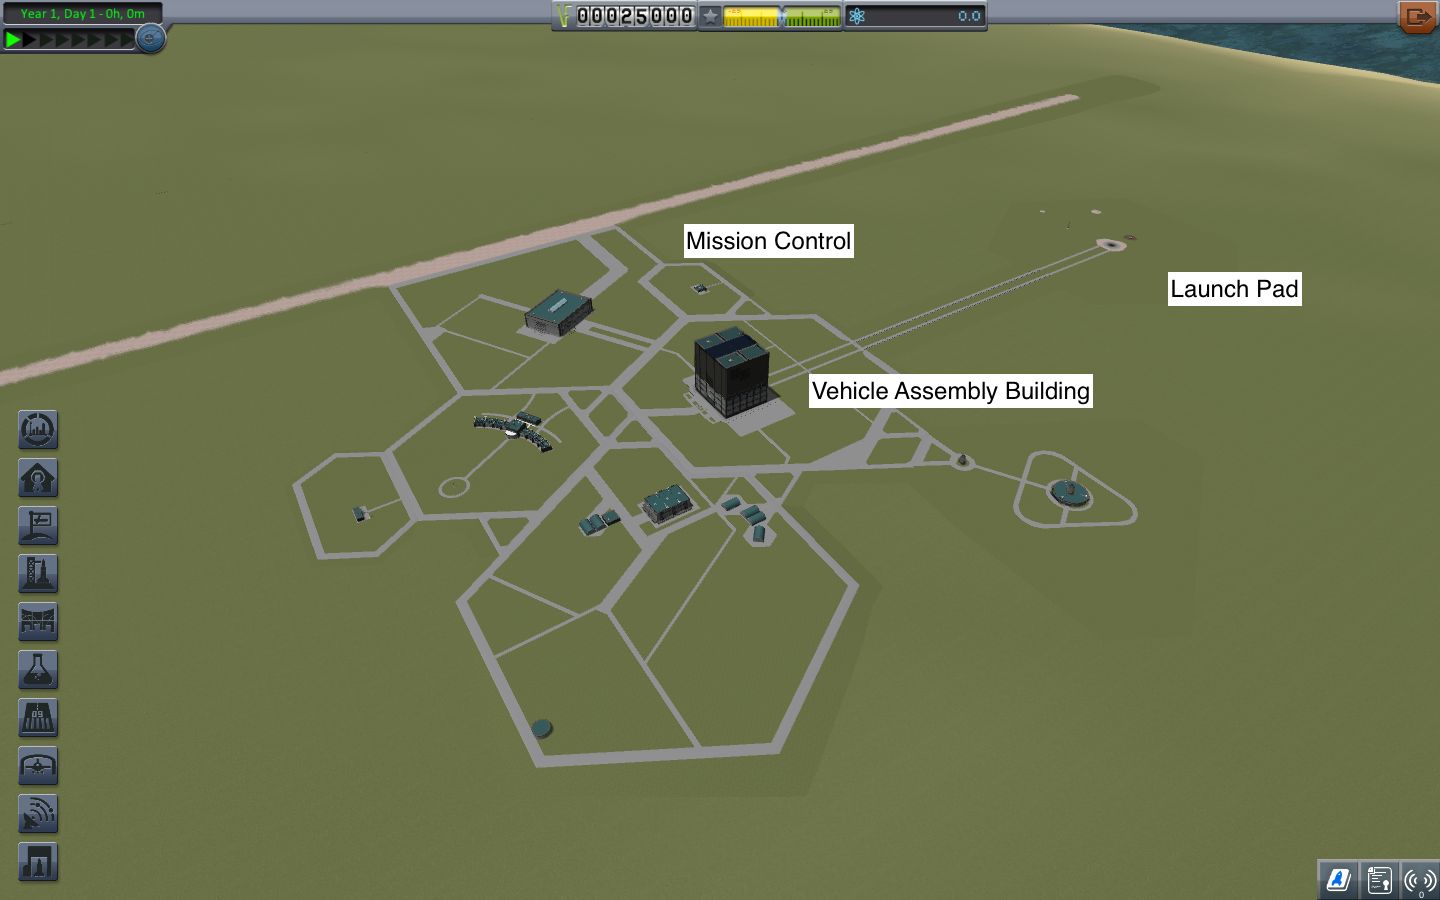
Figure 1-2. The Space Center, with Mission Control, the Launch Pad, and the Vehicle Assembly Building highlighted
Accept the “Gather scientific data from Kerbin” and “Launch our first vessel!” contracts. You’ll be able to achieve both of these at the same time, on the same flight.
When you accept a contract, you’ll be given an amount of money up front. You’ll be given more money when you successfully complete the contract.
Warning
When you accept a contract, you must complete it before its due date. If you don’t, you’ll be penalized and will lose money and reputation. Fortunately, the first contracts that you’ll accept have no deadline.
Once a contract is accepted, it moves from the Available tab to the Active tab. Click on the Active tab to view the list of active contracts. You’ll see the two contracts that you’ve accepted (see Figure 1-3 ).
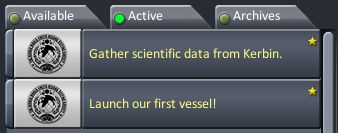
Figure 1-3. The list of active contracts
Now that you’ve received your instructions, it’s time to build your first rocket.
Building the World’s Simplest Rocket
To build the rocket, you need to visit the Vehicle Assembly Building. Leave Mission Control, and click on the Vehicle Assembly Building.
When you build a rocket, you select parts from the Parts menu at the lefthand side of the screen (see Figure 1-4 ) and attach them to other parts.
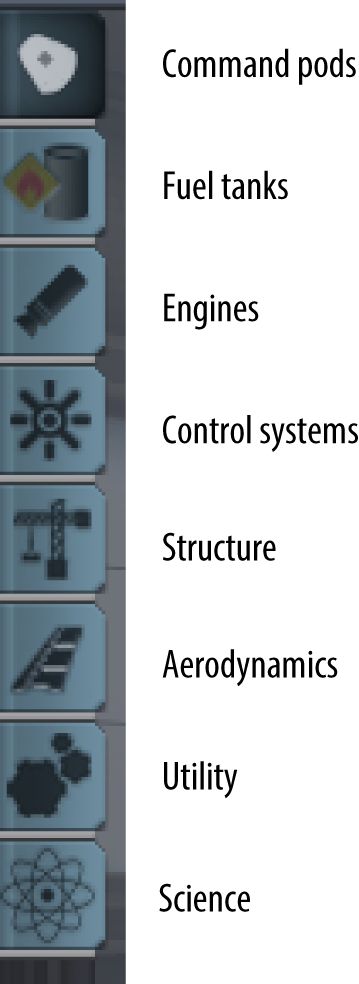
Figure 1-4. The Parts menu
Rockets need at least three things in order to fly:
- A command pod
, which can be
either crewed or uncrewed:
- Crewed command pods are bigger and heavier but can carry Kerbals on missions. They also don’t require any electricity to operate.
- Uncrewed command pods (also called probe cores ) are much smaller and lighter but typically require electricity to operate. If your craft runs out of electricity and has no way of generating more, your craft will stop working.
- An engine . Several different kinds of engines exist in KSP: liquid engines draw their fuel from fuel tanks, while solid boosters have built-in fuel supplies. Different engines have different sizes, weights, efficiencies, and maximum levels of thrust. Typically, the more powerful the engine is, the less efficient it is. Solid engines provide more thrust, but once they’re lit, they cannot be shut down.
- A fuel supply . You need to bring enough fuel for your engine to burn for long enough to get you to where you want to go.
In addition to these minimum requirements for getting a rocket off the launch pad, it’s good to bring along something to do while you’re in the air. In Kerbal Space Program, most of the rockets that you fly aren’t launched purely for their own sake; typically they bring equipment to use in orbit, such as landers and science experiments.
When you begin the game, one such experiment is available: the Mystery Goo Containment Unit. This is a pod that’s filled with…well, filled with something , and your science team believes that they can learn more about the universe by observing it in different situations.
There are many, many other types of parts available for you to use in your spacecraft designs, but these three are the most critical ones. The rocket we’ll build in this chapter will have one of each of these:
- The command pod will be an Mk1 Command Pod , which seats a single crew member.
- The engine will be an RT-5 “Flea” Solid Fuel Booster . Solid fuel boosters come with their own fuel, so we won’t need an additional fuel tank.
- The spacecraft will have two Mystery Goo Containment Units , which you’ll use in flight.
- The spacecraft will have an Mk16 Parachute , which will allow the pilot to survive landing.
Constructing the craft
To begin constructing the rocket, take a look at the Parts menu (see Figure 1-5 ). You’ll see a single part in the Pods tab: the Mk1 Command Pod. Click the command pod. Because it’s the first part, it will immediately appear in the ship’s design.
Note
Left-click to select a part; once a part is selected, move the mouse to reposition it, and left-click again to reattach it. Right-click and drag the mouse to rotate the camera.
Scroll up and down to move the camera up and down. If you hold Shift and use the scroll wheel, the camera will zoom in and out.
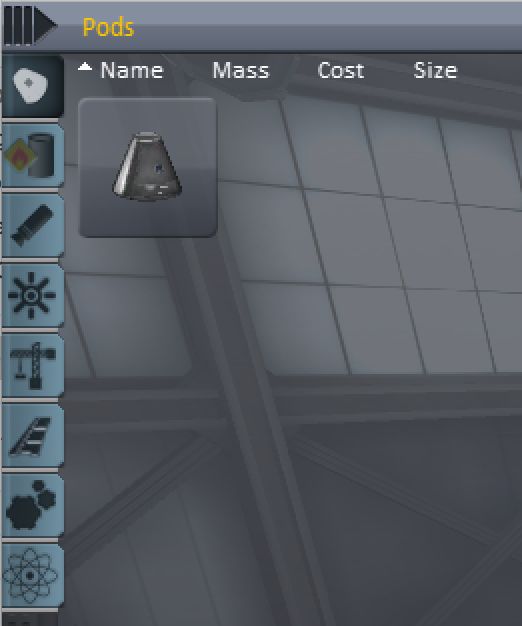
Figure 1-5. The Pods tab of the Parts menu
At the moment, there is only one engine: the RT-5 “Flea” solid booster. Click the RT-5 engine and attach it to the bottom of the rocket.
We now have everything we need to launch a rocket: a command pod, an engine, and fuel. However, there’s a very important part that needs to be added to the rocket if we want our pilot to be able to safely walk away from the mission. We need a parachute.
Attach the Mk16 parachute to the top of the command pod.
Finally, we’ll add the science experiments. Click the Mystery Goo Containment Unit, and attach it to the side of the command pod (see Figure 1-6 ).
When you’re flying a rocket, distribution of weight is important. If the rocket is lopsided , as it is right now, then the rocket will tip over during flight. To correct this problem, you’ll need to add a second Mystery Goo Containment Unit to balance it.
You can add a second one by selecting it from the menu and adding it at the right position, but there’s a simpler way: turn on the Symmetry mode.
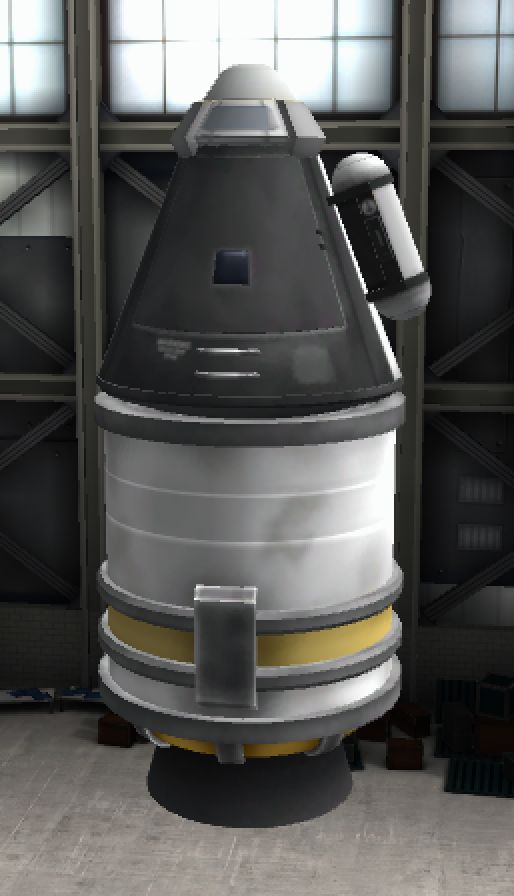
Figure 1-6. The rocket, with a single pod attached to the side of the command pod
To enable symmetry, click on the Symmetry Mode button, shown in Figure 1-7 . When you click on it, you’ll increase the number of parts that you’re placing at once.
Note
Left-click the Symmetry Mode button to increase the number of parts. Right-click the button to decrease.
The Symmetry Mode button can be set to place two, three, four, six, or eight parts at once.
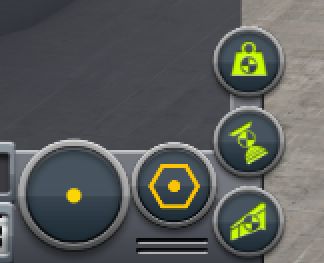
Figure 1-7. The Symmetry Mode button, shown at the left
Next, click on the Mystery Goo Containment Unit. You’ll notice that you’re now moving two parts at once (see Figure 1-8 ). Attach the two parts to the command pod.
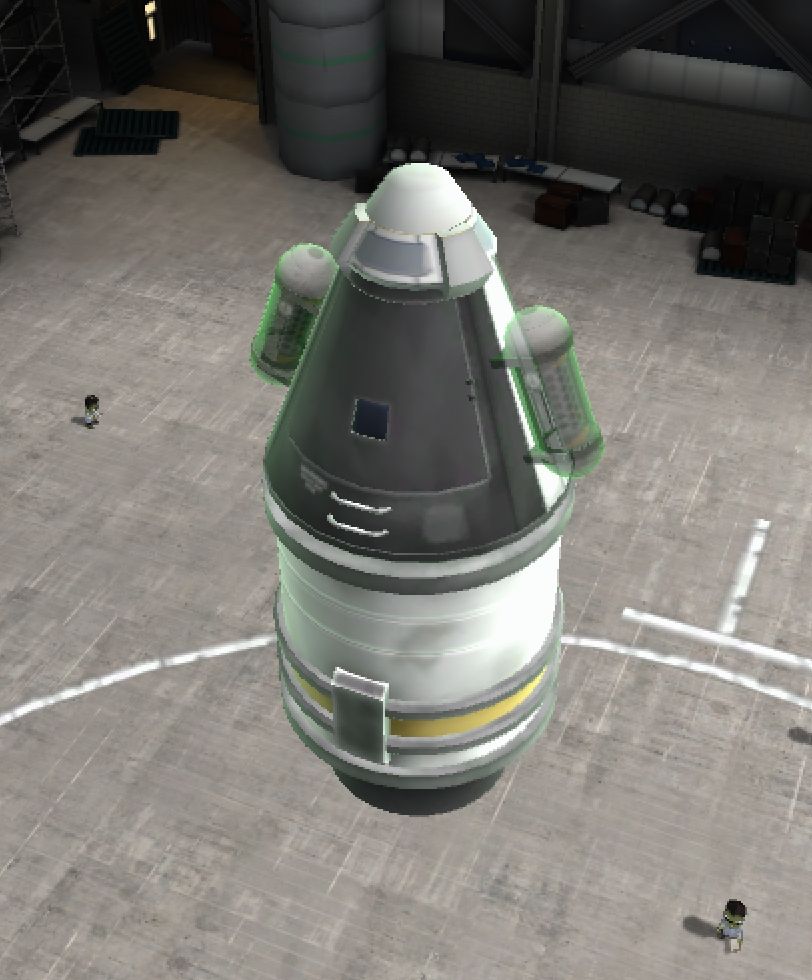
Figure 1-8. Placing two Mystery Goo Containment Units at once
Next we need to set up the staging. In KSP, a stage is a group of parts; when you press the space bar, the next stage is activated, and all of the parts in that stage are activated along with it: engines are lit, separators detach, and parachutes deploy.
At the moment, both the engine and the parachute are in the same stage. This is not a good thing, because it means that when you press the space bar to launch your rocket, your parachute will deploy at the same time as your engine firing. This will make it very difficult to fly.
To fix this, we’ll put the parachute and the engines in separate stages. The engine will activate first, and the parachute will activate when it’s time to come back down.
Setting up the stages
The list of stages can be found in the bottom-right
corner of the screen. Create a new stage by moving your mouse over the list of stages. A +
button will appear; click it and a new stage will be added. Click and drag the Parachute into this new stage.
You can rearrange stages by clicking and dragging the orange bars at the top of each stage. Stages at the bottom of the list activate first. Rearrange the stages so that the stage with the engine fires first, followed by the parachute stage.
Finally, let’s give your ship a name. Click the craft’s name at the top of the screen and change its name to First Craft .
Click the Save button at the top right, and then click Launch. You’ll be taken to the launch pad.
Launching the World’s Simplest Rocket
We’ll now fly this rocket up as high as it can go. It won’t have enough fuel to reach orbit, but you’ll definitely complete your current contracts.
The game’s UI
You’ll spend most of your time in KSP looking at a screen much like Figure 1-9 .

Figure 1-9. The game’s interface
Let’s take a look at its different components:
-
Navball
. The Navball shows your current direction, relative to the body that has the most gravitational influence over you.
In Figure 1-9 , the spacecraft is on the ground and is pointing straight up. The Navball also shows markers for directions like prograde and retrograde (which you’ll learn more about in “Maneuver Nodes” ). Underneath the Navball, you can see your heading.
Above the navball, your current speed (measured relative to the ground or to the body that you’re orbiting) is displayed. Click this display to change between surface speed and orbital speed. - G-force readout . This meter indicates how much strain your ship and pilots are undergoing. Very strong G-forces can tear your ship apart.
- SAS indicator light (shown disabled in Figure 1-9 ). This light comes on when the SAS guidance computer is turned on. The SAS computer is built into most control pods, and helps you maintain your flight’s direction. Press T to turn SAS on and off.
-
RCS indicator light
(also shown disabled).
This light comes on when the Reaction Control System (RCS) thrusters are enabled. If your rocket has RCS thrusters built in, they’ll only be used if this light is glowing green. This allows you to conserve RCS fuel by avoiding unnecessary use of the thrusters. Press R to turn RCS on and off.
We won’t be using RCS on this first rocket, but it’s useful to know that it’s there. -
Throttle
. The throttle meter shows how much fuel is allowed to flow to your rocket’s engines.
Press Left Shift to increase the throttle and Left Control to decrease it. Press Z to set the throttle to maximum and X to set the throttle to zero (which will cut all fuel to engines, stopping your thrust).
Tip
Solid fuel rockets are not affected by the throttle’s setting — once they’re lit, they burn at maximum throttle until their fuel runs out.
-
Lights, gear, and brakes
. These buttons allow you to turn all lights on or off, retract or extend any landing gear you may have, and apply brakes to any wheels your craft may have.
Press U to toggle lights, press G to toggle landing gear, and hold B to activate the brakes.
Again, this rocket won’t be using these, because it doesn’t have any lights, landing gear, or wheels, but these buttons become extremely useful when you’re making landers and aircraft (of which we’ll be making several; see Chapters 4 , 7 , and 8 ). - Crew At the bottom right of the screen, you can view the current status of your crew. In Figure 1-9 , there’s only one crew member: the indefatigable Jebediah Kerman. If you mouse over a crew member, two buttons labeled EVA and IVA will appear. Click EVA (which stands for extra-vehicular activity) to order that crew member to leave the ship; click IVA (intra-vehicular activity) to change the camera to your crew member’s perspective. (Press C to move the camera between your crew member and the external camera.)
- Staging . This is the exact same control that you see in the Vehicle Assembly Building. You can rearrange your staging setup while in flight from here.
- Mission clock . The mission clock displays the current time since launch. If you click the button labeled MET, the clock will toggle between time since launch and current time at the Space Center. Above the clock, the series of arrows indicates the current time-warp rate. In Figure 1-9 , only one arrow is lit up, indicating that time is progressing at normal speed. Press . to increase the time-warp speed, and press , to decrease it.
- Connection status . This area shows the current state of your craft’s connection to the Kerbal Space Center. It indicates, from left to right, whether the craft is under control (either by a pilot on board, or through a link back to the Space Center), the strength of the connection, whether the craft is receiving or transmitting, and how the craft is connected. This is important, because if your craft has no pilot on board, it must have a connection to the Kerbal Space Center in order to be under full control. We’ll discuss the communications system in “Communications” .
-
Readouts and mode select
. This area of the screen changes to show information about how your ship is currently operating.
The buttons at the right allow you to switch from Orbital mode to Docking mode (which will become useful in “Docking”
), as well as to open the orbital map.
Tip
You can also open the map by pressing the M key.
-
Altimeter, vertical speed indicator, and atmospheric pressure gauge
. The altimeter (the digital readout) shows you
current altitude, relative to sea level. (Note that in Figure 1-9
, the altitude is 70 m, despite the fact that we’re on the ground. This is because the Space Center is about 60 meters above sea level.)
Warning
Because the altimeter measures altitude relative to sea level, you need to be careful when attempting to land at high altitudes. The ground might be closer than the altimeter suggests.
The vertical speed indicator shows how fast your craft is rising or falling away.
The atmospheric pressure gauge shows how thick the atmosphere surrounding your craft is. The atmosphere is thickest at sea level (on planets that have seas, at least) and zero when you’re in vacuum.
Note
When you’re in atmosphere, your craft will be subject to drag, which will slow it down. The thinner the atmosphere, the less drag you’ll receive. Additionally, if you’re flying a craft that has wings, you’ll receive less lift when flying in a thinner atmosphere.
Different planets have different atmospheres. Duna, for example, has a much thinner atmosphere than Kerbin, and Mun has no atmosphere at all.
-
Notifications, resources, contracts, currency, KSPedia
. The buttons at the top left of the screen allow you to see different kinds of information. If you mouse over the buttons, different readouts will appear. If you click the buttons, these readouts will stay visible after you move the mouse away from the buttons.
- The Notifications button shows a list of recent notifications you’ve received, generally about your contracts.
- The Resources button displays the amounts of the various resources currently on board your ship, like fuel and electrical power. Keep a close eye on these!
- The Contracts button shows a summary of the contracts that you’ve accepted and the conditions you need to meet in order to fulfill them.
- The Currency button shows your various currencies: how much funding you have (which you can use to buy rocket parts and upgrade the Space Center), your reputation (which determines how good the missions you’re offered are), and your science points (which allow you to unlock new technologies).
- The KSPedia is the game’s built-in manual. In this, you can see detailed information about the various parts of the game.
Keybindings and mouse controls
Before you start your flight, it’s important to know how to operate the game’s controls. Things can happen very quickly in KSP, so it’s helpful to know what buttons to press.
- W and S: pitch your craft up and down.
- A and D: yaw left and right.
- Q and E: roll clockwise and anticlockwise.
- Space: activate the next stage. If your spacecraft hasn’t yet taken off, this will activate the first stage.
There are quite a few keys in Kerbal Space Program, but don’t worry — you won’t be expected to memorize them all, and your first flight will be very simple.
Slip the surly bonds of Kerbin
While you’re on the ground, we can complete one of the contracts that you accepted earlier by asking Jeb to take a crew report:
- Right-click on the Command Pod, and click Crew Report.
A window will appear showing the results. Click the green Keep Experiment button. - Enable guidance control by pressing T.
This will tell Jebediah to keep your rocket stable in flight by making small adjustments to keep your rocket pointing in the same direction.
Next, it’s time to launch the rocket. When you launch, you will start traveling very quickly, and a lot of things will happen at once. Read the rest of these steps first before launching, so that you’re ready. - Launch your rocket by pressing the space bar.
Your rocket will fling itself upward. You’ll burn fuel quickly, but that’s OK.
By launching your rocket, you instantly complete your first contract, which just requires you to get something off the ground. - Immediately tilt to about 45 degrees using the D key.
In addition to the contract that you just fulfilled, you can also break several speed records, an altitude record, and a distance record on this mission. To achieve the distance record, you need to aim away from the Kerbal Space Center. Rotate the craft using the D key so that you’re aiming about 45 degrees (see Figure 1-10 ). You should achieve the speed record contract very quickly.
You’ll now be flying over the ocean, which means that when your engine runs out of fuel, you’ll land in the water.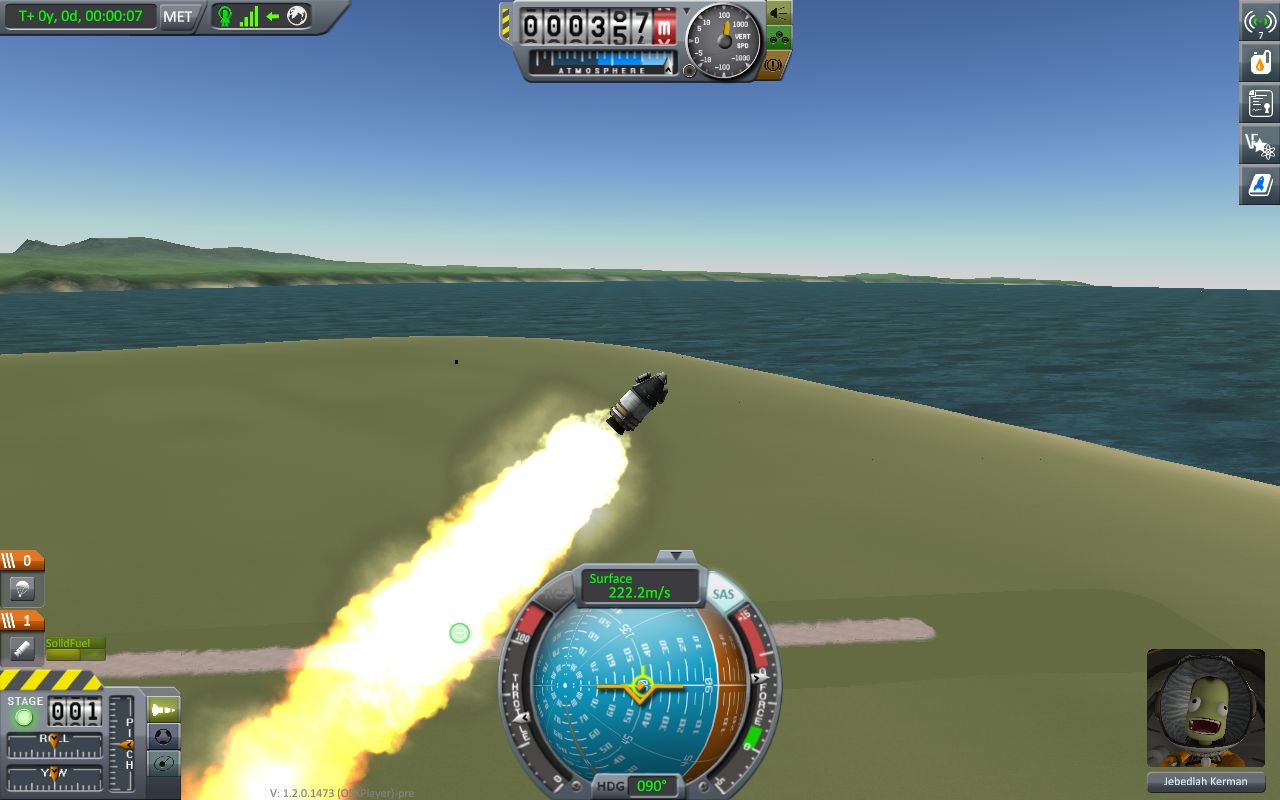
Figure 1-10. Flying at 45 degrees away from the Kerbal Space Center
- Activate one of the Mystery Goo Containment Units when your fuel runs out.
Do this by right-clicking one of the two pods mounted to the side of the command pod, and click Observe Mystery Goo. Another experiment results window will appear, describing what the goo’s doing (see Figure 1-11 ). Click the green Keep Experiment button again.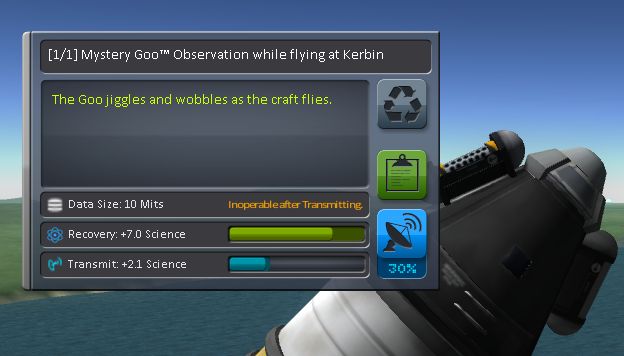
Figure 1-11. Running the first experiment
Getting back down to the ground is usually very easy in KSP. What goes up, and fails to achieve a stable orbit, must come down. - Wait until you run out of fuel and start falling back down to the ground.
You should reach an altitude of over 4,000 meters, which will break multiple altitude records.
Your pilot will look either joyous or terrified. - When you fall to about 1,200 meters, release your parachute by pressing the space bar again.
Your parachute will partially unfurl, slowing your rate of descent. Once you reach 500 meters above the ground, your parachute will unfurl further, reducing you to a safe landing speed (see Figure 1-12 ).
Tip
You can deploy your parachute at any time after your engine finishes its burn. It won’t unfurl until it’s safe to do so — that is, you’re not moving so fast that it would be torn to shreds. However, if you release it too early, you might end up waiting a while before you land in the water.
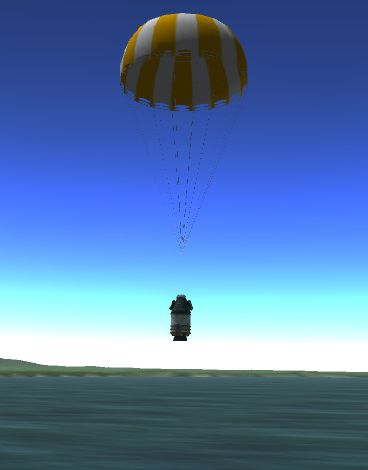
Figure 1-12. The parachute unfurls
- Slowly float down, and land in the water.
Enjoy the splash.
Tip
You can increase and decrease the rate at which time advances by pressing the . (full stop) and , (comma) buttons.
- Activate the second Mystery Goo Containment Unit.
Mystery Goo, like all science experiments in the game, will generate different data when it’s in different situations. This means that you’ll get more science points. Right-click on the other, unused pod, click Observe Mystery Goo, and then choose to keep the data (see Figure 1-13 ).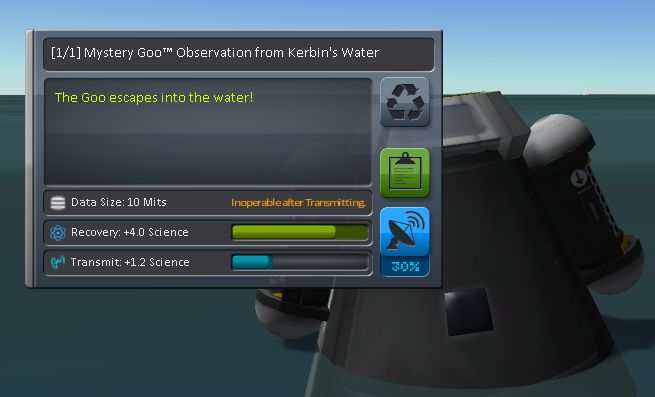
Figure 1-13. Operating the second experiment
- Leave the craft.
In addition to the data you’ve collected from the Mystery Goo pods, we can also get even more science points by getting Jeb out of the spacecraft and having a look.
Move the mouse over the portrait of Jebediah Kerman (in the lower-right corner of the screen), and click the EVA button that appears. - Take an EVA report.
Right-click on Jeb, and click EVA report. Click the green Keep Experiment button again (see Figure 1-14 ).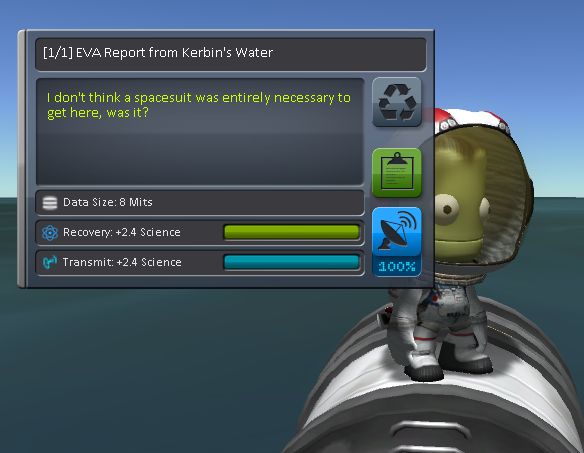
Figure 1-14. Getting an EVA report from the crew member
- Recover Jebediah by moving the mouse over the altimeter and clicking the Recover Vessel button that appears.
You’ll return to the Science Center, and you’ll be rewarded with science points. - Recover the craft.
Because Jeb has left the craft, you’ll need to recover him separately from the spacecraft. Hold down the right mouse button, and move the mouse until you see the spacecraft in the distance (see Figure 1-15 ).
Click it, and click Recover Vessel. You’ll get some money back for the successful recovery of the parts that weren’t destroyed, as well as science points for all of the experiments that were performed.
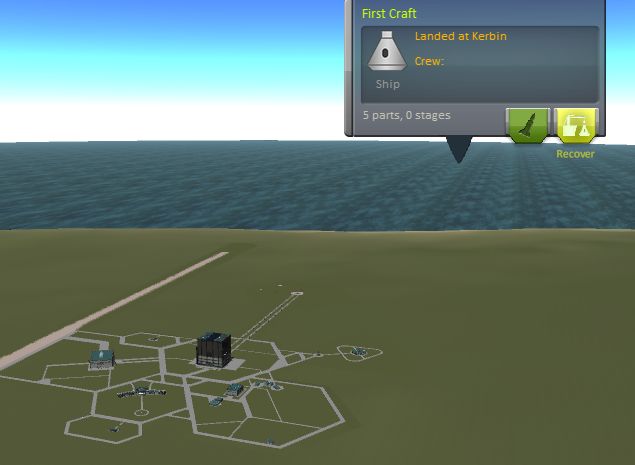
Figure 1-15. Recovering the craft
What to Do Next
In this chapter, we’ve gotten started with Kerbal Space Program and launched our first rocket. From here, there’s a bunch of different things you can do once you complete your first mission:
- Pick up another contract from Mission Control.
- Spend your science points at the Research and Development building, to unlock new technologies.
- Build a new rocket, using new parts, and attempt another mission!
In the next chapter, we’ll play with maneuvers, rockets, planes, and more. See you soon!