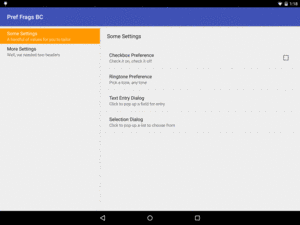
Figure 588: PreferenceActivity UI, on a Landscape Nexus 9
We saw SharedPreferences and PreferenceFragment
earlier in the book. However, we can have
more elaborate preference collection options if we wish,
such as a full master-detail implementation like the
Settings app sports. There are also many other common
attributes on the preference XML elements that we might
consider taking advantage of, such as allowing us to automatically
enable and disable preferences based upon whether some
other preference is checked or unchecked.
In this chapter, we will explore some of these additional capabilities in the world of Android preferences.
Understanding this chapter requires that you have read the core chapters,
particularly the one on SharedPreferences.
If you have a fairly simple set of preferences to collect from the user,
using a single PreferenceFragment should be sufficient.
On the far other end of the spectrum, Android’s Settings app collects a massive amount of preference values from the user. These are spread across a series of groups of preferences, known as preference headers.
While your app may not need to collect as many preferences as does
the Settings app, you may need more than what could be collected
easily in a single PreferenceFragment. In that case, you can consider
adopting the same structure of headers-and-fragments that the Settings
app uses, by means of a PreferenceActivity.
To see this in action, take a look at the
Prefs/FragmentsBC
sample project. It is very similar to the original SharedPreferences
demo app from before. However, this one arranges to collect
a fifth preference value, in a separate PreferenceFragment, and uses
PreferenceActivity to allow access to both PreferenceFragment UI
structures.
In the master-detail approach offered by PreferenceActivity, the
“master” list is a collection of preference headers. Typically, you
would define these in another XML resource.
In the sample project, that is found in
res/xml/preference_headers.xml:
<preference-headers xmlns:android="http://schemas.android.com/apk/res/android">

  <header
    android:fragment="com.commonsware.android.preffragsbc.EditPreferences$First"
    android:summary="@string/header1summary"
    android:title="@string/header1title">
  </header>
  <header
    android:fragment="com.commonsware.android.preffragsbc.EditPreferences$Second"
    android:summary="@string/header2summary"
    android:title="@string/header2title">
  </header>

</preference-headers>Here, your root element is <preference-headers>, containing a series of
<header> elements. Each <header> contains at least three attributes:
android:fragment, which identifies the Java class implementing the
PreferenceFragment to use for this header, as is described in the next
sectionandroid:title, which is a few words identifying this header to
the userOnce again, you may wish to also include android:summary,
which is a short sentence explaining what the user will find inside of this header.
You can, if you wish, include one or more <extra> child elements inside
the <header> element. These values will be put into the “arguments” Bundle that
the associated PreferenceFragment can retrieve via getArguments().
EditPreferences — which in the original sample app was a regular
Activity — is now a PreferenceActivity. It contains little
more than
the two fragments referenced in the above preference header XML:
package com.commonsware.android.preffragsbc;

import android.os.Bundle;
import android.preference.PreferenceActivity;
import android.preference.PreferenceFragment;
import java.util.List;

public class EditPreferences extends PreferenceActivity {
  @Override
  public void onBuildHeaders(List<Header> target) {
    loadHeadersFromResource(R.xml.preference_headers, target);
  }

  @Override
  protected boolean isValidFragment(String fragmentName) {
    if (First.class.getName().equals(fragmentName)
        || Second.class.getName().equals(fragmentName)) {
      return(true);
    }

    return(false);
  }

  public static class First extends PreferenceFragment {
    @Override
    public void onCreate(Bundle savedInstanceState) {
      super.onCreate(savedInstanceState);

      addPreferencesFromResource(R.xml.preferences);
    }
  }

  public static class Second extends PreferenceFragment {
    @Override
    public void onCreate(Bundle savedInstanceState) {
      super.onCreate(savedInstanceState);

      addPreferencesFromResource(R.xml.preferences2);
    }
  }
}
onBuildHeaders() is where we supply the preference headers, via a call
to loadHeadersFromResource().
We also need to have an isValidFragment() method, that will return true
if the supplied fragment name is one we should be showing in this
PreferenceActivity, false otherwise. This will only be called on
Android 4.4+. However, we need to set up the project build target
(e.g., compileSdkVersion in Android Studio) to API Level 19
or higher. Failing to have this method will cause your app to crash
on Android 4.4+ devices, when the user tries to bring up one
of your PreferenceFragments.
Each PreferenceFragment is then responsible for calling
addPreferencesFromResource() to populate its contents. In this
case, we now have two such resources: res/xml/preferences.xml
(the original, used by First) and res/xml/preferences2.xml
(used by Second).
On a wide enough screen — like that of a Nexus 9 in landscape — we get a master-detail presentation:
Figure 588: PreferenceActivity UI, on a Landscape Nexus 9
Here, we see the first preference fragment already pre-selected, showing its settings. Tapping on the second header will show the other preferences.
On a smaller screen, the master-detail approach means that we see a list of headers first:
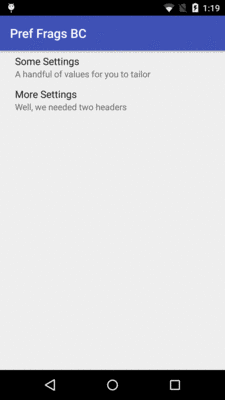
Figure 589: PreferenceActivity UI, on a Portrait Nexus 5
Tapping the headers give us access to the individual fragments.
If you have the need to collect some preferences that are beyond what the standard preferences can handle, you have some choices.
One is to create a custom Preference. Extending DialogPreference to create
your own Preference implementation is not especially hard. However, it does
constrain you to something that can fit in a dialog.
Another option is to specify an <intent> element as a child of a <header>
element. When the user taps on this header, your specified Intent is used
with startActivity(), giving you a gateway to your own activity for
collecting things that are beyond what the preference UI can handle. For
example, you could have the following <header>:
<header android:icon="@drawable/something"
        android:title="Fancy Stuff"
        android:summary="Click here to transcend your
plane of existence">
  <intent android:action="com.commonsware.android.MY_CUSTOM_ACTION" />
</header>
Then, so long as you have an activity with an <intent-filter> specifying your
desired action (com.commonsware.android.MY_CUSTOM_ACTION), that activity will
get control when the user taps on the associated header.
The two-tier, headers-and-preferences approach is fine and helps to organize large rosters of preferences. However, it does tend to steer developers in the direction of displaying headers all of the time. For many apps, that is rather pointless, because there are too few preferences to collect to warrant having more than one header.
One alternative approach is to use the headers on larger devices,
but skip them on smaller devices. That way, the user does not have to
tap past a single-item ListFragment just to get to the actual
preferences to adjust.
This is a wee bit tricky to implement. However, you have two options for how to accomplish it.
(The author would like to thank Richard Le Mesurier, whose question on this topic spurred the development of this section and its samples)
The basic plan in the first approach is to have smarts in onBuildHeaders() to handle this.
onBuildHeaders() is the callback that Android invokes on our
PreferenceActivity to let us define the headers to use in the
master-detail pattern. If we want to have headers, we would supply
them here; if we want to skip the headers, we would instead fall
back to the classic (and, admittedly, deprecated)
addPreferencesFromResource() method to load up some preference
XML.
There is an isMultiPane() method on PreferenceActivity, starting
with API Level 11, that will tell you if the activity will render
with two fragments (master+detail) or not. In principle, this would
be ideal to use. Unfortunately, it does not seem to be designed to
be called from onBuildHeaders(). Similarly, addPreferencesFromResource()
does not seem to be callable from onBuildHeaders(). Both are due
to timing: onBuildHeaders() is called in the middle of the
PreferenceActivity onCreate() processing.
So, we have to do some fancy footwork.
By examining the source code to PreferenceActivity,
you will see that the logic that drives the single-pane vs. dual-pane
UI decision boils down to:
onIsHidingHeaders() || !onIsMultiPane()
If that expression returns true, we are in single-pane mode; otherwise,
we are in dual-pane mode. onIsHidingHeaders() will normally return
false, while onIsMultiPane() will return either true or false
based upon screen size.
So, we can leverage this information in a PreferenceActivity to
conditionally load our headers, as seen in the EditPreferences
class in the
Prefs/SingleHeader
sample project:
package com.commonsware.android.pref1header;

import android.os.Bundle;
import android.preference.PreferenceActivity;
import java.util.List;

public class EditPreferences extends PreferenceActivity {
  private boolean needResource=false;

  @SuppressWarnings("deprecation")
  @Override
  public void onCreate(Bundle savedInstanceState) {
    super.onCreate(savedInstanceState);

    if (needResource) {
      addPreferencesFromResource(R.xml.preferences);
    }
  }

  @Override
  public void onBuildHeaders(List<Header> target) {
    if (onIsHidingHeaders() || !onIsMultiPane()) {
      needResource=true;
    }
    else {
      loadHeadersFromResource(R.xml.preference_headers, target);
    }
  }

  @Override
  protected boolean isValidFragment(String fragmentName) {
    return(StockPreferenceFragment.class.getName().equals(fragmentName));
  }
}
Here, if we are in dual-pane mode, onBuildHeaders() populates the
headers as normal. If, though, we are in single-pane mode, we skip
that step and make note that we need to do some more work in onCreate().
Then, in onCreate(), if we did not load our headers we use the classic addPreferencesFromResource()
method.
The net result is that on Android 3.0+ tablets, we get the dual-pane, master-detail look with our one header, but on smaller devices (regardless of version), we roll straight to the preferences themselves.
Note that this sample application uses a single PreferenceFragment
implementation, named StockPreferenceFragment:
package com.commonsware.android.pref1header;

import android.os.Bundle;
import android.preference.PreferenceFragment;

public class StockPreferenceFragment extends PreferenceFragment {
  @Override
  public void onCreate(Bundle savedInstanceState) {
    super.onCreate(savedInstanceState);

    int res=
        getActivity().getResources()
                     .getIdentifier(getArguments().getString("resource"),
                                    "xml",
                                    getActivity().getPackageName());

    addPreferencesFromResource(res);
  }
}
StockPreferenceFragment does what it is supposed to: call
addPreferencesFromResource() in onCreate() with the resource ID of the
preferences to load. However, rather than hard-coding a resource ID, as we
normally would, we look it up at runtime.
The <extra> elements in our preference header XML supply the name of the
preference XML to be loaded:
<preference-headers xmlns:android="http://schemas.android.com/apk/res/android">

  <header
    android:fragment="com.commonsware.android.pref1header.StockPreferenceFragment"
    android:summary="@string/header1summary"
    android:title="@string/header1title">
    <extra
      android:name="resource"
      android:value="preferences"/>
  </header>

</preference-headers>We get that name via the arguments Bundle
(getArguments().getString("resource")).
To look up a resource ID at runtime, we can use the Resources object, available
from our activity via a call to getResources(). Resources has a method,
getIdentifier(), that will return a resource ID given three pieces of information:
<extra>
element)"xml")getPackageName())Note that getIdentifier() uses reflection to find this value, and so there
is some overhead in the process. Do not use getIdentifier() in a long loop
– cache the value instead.
The net is that StockPreferenceFragment loads the preference XML described
in the <extra> element, so we do not need to create separate
PreferenceFragment implementations per preference header.
The advantage of the above approach is that it works with Android’s own logic
of whether to display the master-detail fragments or just one at a time.
However, that logic — the fact that onIsHidingHeaders() || !onIsMultiPane()
determines the look of the activity — is not documented, and therefore may
change in future Android releases.
Another option is to launch your PreferenceActivity in such a way that
tells Android to skip showing the headers. This approach
is better documented and therefore perhaps more stable. This can also be
used in cases where you do want headers sometimes, but at other times you
want to route the user to a specific PreferenceFragment. The downside
is that this technique only works on API Level 11+.
To see how this works, take a look at the
Prefs/SingleHeader2
sample project.
Our EditPreferences class is the same implementation as in the original sample
for this chapter, except that we only load up the single XML resource’s worth
of preferences:
package com.commonsware.android.pref1header;

import android.preference.PreferenceActivity;
import java.util.List;

public class EditPreferences extends PreferenceActivity {
  @Override
  public void onBuildHeaders(List<Header> target) {
    loadHeadersFromResource(R.xml.preference_headers, target);
  }

  @Override
  protected boolean isValidFragment(String fragmentName) {
    return(StockPreferenceFragment.class.getName().equals(fragmentName));
  }
}
However, there is a change in our main activity (FragmentsDemo). Before, when
the user chose the “Settings” action bar overflow item, we would just call
startActivity() to bring up EditPreferences. Now, we delegate that work
to an editPrefs() method on FragmentsDemo, which will have the smarts to
control how we bring up the EditPreferences activity:
  private void editPrefs() {
    Intent i=new Intent(this, EditPreferences.class);

    i.putExtra(PreferenceActivity.EXTRA_SHOW_FRAGMENT,
               StockPreferenceFragment.class.getName());

    Bundle b=new Bundle();

    b.putString("resource", "preferences");

    i.putExtra(PreferenceActivity.EXTRA_SHOW_FRAGMENT_ARGUMENTS, b);

    startActivity(i);
  }
Here, we will add two extras to our Intent:
EXTRA_SHOW_FRAGMENT, set to the fully-qualified class name of the PreferenceFragment
to be displayed, here obtained by calling getName() on the Class object
for StockPreferenceFragment
EXTRA_SHOW_FRAGMENT_ARGUMENTS, set to a Bundle containing the same values that
would ordinarily be loaded from the <extra> elements in the preference header
XML resource (in our case, the name of the preference XML resource to load)Those extras will be automatically handled by PreferenceActivity (on API Level 11+)
and will have the effect of directly taking the user to our one-and-only fragment, bypassing
the headers.
In the Settings app, or in other apps that appear to be using
PreferenceFragment-based UIs, you may have noticed that there are
times when preferences are disabled. They become enabled when you
check a CheckBoxPreference or toggle on a SwitchPreference.
That is handled via the android:dependency attribute on the to-be-disabled
preferences. The value of android:dependency is the key of
a TwoStatePreference subclass, such as a
CheckBoxPreference or a SwitchPreference. The enabled/disabled
state of the preference with the android:dependency attribute
depends on the checked state of the named dependency.
For example, the
Prefs/Dependency
sample project is a clone of
the original SharedPreferences demo app with one slight
change: all the preferences other than checkbox are now dependent
upon checkbox:
<PreferenceScreen xmlns:android="http://schemas.android.com/apk/res/android">

  <CheckBoxPreference
    android:key="checkbox"
    android:summary="@string/pref1summary"
    android:title="@string/pref1title"/>

  <RingtonePreference
    android:dependency="checkbox"
    android:key="ringtone"
    android:showDefault="true"
    android:showSilent="true"
    android:summary="@string/pref2summary"
    android:title="@string/pref2title"/>

  <EditTextPreference
    android:dependency="checkbox"
    android:dialogTitle="@string/dialogtitle"
    android:key="text"
    android:summary="@string/pref3summary"
    android:title="@string/pref3title"/>

  <ListPreference
    android:dependency="checkbox"
    android:dialogTitle="@string/listdialogtitle"
    android:entries="@array/cities"
    android:entryValues="@array/airport_codes"
    android:key="list"
    android:summary="@string/pref4summary"
    android:title="@string/pref4title"/>

</PreferenceScreen>When you run the project, the dependent preferences are disabled while the checkbox is unchecked:
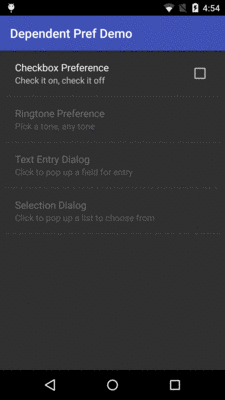
Figure 590: Dependent Preferences, Disabled
…but become enabled once the user checks the checkbox:
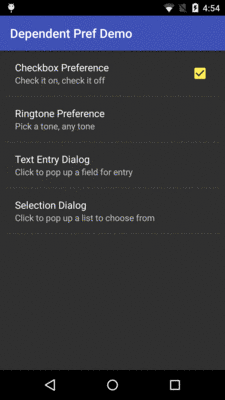
Figure 591: Dependent Preferences, Enabled
Perhaps you have more preferences than you want to collect on a single screen, but you do not feel that a master-detail presentation is the right structure. Or, perhaps you have lots of preferences to collect, and even collecting preferences into groups by header is insufficient.
Another possibility is to nest preference screens. One screen holds another. On the outer preference screen, the user has a “preference” entry that simply displays the nested screen, as opposed to directly collecting any preferences.
A <PreferenceScreen> element in your preference XML can hold
another <PreferenceScreen> element. That inner <PreferenceScreen>
can come in one of two forms:
<PreferenceScreen> you have more preference
XML elements. This means there is only one PreferenceFragment for
the whole structure (outer <PreferenceScreen>, including the
inner <PreferenceScreen>). However, visually, the user will
“drill down” from the outer screen into the inner one by tapping on
an entry.<PreferenceScreen> has an android:fragment
attribute, just like a preference header might. This points to
a Fragment — typically a PreferenceFragment — that will be
responsible for the “inner” content. This is a bit more complex
to set up, as it requires a couple of fragments. However, it gives
you greater flexibility. Plus, it is fairly easy to then switch
from using preference headers and the master-detail approach to
using nested preference screens, or back again, as you are simply
reusing the same PreferenceFragment implementations in either
case.The
Prefs/NestedScreens
sample project takes the master-detail approach shown earlier
in this chapter and switches it to having a top-level screen
and a nested screen. This is accomplished by adding a <PreferenceScreen>
element to res/xml/preferences.xml, pointing to our
Second PreferenceFragment:
  <PreferenceScreen
    android:fragment="com.commonsware.android.preffragsbc.EditPreferences$Second"
    android:key="unused"
    android:title="@string/nested_title"/>
Here, the android:title (and optional android:summary) will be shown
on the outer screen, as an entry that the user can tap on to get to
this inner screen. While in this sample, we are not using android:key,
in principle you could use this to get at the PreferenceScreen itself
to manipulate it at runtime (e.g., disable it).
For this style of <PreferenceScreen> to work, the preference XML must
be used by a PreferenceFragment in a PreferenceActivity — you cannot
use it with a regular Activity. However, just because you use
PreferenceActivity does not mean that you have to opt into the
master-detail structure. We can use the same onCreate(),
show-the-PreferenceFragment approach that we use with a regular
Activity.
However, there is one big catch: when the user taps on the entry
that will launch the inner screen, the Android framework will start
another instance of our PreferenceActivity. It will give us the
same EXTRA_SHOW_FRAGMENT value as we saw earlier in this chapter.
However, PreferenceActivity will automatically show that fragment; we
do not need to show it ourselves.
But, this means that our onCreate() needs to distinguish between
the “show the outer screen ourselves” case and the “show the inner
screen automatically” case, which we can do by seeing if
EXTRA_SHOW_FRAGMENT exists:
  @Override
  public void onCreate(Bundle savedInstanceState) {
    super.onCreate(savedInstanceState);

    if (getIntent().getStringExtra(PreferenceActivity.EXTRA_SHOW_FRAGMENT)==null) {
      if (getFragmentManager().findFragmentById(android.R.id.content)==null) {
        getFragmentManager().beginTransaction()
            .add(android.R.id.content,
                new First()).commit();
      }
    }
  }
The result is that we see the outer screen first, containing our entry for the inner screen:
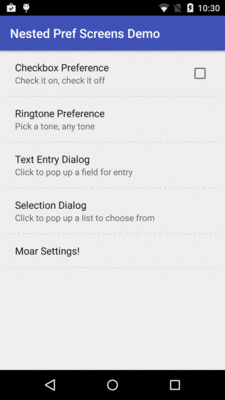
Figure 592: Nested Preferences, Outer Screen
Tapping on that entry brings up the inner, nested, screen:
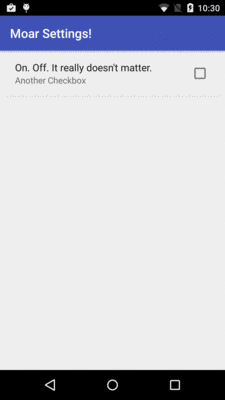
Figure 593: Nested Preferences, Inner Screen
Sometimes, you may need to take steps when the user interacts with
a preference in your PreferenceFragment-based UI.
A common scenario for this comes with the summary. In some cases,
is it handy to have the summary reflect the current value of the
preference. While some preferences naturally show their value inline
(e.g., a CheckBoxPreference), those that extend from DialogPreference
only show their value when the user taps on the preference to display
the dialog. Putting something in the summary that reflects the
value can save the user a click.
However, by default, the summary is static, populated by the
android:summary attribute in your preference XML. If you want it
to reflect the current preference value, you not only need to be able
to set the summary in Java, but to be able to respond when the user
changes the value, so you can update the summary again.
The
Prefs/CustomSubtitle
sample project demonstrates how this works. This is yet another
clone of the original SharedPreferences demo app.
This time, the preference XML is unchanged from the original. However,
we have a slightly more elaborate PreferenceFragment implementation:
  public static class Prefs extends PreferenceFragment
      implements Preference.OnPreferenceChangeListener {
    @Override
    public void onCreate(Bundle savedInstanceState) {
      super.onCreate(savedInstanceState);

      addPreferencesFromResource(R.xml.preferences);

      Preference pref=findPreference("text");

      updateSummary(pref,
          pref.getSharedPreferences().getString(pref.getKey(), null));
      pref.setOnPreferenceChangeListener(this);
    }

    @Override
    public boolean onPreferenceChange(Preference pref, Object newValue) {
      updateSummary(pref, newValue.toString());

      return(true);
    }

    private void updateSummary(Preference pref, String value) {
      if (value==null || value.length()==0) {
        pref.setSummary(R.string.msg_missing_text);
      }
      else {
        pref.setSummary(value);
      }
    }
  }
In onCreate(), after addPreferencesFromResource(), we call
findPreference() to retrieve the Preference object that manages
the snippet of UI for a particular preference. The flow here
mimics that of setContentView() and findViewById(): first you
inflate the resource, then you find the Java object corresponding
to some XML element out of that resource. findPreference()
takes the key of the preference that you are looking for; in this
case, we are looking for the EditTextPreference, whose key is
text.
We then call a private updateSummary() method, which takes the
Preference and the current value of that preference and updates
the summary. To get the current value, onCreate() can ask the
Preference for its backing SharedPreferences (via getSharedPreferences()),
then retrieve the value using standard getters (e.g., getString()).
updateSummary() then shows the string representation of the
current value, or a canned message if there does not appear to be
a current value.
We also register the fragment itself as being the OnPreferenceChangeListener,
and register the fragment with the preference via
setOnPreferenceChangeListener(). This means that when the user
manipulates this preference, we will be called with onPreferenceChange().
This is done before the SharedPreferences are updated. Our options
are either to return true and have the normal persistence process
continue, or return false and manage persistence ourselves (e.g.,
perform some conversion on the raw value before storing it). In our
case, we are just using this to call updateSummary() again.
If you install the app and run it, you will not have an existing value for the preference, and so the summary shows a stock message:
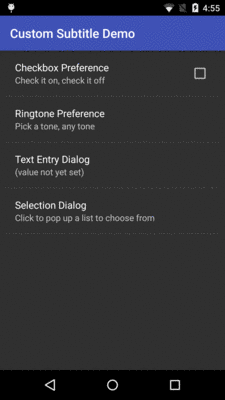
Figure 594: Custom Subtitle Demo, Before Editing Text
After you tap on the EditTextPreference and fill in some value
in the dialog, the summary updates to show what you typed in:
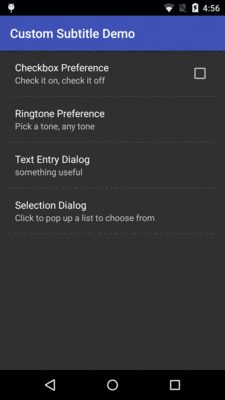
Figure 595: Custom Subtitle Demo, After Editing Text
When you use SharedPreferences to retrieve a value, you can usually
provide a default value along with the key for the value that you want.
If there is no preference value for that key, you get the default
that you supplied.
A preference in preference XML also has an android:defaultValue
attribute. This is, roughly speaking, the preference UI counterpart
to that second parameter to the SharedPreferences getters. If the
user interacts with the preference, the android:defaultValue value
will be presented to the user if there was no preference value stored
for that key in the underlying SharedPreferences.
To synchronize these, you can call setDefaultValues() on
the PreferenceManager class. Given the resource ID of some preference
XML, PreferenceManager will find all android:defaultValue attributes
and then persist those default values to the SharedPreferences under
their respective keys.
Sometimes, you will have components that need to know when preference
values are changed elsewhere in your app. For example, you may have
a Service that is using information from SharedPreferences, and
the Service may need to know when those values change.
One approach, used in all the sample apps, is simply to re-read the
preference values as needed, rather than caching them in data members
or something. After the first time SharedPreferences are accessed,
the SharedPreferences themselves are held in heap space, and so
accessing them can be fairly cheap. So, the sample apps’ launcher
activities just re-read the preference values in onResume() and update
the UI that way.
If, however, that is inappropriate, inconvenient, or otherwise not
what you want to do, you can call registerOnSharedPreferenceChangeListener()
on a SharedPreferences object, supplying an instance of an implementation
of the OnSharedPreferenceChangeListener interface. That object will
be called with onSharedPreferenceChanged() every time a preference value
changes. You are given the key to the changed value, so you can implement
a filter to only pay attention to keys that matter to you. When one of
those keys is reported to have changed, you can ask the SharedPreferences
for the new value.
Many times, the items that the user can choose from in your
ListPreference or MultiSelectListPreference are fixed, allowing you
to populate them from <string-array> resources. However, sometimes,
the items (display names and corresponding values) are dynamic, based
upon information held elsewhere: database, server, or something at a
system level. For those, we need to be able to define the preference
in XML, but configure its contents in Java code.
For example, the
Introspection/SAWMonitor
sample project is a monitor for new and upgraded apps that ask for
the SYSTEM_ALERT_WINDOW permission. Such apps have the right to draw
over top of other apps, for anything from Facebook “chatheads” to
tapjacking attacks.
However, some apps may request this permission that you are perfectly
fine with having it. By default, SAWMonitor will point out this
permission on each subsequent update, which can get tiresome after a while.
Hence, SAWMonitor allows you to add apps to a “whitelist”; those apps
will be ignored, even if they request SYSTEM_ALERT_WINDOW.
To that end, we have a settings.xml resource describing some preferences
to collect from the user:
<?xml version="1.0" encoding="utf-8"?>
<PreferenceScreen xmlns:android="http://schemas.android.com/apk/res/android">
  <SwitchPreference
    android:key="enabled"
    android:title="@string/msg_enable"
    android:defaultValue="true"/>
  <MultiSelectListPreference
    android:key="whitelist"
    android:title="@string/msg_whitelist" />
</PreferenceScreen>Here we have two preferences: a SwitchPreference for whether we
should be monitoring for SYSTEM_ALERT_WINDOW at all, and a MultiSelectListPreference
to allow the user to control the whitelist.
In onCreate() of our SettingsFragment, we load up those preferences
into the UI via addPreferencesFromResource(), use findPreference()
to retrieve both of the Preference objects, and use setOnPreferenceChangeListener()
to be notified about changes to the enabled preference:
  @Override
  public void onCreate(Bundle savedInstanceState) {
    super.onCreate(savedInstanceState);
    addPreferencesFromResource(R.xml.settings);
    pm=getActivity().getPackageManager();

    enabled=(SwitchPreference)findPreference(MonitorApp.PREF_ENABLED);

    populateWhitelist((MultiSelectListPreference)findPreference("whitelist"));
  }
The populateWhitelist() call is where we fill in the details for the
MultiSelectListPreference. In our case, the possible values are the
apps presently installed that have requested the SYSTEM_ALERT_WINDOW
permission. So, we use PackageManager to find those, then use that
information to populate the whitelist preference:
  void populateWhitelist(MultiSelectListPreference whitelist) {
    List<ApplicationInfo> apps=pm.getInstalledApplications(0);

    Collections.sort(apps,
      new ApplicationInfo.DisplayNameComparator(pm));

    ArrayList<CharSequence> displayNames=
      new ArrayList<CharSequence>();
    ArrayList<String> packageNames=new ArrayList<String>();

    for (ApplicationInfo app : apps) {
      try {
        PackageInfo pkgInfo=
          pm.getPackageInfo(app.packageName,
            PackageManager.GET_PERMISSIONS);

        if (pkgInfo.requestedPermissions!=null) {
          for (String perm : pkgInfo.requestedPermissions) {
            if (SYSTEM_ALERT_WINDOW.equals(perm)) {
              displayNames.add(app.loadLabel(pm));
              packageNames.add(app.packageName);
              break;
            }
          }
        }
      }
      catch (PackageManager.NameNotFoundException e) {
        // should not happen, quietly ignore
      }
    }

    whitelist
      .setEntries(displayNames
        .toArray(new CharSequence[displayNames.size()]));
    whitelist
      .setEntryValues(packageNames
        .toArray(new String[packageNames.size()]));
  }
Most of the code is determining which applications have that permission.
However, MultiSelectListPreference complicates matters, by having
two separate setter methods for its contents:
setEntries() sets the display names, what the user will see in the
multi-select dialogsetEntryValues() sets the corresponding values, what will be stored
in the SharedPreferences based upon the user’s inputThese each take arrays of CharSequence implementations, like String.
Hence, we need two parallel arrays of values, rather than a single
ArrayList of Pair objects or something.
With that in mind, populateWhitelist():
PackageManager
(pm is a field initialized in onCreate())ArrayList for the display names and a separate one for the
package names, which will serve as our entry valuesSYSTEM_ALERT_WINDOW, add the display name
(loadLabel()) and the package name to their respective listsArrayList objects into a corresponding
Java array, and passes them to their appropriate settersThe resulting SettingsFragment has the two preferences:
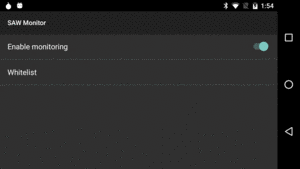
Figure 596: SAWMonitor SettingsFragment
Tapping on the “Whitelist” entry brings up the MultiSelectListPreference:
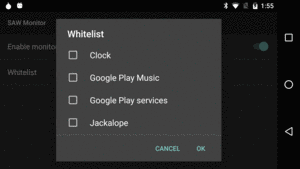
Figure 597: SAWMonitor Whitelist MultiSelectListPreference
If you run the app on your device or emulator, you will wind up with
different possible entries in the MultiSelectListPreference, as the
mix of apps requesting SYSTEM_ALERT_WINDOW will be different for
different devices and users.
What happens if you have a PreferenceFragment in the foreground,
and the preference changes “behind the scenes” by some other component
of your app?
For preferences with dialogs — ListPreference, EditTextPreference,
etc. — the pattern seems to be “transaction by dialog”. Whatever the
preference value is at the time the dialog appears is what the user
sees, and that does not change (and cannot readily be changed)
if the preference changes while that dialog is on the screen.
However, for inline preferences — CheckBoxPreference, SwitchPreference,
etc. — while the UI will not automatically update based on the external
change, you can handle that yourself.
For example, SAWMonitor offers
an optional notification shade tile using a TileService on Android 7.0+ devices.
The tile allows the user to enable and disable the monitoring, just as
the user can from the SwitchPreference. So… what happens if the
SettingsFragment is on the screen, the user slides open the notification
shade, and taps the tile? By default, the SettingsFragment would
be oblivious to this, with the result of the SwitchPreference being
out of sync.
But, we can fix this.
In SettingsFragment, in onStart(),
we register for preference changes, plus call a syncEnabledStates()
method. We unregister from preference changes in onStop():
  @Override
  public void onStart() {
    super.onStart();

    prefs=PreferenceManager.getDefaultSharedPreferences(getActivity());
    prefs.registerOnSharedPreferenceChangeListener(this);
    syncEnabledStates();
  }

  @Override
  public void onStop() {
    super.onStop();

    prefs.unregisterOnSharedPreferenceChangeListener(this);
  }
The onSharedPreferenceChanged() method on our SettingsFragment
will be called when any of our preferences changes. If the enabled
preference changes, we call syncEnabledStates():
  @Override
  public void onSharedPreferenceChanged(SharedPreferences prefs,
                                        String s) {
    if (MonitorApp.PREF_ENABLED.equals(s)) {
      syncEnabledStates();
    }
  }
syncEnabledStates() simply updates the checked state of enabled based
upon the now-current value in SharedPreferences:
  void syncEnabledStates() {
    enabled.setChecked(prefs.getBoolean(MonitorApp.PREF_ENABLED, false));
  }
Hence, this also handles the case where our SettingsFragment
was displayed, the user navigated elsewhere, one of our preferences changes,
and then the user returns to our running SettingsFragment. Normally,
the SettingsFragment might miss that preference change, but with this
implementation, the SettingsFragment will be kept in sync with the
actual preference value.
On Android 7.0+, you can have the Settings app show a “gear” icon on your activity that collects preferences. When the user taps that gear, the Settings app will launch your designated activity:
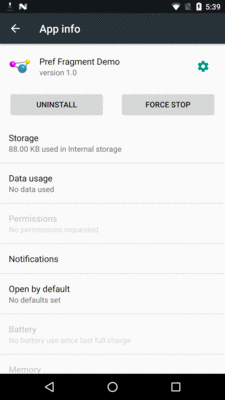
Figure 598: Settings Activity Gear Icon
To offer this, you need to add an <intent-filter> for your desired
activity, with an <action> of android.intent.action.APPLICATION_PREFERENCES:
<activity
  android:name="EditPreferences"
  android:label="@string/app_name">
  <intent-filter>
    <action android:name="android.intent.action.APPLICATION_PREFERENCES" />
    <category android:name="android.intent.category.DEFAULT" />
  </intent-filter>
</activity>
However, by default, there is a cost to this: any app can start your
settings activity, whenever another app wants to. Your settings activity
is exported once you add the <intent-filter>, and it needs to be exported
for the Settings app to be able to start the activity.
However, it is fairly likely that this activity was not exported before you
added this <intent-filter>.
And while you may not mind it if the Settings app starts this activity,
or if your own application code starts this activity, you may not want
arbitrary other apps to start this activity. A general rule of thumb
in modern development is to keep your “attack surface” low. Having an
activity be exported for little value is an unnecessary increase in your
app’s attack surface.
There is no officially-documented solution for this, though perhaps they will add one someday.
There are two candidate approaches. An unexpected
one works:
you can mark the activity as being not exported, via android:exported="false".
For some reason, the Settings app can still start up that activity,
perhaps due to some system-level privilege.
However, other apps will
be unable to start the activity. This would result in an <activity>
element like this:
<activity
  android:name="EditPreferences"
  android:label="@string/app_name"
  android:exported="false">
  <intent-filter>
    <action android:name="android.intent.action.APPLICATION_PREFERENCES" />
    <category android:name="android.intent.category.DEFAULT" />
  </intent-filter>
</activity>
Another approach that should work is to use android:permission to limit what other
apps can start your activity, choosing a permission that the Settings app
is sure to have but that most other apps will lack. WRITE_SECURE_SETTINGS
is one candidate:
<activity
  android:name="EditPreferences"
  android:label="@string/app_name"
  android:permission="android.permission.WRITE_SECURE_SETTINGS">
  <intent-filter>
    <action android:name="android.intent.action.APPLICATION_PREFERENCES" />
    <category android:name="android.intent.category.DEFAULT" />
  </intent-filter>
</activity>
Now, the only other apps that can start your activity must hold
the WRITE_SECURE_SETTINGS permission, which ordinary Android SDK apps
cannot hold.
SharedPreferences are stored in an app’s portion of internal storage as an
XML file. This is fine in many cases. However, it is a problem for apps that
need to ensure that persisted data is encrypted. While you can create a wrapper
around SharedPreferences that encrypts the keys and values, that will not
work well with things like the preference screen UI system. Basically, anything
that does not know about the wrapper would try working with the actual
SharedPreference data and be broken by the encryption.
This has always been disappointing, considering that SharedPreferences is
an interface, and so setting up some sort of decorator approach should have been
fairly easy to add.
In Android 8.0+, Google does not do that.
However, they do add in another mechanism: PreferenceDataStore.
You can create a PreferenceDataStore and associate it with a PreferenceManager
via setPreferenceDataStore().
Then, all SharedPreferences loaded from that PreferenceManager will not use
the normal XML-based persistence. Instead, the PreferenceDataStore will be used
instead. That interface has getter and setter methods for all of the types supported
by SharedPreferences, and it is the responsibility of some instance of
PreferenceDataStore to handle the persistence as you see fit.
This solution is goofy, but it works, after a fashion, as is illustrated in the
Prefs/DataStore
sample project.
In that project, we have a SillyDataStore implementation of the PreferenceDataStore
interface. It just stuffs all the data into a HashMap:
package com.commonsware.android.preffrag;

import android.preference.PreferenceDataStore;
import java.util.HashMap;
import java.util.Map;
import java.util.Set;

class SillyDataStore implements PreferenceDataStore {
  static private final SillyDataStore INSTANCE=new SillyDataStore();
  private Map<String, Object> cache=new HashMap<>();

  static SillyDataStore get() {
    return(INSTANCE);
  }

  private SillyDataStore() {
    // just here to prevent accidental creation from outside
  }

  @Override
  public void putString(String key, String value) {
    cache.put(key, value);
  }

  @Override
  public void putStringSet(String key, Set<String> values) {
    cache.put(key, values);
  }

  @Override
  public void putInt(String key, int value) {
    cache.put(key, value);
  }

  @Override
  public void putLong(String key, long value) {
    cache.put(key, value);
  }

  @Override
  public void putFloat(String key, float value) {
    cache.put(key, value);
  }

  @Override
  public void putBoolean(String key, boolean value) {
    cache.put(key, value);
  }

  @SuppressWarnings("Since15")
  @Override
  public String getString(String key, String defValue) {
    return((String)cache.getOrDefault(key, defValue));
  }

  @SuppressWarnings("Since15")
  @Override
  public Set<String> getStringSet(String key, Set<String> defValues) {
    return((Set<String>)cache.getOrDefault(key, defValues));
  }

  @SuppressWarnings("Since15")
  @Override
  public int getInt(String key, int defValue) {
    return((Integer)cache.getOrDefault(key, defValue));
  }

  @SuppressWarnings("Since15")
  @Override
  public long getLong(String key, long defValue) {
    return((Long)cache.getOrDefault(key, defValue));
  }

  @SuppressWarnings("Since15")
  @Override
  public float getFloat(String key, float defValue) {
    return((Float)cache.getOrDefault(key, defValue));
  }

  @SuppressWarnings("Since15")
  @Override
  public boolean getBoolean(String key, boolean defValue) {
    return((Boolean)cache.getOrDefault(key, defValue));
  }
}
This implementation is truly silly, as it does no type checking and no persistence.
It should be considered the bare minimum implementation of a PreferenceDataStore,
though one that might be useful, instead of rolling a mock, in unit testing.
(note: the @SuppressWarnings("Since15") annotations are because this code
uses the getOrDefault() method on HashMap, which was added in Java 8 and
is new to Android 8.0)
There is a singleton instance of SillyDataStore. That way we can ensure that
the same instance is used wherever we want it.
We apply that singleton in the PreferenceFragment subclass:
  public static class Prefs extends PreferenceFragment {
    @Override
    public void onCreate(Bundle savedInstanceState) {
      super.onCreate(savedInstanceState);

      if (getPreferenceManager().getPreferenceDataStore()==null) {
        getPreferenceManager().setPreferenceDataStore(SillyDataStore.get());
      }

      addPreferencesFromResource(R.xml.preferences);
    }
  }
Here, we check to see if there is a PreferenceDataStore associated with the
PreferenceManager and, if not, we attach the SillyDataStore singleton.
This causes the SharedPreferences used by this PreferenceFragment to use
the SillyDataStore for storage, instead of the default XML-based persistence.
This works… somewhat. There are some problems.
First, a PreferenceManager is not a system service. Of note, each instance
of our PreferenceFragment gets its own fresh PreferenceManager. This is why
we need to check for, and set, the PreferenceDataStore on the PreferenceManager
for the PreferenceFragment each time.
Second, we have no way of associating a PreferenceDataStore with the default
SharedPreferences obtained from PreferenceManager.getDefaultSharedPreferences().
That will always use the standard XML backing store. The initial activity contents
are in the form of a PreferenceContentsFragment that reads from the default
SharedPreferences in onResume(). Normally, that would cause changes that we
make via our PreferenceFragment to show up when the PreferenceContentsFragment
is resumed. In this specific sample, that does not happen, as the
PreferenceContentsFragment is using the default XML data store, and our data
is really in the SillyDataStore.
This illustrates the fatal flaw of this system: you can never really use
the SharedPreferences. You cannot create PreferenceManager instances yourself,
as it has no public constructors. All of the code that gives you
SharedPreferences objects back other than through a PreferenceManager
has no way of associating a PreferenceDataStore with the SharedPreferences.
Instead of using SharedPreferences… you have to read and write from your
PreferenceDataStore itself. This, in turn, loses everything that you normally
associate with SharedPreferences, such as atomicity of updates and preference-change
listeners.
Worse, since PreferenceDataStore has no API telling you when to persist changes,
you would have to do that yourself… somehow.
These can be overcome, with a sufficiently-robust PreferenceDataStore implementation
and lots of documentation. However, for casual use, other than perhaps for test
mocks, PreferenceDataStore is not a well-engineered solution and probably should
be avoided.