Figure 745: SigDump App, As Initially Launched
This chapter outlines some additional security measures that you can consider for your applications that do not necessarily warrant a full chapter on their own at this time.
In other words, it’s just a pile of interesting security stuff.
Understanding this chapter requires that you have read the core chapters of this book. In addition, you should review the app signing chapter if you are unfamiliar with the signing process.
We sign our apps with signing keys all the time. By default, we are signing with a so-called “debug signing key”, created automatically by the build tools. For production, we sign with a different signing key. The primary use of that signing key is to determine equivalence of authorship:
signature-level permissions, signed
by the same signing key that signed the firmware?However, as it turns out, information about the public key that signed an APK is visible
to us, for our own APK as well as for any other APK on the device. We can leverage
that to help determine whether a given APK was signed by something we recognize.
This goes above and beyond using Android’s built-in signature-based defenses (e.g., using
a custom signature-level permission).
There are several scenarios in which we might imagine that we could employ our own public key validation. How well the technique will work, though, depends on what we are checking and the nature of the attack we are defending against.
You might consider checking your own app’s public key. After all, if your app is not signed with your production signing key, something very strange is going on, and the natural reaction is that “something strange” is unlikely to be a good thing for you.
However, there are some issues here.
First and foremost, checking your own signing key assumes that whatever caused you to not be signed by that key did not also modify your validation algorithm. For example, suppose that you validate your signing key to determine if somebody perhaps reverse-engineered and modified your app, perhaps to remove some license checks. This will only catch an attacker that removed the licensing checks and did not also remove your signature validation, or modify the validation to use the attacker’s signing key. While it is possible that an attacker will modify one part but not another, it remains unclear how well this defense will work in practice.
Also, bear in mind that you, as a developer, may be opting into services that intentionally change your app’s signature. Various providers will “wrap” your app, whether for interstitial ad banners or for quasi-DRM. There are three possible ways that they wrap your app:
What will tend to be more reliable is to check other applications’ public keys. While they might have been cracked, it is unlikely that the same attacker also attacked your app, and so you can help detect problems in others.
For example, let us consider a specific scenario: a client-side JAR for integration to a third-party app.
This book outlines many forms of IPC, from content providers to remote services to broadcast
Intent objects. If you are creating an app that offers such IPC endpoints, you may wish to
consider also shipping a JAR to make using those endpoints a bit easier. You might create
a library that handles all of the details of sending commands to your remote service,
or you might create a library that provides a wrapper around the AIDL-generated Java proxy
classes for remote binding.
Another thing such a JAR could do is check the integrity of your app. The JAR’s code is in the client’s app, not yours, and while your app might be cracked, the client’s app might not. You could check the validity of the public key of your own app from the client’s app, and fail if there is a detected problem.
This might be especially important depending upon the nature of the app and the JAR that is providing access to it. If the app is an app offering on-device payments (e.g., a Google Wallet sort of app), and the app offers an API for other apps to do payments, it is fairly important that those other apps can trust the payment app. By checking the public key, your JAR can help provide that level of trust… or at least ensure that nobody else has done something specifically to degrade that trust.
This is particularly important for avoiding device-hosted man-in-the-middle attacks on
your IPC from client apps to your app. In an ideal world, you would only allow IPC
via signature-level permissions, but that will not work in cases where third parties
are writing the clients.
If your IPC is based upon a service (command pattern or binding
pattern), if multiple service implementations all advertise the same <intent-filter>,
Android needs to decide which service will handle the request. First, it will take
into account the android:priority value on the <intent-filter> (even though this
behavior is currently undocumented). For multiple services with the same priority (e.g.,
no priority specified), the first one that was installed will be the one that is chosen.
In either case, the client has
no way to know, short of examining the service’s public key, whether the service that will
respond to the requests for IPC is the legitimate service or something else advertising
that it supports the same Intent action. Even with Android 5.0 blocking your ability
to bind via an implicit Intent, you wind up with the same sorts of problems
when you use resolveService() to try to determine the ComponentName
of the service to make an explicit Intent for it.
The author of this book has published the CWAC-Security library.
Among other things, this library has a SignatureUtils class that makes it relatively
easy for you to compare the signature of some Android app to a known good value.
All you need to do is call the static getSignatureHash() method, supplying some
Context (any will do) and the package name of the app that you wish to check. This
will return the SHA-256 hash of the signing key of the app, as a set of capitalized,
colon-delimited hex values.
You can get the same sort of hash by running the Java 7 version of keytool.
Hence, if the app you wish to test is another one of yours, perhaps signed
with a different signing key, you can use keytool to get the value to compare
with the result of getSignatureHash(). Or, during development, create a little utility app
that will dump the getSignatureHash() value for the third-party app, and run it
on a device containing a known good version of that app (i.e., one that does not
appear to have been replaced by malware).
Ideally, over time, we will be able to get app developers to publish their SHA-256 hashes on their Web sites, as another means of getting a known value of the hash to compare at runtime.
If you determine that getSignatureHash() does not return the right value, this
means that the app that is installed on the device is written by somebody other than the
app’s original author. Often times, this will mean the app has malware in it. It
is up to you to determine how you wish to respond to this scenario:
Under the covers, SignatureUtils uses PackageManager
and related classes to examine what they somewhat erroneously refer to as “signatures”. The
MiscSecurity/SigDump
sample project will allow us to browse the list of installed packages, see a decoded public
key on the screen for a package that we select, plus dump the “signature” as a binary file
for later comparison using another app.
This app has a single activity, whose UI consists of:
RecyclerView to show the list of packages, andTextView widgets to show details of the last-clicked-upon
packageThese are wrapped in a ConstraintLayout, which uses Barrier objects
to organize the TextView widgets into a table:
<layout>

  <data>

    <variable
      name="model"
      type="com.commonsware.android.signature.dump.MainActivity.DetailModel" />
  </data>

  <android.support.constraint.ConstraintLayout xmlns:android="http://schemas.android.com/apk/res/android"
    xmlns:app="http://schemas.android.com/apk/res-auto"
    android:layout_width="match_parent"
    android:layout_height="match_parent">

    <android.support.v7.widget.RecyclerView
      android:id="@+id/packages"
      android:layout_width="0dp"
      android:layout_height="0dp"
      android:layout_margin="4dp"
      android:background="#11000000"
      app:layout_constraintBottom_toTopOf="@id/selected"
      app:layout_constraintEnd_toEndOf="parent"
      app:layout_constraintStart_toStartOf="parent"
      app:layout_constraintTop_toTopOf="parent" />

    <TextView
      android:id="@+id/selected"
      android:text="@{model.selected}"
      android:layout_width="wrap_content"
      android:layout_height="wrap_content"
      android:layout_margin="4dp"
      android:textStyle="bold"
      app:layout_constraintBottom_toTopOf="@id/top_row"
      app:layout_constraintStart_toStartOf="parent" />

    <android.support.constraint.Barrier
      android:id="@+id/column"
      android:layout_width="wrap_content"
      android:layout_height="wrap_content"
      app:barrierDirection="end"
      app:constraint_referenced_ids="subject_caption,issuer_caption,valid_caption" />

    <android.support.constraint.Barrier
      android:id="@+id/top_row"
      android:layout_width="wrap_content"
      android:layout_height="wrap_content"
      app:barrierDirection="top"
      app:constraint_referenced_ids="subject_caption,subject" />

    <TextView
      android:id="@+id/subject_caption"
      android:layout_width="wrap_content"
      android:layout_height="wrap_content"
      android:layout_margin="4dp"
      android:text="@string/subject"
      app:layout_constraintBottom_toTopOf="@id/middle_row"
      app:layout_constraintStart_toStartOf="parent" />

    <TextView
      android:id="@+id/subject"
      android:text="@{model.sigModel.subject}"
      android:layout_width="wrap_content"
      android:layout_height="wrap_content"
      android:layout_margin="4dp"
      app:layout_constraintBottom_toTopOf="@id/middle_row"
      app:layout_constraintStart_toStartOf="@id/column" />

    <android.support.constraint.Barrier
      android:id="@+id/middle_row"
      android:layout_width="wrap_content"
      android:layout_height="wrap_content"
      app:barrierDirection="top"
      app:constraint_referenced_ids="issuer_caption,issuer" />

    <TextView
      android:id="@+id/issuer_caption"
      android:layout_width="wrap_content"
      android:layout_height="wrap_content"
      android:layout_margin="4dp"
      android:text="@string/issuer"
      app:layout_constraintBottom_toTopOf="@id/bottom_row"
      app:layout_constraintStart_toStartOf="parent" />

    <TextView
      android:id="@+id/issuer"
      android:text="@{model.sigModel.issuer}"
      android:layout_width="wrap_content"
      android:layout_height="wrap_content"
      android:layout_margin="4dp"
      app:layout_constraintBottom_toTopOf="@id/bottom_row"
      app:layout_constraintStart_toStartOf="@id/column" />

    <android.support.constraint.Barrier
      android:id="@+id/bottom_row"
      android:layout_width="wrap_content"
      android:layout_height="wrap_content"
      app:barrierDirection="top"
      app:constraint_referenced_ids="valid_caption,valid" />

    <TextView
      android:id="@+id/valid_caption"
      android:layout_width="wrap_content"
      android:layout_height="wrap_content"
      android:layout_margin="4dp"
      android:text="@string/valid_between"
      app:layout_constraintBottom_toBottomOf="parent"
      app:layout_constraintStart_toStartOf="parent" />

    <TextView
      android:id="@+id/valid"
      android:text="@{model.sigModel.validDates}"
      android:layout_width="wrap_content"
      android:layout_height="wrap_content"
      android:layout_margin="4dp"
      app:layout_constraintBottom_toBottomOf="parent"
      app:layout_constraintStart_toStartOf="@id/column" />

  </android.support.constraint.ConstraintLayout>
</layout>The TextView contents use data binding expressions to pull information in
from a DetailModel, which we will examine shortly.
But, given this structure, the job of the activity is to show the list of packages
in the RecyclerView and, when a list item is clicked, update the DetailModel
to fill in the remaining widgets.
MainActivity holds a DetailModel object in a field:
private final DetailModel detailModel=new DetailModel();
In onCreate() of MainActivity, we set up the data binding and bind that
data model, plus populate the RecyclerView:
  @Override
  protected void onCreate(Bundle savedInstanceState) {
    super.onCreate(savedInstanceState);

    ActivityMainBinding binding=
      DataBindingUtil.setContentView(this, R.layout.activity_main);

    binding.setModel(detailModel);

    binding.packages.setLayoutManager(new LinearLayoutManager(this));
    binding.packages.addItemDecoration(new DividerItemDecoration(this,
      LinearLayoutManager.VERTICAL));
    binding.packages.setAdapter(new PackageAdapter(getLayoutInflater(),
      buildPackageList(), detailModel));
  }
The RecyclerView uses a PackageAdapter to fill in its contents:
  private static class PackageAdapter extends RecyclerView.Adapter<RowHolder> {
    private final LayoutInflater inflater;
    private final List<PackageInfo> packages;
    private final DetailModel detailModel;

    private PackageAdapter(LayoutInflater inflater,
                           List<PackageInfo> packages,
                           DetailModel detailModel) {
      this.inflater=inflater;
      this.packages=packages;
      this.detailModel=detailModel;
    }

    @NonNull
    @Override
    public RowHolder onCreateViewHolder(@NonNull ViewGroup parent,
                                        int viewType) {
      View row=
        inflater.inflate(android.R.layout.simple_list_item_1, parent, false);

      return new RowHolder(row);
    }

    @Override
    public void onBindViewHolder(@NonNull RowHolder holder,
                                 int position) {
      holder.bind(packages.get(position), detailModel);
    }

    @Override
    public int getItemCount() {
      return packages.size();
    }
  }
This wraps around a List of PackageInfo objects, which we get from PackageManager:
  public List<PackageInfo> buildPackageList() {
    List<PackageInfo> result=
      getPackageManager().getInstalledPackages(PackageManager.GET_SIGNATURES);

    Collections.sort(result, (a, b) -> (a.packageName.compareTo(b.packageName)));

    return result;
  }
getPackageList() calls getInstalledPackages()
on PackageManager, specifically requesting to retrieve signature information via the
GET_SIGNATURES flag. The list we get back from getInstalledPackages() can be in any
order, so we sort the results before returning it for display purposes.
We need to fill in those TextView widgets, and to do that, we need to have a
DetailModel.
That class just holds onto a pair of ObservableField objects, one for the
“selected” package name (whatever the user last clicked on), and one for a separate
SigModel class:
  public static class DetailModel {
    public final ObservableField<String> selected=new ObservableField<>();
    public final ObservableField<SigModel> sigModel=new ObservableField<>();
  }
SigModel holds the formatted data to pour into the TextView widgets, populated
from an X509Certificate object:
  public static class SigModel {
    public final String subject;
    public final String issuer;
    public final String validDates;

    private SigModel(X509Certificate cert) {
      this.subject=cert.getSubjectDN().toString();
      this.issuer=cert.getIssuerDN().toString();
      this.validDates=
        FORMAT.format(cert.getNotBefore())+" to "+
          FORMAT.format(cert.getNotAfter());
    }
We are interested in three items from the X509Certificate. The subject is who
the certificate is for and the issuer is who created the certificate. For
a self-signed certificate — what we usually use for Android app development –
the subject and the issuer usually are the same party. We also want to show
the valid date range for the certificate, where we get the getNotBefore()
and getNotAfter() dates and format them using a SimpleDateFormat object:
  private static final DateFormat FORMAT=
    DateFormat.getDateInstance();
So now we are left with the glue code: when the user clicks on a package in
the list, we need to get an X509Certificate representing the contents of the
signing key and use that to put a fresh SigModel into the DetailModel, so data
binding can update the TextView widgets.
That is all taken care of by RowHolder, which is the ViewHolder for
our RecyclerView:
  private static class RowHolder extends RecyclerView.ViewHolder {
    private final TextView title;
    private final View row;

    RowHolder(View itemView) {
      super(itemView);

      row=itemView;
      title=itemView.findViewById(android.R.id.text1);
    }

    void bind(final PackageInfo packageInfo, final DetailModel detailModel) {
      title.setText(packageInfo.packageName);

      row.setOnClickListener(v -> {
        detailModel.selected.set(packageInfo.packageName);
        detailModel.sigModel.set(new SigModel(buildCertificate(packageInfo)));
        SigSaver.enqueueWork(title.getContext(), packageInfo);
      });
    }

    private X509Certificate buildCertificate(PackageInfo packageInfo) {
      Signature[] signatures=packageInfo.signatures;
      byte[] raw=signatures[0].toByteArray();
      CertificateFactory certFactory;

      try {
        certFactory=CertificateFactory.getInstance("X509");
      }
      catch (CertificateException e) {
        Log.e(getClass().getSimpleName(),
          "Exception getting CertificateFactory", e);
        return null;
      }

      X509Certificate cert;
      ByteArrayInputStream bin=new ByteArrayInputStream(raw);

      try {
        cert=(X509Certificate)certFactory.generateCertificate(bin);
      }
      catch (CertificateException e) {
        Log.e(getClass().getSimpleName(),
          "Exception getting X509Certificate", e);
        return null;
      }

      return cert;
    }
  }
When we bind() a PackageInfo into the row, we also set up an click listener
for the row itself, to find out when the user taps on it. There, we update the
two fields of the DetailModel, using buildCertificate() to get the
X509Certificate for use with SigModel.
The PackageInfo object contains a signatures field with an array of Signature
objects. Despite the name, those each are an encoded representation of an
X509Certificate. Traditionally, Android apps have been signed with just one
key, so we only look at the first element of the array. Then, using Java cryptography
classes, we:
toByteArray()
on the Signature
CertificateFactory for the X509 formatByteArrayInputStream
CertificateFactory to decode the certificateThe click listener we applied to the row also has this line:
SigSaver.enqueueWork(title.getContext(), packageInfo);
This invokes a SigSaver implementation of a JobIntentService. Its job is to
write this “signature” to a file, so it could be transferred off of the device
and perhaps examined using tools like openssl.
SigSaver uses getPackageInfo() on PackageManager to get the PackageInfo
object for a specific package, then gets the same byte array that buildCertificate() does
and writes it to a file on external storage:
package com.commonsware.android.signature.dump;

import android.content.Context;
import android.content.Intent;
import android.content.pm.PackageInfo;
import android.content.pm.PackageManager;
import android.content.pm.Signature;
import android.support.annotation.NonNull;
import android.support.v4.app.JobIntentService;
import android.util.Log;
import java.io.File;
import java.io.FileOutputStream;

public class SigSaver extends JobIntentService {
  private static final int UNIQUE_JOB_ID=1337;
  private static final String EXTRA_PACKAGE="package";

  static void enqueueWork(Context ctxt, PackageInfo packageInfo) {
    Intent i=new Intent(ctxt, SigSaver.class)
      .putExtra(EXTRA_PACKAGE, packageInfo.packageName);

    enqueueWork(ctxt, SigSaver.class, UNIQUE_JOB_ID, i);
  }

  @Override
  protected void onHandleWork(@NonNull Intent intent) {
    String packageName=intent.getStringExtra(EXTRA_PACKAGE);

    try {
      PackageInfo packageInfo=getPackageManager().getPackageInfo(packageName,
        PackageManager.GET_SIGNATURES);
      File output=
        new File(getExternalFilesDir(null),
          packageInfo.packageName.replace('.', '_')+".bin");

      if (output.exists()) {
        output.delete();
      }

      Signature[] signatures=packageInfo.signatures;
      byte[] raw=signatures[0].toByteArray();

      try {
        FileOutputStream fos=new FileOutputStream(output.getPath());

        fos.write(raw);
        fos.close();
      }
      catch (java.io.IOException e) {
        Log.e(getClass().getSimpleName(),
          "Exception in writing signature file", e);
      }
    }
    catch (PackageManager.NameNotFoundException e) {
      Log.e(getClass().getSimpleName(),
        "Exception loading package info: "+packageName, e);
    }
  }
}
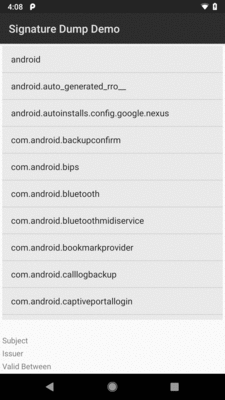
When you run the app, you will get a list of all of the installed packages, which will include system packages that have no activities (and, therefore, nothing in the app drawer of your launcher):
Figure 745: SigDump App, As Initially Launched
Scrolling to and clicking on a package will populate the bottom panel with the details of that package’s signature:
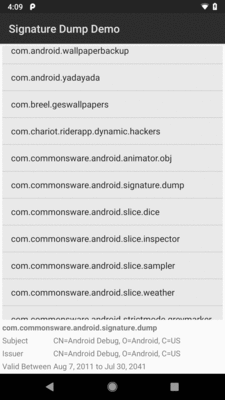
Figure 746: SigDump App, After Clicking on the SigDump Entry
Also, a copy of the public signing key — as an encoded X.509 certificate — is written out to a file on external storage.
The documentation for app signing
contains a small side note about the -keysize parameter to
keytool, the utility used to generate our signing keys:
The size of each generated key (bits). If not supplied, Keytool uses a default key size of 1024 bits. In general, we recommend using a key size of 2048 bits or higher.
The reason for the 2,048-bit key size recommendation is that
1,024-bit RSA (the keytool default)
has been considered at risk for a few years.
The recent revelations about state-sponsored decryption research should
be hammering this home. Even if today, forging a 1,024-bit digital
signature is still impractical for all but the largest security
agencies, it is well within reason that this will fall within the
reach of large botnets in the not-too-distant future.
Once signing keys can be cracked, apps
will be able to be replaced with hacked editions, without tripping
up the signature check, or signature-level permission checks might
start passing due to forged signatures.
Switching to a larger keysize is not that hard… for new apps. Just
specify -keysize 4096 when creating your production signing key,
and you should be good for a long time, barring a major decryption
breakthrough for RSA signatures.
For existing apps with existing signing keys, though, you cannot change the key without breaking your ability to update the app.
Create a new, stronger production signing key, as a separate key from whatever you are using for production. Make note to use that new signing key for any new apps you create. And, if you have other reasons why you are migrating an existing user base to a new app (e.g., free app for which you are now offering a paid-app option), consider using the new signing key.
If you are a consultant, and you create unique signing keys per project, just cut over to using a stronger key for new clients and projects.
And if you are creating apps for which security is paramount, you might consider whether it is worthwhile to move your user base to a new version of the app with a new signing key at some point, just for the added protection.
One place where developers create their own security problems is with “accidental APIs”.
An API, of course, is where one code base exposes some interface that another code base can use. An accidental API is when one code base does not intend to expose an interface, but does anyway, possibly to the app’s detriment.
Bear in mind that if your app becomes popular, other developers will poke and prod at it, to see if they can connect to your app by one means or another. Perhaps they want to offer features that you have not gotten to yet. Perhaps they have more nefarious aims. Regardless, making sure that other code can only work with your app the way that you intend for such code to work with your app.
A component of your app is only reachable by a third-party app if it is exported. Otherwise, it is inaccessible to third-party apps.
(Admittedly, content providers have an exception to this rule, which we will get to shortly)
You normally do not think about exporting components, except when it comes to content providers. However, your choices for how you implement your app may lead you to accidentally export things that you did not realize were exported.
The official way to declare whether or not a component is exported is
to have an android:exported attribute for that component in the manifest
(e.g., on an <activity> element). However, many times, we do not have
such an attribute, but instead rely on the default export behavior.
Activities, services, and broadcast receivers have a simple rule for
the default: if the component has an <intent-filter>, it is exported by default.
Otherwise, it is not exported by default.
This, in turn, leads to a fairly simple development rule: only use an
<intent-filter> and implicit Intent objects for working with your components
if you also want third party apps to work with those components. Otherwise,
do not use <intent-filter>, and instead communicate with your components
using explicit Intent objects (e.g., the kind that take a Java class as the second
constructor parameter).
For example, the classic MAIN/LAUNCHER <intent-filter> on your launcher
activity is specifically there because you want a third party app — the
launcher — to be able to start your activity. Most, if not all, of your other
activities probably do not need an <intent-filter>, as they are likely to
be private to your app.
Some developers choose to still use an <intent-filter> and implicit
Intent objects for their own private activities, yet then use android:exported to
enforce the privacy.
This is not a good plan.
The rest of the system, notably PackageManager, does not pay much attention
to android:exported until the time when the component is to be used,
such as when the activity is to be started. Then, and only then, does Android
realize that the component is not exported, and it fails the request, usually
with a cryptic SecurityException.
A classic example of where this can cause problem came to light in 2012, with the UPS Mobile app. The rest of this section is an excerpt from the author’s blog post on this incident:
The UPS Mobile app allows you to track packages and do a handful of other things that you might ordinarily do via the UPS Web site. It generally seems to be well-regarded, but it has an annoying flaw:
It claims to be Barcode Scanner, and does a lousy job at it.
Barcode Scanner, from ZXing, is a favorite among Android developers for its integration possibilities. However, some people do not like having a dependence upon the Barcode Scanner app, so they grab the open source code and attempt to blend it into their own apps. This is neither endorsed nor supported by the ZXing team, but since it is open source, it is also perfectly legitimate.
However, UPS (or whoever they hired to build the app) screwed up. They not only copied the source code, but they copied the manifest entry for the scanning activity. And, their activity has:
<intent-filter>
  <action android:name="com.google.zxing.client.android.SCAN" />
  <category android:name="android.intent.category.DEFAULT" />
<intent-filter>
This means that on any device that has UPS Mobile installed, they
will be an option for handling Barcode Scanner Intent objects. What
happened was that the person asking the question was manually
invoking startActivityForResult() to bring up Barcode Scanner,
was getting a chooser with UPS Mobile in it, and then was crashing
upon choosing UPS Mobile… because UPS Mobile declared this activity
to be not exported.
There was a bug, in which Android would display non-exported activities in a chooser, despite the fact that they could never be successfully used by the user. This appears to have been fixed as of Android 4.2, despite the issue being declined.
So, what should we learn from this?
First, UPS Mobile should not have used that <intent-filter>.
As Dianne Hackborn has pointed out, your <intent-filter> mix
is effectively part of your app’s API,
and so you need to think long and hard about every <intent-filter>
you publish. UPS Mobile is not Barcode Scanner and should not
be advertising that they handle such Intent objects, despite the activity
being not exported.
Second, UPS Mobile probably should not have had any <intent-filter>
elements for this activity, if they intend to use it purely internally.
They could just as easily use an explicit Intent to identify the
activity and avoid all of this nonsense.
Third, the person who filed the SO question ideally would have
been using ZXing’s IntentIntegrator. As Sean Owen of the ZXing project
noted in a comment on my answer, IntentIntegrator ensures that
only Barcode Scanner or official brethren will handle any scan
requests, so this problem would not have appeared.
Fourth, Android really should not be showing non-exported activities
in a chooser, which means probably that PackageManager should
be filtering out non-exported activities from methods like
queryIntentActivities(), which I presume lies at the heart of
the chooser.
In summary, if your component is truly private, do not have an <intent-filter>
on it, lest you cause yourself, and your users, problems with other
apps.
Content providers are a little different… in lots of ways. In the specific scenarios being covered here, there are two primary differences.
First, third-party apps can still access a provider that has
android:exported="false". However, they can only do so in response to some
operation initiated by your application, using android:grantUriPermissions
and flags like FLAG_GRANT_READ_URI_PERMISSION. A third-party app will
have no independent access to your non-exported provider.
Second, the default value for android:exported not only does not depend
upon <intent-filter> (since few providers use one), but it has changed
over the years:
android:minSdkVersion and android:targetSdkVersion
set to 16 or lower, the provider is exported by defaultLint will complain about your manifest having a <provider> without an
android:exported attribute.
If you do expose one or more of your components to third-party apps,
and you are supporting certain Intent extras on any Intent objects used to
talk to those components, make sure that the extras’ values make sense.
Even Google makes this error, as was seen in
the PreferenceActivity bug. PreferenceActivity
supports an extra, named :android:show_fragment, to indicate that the
activity should immediately jump to a specific fragment, rather than start
at the top level of the preference navigation. The problem is that
PreferenceActivity did not — and, at the time, could not — validate that
the fragment to be loaded is a fragment that is supposed to be loaded.
This would allow attackers to force apps, like Settings, to load arbitrary
fragments, including those not normally accessible to the current user.
This is the reason why we now need to override isValidFragment() in our
PreferenceActivity implementations, so we can declare whether or not
a particular requested fragment is a legitimate choice or not.
The equivalent behavior for a ContentProvider is to sanitize the inputs
to methods like query(), update(), openFile(), and so on, to make
sure that you do not expose something that you should not. For example,
blindly accepting paths to openFile() could get you in trouble, if
the Uri contains relative paths
(e.g., content://your.authority.here/../databases/your-private.db), perhaps
allowing third parties to get at files that you did not intend for them
to access.
Similarly, if you send broadcasts or otherwise use IPC to talk to third-party apps, bear in mind that others might be able to see some of that interaction, depending on the IPC in question.
The obvious case is with a broadcast Intent for an implicit Intent. Any
app with a registered receiver will be able to “tune into” that broadcast and
get whatever data is inside the Intent. In cases where you cannot use
permissions to limit the scope of the broadcast, you need to make sure that
there is nothing in the Intent that is private to the user.
Sometimes, though, non-obvious cases will emerge. For a few years, Intent
extras on activities might be viewed by third-party apps that held the
GET_TASKS permission, courtesy of the recent-tasks list. The Intent
used to launch the task is available via ActivityManager and getRecentTasks().
While this specific problem was resolved in Android 4.1.1, there may be
other similar scenarios lurking about.
Sometimes, we expose data to third-party apps by using standard Android APIs. We focus on the normal publisher and consumer of data using those APIs and forget about other apps that might be monitoring those communications. Or, we might not realize that one party in those communications may not have the user’s best interests at heart. This section outlines some examples.
Any data that is put into the widgets inside of your RemoteViews for
an app widget is visible to the home screen, lockscreen, or other app
widget host. Those apps are the ones actually converting the RemoteViews
into a view hierarchy, and they can inspect those views, reading the
text in your TextViews, and so forth.
As a result, be careful about exposing potentially sensitive data via an app widget.
Custom notifications also use RemoteViews and therefore could suffer from
the same problem.
On the surface, you might not be worried quite so much about this, because
the Notification object goes to the NotificationManager, for display by
the OS itself.
However, as of Android 4.3 (API Level 18), apps can register to listen to
added and removed notifications via a NotificationListenerService. Not
only can such a service read the text from your Notification, but it can
also access your RemoteViews. This includes any RemoteViews that may be
generated for you by the expanded notification classes
(e.g., BigPictureStyle).
As a result, be careful about exposing potentially sensitive data via
a Notification.
Any app can retrieve text off of the clipboard. After all, that’s the point behind a clipboard.
However, this does mean that you need to be careful what you put on the
clipboard in the first place. The quintessential problem case is a password
manager: putting a password on the clipboard for easy pasting into an app’s
EditText password field will be popular, but it allows that password to
be retrieved by other apps.
You can attempt to help reduce the window of risk by clearing the clipboard after a period of time. However, bear in mind that your process might be terminated before that occurs. Also, only clear the clipboard if the clipboard text is still yours — do not clear the clipboard if another app has already put its own contents there, lest you confuse and irritate the user in the middle of some other paste operation.
If you open up any sort of server-style socket connection — TCP/IP, Bluetooth,
etc. — bear in mind that the Android security framework may not be able
to help you much. You cannot secure a ServerSocket with an
android:permission attribute, for example. It is up to you to validate whether
a particular request is expected and allowed, or not.
Jacking attacks, in general, refer to cases where what the user thinks they are interacting with on-screen is not actually what they are interacting with. Instead, something else has interposed itself between the user and the activity that the user is trying to use. That “something else” might be trying to intercept user input (tapjacking, activity jacking) or confuse the user about what is actually being interacted with (window jacking).
Tapjacking refers to another program intercepting and inspecting touch events that are delivered to your foreground activity (or related artifacts, such as the input method editor). At its worst, tapjackers could intercept passwords, PINs, and other private data.
The term “tapjacking” seems to have been coined by Lookout Mobile Security, in a blog post that originally demonstrated this issue.
You may recall that there are three axes to consider with Android user interfaces. The X and Y axes are the ones you typically think about, as they control the horizontal and vertical positioning of widgets in an activity. The Z axis — effectively “coming out the screen towards the user’s eyes” — can be used in applications for sophisticated techniques, such as a pop-up panel.
Normally, you think of the Z axis within the scope of your activity
and its widgets. However, there are ways to display “system alerts”
– widgets that can float over the top of any activity. A Toast is
the one you are familiar with, most likely. A Toast displays
something on the screen, yet touch events on the Toast itself will
be passed through to the underlying activity. Lookout demonstrated
that it is possible to create a fully-transparent Toast. However,
the lifetime of a Toast is limited (3.5 seconds maximum), which
would limit how long it can try to grab touch events.
However, any application holding the SYSTEM_ALERT_WINDOW permission
can display their own “system alerts” with custom look and custom
duration. By making one that is fully transparent and lives as long
as possible, a tapjacker can obtain touch events for any application
in the system, including lock screens, home screens, and any standard
activity.
On the surface, this might not seem
terribly useful, since the View cannot see what is being tapped upon.
However, a savvy malware author would identify what activity is in the foreground and log that information along with the tap details and the screen size, periodically dumping that information to some server. The malware author can then scan the touch event dumps to see what interesting applications are showing up. With a minor investment – and possibly collaboration with other malware authors — the author can know what touch events correspond to what keys on various input method editors, including the stock keyboards used by a variety of devices. Loading a pirated version of the APK on an emulator can indicate which activity has the password, PIN, or other secure data. Then, it is merely a matter of identifying the touch events applied to that activity and matching them up with the soft keyboard to determine what the user has entered. Over time, the malware author can perhaps develop a script to help automate this conversion.
Hence, the on-device tapjacker does not have to be very sophisticated, other than trying to avoid detection by the user. All of the real work to leverage the intercepted touch events can be handled offline.
In principle, Android 4.0.3 fixed this, by preventing touch events
from being delivered to two separate applications. Either the tapjacking
View gets the touch event (and consumes it), or the tapjacking
View does not get the touch event (and therefore does not know about it).
For Android 2.2 and 2.3 devices, you also have the option of
setFilterTouchesWhenObscured(), which will be examined
later in this chapter.
In August 2014, a number of media outlets reported on a research paper and USENIX conference presentation describing a way by which your users could be tricked into providing confidential information — passwords, credit card information, and such — to a piece of malware, rather than to your app. This flew in the face of conventional wisdom, which said that the tapjacking fixes from Android 4.0.3 cleared up this sort of problem.
The paper points out that there are ways of writing malware such that:
The authors describe it as a UI inference attack; to keep with the theme of this chapter, this section refers to it as “activity jacking”.
The details of how to execute the attack are rather esoteric, using lots of curious approaches to find out when an activity comes onto the screen and, more specifically, which activity of an app being attacked it is. Readers are encouraged to review the paper if you want details of exactly how to execute this sort of attack their way.
However, one simpler way of knowing this stuff is to implement an
AccessibilityService. Officially, such services are supposed to help
with accessibility, such as providing TalkBack-style audio announcements
as the user navigates the UI by touch alone. In practice, a lot of
apps use AccessibilityService to be able to monitor user inputs
across the device and, in some cases, modify those inputs. Some password
managers, for example, implement an AccessibilityService to help them
auto-fill login dialogs. As a result, many users install and enable an
AccessibilityService without really thinking about whether they can
trust that service.
Given that you know when a particular activity appears on the screen, the attack is simple: launch your own activity that looks much like the original. The user might miss the fact that two activities just appeared, then go ahead and interact with your activity, thinking that it is from the real app. For example, you might interpose your own authentication dialog in front of the one for the banking app, thereby getting the user’s PIN or passcode.
You can further take steps to try to “cover your tracks” and deal with the fact that the real activity is waiting for user input:
AccessibiltyService, you can use
performGlobalAction() to initiate a BACK button press, right after
dismissing your own activity, to dismiss the original activity.AlertDialog that says that their password was not
recognized. When the user dismisses that dialog, you also finish()
your intercepting activity, returning the user to the real activity, where
they can complete the real authentication.An activity jack attack has two key weaknesses:
onPause() (and perhaps other lifecycle methods, depending upon the nature
of the attacker).Hence, one defense can be to include in our activity a secure element that cannot be mimicked ahead of time, then hide that element (or our whole UI) when we are no longer in the foreground.
This concept of a secure element is not new. Some financial services Web sites have taken this approach. As part of the user setting up their online banking account, the user chooses an image from a collection of clipart. On the Web page that collects the user’s passphrase, the page also shows this secure element. The user is taught that if they do not see their chosen image, then the Web page they are looking at is not really from their bank, and therefore they should not type in their passphrase.
This is not that hard to implement in Android. You too would allow the user to
choose a piece of clipart, displaying that in an ImageView on your secure
activity in onResume(). In onPause() you would hide that ImageView
via setVisibility(View.INVISIBLE). That way:
As a result, if the user is paying attention, the user should see either the wrong image or no image at all, and the user should realize that they are being activity jacked and therefore fail to proceed.
You might be tempted to do something else in response to your secure activity being replaced in the foreground by another app’s activity, such as pop up a warning dialog. However, there are plenty of valid scenarios when this would occur, such as an incoming phone call, and you have no reliable means of whitelisting all possible valid scenarios. There will be a high incidence of false positives, and that may not help the user. Having this as an user-selectable option is fine, but I would not go this route by default.
Sometimes, the objective of the attacker is not to prevent the user from entering in information, or even to see what the user enters. Sometimes, the objective is to confuse the user, tricking them into clicking on things that they might not want to click on.
A great example of this comes from Android 6.0’s runtime permission system.
Apps with targetSdkVersion of 23 or higher will need to call
requestPermissions() at various points, to ask the user to grant
runtime permissions not previously granted (or granted but later
revoked). That brings up a system-supplied dialog-themed activity:
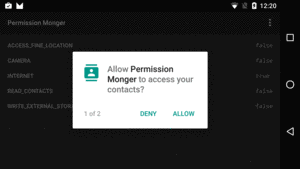
Figure 747: Runtime Permission System Dialog
Perhaps the attacker wants the user to agree to the permission but
fears that the user might deny it instead. The attacker could use
SYSTEM_ALERT_WINDOW to put a View on top of the system dialog,
replacing the real permission explanation with something seemingly
benign. The user — who may not have a lot of Android experience –
clicks “Allow”, where if the user were presented with the real
message, the user might have clicked “Deny”.
Quoting the Android documentation:
Sometimes it is essential that an application be able to verify that an action is being performed with the full knowledge and consent of the user, such as granting a permission request, making a purchase or clicking on an advertisement. Unfortunately, a malicious application could try to spoof the user into performing these actions, unaware, by concealing the intended purpose of the view. As a remedy, the framework offers a touch filtering mechanism that can be used to improve the security of views that provide access to sensitive functionality.
To enable touch filtering, call
setFilterTouchesWhenObscured(boolean)or set theandroid:filterTouchesWhenObscuredlayout attribute to true. When enabled, the framework will discard touches that are received whenever the view’s window is obscured by another visible window. As a result, the view will not receive touches whenever a toast, dialog or other window appears above the view’s window.
For the runtime permission window jacking,
using setFilterTouchesWhenObscured() would prevent the
user from clicking on either the “Allow” or the “Deny” buttons. The
alternative message would be in its own window, floating over the dialog.
Hence, that should cause FLAG_WINDOW_IS_OBSCURED to be set on any
MotionEvents delivered to the dialog, and those touch events would
be dropped.
For example, take a look at the res/layout/main.xml file in the
Tapjacking/RelativeSecure
sample project:
<?xml version="1.0" encoding="utf-8"?>
<RelativeLayout
  xmlns:android="http://schemas.android.com/apk/res/android"
  android:layout_width="match_parent"
  android:layout_height="wrap_content"
  android:filterTouchesWhenObscured="true">
  <TextView android:id="@+id/label"
    android:layout_width="wrap_content"
    android:layout_height="wrap_content"
    android:text="URL:"
    android:layout_alignBaseline="@+id/entry"
    android:layout_alignParentLeft="true"/>
  <EditText
    android:id="@id/entry"
    android:layout_width="match_parent"
    android:layout_height="wrap_content"
    android:layout_toRightOf="@id/label"
    android:layout_alignParentTop="true"/>
  <Button
    android:id="@+id/ok"
    android:layout_width="wrap_content"
    android:layout_height="wrap_content"
    android:layout_below="@id/entry"
    android:layout_alignRight="@id/entry"
    android:text="OK" />
  <Button
    android:id="@+id/cancel"
    android:layout_width="wrap_content"
    android:layout_height="wrap_content"
    android:layout_toLeftOf="@id/ok"
    android:layout_alignTop="@id/ok"
    android:text="Cancel" />
</RelativeLayout>Here, we have android:filterTouchesWhenObscured="true" on the
RelativeLayout at the root of the layout resource. This property
cascades to a container’s children, and so if a tapjacker (or Toast
or whatever) is above any of the widgets in the RelativeLayout,
none of the touch events will be processed.
More fine-grained control can be achieved in custom widgets by
overriding onFilterTouchEventForSecurity(), which gets control
before the regular touch event methods. You can determine if a touch
event had been intercepted by looking for the
FLAG_WINDOW_IS_OBSCURED flag in the MotionEvent passed to
onFilterTouchEventForSecurity(), and you can make the decision of
how to handle this on an event-by-event basis.
According to Iwo Banaś, this approach
may not actually work
due to bugs in Android’s implementation. The filter-when-obscured logic
depends upon a FLAG_WINDOW_IS_OBSCURED value being on the MotionEvent,
and that may be getting lost somewhere along the way.
The author of this book has not yet attempted to replicate Mr. Banaś’ findings.
Google’s focus, besides the fixes listed above, is to make it increasingly difficult for one app to find out when another app is in the foreground. This is a key component of jacking attacks, as the jacker needs to know what is behind it. For example, with window jacking, obscuring the permission message only makes sense when the permission dialog appears — having some floating message appear at other points in time will be a giveaway that something is amiss.
As a result, methods on ActivityManager that used to provide details
of all running processes have been neutered, frequently only providing
details about your own process. Similarly, in Android 7.0, attempts
by apps to find out about other processes through Linux-isms, like
/proc, are being locked down.
By default, your activity’s UI contents can be captured for any number of things:
However, you may have some activities that should not be captured in this fashion, due to potential privacy issues.
For that, you can apply FLAG_SECURE to an Activity:
public class FlagSecureTestActivity extends Activity {
  @Override
  public void onCreate(Bundle savedInstanceState) {
    super.onCreate(savedInstanceState);

    getWindow().setFlags(LayoutParams.FLAG_SECURE,
                         LayoutParams.FLAG_SECURE);

    setContentView(R.layout.main);
  }
}
Call setFlags() before setContentView(), in this case setting
FLAG_SECURE.
In theory, this will prevent any of the aforementioned capture options from working.
Unfortunatately, the Android framework sometimes creates its own
Window instances, such as the drop-down in a Spinner. Even if you
set FLAG_SECURE on the Window for an activity, the Android framework
does not pass that flag to any other windows created on behalf of that
activity, and those windows show up in:
This has been demonstrated to affect:
AutoCompleteTextViewSpinner (both dropdown and dialog modes)ShareActionProviderDialog and subclasses (e.g., AlertDialog)ToastOf these, only the Dialog offers us access to its Window, on which
we could apply FLAG_SECURE, for developers that realize that this is
required.
Google has officially stated that all of this is working as intended.
If you are using FLAG_SECURE, you should thoroughly exercise your app’s
UI on Android 4.4+ while recording a screencast — the Android Studio screen recorder
would be a simple tool to use. Then, play back that screencast, see what
windows show up, and identify those that contain sensitive information
that should not appear. Some of the windows that appear will not contain
sensitive information — here, the risk is that you might add
sensitive information to them in the future but forget about this bug.
Then, you have two main courses of action: rewrite your UI to avoid the UI elements that are leaking this information, or attempt to patch the problem.