
Figure 662: Android 6.0 Default Apps Screen in Settings
Android 6.0 introduced the concept of the device “assistant”. The assistant can be triggered by a long-press of the HOME button or via a spoken phrase (if the user has always-on keyphrase detection) enabled. An assistant is a special app that has access to the content of the foreground activity and other visible windows, much like an accessibility service does.
For the vast majority of users of Google Play ecosystem devices running Android 6.0 or higher, the “assistant” is known as Now On Tap. On some devices, such as the Google Pixel series, this assistant is known simply as the “Google Assistant”. This is marketed as an extension of the Google Now UI, where Now On Tap/Google Assistant will take the data from the foreground activity and use that to find other relevant things for the user to do based upon that data.
(for the purposes of this chapter, this Google-supplied assistant will be referred to as “Now On Tap”, to distinguish Google’s assistant from assistants that others might write using these APIs)
For example, suppose the user receives a text message, suggesting dinner at a particular restaurant. The restaurant is merely named — no URL — and so the text messaging client would just display the name of the restaurant as part of the message. If the user invokes Now On Tap, Google will take the contents of this message (and anything else on the screen), and presumably send it to Google’s servers, sending back things like details about the restaurant (e.g., URL to Web site, Google’s scanned reviews of the restaurant, link to Google Maps for driving directions). Google’s search engine technology would scan the data from the app, recognize that the restaurant name appears to be something significant, and give Now On Tap details of what to offer the user.
As with many things from Google, Now On Tap is very compelling and very much a privacy problem. Now On Tap is automatically installed and enabled on Android 6.0 devices — users have to go through some work to disable it. Users and app developers have limited ability to control Now On Tap, in terms of what data it collects and what it does with that data. On the other hand, certain apps (for which there are no privacy considerations) might wish to provide more data to Now On Tap, beyond what is visible in widgets, to help provide more context for Now On Tap to help users.
In this chapter, we will explore the Assist API, in terms of:
Understanding this chapter requires that you have read the core chapters of this book.
Quite a bit of data is made available to Now On Tap or other assistants through the Assist API alone, as will be explored in this section.
Assistants are welcome to use other APIs
as well, subject to standard Android permissions and such. So, for example,
an app might not show the device’s location, and therefore an assistant
could not get the location from the Assist API, but the assistant could
use LocationManager or the Play Services location API to find out the
device’s location.
There is also a risk of pre-installed assistants using undocumented means of getting at data beyond what the normal Android SDK would allow.
All that being said, assistants will get a lot of information about the currently-visible UI, just from what the Assist API provides.
Assistants can get a screenshot of the current screen contents — minus the status bar — when the user activated the assistant (e.g., long-pressed HOME). Developers can block this for select activities or other windows. Hence, an assistant cannot assume that it will get a screenshot, though frequently it will.
Presumably, the “vision” here is to use computer vision and other image recognition techniques on the screenshot to find things of interest. For example, the user might bring up Now On Tap for some activity that is showing a photo of a monument. The activity might not be showing any other details about the monument, such as its name. However, Google’s servers might well recognize what monument it is and therefore give the user links to Wikipedia pages about the monument, a map of where the monument is located, etc.
By far the largest dump of data that the assistant gets comes in the
form of the view structure. This is represented by a tree
of AssistStructure.ViewNode objects, one per widget or container within
a window. These provide similar information as to what one gets from
the accessibility APIs. For most assistants, the key data is the
text or content description in the widget. In the case of text, this
is available as a CharSequence and so may contain additional information
(e.g., hyperlinks represented in URLSpan objects) beyond the words
visible to the user.
Developers can restrict what widgets and containers are disclosed, but that is something developers have to do explicitly. In other words, making data available to assistants is something a developer has to opt out of, not opt into.
In addition to the view structure and a largely-undocumented Bundle,
the other piece of data supplied to the assistant is the AssistContent.
Here is where an app can provide some additional context about
the foreground activity.
Specifically, the app can provide:
Intent that represents the activity, replacing the Intent
that was used to start the activity, if there is a better one for
long-term use (e.g., the activity was started via a Notification
action and you want to route the user through a different Intent
for other scenarios)Uri that points to some Web page of relevance for this activityBundle
ClipData
Assistants can use this directly (e.g., offer a link to the Uri
supplied in this content) or indirectly (e.g., using the schema.org
JSON to find places where the user can purchase related content).
You may wish to provide some additional information to Now On Tap
or other assistants, such as the Intent or JSON described above.
Or, you may just generally want to ensure that your app provides
the maximum amount of information to these assistants, without necessarily
trying to invent new data to provide.
There are a few options for accomplishing this.
The big one is to ensure that your app provides text or content descriptions for everything visible. This will not only help these assistants, but this will make your app far more accessible to those using TalkBack or other accessibility services.
Mostly, this is a matter of ensuring that your ImageView widgets
and other non-textual widgets have a content description, whether
set via android:contentDescription attributes or by
setContentDescription() in Java. TextView and its subclasses
automatically use their text as the content description; EditText
will use the hint if there is no text in the field at the moment.
More advice regarding accessibility can be found in the chapter on accessibility and focus management.
Beyond that, you can contribute to the AssistContent (where the
Intent, Uri, and JSON live) and other assist-related information
for a given invocation of the assistant by the user.
You have a few options of where to place this logic: in one spot globally, on a per-activity basis, and, for custom views, on a per-view basis.
You can call registerOnProvideAssistDataListener() on the global
Application object (retrieved by calling getApplicationContext()
on some other Context, like your Activity). This takes an
OnProvideAssistDataListener implementation, which in turn provides
an onProvideAssistData() implementation, that will be called when
the assistant is requested. You are passed the Activity of yours
that is in the foreground, along with a Bundle that you can fill in.
However, the documentation only says that the Bundle will go into
the EXTRA_ASSIST_CONTEXT extra on the Intent that invokes
the assistant. What that Bundle is supposed to contain is undocumented.
Your primary hooks for customizing the assist data come in the form of
two callbacks on your Activity subclasses: onProvideAssistData()
and onProvideAssistContent().
onProvideAssistData() is given the same Bundle that is given to
the OnProvideAssistDataListener on a global basis. However, it is
unclear what goes in that Bundle, and the contents of that Bundle
do not appear to make it to the assistant, at least through the documented
Assist API.
onProvideAssistContent(), though, is more relevant.
The
Assist/MoAssist
sample project is another version of the ViewPager-of-editors sample seen elsewhere
in the book.
The clone overrides
onProvideAssistData() and onProvideAssistContent():
  @Override
  public void onProvideAssistData(Bundle data) {
    super.onProvideAssistData(data);

    data.putInt("random-value", new SecureRandom().nextInt());
  }

  @TargetApi(23)
  @Override
  public void onProvideAssistContent(AssistContent outContent) {
    super.onProvideAssistContent(outContent);

    outContent.setWebUri(Uri.parse("https://commonsware.com"));

    try {
      JSONObject json=new JSONObject()
        .put("@type", "Book")
        .put("author", "https://commonsware.com/mmurphy")
        .put("publisher", "CommonsWare, LLC")
        .put("name", "The Busy Coder's Guide to Android Development");

      outContent.setStructuredData(json.toString());
    }
    catch (JSONException e) {
      Log.e(getClass().getSimpleName(),
        "Um, what happened here?", e);
    }
  }
The onProvideAssistData() simply puts a random number into the
Bundle. That random number does not appear anywhere in
the data collected by an assistant.
onProvideAssistContent() fills in two items in the AssistContent:
Book structure,
with metadata about this bookThis information is supplied to assistants and can be used by them to do something useful, such as offer links for the user to click on to visit the sites.
If you are implementing your own custom views, particularly those
that render their own text using low-level Canvas APIs, you may
wish to override onProvideStructure() and/or
onProvideVirtualStructure(). These will be called on your widgets
to provide the AssistStructure.ViewNode details to be passed to the
assistant.
However, in all likelihood, you would want to instead work with the
accessibility APIs to publish data to be used by accessibility services,
such as the text that you are rendering. If you do that, the default
implementations of onProvideStructure() and
onProvideVirtualStructure() should suffice.
While some developers may embrace Now On Tap, others may specifically want to prevent Now On Tap or other assistants from “spying” on application data. You have a few options for controlling what is provided to assistants; however, all require work and some have side effects. For example, there is nothing in the manifest that you can specify to make your activities opt out of providing assist data.
The standard approach for making private activities really private
is to use FLAG_SECURE:
public class FlagSecureTestActivity extends Activity {
  @Override
  public void onCreate(Bundle savedInstanceState) {
    super.onCreate(savedInstanceState);

    getWindow().setFlags(LayoutParams.FLAG_SECURE,
                         LayoutParams.FLAG_SECURE);

    setContentView(R.layout.main);
  }
}
Call setFlags() before setContentView(), in this case setting
FLAG_SECURE.
The classic effect of FLAG_SECURE is to block screenshots, both
user-initiated ones and system-initiated ones (e.g., the screenshots
used in the overview/recent-tasks screen on Android 4.0+).
If the user triggers an assistant for a secure activity, the assistant will not get the full view structure (i.e., no widgets and no text) and will not get a screenshot.
An EditText that is set up as a password field will have its text
blocked from the view structure. The widget will be listed, but its
text will be null.
Presumably, this relies on the EditText using a PasswordTransformationMethod,
as that is Android’s typical approach for determining whether or not
an EditText is deemed to be secure. If you have implemented your
own TransformationMethod (e.g., with a different approach for shrouding
the user input), either have it extend PasswordTransformationMethod
or use other approaches to prevent this field’s contents from being
published to assistants.
The apparently-official way to block a widget or container from
participating in the assist API is to create a subclass of it
and override dispatchProvideStructure(). The stock implementation
of this triggers the calls to onProvideStructure() and
onProvideVirtualStructure(). Plus, for a ViewGroup, it will
iterate over the children and call dispatchProvideStructure() on each
of them.
If you are creating your own custom view, and you want it eliminated
from the view structure, just override dispatchProvideStructure()
and have it do nothing.
Or, you can create a container that is there solely to block the
assist data collection. The
Assist/NoAssist
sample project does this, in the form of a NoAssistFrameLayout:
package com.commonsware.android.assist.no;

import android.annotation.TargetApi;
import android.content.Context;
import android.os.Build;
import android.util.AttributeSet;
import android.view.ViewStructure;
import android.widget.FrameLayout;

public class NoAssistFrameLayout extends FrameLayout {
  public NoAssistFrameLayout(Context context) {
    super(context);
  }

  public NoAssistFrameLayout(Context context,
                             AttributeSet attrs) {
    super(context, attrs);
  }

  public NoAssistFrameLayout(Context context,
                             AttributeSet attrs,
                             int defStyleAttr) {
    super(context, attrs, defStyleAttr);
  }

  @TargetApi(Build.VERSION_CODES.LOLLIPOP)
  public NoAssistFrameLayout(Context context,
                             AttributeSet attrs,
                             int defStyleAttr,
                             int defStyleRes) {
    super(context, attrs, defStyleAttr, defStyleRes);
  }

  @Override
  public void dispatchProvideStructure(ViewStructure structure) {
    // no, thanks
  }
}
EditorFragment — responsible for showing a large multi-line EditText
for the user to type into — will conditionally use a NoAssistFrameLayout,
specifically on the third tab (a ViewPager position of 2):
  @Override
  public View onCreateView(LayoutInflater inflater,
                           ViewGroup container,
                           Bundle savedInstanceState) {
    int position=getArguments().getInt(KEY_POSITION, -1);
    View result;

    if (position==2) {
      ViewGroup doctorNo=new NoAssistFrameLayout(getActivity());
      inflater.inflate(R.layout.editor, doctorNo);
      result=doctorNo;
    }
    else {
      result=inflater.inflate(R.layout.editor, container, false);
    }

    EditText editor=result.findViewById(R.id.editor);

    editor.setHint(getTitle(getActivity(), position));

    if (position==1) {
      editor.
        setTransformationMethod(PasswordTransformationMethod.
          getInstance());
    }

    return(result);
  }
If we are on the third tab, we create a NoAssistFrameLayout and inflate
our EditText into it. Otherwise, we inflate the layout normally.
Note that this sample also applies a PasswordTransformationMethod for
the second page of the ViewPager (a position of 1), to illustrate
the null text that will be recorded as a result.
It is possible that your reaction to all of this is that you want to opt out of Now On Tap as a user. Or, perhaps you want to provide some instructions to your users on how to opt out of Now On Tap.
Go to Settings > Apps. There should be an option for advanced app configuration actions (on Nexus-series devices, this is a gear icon in the action bar). Tap that, then choose “Default Apps” to bring up categories of default apps for various actions:
Figure 662: Android 6.0 Default Apps Screen in Settings
In there, tap on “Assist & voice input”. By default, you should see “Google App” as the chosen option, which means that Now On Tap is active:
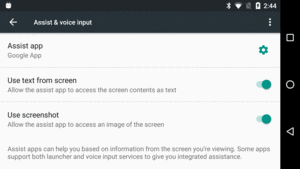
Figure 663: Android 6.0 Assist & Voice Input Screen in Settings
Tapping on that entry will bring up a list of available options, including “None”:
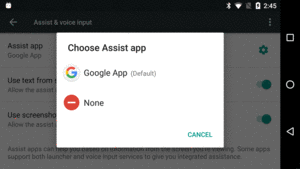
Figure 664: Android 6.0 Assist & Voice Input Options in Settings
While Now On Tap is pre-installed and pre-activated, and while users
can disable Now On Tap, another option for users is to activate some
other assistant. Any app that implements the proper pieces of the
Assist API will appear in the roster of available assistants for the user
to choose from, as described in the previous section.
The
Assist/AssistLogger
sample project represents one such app.
Primarily, this app is for diagnostic purposes, showing you exactly what your activity is “leaking” to assistants. It was essential in figuring out how the APIs shown in earlier examples in this chapter worked, for instance. However, it also serves as a demonstration of the minimum requirements to implement an assistant in general.
Creating an assistant is technically part of a larger bit of work on handling voice interactions in Android. However, if all you want is an assistant, you can ignore the voice-related bits.
Some of what is needed to set up an assistant is some boilerplate.
For example, the entry point for assistants and voice interactions
is a custom subclass of VoiceInteractionService. If you only are concerned
with implementing an assistant, your VoiceInteractionService can be
empty:
package com.commonsware.android.assist.logger;

import android.service.voice.VoiceInteractionService;

public class AssistLoggerService extends VoiceInteractionService {
}However, it needs to exist, and in particular it needs to have its
<service> entry in your manifest:
    <service
      android:name=".AssistLoggerService"
      android:permission="android.permission.BIND_VOICE_INTERACTION">
      <meta-data
        android:name="android.voice_interaction"
        android:resource="@xml/assist_service"/>
      <intent-filter>
        <action android:name="android.service.voice.VoiceInteractionService"/>
      </intent-filter>
    </service>
The keys to the manifest entry are:
android:permission attribute, limiting it
clients that hold the BIND_VOICE_INTERACTION permission, which should
limit clients to those that are part of the device firmware<intent-filter> advertising that it supports the
android.service.voice.VoiceInteractionService action stringandroid.voice_interaction <meta-data> element, pointing
to an XML resource that further configures the voice interaction/assistant
implementationThe sample project has that metadata in res/xml/assist_service.xml:
<voice-interaction-service
  xmlns:android="http://schemas.android.com/apk/res/android"
  android:recognitionService="com.commonsware.android.assist.logger.AssistLoggerService"
  android:sessionService="com.commonsware.android.assist.logger.AssistLoggerSessionService"
  android:supportsAssist="true"/>

<!--
  android:settingsActivity="com.android.test.voiceinteraction.SettingsActivity"
-->There are three attributes required on the <voice-interaction-service>
root element to enable an assistant:
android:recognitionService points back to your VoiceInteractionService
subclassandroid:sessionService points to a subclass of VoiceInteractionSessionService
(we will examine the project’s implementation shortly)android:supportsAssist should be true
If you want, you can also have an android:settingsActivity attribute,
shown in this XML as a commented-out snippet at the end of the file.
This can point to an activity in your app. If you have this, a gear icon
will appear on the “Assist & voice input” Settings screen that, when tapped,
will bring up this activity, to configure the behavior of your assistant.
The sample app skips this.
The service pointed to by android:sessionService in the metadata needs
to be a subclass of VoiceInteractionSessionService. The only method
that you need to override is onNewSession(), where you can return
an instance of a VoiceInteractionSession:
package com.commonsware.android.assist.logger;

import android.os.Bundle;
import android.service.voice.VoiceInteractionSession;
import android.service.voice.VoiceInteractionSessionService;

public class AssistLoggerSessionService extends
  VoiceInteractionSessionService {
  @Override
  public VoiceInteractionSession onNewSession(Bundle args) {
    return(new AssistLoggerSession(this));
  }
}
Here, we return an instance of AssistLoggerSession, which is where
all of our real business logic resides for our assistant.
Note that this service also should use
android:permission to limit clients to those that hold the
android.permission.BIND_VOICE_INTERACTION permission:
    <service
      android:name=".AssistLoggerSessionService"
      android:permission="android.permission.BIND_VOICE_INTERACTION"/>
VoiceInteractionSession has a lot of methods that you can override,
both for voice interactions and for assistant invocations. The sample
app overrides the minimum required for an assistant, as its mission
simply is to log all of the data received by our assistant to files
on external storage, for diagnostic purposes.
NOTE: Running this sample app on hardware that is actually used with private data is stupid beyond words. Any app can then read the files on external storage and see what information is published by whatever apps are in the foreground at the times when you invoke the assistant. Please use this only on test environments.
Akin to components, a VoiceInteractionSession has an onCreate() method,
called as part of setting up the session. In there, AssistLoggerSession
sets up an output directory for logging the results, assuming that external
storage is available:
  @Override
  public void onCreate() {
    super.onCreate();

    if (Environment.MEDIA_MOUNTED
      .equals(Environment.getExternalStorageState())) {
      String logDirName=
        "assistlogger_"+
          new SimpleDateFormat("yyyyMMdd'-'HHmmss").format(new Date());

      logDir=
        new File(getContext().getExternalCacheDir(), logDirName);
      logDir.mkdirs();
    }
  }
If the user invokes your assistant, you will be called with onHandleScreenshot().
Usually, you will be passed a Bitmap that contains the screenshot.
However, if the foreground activity is using FLAG_SECURE, the Bitmap
that is passed to you will be null, so make sure you check it before
doing anything with it.
The AssistLoggerSession forks a ScreenshotThread to save this screenshot
in the background:
  @Override
  public void onHandleScreenshot(Bitmap screenshot) {
    super.onHandleScreenshot(screenshot);

    if (screenshot!=null) {
      new ScreenshotThread(getContext(), logDir, screenshot).start();
    }
  }
ScreenshotThread, in turn, just uses compress() on Bitmap
to write the image out as a PNG to the directory that we are using for
logging:
  private static class ScreenshotThread extends Thread {
    private final File logDir;
    private final Bitmap screenshot;
    private final Context ctxt;

    ScreenshotThread(Context ctxt, File logDir, Bitmap screenshot) {
      this.ctxt=ctxt.getApplicationContext();
      this.logDir=logDir;
      this.screenshot=screenshot;
    }

    @Override
    public void run() {
      if (logDir!=null) {
        try {
          File f=new File(logDir, "screenshot.png");
          FileOutputStream fos=new FileOutputStream(f);

          screenshot.compress(Bitmap.CompressFormat.PNG, 100, fos);
          fos.flush();
          fos.getFD().sync();
          fos.close();

          MediaScannerConnection
            .scanFile(ctxt,
              new String[] {f.getAbsolutePath()},
              new String[] {"image/png"}, null);

          Log.d(getClass().getSimpleName(),
            "screenshot written to: "+f.getAbsolutePath());
        }
        catch (IOException e) {
          Log.e(getClass().getSimpleName(),
            "Exception writing out screenshot", e);
        }
      }
      else {
        Log.d(getClass().getSimpleName(),
          String.format("onHandleScreenshot: %dx%d",
            screenshot.getWidth(), screenshot.getHeight()));
      }
    }
  }
onHandleAssist() is your other main assistant callback. Here is where you
get:
Bundle of undocumented stuffAssistStructure outlining the contents of the windows, including
the view hierarchyAssistContent with the Intent, Web Uri, JSON, and so onAssistLoggerSession kicks off an AssistDumpThread to record this data
in the background:
  @Override
  public void onHandleAssist(Bundle data,
                             AssistStructure structure,
                             AssistContent content) {
    super.onHandleAssist(data, structure, content);

    new AssistDumpThread(getContext(), logDir, data, structure,
      content).start();
  }
AssistDumpThread itself is a long class that generates
a JSON file containing the information found in the parameters to
onHandleAssist():
package com.commonsware.android.assist.logger;

import android.app.assist.AssistContent;
import android.app.assist.AssistStructure;
import android.content.Context;
import android.content.Intent;
import android.media.MediaScannerConnection;
import android.os.Bundle;
import android.util.Log;
import org.json.JSONArray;
import org.json.JSONException;
import org.json.JSONObject;
import java.io.File;
import java.io.FileOutputStream;
import java.io.OutputStreamWriter;
import java.io.PrintWriter;
import java.util.Set;

class AssistDumpThread extends Thread {
  private final File logDir;
  private final Bundle data;
  private final AssistStructure structure;
  private final AssistContent content;
  private final Context ctxt;

  AssistDumpThread(Context ctxt, File logDir, Bundle data,
                   AssistStructure structure,
                   AssistContent content) {
    this.ctxt=ctxt.getApplicationContext();
    this.logDir=logDir;
    this.data=data;
    this.structure=structure;
    this.content=content;
  }

  @Override
  public void run() {
    if (logDir!=null) {
      JSONObject json=new JSONObject();

      try {
        json.put("data", dumpBundle(data, new JSONObject()));
      }
      catch (JSONException e) {
        Log.e(getClass().getSimpleName(),
          "Exception saving data", e);
      }

      try {
        json.put("content", dumpContent(new JSONObject()));
      }
      catch (JSONException e) {
        Log.e(getClass().getSimpleName(),
          "Exception saving content", e);
      }

      try {
        json.put("structure", dumpStructure(new JSONObject()));
      }
      catch (JSONException e) {
        Log.e(getClass().getSimpleName(),
          "Exception saving structure", e);
      }

      File f=new File(logDir, "assist.json");

      try {
        FileOutputStream fos=new FileOutputStream(f);
        OutputStreamWriter osw=new OutputStreamWriter(fos);
        PrintWriter pw=new PrintWriter(osw);

        pw.print(json.toString(2));
        pw.flush();
        fos.getFD().sync();
        fos.close();

        MediaScannerConnection
          .scanFile(ctxt,
            new String[] {f.getAbsolutePath()},
            new String[] {"application/json"}, null);

        Log.d(getClass().getSimpleName(),
          "assist data written to: "+f.getAbsolutePath());
      }
      catch (Exception e) {
        Log.e(getClass().getSimpleName(),
          "Exception writing out assist data", e);
      }
    }
    else {
      Log.d(getClass().getSimpleName(), "onHandleAssist");
    }
  }

  JSONObject dumpBundle(Bundle b, JSONObject json)
    throws JSONException {
    Set<String> keys=b.keySet();

    for (String key : keys) {
      json.put(key, wrap(b.get(key)));
    }

    return (json);
  }

  private JSONObject dumpContent(JSONObject json)
    throws JSONException {
    JSONObject extras=new JSONObject();

    if (content.getExtras()!=null) {
      json.put("extras", extras);
      dumpBundle(content.getExtras(), extras);
    }

    if (content.getIntent()!=null) {
      json.put("intent",
        content.getIntent().toUri(Intent.URI_INTENT_SCHEME));
    }

    json.put("structuredData",
      wrap(content.getStructuredData()));
    json.put("webUri", wrap(content.getWebUri()));

    return (json);
  }

  private JSONObject dumpStructure(JSONObject json)
    throws JSONException {
    return (json.put("windows",
      dumpStructureWindows(new JSONArray())));
  }

  private JSONArray dumpStructureWindows(JSONArray windows)
    throws JSONException {
    for (int i=0; i<structure.getWindowNodeCount(); i++) {
      windows.put(
        dumpStructureWindow(structure.getWindowNodeAt(i),
          new JSONObject()));
    }

    return (windows);
  }

  private JSONObject dumpStructureWindow(
    AssistStructure.WindowNode window,
    JSONObject json)
    throws JSONException {
    json.put("displayId", wrap(window.getDisplayId()));
    json.put("height", wrap(window.getHeight()));
    json.put("left", wrap(window.getLeft()));
    json.put("title", wrap(window.getTitle()));
    json.put("top", wrap(window.getTop()));
    json.put("width", wrap(window.getWidth()));
    json.put("root",
      dumpStructureNode(window.getRootViewNode(),
        new JSONObject()));

    return (json);
  }

  private JSONObject dumpStructureNode(
    AssistStructure.ViewNode node,
    JSONObject json)
    throws JSONException {
    json.put("accessibilityFocused",
      wrap(node.isAccessibilityFocused()));
    json.put("activated", wrap(node.isActivated()));
    json.put("alpha", wrap(node.getAlpha()));
    json.put("assistBlocked", wrap(node.isAssistBlocked()));
    json.put("checkable", wrap(node.isCheckable()));
    json.put("checked", wrap(node.isChecked()));
    json.put("className", wrap(node.getClassName()));
    json.put("clickable", wrap(node.isClickable()));
    json.put("contentDescription",
      wrap(node.getContentDescription()));
    json.put("contextClickable",
      wrap(node.isContextClickable()));
    json.put("elevation", wrap(node.getElevation()));
    json.put("enabled", wrap(node.isEnabled()));

    if (node.getExtras()!=null) {
      json.put("extras", dumpBundle(node.getExtras(),
        new JSONObject()));
    }

    json.put("focusable", wrap(node.isFocusable()));
    json.put("focused", wrap(node.isFocused()));
    json.put("height", wrap(node.getHeight()));
    json.put("hint", wrap(node.getHint()));
    json.put("id", wrap(node.getId()));
    json.put("idEntry", wrap(node.getIdEntry()));
    json.put("idPackage", wrap(node.getIdPackage()));
    json.put("idType", wrap(node.getIdType()));
    json.put("left", wrap(node.getLeft()));
    json.put("longClickable", wrap(node.isLongClickable()));
    json.put("scrollX", wrap(node.getScrollX()));
    json.put("scrollY", wrap(node.getScrollY()));
    json.put("isSelected", wrap(node.isSelected()));
    json.put("text", wrap(node.getText()));
    json.put("textBackgroundColor",
      wrap(node.getTextBackgroundColor()));
    json.put("textColor", wrap(node.getTextColor()));
    json.put("textLineBaselines",
      wrap(node.getTextLineBaselines()));
    json.put("textLineCharOffsets",
      wrap(node.getTextLineCharOffsets()));
    json.put("textSelectionEnd",
      wrap(node.getTextSelectionEnd()));
    json.put("textSelectionStart",
      wrap(node.getTextSelectionStart()));
    json.put("textSize", wrap(node.getTextSize()));
    json.put("textStyle", wrap(node.getTextStyle()));
    json.put("top", wrap(node.getTop()));
    json.put("transformation",
      wrap(node.getTransformation()));
    json.put("visibility", wrap(node.getVisibility()));
    json.put("width", wrap(node.getWidth()));

    json.put("children",
      dumpStructureNodes(node, new JSONArray()));

    return (json);
  }

  private JSONArray dumpStructureNodes(
    AssistStructure.ViewNode node,
    JSONArray children) throws JSONException {
    for (int i=0; i<node.getChildCount(); i++) {
      children.put(dumpStructureNode(node.getChildAt(i),
        new JSONObject()));
    }

    return (children);
  }

  private Object wrap(Object thingy) {
    if (thingy instanceof CharSequence) {
      return (JSONObject.wrap(thingy.toString()));
    }

    return (JSONObject.wrap(thingy));
  }
}
AssistLogger is a faithful implementation of an assistant, but it does
not really assist the user, except in seeing what sorts of information
Google gets via Now On Tap.
If you wanted to make an actual assistant that is a true replacement for Now On Tap, you would also need to implement methods like:
onCreateContentView(), where you can inflate a layout or otherwise
assemble the basic UI to be shown to the user when your assistant
is invokedonShow(), where you can populate that UI with the details for this
particular assist requestonHide(), called when your UI is no longer visible to the user…and so on.
If you elect to create your own assistant, you might be interested in knowing whether or not your app has been chosen as the user’s assistant. Unfortunately, there is no documented and supported means of doing this.
So, here is the undocumented and unsupported approach that works on Android 6.0.
WARNING: this code may not work on all Android 6.0 devices, let alone on future versions of Android, as it relies a bit on internal implementation that could be changed by device manufacturers or custom ROM authors. Please use this very carefully and do not be shocked if it stops working.
Settings.Secure holds the details of the currently-chosen assistant.
However, the key under which those details are stored is a hidden
entry in Settings.Secure, and so it does not show up in the Android
SDK. The key is "voice_interaction_service". The value is the
ComponentName of the assistant, serialized (or “flattened”) into a
String. So, to get the ComponentName of the assistant, you can use:
String assistant=
  Settings.Secure.getString(getContentResolver(),
    "voice_interaction_service");

boolean areWeGood=false;

if (assistant!=null) {
  ComponentName cn=ComponentName.unflattenFromString(assistant);
}
cn will then hold the ComponentName.
If you implement your own assistant, and at the moment you are not the user’s chosen assistant, you might have the need to lead the user over to the spot in the Settings app where they can change this. Once again, this is not explicitly documented.
However, for Android 6.0, Settings.ACTION_VOICE_INPUT_SETTINGS
contains the action string that opens up the screen where the user
can choose their assistant implementation. So, you could call:
startActivity(new Intent(Settings.ACTION_VOICE_INPUT_SETTINGS));
to lead the user to that screen, plus use a Toast or something to
remind the user to tap on the “Assist app” entry to choose the assistant.
However:
Settings.ACTION_VOICE_INPUT_SETTINGS is not guaranteed to
be on all devices, please wrap the startActivity() call in an
ActivityNotFoundException try/catch block and deal with the
missing action accordinglySettings.ACTION_VOICE_INPUT_SETTINGS
will lead the user to the correct screen on all Android 6.0+ devices,
as the Settings app might be altered by the device manufacturer or
custom ROM author